Decision tables are a "precise yet compact" (ref. Wikipedia) way of representing conditional logic, and are well suited to business level rules.
Drools supports managing rules in a spreadsheet format. Supported formats are Excel (XLS), and CSV, which means that a variety of spreadsheet programs (such as Microsoft Excel, OpenOffice.org Calc amongst others) can be utilized. It is expected that web based decision table editors will be included in a near future release.
Decision tables are an old concept (in software terms) but have proven useful over the years. Very briefly speaking, in Drools decision tables are a way to generate rules driven from the data entered into a spreadsheet. All the usual features of a spreadsheet for data capture and manipulation can be taken advantage of.
Consider decision tables as a course of action if rules exist that can be expressed as rule templates and data: each row of a decision table provides data that is combined with a template to generate a rule.
Many businesses already use spreadsheets for managing data, calculations, etc. If you are happy to continue
this way, you can also manage your business rules this way. This also assumes you are happy to manage packages of
rules in .xls or .csv files. Decision tables are not recommended for rules
that do not follow a set of templates, or where there are a small number of rules (or if there is a dislike towards
software like Excel or OpenOffice.org). They are ideal in the sense that there can be control over what
parameters of rules can be edited, without exposing the rules directly.
Decision tables also provide a degree of insulation from the underlying object model.
Here are some examples of real world decision tables (slightly edited to protect the innocent).
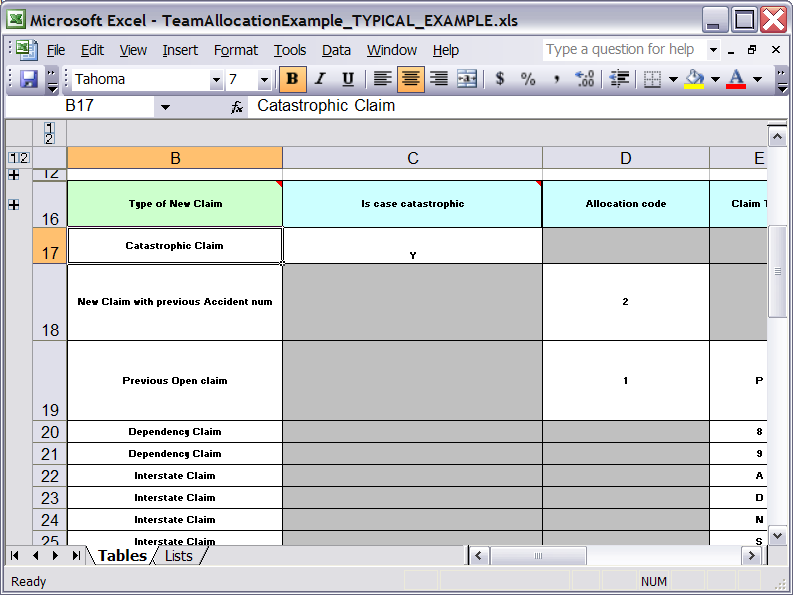

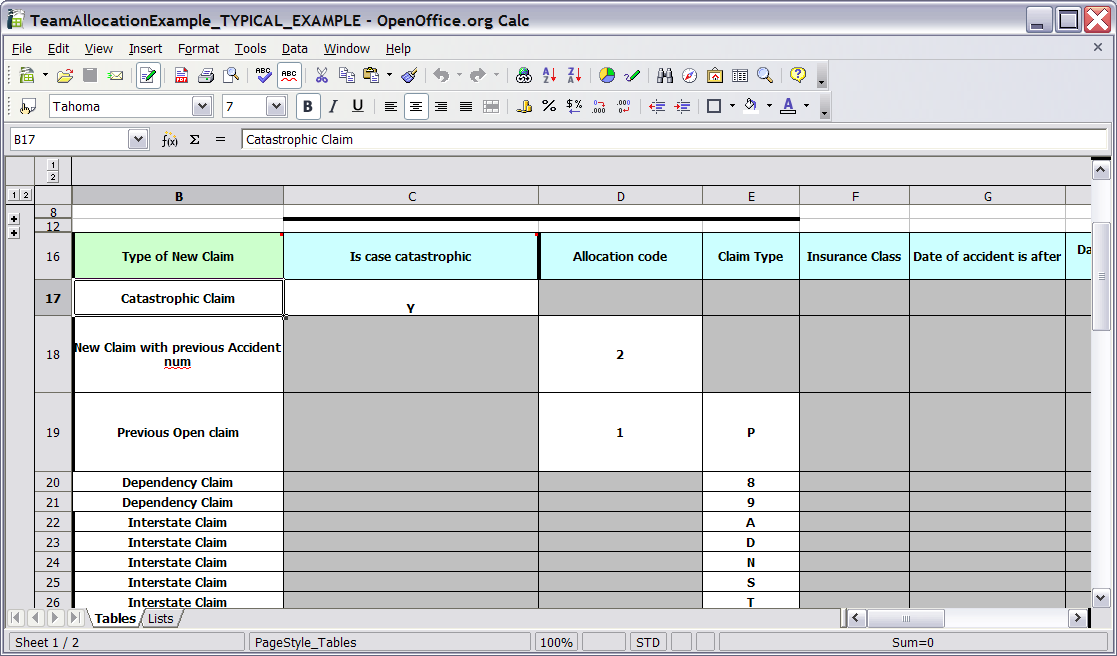
In the above examples, the technical aspects of the decision table have been collapsed away (using a standard spreadsheet feature).
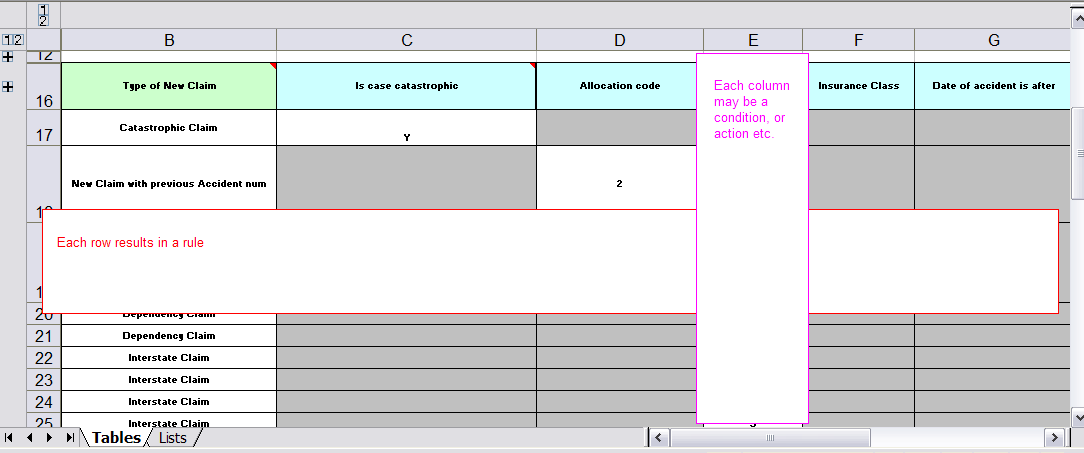
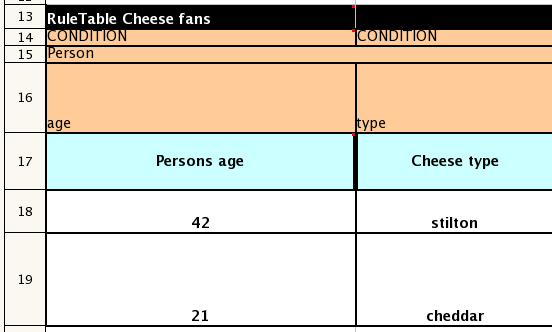
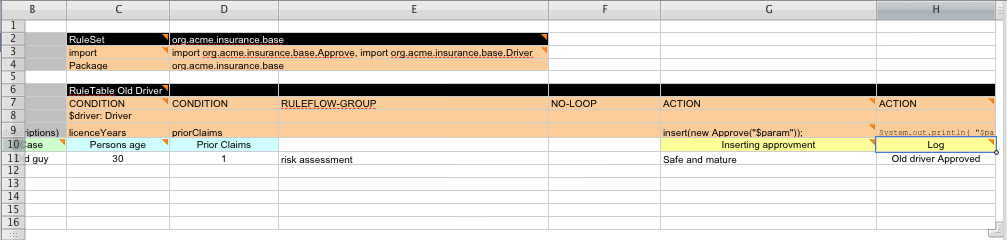
The rules start from row 17, with each row resulting in a rule. The conditions are in columns C, D, E, etc., the actions being off-screen. The values in the cells are quite simple, and their meaning is indicated by the headers in Row 16. Column B is just a description. It is customary to use color to make it obvious what the different areas of the table mean.
Note
Note that although the decision tables look like they process top down, this is not necessarily the case. Ideally, rules are authored without regard for the order of rows, simply because this makes maintenance easier, as rows will not need to be shifted around all the time.
As each row is a rule, the same principles apply. As the rule engine processes the facts, any rules that match may fire. (Some people are confused by this. It is possible to clear the agenda when a rule fires and simulate a very simple decision table where only the first match effects an action.) Also note that you can have multiple tables on one spreadsheet. This way, rules can be grouped where they share common templates, yet at the end of the day they are all combined into one rule package. Decision tables are essentially a tool to generate DRL rules automatically.
The key point to keep in mind is that in a decision table each row is a rule, and each column in that row is either a condition or action for that rule.
The spreadsheet looks for the RuleTable keyword to indicate the start of a rule table (both the starting row and column). Other keywords are also used to define other package level attributes (covered later). It is important to keep the keywords in one column. By convention the second column ("B") is used for this, but it can be any column (convention is to leave a margin on the left for notes). In the following diagram, C is actually the column where it starts. Everything to the left of this is ignored.
If we expand the hidden sections, it starts to make more sense how it works; note the keywords in column C.
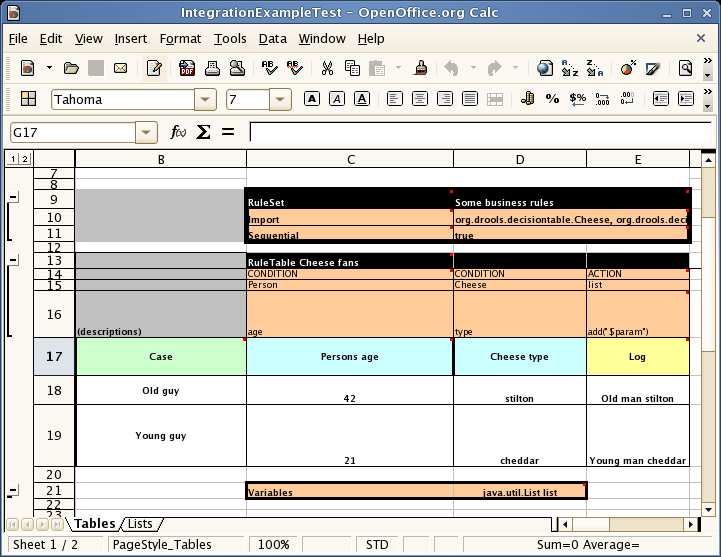
Now the hidden magic which makes it work can be seen. The RuleSet keyword indicates the name to be used in the rule package that will encompass all the rules. This name is optional, using a default, but it must have the RuleSet keyword in the cell immediately to the right.
The other keywords visible in Column C are Import and Sequential which will be covered later. The RuleTable keyword is important as it indicates that a chunk of rules will follow, based on some rule templates. After the RuleTable keyword there is a name, used to prefix the names of the generated rules. The row numbers are appended to guarantee unique rule names. The column of RuleTable indicates the column in which the rules start; columns to the left are ignored.
Note
In general the keywords make up name-value pairs.
Referring to row 14 (the row immediately after RuleTable), the keywords CONDITION and ACTION indicate that the data in the columns below are for either the LHS or the RHS parts of a rule. There are other attributes on the rule which can also be optionally set this way.
Row 15 contains declarations of ObjectTypes. The content in this row is optional, but
if this option is not in use, the row must be left blank; however this option is usually found to be quite useful.
When using this row, the values in the cells below (row 16) become constraints on that object type. In the above
case, it generates Person(age=="42") and Cheese(type=="stilton"), where 42 and
"stilton" come from row 18. In the above example, the "==" is implicit; if just a field name is given the
translator assumes that it is to generate an exact match.
Note
An ObjectType declaration can span columns (via merged cells), meaning that all columns below the merged range are to be combined into one set of constraints within a single pattern matching a single fact at a time, as opposed to non-merged cells containing the same ObjectType, but resulting in different patterns, potentially matching different or identical facts.
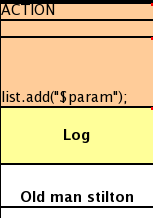
Row 16 contains the rule templates themselves. They can use the "$param" placeholder to indicate where data from the cells below should be interpolated. (For multiple insertions, use "$1", "$2", etc., indicating parameters from a comma-separated list in a cell below.) Row 17 is ignored; it may contain textual descriptions of the column's purpose.
Rows 18 and 19 show data, which will be combined (interpolated) with the templates in row 15, to generate rules. If a cell contains no data, then its template is ignored. (This would mean that some condition or action does not apply for that rule row.) Rule rows are read until there is a blank row. Multiple RuleTables can exsist in a sheet. Row 20 contains another keyword, and a value. The row positions of keywords like this do not matter (most people put them at the top) but their column should be the same one where the RuleTable or RuleSet keywords should appear. In our case column C has been chosen to be significant, but any other column could be used instead.
In the above example, rules would be rendered like the following (as it uses the "ObjectType" row):
//row 18
rule "Cheese_fans_18"
when
    Person(age=="42")
    Cheese(type=="stilton")
then
    list.add("Old man stilton");
end
Note
The constraints age=="42" and type=="stilton" are interpreted as single
constraints, to be added to the respective ObjectType in the cell above. If the cells above were spanned, then
there could be multiple constraints on one "column".
There are two types of rectangular areas defining data that is used for generating a DRL file.
One, marked by a cell labelled RuleSet, defines all DRL items except rules. The
other one may occur repeatedly and is to the right and below a cell whose contents begin with
RuleTable. These areas represent the actual decision tables, each area resulting
in a set of rules of similar structure.
A Rule Set area may contain cell pairs, one below the RuleSet cell and containing
a keyword designating the kind of value contained in the other one that follows in the same row.
The columns of a Rule Table area define patterns and constraints for the left hand sides of
the rules derived from it, actions for the consequences of the rules, and the values of
individual rule attributes. Thus, a Rule Table area should contain one or more columns, both for
conditions and actions, and an arbitrary selection of columns for rule attributes, at most one
column for each of these. The first four rows following the row with the cell marked with
RuleTable are earmarked as header area, mostly used for the definition of code to
construct the rules. It is any additional row below these four header rows that spawns another
rule, with its data providing for variations in the code defined in the Rule Table header.
All keywords are case insensitive.
Only the first worksheet is examined for decision tables.
Entries in a Rule Set area may define DRL constructs (except rules), and specify rule attributes. While entries for constructs may be used repeatedly, each rule attribute may be given at most once, and it applies to all rules unless it is overruled by the same attribute being defined within the Rule Table area.
Entries must be given in a vertically stacked sequence of cell pairs. The first one
contains a keyword and the one to its right the value, as shown in the table below.
This sequence of cell pairs may be interrupted by blank rows or even a Rule Table, as long
as the column marked by RuleSet is upheld as the one containing the keyword.
Table 6.1. Entries in the Rule Set area
| Keyword | Value | Usage |
|---|---|---|
| RuleSet | The package name for the generated DRL file.
Optional, the default is rule_table. | Must be First entry. |
| Sequential | "true" or "false". If "true", then salience is used to ensure that rules fire from the top down. | Optional, at most once. If omitted, no firing order is imposed. |
| Import | A comma-separated list of Java classes to import. | Optional, may be used repeatedly. |
| Variables | Declarations of DRL globals, i.e., a type followed by a variable name. Multiple global definitions must be separated with a comma. | Optional, may be used repeatedly. |
| Functions | One or more function definitions, according to DRL syntax. | Optional, may be used repeatedly. |
| Queries | One or more query definitions, according to DRL syntax. | Optional, may be used repeatedly. |
For defining rule attributes that apply to all rules in the generated DRL file you can use any of the entries in the following table. Notice, however, that the proper keyword must be used. Also, each of these attributes may be used only once.
Table 6.2. Rule attribute entries in the Rule Set area
| Keyword | Initial | Value |
|---|---|---|
| PRIORITY | P | An integer defining the "salience" value for the rule. Overriden by the "Sequential" flag. |
| DURATION | D | A long integer value defining the "duration" value for the rule. |
| NO-LOOP | U | A Boolean value. "true" inhibits looping of rules due to changes made by its consequence. |
| LOCK-ON-ACTIVE | L | A Boolean value. "true" inhibits additional activations of all rules with this flag set within the same ruleflow or agenda group. |
| AUTO-FOCUS | F | A Boolean value. "true" for a rule within an agenda group causes activations of the rule to automatically give the focus to the group. |
| ACTIVATION-GROUP | X | A string identifying an activation (or XOR) group. Only one rule within an activation group will fire, i.e., the first one to fire cancels any existing activations of other rules within the same group. |
| AGENDA-GROUP | G | A string identifying an agenda group, which has to be activated by giving it the "focus", which is one way of controlling the flow between groups of rules. |
| RULEFLOW-GROUP | R | A string identifying a rule-flow group. |
All Rule Tables begin with a cell containing "RuleTable", optionally followed by a string within the same cell. The string is used as the initial part of the name for all rules derived from this Rule Table, with the row number appended for distinction. (This automatic naming can be overridden by using a NAME column.) All other cells defining rules of this Rule Table are below and to the right of this cell.
The next row defines the column type, with each column resulting in a part of the condition or the consequence, or providing some rule attribute, the rule name or a comment. The table below shows which column headers are available; additional columns may be used according to the table showing rule attribute entries given in the preceding section. Note that each attribute column may be used at most once. For a column header, either use the keyword or any other word beginning with the letter given in the "Initial" column of these tables.
Table 6.3. Column Headers in the Rule Table
| Keyword | Initial | Value | Usage |
|---|---|---|---|
| NAME | N | Provides the name for the rule generated from that row. The default is constructed from the text following the RuleTable tag and the row number. | At most one column |
| DESCRIPTION | I | A text, resulting in a comment within the generated rule. | At most one column |
| CONDITION | C | Code snippet and interpolated values for constructing a constraint within a pattern in a condition. | At least one per rule table |
| ACTION | A | Code snippet and interpolated values for constructing an action for the consequence of the rule. | At least one per rule table |
| METADATA | @ | Code snippet and interpolated values for constructing a metadata entry for the rule. | Optional, any number of columns |
Given a column headed CONDITION, the cells in successive lines result in a conditional element.
Text in the first cell below CONDITION develops into a pattern for the rule condition, with the snippet in the next line becoming a constraint. If the cell is merged with one or more neighbours, a single pattern with multiple constraints is formed: all constraints are combined into a parenthesized list and appended to the text in this cell. The cell may be left blank, which means that the code snippet in the next row must result in a valid conditional element on its own.
To include a pattern without constraints, you can write the pattern in front of the text for another pattern.
The pattern may be written with or without an empty pair of parentheses. A "from" clause may be appended to the pattern.
If the pattern ends with "eval", code snippets are supposed to produce boolean expressions for inclusion into a pair of parentheses after "eval".
Text in the second cell below CONDITION is processed in two steps.
The code snippet in this cell is modified by interpolating values from cells farther down in the column. If you want to create a constraint consisting of a comparison using "==" with the value from the cells below, the field selector alone is sufficient. Any other comparison operator must be specified as the last item within the snippet, and the value from the cells below is appended. For all other constraint forms, you must mark the position for including the contents of a cell with the symbol
$param. Multiple insertions are possible by using the symbols$1,$2, etc., and a comma-separated list of values in the cells below.A text according to the pattern
forall(delimiter){snippet}is expanded by repeating the snippet once for each of the values of the comma-separated list of values in each of the cells below, inserting the value in place of the symbol$and by joining these expansions by the given delimiter. Note that the forall construct may be surrounded by other text.If the cell in the preceding row is not empty, the completed code snippet is added to the conditional element from that cell. A pair of parentheses is provided automatically, as well as a separating comma if multiple constraints are added to a pattern in a merged cell.
If the cell above is empty, the interpolated result is used as is.
Text in the third cell below CONDITION is for documentation only. It should be used to indicate the column's purpose to a human reader.
From the fourth row on, non-blank entries provide data for interpolation as described above. A blank cell results in the omission of the conditional element or constaint for this rule.
Given a column headed ACTION, the cells in successive lines result in an action statement.
Text in the first cell below ACTION is optional. If present, it is interpreted as an object reference.
Text in the second cell below ACTION is processed in two steps.
The code snippet in this cell is modified by interpolating values from cells farther down in the column. For a singular insertion, mark the position for including the contents of a cell with the symbol
$param. Multiple insertions are possible by using the symbols$1,$2, etc., and a comma-separated list of values in the cells below.A method call without interpolation can be achieved by a text without any marker symbols. In this case, use any non-blank entry in a row below to include the statement.
The forall construct is available here, too.
If the first cell is not empty, its text, followed by a period, the text in the second cell and a terminating semicolon are stringed together, resulting in a method call which is added as an action statement for the consequence.
If the cell above is empty, the interpolated result is used as is.
Text in the third cell below ACTION is for documentation only. It should be used to indicate the column's purpose to a human reader.
From the fourth row on, non-blank entries provide data for interpolation as described above. A blank cell results in the omission of the action statement for this rule.
Note
Using $1 instead of $param works in most cases, but it will fail
if the replacement text contains a comma: then, only the part preceding the first comma is inserted.
Use this "abbreviation" judiciously.
Given a column headed METADATA, the cells in successive lines result in a metadata annotation for the generated rules.
Text in the first cell below METADATA is ignored.
Text in the second cell below METADATA is subject to interpolation, as described above, using values from the cells in the rule rows. The metadata marker character
@is prefixed automatically, and thus it should not be included in the text for this cell.Text in the third cell below METADATA is for documentation only. It should be used to indicate the column's purpose to a human reader.
From the fourth row on, non-blank entries provide data for interpolation as described above. A blank cell results in the omission of the metadata annotation for this rule.
The various interpolations are illustrated in the following example.
Example 6.1. Interpolating cell data
If the template is Foo(bar == $param) and the cell is 42, then the result is
Foo(bar == 42).
If the template is Foo(bar < $1, baz == $2) and the cell contains 42,43,
the result will be Foo(bar < 42, baz ==43).
The template forall(&&){bar != $} with a cell containing 42,43
results in bar != 42 && bar != 43.
The next example demonstrates the joint effect of a cell defining the pattern type and the code snippet below it.
This spreadsheet section shows how the Person type declaration spans 2 columns, and thus
both constraints will appear as Person(age == ..., type == ...). Since only
the field names are present in the snippet, they imply an equality test.
In the following example the marker symbol $param is used.
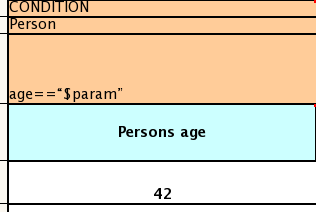
The result of this column is the pattern Person(age == "42")). You may have
noticed that the marker and the operator "==" are redundant.
The next example illustrates that a trailing insertion marker can be omitted.
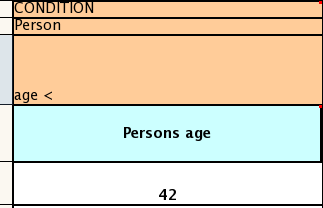
Here, appending the value from the cell is implied, resulting in Person(age < "42")).
You can provide the definition of a binding variable, as in the example below. .

Here, the result is c: Cheese(type == "stilton"). Note that the quotes are provided
automatically. Actually, anything can be placed in the object type row. Apart from the definition
of a binding variable, it could alse be an additional pattern that is to be inserted literally.
A simple construction of an action statement with the insertion of a single value is shown below.
The cell below the ACTION header is left blank. Using this style, anything can be placed in the consequence, not just a sinle method call. (The same technique is applicable within a CONDITION column as well.)
Below is a comprehensive example, showing the use of various column headers. It is not an error to have no value below a column header (as in the NO-LOOP column): here, the attribute will not be applied in any of the rules.
And, finally, here is an example of Import, Variables and Functions.
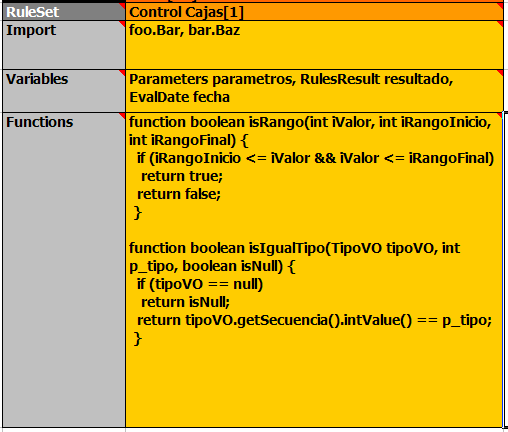
Multiple package names within the same cell must be separated by a comma. Also, the pairs of type and variable names must be comma-separated. Functions, however, must be written as they appear in a DRL file. This should appear in the same column as the "RuleSet" keyword; it could be above, between or below all the rule rows.
Note
It may be more convenient to use Import, Variables, Functions and Queries repeatedly rather than packing several definitions into a single cell.
The API to use spreadsheet based decision tables is in the drools-decisiontables module. There is really only
one class to look at: SpreadsheetCompiler. This class will take spreadsheets in various formats,
and generate rules in DRL (which you can then use in the normal way). The SpreadsheetCompiler can
just be used to generate partial rule files if it is wished, and assemble it into a complete rule package after the
fact (this allows the separation of technical and non-technical aspects of the rules if needed).
To get started, a sample spreadsheet can be used as a base. Alternatively, if the plug-in is being used (Rule Workbench IDE), the wizard can generate a spreadsheet from a template (to edit it an xls compatible spreadsheet editor will need to be used).
Spreadsheets are well established business tools (in use for over 25 years). Decision tables lend themselves to close collaboration between IT and domain experts, while making the business rules clear to business analysts, it is an ideal separation of concerns.
Typically, the whole process of authoring rules (coming up with a new decision table) would be something like:
Business analyst takes a template decision table (from a repository, or from IT)
Decision table business language descriptions are entered in the table(s)
Decision table rules (rows) are entered (roughly)
Decision table is handed to a technical resource, who maps the business language (descriptions) to scripts (this may involve software development of course, if it is a new application or data model)
Technical person hands back and reviews the modifications with the business analyst.
The business analyst can continue editing the rule rows as needed (moving columns around is also fine etc).
In parallel, the technical person can develop test cases for the rules (liaising with business analysts) as these test cases can be used to verify rules and rule changes once the system is running.
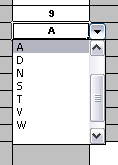
Features of applications like Excel can be used to provide assistance in entering data into spreadsheets, such as validating fields. Lists that are stored in other worksheets can be used to provide valid lists of values for cells, like in the following diagram.
Some applications provide a limited ability to keep a history of changes, but it is recommended to use an alternative means of revision control. When changes are being made to rules over time, older versions are archived (many open source solutions exist for this, such as Subversion or Git).
Related to decision tables (but not necessarily requiring a spreadsheet) are "Rule Templates" (in the drools-templates module). These use any tabular data source as a source of rule data - populating a template to generate many rules. This can allow both for more flexible spreadsheets, but also rules in existing databases for instance (at the cost of developing the template up front to generate the rules).
With Rule Templates the data is separated from the rule and there are no restrictions on which part of the rule is data-driven. So whilst you can do everything you could do in decision tables you can also do the following:
store your data in a database (or any other format)
conditionally generate rules based on the values in the data
use data for any part of your rules (e.g. condition operator, class name, property name)
run different templates over the same data
As an example, a more classic decision table is shown, but without any hidden rows for the rule meta data (so the spreadsheet only contains the raw data to generate the rules).
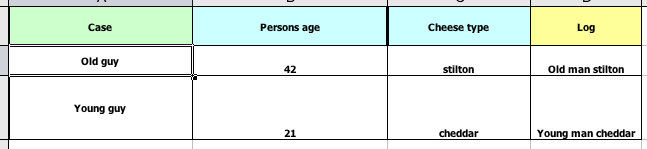
See the ExampleCheese.xls in the examples download for the above spreadsheet.
If this was a regular decision table there would be hidden rows before row 1 and between rows 1 and 2 containing rule metadata. With rule templates the data is completely separate from the rules. This has two handy consequences - you can apply multiple rule templates to the same data and your data is not tied to your rules at all. So what does the template look like?
1  template header
2  age
3  type
4  log
5
6  package org.drools.examples.templates;
7
8  global java.util.List list;
9
10 template "cheesefans"
11
12 rule "Cheese fans_@{row.rowNumber}"
13 when
14    Person(age == @{age})
15    Cheese(type == "@{type}")
16 then
17    list.add("@{log}");
18 end
19
20 end template
Annotations to the preceding program listing:
Line 1: All rule templates start with
template header.Lines 2-4: Following the header is the list of columns in the order they appear in the data. In this case we are calling the first column
age, the secondtypeand the thirdlog.Line 5: An empty line signifies the end of the column definitions.
Lines 6-9: Standard rule header text. This is standard rule DRL and will appear at the top of the generated DRL. Put the package statement and any imports and global and function definitions into this section.
Line 10: The keyword
templatesignals the start of a rule template. There can be more than one template in a template file, but each template should have a unique name.Lines 11-18: The rule template - see below for details.
Line 20: The keywords
end templatesignify the end of the template.
The rule templates rely on MVEL to do substitution using the syntax @{token_name}. There is currently one built-in expression, @{row.rowNumber} which gives a unique number for each row of data and enables you to generate unique rule names. For each row of data a rule will be generated with the values in the data substituted for the tokens in the template. With the example data above the following rule file would be generated:
package org.drools.examples.templates;

global java.util.List list;

rule "Cheese fans_1"
when
  Person(age == 42)
  Cheese(type == "stilton")
then
  list.add("Old man stilton");
end

rule "Cheese fans_2"
when
  Person(age == 21)
  Cheese(type == "cheddar")
then
  list.add("Young man cheddar");
end
The code to run this is simple:
DecisionTableConfiguration dtableconfiguration =

    KnowledgeBuilderFactory.newDecisionTableConfiguration();

dtableconfiguration.setInputType( DecisionTableInputType.XLS );


KnowledgeBuilder kbuilder = KnowledgeBuilderFactory.newKnowledgeBuilder();


kbuilder.add( ResourceFactory.newClassPathResource( getSpreadsheetName(),

                                                    getClass() ),

              ResourceType.DTABLE,

              dtableconfiguration );
If you discover that you have a group of rules following the same arrangement of patterns, constraints and actions on the RHS, differing only in constants or names for objects or fields, you might think of employing Drool's rule template feature for generating the actual rules. You would write a rule template file, containing the textual skeleton of your rule and use the Drools template compiler in combination with a collection of objects providing the actual values for the "flesh" of the rules for their instantiation.
The mechanism is very similar to what a macro processor does. The major advantage proffered by template expansion is that it's nicely integrated in the overall handling of Knowledge Resources.
Caution
This is an experimental feature. In particular, the API is subject to change.
A rule template file begins with a header defining the
placeholders, or formal template parameters
for the strings that are to be inserted during instantiation.
After the first line, which invariably contains template header,
you should write a number of lines, each of which contains a single
parameter name.
Example 6.2. Rule template file: template header
template header
parameter-name-1
...
parameter-name-n
...
The template header is followed by the text that is to
be replicated and interpolated with the actual parameters. It
may begin with a package statement, followed by some
additional lines. These
may be sectioned into one or more templates, each of them
between a pair of matching template and
end template statements. The template takes
an argument, which puts a name to the template. The name
can be a simple unquoted name or an arbitrary string enclosed
in double quotes. The template text between these lines may
contain one or more rules, constituting the "raw material"
for the expansion.
Example 6.3. Rule template file: templates
template header
parameter-name-1
...
parameter-name-n
package ...     # optional
header text    # optional
template template-name
...
// template text
...
end template
...
The resulting text will begin with the package line and the header text following it, if present. Then, each template text will be expanded individually, yielding one set of rules for each of the actual parameter sets. Therefore, the structure of the template sections affect the order of the generated rules, since the generator iterates over the sections and then over the set of actual parameters.
Any interpolation takes place between a pair of template
and end template statements, when this template is
expanded. The template text is scanned for occurrences of
parameter expansions written according to:
@{parameter-name}The name between '@{' and '}' should be one of the parameter names defined in the template header. The substitution is effected anywhere, even within string literals.
An important parameter is available without having to be
included in the data source providing the actual values. The
parameter substitution
@{row.rowNumber}
expands to the integers 0, 1, 2, etc., providing a unique distinction
for the instantiation derived from a parameter set. You would use this
as part of each rule name, because, without this precaution, there
would be duplicate rule names. (You are, of course, free to use your
own identification included as an extra parameter.)
To expand a template, you must prepare a data source. This can
be a spreadsheet, as explained in the previous section. Here, we'll
concentrate on expansion driven by Java objects. There are two
straightforward ways of supplying values for a fixed set of names:
Java objects, in the JavaBeans style, and Maps. Both of them can
be arranged in a Collection, whose elements will be
processed during the expansion, resulting in an instantiation
for each element.
You may use a Java object that provides getter methods corresponding to all of the parameter names of your template file. If, for instance, you have defined a header
template header
type
limit
word
the following Java class could be used:
public class ParamSet {

    //...

    public ParamSet( String t, int l, boolean w ) {

        //...

    }

    public String  getType(){...}

    public int     getLimit(){...}

    public boolean isWord(){...}

}
Although interpolation is pure text manipulation, the actual values
supplied may be of any type, just as long as this type provides a
reasonable toString() method. (For simple types, the
eponymous static method of the related class from java.lang
is used.)
Assuming that we have created a Collection<ParamSet>
for a template file template.drl, we can now proceed to
request its expansion.
The resulting string contains the expanded rules text. You could write it to a file and proceed as usual, but it's also possible to feed this to a
Collection<ParamSet> paramSets = new ArrayList<ParamSet>();

// populate paramSets

paramSets.add( new ParamSet( "Foo", 42, true ) );

paramSets.add( new ParamSet( "Bar", 13, false ) );

ObjectDataCompiler converter = new ObjectDataCompiler();

InputStream templateStream =

    this.getClass().getResourceAsStream( "template.drl" );

String drl = converter.compile( objs, templateStream );
KnowledgeBuilder and continue with the
resulting Knowledge Packages.
KnowledgeBase kBase = KnowledgeBaseFactory.newKnowledgeBase();

KnowledgeBuilder kBuilder = KnowledgeBuilderFactory.newKnowledgeBuilder();

Reader rdr = new StringReader( drl );

kBuilder.add( ResourceFactory.newReaderResource( rdr ), ResourceType.DRL );

if( kBuilder.hasErrors() ){

    // ...

    throw new IllegalStateException( "DRL errors" );

}

kBase.addKnowledgePackages( kBuilder.getKnowledgePackages() );
A Map that provides the values for substituting
template parameters should have a (string) key set matching all of
the parameter names. Again, values could be from any class, as long
as they provide a good toString() method. The expansion
would use the same approach, just differing in the way the
map collection is composed.
Collection<Map<String,Object>> paramMaps = new ArrayList<Map<String,Object>>();

// populate paramMaps

ObjectDataCompiler converter = new ObjectDataCompiler();

InputStream templateStream =

    this.getClass().getResourceAsStream( "template.drl" );

String drl = converter.compile( objs, templateStream );
The following example illustrates template expansion. It is based on simple
objects of class Item containing a couple of integer fields and an
enum field of type ItemCode.
public class Item {

    // ...

    public Item( String n, int p, int w, ItemCode c ){...}


    public String   getName() {...}

    public int      getWeight() {...}

    public int      getPrice() {...}

    public ItemCode getCode() {...}

}


public enum ItemCode {

    LOCK,

    STOCK,

    BARREL;

}
The rule template contains a single rule. Notice that the field name for the range test is a parameter, which enables us to instantiate the template for different fields.
template header
field
lower
upper
codes

package range;
template "inRange"
rule "is in range @{row.rowNumber}"
when
    Item( $name : name, $v : @{field} >= @{lower} && <= @{upper}, $code : code @{codes} )
then
    System.out.println( "Item " + $name + " @{field} in range: " + $v + " code: " + $code );
end
end template
The next code snippet is from the application, where several
parameter sets have to be set up. First, there is class
ParamSet, for storing a set of actual parameters.
public class ParamSet {

    //...

    private EnumSet<ItemCode> codeSet;


    public ParamSet( String f, int l, int u, EnumSet<ItemCode> cs ){...}


    public String getField() { return field; }

    public int getLower() { return lower; }

    public int getUpper() { return upper; }


    public String getCodes(){

        StringBuilder sb = new StringBuilder();

        String conn = "";

        for( ItemCode ic: codeSet ){

             sb.append( conn ).append( " == ItemCode." ).append( ic );

             conn = " ||";

        }

        return sb.toString();

    }

}
Note that the method getCodes() does returns the
EnumSet<ItemCode> field value as a String
value representing a multiple restriction, i.e., a test for one out
of a list of values.
The task of expanding a template, passing the resulting DRL text
to a Knowledge Builder and adding the resulting Knowledge Packages
to a Knowledge Base is generic. The utility class Expander
takes care of this, using a Knowledge Base, the InputStream
with the rule template and the collection of parameter sets.
public class Expander {


    public void expand( KnowledgeBase kBase, InputStream is, Collection<?> act )

        throws Exception {

        ObjectDataCompiler converter = new ObjectDataCompiler();

        String drl = converter.compile( act, is );


        KnowledgeBuilder kBuilder = KnowledgeBuilderFactory.newKnowledgeBuilder();

        Reader rdr = new StringReader( drl );

        kBuilder.add( ResourceFactory.newReaderResource( rdr ), ResourceType.DRL );

        if( kBuilder.hasErrors() ){

            for( KnowledgeBuilderError err: kBuilder.getErrors() ){

                System.err.println( err.toString() );

            }

            throw new IllegalStateException( "DRL errors" );

        }

        kBase.addKnowledgePackages( kBuilder.getKnowledgePackages() );

    }

}
We are now all set to prepare the Knowledge Base with some
generated rules. First, we define several parameter sets,
constructed as ParamSet objects, and add them to a
List, which is passed to the expand
method shown above. Then we launch a stateful session, insert a
few Item, and watch what happens.
Collection<ParamSet> cfl = new ArrayList<ParamSet>();

cfl.add( new ParamSet( "weight",  10,  99, EnumSet.of( ItemCode.LOCK, ItemCode.STOCK ) ) );

cfl.add( new ParamSet( "price",   10,  50, EnumSet.of( ItemCode.BARREL ) ) );


KnowledgeBase kBase = KnowledgeBaseFactory.newKnowledgeBase();

Expander ex = new Expander();

InputStream dis = new FileInputStream( new File( "rangeTemp.drl" ) );

ex.expand( kBase, dis, cfl );


StatefulKnowledgeSession session = kBase.newStatefulKnowledgeSession();

session.insert( new Item( "A", 130,  42, ItemCode.LOCK ) );

session.insert( new Item( "B",  44, 100, ItemCode.STOCK ) );

session.insert( new Item( "C", 123, 180, ItemCode.BARREL ) );

session.insert( new Item( "D",  85,   9, ItemCode.LOCK ) );


session.fireAllRules();
Notice that the two resulting rules deal with different fields, one with an item's weight, the other one with its price. - Below is the output.
Item E price in range: 25 code: BARREL
Item A weight in range: 42 code: LOCK