If you are reading this, you must be the impatient type who wants to kick the tires (and light the fires) and have a look around as soon as possible. This section will provide a quick end to end tour of the steps involved (but does not go through the concepts in detail). This assumes you have installed the repository correctly, and are able to access the main login screen.
You can also consult the wiki: http://wiki.jboss.org/wiki/Wiki.jsp?page=RulesRepository for some tutorials and user tips (it IS a wiki, so you can even contribute your own tips and examples and even upload files if you desire !).
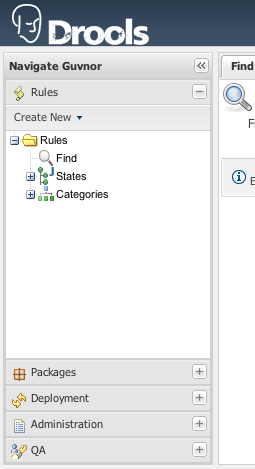
The above picture shows the main feature areas of Guvnor.
Info: This is the initial screen, with links to resources.
Rules: This is the category and business user perspective.
Package: This is where packages are configured and managed.
Deployment: this is where deployment snapshots are managed.
Admin: Administrative functions (categories, statuses, import and export)
The supported server side platforms are mentioned in the installation guide. For browsers - the major ones are supported, this includes Firefox (1.5 and up), IE7 and up, Opera, Safari, Google Chrome etc. The preferred browser for most platforms is firefox, it is widely available and free, if you have any choice at all, Firefox is the preferred platform, followed by safari on mac. IE6 users can experience some poor performance, and as this is a dangerously insecure browser IE7 or a superior browser (such as Google Chrome, Firefox, Safari) is recommended.
Some initial setup is required the first time. The first time the server starts up, it will create an empty repository, then take the following steps:
Once deployed, go to http://localhost:8080/guvnor-webapp/ This will show the initial info screen or login screen depending on the configuration.
If it is a brand new repository, you will want to go to "Admin", and choose "Manage Categories"
(Add a few categories of your choosing, categories are only for classification, not for execution or anything else.)
Rules need a fact model (object model) to work off, so next you will want to go to the Package management feature. From here you can click on the icon to create a new package (give it a meaningful name, with no spaces).
To upload a model, use a JAR which has the fact model (API) that you will be using in your rules and your code (go and make one now if you need to !). When you are in the model editor screen, you can upload a JAR file, choose the package name from the list that you created in the previous step.
Now edit your package configuration (you just created) to import the fact types you just uploaded (add import statements), and save the changes.
At this point, the package is configured and ready to go (you generally won't have to go through that step very often).
(Note that you can also import an existing DRL package - it will store the rules in the repository as individual assets).
Once you have at least one category and one package setup, you can author rules.
There are multiple rule "formats", but from the Guvnor point of view, they are all "assets".
You create a rule by clicking the icon with the rules logo (the head), and from that you enter a name.
You will also have to choose one category. Categories provide a way of viewing rules that is separate to packages (and you can make rules appear in multiple packages) - think of it like tagging.
Chose the "Business rule (guided editor)" formats.
This will open a rule modeler, which is a guided editor. You can add and edit conditions and actions based on the model that is in use in the current package. Also, any DSL sentence templates setup for the package will be available.
When you are done with rule editing, you can check in the changes (save), or you can validate or "view source" (for the effective source).
You can also add/remove categories from the rule editor, and other attributes such as documentation (if you aren't sure what to do, write a document in natural language describing the rule, and check it in, that can also serve as a template later)
In terms of navigating, you can either use the Rules feature, which shows things grouped by categories, or you can use the Package feature, and view by package (and rule type). If you know the name or part of the name of an asset, you can also use the "Quick find", start typing a rule name and it will return a list of matches as you type (so if you have a sensible naming scheme, it will make it very quick to find stuff).
After you have edited some rules in a package, you can click on the package feature, open the package that you wish, and build the whole package.
If that succeeds, then you will be able to download a binary package file which can be deployed into a runtime system.
You can also take a "snapshot" of a package for deployment. This freezes the package at that point in time, so any concurrent changes to not effect the package. It also makes the package available on a URL of the form: "http://<your server>/guvnor-webapp/org.drools.guvnor.Guvnor/packages/<packageName>/<snapshotName>" (where you can use that URL and downloads will be covered in the section on deployment).