
Welcome
Welcome and Drools Release Notes
1. Introduction
1.1. Introduction
KIE (Knowledge Is Everything) is an umbrella project introduced to bring our related technologies together under one roof. It also acts as the core shared between our projects.
KIE contains the following different but related projects offering a complete portfolio of solutions for business automation and management:
-
Drools is a business rule management system with a forward-chaining and backward-chaining inference based rules engine, allowing fast and reliable evaluation of business rules and complex event processing. A rule engine is also a fundamental building block to create an expert system which, in artificial intelligence, is a computer system that emulates the decision-making ability of a human expert.
-
jBPM is a flexible Business Process Management suite allowing you to model your business goals by describing the steps that need to be executed to achieve those goals.
-
OptaPlanner is a constraint solver that optimizes use cases such as employee rostering, vehicle routing, task assignment and cloud optimization.
-
Drools Workbench is is a full featured web application for the visual composition of custom business rules and processes.
-
UberFire is a web based workbench framework inspired by Eclipse Rich Client Platform.
The 7.x series will follow a more agile approach with more regular and iterative releases. We plan to do some bigger changes than normal for a series of minor releases, and users need to be aware those are coming before adopting.
-
UI sections and links will become object oriented, rather than task oriented. https://en.wikipedia.org/wiki/Object-oriented_user_interface
-
Authoring/Library will become project oriented, rather than repository oriented. You’ll create, browse and open projects rather than repositories. The repository concept will be pushed lower, for instance it’ll be created automaticaly when you create the projcet.
-
The old form modeller will be removed and only the new one made available. Although old forms will continue to render.
-
The new designer will continue to mature with more nodes and improved UXD. Eventually it’ll become the default editor, but we will not remove the old one until there is feature parity in BPMN2 support.
-
Continued UXD improvements in lots of places.
-
We will introduce the AppFormer project, this will be a re-org and consolidation of existing projects and result in some artifact renames. UberFire will become AppFormer-Core, forms, data modeller and dashbuilder will come under AppFormer. Dashbuilder will most likely becalled Appformer-Insight.
The 8.x series will come towards the end of this year. We have ongoing parallel work to introduce concepts of workspaces with improved git support, that will have a built in workflow for forking and pull requests. This will be combined with horizontal scaling and improved high availability. These changes are important for usability and cloud scalability, but too much of a change for a minor release, hence the bump to 8.x
1.2. Getting Involved
We are often asked "How do I get involved". Luckily the answer is simple, just write some code and submit it :) There are no hoops you have to jump through or secret handshakes. We have a very minimal "overhead" that we do request to allow for scalable project development. Below we provide a general overview of the tools and "workflow" we request, along with some general advice.
If you contribute some good work, don’t forget to blog about it :)
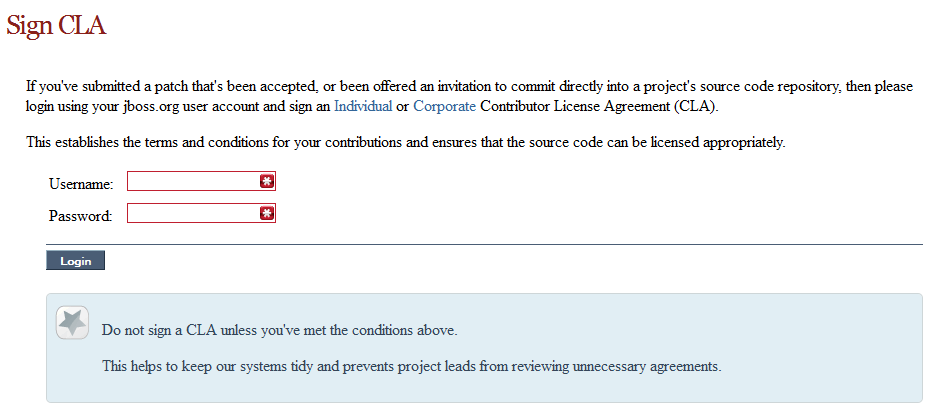
1.2.1. Sign up to jboss.org
Signing to jboss.org will give you access to the JBoss wiki, forums and JIRA. Go to https://www.jboss.org/ and click "Register".

1.2.2. Sign the Contributor Agreement
The only form you need to sign is the contributor agreement, which is fully automated via the web. As the image below says "This establishes the terms and conditions for your contributions and ensures that source code can be licensed appropriately"
1.2.3. Submitting issues via JIRA
To be able to interact with the core development team you will need to use JIRA, the issue tracker. This ensures that all requests are logged and allocated to a release schedule and all discussions captured in one place. Bug reports, bug fixes, feature requests and feature submissions should all go here. General questions should be undertaken at the mailing lists.
Minor code submissions, like format or documentation fixes do not need an associated JIRA issue created.

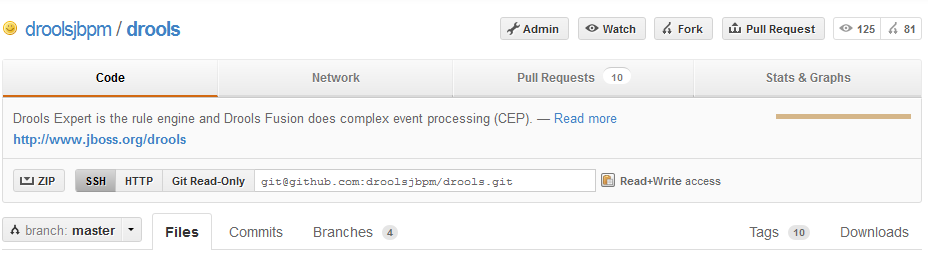
1.2.4. Fork GitHub
With the contributor agreement signed and your requests submitted to JIRA you should now be ready to code :) Create a GitHub account and fork any of the Drools, jBPM or Guvnor repositories. The fork will create a copy in your own GitHub space which you can work on at your own pace. If you make a mistake, don’t worry blow it away and fork again. Note each GitHub repository provides you the clone (checkout) URL, GitHub will provide you URLs specific to your fork.
1.2.5. Writing Tests
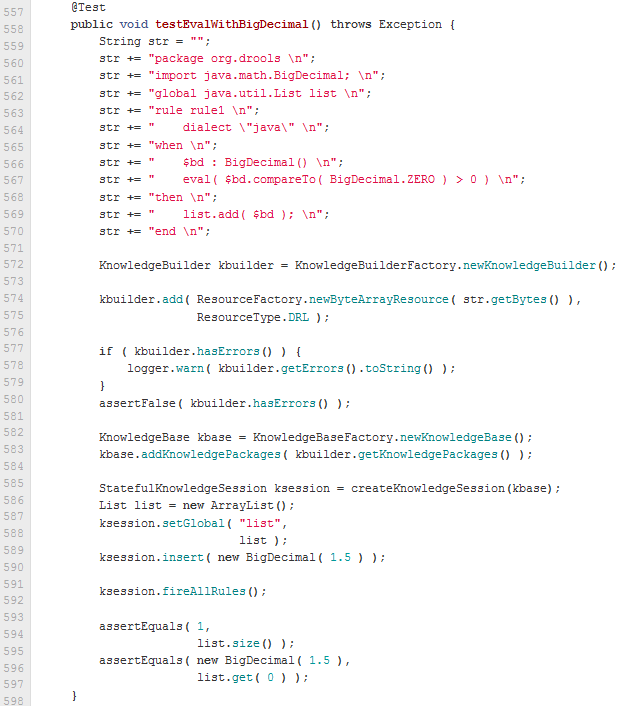
When writing tests, try and keep them minimal and self contained. We prefer to keep the DRL fragments within the test, as it makes for quicker reviewing. If their are a large number of rules then using a String is not practical so then by all means place them in separate DRL files instead to be loaded from the classpath. If your tests need to use a model, please try to use those that already exist for other unit tests; such as Person, Cheese or Order. If no classes exist that have the fields you need, try and update fields of existing classes before adding a new class.
There are a vast number of tests to look over to get an idea, MiscTest is a good place to start.
1.2.6. Commit with Correct Conventions
When you commit, make sure you use the correct conventions. The commit must start with the JIRA issue id, such as DROOLS-1946. This ensures the commits are cross referenced via JIRA, so we can see all commits for a given issue in the same place. After the id the title of the issue should come next. Then use a newline, indented with a dash, to provide additional information related to this commit. Use an additional new line and dash for each separate point you wish to make. You may add additional JIRA cross references to the same commit, if it’s appropriate. In general try to avoid combining unrelated issues in the same commit.
Don’t forget to rebase your local fork from the original master and then push your commits back to your fork.
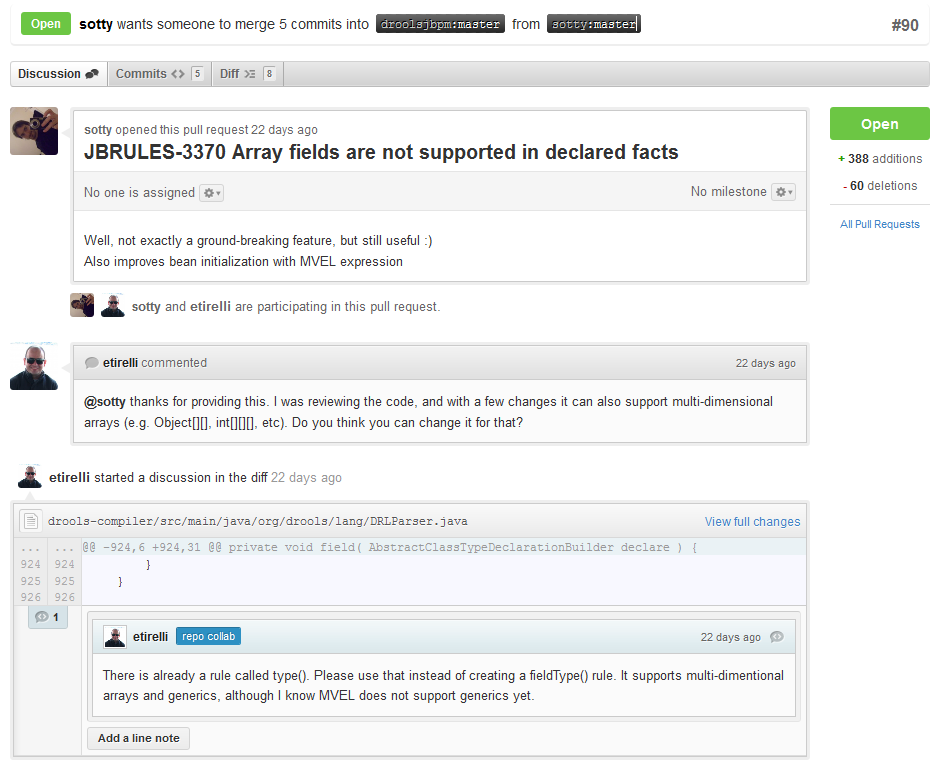
1.2.7. Submit Pull Requests
With your code rebased from original master and pushed to your personal GitHub area, you can now submit your work as a pull request. If you look at the top of the page in GitHub for your work area their will be a "Pull Request" button. Selecting this will then provide a gui to automate the submission of your pull request.
The pull request then goes into a queue for everyone to see and comment on. Below you can see a typical pull request. The pull requests allow for discussions and it shows all associated commits and the diffs for each commit. The discussions typically involve code reviews which provide helpful suggestions for improvements, and allows for us to leave inline comments on specific parts of the code. Don’t be disheartened if we don’t merge straight away, it can often take several revisions before we accept a pull request. Luckily GitHub makes it very trivial to go back to your code, do some more commits and then update your pull request to your latest and greatest.
It can take time for us to get round to responding to pull requests, so please be patient. Submitted tests that come with a fix will generally be applied quite quickly, where as just tests will often way until we get time to also submit that with a fix. Don’t forget to rebase and resubmit your request from time to time, otherwise over time it will have merge conflicts and core developers will general ignore those.
1.3. Installation and Setup (Core and IDE)
1.3.1. Installing and using
Drools provides an Eclipse-based IDE (which is optional), but at its core only Java 1.5 (Java SE) is required.
A simple way to get started is to download and install the Eclipse plug-in - this will also require the Eclipse GEF framework to be installed (see below, if you don’t have it installed already). This will provide you with all the dependencies you need to get going: you can simply create a new rule project and everything will be done for you. Refer to the chapter on the Rule Workbench and IDE for detailed instructions on this. Installing the Eclipse plug-in is generally as simple as unzipping a file into your Eclipse plug-in directory.
Use of the Eclipse plug-in is not required. Rule files are just textual input (or spreadsheets as the case may be) and the IDE (also known as the Rule Workbench) is just a convenience. People have integrated the rule engine in many ways, there is no "one size fits all".
Alternatively, you can download the binary distribution, and include the relevant JARs in your projects classpath.
1.3.1.1. Dependencies and JARs
Drools is broken down into a few modules, some are required during rule development/compiling, and some are required at runtime. In many cases, people will simply want to include all the dependencies at runtime, and this is fine. It allows you to have the most flexibility. However, some may prefer to have their "runtime" stripped down to the bare minimum, as they will be deploying rules in binary form - this is also possible. The core runtime engine can be quite compact, and only requires a few 100 kilobytes across 3 JAR files.
The following is a description of the important libraries that make up JBoss Drools
-
knowledge-api.jar - this provides the interfaces and factories. It also helps clearly show what is intended as a user API and what is just an engine API.
-
knowledge-internal-api.jar - this provides internal interfaces and factories.
-
drools-core.jar - this is the core engine, runtime component. Contains both the RETE engine and the LEAPS engine. This is the only runtime dependency if you are pre-compiling rules (and deploying via Package or RuleBase objects).
-
drools-compiler.jar - this contains the compiler/builder components to take rule source, and build executable rule bases. This is often a runtime dependency of your application, but it need not be if you are pre-compiling your rules. This depends on drools-core.
-
drools-jsr94.jar - this is the JSR-94 compliant implementation, this is essentially a layer over the drools-compiler component. Note that due to the nature of the JSR-94 specification, not all features are easily exposed via this interface. In some cases, it will be easier to go direct to the Drools API, but in some environments the JSR-94 is mandated.
-
drools-decisiontables.jar - this is the decision tables 'compiler' component, which uses the drools-compiler component. This supports both excel and CSV input formats.
There are quite a few other dependencies which the above components require, most of which are for the drools-compiler, drools-jsr94 or drools-decisiontables module. Some key ones to note are "POI" which provides the spreadsheet parsing ability, and "antlr" which provides the parsing for the rule language itself.
| if you are using Drools in J2EE or servlet containers and you come across classpath issues with "JDT", then you can switch to the janino compiler. Set the system property "drools.compiler": For example: -Ddrools.compiler=JANINO. |
For up to date info on dependencies in a release, consult the released POMs, which can be found on the Maven repository.
1.3.1.2. Use with Maven, Gradle, Ivy, Buildr or Ant
The JARs are also available in the central Maven repository (and also in https://repository.jboss.org/nexus/index.html#nexus-search;gavorg.drools~[the JBoss Maven repository]).
If you use Maven, add KIE and Drools dependencies in your project’s pom.xml like this:
  <dependencyManagement>
    <dependencies>
      <dependency>
        <groupId>org.drools</groupId>
        <artifactId>drools-bom</artifactId>
        <type>pom</type>
        <version>...</version>
        <scope>import</scope>
      </dependency>
      ...
    </dependencies>
  </dependencyManagement>
  <dependencies>
    <dependency>
      <groupId>org.kie</groupId>
      <artifactId>kie-api</artifactId>
    </dependency>
    <dependency>
      <groupId>org.drools</groupId>
      <artifactId>drools-compiler</artifactId>
      <scope>runtime</scope>
    </dependency>
    ...
  <dependencies>
This is similar for Gradle, Ivy and Buildr. To identify the latest version, check the Maven repository.
If you’re still using Ant (without Ivy), copy all the JARs from the download zip’s binaries directory and manually verify that your classpath doesn’t contain duplicate JARs.
1.3.1.3. Runtime
The "runtime" requirements mentioned here are if you are deploying rules as their binary form (either as KnowledgePackage objects, or KnowledgeBase objects etc). This is an optional feature that allows you to keep your runtime very light. You may use drools-compiler to produce rule packages "out of process", and then deploy them to a runtime system. This runtime system only requires drools-core.jar and knowledge-api for execution. This is an optional deployment pattern, and many people do not need to "trim" their application this much, but it is an ideal option for certain environments.
1.3.1.4. Installing IDE (Rule Workbench)
The rule workbench (for Eclipse) requires that you have Eclipse 3.4 or greater, as well as Eclipse GEF 3.4 or greater. You can install it either by downloading the plug-in or using the update site.
Another option is to use the JBoss IDE, which comes with all the plug-in requirements pre packaged, as well as a choice of other tools separate to rules. You can choose just to install rules from the "bundle" that JBoss IDE ships with.
Installing GEF (a required dependency)
GEF is the Eclipse Graphical Editing Framework, which is used for graph viewing components in the plug-in.
If you don’t have GEF installed, you can install it using the built in update mechanism (or downloading GEF from the Eclipse.org website not recommended). JBoss IDE has GEF already, as do many other "distributions" of Eclipse, so this step may be redundant for some people.
Open the Help→Software updates…→Available Software→Add Site… from the help menu. Location is:
http://download.eclipse.org/tools/gef/updates/releases/Next you choose the GEF plug-in:
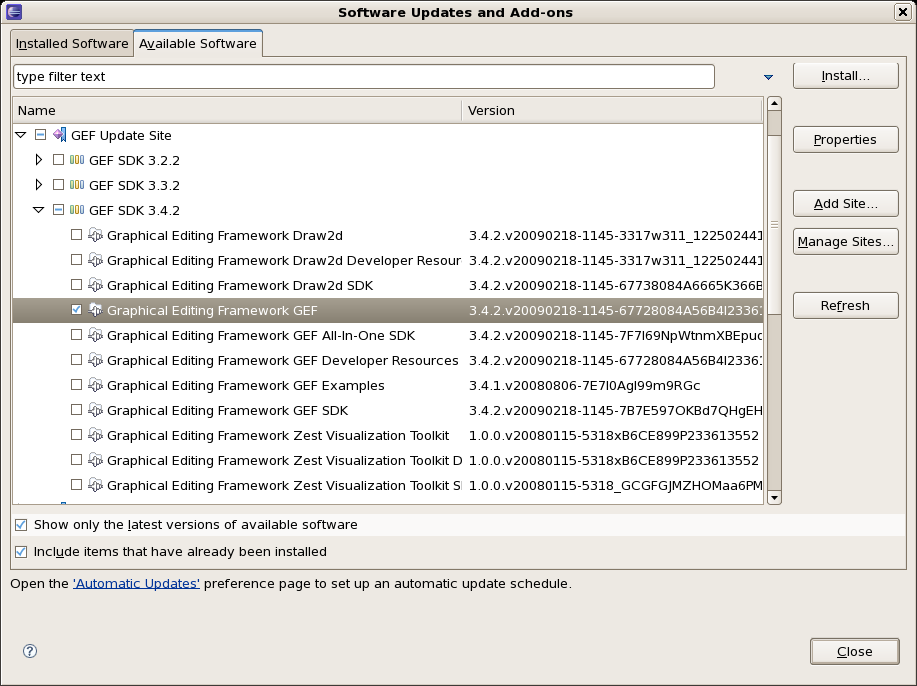
Press next, and agree to install the plug-in (an Eclipse restart may be required). Once this is completed, then you can continue on installing the rules plug-in.
Installing GEF from zip file
To install from the zip file, download and unzip the file. Inside the zip you will see a plug-in directory, and the plug-in JAR itself. You place the plug-in JAR into your Eclipse applications plug-in directory, and restart Eclipse.
Installing Drools plug-in from zip file
Download the Drools Eclipse IDE plugin from the link below. Unzip the downloaded file in your main eclipse folder (do not just copy the file there, extract it so that the feature and plugin JARs end up in the features and plugin directory of eclipse) and (re)start Eclipse.
To check that the installation was successful, try opening the Drools perspective: Click the 'Open Perspective' button in the top right corner of your Eclipse window, select 'Other…' and pick the Drools perspective. If you cannot find the Drools perspective as one of the possible perspectives, the installation probably was unsuccessful. Check whether you executed each of the required steps correctly: Do you have the right version of Eclipse (3.4.x)? Do you have Eclipse GEF installed (check whether the org.eclipse.gef_3.4..jar exists in the plugins directory in your eclipse root folder)? Did you extract the Drools Eclipse plugin correctly (check whether the org.drools.eclipse_.jar exists in the plugins directory in your eclipse root folder)? If you cannot find the problem, try contacting us (e.g. on irc or on the user mailing list), more info can be found no our homepage here:
Drools Runtimes
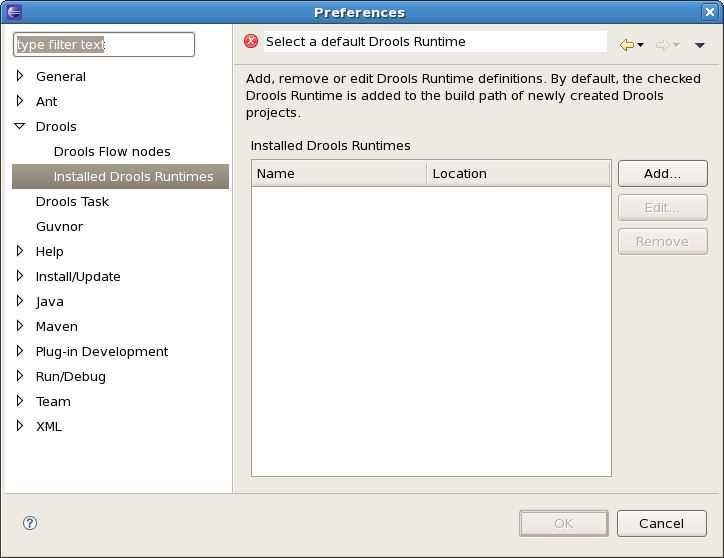
A Drools runtime is a collection of JARs on your file system that represent one specific release of the Drools project JARs. To create a runtime, you must point the IDE to the release of your choice. If you want to create a new runtime based on the latest Drools project JARs included in the plugin itself, you can also easily do that. You are required to specify a default Drools runtime for your Eclipse workspace, but each individual project can override the default and select the appropriate runtime for that project specifically.
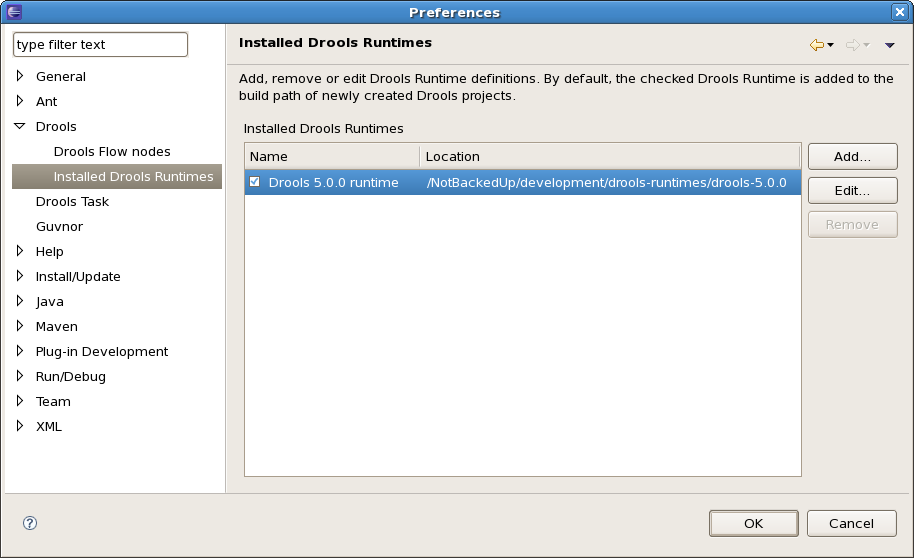
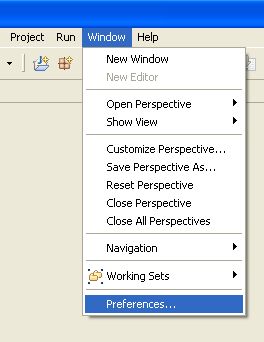
You are required to define one or more Drools runtimes using the Eclipse preferences view. To open up your preferences, in the menu Window select the Preferences menu item. A new preferences dialog should show all your preferences. On the left side of this dialog, under the Drools category, select "Installed Drools runtimes". The panel on the right should then show the currently defined Drools runtimes. If you have not yet defined any runtimes, it should like something like the figure below.
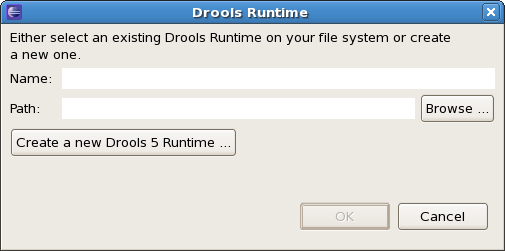
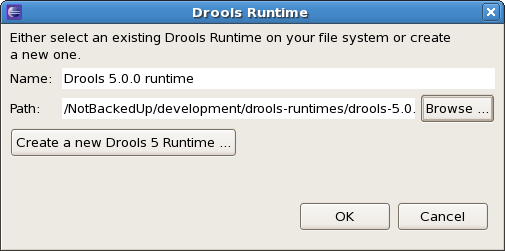
To define a new Drools runtime, click on the add button. A dialog as shown below should pop up, requiring the name for your runtime and the location on your file system where it can be found.
In general, you have two options:
-
If you simply want to use the default JARs as included in the Drools Eclipse plugin, you can create a new Drools runtime automatically by clicking the "Create a new Drools 5 runtime …" button. A file browser will show up, asking you to select the folder on your file system where you want this runtime to be created. The plugin will then automatically copy all required dependencies to the specified folder. After selecting this folder, the dialog should look like the figure shown below.
-
If you want to use one specific release of the Drools project, you should create a folder on your file system that contains all the necessary Drools libraries and dependencies. Instead of creating a new Drools runtime as explained above, give your runtime a name and select the location of this folder containing all the required JARs.
After clicking the OK button, the runtime should show up in your table of installed Drools runtimes, as shown below. Click on checkbox in front of the newly created runtime to make it the default Drools runtime. The default Drools runtime will be used as the runtime of all your Drools project that have not selected a project-specific runtime.
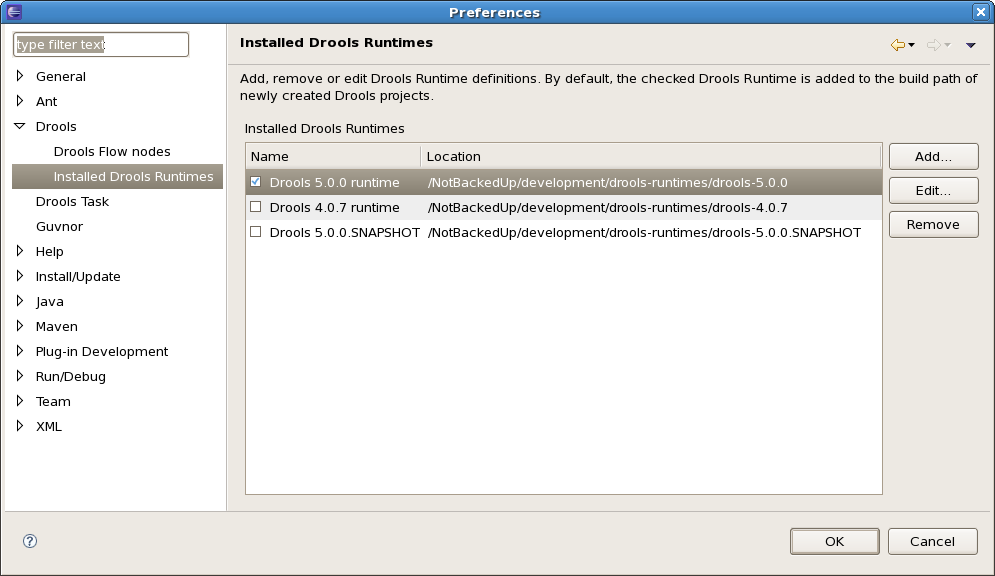
You can add as many Drools runtimes as you need. For example, the screenshot below shows a configuration where three runtimes have been defined: a Drools 4.0.7 runtime, a Drools 5.0.0 runtime and a Drools 5.0.0.SNAPSHOT runtime. The Drools 5.0.0 runtime is selected as the default one.
Note that you will need to restart Eclipse if you changed the default runtime and you want to make sure that all the projects that are using the default runtime update their classpath accordingly.
Whenever you create a Drools project (using the New Drools Project wizard or by converting an existing Java project to a Drools project using the "Convert to Drools Project" action that is shown when you are in the Drools perspective and you right-click an existing Java project), the plugin will automatically add all the required JARs to the classpath of your project.
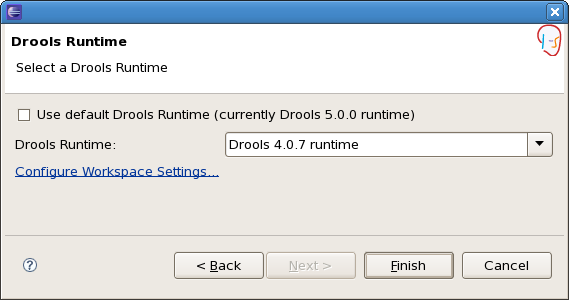
When creating a new Drools project, the plugin will automatically use the default Drools runtime for that project, unless you specify a project-specific one. You can do this in the final step of the New Drools Project wizard, as shown below, by deselecting the "Use default Drools runtime" checkbox and selecting the appropriate runtime in the drop-down box. If you click the "Configure workspace settings …" link, the workspace preferences showing the currently installed Drools runtimes will be opened, so you can add new runtimes there.
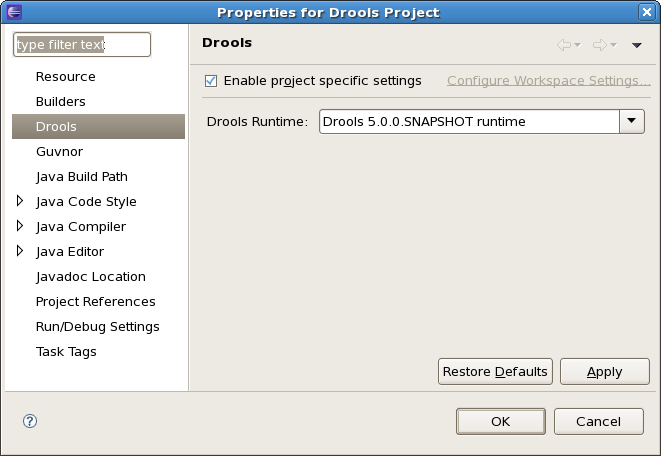
You can change the runtime of a Drools project at any time by opening the project properties (right-click the project and select Properties) and selecting the Drools category, as shown below. Check the "Enable project specific settings" checkbox and select the appropriate runtime from the drop-down box. If you click the "Configure workspace settings …" link, the workspace preferences showing the currently installed Drools runtimes will be opened, so you can add new runtimes there. If you deselect the "Enable project specific settings" checkbox, it will use the default runtime as defined in your global preferences.
1.3.2. Building from source
1.3.2.1. Getting the sources
The source code of each Maven artifact is available in the JBoss Maven repository as a source JAR. The same source JARs are also included in the download zips. However, if you want to build from source, it’s highly recommended to get our sources from our source control.
Git allows you to fork our code, independently make personal changes on it, yet still merge in our latest changes regularly and optionally share your changes with us. To learn more about git, read the free book Git Pro.
1.3.2.2. Building the sources
In essense, building from source is very easy, for example if you want to build the guvnor project:
$ git clone git@github.com:kiegroup/guvnor.git
...
$ cd guvnor
$ mvn clean install -DskipTests -Dfull
...
However, there are a lot potential pitfalls, so if you’re serious about building from source and possibly contributing to the project, follow the instructions in the README file in droolsjbpm-build-bootstrap.
1.3.3. Eclipse
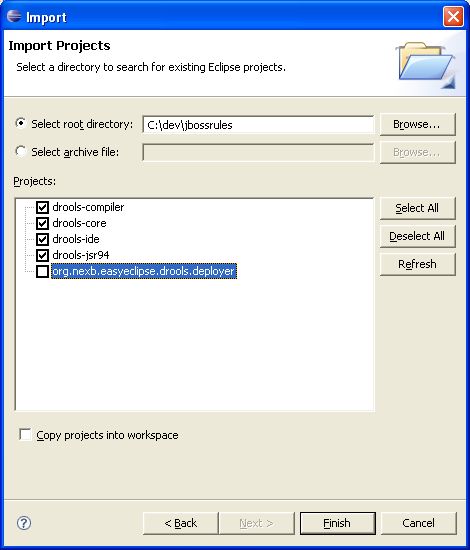
1.3.3.1. Importing Eclipse Projects
With the Eclipse project files generated they can now be imported into Eclipse. When starting Eclipse open the workspace in the root of your subversion checkout.

When calling mvn install all the project dependencies were downloaded and added to the local Maven repository.
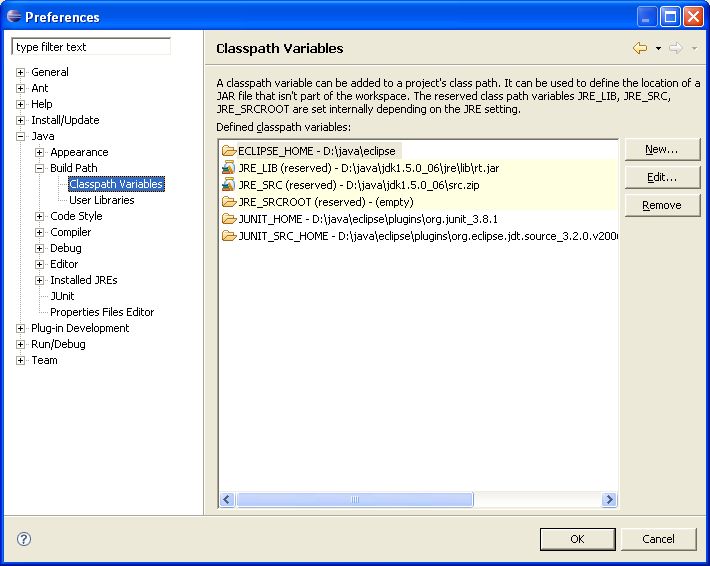
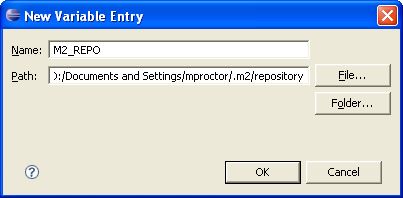
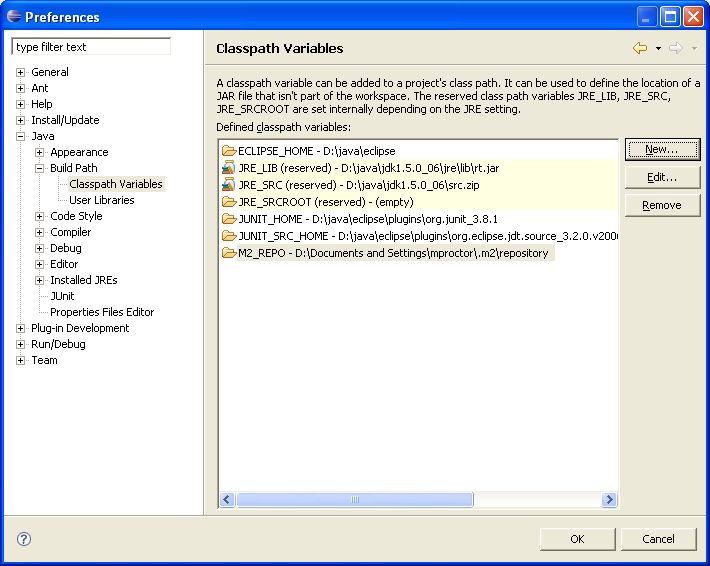
Eclipse cannot find those dependencies unless you tell it where that repository is.
To do this setup an M2_REPO classpath variable.
2. Release Notes
2.1. What is New and Noteworthy in Drools 7.11
2.1.1. Minor API changes of Kie DMN open source engine
The API of Kie DMN open source engine introduces some minor changes, in order to support the new DMN v1.2 format.
A new package org.kie.dmn.model.api inside Maven module kie-dmn-model provides a generic model to support for both DMN versions v1.1 and v1.2.
This requires users of previous versions to update references from previous package org.kie.dmn.model.v1_1 to this new package org.kie.dmn.model.api.
Users of the Kie DMN API must update references of import packages from import org.kie.dmn.model.v1_1.; to import org.kie.dmn.model.api.;.
|
Package org.kie.dmn.api.marshalling.v1_1 has been deprecated in favour of org.kie.dmn.api.marshalling; normally this shouldn’t impact end-users of the Kie DMN API as the DMNRuntime will automatically provide support for both DMN v1.1 and v1.2. This change impacts users who manage the marshaling of DMN resources manually, who must upgrade to the new package in order to support the new DMN v1.2 version.
2.2. What is New and Noteworthy in Drools 7.9
2.2.1. Moved ExecutableCommand to KIE public API
Drools internal ExecutableCommand interface has been moved to KIE public API. It’s now possible to create custom
executable commands without rely on internal interface.
A deprecated internal ExecutableCommand interface still exists for backward compatibility and will be removed in a
future release.
Existing custom commands based on old internal interface that override canRunInTransaction() method will no
longer compile due to this change.
|
2.2.2. Alpha Network Compiler
Drools now supports an optimization on evaluating alpha nodes which involves generating an intermediate class that gets compiled to evaluate the constraint faster.
It’s highly experimental and it’s supposed to work only with the new executable model system. To enable it use drools.alphaNetworkCompiler configuration key in the KieModuleModel configuration.
<kmodule xmlns:xsi="http://www.w3.org/2001/XMLSchema-instance"
         xmlns="http://www.drools.org/xsd/kmodule">
  <configuration>
    <property key="drools.alphaNetworkCompiler" value="true"/>
  </configuration>
</kmodule>
| The current implementation has problems with incremental compilation so don’t use it together. |
2.3. New and Noteworthy in KIE Workbench 7.8.0
2.3.1. New System Property for setting the Default Maven Repository in Project pom.xml files
To make building Workbench projects outside of the Workbench easier, it is now possible to set the URL for the default Maven Repository that is added into each new Project pom.xml. It is recommended that you set this before starting you Workbench for the first time.
2.4. What is New and Noteworthy in Drools 7.7
2.4.1. Executable Model
The purpose of the executable model is to provide a pure Java-based representation of a rule set, together with a convenient Java DSL to programmatically create such model. The model is low level and designed for the user to provide all the information it needs, such as the lambda’s for the index evaluation. This keeps it fast and avoids building in too many assumptions at this level. It is expected higher level representations can layer on in the future, that may be more end-user focused. This work also highly compliments the unit work, which provides a java-oriented way to provide data and control orchestration.
2.4.1.1. Details
This model is generic enough to be independent from Drools but can be compiled into a plain Drools knowledge base. For this reason the implementation of the executable model has been split in 2 subprojects:
-
drools-canonical-model is the canonical representation of a rule set model which is totally independent from Drools
-
drools-model-compiler compiles the canonical model into Drools internal data structures making it executable by the engine
The introduction of the executable model brings a set of benefits in different areas:
-
Compile time: in Drools 6 a kjar contained the list of drl files and other Drools artifacts defining the rule base together with some pre generated classes implementing the constraints and the consequences. Those drl files needed to be parsed and compiled from scratch, when the kjar is downloaded from the Maven repository and installed in a KieContainer, making this process quite slow especially for large rules sets. Conversely it is now possible to package inside the kjar the Java classes implementing the executable model of the project rule base and recreate the KieContainer and its KieBases out of it in a much faster way. The kie-maven-plugin automatically generates the executable model sources from the drl files during the compilation process.
-
Runtime: in the executable model all constraints are defined as Java lambda expressions. The same lambdas are also used for constraints evaluation and this allows to get rid of both mvel for interpreted evaluation and the jitting process transforming the mvel-based constraints in bytecode, resulting in a slow warming up process.
-
Future research: the executable model will allow to experiment new features of the rule engine without the need of encoding them in the drl format and modify the drl parser to support them.
2.4.1.2. Executable Model DSLs
One goal while designing the first iteration of the DSL for the executable model was to get rid of the notion of pattern and to consider a rule as a flow of expressions (constraints) and actions (consequences). For this reason we called it Flow DSL. Some examples of this DSL are available here.
However after having implemented the Flow DSL it became clear that the decision of avoiding the explicit use of patterns obliged us to implement some extra-logic that had both a complexity and a performance cost, since in order to properly recreate the data structures expected by the Drools compiler it is necessary to put together the patterns out of those apparently unrelated expressions.
For this reason it has been decided to reintroduce the patterns in a second DSL that we called Pattern DSL. This allowed to bypass that algorithm grouping expressions that has to fill an artificial semantic gap and that is also time consuming at runtime. We believe that both DSLs are valid for different use cases and then we decided to keep and support both. In particular the Pattern DSL is safer and faster (even if more verbose) so this will be the DSL that will be automatically generated when creating a kjar through the kie-maven-plugin. Conversely the Flow DSL is more succinct and closer to the way how an user may want to programmatically define a rule in Java and we planned to make it even less verbose by generating in an automatic way through a post processor the parts of the model defining the indexing and property reactivity. In other terms we expect that the Pattern DSL will be written by machines and the Flow DSL eventually by human.
2.4.1.3. Programmatic Build
As evidenced by the test cases linked in the former section it is possible to programmatically define in Java one or more rules and then add them to a Model with a fluent API
Model model = new ModelImpl().addRule( rule );Once you have this model, which as explained is totally independent from Drools algorithms and data structures, it’s possible to create a KieBase out of it as it follows
KieBase kieBase = KieBaseBuilder.createKieBaseFromModel( model );Alternatively, it is also possible to create an executable model based kieproject by starting from plain drl files, adding them to a KieFileSystem as usual
KieServices ks = KieServices.Factory.get();
KieFileSystem kfs = ks.newKieFileSystem()
                      .write( "src/main/resources/r1.drl", createDrl( "R1" ) );
KieBuilder kieBuilder = ks.newKieBuilder( kfs );
and then building the project using a new overload of the buildAll() method that accepts a class specifying which kind of project you want to build
kieBuilder.buildAll( ExecutableModelProject.class );Doing so the KieBuilder will generate the executable model (based on the Pattern DSL) and then the resulting KieSession
KieSession ksession = ks.newKieContainer(ks.getRepository()
                                           .getDefaultReleaseId())
                        .newKieSession();
will work with lambda expression based constraint as described in the first section of this document. In the same way it is also possible to generate the executable model from the Flow DSL by passing a different project class to the KieBuilder
kieBuilder.buildAll( ExecutableModelFlowProject.class );but, for what explained when discussing the 2 different DSLs, it is better to use the pattern-based one for this purpose.
2.4.1.4. Kie Maven Plugin
In order to generate a kjar embedding the executable model using the kie-maven-plugin it is necessary to add the dependencies related to the two formerly mentioned projects implementing the model and its compiler in the pom.xml file:
<dependencies>
 <dependency>
   <groupId>org.drools</groupId>
   <artifactId>drools-model-compiler</artifactId>
 </dependency>
 <dependency>
   <groupId>org.drools</groupId>
   <artifactId>drools-canonical-model</artifactId>
 </dependency>
</dependencies>
also add the plugin to the plugin section
<build>
 <plugins>
   <plugin>
     <groupId>org.kie</groupId>
     <artifactId>kie-maven-plugin</artifactId>
     <version>${project.version}</version>
     <extensions>true</extensions>
   </plugin>
 </plugins>
</build>
An example of a pom.xml file already prepared to generate the executable model is available here. By default the kie-maven-plugin still generates a drl based kjar, so it is necessary to run the plugin with the following argument:
-DgenerateModel=<VALUE>Where <VALUE> can be one of three values:
YES
NO
WITHDRL
Both YES and WITHDRL will generate and add to the kjar use the Java classes implementing the executable model corresponding to the drl files in the original project with difference that the first will exclude the drl files from the generated kjar, while the second will also add them. However in this second case the drl files will play only a documentation role since the KieBase will be built from the executable model regardless.
2.5. New and Noteworthy in KIE Workbench 7.7.0
2.5.1. Project Oriented Workbench
Workbench becomes Project Oriented. Meaning each project is now in a dedicated repository. Previously each project was in a folder and one repository could hold several projects. These changes merge the concepts of Project and Repository.
One project one repository approach makes the UI simpler and improves releasing or freezing a single project. Previously if a project was frozen, branched or tagged the repository was still shared with other projects, making the release control harder and more complicated.
Projects from older Workbench versions need to be migrated to the new setup. For this we offer a command line migration tool.
Project Orientated does not, at the moment, offer support for multimodule setup. This feature is planned, but not in this release. The now deprecated Asset Management features depended on multimodule support and can not be migrated to this Workbench version.
2.5.2. Connecting to a remote Kie Server Controller
When running a Workbench instance, there is now greater flexibility to decide how Kie Server instances will be managed. Previously, whenever a Workbench is started, it would always start an embedded Kie Server Controller. This setup is still available but now there is also an option to not start this service and instead connect to a remote Kie Server Controller. This allows a more fine grained deployment model where it’s possible to decide the best approach for a specific scenario.
To switch between these modes, a key system property is used: org.kie.workbench.controller. By default, the Workbench will continue to start the embedded service if this system property is missing. Otherwise, it will try to connect to the remote service and also ensure that none of the embedded services are started.
It is important to note that only Web Socket connection protocol is available to use when connecting to remote Kie Server Controller.
For more details regarding all possible system configs regarding user name, password, token and secured password via key store, please refer to Workbench system properties.
2.5.3. Content management enhancements
2.5.3.1. Properties panel
It is possible to edit the properties of the different page elements including, the page itself or any of its rows and components. Once an element is selected, either by hovering on the element and clicking on the editor’s area or selecting the element in the Properties panel dropdown, its properties are displayed in the left docked panel. See screenshot:
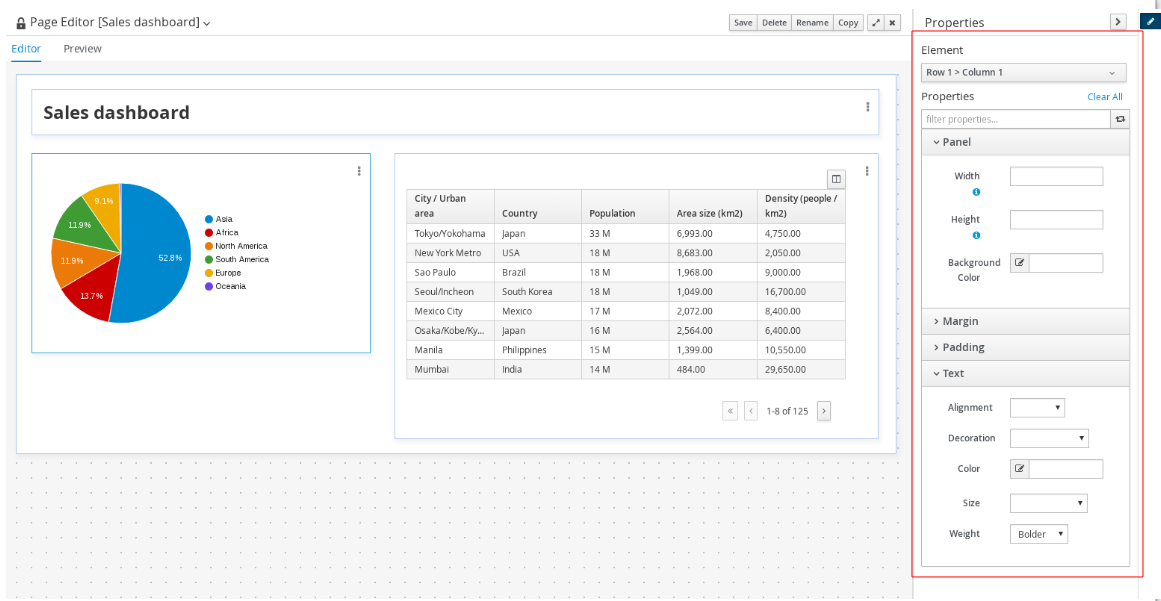
The properties available in this version are basically those related with the element style such as width, height or margins, amongst others. The properties available might differ for each type. Notice for example, the HTML component provides an extra set of properties all related with the text style.
Once a property is changed, its value is reflected in the editor’s area, both in design and preview modes.
2.5.3.2. Screen component removed
The Screen component, which was placed under the Core group in the right sidebar’s Components panel, has been removed. The reason is, this component was not suitable for production environments.
In future versions though, domain related components, such as a BPM’s task list, will be available for easy consumption by end users.
2.5.4. New Migration Tool
A new command line Migration tool with support for Linux and Windows has been provided to move different resources to it’s latest version. It makes possible to perform different migrations:
-
Project Migration: migrates KIE projects from the old project layout (7.4.x and previous) to the new project-oriented structure.
-
Forms Migration: migrates old jBPM Form Modeler forms into the new Forms format.

You can find more info here.
2.6. New and Noteworthy in KIE Workbench 7.6.0
2.6.1. Content management enhancements
A few extra changes have been introduced in the Content Management tooling (aka Page Authoring) in order to improve the user experience. The following screenshot reveals the changes introduced since the latest version.
2.6.1.1. Fluid/Page editor mode selection
The new page pop up allows for the selection of two edition modes:
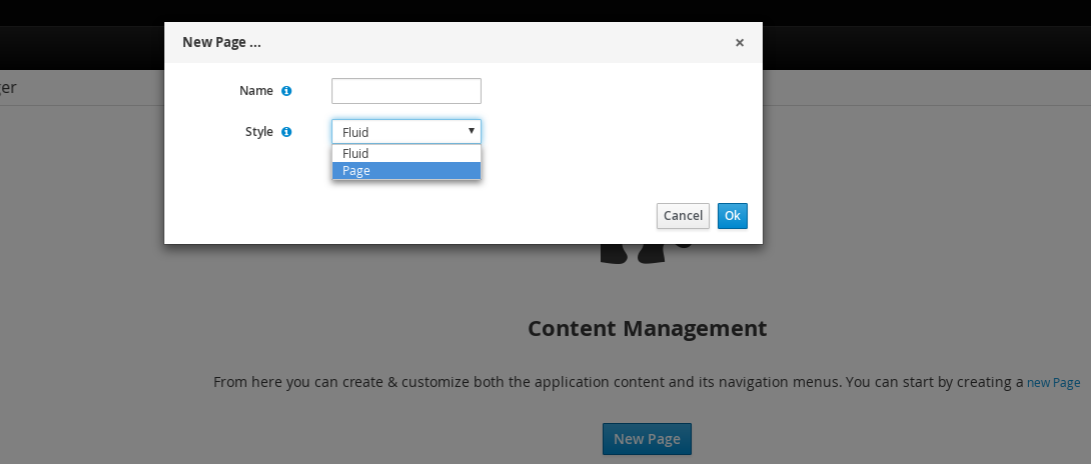
-
Fluid: it acts more as a classical web page, showing a vertical scrollbar when the page exceeds the available height.
-
Page: it was the default in previous versions. When selected, it forces the page to always fit the window’s 100% height.
2.6.1.2. Preview feature
Page authors can go back and forth from the Editor to the Preview mode as many times as needed. In the Preview mode all the editor’s controls are removed, allowing for the display of the page as it would be seen by end users once the page is published.
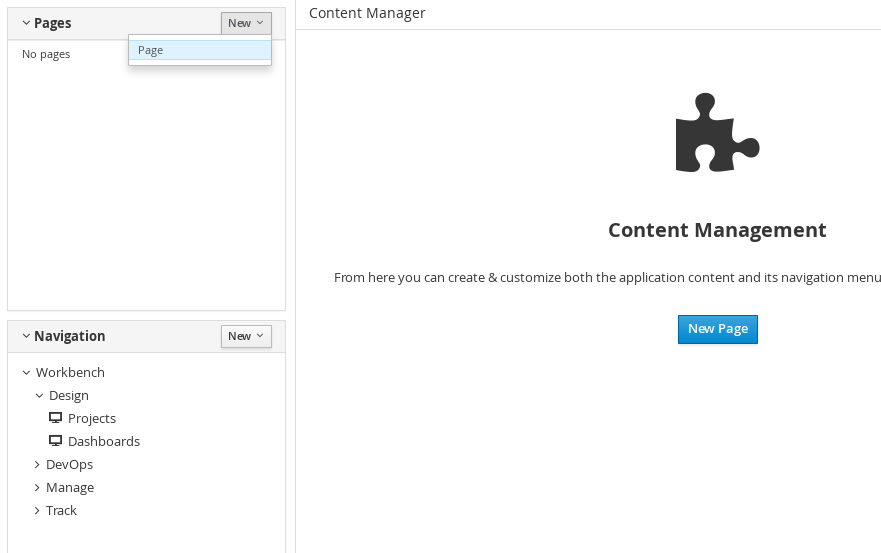
2.6.1.3. Use dock panels to increase the editor content area
In order to increase the available space in the editor’s central area, the page listing, the navigation configuration and the component palette panels have all been moved to the left sidebar as docked panels.
2.6.1.4. Component palette reorganization
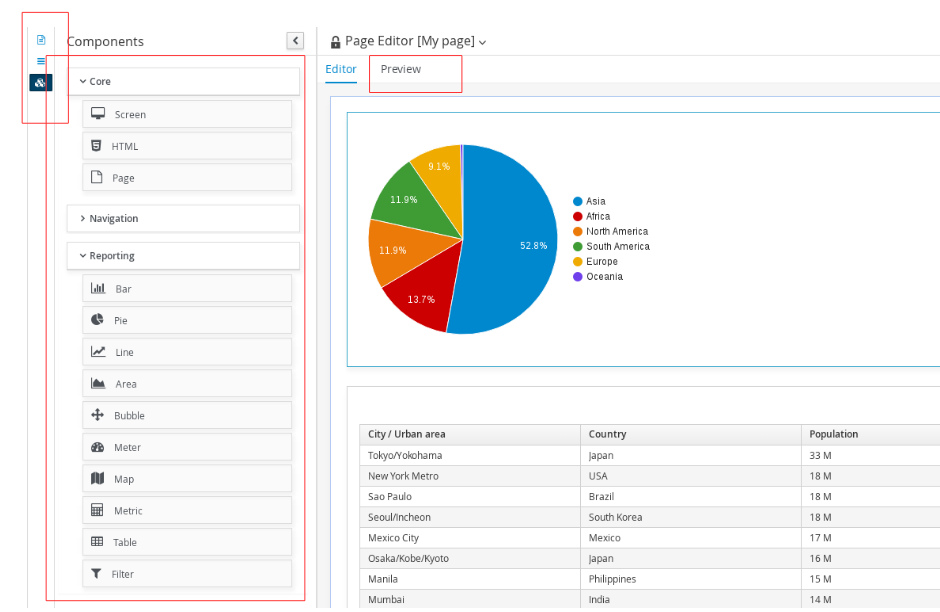
In previous versions, there only existed one single category of components in the palette. As of version 7.6, the components are now grouped into three main categories:
-
Core: HTML and Page components
-
Navigation: Menu Bar, Tree, Tiles, Tab List, Carousel and Target Div
-
Reporting: Bar, Pie, Line, Area, Map, Bubble, Metric, Meter, Table and Filter
The goal of these changes is to make the palette more appealing as well as to ease the selection of the target component to drag.
2.7. New Kie Server Controller Client API
In order to facilitate the management of Kie Server Controller related tasks such as creating server templates, starting and stopping containers, etc, we developed a new Java client API available under the kie-server-controller-client Maven module. With this API, you can connect to a Kie Server Controller using either REST or Web Socket protocols. For more details, see Kie Server Controller Client API chapter.
2.8. Breaking changes in Kie Server 7.5.1 from 7.0
2.8.1. Kie Server Controller API changes
Changes to SpecManagementService interface:
-
Included new method
getContainerInfothat allows to retrieve a singleContainerSpecdefined in aServerTemplate. -
Changed methods
listContainerSpec,listServerTemplateKeys, andlistServerTemplatesreturn types from generic collection to specific domain list types (ContainerSpecList,ServerTemplateKeyList, andServerTemplateList) in order to properly serialize and deserialize the returned values using JAXB and JSON.
Changes to RuleCapabilitiesService interface:
-
startScannermethod now uses ajava.lang.Longtime instead of a primitivelongfor theintervalparameter in order to avoid JSON and JAXB serialization issues.
Changes to RuntimeManagementService interface:
-
Changed methods
getContainersandgetServerInstancesreturn types from generic collection to specific domain list types (ContainerListandServerInstanceKeyList) in order to properly serialize and deserialize the returned values using JAXB and JSON.
For more details, see JBPM-6243.
2.8.2. Kie Server API changes
Changes to ServiceResponse wrapper:
-
Moved
ResponseTypeenum and common methods to a new interface calledKieServiceResponse, allowing it to be extended to multiple implementations.
2.9. New and Noteworthy in KIE Workbench 7.5.0
2.9.1. Content management enhancements
Remarkable changes have been introduced in the Content Management (aka Dashboards) tooling in order to improve the user experience.
2.9.1.1. Perspective to page renaming
The "page" term is far more familiar to users. Notice that, "perspective" is a concept that was borrowed from the Eclipse development tool, thus it is a concept mostly used in developer circles. Page is more related to web content, easier to understand by regular people. For this reason, perspective has been renamed to page all over the tooling.
2.9.1.2. Left sidebar new look and feel
This is the most noticeable change introduced. The left sidebar has been completely rewritten in order to provide an enhanced look and feel.
The two sections Pages and Navigation have been merged into a single view. From this view users can either create new pages or change the navigation configuration.
The Navigation section lists the navigation trees. Specifically, the tree named Workbench is available by default, it can not be deleted and it contains the entries displayed in the workbench’s top mega menu. Any change applied to it will cause the mega menu to modify its entries. This is actually the mechanism users must use to extend the workbench with new pages.
2.9.1.3. Tags button disabled
The tags feature or the ability to attach a set of labels to a page during edition time has been removed. This feature in combination with the former "Apps" perspective was used to allow users to publish their dynamic pages in a categorized way. This feature is no longer needed. During the edition of a page, the Tags button, that used to appear at the editor’s top right button bar, has been removed.
As a replacement, users can leverage the existing navigation features to create new pages and attach them to the workbench’s mega menu.
2.9.2. Extra navigation components
The existing navigation components available in the Content Management tooling have been extended with some extra types. To date there exist the following components:
-
Tile navigator
-
Tab list
-
Carousel
The following have recently been added to the release:
2.9.2.1. Menu bar
As its name states, this component displays the entries of a navigation tree in a manu bar shape. There is no limit to the number of levels supported. When a page item is clicked, the page content is displayed in the Target div (see details below) component specified in the menu bar’s configuration.

2.9.2.2. Tree navigator
Same as the Menu bar, but the entries are displayed as a vertical tree structure.
2.9.2.3. Target div
Both the Carousel and the Tile navigator components can handle by themselves the display of the items the user clicks on. Others like Tab list, Menu bar and Tree navigator require a Target div component as its display output since they have a clear separation between the display of its entries and the content of the last item clicked.
So, every time, a Target div based navigation component is dropped into a page, a Target div component must have been dropped as well, so that the first one can link to it. The following screen shows the configuration panel that is displayed every time a target div based component is dropped into a page.

The navigation group is mandatory for all the navigation components as it indicates the navigation structure to display whereas the Target div setting is not available for non target div components like Carousel or Tile navigator.
2.10. New and Noteworthy in KIE Workbench 7.4.0
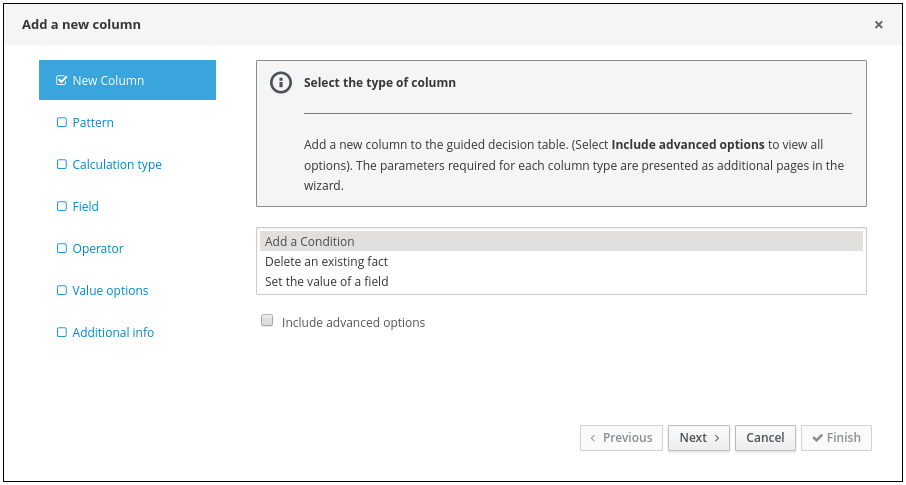
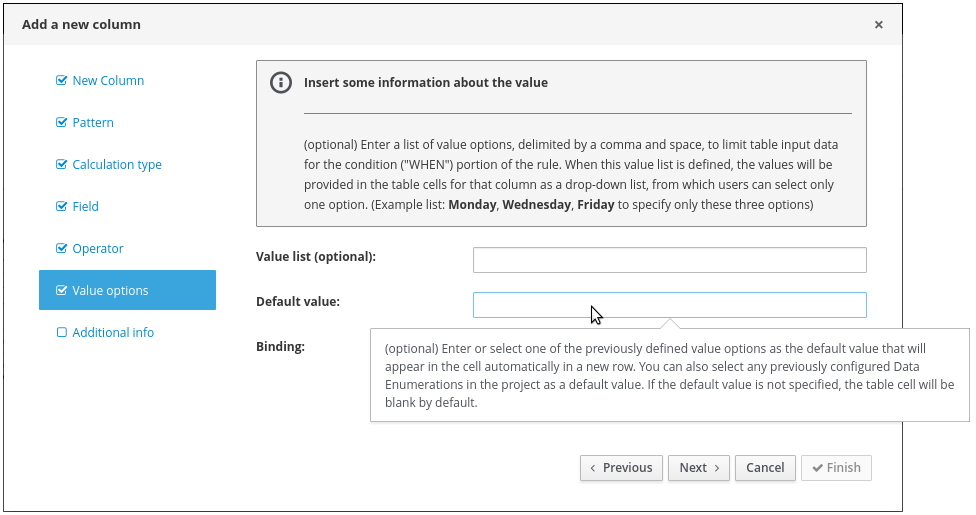
2.10.1. Guided Decision Table improvements
In addition to fixing numerous bugs the Wizard used to create and edit columns has been improved to show descriptions of the different steps required for the different column types.
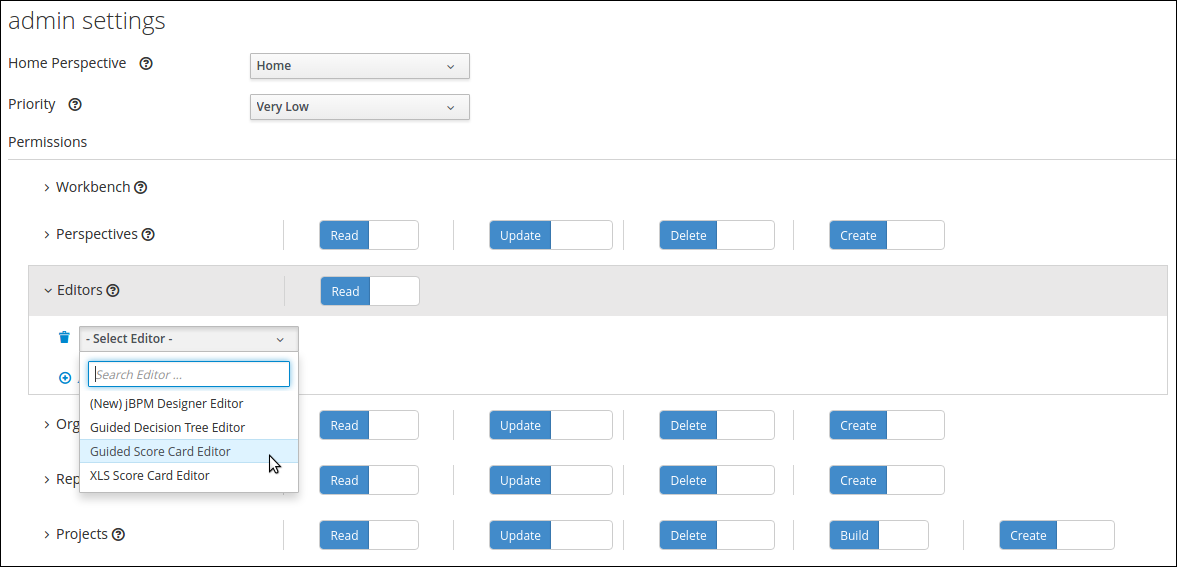
2.10.2. Disable experimental editors
The following features are considered experimental and can be disabled using the Security/User Management administration screen:-
-
Guided Decision Tree Editor
-
Guided Score Card Editor
-
XLS Score Card Editor
-
(New) BPMN2 Process Editor
-
Deployments/Server Provisioning Perspective
These features are enabled by default.
2.11. New and Noteworthy in KIE Workbench 7.3.0
2.11.1. New Home and Menu Bar
The Home page, Menu bar and About popup now have a new design. Menu items are split into groups representing major functional areas.
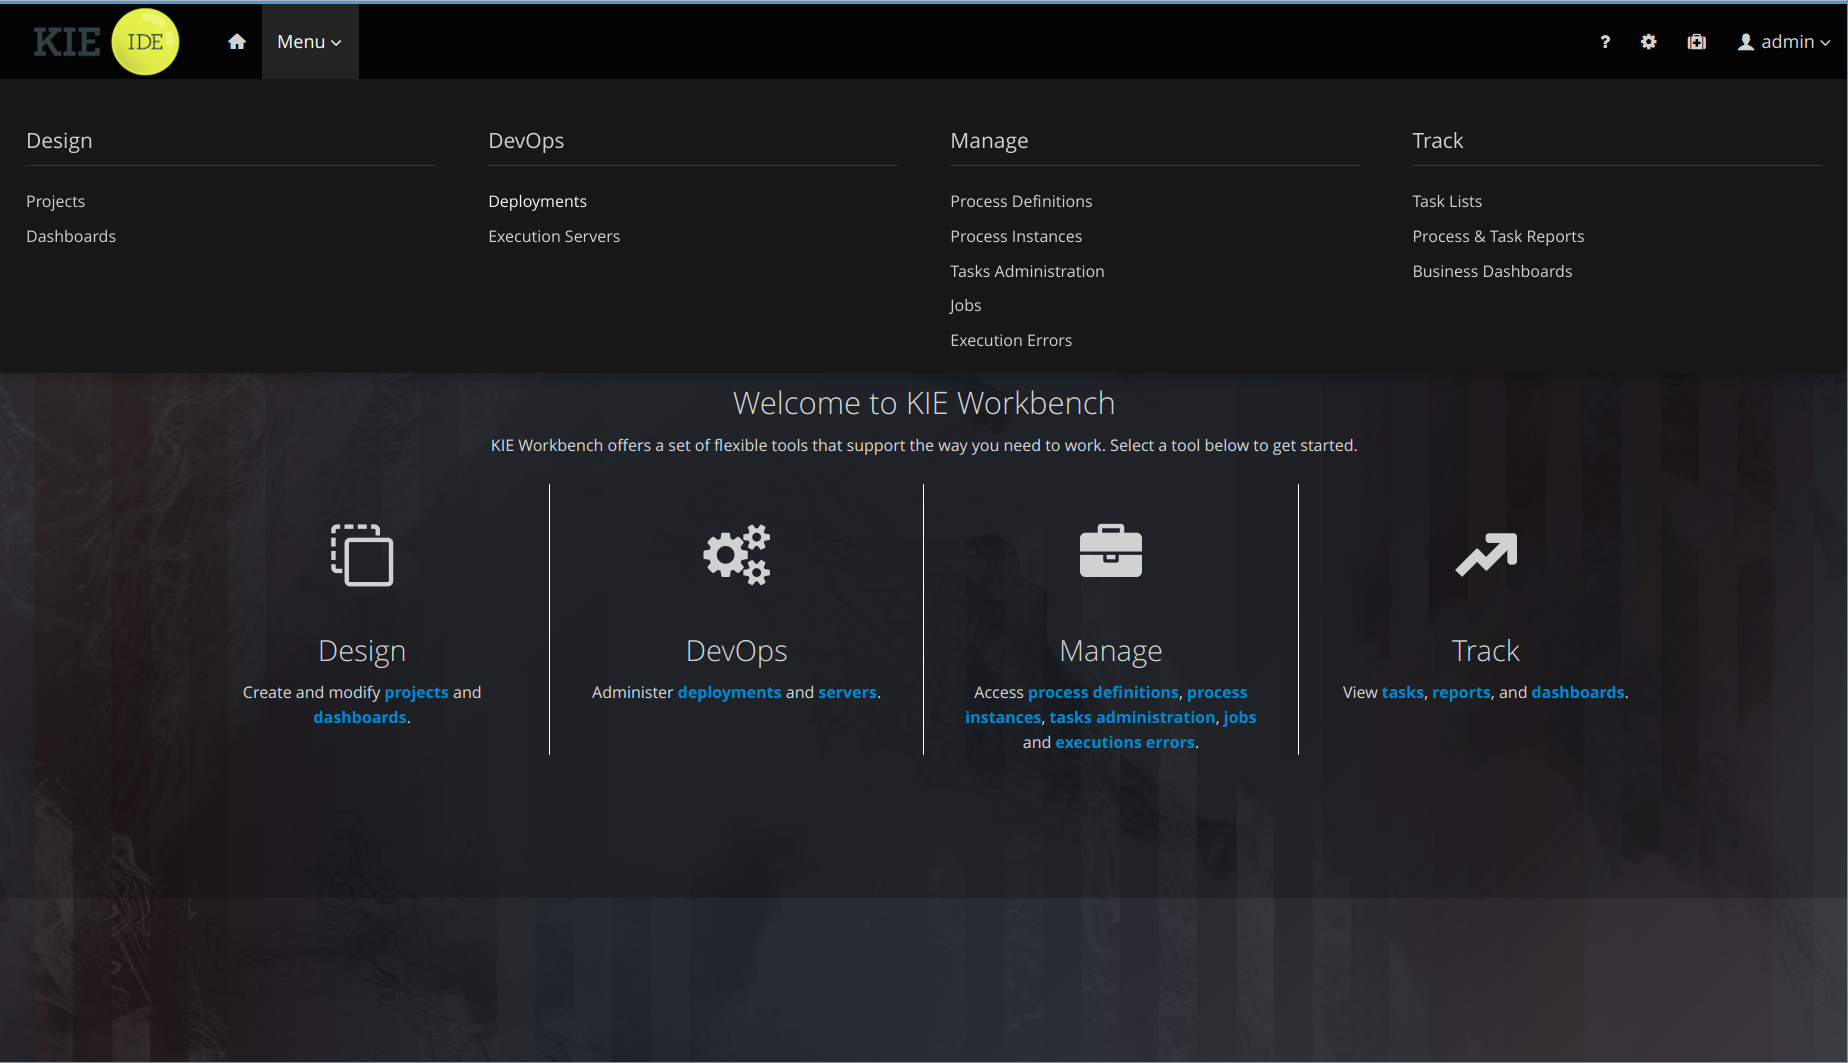

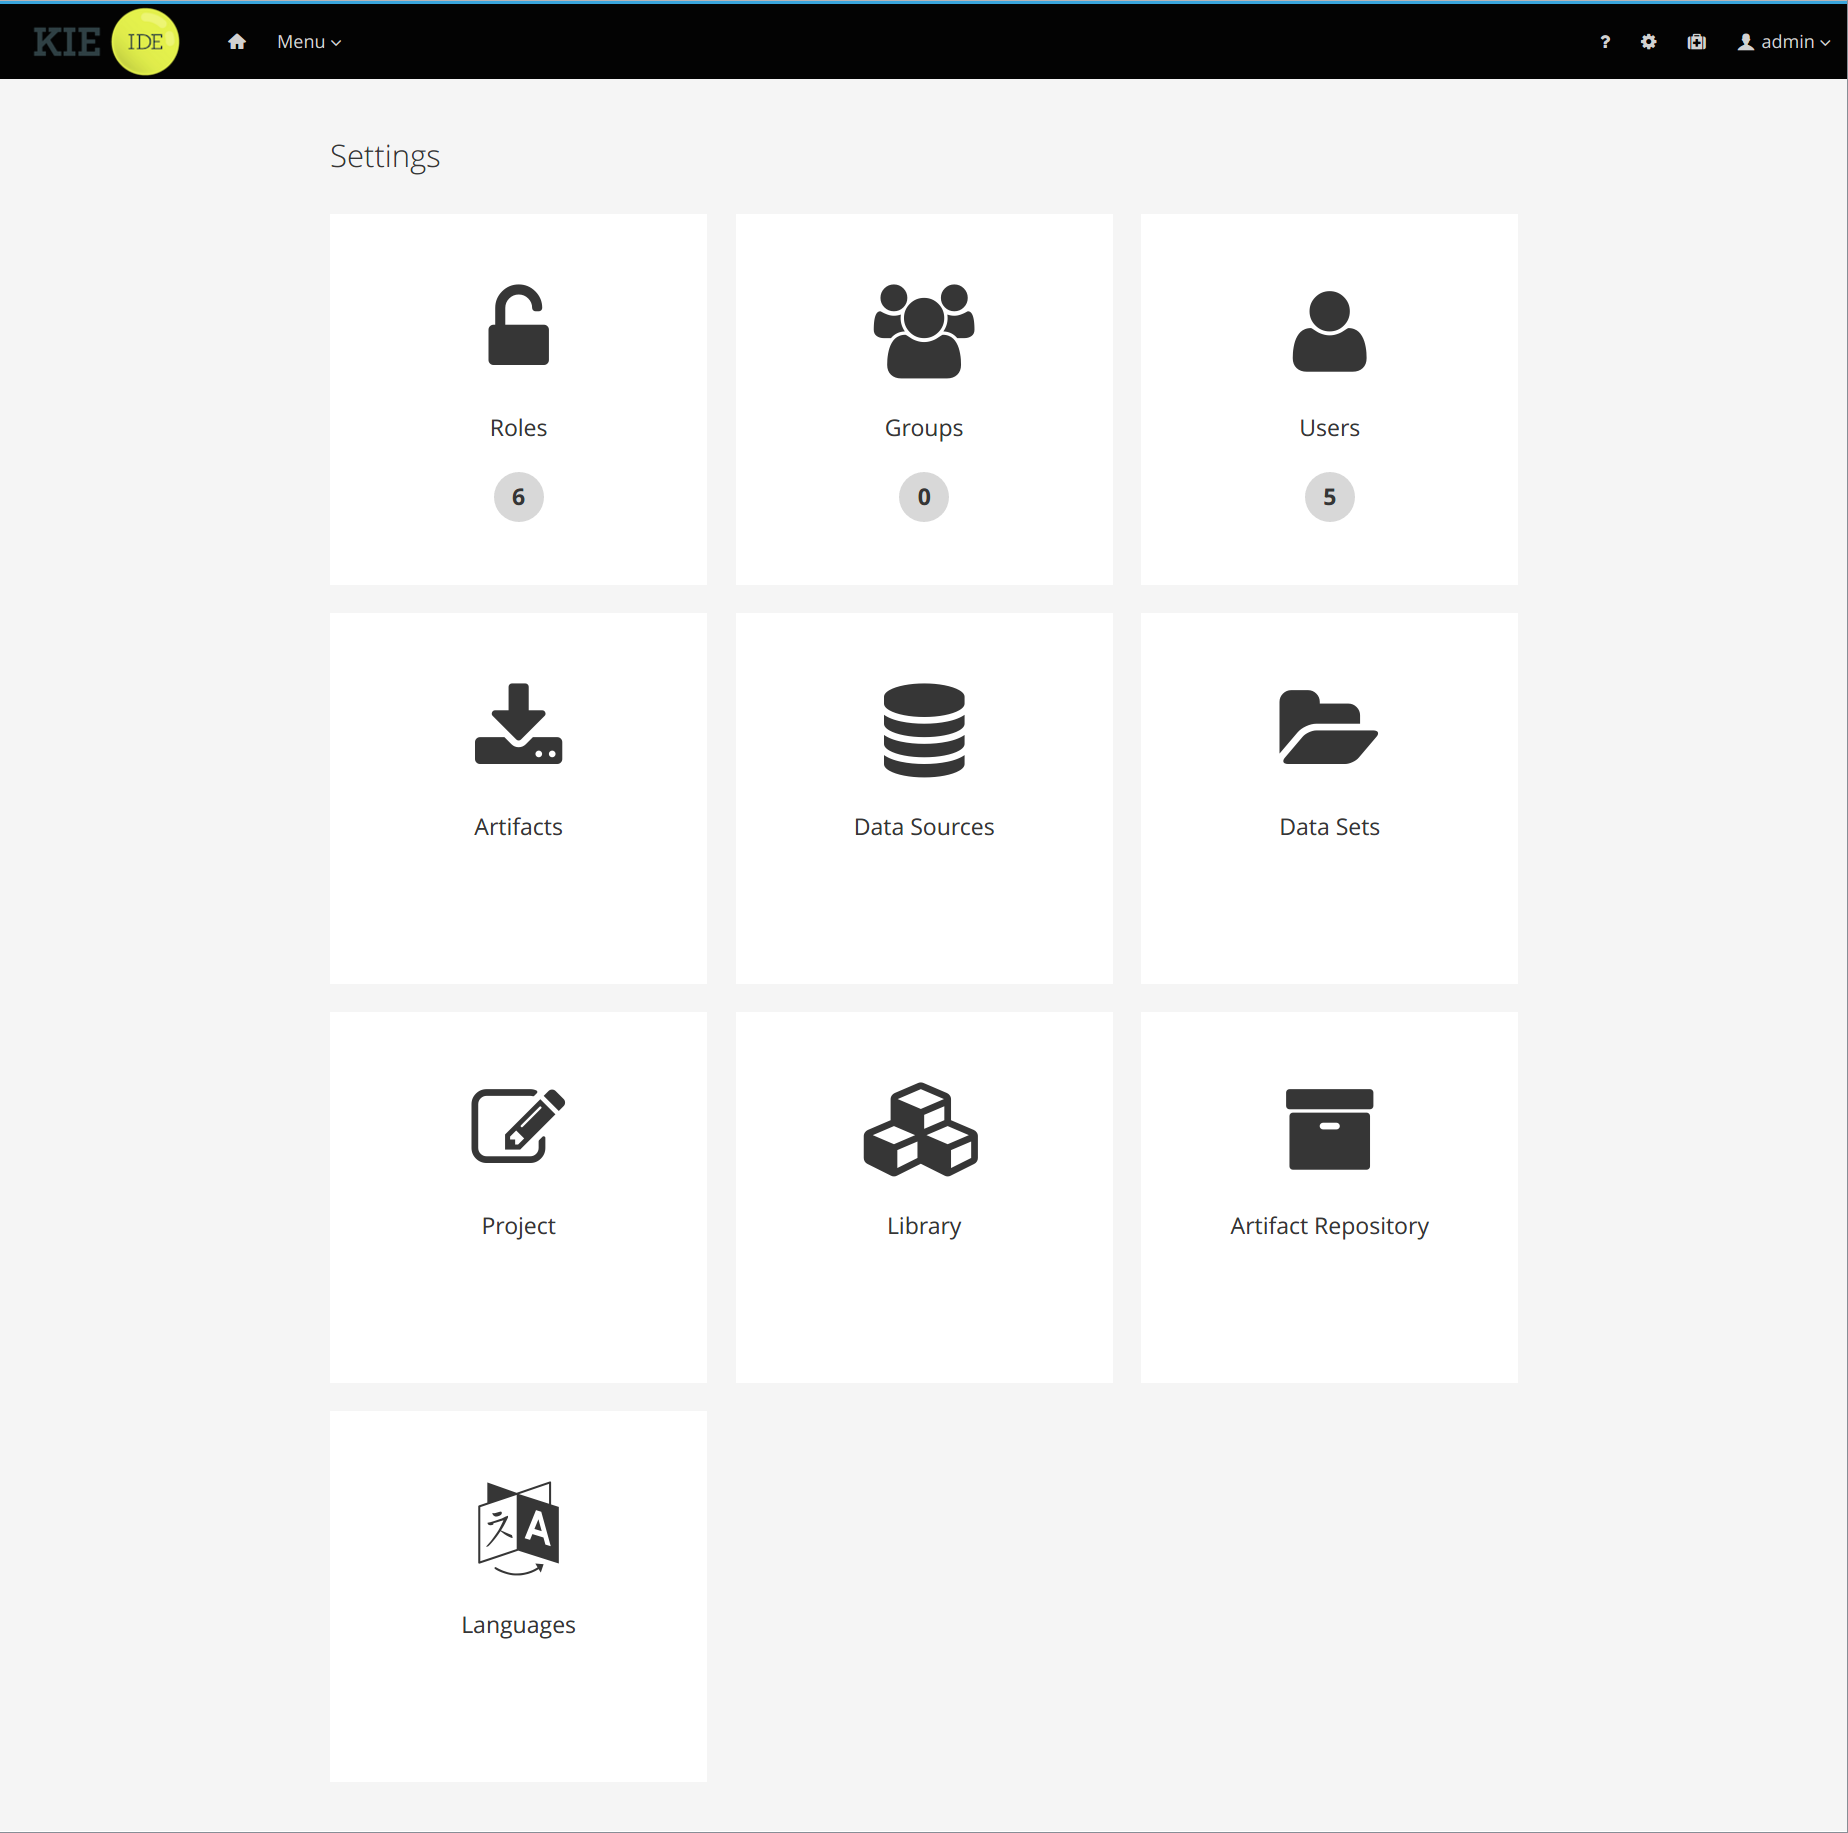
2.11.2. Admin page changes
The Admin page is now accessible with the cog icon on the Menu bar and has more items. Access to the perspective artifacts, Data Sets, Data Sources and Language options have been moved there.
2.13. New and Noteworthy in KIE Workbench 7.1.0
2.13.1. Project Metrics Dashboard
A brand new dashboard is now available for every project listed in the authoring library. After opening the project details page, a metrics card shows up on the right side of the screen.
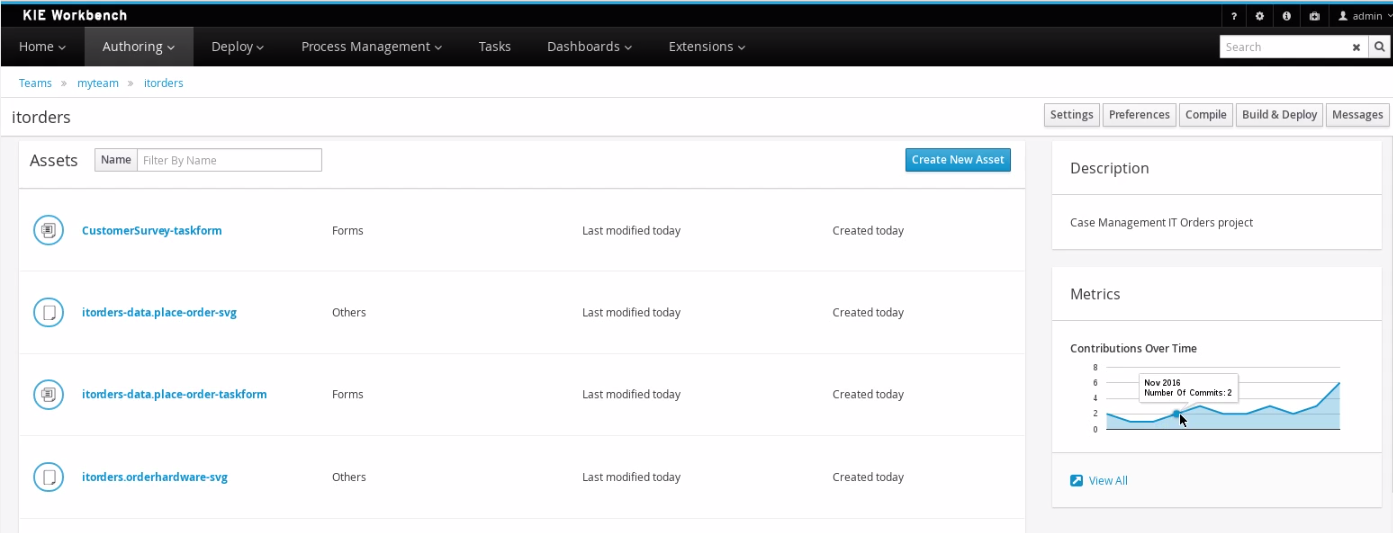
The card shows the history of contributions (commits) made to that specific project over time. Click the View All link to access the full dashboard that shows several metrics all about the project’s contributions.

Notice that different filter controls are available for selecting the contributions made either by a concrete user or in a specific time frame.
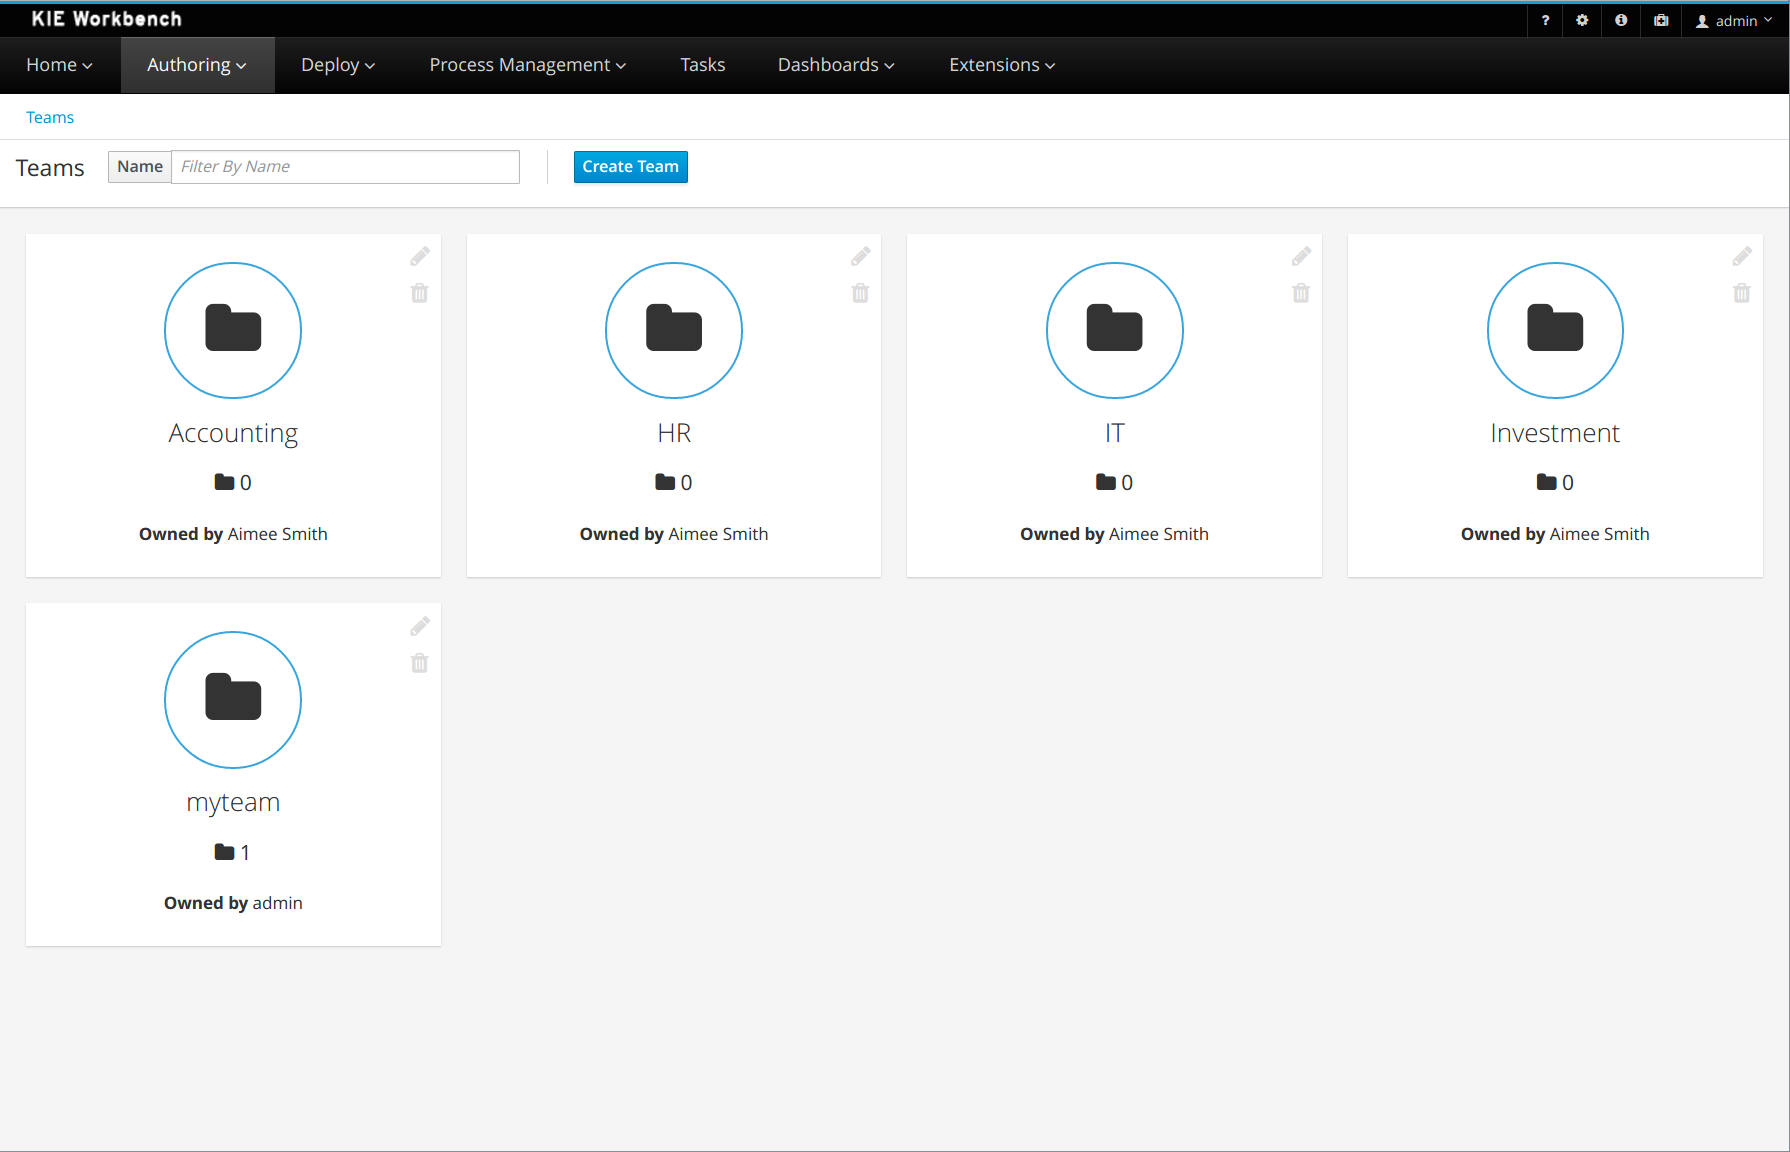
2.13.2. Teams Metrics Dashboard
A brand new dashboard has also been added to the Teams page. A metrics card on the right side shows the history of all contributions (commits).
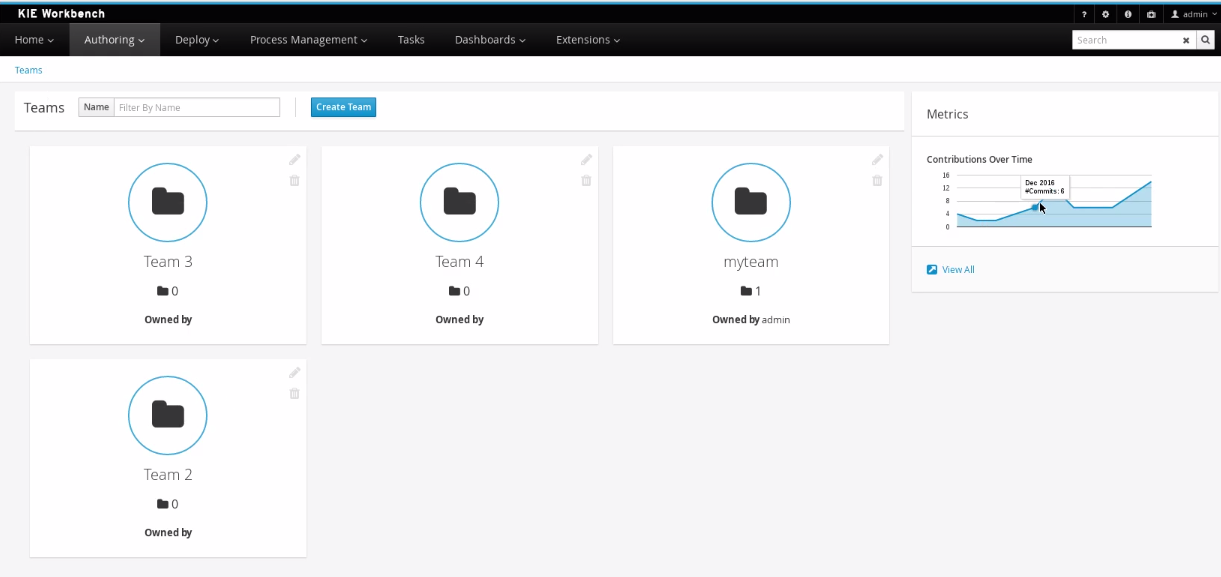
Click the View All link to access the full dashboard showing overall contributions metrics.
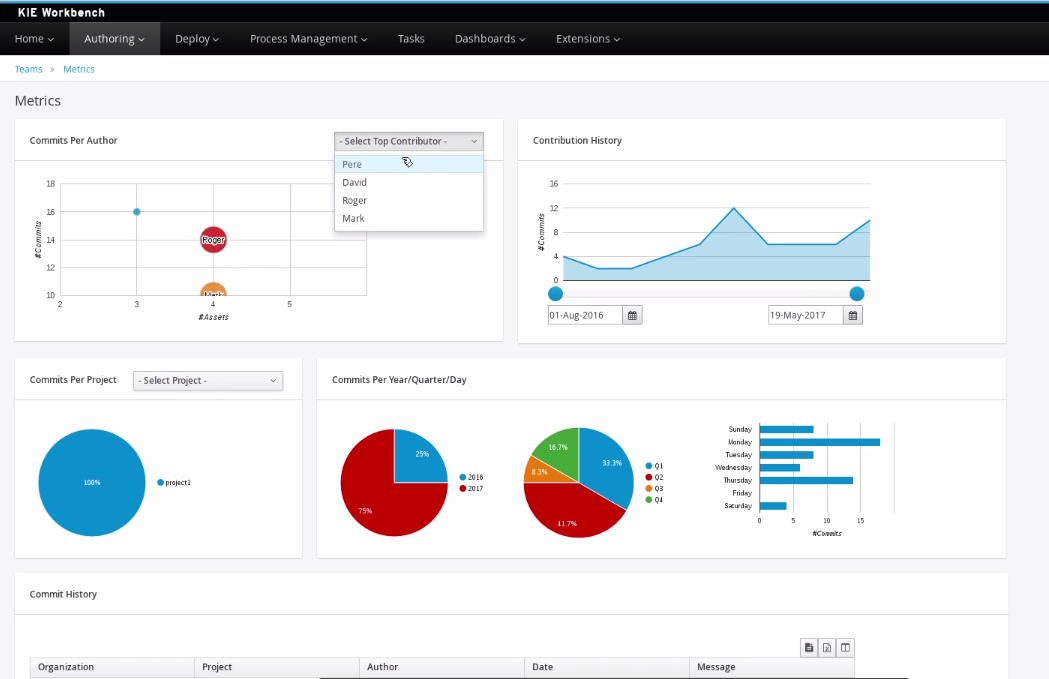
Note that different filter controls are available for selecting the contributions by different criteria:
-
by a concrete user,
-
within a specific time frame,
-
by team or,
-
by project.
This dashboard replaces the former Authoring>Contributors dashboard, which is no longer available at the top menu bar of the workbench.
2.14. What is New and Noteworthy in Drools 7.0
2.14.1. Core Engine
2.14.1.1. DMN Runtime Support
Drools now has complete runtime support for DMN (Decision Model and Notation). DMN files are now an asset that can be added to any kjar for execution. Please refer to the DMN section for details on how to build and execute DMN models.
At this time, no DMN authoring is supported, but it will be supported in future versions.
2.14.1.2. Multithreaded rule engine
|
This feature is experimental |
Historically Rete has always been a sequential algorithm and even if Phreak, its evolution introduced in Drools 6, allowed some degree of parallelization, this possibility wasn’t concretely leveraged yet. In Drools 7 is finally possible to make the engine to evaluate more rules in parallel. This is achieved by partitioning the Rete/Phreak in independent partitions and evaluating them in parallel.
This feature is off by default, but it’s possible to create a parallel KieBase by enabling it via the KieBaseConfiguration as it follows:
KieServices ks = KieServices.Factory.get();
KieBaseConfiguration kieBaseConf = ks.newKieBaseConfiguration();
kieBaseConf.setOption(MultithreadEvaluationOption.YES);
KieBase kieBase = kieContainer.newKieBase(kieBaseConf);
or alternatively through the system property:
drools.multithreadEvaluation = true|
Rules using queries, salience or agenda-group are currently not supported by the parallel engine. In case they are present inside the rule base the compiler emits a warning and automatically switches back using the single threaded implementation. There are other cases where using the multithreaded rule engine is not correct and leads to wrong results even if the engine may be not able to automatically detect them and then will not fallback to the single thread mode, e.g. rules rely on implicit salience given by rule ordering inside the drl file. For this reason particular attention must be paid when enabling this option. Finally at the moment session serialization and incremental compilation are not supported. |
2.14.1.3. OOPath improvements
|
This feature is experimental |
OOPath has been introduced with Drools 6.3.0 but in Drools 7.0.0 the syntax has been slightly changed to make it closer to standard xpath one. This means that constraints have to be put between square brackets instead of curly ones and inline cast has to be expressed out of constraints. For instance the following oopath expressed with 6.x syntax:
/list{#SubClass, prop == 0}in Drools 7.x becomes:
/list#SubClass[prop == 0]Also Drools 7.0.0 improves the support for standard Java Collection, with a dedicated implementation for List and Set,
as specialized ReactiveList and ReactiveSet; a ReactiveCollection is also available.
This also includes out of the box reactive support when performing mutable operations through their Iterator and ListIterator.
public class School extends AbstractReactiveObject {
    private String name;
    private final List<Child> children = new ReactiveList<Child>(); (1)

    public void setName(String name) {
        this.name = name;
        notifyModification(); (2)
    }

    public void addChild(Child child) {
        children.add(child); (3)
        // no need to call notifyModification() here.
}| 1 | Using specialized ReactiveList for reactive support over standard Java List. |
| 2 | Usually notifyModification() is required to be called when a field is changed for reactive support |
| 3 | but in the case of ReactiveList this is handled automatically, like every other mutating operations performed over the field children. |
As a best-practice, it is recommended to declare reactive collection fields final as per the example shown.
|
OOPath Maven plug-in
The Kie Maven plug-in offers a new goal injectreactive to instrument bytecode and automatically inject reactivity support for standard cases.
The injectreactive goal is disabled by default, and can be enabled via Maven plug-in configuration instrument-enabled settings.
<groupId>org.kie</groupId>
<artifactId>kie-maven-plugin</artifactId>
<extensions>true</extensions>
<configuration>
    <instrument-enabled>true</instrument-enabled> (1)
</configuration>| 1 | Enable the injectreactive goal. |
The injectreactive goal will instrument bytecode pertaining to the Maven project build’s output directory ${project.build.outputDirectory}.
It is possible to limit the scope of the goal to a specific package or hierarchy of packages via Maven plug-in
configuration instrument-packages settings list.
.Example:
<groupId>org.kie</groupId>
<artifactId>kie-maven-plugin</artifactId>
<extensions>true</extensions>
<configuration>
    <instrument-enabled>true</instrument-enabled>
    <instrument-packages>
        <instrumentPackage>to.instrument</instrumentPackage> (1)
        <instrumentPackage>org.drools.compiler.xpath.tobeinstrumented.*</instrumentPackage> (2)
    </instrument-packages>
</configuration>| 1 | Limit scope of instrumentation specifically to to.instrument package only. |
| 2 | Limit scope of instrumentation to org.drools.compiler.xpath.tobeinstrumented and its children packages. |
The plug-in will instrument bytecode for every field assignment under the following standard cases:
-
a field assignment will also trigger
notifyModification() -
wrap any field defined as List with a
ReactiveList -
wrap any field defined as Set with a
ReactiveSet -
wrap any field defined as Collection with a
ReactiveCollection
In order for a field of type List/Set to be wrapped correctly, the field member of the java class must be declared specifically using either
java.util.Collection, java.util.List or java.util.Set
(declaring for instance a field as java.util.ArrayList will not be instrumented with the specialized reactive collections).
|
| It is not recommended to mix manual support for reactivity (implemented manually) and the bytecode instrumentation Maven plug-in; it is better envisaged to keep the two scopes distinct, for instance by making use of the plug-in configuration to instrument only specific packages as documented above. |
The following section present detailed examples of the plug-in instrumentation.
A field assignment like in the following example:
public class Toy {
    private String owner;
    ...

    public void setOwner(String owner) {
        this.owner = owner;
    }
}
will be instrumented by intercepting the field assignment and triggering the notifyModification():
public class Toy implements ReactiveObject {
    private String owner;
    ...

    public void setOwner(final String owner) {
        this.$$_drools_write_owner(owner);
    }

    public void $$_drools_write_owner(final String owner) {
        this.owner = owner;
        ReactiveObjectUtil.notifyModification((ReactiveObject) this);
    }
}
Please notice this instrumentation applies only if the field is not a Collection.
In the case the field assignment is referring a List or a Set, the instrumentation will wrap the assignment with a ReactiveList or `ReactiveSet accordingly; for example:
public class School {
    private final String name;
    private final List<Child> children = new ArrayList<Child>();
    ...

    public School(String name) {
        this.name = name;
    }

    public List<Child> getChildren() {
        return children;
    }
}
will be instrumented by intercepting and wrapping with ReactiveList:
public class School implements ReactiveObject {
    private final String name;
    private final List<Child> children;

    public School(final String name) {
        this.$$_drools_write_children(new ArrayList());
        this.name = name;
    }

    public List<Child> getChildren() {
        return this.children;
    }

    public void $$_drools_write_children(final List list) {
        this.children = (List<Child>) new ReactiveList(list);
    }
2.14.1.4. PMML Support
|
This feature is experimental |
| This feature makes use of Rule Units |
Drools now support assets that conform to a subset of the Predictive Modeling Markup Language (PMML). The following predictive model types are now supported:
-
Regression
-
Scorecard
-
Tree
Additionally, the Mining model type has partial support; with the following modes currently available:
-
Model Chain
-
Select All
-
Select First
Further modes of operation will be supported as they become available.
2.14.1.5. Soft expiration for events
When explicitly defining an event expiration in Drools 6.x, it is always considered an hard expiration, meaning that it always takes precedence on any other expiration implicitly calculated on temporal windows and constraints where the event is involved. Drools 7 also allows to specify a soft expiration for events that can be used if the inferred expiration offset is infinite. In this way it is possible to have a guaranteed expiration that is either the inferred one or the specified one if the other is missing. Moreover this implies that rule authors are not required to include a temporal constraint in all rules and then event classes can be designed even if the rules are not yet known.
By default event expiration is considered to be hard, but it is possible to change the expiration policy and define a soft expiration either annotating the event’s class as it follows:
@Role(Role.Type.EVENT)
@Expires( value = "30s", policy = TIME_SOFT )
public class MyEvent { ... }
or using a type declaration:
declare MyEvent
  @role( event )
  @expires(value = 30s, policy = TIME_SOFT)
end
2.14.1.6. Rule Units
|
This feature is experimental |
Rule units represent a purely declarative approach to partition a rules set into smaller units, binding different data sources to those units and orchestrate the execution of the individual unit. A rule unit is an aggregate of data sources, global variables and rules.
2.14.2. Workbench
Apart from the generic improvements to the workbench (listed below in a separate section), there are also some Drools-specific enhancements in the workbench.
2.14.2.1. DMN style hit policies for Decision Tables
With each Hit Policy, by default a row has priority over each row below it.
-
Unique Hit With unique hit policy each row has to be unique meaning there can be no overlap. There can never be a situation where two rows can fire, if there is the Verification feature warns about this on development time.
-
First Hit First hit fires only one row, the one that is satisfied first from top to bottom.
-
Resolved Hit Similar to First Hit, but you can for example give row 10 priority over row 5. This means you can keep the order of the rows you want for visual readability, but specify priority exceptions.
-
Rule Order Multiple rows can fire and Verification does not report about conflicts between the rows since they are expected to happen.
-
None This is the normal hit mode. Old decision tables will use this by default, but since 7.0 uses PHREAK the row order now matters. There is no migration tooling needed for the old tables. Multiple rows can fire. Verification warns about rows that conflict.
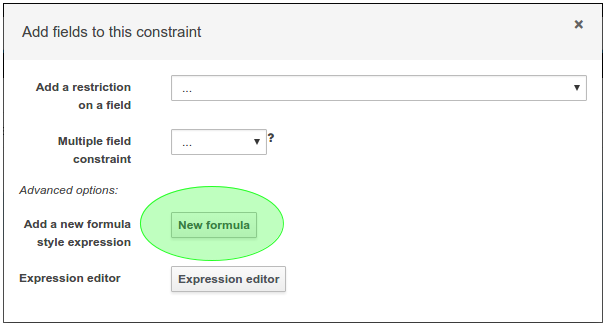
2.14.2.2. Guided Rule Editor : Support formulae in composite field constraints
Composite field constraints now support use of formulae.
When adding constraints to a Pattern the "Multiple Field Constraint" selection ("All of (and)" and "Any of (or)") supports use of formulae in addition to expressions.
2.14.2.3. Guided Decision Table Editor : New editor
The Guided Decision Table Editor has been extensively rewritten to support editing of multiple tables in the same editor. Tables that share an association are visibly linked making it easier to visualise relationships. Associations are infered from Actions that create or update a Fact consumed by the Conditions of another table.
Highlights include:-
-
A new look and feel
-
Resizable columns
-
Reordering of columns by dragging and dropping "in table"
-
Reordering of rows by dragging and dropping "in table"
-
Repositioning of tables with drag and drop
-
Panning of view to scroll content
-
Zoomable view, so you can zoom "out" to see more content at once
-
File locks and Version History per Decision Table

2.14.2.4. Guided Decision Table Editor : Caching of enumeration lookups
The Guided Decision Table Editor has long been capable of using enumeration definitions. However since a table can contain many cells performance of enumerations could sometimes be less than ideal if the definition required a server round-trip to retrieve the lookups from a helper class.
Results from server round-trips are now cached in the client hence removing the need for successive network calls when cells are modified. The cache is initialised when the editor is opened and populated on demand.
2.14.2.5. Guided Decision Table Editor : Verification and Validation
System Property
It is possible to disable the Verification & Validation with the system property org.kie.verification.disable-dtable-realtime-verification. This can be useful for large decision tables or if the users want to ignore V&V.
Range Checks
The verification takes the first steps towards helping you to make complete decision tables. In the next release we add the support for checking if all the ranges are covered for boolean, numeric and date values. This means if your table has a check for if an Application is approved the verification report will remind you to make sure you also handle situations where the Application was not approved.
Unique Single Hit
In the past verification and validation has raised an issue if rows subsume each other. If a row subsumes another, then the conditions can be satisfied with the same set of facts. Meaning two rows from the same table can fire at the same time. In some cases subsumption does not matter, but in other cases you want to have a table where only one rule fires at the time. The table is then a single hit decision table. To help the making of single hit tables where only one row can fire, the verification keeps an eye on the conditions. Reporting situations when single hit is broken.
2.15. Breaking changes in Drools 7.0 from 6.x
2.15.1. Property reactivity enabled by default
Property reactivity has been introduced in Drools 5.4 but users had to explicitly enable it on a class by class basis through
the @PropertyReactive annotation or on the whole knowledge base using the PropertySpecificOption.ALWAYS builder option.
However, since using this feature is considered a good practice both under correctness and performance points of view, it has
been enabled by default in Drools 7.0. If required it is possible to disable property reactivity and reconfigure Drools 7.0
to work exactly as it did in version 6.x by adding the following configuration to the kmodule.xml file.
<configuration>
  <property key="drools.propertySpecific" value="ALLOWED"/>
</configuration>
2.15.2. Type preserving accumulate functions
In Drools 6 when using the sum function inside an accumulate pattern the result was always a Double regardless of the
field type on which the sum was performed. This caused the following 3 problems:
-
Loss of precision: the sum of a long
1881617265586265321Lwill incorrectly return1.88161726558626534E18. The BigDecimal sum of0.09and0.01will also be incorrect. -
Loss of performance: summing with a Double total is significantly slower than summing with a Long or an Integer.
-
Leaked complexity: it enforced the user to pattern matching on Double, or more generically (suggested choice) on Number, while it may be expected that the result of summing on a field of type Integer would be an Integer as well.
Conversely Drools 7 preserves the type of the expression on which the sum is executed, so it will be possible to directly match on that type as in:
Long(...) from accumulate(..., sum($p.getLongWeight()))2.15.3. Renaming TimedRuleExecutionOption
The KieSession option to control when timed rules have to be automatically executed has been renamed into TimedRuleExecutionOption fixing a typing mistake in its name which affected previous releases; the property has been aligned into drools.timedRuleExecution.
| previous releases | version 7.0.0.Final |
|
|---|---|---|
KieSession option |
|
|
property |
|
|
2.15.4. Renaming and unification of configuration files
In Drools 6.x, the default Drools configuration properties were configured in two distinct files:
* drools.default.rulebase.conf located in the META-INF folder of drools-core
* drools.default.packagebuilder.conf located in the META-INF folder of of drools-compiler
In Drools 7.0.0, these files are unified into a single one named kie.default.properties.conf, located in the META-INF folder of drools-core.
If you want to override the default values of these properties or add your own, you can put them in a file called kie.properties.conf located in the META-INF folder of your project.
2.16. New and Noteworthy in KIE Workbench 7.0.0
The workbench has been updated to support Wildfly 10 and EAP7. Minimum Java requirement is JDK8.
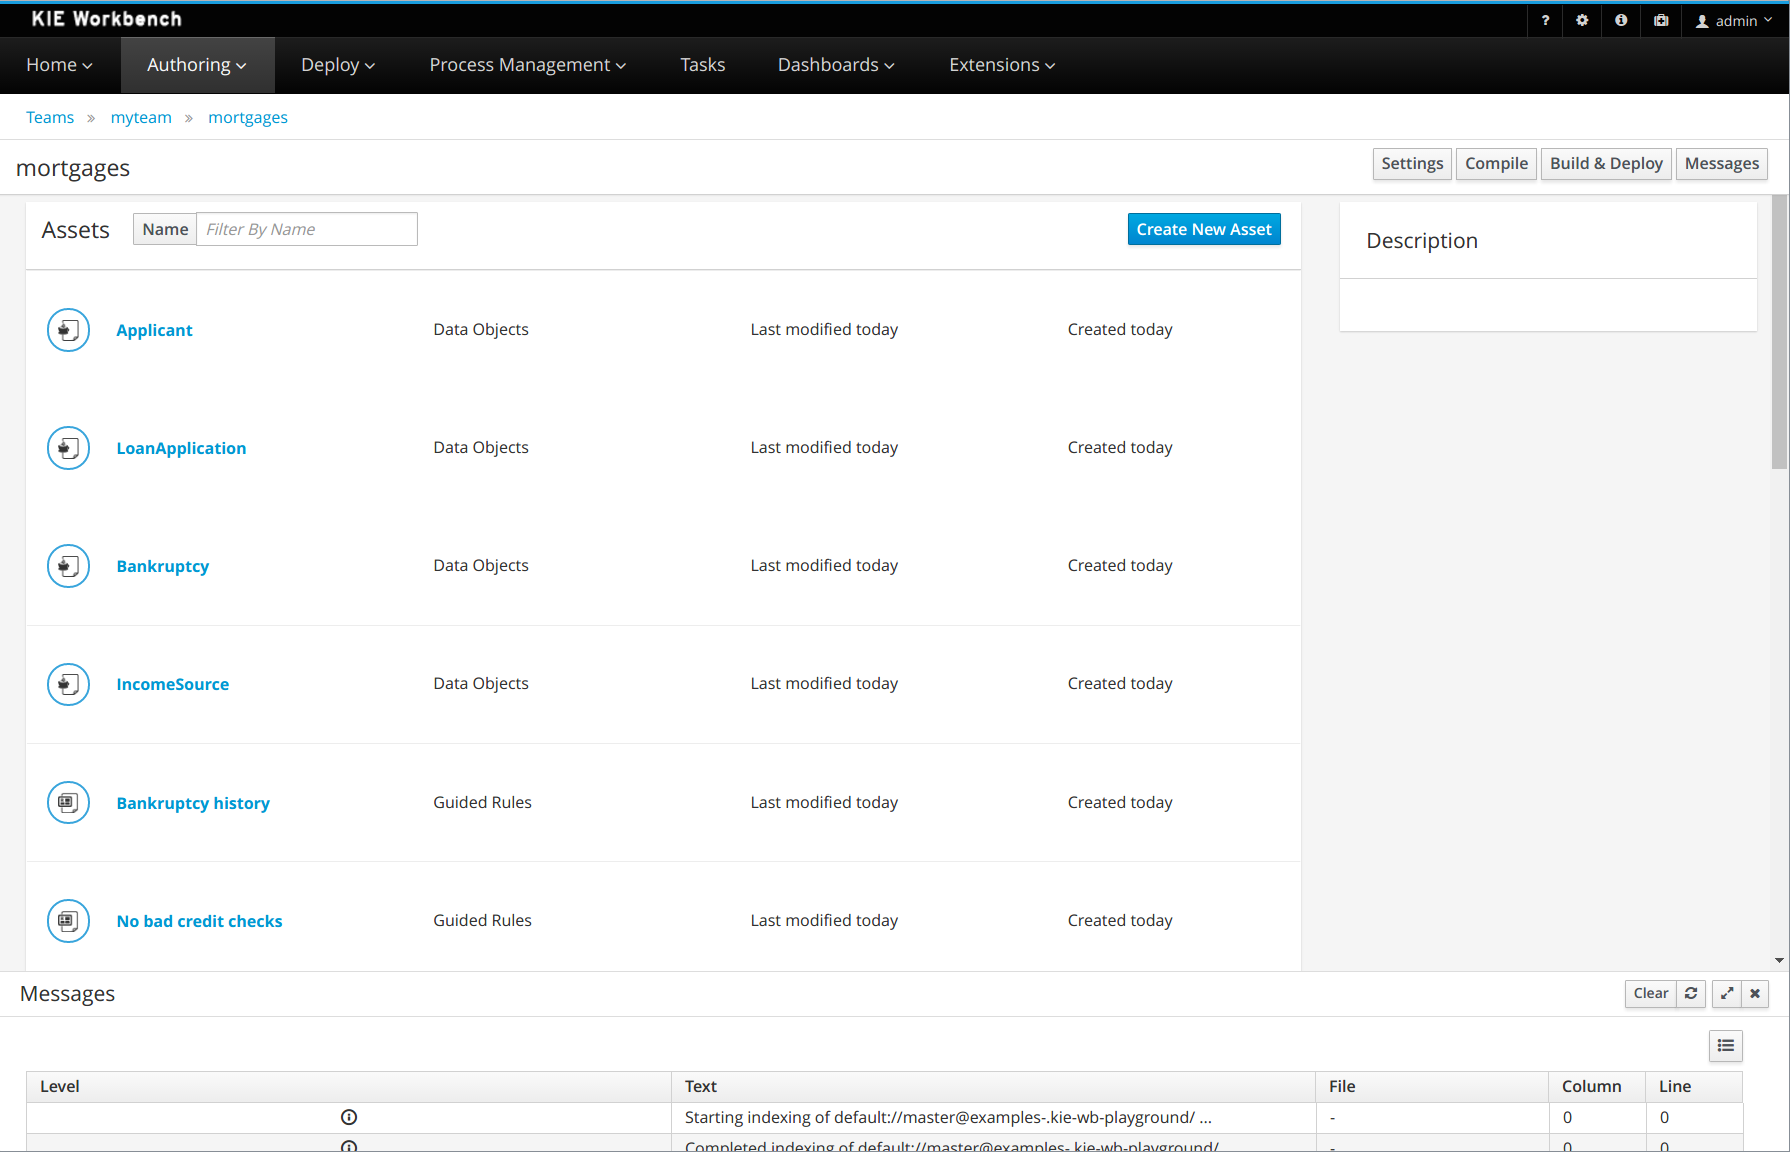
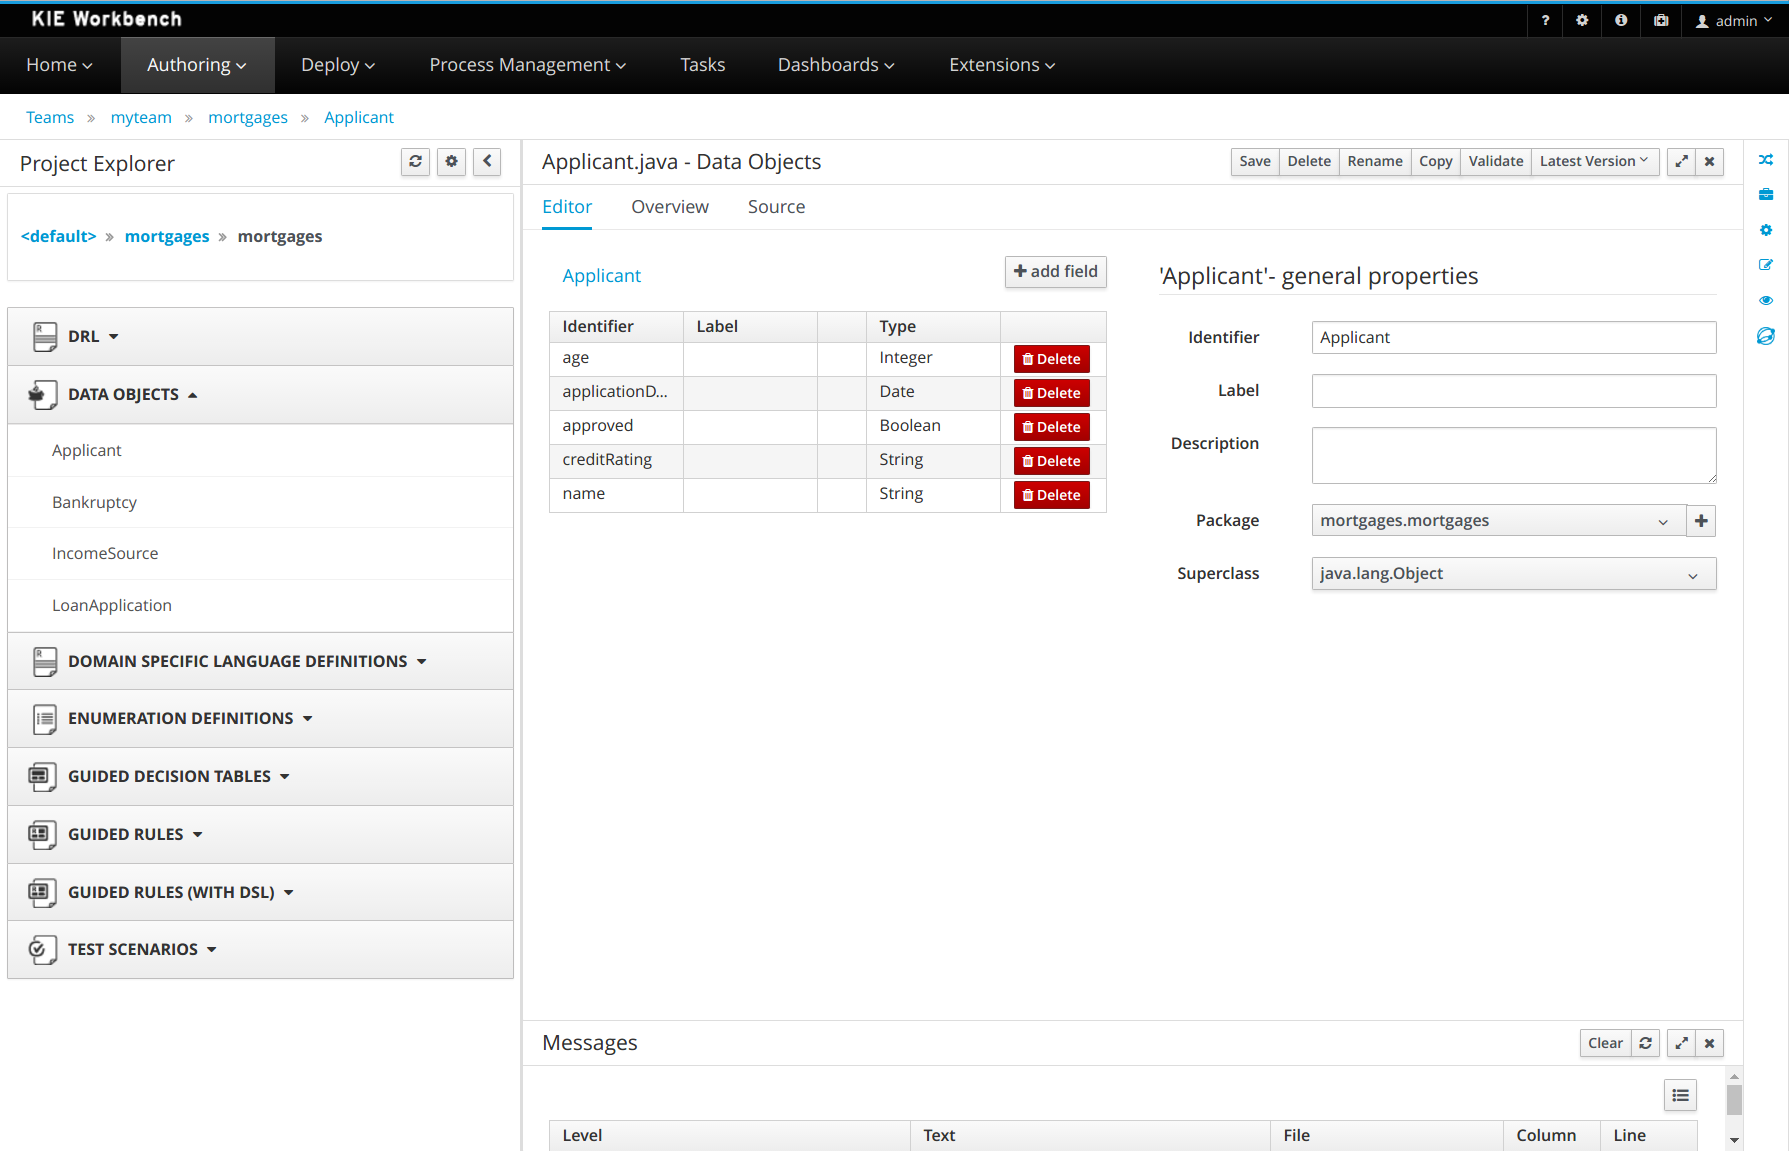
2.16.1. New Authoring (Library)
Authoring now has a new design, with a better information organization. It’s now possible to manage (create, delete and edit) Teams (Organizational Units), list Projects in a Repository and the Assets in a Project. When an Asset is selected, you can see the Asset Editor and the Project Explorer.
|
The Library uses the indexing of the Workbench. It is, therefore, imperative that existing index information is deleted so that the Workbench can rebuild them with the necessary information. Index information is stored in the |

Also, you can set some preferences about your default workspace by accessing Home > Admin > Library.
2.16.2. Authoring - Imports of Examples
Prior to 7.x the Workbench used to install pre-defined examples at startup.
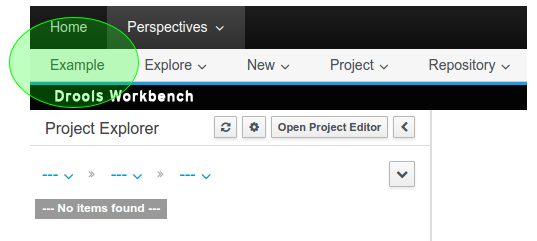
Version 7.x brings the ability to import examples from git repositories. The Authoring Perspective contains a menu item for 'Examples' clicking this launches a Wizard to guide you through the import.
The Authoring Perspective contains a menu item for 'Examples'.
Page 1 of the Wizard allows the User to select a pre-defined examples repository, or enter their own URL.
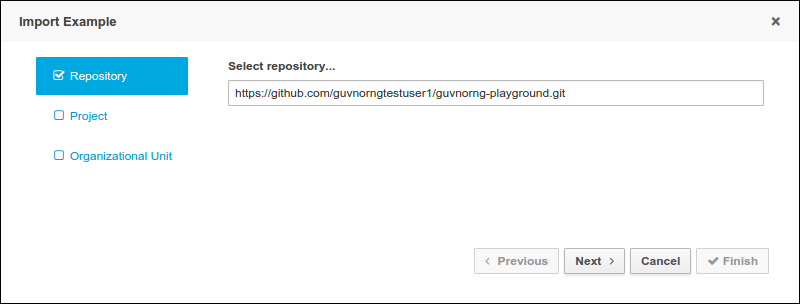
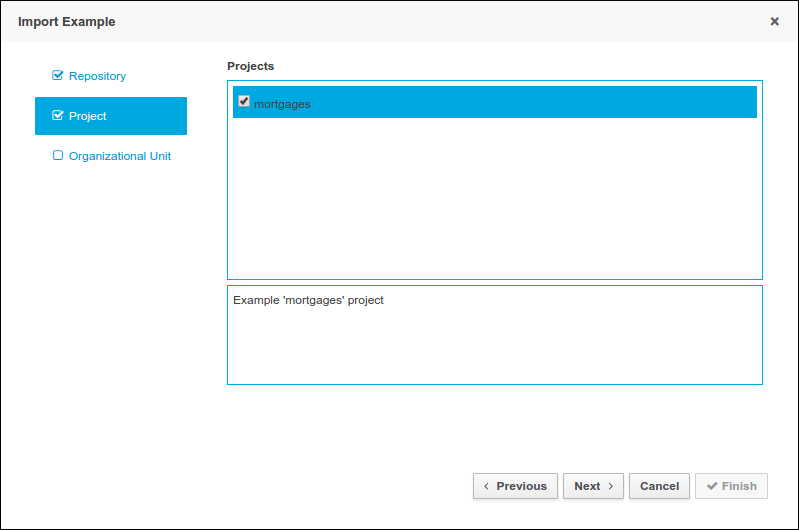
Page 2 of the Wizard lists Projects available in the source repository.
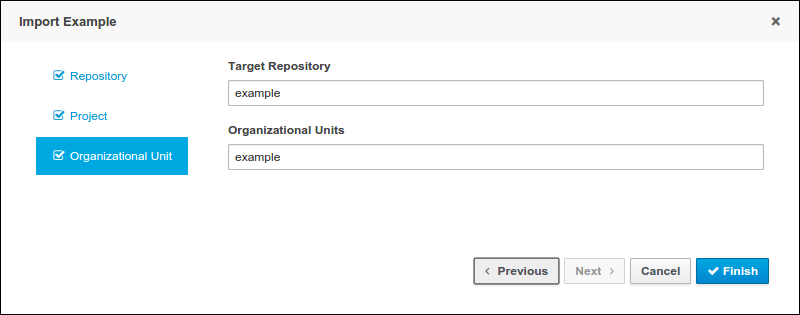
Page 3 of the Wizard allows the User to enter a target Repository name and associate it with an Organizational Unit.
2.16.3. Authoring - Pop-ups improvements
All system pop-ups had their UX improved.
The "comment" field is hidden by default.
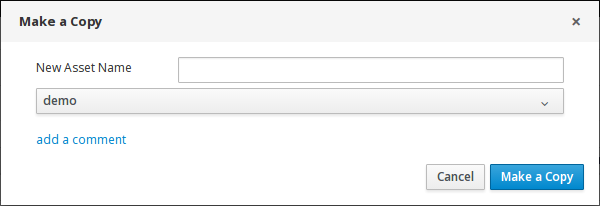
Now, the destination package can be selected when a project file is copied from any package.
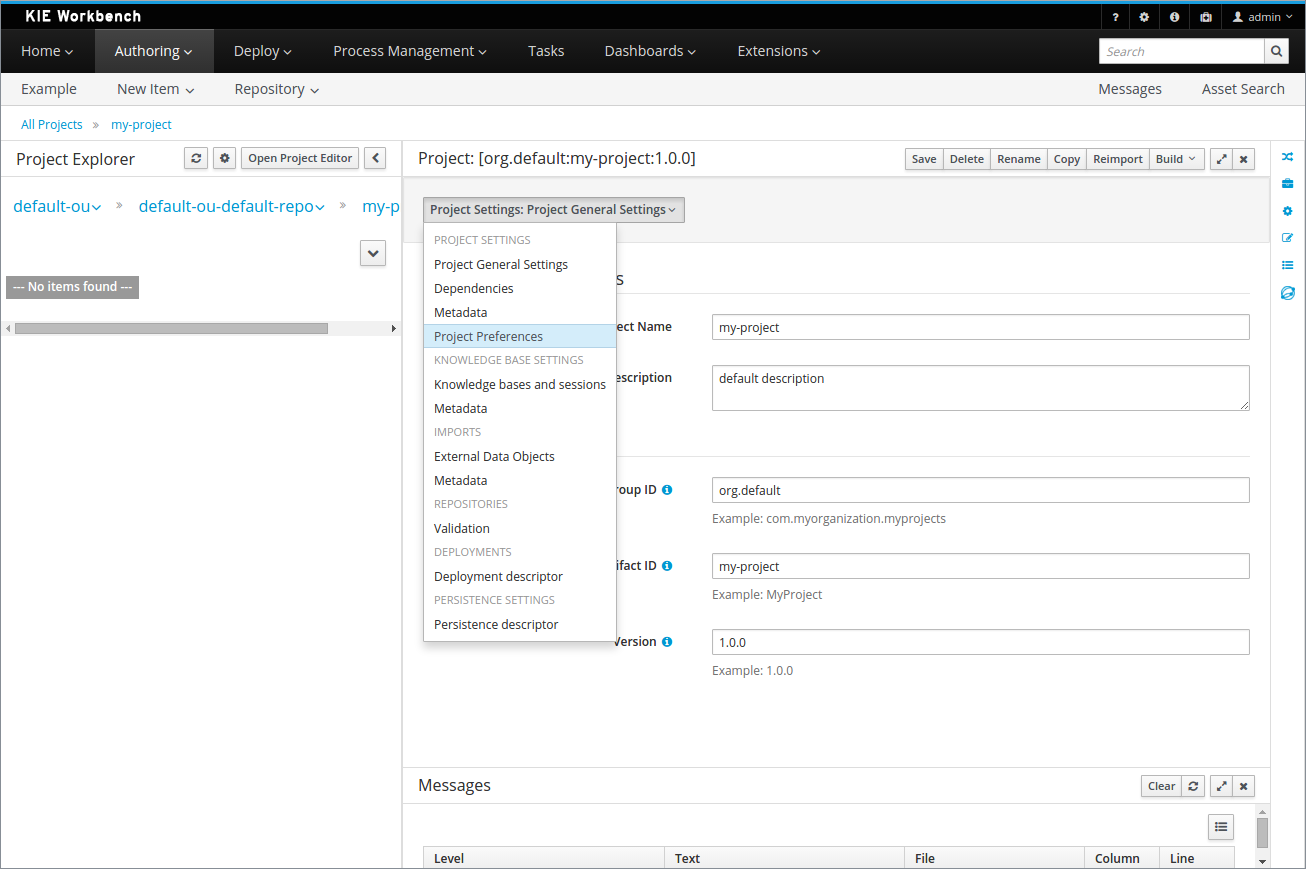
2.16.4. Authoring - Project Editor - Reimport button
The "Reimport" button invalidates all cached dependencies, in order to handle scenarios where a specific dependency was updated without having its version modified.
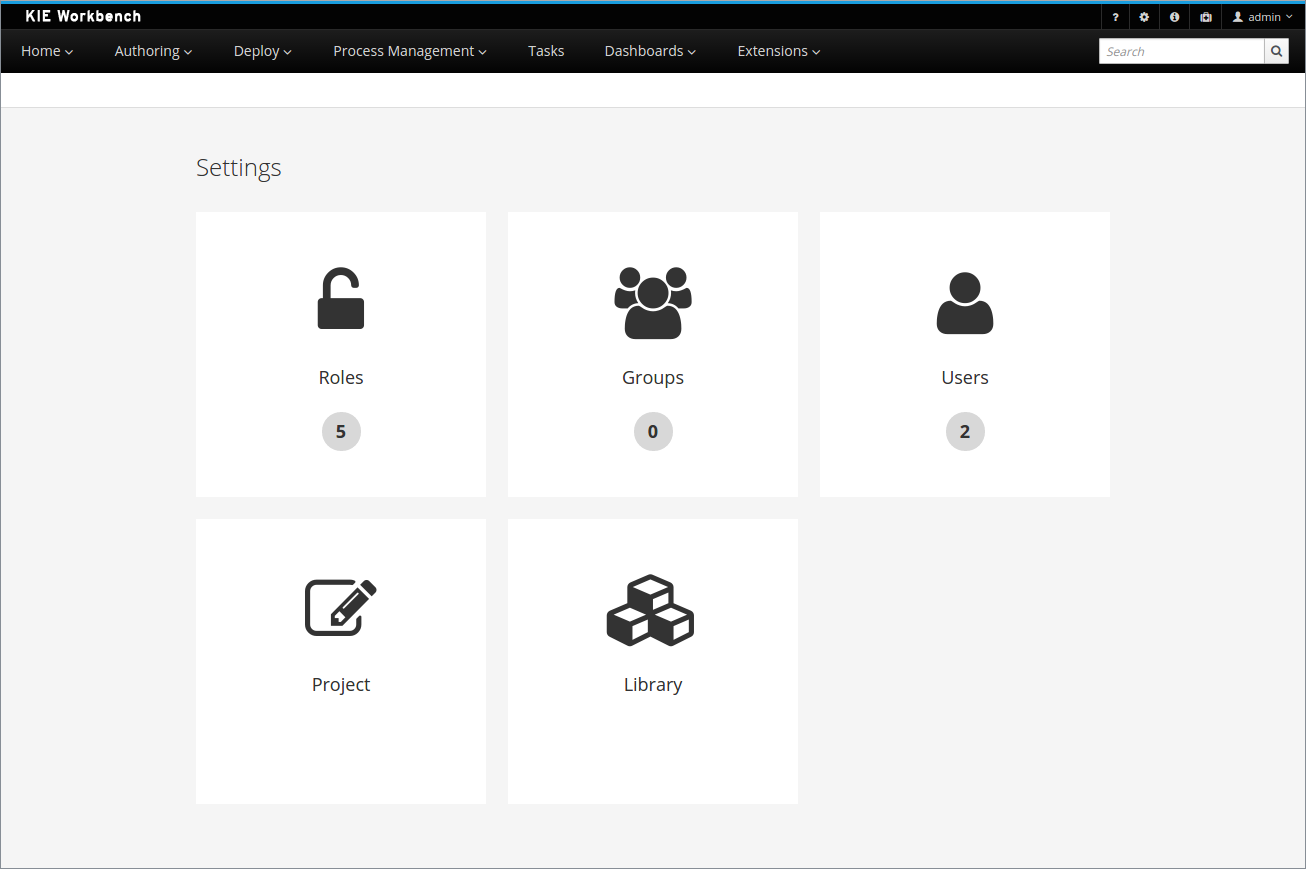
2.16.5. Security Management
The User and Group management perspectives released in version 6.4 have been unified into a single perspective which delivers a shared view for managing both users and groups as well as the permissions granted to any of the application roles.
This very new perspective is placed under the Home section in the top menu bar.
The next screenshot shows how this new perspective looks:
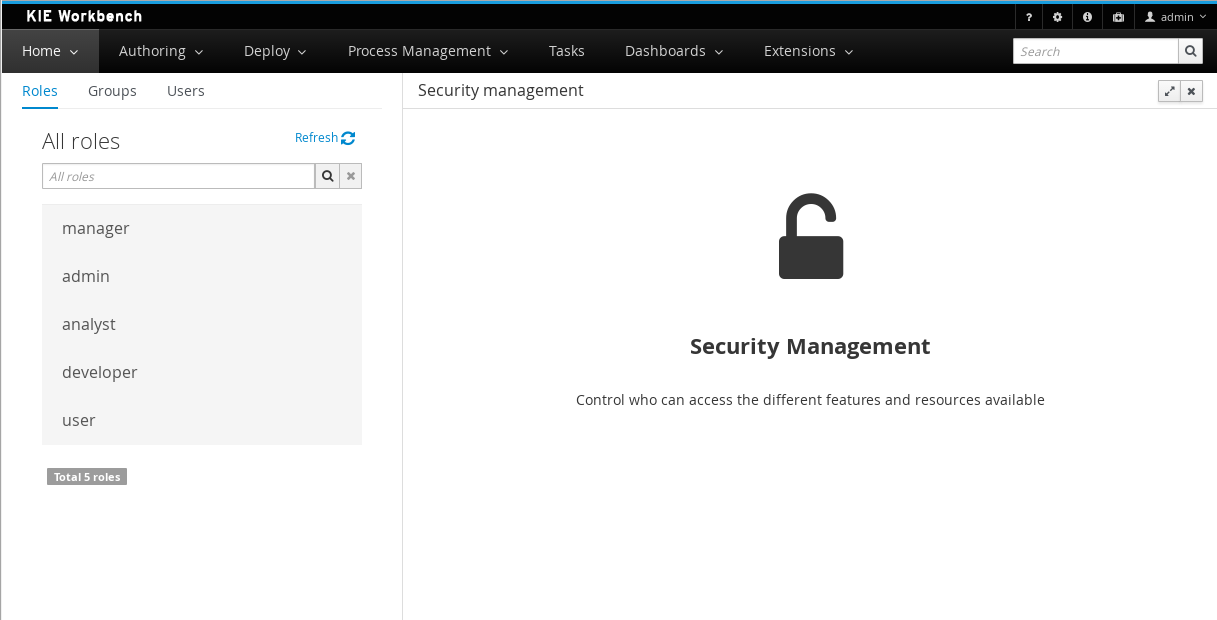
A tabbed pane is shown on the left, allowing the User to select the Roles, Groups or Users tab. After clicking on a Role (or Group) a detailed screen is displayed allowing the user to configure some security settings.
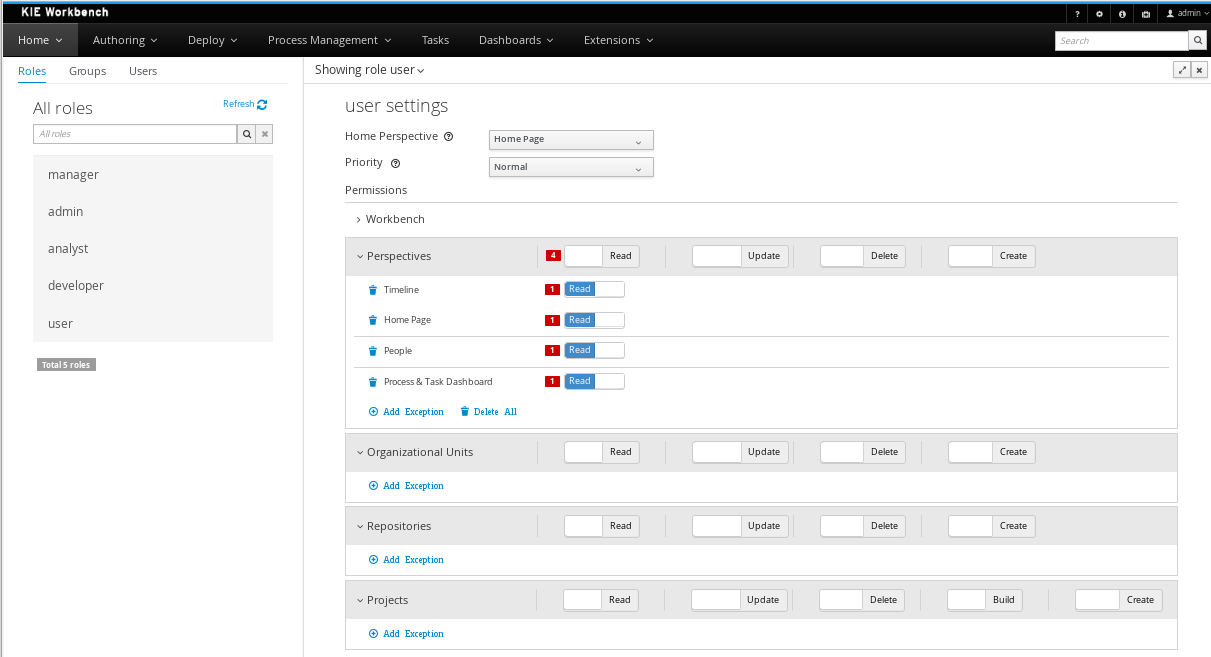
-
Home Perspective: The target perspective where the user is directed after login, which makes it possible to have different home pages per role/group.
-
Priority: Used to determine what settings (home perspective, permissions, …) have precedence for those users with more than one role or group assigned.
-
Permissions: A full ACL (Access Control List) editor for grant/deny permissions over the different resources available in the platform like Perspectives, Organizational Units, Repositories or Projects. Global permissions on top of any of those resource types can be ovewritten by means of adding individual exceptions which makes it possible to implement both the grant all deny a few or the deny all grant a few strategies.
2.16.6. kie-config-cli has been removed
The command-line tool kie-config-cli.[sh/bat] for managing remote repositories that was present in 6.x has been removed for the following reasons:
-
The security-related operations it provided (
add-role-repo,remove-role-repo,add-role-org-unit,remove-role-org-unit,add-role-project,remove-role-project) have been replaced by more comprehensive Security management feature. -
The operations related to managing deployments (
list-deployment,add-deployment,remove-deployment) no longer make sense, since jBPM Runtime has been removed from workbench. Deployments can still be managed programmatically using Kie Server REST API. -
The remaining operations (
create-org-unit,remove-org-unit,list-org-units,create-repo,remove-repo,list-repo,add-repo-org-unit,remove-repo-org-unit,list-project-details) are available as a part of workbench remote API
2.16.7. User and Project Admin Pages and Preferences
The workbench now has a new menu item: "Admin". In there, you can find some admin tools, like "Users", "Groups" and "Roles" management, and also general preferences. When a preference is changed there, it will affect all places that depend on it, but only for the logged user.

Each project also has its own admin page, with admin tools and preferences. When a preference is changed there, it will affect only that project, and only for the logged user.
2.16.8. GAV conflict check and child GAV edition
It is now possible, for each user, to set the GAV conflict check flag, and also allow or block child GAV edition for all their projects, or specifically for each project.
The configuration can be found inside the admin tool "Project", in case the access is made through the "Admin" menu item. It can also be found by entering the admin tool "General", on the Project admin page.

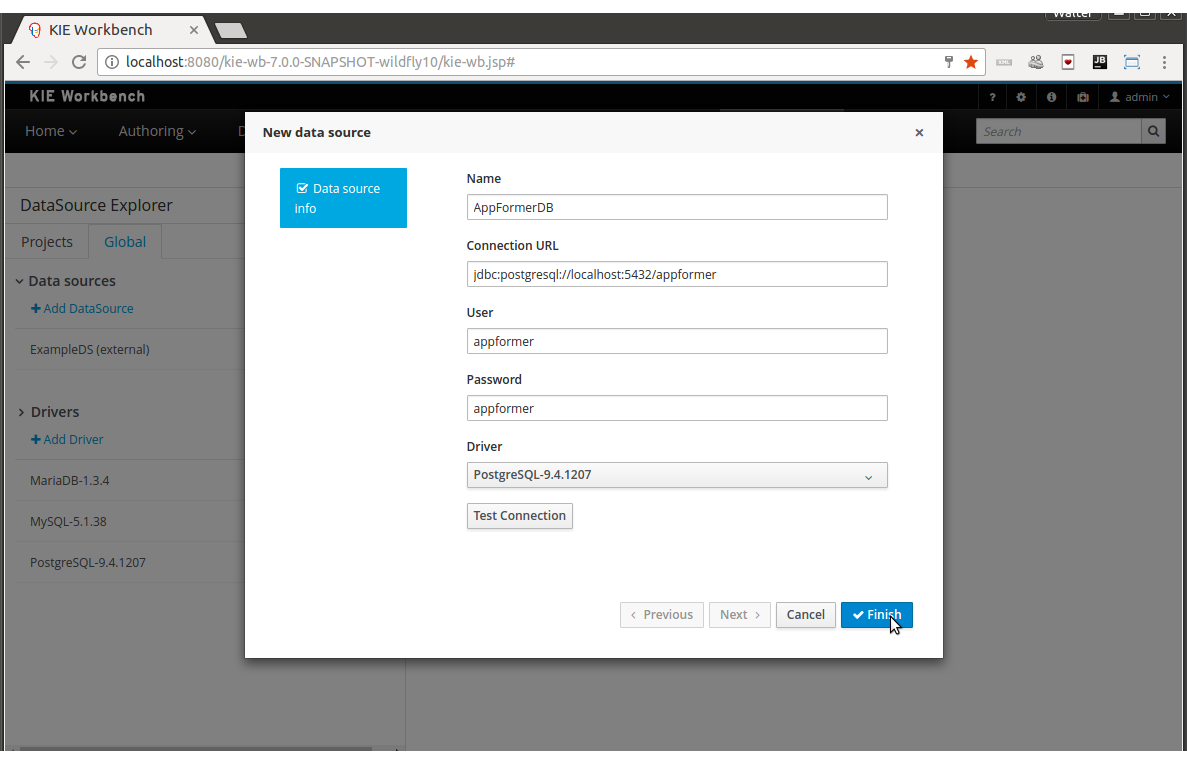
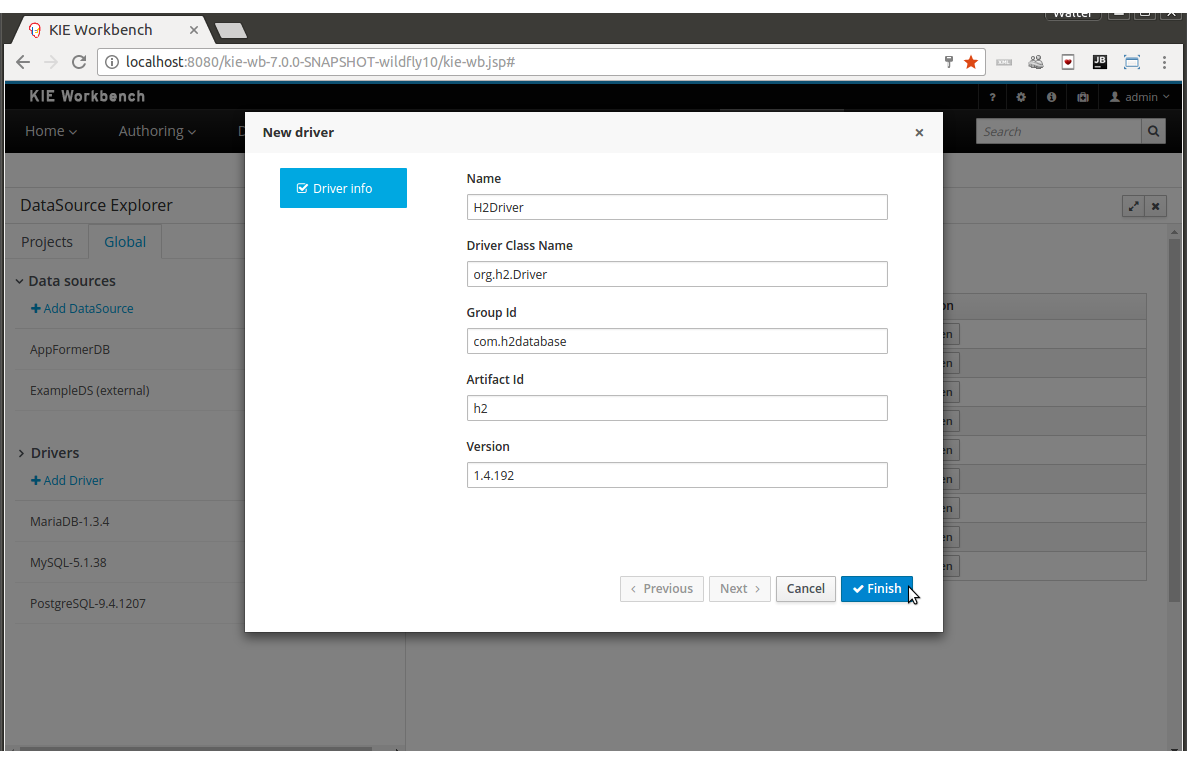
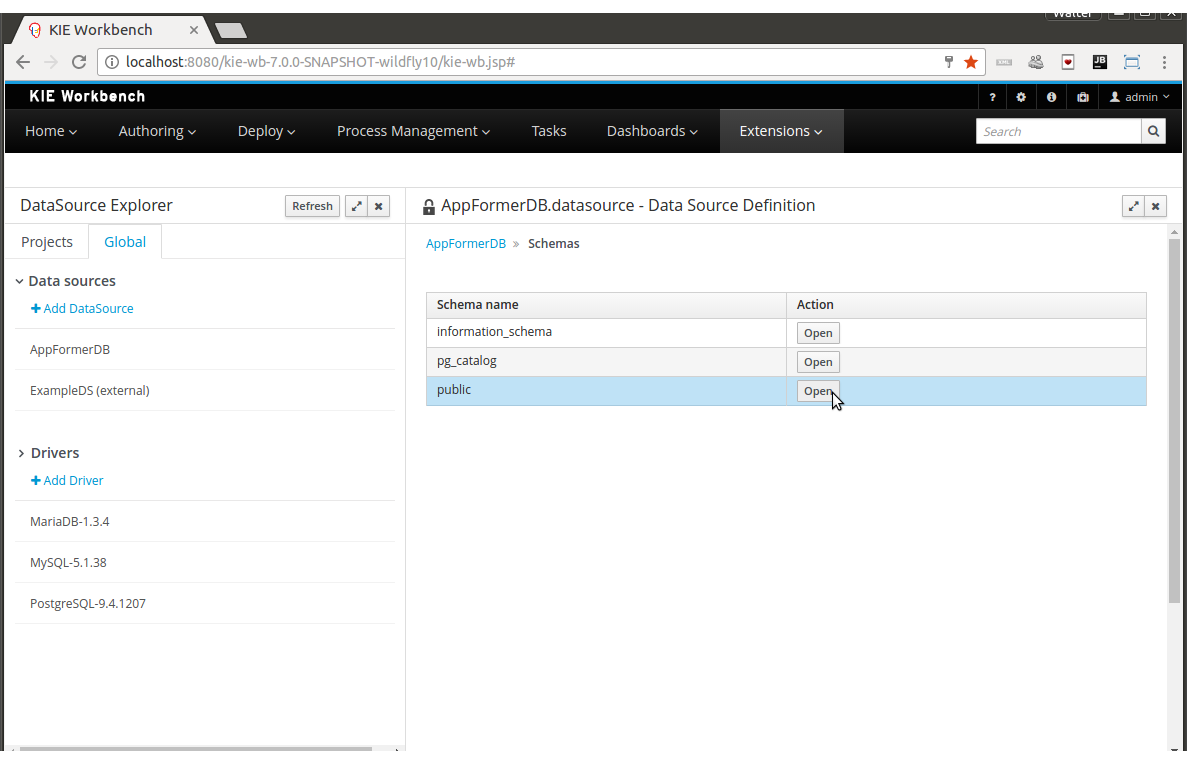
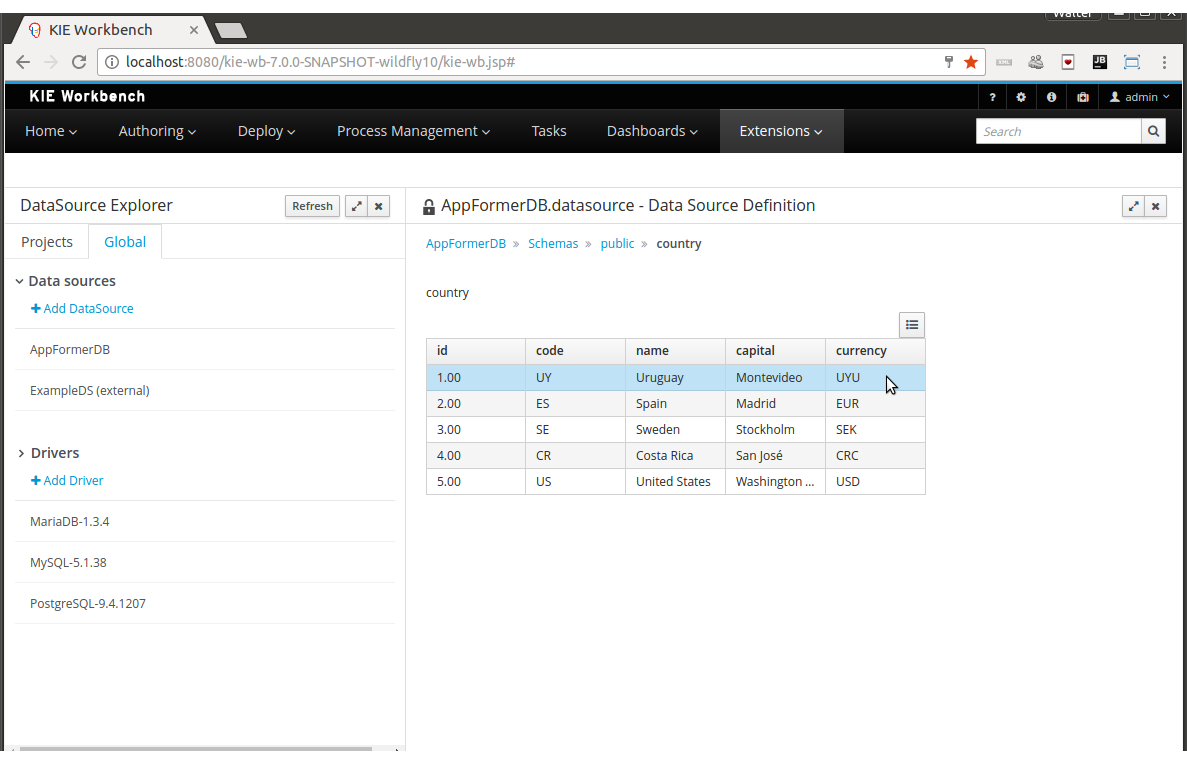
2.16.9. Data Source Management
The new data source management system empowers the workbench with the ability of defining data sources and drivers for accessing external databases.
Some of the included functionalities are:
-
A new perspective for managing the data sources:
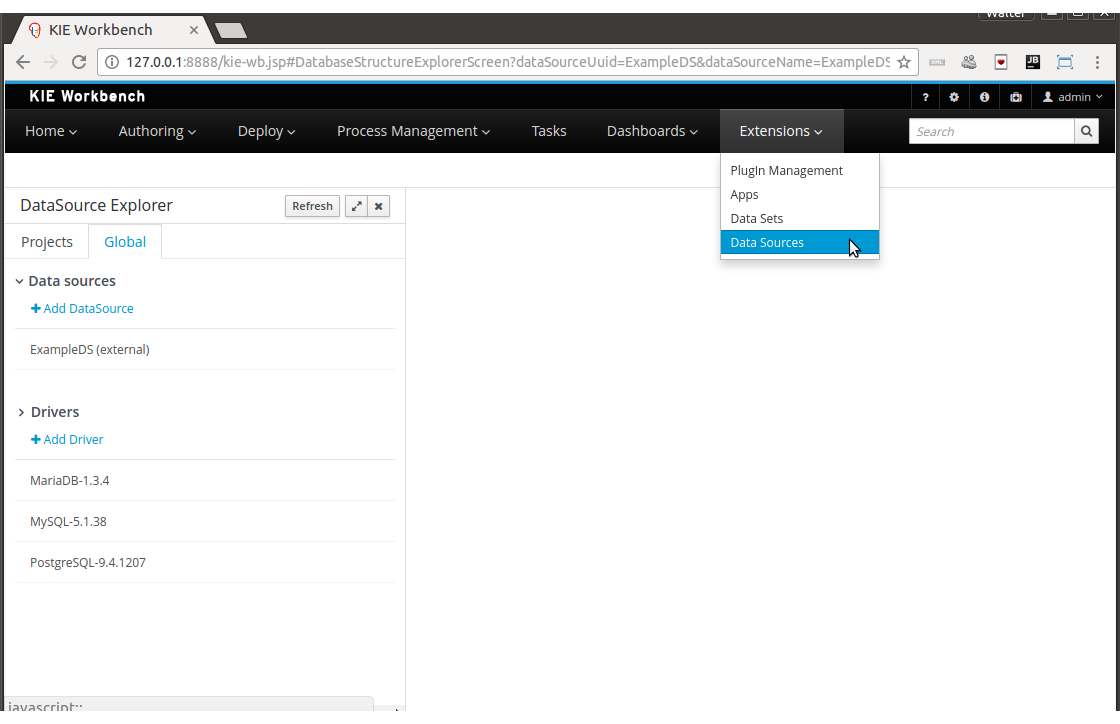
-
A new wizard for guiding the data source creation.
-
A new wizard for guiding the drivers creation.
And the ability of browsing the database information for the databases pointed to by the data sources.
-
Available schemas browsing
-
Available tables browsing

-
Table content browsing
2.17. Breaking changes in Kie Server 7.0 from 6.x
2.17.1. ServiceResponse XStream marshalling changes
| This release note applies only when directly interfacing with the Kie Server (kie-server) API, not when using the Kie Server Java Client (kie-server-client) API. |
In an effort to be more consistent with JAXB marshalling, XStream marshalling has undergone the following changes:
-
The XML ServiceResponse element’s
responseobject no longer renders with the canonical name. -
XStream now uses
typeandmsgas attributes, not child elements.
For more details, see DROOLS-1509.
2.17.2. Simplified Planner REST API
2.17.2.1. ServiceResponse wrapper removal
ServiceResponse wrapper has been removed from Planner service responses returned by KIE Server.
This allows an easier processing of the responses on the client side.
<solver-instance>
    ...
    <status>SOLVING</status>
    <score scoreClass="org.optaplanner.core.api.score.buildin.hardsoft.HardSoftScore">0hard/-10soft</score>
    <best-solution class="curriculumcourse.curriculumcourse.CourseSchedule">
        ...
    </best-solution>
</solver-instance>
2.17.2.2. New Planner API overview
Register a solver:
Submit a solution:
Get the best solution:
Terminate a solver:
Dispose a solver:
2.18. What is New and Noteworthy in Drools 6.5.0
2.18.1. Configurable ThreadFactory
Some runtime environments (like for example Google App Engine) don’t allow to directly create new Threads.
For this reason it is now possible to plug your own ThreadFactory implementation by setting the system property drools.threadFactory with its class name.
For instance if you implemented your Google App Engine compatible ThreadFactory with the class com.user.project.GoogleAppEngineThreadFactory you can make Drools to use it by setting:
drools.threadFactory = com.user.project.GoogleAppEngineThreadFactory2.18.2. Use of any expressions as input for a query
It is now possible to use as input argument for a query both the field of a fact as in:
query contains(String $s, String $c)
    $s := String( this.contains( $c ) )
end

rule PersonNamesWithA when
    $p : Person()
    contains( $p.name, "a"; )
then
end
and more in general any kind of valid expression like in:
query checkLength(String $s, int $l)
    $s := String( length == $l )
end

rule CheckPersonNameLength when
    $i : Integer()
    $p : Person()
    checkLength( $p.name, 1 + $i + $p.age; )
then
end
2.18.3. Update with modified properties
Property reactivity has been introduced to avoid unwanted and useless (re)evaluations and allow the engine to react only to modification of properties actually constrained or bound inside of a given pattern. However this feature is automatically available only for modifications performed inside the consequence of a rule. Conversely a programmatic update is unaware of the object’s properties that have been changed, so it is unable of using this feature.
To overcome this limitation it is now possible to optionally specify in an update statement the names of the properties that have been changed in the modified object as in the following example:
Person me = new Person("me", 40);
FactHandle meHandle = ksession.insert( me );

me.setAge(41);
me.setAddress("California Avenue");
ksession.update( meHandle, me, "age", "address" );
2.18.4. Monitoring framework improvements
A new type of MBean has been introduced in order to provide monitoring of the KieContainers, and the JMX MBeans hierarchical structure have been revisited to reflect the relationship with the related MBeans of the KieBases. The JMX objectnaming has been normalized to reflect the terminology used in the Kie API. A new type of MBean has been introduced in order to provide monitoring for Stateless KieSession, which was not available in previous releases.
| MBean | before 6.5.x |
from 6.5.0.Final |
|---|---|---|
KieContainer |
n/a |
|
KieBase |
|
|
KieSession (stateful) |
|
|
Stateless KieSession |
n/a |
|
The KieSession MBeans consolidate the statistics data for all sessions instantiated under the same name.
KieSession created via JPAKnowledgeService, will be monitored under a KieSession MBean having constant {ksessionName} valorized to persistent; this MBean is not managed by the KieContainer directly, hence it requires to be manually deregistered from JMX, when monitoring is no longer needed.
The new JMX objectnaming scheme now enforces proper JMX quoting for IDs, e.g.: org.kie:kcontainerId="2cb55f40-f220-432a-aba8-7940c18bf108",kbaseId="KBase1"
The old DroolsManagementAgent (which was registered on JMX under org.drools:type=DroolsManagementAgent) is no longer necessary, hence no longer registered on JMX.
The KieSession MBeans now have proper JMX CompositeData and TabularData support, where applicable. The KieSession MBeans continue to support all process-related aggregated statistics monitoring, but no longer display start/end dates for each process instances: auditing and logging support is available in jBPM for this scope.
The Drools RHQ/JON plug-in have been changed to reflect all the above mentioned changes, in addition to specific bug-fixing aiming to display hierarchical nesting correctly.
2.19. What is New and Noteworthy in Drools 6.4.0
2.19.1. Better Java 8 compatibility
It is now possible to use Java 8 syntax (lambdas and method references) in the Right Hand Side (then) part of a rule.
2.19.2. More robust incremental compilation
The incremental compilation (dynamic rule-base update) had some relevant flaws when one or more rules with a subnetwork (rules with complex existential patterns) were involved, especially when the same subnetwork was shared among different rules. This issue required a partial rewriting of the existing incremental compilation algorithm, followed by a complete audit that has also been validated by brand new test suite made by more than 20,000 test cases only in this area.
2.19.3. Improved multi-threading behaviour
Engine’s code dealing with multi-threading has been partially rewritten in order to remove a large number of synchronisation points and improve stability and predictability. In particular this new implementation allows a clearer separation and better interaction between the User thread (performing the insert/update/delete actions on the session), the Engine thread (doing the proper rules evaluation) and the Timer one (performing time-based actions like events expiration).
This improvement has been made possible by the new phreak algorithm introduced with Drools 6. In fact with in the ReteOO algorithm the network evaluation is performed during the User insert/update/delete action, meaning that each user action locks the entire engine. Conversely with phreak the insert/update/delete is separated and the network evaluation happens when fireAllRules or fireUntilHalt is called.
More in detail this improvement has been made by 2 parts. First of all a new thread-safe queue has been added to store all user actions as commands. This queue is populated by the User thread while its entries are flushed and processed by the Engine thread during the rules evaluations phase. The second part introduced a state machine coordinating the User, Timer and Engine threads and then providing a clearer and self-documenting way to model their interactions.
2.19.4. OOPath improvements
|
This feature is experimental |
OOPath has been introduced with Drools 6.3.0. In Drools 6.4.0 it has been enhanced to support the following features:
-
A constraint can also have a beckreference to an object of the graph traversed before the currently iterated one. For example the following OOPath:
Student( $grade: /plan/exams/grades{ result > ../averageResult } )will match only the grades having a result above the average for the passed exam.
-
A constraint can also recursively be another OOPath as it follows:
Student( $exam: /plan/exams{ /grades{ result > 20 } } ) -
It is also possible to use the
?/separator instead of the/one. As in the following example:Student( $grade: /plan/exams{ course == "Big Data" }?/grades )By doing so the engine will react to a change made to an exam, or if an exam is added to the plan, but not if a new grade is added to an existing exam. Of course if a OOPath chunk is not reactive, all remaining part of the OOPath from there till the end of the expression will be non-reactive as well. For instance the following OOPath
Student( $grade: ?/plan/exams{ course == "Big Data" }/grades )will be completely non-reactive. For this reason it is not allowed to use the
?/separator more than once in the same OOPath so an expression like:Student( $grade: /plan?/exams{ course == "Big Data" }?/grades )will cause a compile time error.
2.20. New and Noteworthy in KIE Workbench 6.4.0
2.20.1. New look and feel
The general look and feel in the entire workbench has been updated to adopt PatternFly. The update brings a cleaner, lightweight and more consistent user experience throughout every screen. Allowing users focus on the data and the tasks by removing all uncessary visual elements. Interactions and behaviors remain mostly unchanged, limiting the scope of this change to visual updates.
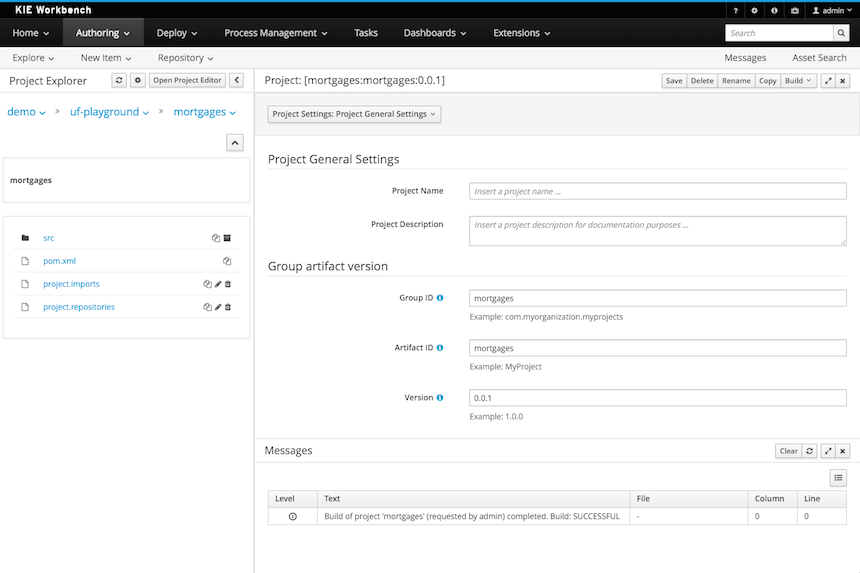
2.20.2. Various UI improvements
In addition to the PatternFly update described above which targeted the general look and feel, many individual components in the workbench have been improved to create a better user experience. This involved making sure the default size of modal popup windows is appropriate to fit the corresponding content, adjusting the size of text fields as well as aligning labels, and improving the resize behaviour of various components when used on smaller screens.
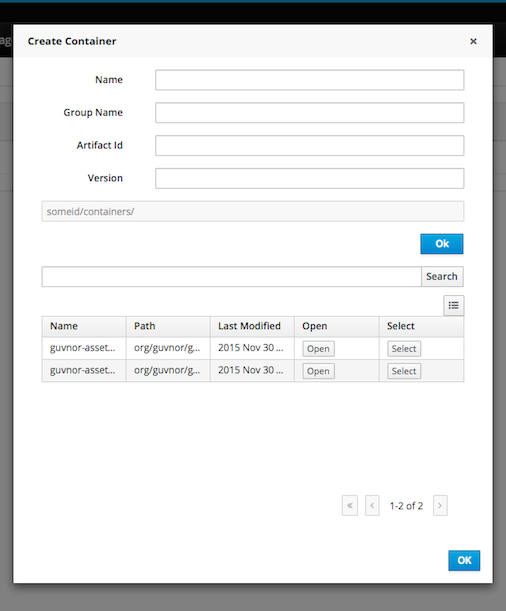
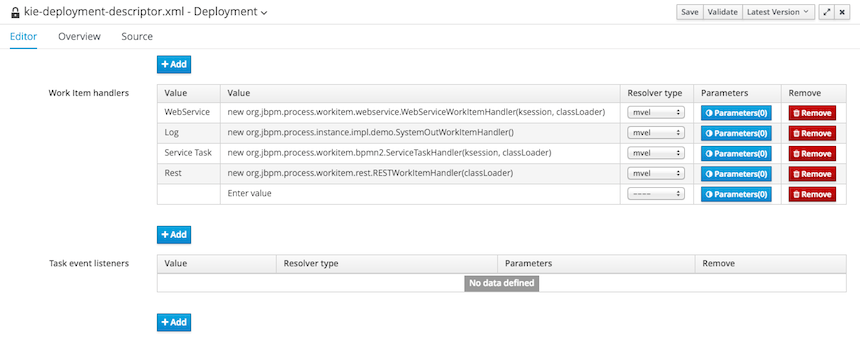
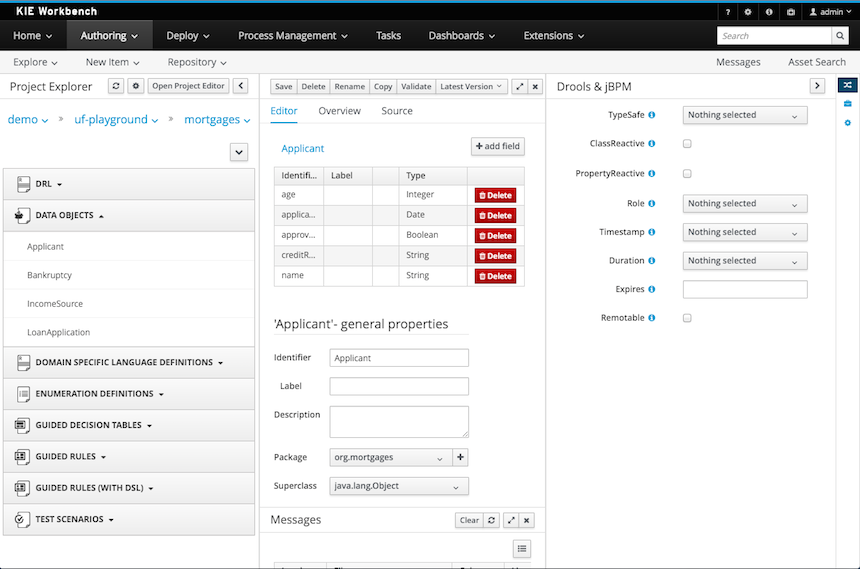
2.20.3. New locales
Locales ru (Russian) and zh_TW (Chineses Traditional) have now been added.
The locales now supported are:
-
Default English.
-
es(Spanish) -
fr(French) -
de(German) -
ja(Japanese) -
pt_BR(Portuguese - Brazil) -
zh_CN(Chinese - Simplified) -
zh_TW(Chinese - Traditional) -
ru(Russian)
2.20.4. Authoring - Imports - Consistent terminology
The Workbench used to have a section in the Project Editor for "Import Suggestions" which was really a way for Users to register classes provided by the Java Runtime environment to be available to Rule authoring. Furthermore Editors had a "Config" tab which was where Users were expected to import classes from other packages to that in which the rule resides.
Neither term was clear and both were inconsistent with each other and other aspects of the Workbench.
We have changed these terms to (hopefully) be clearer in their meaning and to be consistent with the "Data Object" term used in relation to authoring Java classes within the Workbench.
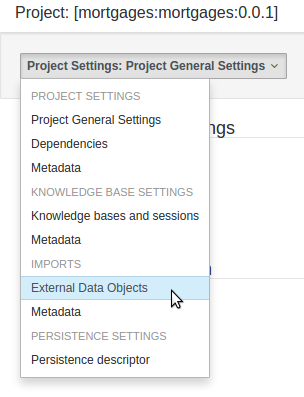
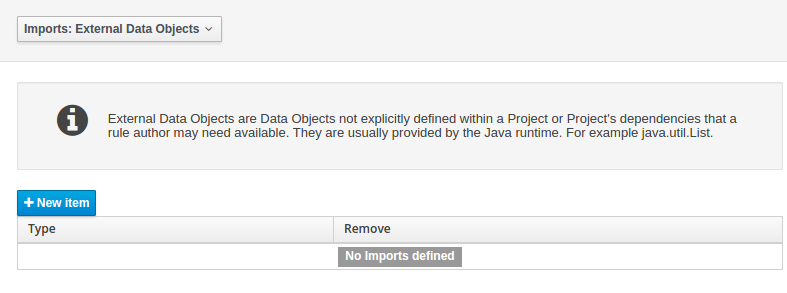
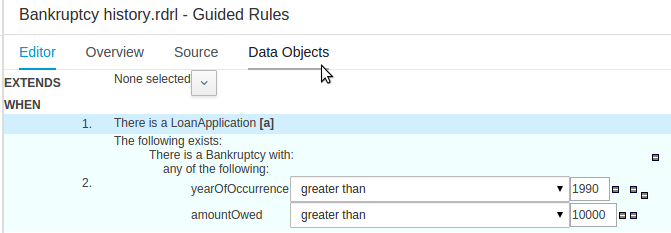
The Data Object screen lists all Data Objects in the same package as the asset and allows other Data Objects from other packages to be imported.
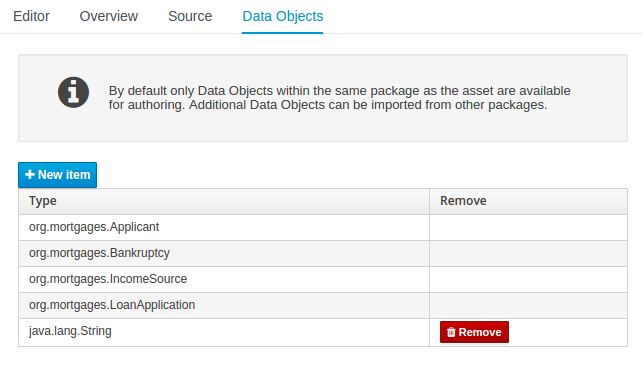
2.20.5. Disable automatic build
When navigating Projects with the Project Explorer the workbench automatically builds the selected project, displaying build messages in the Message Console.
Whilst this is beneficial it can have a detremental impact on performance of the workbench when authoring large projects.
The automatic build can now be disabled with the org.kie.build.disable-project-explorer System Property.
Set the value to true to disable.
The default value is false.
2.20.6. Support for SCP style git Repository URLs
When cloning git Repositories it is now possible to use SCP style URLS, for example git@github.com:user/repository.git.
If your Operating System’s public keystore is password protected the passphrase can be provided with the org.uberfire.nio.git.ssh.passphrase System Property.
2.20.7. Authoring - Duplicate GAV detection
When performing any of the following operations a check is now made against all Maven Repositories, resolved for the Project, for whether the Project’s GroupId, ArtifactId and Version pre-exist.
If a clash is found the operation is prevented; although this can be overridden by Users with the admin role.
|
The feature can be disabled by setting the System Property |
Resolved repositories are those discovered in:
-
The Project’s
POM<repositories>section (or any parentPOM). -
The Project’s
POM<distributionManagement>section. -
Maven’s global
settings.xmlconfiguration file.
Affected operations:
-
Creation of new Managed Repositories.
-
Saving a Project defintion with the Project Editor.
-
Adding new Modules to a Managed Multi-Module Repository.
-
Saving the
pom.xmlfile. -
Build & installing a Project with the Project Editor.
-
Build & deploying a Project with the Project Editor.
-
Asset Management operations building, installing or deloying Projects.
-
RESToperations creating, installing or deploying Projects.
Users with the Admin role can override the list of Repositories checked using the "Repositories" settings in the Project Editor.

2.20.8. New Execution Server Management User Interface
The KIE Execution Server Management UI has been completely redesigned to adjust to major improvements introduced recently. Besides the fact that new UI has been built from scratch and following best practices provided by PatternFly, the new interface expands previous features giving users more control of their servers.
2.20.9. User and group management
Provides the backend services and an intuitive and friendly user interface that allows the workbench administrators to manage the application’s users and groups.
This interface provides to the workbench administrators the ability to perform realm related operations such as create users, create groups, assign groups or roles to a given user, etc.
It comes by default with built-in implementations for the administration of Wildfly, EAP and Tomcat default realms, and it’s designed to be extensible - any third party realm management system can be easily integrated into the workbench.
2.21. What is New and Noteworthy in Drools 6.3.0
2.21.1. Browsing graphs of objects with OOPath
|
This feature is experimental |
When the field of a fact is a collection it is possible to bind and reason over all the items in that collection on by one using the from keyword.
Nevertheless, when it is required to browse a graph of object the extensive use of the from conditional element may result in a verbose and cubersome syntax like in the following example:
rule "Find all grades for Big Data exam" when
    $student: Student( $plan: plan )
    $exam: Exam( course == "Big Data" ) from $plan.exams
    $grade: Grade() from $exam.grades
then /* RHS */ end
In this example it has been assumed to use a domain model consisting of a Student who has a Plan of study: a Plan can have zero or more Exams and an Exam zero or more Grades.
Note that only the root object of the graph (the Student in this case) needs to be in the working memory in order to make this works.
By borrowing ideas from XPath, this syntax can be made more succinct, as XPath has a compact notation for navigating through related elements while handling collections and filtering constraints.
This XPath-inspired notation has been called OOPath since it is explictly intended to browse graph of objects.
Using this notation the former example can be rewritten as it follows:
rule "Find all grades for Big Data exam" when
    Student( $grade: /plan/exams[course == "Big Data"]/grades )
then /* RHS */ end
Formally, the core grammar of an OOPath expression can be defined in EBNF notation in this way.
OOPExpr = "/" OOPSegment { ( "/" | "." ) OOPSegment } ;
OOPSegment = [ID ( ":" | ":=" )] ID ["[" Number "]"] ["{" Constraints "}"];
In practice an OOPath expression has the following features.
-
It has to start with
/. -
It can dereference a single property of an object with the
.operator -
It can dereference a multiple property of an object using the
/operator. If a collection is returned, it will iterate over the values in the collection -
While traversing referenced objects it can filter away those not satisfying one or more constraints, written as predicate expressions between curly brackets like in:
Student( $grade: /plan/exams[course == "Big Data"]/grades ) -
Items can also be accessed by their index by putting it between square brackets like in:
Student( $grade: /plan/exams[0]/grades )To adhere to Java convention OOPath indexes are 0-based, compared to XPath 1-based
2.21.1.1. Reactive OOPath
At the moment Drools is not able to react to updates involving a deeply nested traversed during the evaluation of an OOPath expression.
To make these objects reactive to changes at the moment it is necessary to make them extend the class org.drools.core.phreak.ReactiveObject.
It is planned to overcome this limitation by implementing a mechanism that automatically instruments the classes belonging to a specific domain model.
Having extendend that class, the domain objects can notify the engine when one of its field has been updated by invoking the inherited method notifyModification as in the following example:
public void setCourse(String course) {
    this.course = course;
    notifyModification(this);
}
In this way if an exam is moved to a different course, the rule is re-triggered and the list of grades matching the rule recomputed.
2.21.2. Kie Navigator View for Eclipse
A new viewer has been added to the Eclipse Tooling. This Kie Navigator View is used to manage Kie Server installations and projects.
Please read the chapter Kie Navigator View for more information about this new feature
2.22. New and Noteworthy in KIE Workbench 6.3.0
2.22.1. Real Time Validation and Verification for the Decision Tables
Decision tables used to have a Validation-button for validating the table. This is now removed and the table is validated after each cell value change. The validation and verification checks include:
-
Redundancy
-
Subsumption
-
Conflicts
-
Missing Columns
These checks are explained in detail in the workbench documentation.
2.22.2. Improved DRL Editor
The DRL Editor has undergone a face lift; moving from a plain TextArea to using ACE Editor and a custom DRL syntax highlighter.
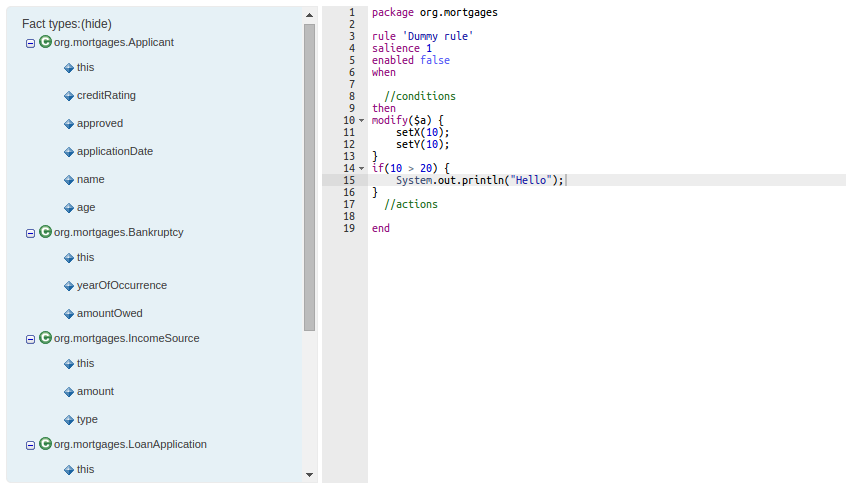
2.22.3. Asset locking
To avoid conflicts when editing assets, a new locking mechanism has been introduced that makes sure that only one user at a time can edit an asset. When a user begins to edit an asset, a lock will automatically be acquired. This is indicated by a lock symbol appearing on the asset title bar as well as in the project explorer view. If a user starts editing an already locked asset a pop-up notification will appear to inform the user that the asset can’t currently be edited, as it is being worked on by another user. As long as the editing user holds the lock, changes by other users will be prevented. Locks will automatically be released when the editing user saves or closes the asset, or logs out of the workbench. Every user further has the option to force a lock release in the metadata tab, if required.

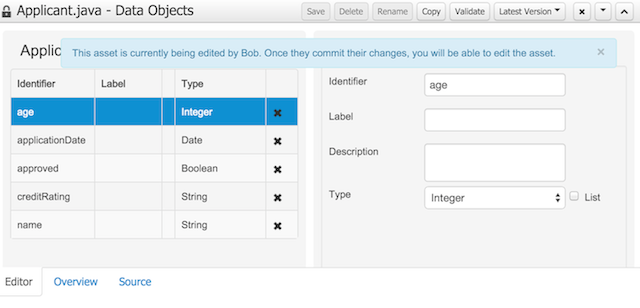
2.22.4. Data Modeller Tool Windows
Drools and jBPM configurations, Persistence (see Generation of JPA enabled Data Models) and Advanced configurations were moved into "Tool Windows". "Tool Windows" are a new concept introduced in latest Uberfire version that enables the development of context aware screens. Each "Tool Window" will contain a domain editor that will manage a set of related Data Object parameters.
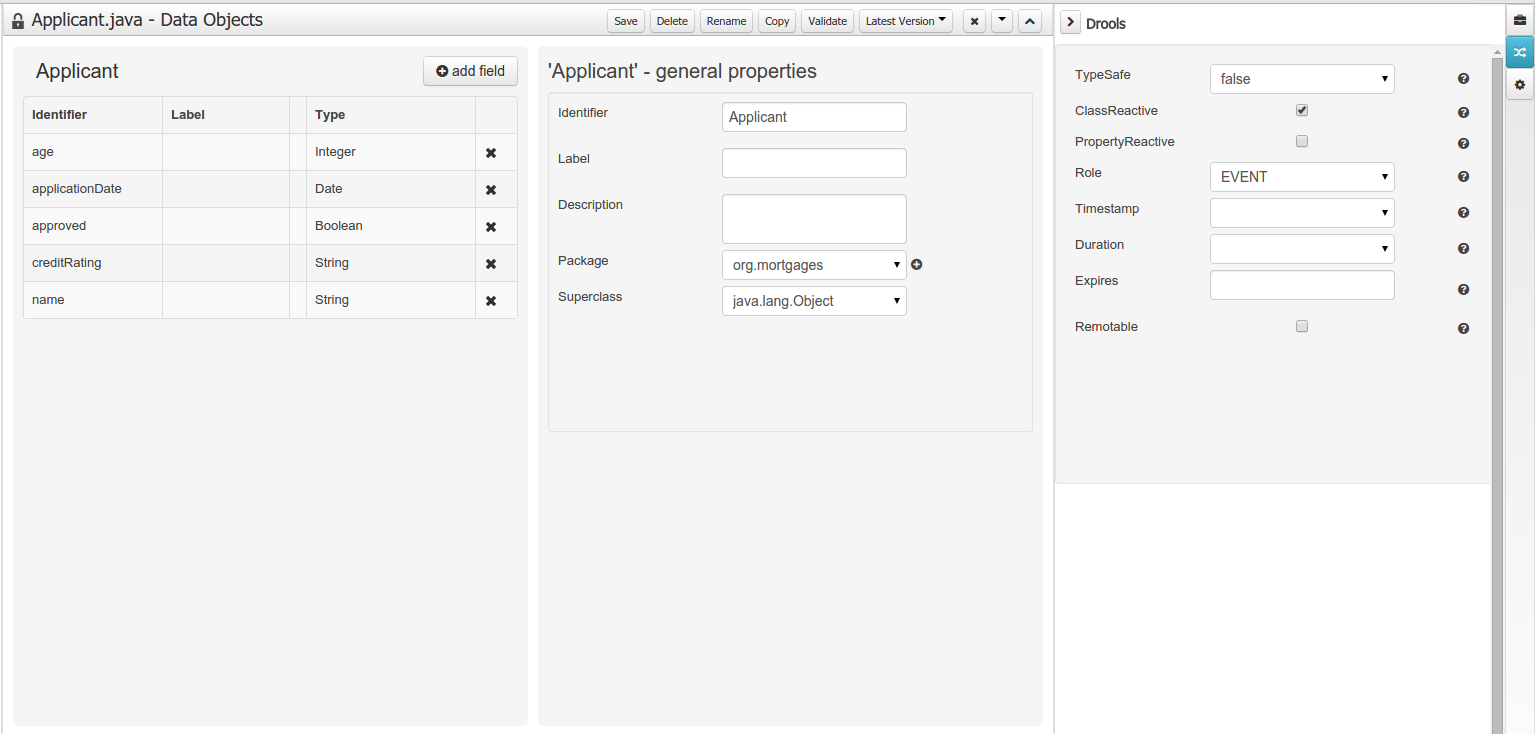
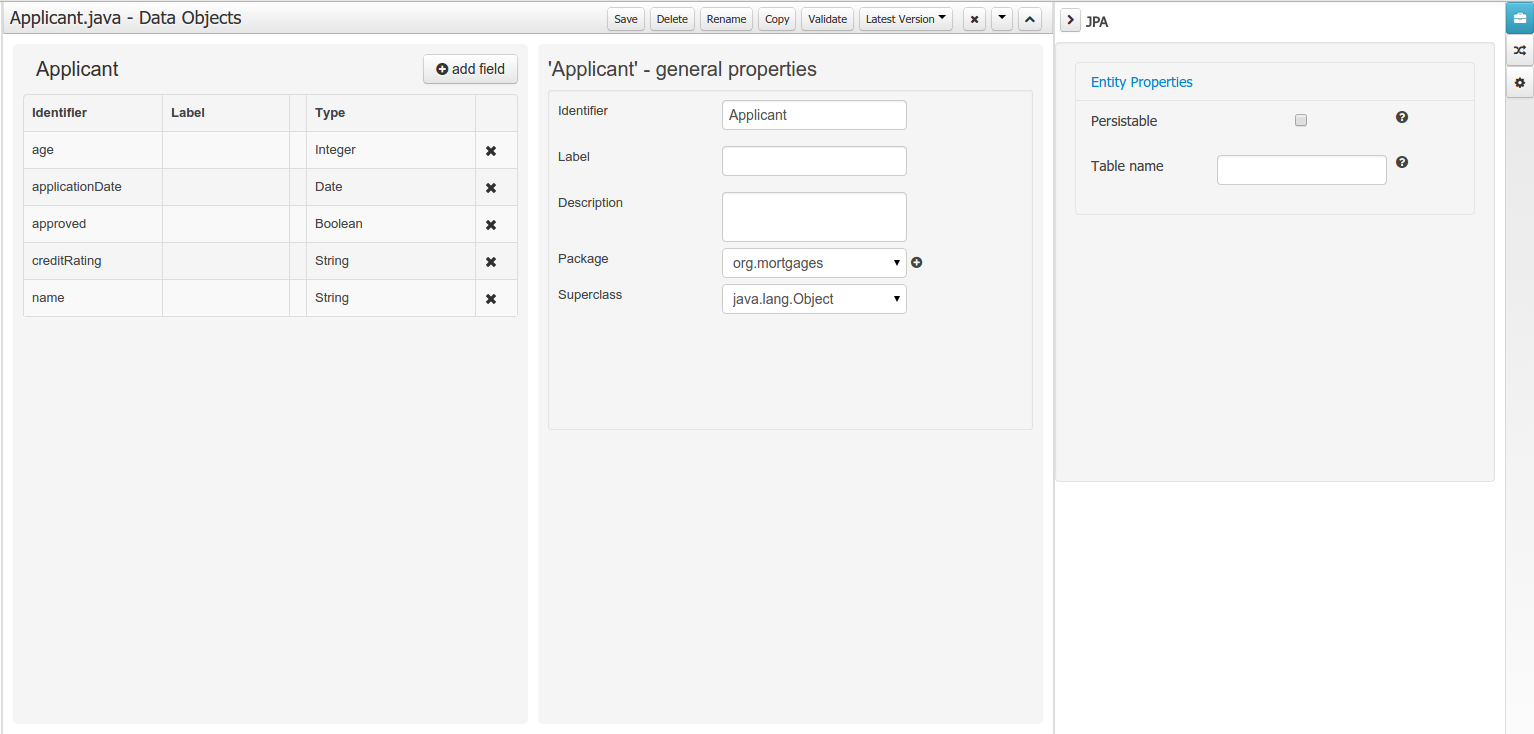

2.22.5. Generation of JPA enabled Data Models
Data modeller was extended to support the generation of persistable Data Objects. The persistable Data Objects are based on the JPA specification and all the underlying metadata are automatically generated.
-
"The New → Data Object" Data Objects can be marked as persistable at creation time.
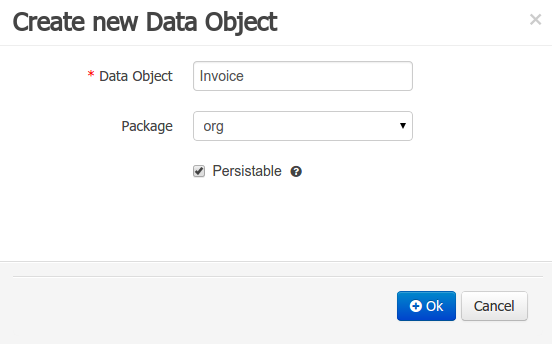 Figure 63. New Data Object
 -
The Persistence tool window contains the JPA Domain editors for both Data Object and Field. Each editor will manage the by default generated JPA metadata
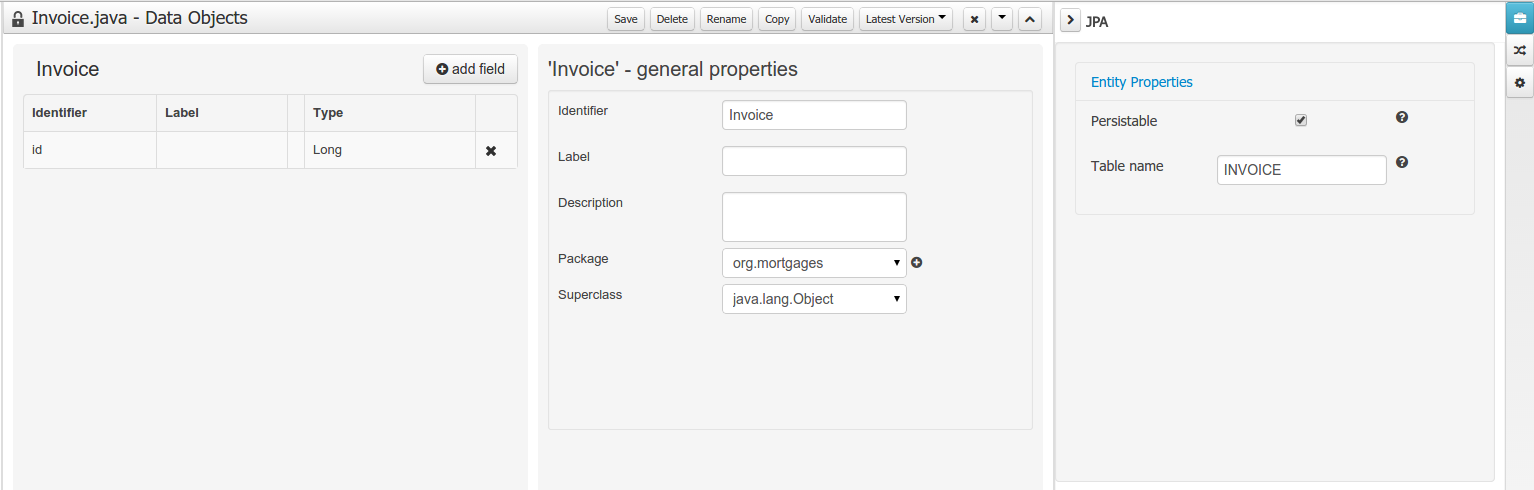 Figure 64. Data Object level JPA domain editor
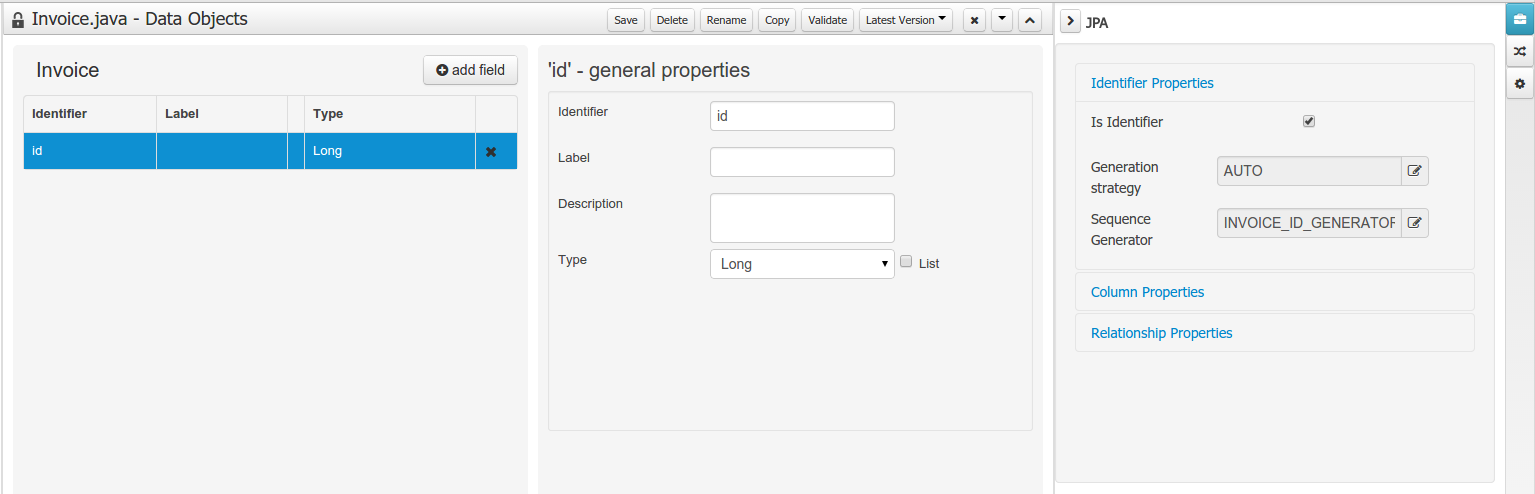 Figure 65. Field level JPA domain editor
 -
Persistence configuration screen was added to the project editor.
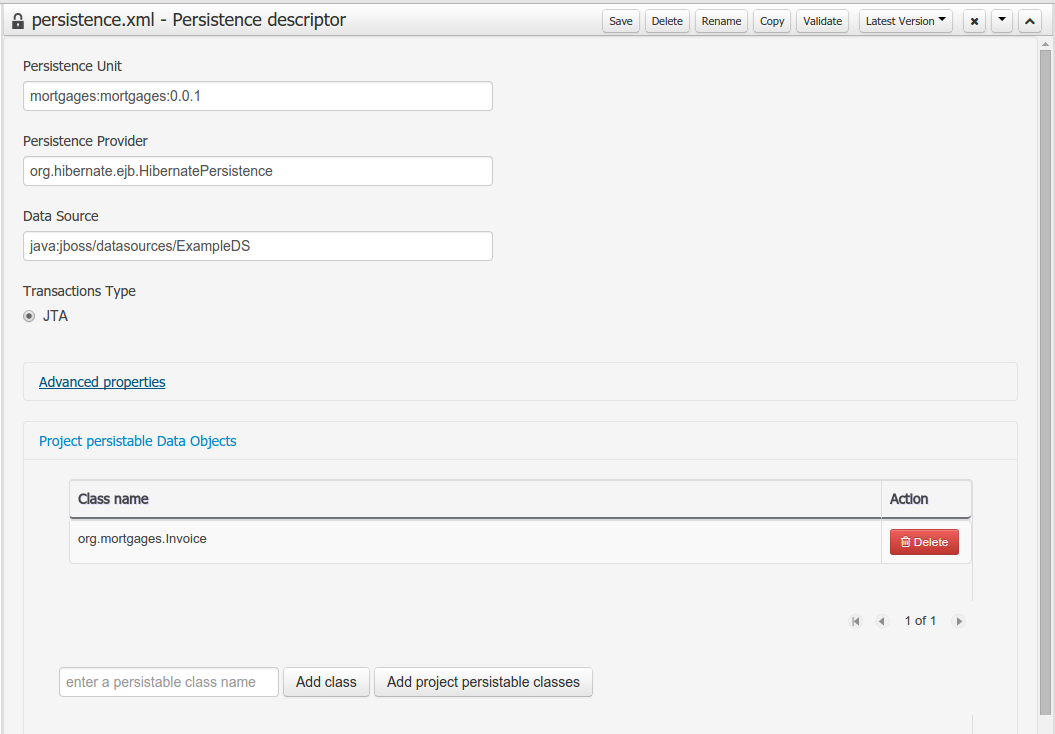 Figure 66. Persistence configuration
2.22.6. Data Set Authoring
A new perspective for authoring data set definitions has been added. Data set definitions make it possible to retrieve data from external systems like databases, CSV/Excel files or even use a Java class to generate the data. Once the data is available it can be used, for instance, to create charts and dashboards from the Perspective Editor just feeding the charts from any of the data sets available.
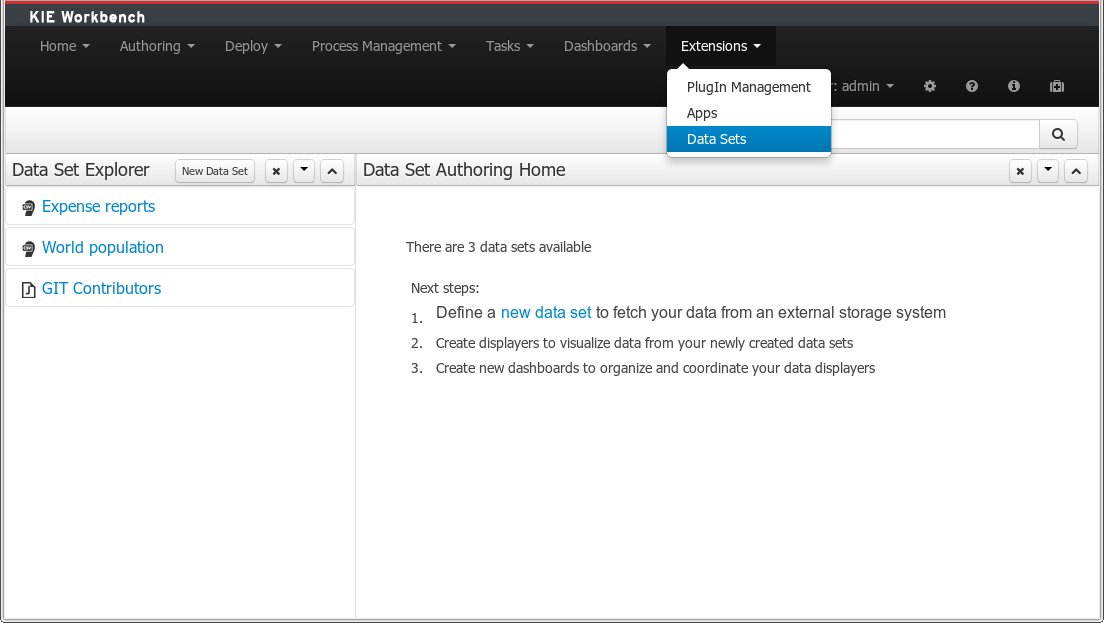
2.23. What is New and Noteworthy in Drools 6.2.0
2.23.1. Propagation modes
The introduction of PHREAK as default algorithm for the Drools engine made the rules' evaluation lazy. This new Drools lazy behavior allowed a relevant performance boost but, in some very specific cases, breaks the semantic of a few Drools features.
More precisely in some circumstances it is necessary to propagate the insertion of new fact into th session immediately. For instance Drools allows a query to be executed in pull only (or passive) mode by prepending a '?' symbol to its invocation as in the following example:
query Q (Integer i)
    String( this == i.toString() )
end
rule R when
    $i : Integer()
    ?Q( $i; )
then
    System.out.println( $i );
end
In this case, since the query is passive, it shouldn’t react to the insertion of a String matching the join condition in the query itself. In other words this sequence of commands
KieSession ksession = ...
ksession.insert(1);
ksession.insert("1");
ksession.fireAllRules();
shouldn’t cause the rule R to fire because the String satisfying the query condition has been inserted after the Integer and the passive query shouldn’t react to this insertion. Conversely the rule should fire if the insertion sequence is inverted because the insertion of the Integer, when the passive query can be satisfied by the presence of an already existing String, will trigger it.
Unfortunately the lazy nature of PHREAK doesn’t allow the engine to make any distinction regarding the insertion sequence of the two facts, so the rule will fire in both cases. In circumstances like this it is necessary to evaluate the rule eagerly as done by the old RETEOO-based engine.
In other cases it is required that the propagation is eager, meaning that it is not immedate, but anyway has to happen before the engine/agenda starts scheduled evaluations. For instance this is necessary when a rule has the no-loop or the lock-on-active attribute and in fact when this happens this propagation mode is automatically enforced by the engine.
To cover these use cases, and in all other situations where an immediate or eager rule evaluation is required, it is possible to declaratively specify so by annotating the rule itself with @Propagation(Propagation.Type), where Propagation.Type is an enumeration with 3 possible values:
-
IMMEDIATE means that the propagation is performed immediately.
-
EAGER means that the propagation is performed lazily but eagerly evaluated before scheduled evaluations.
-
LAZY means that the propagation is totally lazy and this is default PHREAK behaviour
This means that the following drl:
query Q (Integer i)
    String( this == i.toString() )
end
rule R @Propagation(IMMEDIATE) when
    $i : Integer()
    ?Q( $i; )
then
    System.out.println( $i );
end
will make the rule R to fire if and only if the Integer is inserted after the String, thus behaving in accordance with the semantic of the passive query.
2.24. New and Noteworthy in KIE Workbench 6.2.0
2.24.1. Download Repository or Part of the Repository as a ZIP
This feature makes it possible to download a repository or a folder from the repository as a ZIP file.
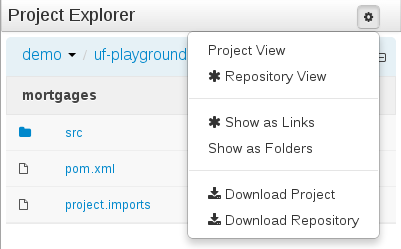
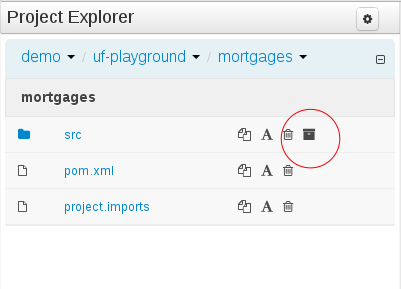
2.24.2. Project Editor permissions
The ability to configure role-based permissions for the Project Editor have been added.
Permissions can be configured using the WEB-INF/classes/workbench-policy.properties file.
The following permissions are supported:
-
Save button
feature.wb_project_authoring_save -
Delete button
feature.wb_project_authoring_delete -
Copy button
feature.wb_project_authoring_copy -
Rename button
feature.wb_project_authoring_rename -
Build & Deploy button
feature.wb_project_authoring_buildAndDeploy
2.24.3. Unify validation style in Guided Decision Table Wizard.
All of our new screens use GWT-Bootstrap widgets and alert users to input errors in a consistent way.
One of the most noticable differences was the Guided Decision Table Wizard that alerted errors in a way inconsistent with our use of GWT-Bootstrap.
This Wizard has been updated to use the new look and feel.

2.24.4. Improved Wizards
During the re-work of the Guided Decision Table’s Wizard to make it’s validation consistent with other areas of the application we took the opportunity to move the Wizard Framework to GWT-Bootstrap too.
The resulting appearance is much more pleasing. We hope to migrate more legacy editors to GWT-Bootstrap as time and priorities permit.
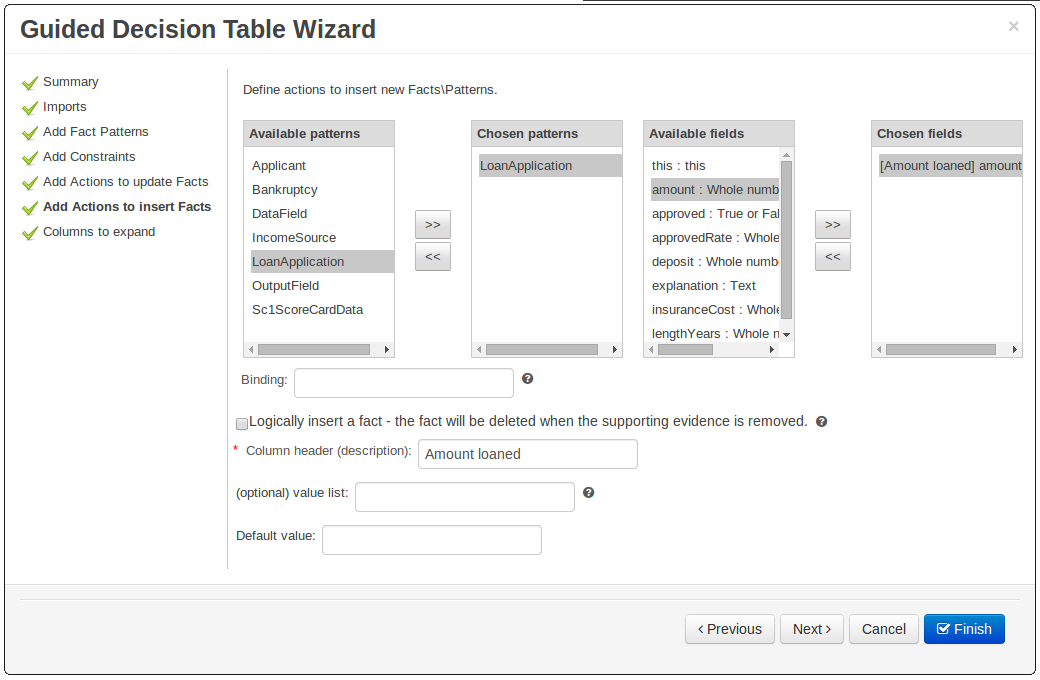
2.24.5. Consistent behaviour of XLS, Guided Decision Tables and Guided Templates
Consistency is a good thing for everybody. Users can expect different authoring metaphores to produce the same rule behaviour (and developers know when something is a bug!).
There were a few inconsistencies in the way XLS Decision Tables, Guidied Decision Tables and Guided Rule Templates generated the underlying rules for empty cells. These have been eliminated making their operation consistent.
-
If all constraints have null values (empty cells) the Pattern is not created.
Should you need the Pattern but no constraints; you will need to include the constraint
this != null.This operation is consistent with how XLS and Guided Decision Tables have always worked.
-
You can define a constraint on a String field for an empty String or white-space by delimiting it with double-quotation marks. The enclosing quotation-marks are removed from the value when generating the rules.
The use of quotation marks for other String values is not required and they can be omitted. Their use is however essential to differentiate a constraint for an empty String from an empty cell - in which case the constraint is omitted.
2.24.6. Improved Metadata Tab
The Metadata tab provided in previous versions was redesigned to provide a better asset versioning information browsing and recovery. Now every workbench editor will provide an "Overview tab" that will enable the user to manage the following information.
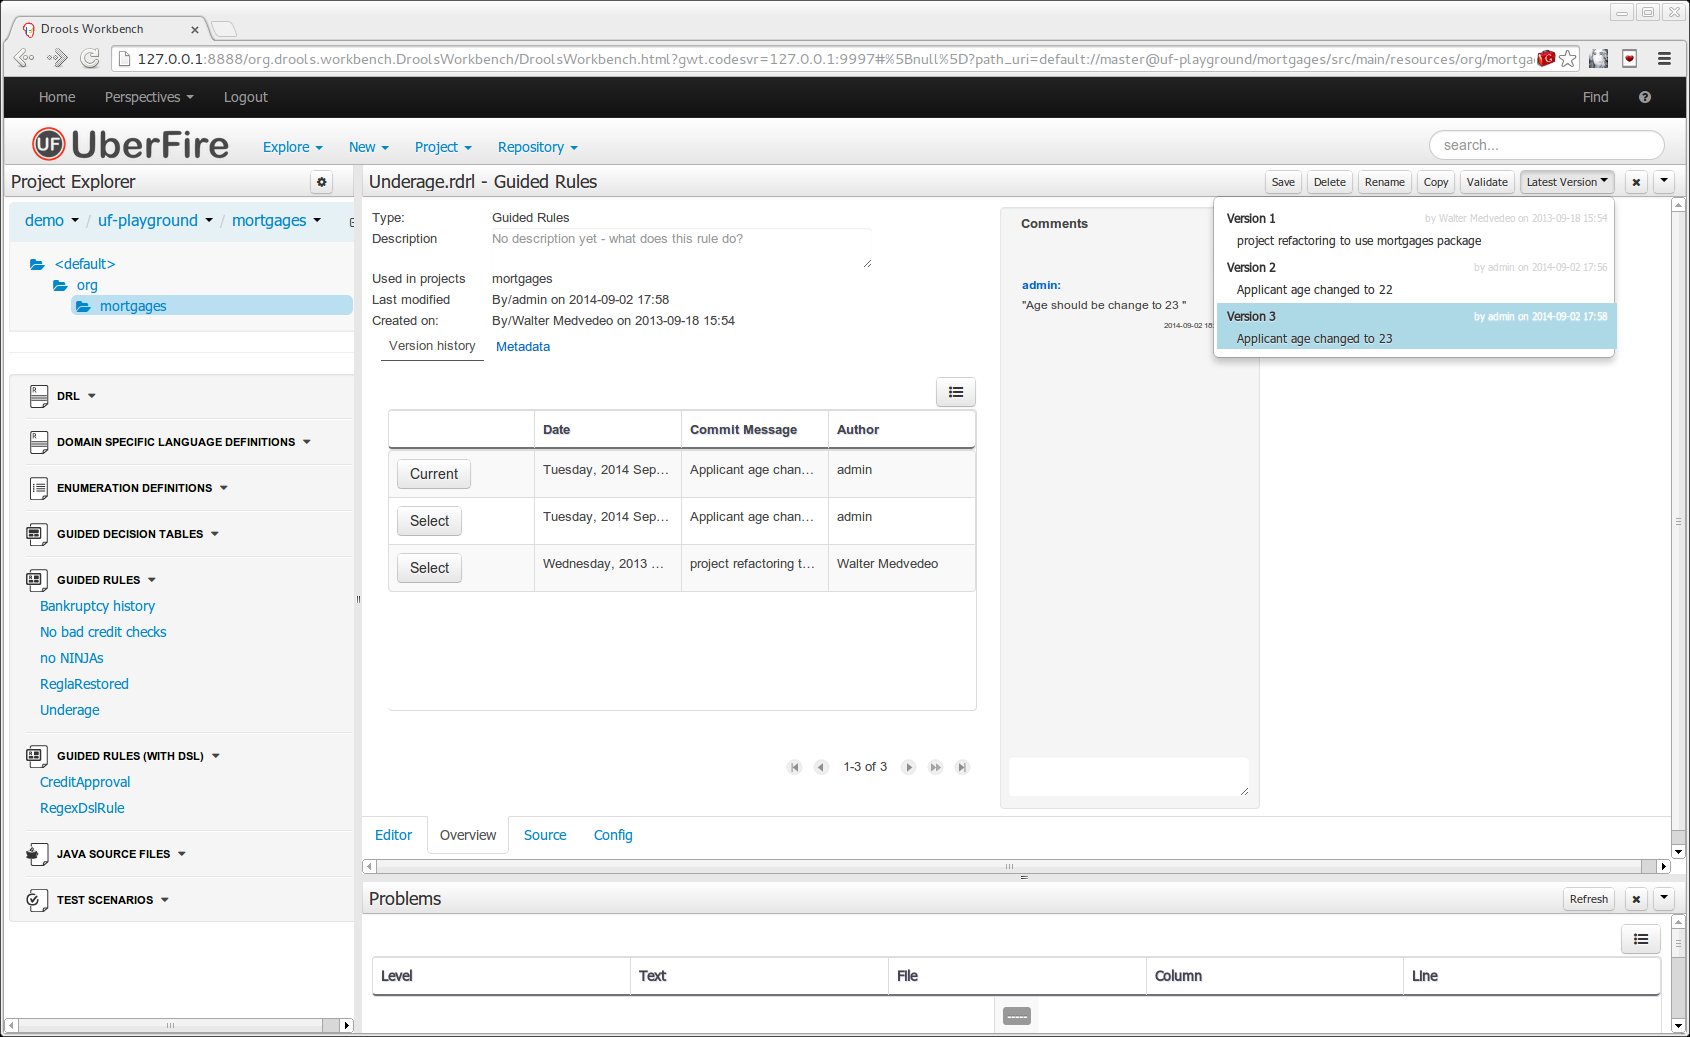
-
Versions history
The versions history shows a tabular view of the asset versions and provides a "Select" button that will enable the user to load a previously created version.
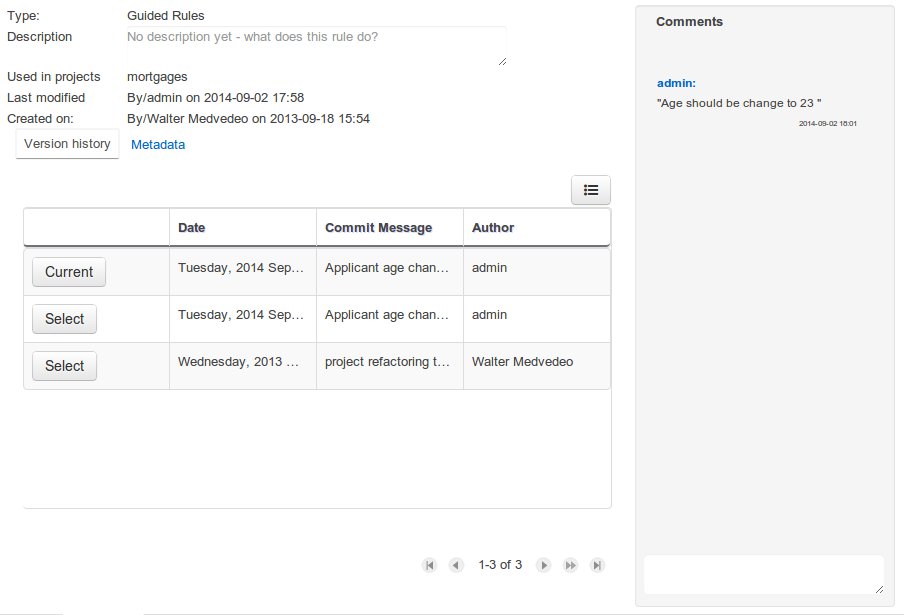 Figure 73. Versions history
 -
Metadata
The metadata section gets access to additional file attributes.
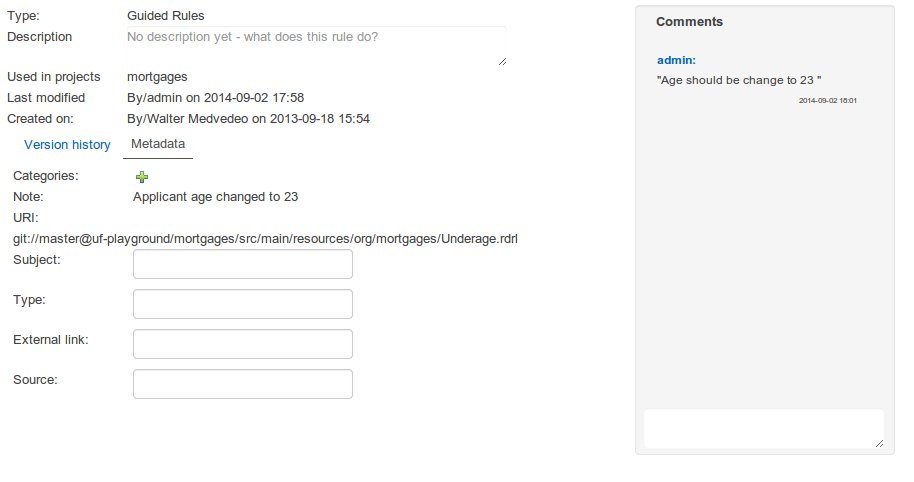 Figure 74. Metadata section
 -
Comments area
The redesigned comments area enables much clearer discussions on a file.
-
Version selection dropdown
The "Version selector dropdown" located at the menu bar provides the ability to load and restore previous versions from the "Editor tab", without having to open the "Overview tab" to load the "Version history".
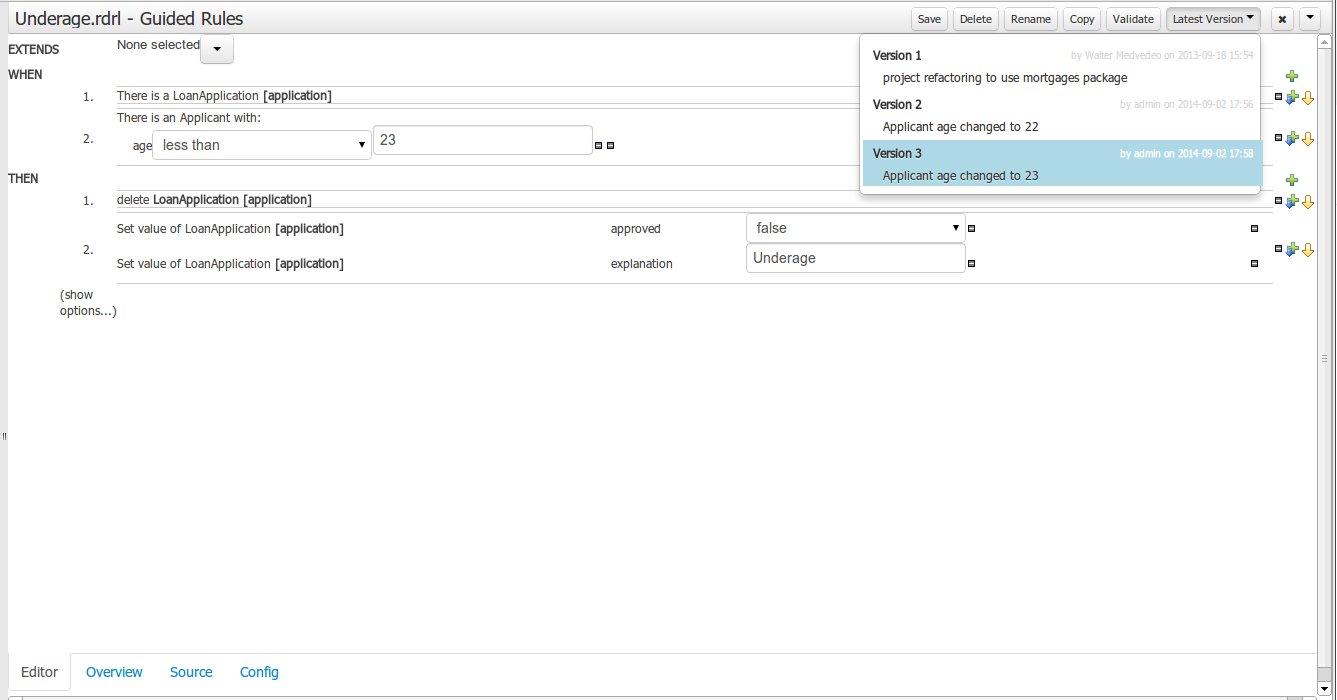 Figure 75. Version selection dropdown
2.24.7. Improved Data Objects Editor
The Java editor was unified to the standard workbench editors functioning. It means that and now every data object is edited on his own editor window.
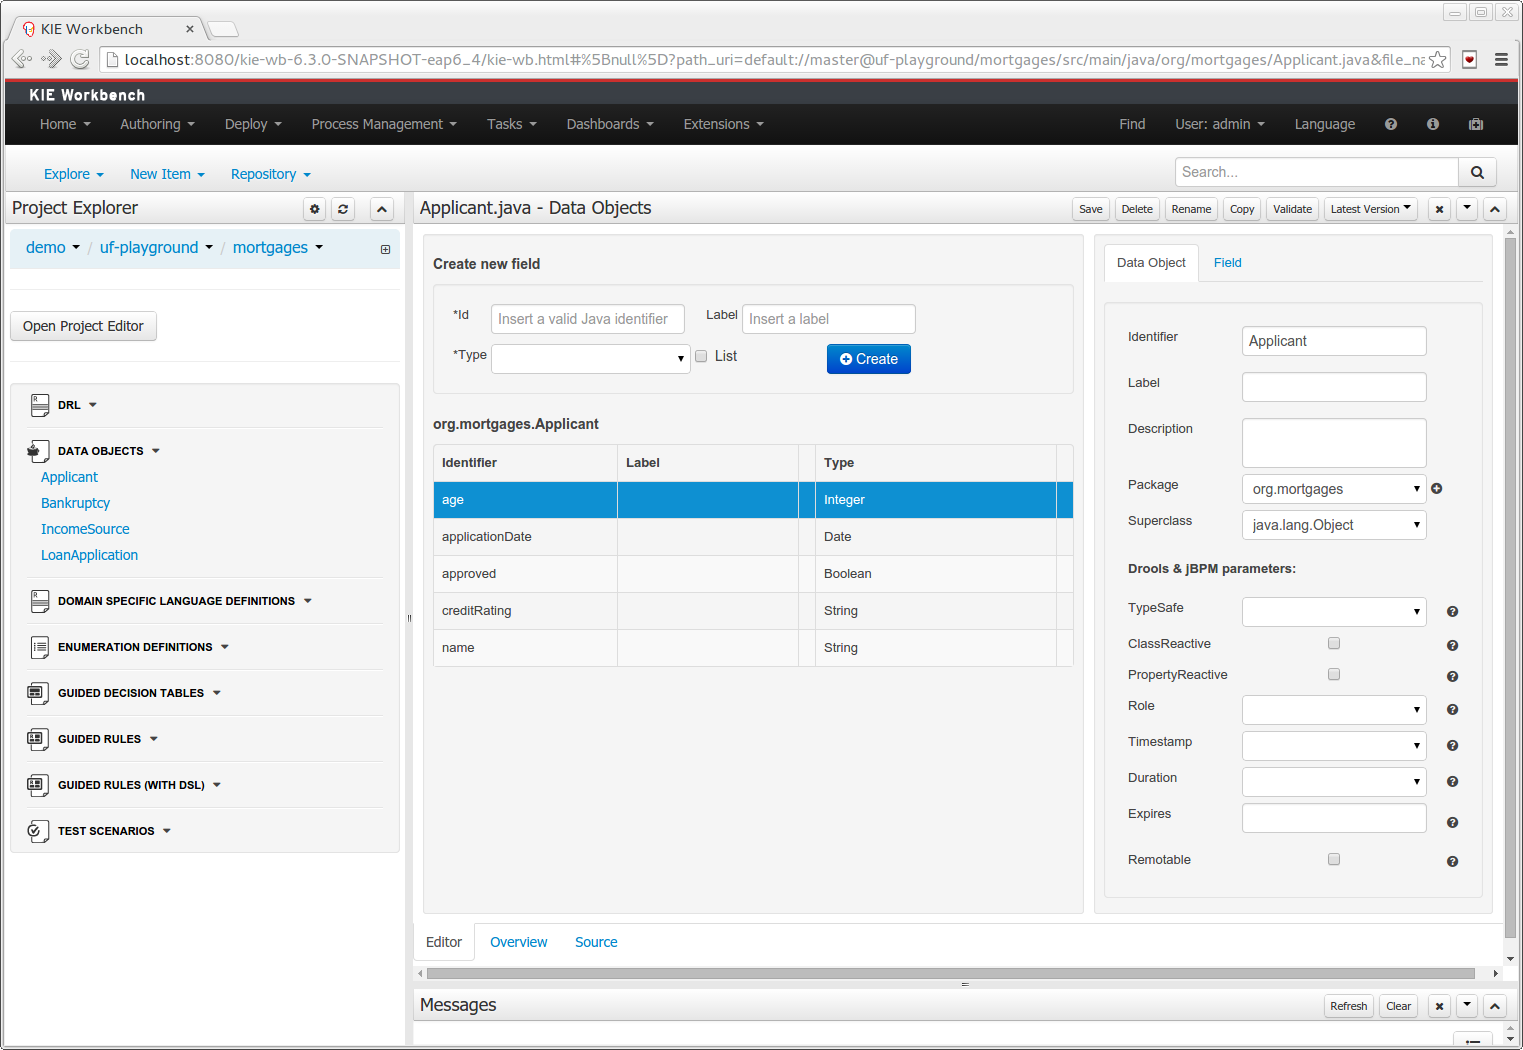
-
"New → Data Object" option was added to create the data objects.
-
Overview tab was added for every file to manage the file metadata and have access to the file versions history.
-
Editable "Source Tab" tab was added. Now the Java code can be modified by administrators using the workbench.
-
"Editor" - "Source Tab" round trip is provided. This will let administrators to do manual changes on the generated Java code and go back to the editor tab to continue working.
-
Class usages detection. Whenever a Data Object is about to be deleted or renamed, the project will be scanned for the class usages. If usages are found (e.g. in drl files, decision tables, etc.) the user will receive an alert. This will prevent the user from breaking the project build.
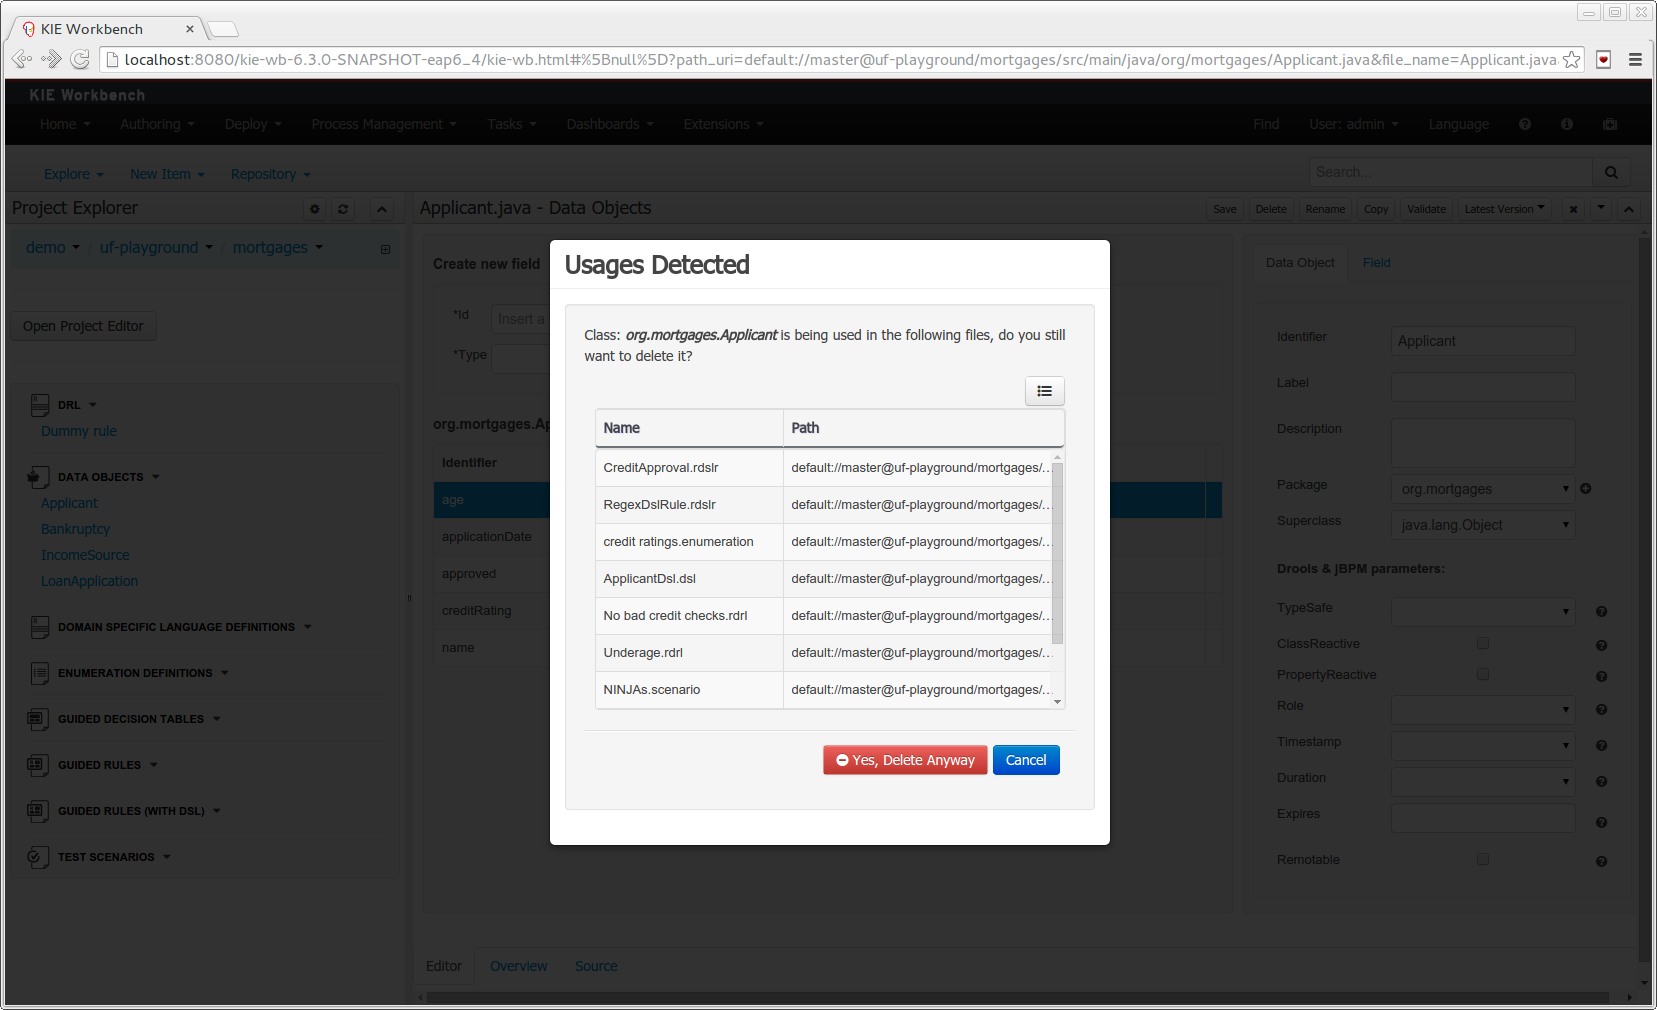 Figure 77. Usages detection
2.24.8. Execution Server Management UI
A new perspective called Management has been added under Servers top level menu. This perspective provides users the ability to manage multiple execution servers with multiple containers. Available features includes connect to already deployed execution servers; create new, start, stop, delete or upgrade containers.
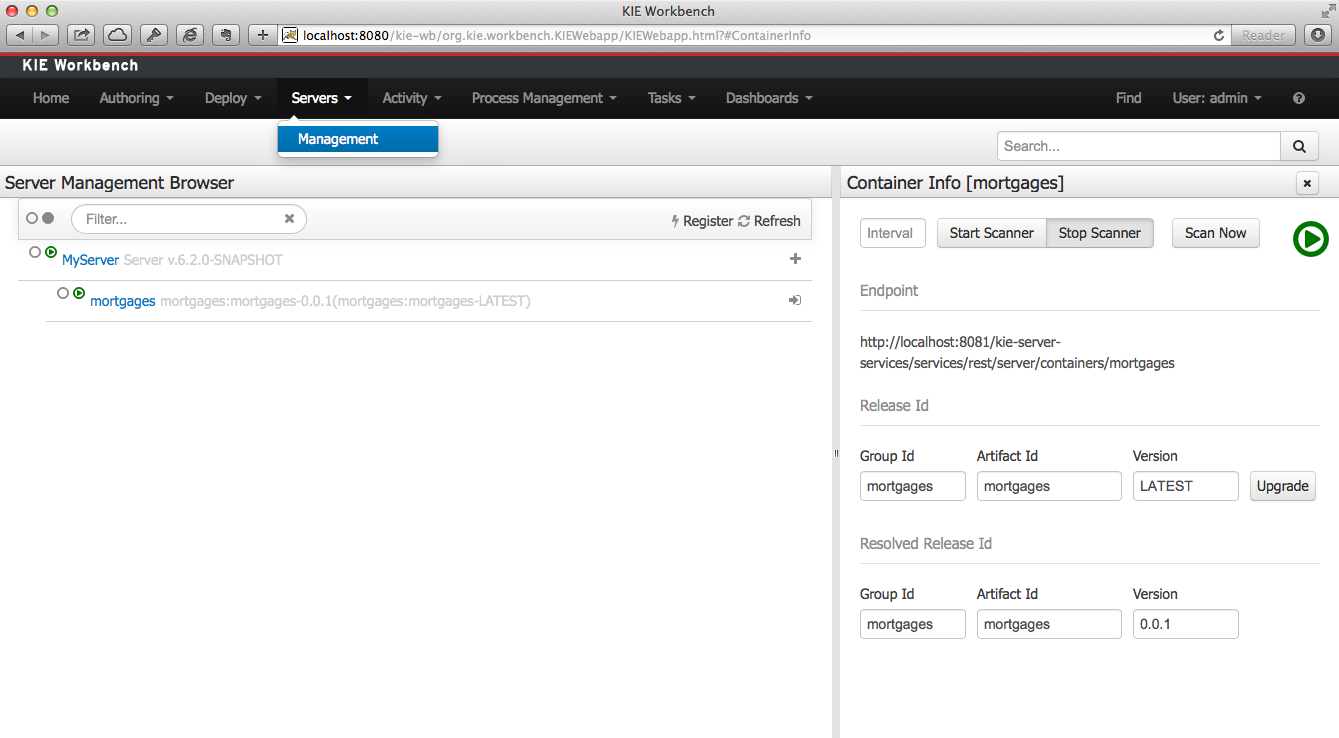
|
Current version of Execution Server just supports rule based execution. |
2.24.9. Social Activities
A brand new feature called Social Activities has been added under a new top level menu item group called Activity.
This new feature is divided in two different perspectives: Timeline Perspective and People Perspective.
The Timeline Perspective shows on left side the recent assets created or edited by the logged user. In the main window there is the "Latest Changes" screen, showing all the recent updated assets and an option to filter the recent updates by repository.
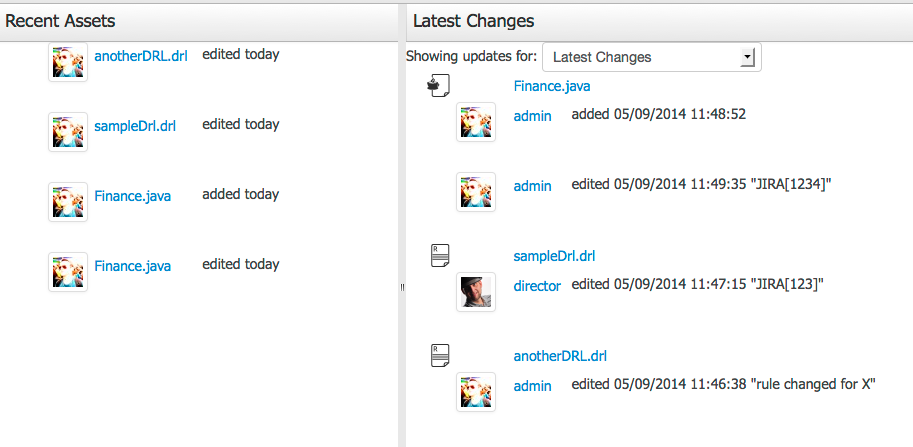
The People Perspective is the home page of an user. Showing his infos (including a gravatar picture from user e-mail), user connections (people that user follow) and user recent activities. There is also a way to edit an user info. The search suggestion can be used to navigate to a user profile, follow him and see his updates on your timeline.
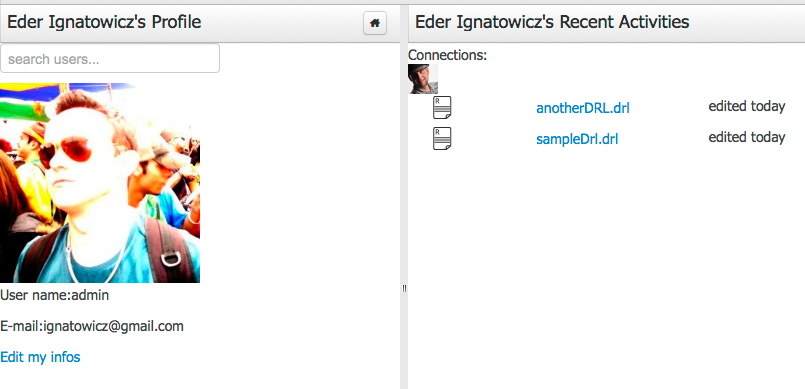
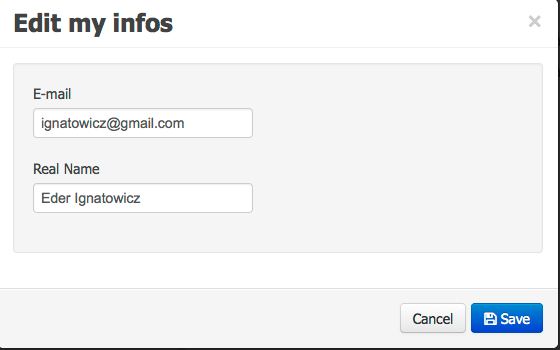
2.24.10. Contributors Dashboard
A brand new perspective called Contributors has been added under a new top level menu item group called Activity. The perspective itself is a dashboard which shows several indicators about the contributions made to the managed organizations / repositories within the workbench. Every time a organization/repository is added/removed from the workbench the dashboard itself is updated accordingly.
This new perspective allows for the monitoring of the underlying activity on the managed repositories.
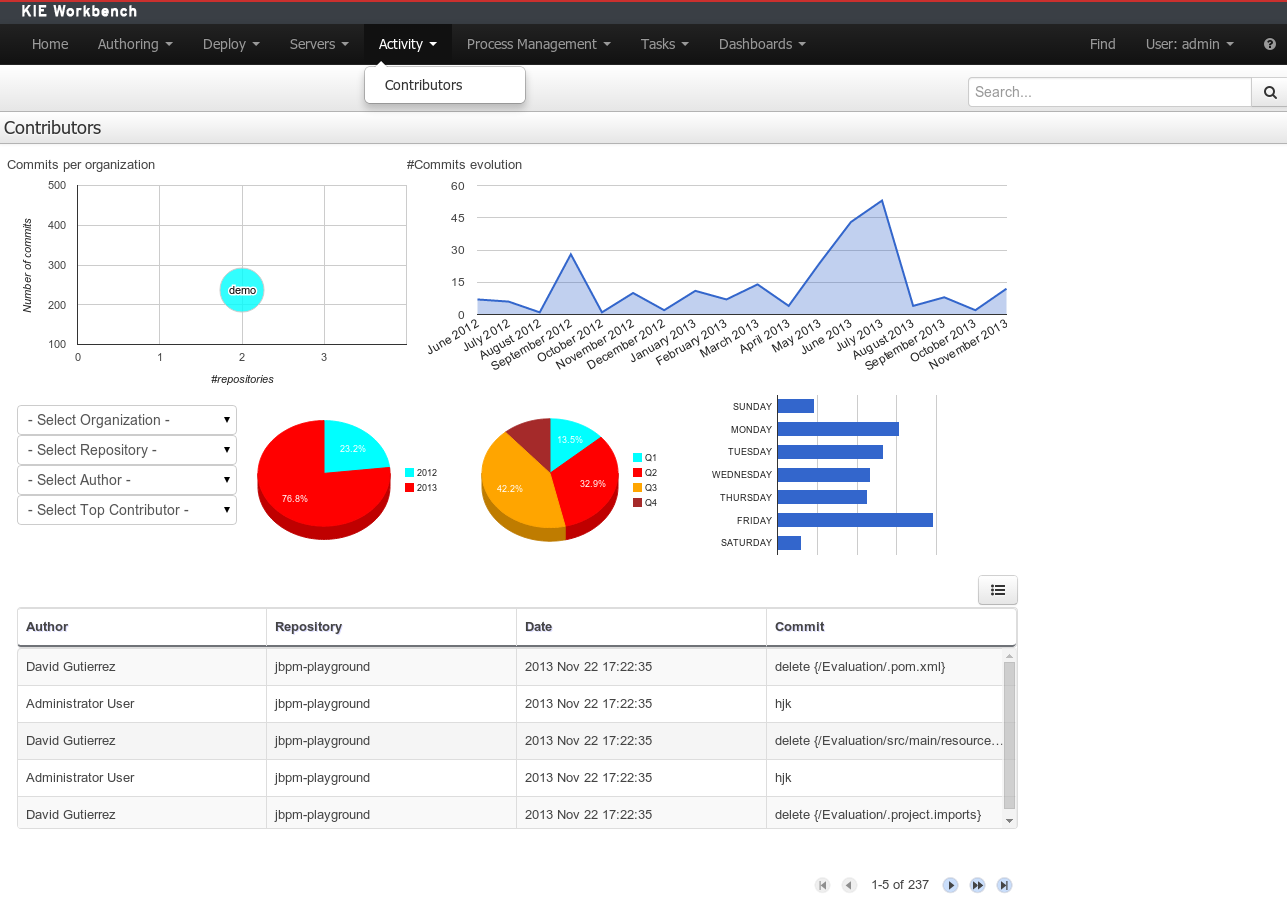
2.24.11. Package selector
The location of new assets whilst authoring was driven by the context of the Project Explorer.
This has been replaced with a Package Selector in the New Resource Popup.
The location defaults to the Project Explorer context but different packages can now be more easily chosen.
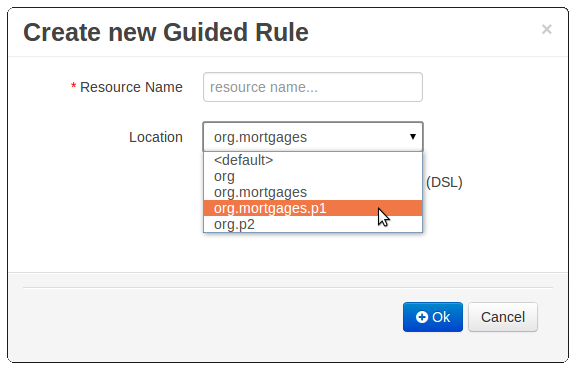
2.24.12. Improved visual consistency
All Popups have been refactored to use GWT-Bootstrap widgets.
Whilst a simple change it brings greater visual consistency to the application as a whole.
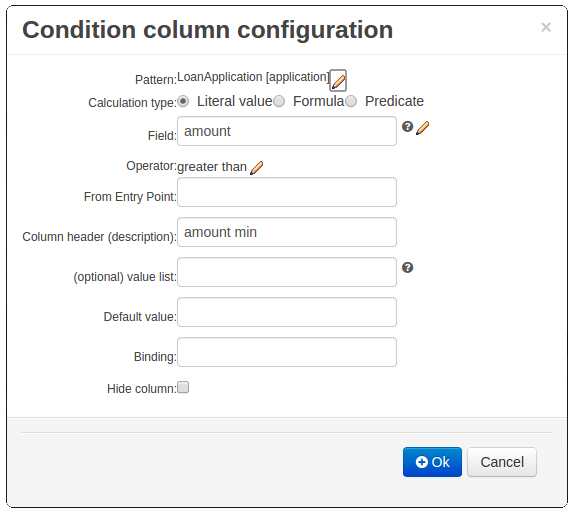
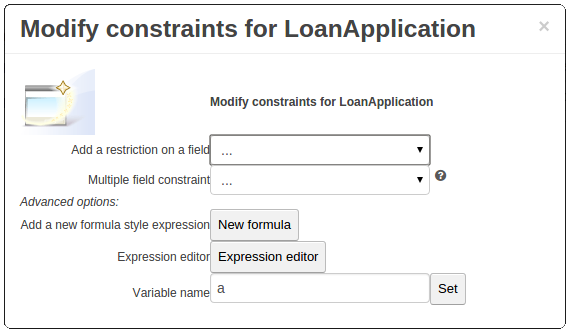
2.24.13. Guided Decision Tree Editor
A new editor has been added to support modelling of simple decision trees.
See the applicable section within the User Guide for more information about usage.

2.24.14. Create Repository Wizard
A wizard has been created to guide the repository creation process. Now the user can decide at repository creation time if it should be a managed or unmanaged repository and configure all related parameters.
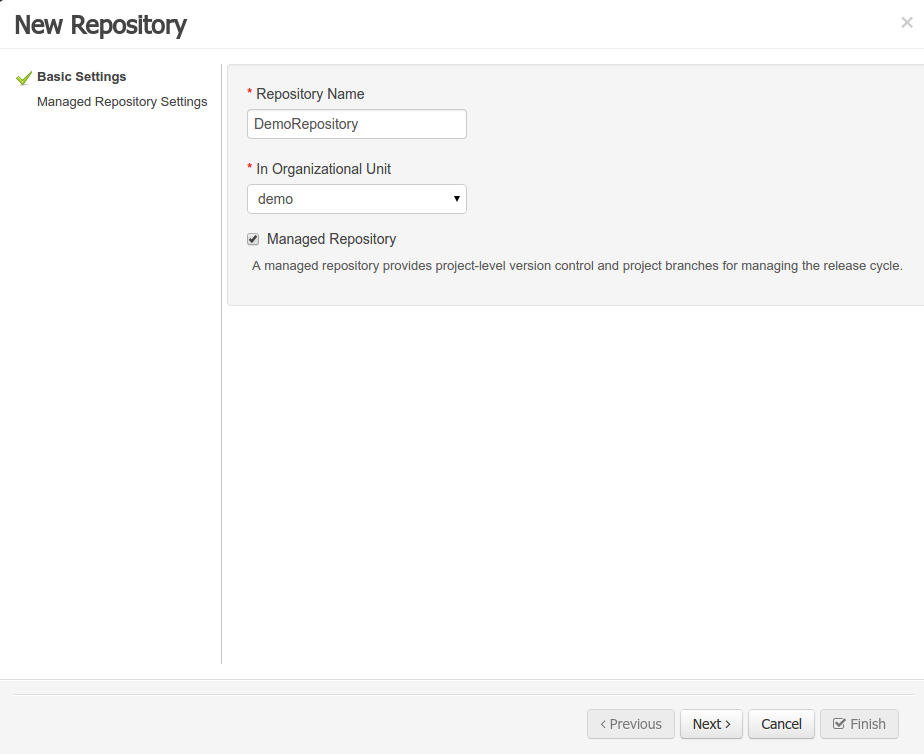
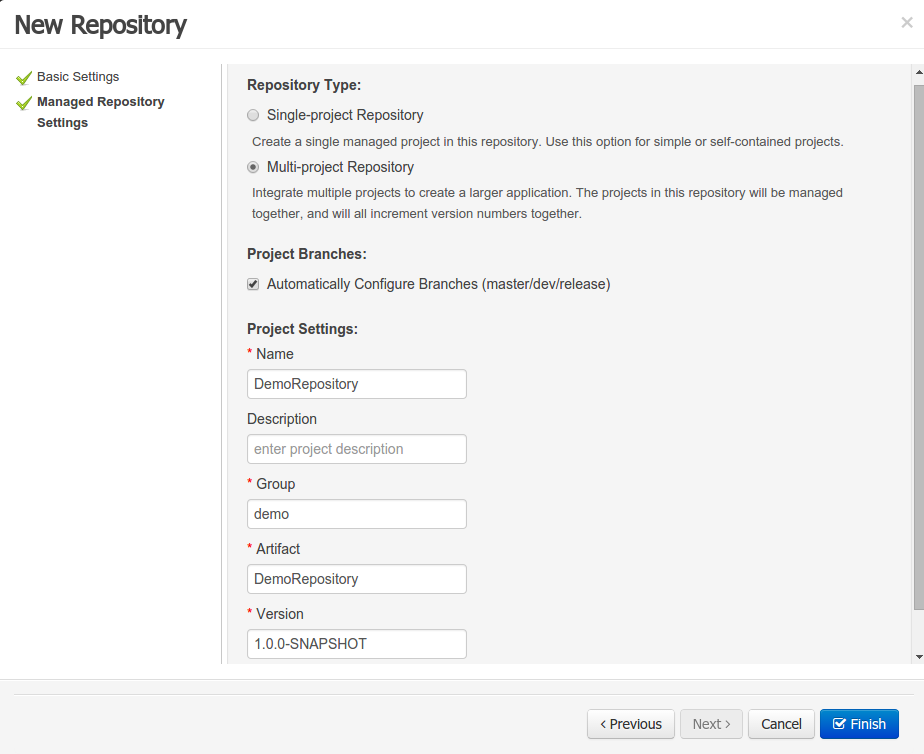
2.24.15. Repository Structure Screen
The new Repository Structure Screen will let users to manage the projects for a given repository, as well as other operations related to managed repositories like: branch creation, assets promotion and project release.
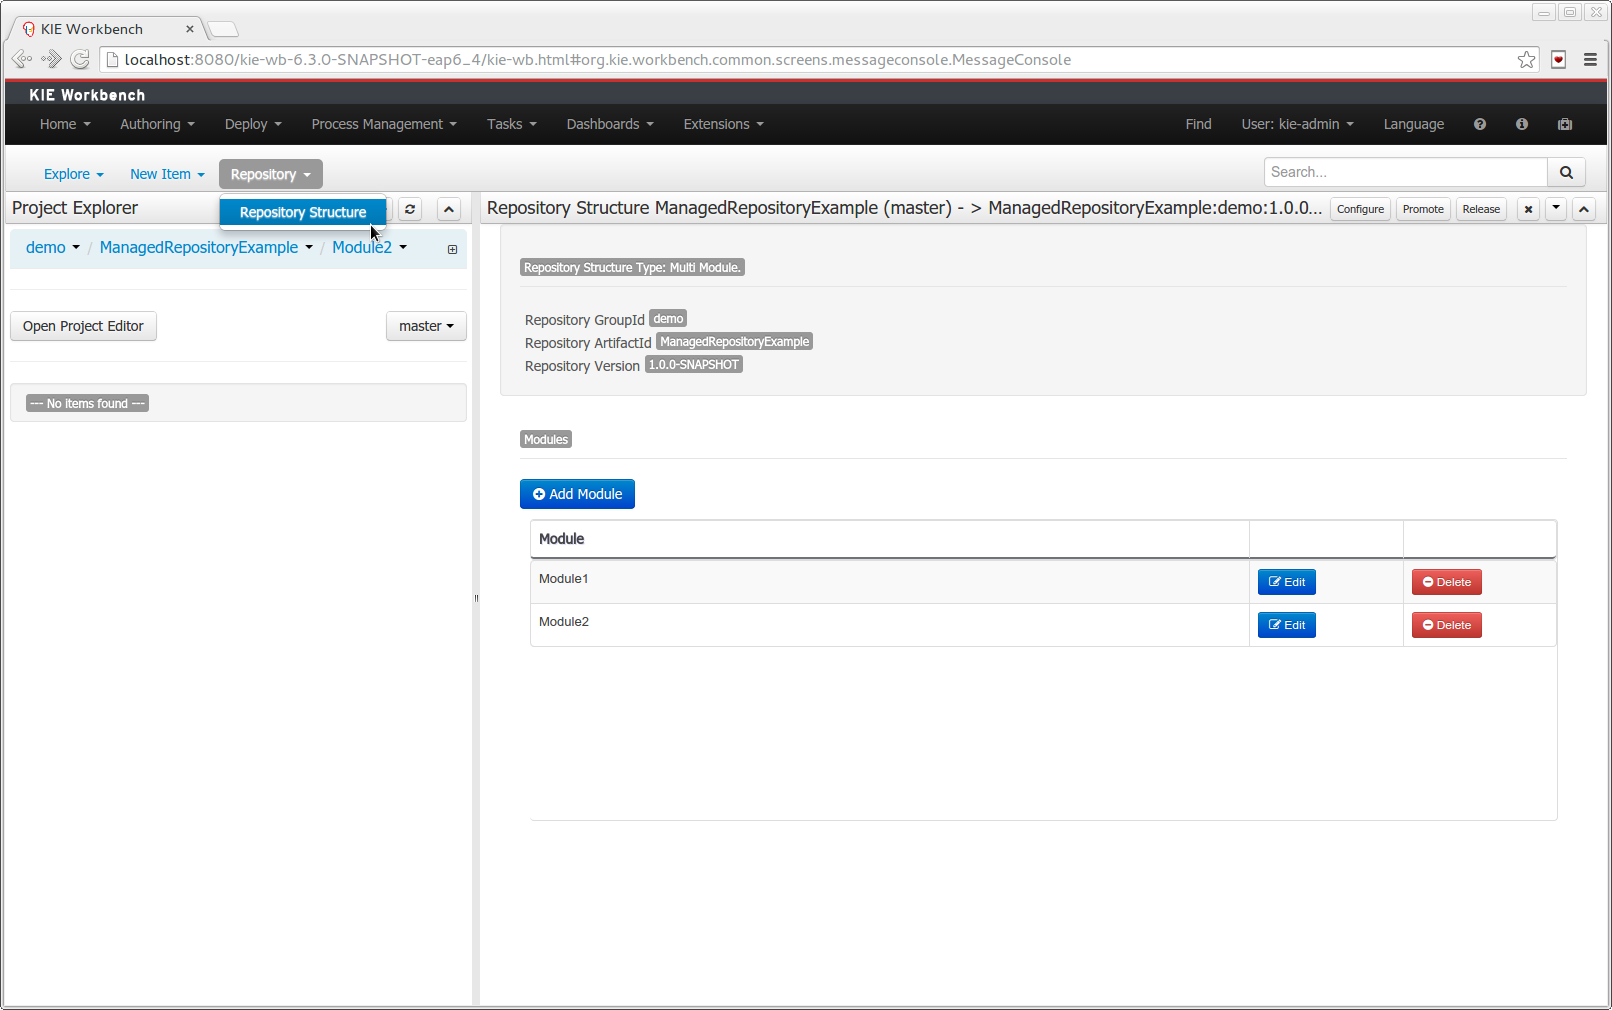
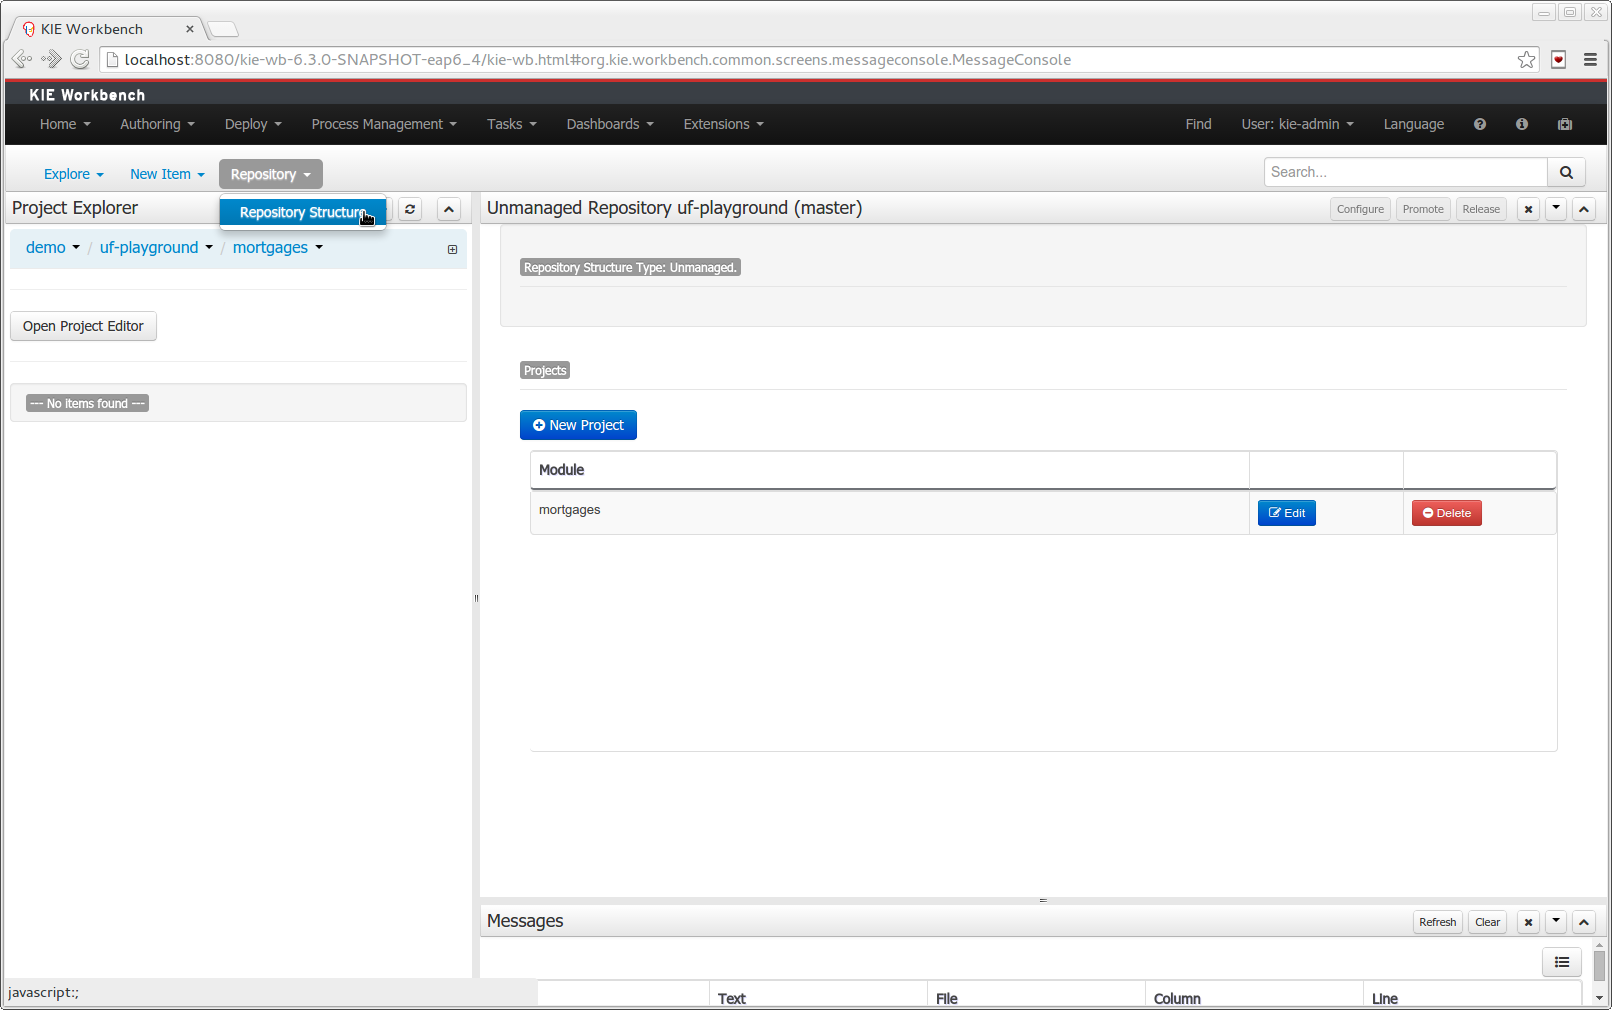
2.25. New and Noteworthy in Integration 6.2.0
2.25.1. KIE Execution Server
A new KIE Execution Server was created with the goal of supporting the deployment of kjars and the automatic creation of REST endpoints for remote rules execution. This initial implementation supports provisioning and execution of kjars via REST without any glue code.
A user interface was also integrated into the workbench for remote provisioning. See the workbench’s New&Noteworthy for details.
@Path("/server")
public interface KieServer {

    @GET
    @Produces({MediaType.APPLICATION_XML, MediaType.APPLICATION_JSON})
    public Response getInfo();

    @POST
    @Consumes({MediaType.APPLICATION_XML, MediaType.APPLICATION_JSON})
    @Produces({MediaType.APPLICATION_XML, MediaType.APPLICATION_JSON})
    public Response execute( CommandScript command );

    @GET
    @Path("containers")
    @Produces({MediaType.APPLICATION_XML, MediaType.APPLICATION_JSON})
    public Response listContainers();

    @GET
    @Path("containers/{id}")
    @Produces({MediaType.APPLICATION_XML, MediaType.APPLICATION_JSON})
    public Response getContainerInfo( @PathParam("id") String id );

    @PUT
    @Path("containers/{id}")
    @Consumes({MediaType.APPLICATION_XML, MediaType.APPLICATION_JSON})
    @Produces({MediaType.APPLICATION_XML, MediaType.APPLICATION_JSON})
    public Response createContainer( @PathParam("id") String id, KieContainerResource container );

    @DELETE
    @Path("containers/{id}")
    @Produces({MediaType.APPLICATION_XML, MediaType.APPLICATION_JSON})
    public Response disposeContainer( @PathParam("id") String id );

    @POST
    @Path("containers/{id}")
    @Consumes({MediaType.APPLICATION_XML, MediaType.APPLICATION_JSON})
    @Produces({MediaType.APPLICATION_XML, MediaType.APPLICATION_JSON})
    public Response execute( @PathParam("id") String id, String cmdPayload );

    @GET
    @Path("containers/{id}/release-id")
    @Produces({MediaType.APPLICATION_XML, MediaType.APPLICATION_JSON})
    public Response getReleaseId( @PathParam("id") String id);

    @POST
    @Path("containers/{id}/release-id")
    @Consumes({MediaType.APPLICATION_XML, MediaType.APPLICATION_JSON})
    @Produces({MediaType.APPLICATION_XML, MediaType.APPLICATION_JSON})
    public Response updateReleaseId( @PathParam("id") String id, ReleaseId releaseId );

    @GET
    @Path("containers/{id}/scanner")
    @Produces({MediaType.APPLICATION_XML, MediaType.APPLICATION_JSON})
    public Response getScannerInfo( @PathParam("id") String id );

    @POST
    @Path("containers/{id}/scanner")
    @Consumes({MediaType.APPLICATION_XML, MediaType.APPLICATION_JSON})
    @Produces({MediaType.APPLICATION_XML, MediaType.APPLICATION_JSON})
    public Response updateScanner( @PathParam("id") String id, KieScannerResource resource );

}
2.26. What is New and Noteworthy in Drools 6.1.0
2.26.1. JMX support for KieScanner
Added support for JMX monitoring and management on KieScanner and KieContainer.
To enable, set the property kie.scanner.mbeans to enabled, for example via Java command line: -Dkie.scanner.mbeans=enabled .
KieScannerMBean will register under the name:
It exposes the following properties:
-
Scanner Release Id: the release ID the scanner was configured with. May include maven range versions and special keywords like LATEST, SNAPSHOT, etc.
-
Current Release Id: the actual release ID the artifact resolved to.
-
Status: STARTING, SCANNING, UPDATING, RUNNING, STOPPED, SHUTDOWN
It also exposes the following operations:
-
scanNow(): forces an immediate scan of the maven repository looking for artifact updates
-
start(): starts polling the maven repository for artifact updates based on the polling interval parameter
-
stop(): stops automatically polling the maven repository
2.27. New and Noteworthy in KIE Workbench 6.1.0
2.27.1. Data Modeler - round trip and source code preservation
Full round trip between Data modeler and Java source code is now supported. No matter where the Java code was generated (e.g. Eclipse, Data modeller), data modeler will only update the necessary code blocks to maintain the model updated.
2.27.2. Data Modeler - improved annotations
New annotations @TypeSafe, @ClassReactive, @PropertyReactive, @Timestamp, @Duration and @Expires were added in order enrich current Drools annotations manged by the data modeler.
2.27.3. Standardization of the display of tabular data
We have standardized the display of tabular data with a new table widget.
The new table supports the following features:
-
Selection of visible columns
-
Resizable columns
-
Moveable columns
The table is used in the following scenarios:
-
Inbox (Incoming changes)
-
Inbox (Recently edited)
-
Inbox (Recently opened)
-
Project Problems summary
-
Artifact Repository browser
-
Project Editor Dependency grid
-
Project Editor KSession grid
-
Project Editor Work Item Handlers Configuration grid
-
Project Editor Listeners Configuration grid
-
Search Results grid
2.27.4. Generation of modify(x) {…} blocks
The Guided Rule Editor, Guided Template Editor and Guided Decision Table Editor have been changed to generate modify(x){…}
Historically these editors supported the older update(x) syntax and hence rules created within the Workbench would not respond correctly to @PropertyReactive and associated annotations within a model.
This has now been rectified with the use of modify(x){…} blocks.
2.28. New and Noteworthy in KIE API 6.0.0
2.28.1. New KIE name
KIE is the new umbrella name used to group together our related projects; as the family continues to grow. KIE is also used for the generic parts of unified API; such as building, deploying and loading. This replaces the kiegroup and knowledge keywords that would have been used before.
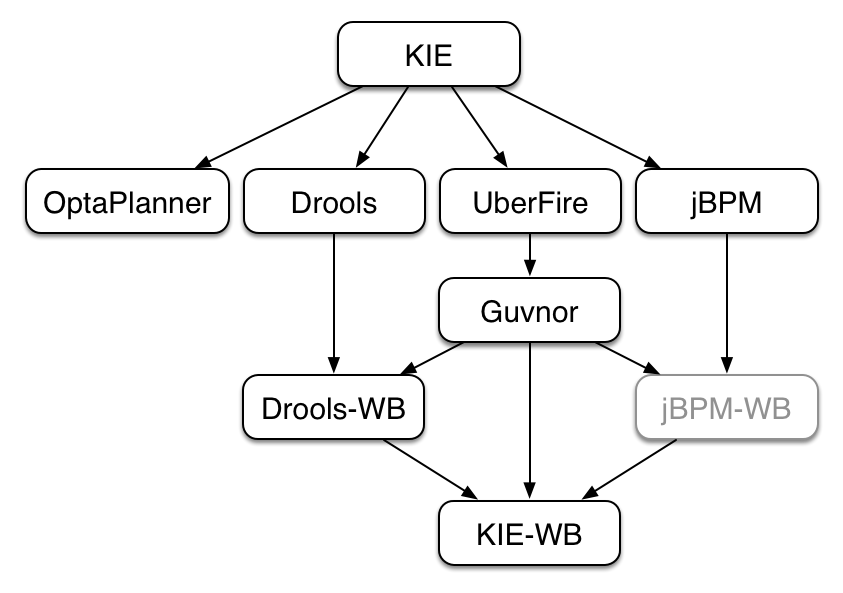
2.28.2. Maven aligned projects and modules and Maven Deployment
One of the biggest complaints during the 5.x series was the lack of defined methodology for deployment. The mechanism used by Drools and jBPM was very flexible, but it was too flexible. A big focus for 6.0 was streamlining the build, deploy and loading (utilization) aspects of the system. Building and deploying activities are now aligned with Maven and Maven repositories. The utilization for loading rules and processess is now convention and configuration oriented, instead of programmatic, with sane defaults to minimise the configuration.
Projects can be built with Maven and installed to the local M2_REPO or remote Maven repositories. Maven is then used to declare and build the classpath of dependencies, for KIE to access.
2.28.3. Configuration and convention based projects
The 'kmodule.xml' provides declarative configuration for KIE projects. Conventions and defaults are used to reduce the amount of configuration needed.
<kmodule xmlns="http://www.drools.org/xsd/kmodule">
  <kbase name="kbase1" packages="org.mypackages">
    <ksession name="ksession1"/>
  </kbase>
</kmodule>KieServices ks = KieServices.Factory.get();
KieContainer kContainer = ks.getKieClasspathContainer();
KieSession kSession = kContainer.newKieSession("ksession1");
kSession.insert(new Message("Dave", "Hello, HAL. Do you read me, HAL?"));
kSession.fireAllRules();2.28.4. KieBase Inclusion
It is possible to include all the KIE artifacts belonging to a KieBase into a second KieBase. This means that the second KieBase, in addition to all the rules, function and processes directly defined into it, will also contain the ones created in the included KieBase. This inclusion can be done declaratively in the kmodule.xml file
<kmodule xmlns="http://www.drools.org/xsd/kmodule">
  <kbase name="kbase2" includes="kbase1">
    <ksession name="ksession2"/>
  </kbase>
</kmodule>
or programmatically using the KieModuleModel.
KieModuleModel kmodule = KieServices.Factory.get().newKieModuleModel();
KieBaseModel kieBaseModel1 = kmodule.newKieBaseModel("KBase2").addInclude("KBase1");
2.28.5. KieModules, KieContainer and KIE-CI
Any Maven produced JAR with a 'kmodule.xml' in it is considered a KieModule. This can be loaded from the classpath or dynamically at runtime from a Resource location. If the kie-ci dependency is on the classpath it embeds Maven and all resolving is done automatically using Maven and can access local or remote repositories. Settings.xml is obeyed for Maven configuration.
The KieContainer provides a runtime to utilize the KieModule, versioning is built in throughout, via Maven. Kie-ci will create a classpath dynamically from all the Maven declared dependencies for the artifact being loaded. Maven LATEST, SNAPSHOT, RELEASE and version ranges are supported.
KieServices ks = KieServices.Factory.get();
KieContainer kContainer = ks.newKieContainer(
        ks.newReleaseId("org.mygroup", "myartefact", "1.0") );

KieSession kSession = kContainer.newKieSession("ksession1");
kSession.insert(new Message("Dave", "Hello, HAL. Do you read me, HAL?"));
kSession.fireAllRules();
KieContainers can be dynamically updated to a specific version, and resolved through Maven if KIE-CI is on the classpath. For stateful KieSessions the existing sessions are incrementally updated.
KieContainer kContainer.updateToVersion(
                ks.newReleaseId("org.mygroup", "myartefact", "1.1") );
2.28.6. KieScanner
The KieScanner is a Maven-oriented replacement of the KnowledgeAgent present in Drools 5.
It continuously monitors your Maven repository to check if a new release of a Kie project has been installed and if so, deploys it in the KieContainer wrapping that project.
The use of the KieScanner requires kie-ci.jar to be on the classpath.
A KieScanner can be registered on a KieContainer as in the following example.
KieServices kieServices = KieServices.Factory.get();
ReleaseId releaseId = kieServices.newReleaseId( "org.acme", "myartifact", "1.0-SNAPSHOT" );
KieContainer kContainer = kieServices.newKieContainer( releaseId );
KieScanner kScanner = kieServices.newKieScanner( kContainer );

// Start the KieScanner polling the Maven repository every 10 seconds
kScanner.start( 10000L );
In this example the KieScanner is configured to run with a fixed time interval, but it is also possible to run it on demand by invoking the scanNow() method on it.
If the KieScanner finds, in the Maven repository, an updated version of the Kie project used by that KieContainer it automatically downloads the new version and triggers an incremental build of the new project.
From this moment all the new KieBases and KieSessions created from that KieContainer will use the new project version.
2.28.7. Hierarchical ClassLoader
The CompositeClassLoader is no longer used; as it was a constant source of performance problems and bugs. Traditional hierarchical classloaders are now used. The root classloader is at the KieContext level, with one child ClassLoader per namespace. This makes it cleaner to add and remove rules, but there can now be no referencing between namespaces in DRL files; i.e. functions can only be used by the namespaces that declared them. The recommendation is to use static Java methods in your project, which is visible to all namespaces; but those cannot (like other classes on the root KieContainer ClassLoader) be dynamically updated.
2.28.8. Legacy API Adapter
The 5.x API for building and running with Drools and jBPM is still available through Maven dependency "knowledge-api-legacy5-adapter". Because the nature of deployment has significantly changed in 6.0, it was not possible to provide an adapter bridge for the KnowledgeAgent. If any other methods are missing or problematic, please open a JIRA, and we’ll fix for 6.1
2.28.9. KIE Documentation
While a lot of new documentation has been added for working with the new KIE API, the entire documentation has not yet been brought up to date. For this reason there will be continued references to old terminologies. Apologies in advance, and thank you for your patience. We hope those in the community will work with us to get the documentation updated throughout, for 6.1
2.29. What is New and Noteworthy in Drools 6.0.0
2.29.1. PHREAK - Lazy rule matching algorithm
The main work done for Drools in 6.0 involves the new PREAK algorithm. This is a lazy algorithm that should enable Drools to handle a larger number of rules and facts. AngendaGroups can now help improvement performance, as rules are not evaluated until it attempts to fire them.
Sequential mode continues to be supported for PHREAK but now 'modify' is allowed. While there is no 'inference' with sequential configuration, as rules are lazily evaluated, any rule not yet evaluated will see the more recent data as a result of 'modify'. This is more inline with how people intuitively think sequential works.
The conflict resolution order has been tweaked for PHREAK, and now is ordered by salience and then rule order; based on the rule position in the file.. Prior to Drools 6.0.0, after salience, it was considered arbitrary. When KieModules and updateToVersion are used for dynamic deployment, the rule order in the file is preserved via the diff processing.
2.29.2. Automatically firing timed rule in passive mode
When the rule engine runs in passive mode (i.e.: using fireAllRules) by default it doesn’t fire consequences of timed rules unless fireAllRules isn’t invoked again.
Now it is possible to change this default behavior by configuring the KieSession with a TimedRuleExectionOption as shown in the following example.
KieSessionConfiguration ksconf = KieServices.Factory.get().newKieSessionConfiguration();
ksconf.setOption( TimedRuleExectionOption.YES );
KSession ksession = kbase.newKieSession(ksconf, null);
It is also possible to have a finer grained control on the timed rules that have to be automatically executed.
To do this it is necessary to set a `FILTERED`TimedRuleExectionOption that allows to define a callback to filter those rules, as done in the next example.
KieSessionConfiguration ksconf = KieServices.Factory.get().newKieSessionConfiguration();
conf.setOption( new TimedRuleExectionOption.FILTERED(new TimedRuleExecutionFilter() {
    public boolean accept(Rule[] rules) {
        return rules[0].getName().equals("MyRule");
    }
}) );
2.29.3. Expression Timers
It is now possible to define both the delay and interval of an interval timer as an expression instead of a fixed value. To do that it is necessary to declare the timer as an expression one (indicated by "expr:") as in the following example:
declare Bean
    delay   : String = "30s"
    period  : long = 60000
end

rule "Expression timer"
    timer( expr: $d, $p )
when
    Bean( $d : delay, $p : period )
then
end
The expressions, $d and $p in this case, can use any variable defined in the pattern matching part of the rule and can be any String that can be parsed in a time duration or any numeric value that will be internally converted in a long representing a duration expressed in milliseconds.
Both interval and expression timers can have 3 optional parameters named "start", "end" and "repeat-limit". When one or more of these parameters are used the first part of the timer definition must be followed by a semicolon ';' and the parameters have to be separated by a comma ',' as in the following example:
timer (int: 30s 10s; start=3-JAN-2010, end=5-JAN-2010)The value for start and end parameters can be a Date, a String representing a Date or a long, or more in general any Number, that will be transformed in a Java Date applying the following conversion:
new Date( ((Number) n).longValue() )Conversely the repeat-limit can be only an integer and it defines the maximum number of repetitions allowed by the timer. If both the end and the repeat-limit parameters are set the timer will stop when the first of the two will be matched.
The using of the start parameter implies the definition of a phase for the timer, where the beginning of the phase is given by the start itself plus the eventual delay. In other words in this case the timed rule will then be scheduled at times:
start + delay + n*periodfor up to repeat-limit times and no later than the end timestamp (whichever first). For instance the rule having the following interval timer
timer ( int: 30s 1m; start="3-JAN-2010" )will be scheduled at the 30th second of every minute after the midnight of the 3-JAN-2010. This also means that if for example you turn the system on at midnight of the 3-FEB-2010 it won’t be scheduled immediately but will preserve the phase defined by the timer and so it will be scheduled for the first time 30 seconds after the midnight. If for some reason the system is paused (e.g. the session is serialized and then deserialized after a while) the rule will be scheduled only once to recover from missing activations (regardless of how many activations we missed) and subsequently it will be scheduled again in phase with the timer.
2.29.4. RuleFlowGroups and AgendaGroups are merged
These two groups have been merged and now RuleFlowGroups behave the same as AgendaGroups. The get methods have been left, for deprecation reasons, but both return the same underlying data. When jBPM activates a group it now just calls setFocus. RuleFlowGroups and AgendaGroups when used together was a continued source of errors. It also aligns the codebase, towards PHREAK and the multi-core explotation that is planned in the future.
2.30. New and Noteworthy in KIE Workbench 6.0.0
The workbench has had a big overhaul using a new base project called UberFire. UberFire is inspired by Eclipse and provides a clean, extensible and flexible framework for the workbench. The end result is not only a richer experience for our end users, but we can now develop more rapidly with a clean component based architecture. If you like he Workbench experience you can use UberFire today to build your own web based dashboard and console efforts.
As well as the move to a UberFire the other biggest change is the move from JCR to Git; there is an utility project to help with migration. Git is the most scalable and powerful source repository bar none. JGit provides a solid OSS implementation for Git. This addresses the continued performance problems with the various JCR implementations, which would slow down once the number of files and number of versions become too high. There has been a big "low tech" drive, to remove complexity. Everything is now stored as a file, including meta data. The database is only there to provide fast indexing and search. So importing and exporting is all standard Git and external sites, like GitHub, can be used to exchange repositories.
In 5.x developers would work with their own source repository and then push JCR, via the team provider. This team provider was not full featured and not available outside Eclipse. Git enables our repository to work any existing Git tool or team provider. While not yet supported in the UI, this will be added over time, it is possible to connect to the repo and tag and branch and restore things.
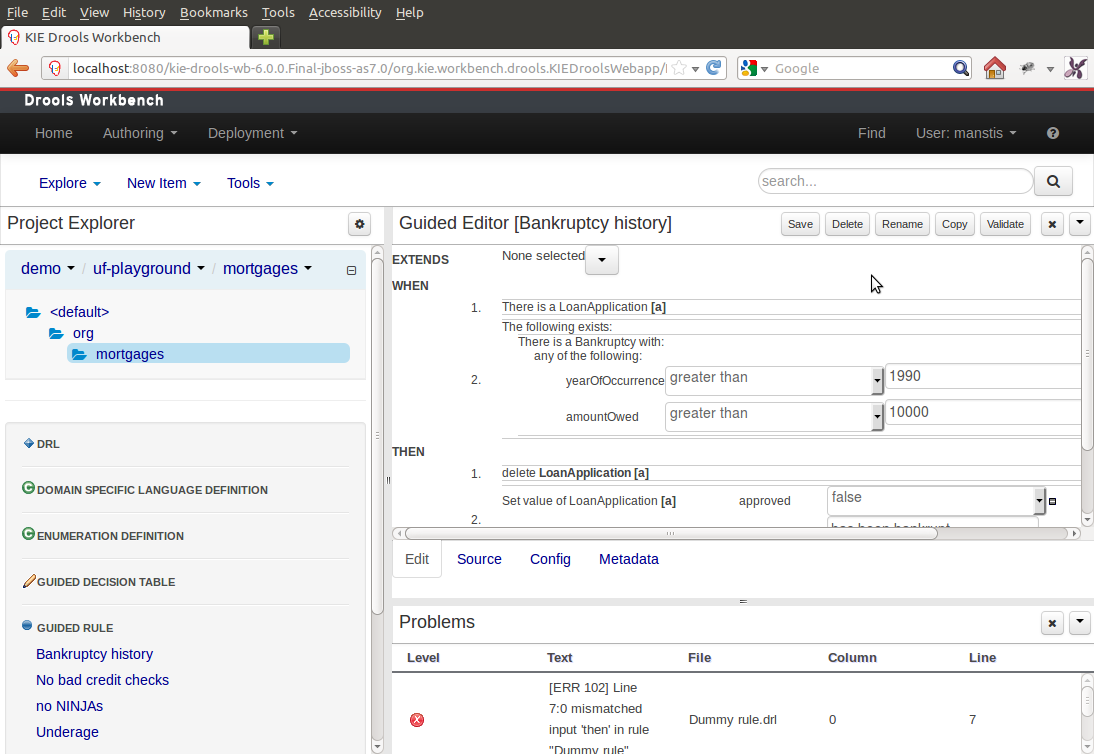
The Guvnor brand leaked too much from its intended role; such as the authoring metaphors, like Decision Tables, being considered Guvnor components instead of Drools components. This wasn’t helped by the monolithic projects structure used in 5.x for Guvnor. In 6.0 Guvnor 's focus has been narrowed to encapsulates the set of UberFire plugins that provide the basis for building a web based IDE. Such as Maven integration for building and deploying, management of Maven repositories and activity notifications via inboxes. Drools and jBPM build workbench distributions using Uberfire as the base and including a set of plugins, such as Guvnor, along with their own plugins for things like decision tables, guided editors, BPMN2 designer, human tasks.
The "Model Structure" diagram outlines the new project anatomy. The Drools workbench is called KIE-Drools-WB. KIE-WB is the uber workbench that combines all the Guvnor, Drools and jBPM plugins. The jBPM-WB is ghosted out, as it doesn’t actually exist, being made redundant by KIE-WB.
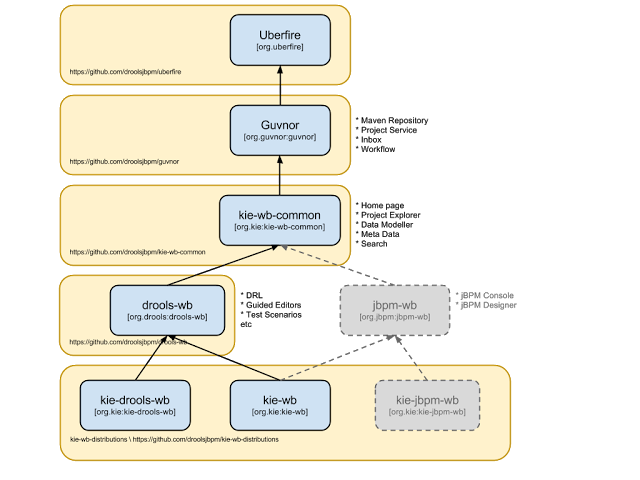
|
KIE Drools Workbench and KIE Workbench share a common set of components for generic workbench functionality such as Project navigation, Project definitions, Maven based Projects, Maven Artifact Repository. These common features are described in more detail throughout this documentation. |
The two primary distributions consist of:
-
KIE Drools Workbench
-
Drools Editors, for rules and supporting assets.
-
jBPM Designer, for Rule Flow and supporting assets.
-
-
KIE Workbench
-
Drools Editors, for rules and supporting assets.
-
jBPM Designer, for BPMN2 and supporting assets.
-
jBPM Console, runtime and Human Task support.
-
jBPM Form Builder.
-
BAM.
-
Workbench highlights:
-
New flexible Workbench environment, with perspectives and panels.
-
New packaging and build system following KIE API.
-
Maven based projects.
-
Maven Artifact Repository replaces Global Area, with full dependency support.
-
-
New Data Modeller replaces the declarative Fact Model Editor; bringing authoring of Java classes to the authoring environment. Java classes are packaged into the project and can be used within rules, processes etc and externally in your own applications.
-
Virtual File System replaces JCR with a default Git based implementation.
-
Default Git based implementation supports remote operations.
-
External modifications appear within the Workbench.
-
-
Incremental Build system showing, near real-time validation results of your project and assets.
The editors themselves are largely unchanged; however of note imports have moved from the package definition to individual editors so you need only import types used for an asset and not the package as a whole.
2.31. New and Noteworthy in Integration 6.0.0
2.31.1. CDI
@Inject
@KSession("kbase1")
@KReleaseId( groupId = "jar1", rtifactId = "art1", version = "1.0")
private KieBase kbase1v10;

@Inject
@KBase("kbase1")
@KReleaseId( groupId = "jar1", rtifactId = "art1", version = "1.1")
private KieBase kbase1v10;@Inject
@KSession("ksession1")
@KReleaseId( groupId = "jar1", rtifactId = "art1", version = "1.0")
private KieSession ksessionv10;
@Inject
@KSession("ksession1")
@KReleaseId( groupId = "jar1", rtifactId = "art1", version = "1.1")
private KieSession ksessionv11;CDI is now tightly integrated into the KIE API. It can be used to inject versioned KieSession and KieBases.
2.31.2. Spring
Spring has been revamped and now integrated with KIE. Spring can replace the 'kmodule.xml' with a more powerful spring version. The aim is for consistency with kmodule.xml
2.31.3. Aries Blueprints
Aries blueprints is now also supported, and follows the work done for spring. The aim is for consistency with spring and kmodule.xml
2.31.4. OSGi Ready
All modules have been refactored to avoid package splitting, which was a problem in 5.x. Testing has been moved to PAX.
3. Compatibility matrix
Starting from KIE 6.0, Drools (including workbench), jBPM (including designer and console) and OptaPlanner follow the same version numbering.
KIE
KIE is the shared core for Drools and jBPM. It provides a unified methodology and programming model for building, deploying and utilizing resources.
4. KIE
4.1. Overview
4.1.1. Anatomy of Projects
The process of researching an integration knowledge solution for Drools and jBPM has simply used the "kiegroup" group name. This name permeates GitHub accounts and Maven POMs. As scopes broadened and new projects were spun KIE, an acronym for Knowledge Is Everything, was chosen as the new group name. The KIE name is also used for the shared aspects of the system; such as the unified build, deploy and utilization.
KIE currently consists of the following subprojects:
OptaPlanner, a local search and optimization tool, has been spun off from Drools Planner and is now a top level project with Drools and jBPM. This was a natural evolution as Optaplanner, while having strong Drools integration, has long been independant of Drools.
From the Polymita acquisition, along with other things, comes the powerful Dashboard Builder which provides powerful reporting capabilities. Dashboard Builder is currently a temporary name and after the 6.0 release a new name will be chosen. Dashboard Builder is completely independant of Drools and jBPM and will be used by many projects at JBoss, and hopefully outside of JBoss :)
UberFire is the new base workbench project, spun off from the ground up rewrite. UberFire provides Eclipse-like workbench capabilities, with panels and pages from plugins. The project is independant of Drools and jBPM and anyone can use it as a basis of building flexible and powerful workbenches. UberFire will be used for console and workbench development throughout JBoss.
It was determined that the Guvnor brand leaked too much from its intended role; such as the authoring metaphors, like Decision Tables, being considered Guvnor components instead of Drools components. This wasn’t helped by the monolithic projects structure used in 5.x for Guvnor. In 6.0 Guvnor’s focus has been narrowed to encapsulate the set of UberFire plugins that provide the basis for building a web based IDE. Such as Maven integration for building and deploying, management of Maven repositories and activity notifications via inboxes. Drools and jBPM build workbench distributions using Uberfire as the base and including a set of plugins, such as Guvnor, along with their own plugins for things like decision tables, guided editors, BPMN2 designer, human tasks. The Drools workbench is called Drools-WB. KIE-WB is the uber workbench that combined all the Guvnor, Drools and jBPM plugins. The jBPM-WB is ghosted out, as it doesn’t actually exist, being made redundant by KIE-WB.
4.1.2. Lifecycles
The different aspects, or life cycles, of working with KIE system, whether it’s Drools or jBPM, can typically be broken down into the following:
-
Author
-
Authoring of knowledge using a UI metaphor, such as: DRL, BPMN2, decision table, class models.
-
-
Build
-
Builds the authored knowledge into deployable units.
-
For KIE this unit is a JAR.
-
-
Test
-
Test KIE knowedge before it’s deployed to the application.
-
-
Deploy
-
Deploys the unit to a location where applications may utilize (consume) them.
-
KIE uses Maven style repository.
-
-
Utilize
-
The loading of a JAR to provide a KIE session (KieSession), for which the application can interact with.
-
KIE exposes the JAR at runtime via a KIE container (KieContainer).
-
KieSessions, for the runtime’s to interact with, are created from the KieContainer.
-
-
Run
-
System interaction with the KieSession, via API.
-
-
Work
-
User interaction with the KieSession, via command line or UI.
-
-
Manage
-
Manage any KieSession or KieContainer.
-
4.2. Build, Deploy, Utilize and Run
4.2.1. Introduction
6.0 introduces a new configuration and convention approach to building knowledge bases, instead of using the programmatic builder approach in 5.x. The builder is still available to fall back on, as it’s used for the tooling integration.
Building now uses Maven, and aligns with Maven practices. A KIE project or module is simply a Maven Java project or module; with an additional metadata file META-INF/kmodule.xml. The kmodule.xml file is the descriptor that selects resources to knowledge bases and configures those knowledge bases and sessions. There is also alternative XML support via Spring and OSGi BluePrints.
While standard Maven can build and package KIE resources, it will not provide validation at build time. There is a Maven plugin which is recommended to use to get build time validation. The plugin also generates many classes, making the runtime loading faster too.
The example project layout and Maven POM descriptor is illustrated in the screenshot
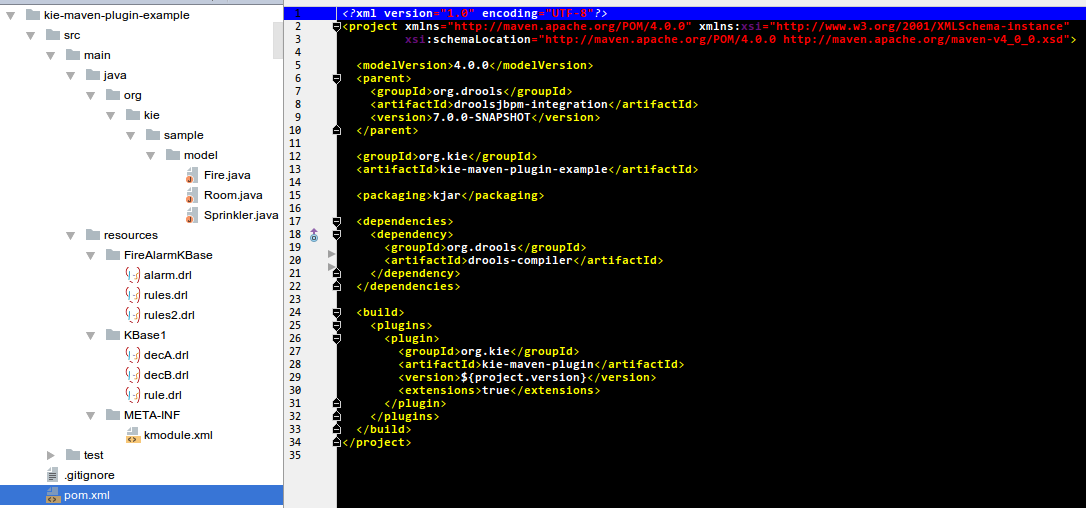
KIE uses defaults to minimise the amount of configuration. With an empty kmodule.xml being the simplest configuration. There must always be a kmodule.xml file, even if empty, as it’s used for discovery of the JAR and its contents.
Maven can either 'mvn install' to deploy a KieModule to the local machine, where all other applications on the local machine use it. Or it can 'mvn deploy' to push the KieModule to a remote Maven repository. Building the Application will pull in the KieModule and populate the local Maven repository in the process.

JARs can be deployed in one of two ways. Either added to the classpath, like any other JAR in a Maven dependency listing, or they can be dynamically loaded at runtime. KIE will scan the classpath to find all the JARs with a kmodule.xml in it. Each found JAR is represented by the KieModule interface. The terms classpath KieModule and dynamic KieModule are used to refer to the two loading approaches. While dynamic modules supports side by side versioning, classpath modules do not. Further once a module is on the classpath, no other version may be loaded dynamically.
Detailed references for the API are included in the next sections, the impatient can jump straight to the examples section, which is fairly self-explanatory on the different use cases.
4.2.2. Building
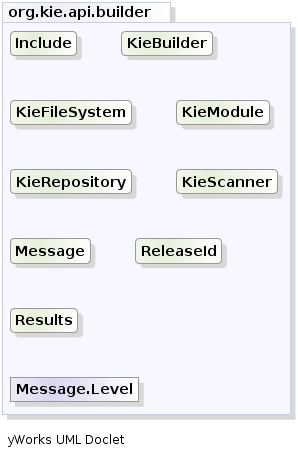
4.2.2.1. Creating and building a Kie Project
A Kie Project has the structure of a normal Maven project with the only peculiarity of including a kmodule.xml file defining in a declaratively way the KieBases and KieSessions that can be created from it.
This file has to be placed in the resources/META-INF folder of the Maven project while all the other Kie artifacts, such as DRL or a Excel files, must be stored in the resources folder or in any other subfolder under it.
Since meaningful defaults have been provided for all configuration aspects, the simplest kmodule.xml file can contain just an empty kmodule tag like the following:
<?xml version="1.0" encoding="UTF-8"?>
<kmodule xmlns="http://www.drools.org/xsd/kmodule"/>
In this way the kmodule will contain one single default KieBase.
All Kie assets stored under the resources folder, or any of its subfolders, will be compiled and added to it.
To trigger the building of these artifacts it is enough to create a KieContainer for them.
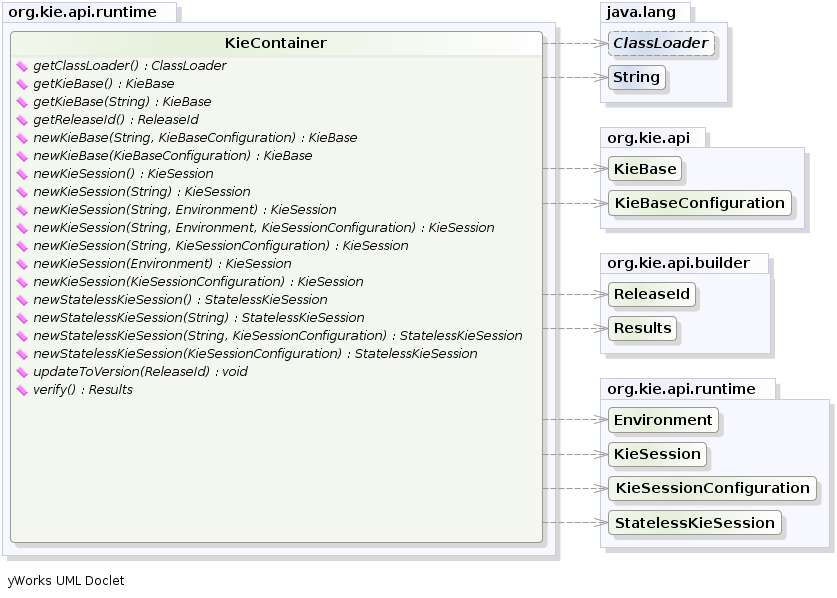
For this simple case it is enough to create a KieContainer that reads the files to be built from the classpath:
KieServices kieServices = KieServices.Factory.get();
KieContainer kContainer = kieServices.getKieClasspathContainer();
` KieServices` is the interface from where it possible to access all the Kie building and runtime facilities:
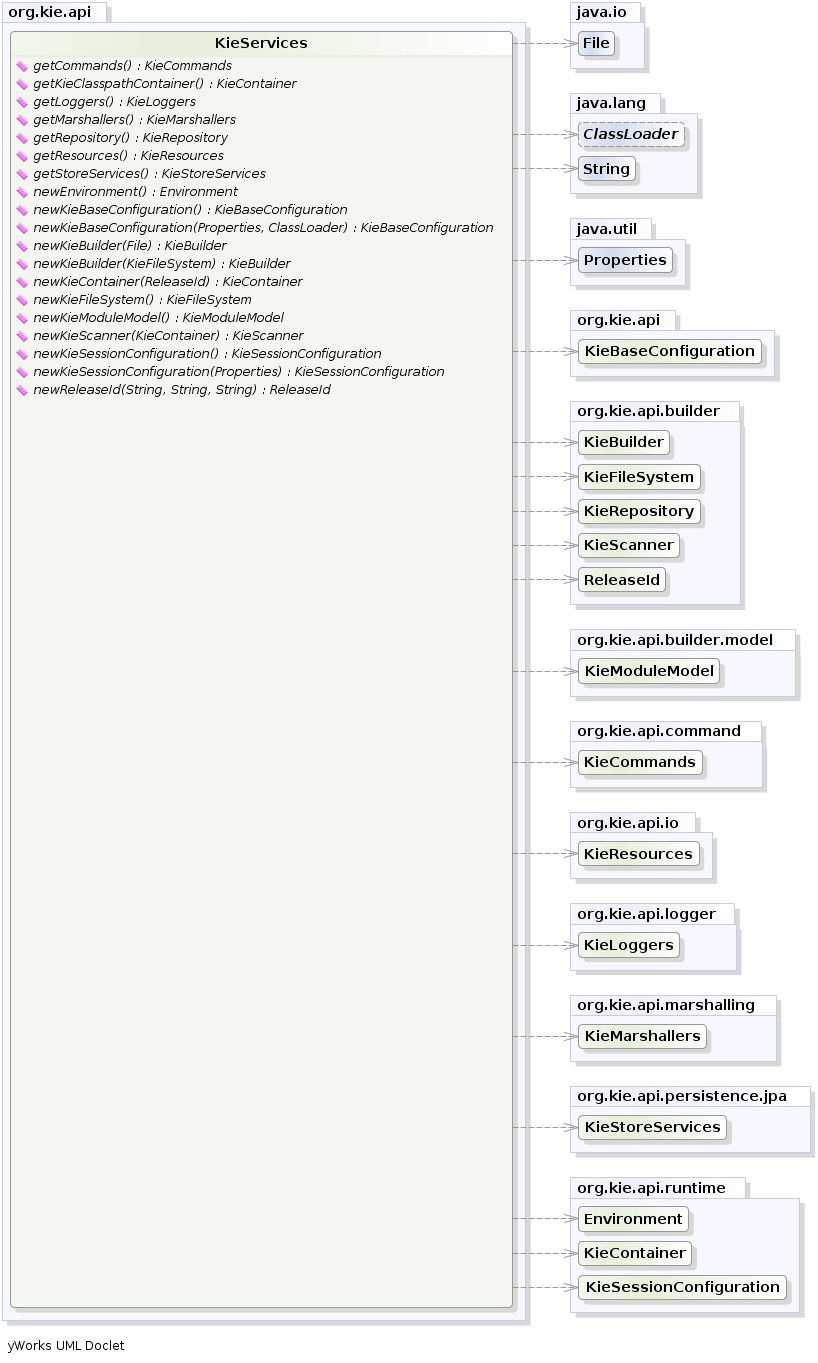
In this way all the Java sources and the Kie resources are compiled and deployed into the KieContainer which makes its contents available for use at runtime.
4.2.2.2. The kmodule.xml file
As explained in the former section, the kmodule.xml file is the place where it is possible to declaratively configure the KieBase(s) and KieSession(s) that can be created from a KIE project.
In particular a KieBase is a repository of all the application’s knowledge definitions.
It will contain rules, processes, functions, and type models.
The KieBase itself does not contain data; instead, sessions are created from the KieBase into which data can be inserted and from which process instances may be started.
Creating the KieBase can be heavy, whereas session creation is very light, so it is recommended that KieBase be cached where possible to allow for repeated session creation.
However end-users usually shouldn’t worry about it, because this caching mechanism is already automatically provided by the KieContainer.
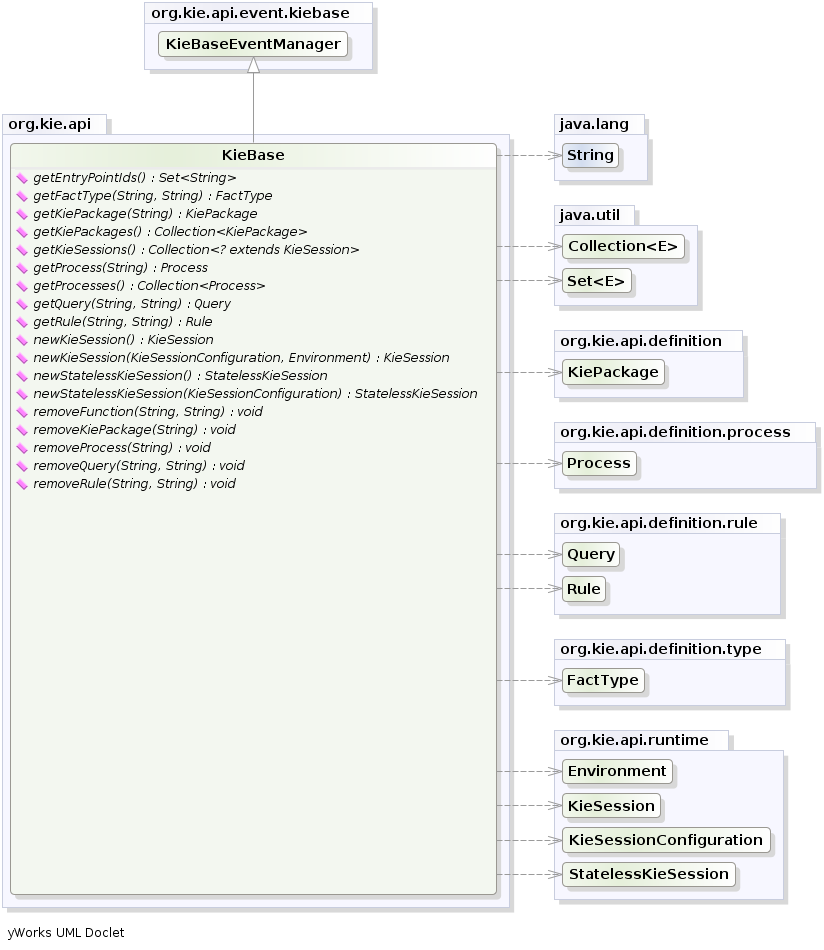
Conversely the KieSession stores and executes on the runtime data.
It is created from the KieBase or more easily can be created directly from the KieContainer if it has been defined in the kmodule.xml file
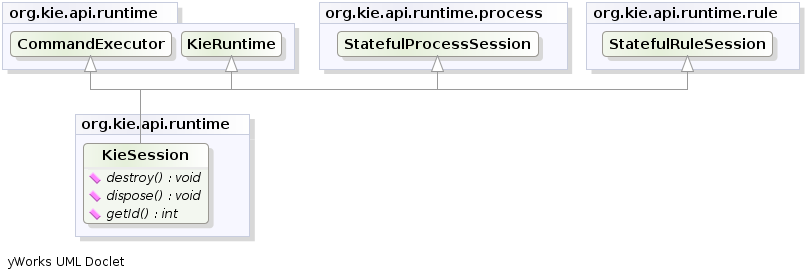
The kmodule.xml allows to define and configure one or more KieBases and for each KieBase all the different KieSessions that can be created from it, as showed by the follwing example:
<kmodule xmlns:xsi="http://www.w3.org/2001/XMLSchema-instance"
        xmlns="http://www.drools.org/xsd/kmodule">
  <configuration>
    <property key="drools.evaluator.supersetOf" value="org.mycompany.SupersetOfEvaluatorDefinition"/>
  </configuration>
  <kbase name="KBase1" default="true" eventProcessingMode="cloud" equalsBehavior="equality" declarativeAgenda="enabled" packages="org.domain.pkg1">
    <ksession name="KSession2_1" type="stateful" default="true"/>
    <ksession name="KSession2_2" type="stateless" default="false" beliefSystem="jtms"/>
  </kbase>
  <kbase name="KBase2" default="false" eventProcessingMode="stream" equalsBehavior="equality" declarativeAgenda="enabled" packages="org.domain.pkg2, org.domain.pkg3" includes="KBase1">
    <ksession name="KSession3_1" type="stateful" default="false" clockType="realtime">
      <fileLogger file="drools.log" threaded="true" interval="10"/>
      <workItemHandlers>
        <workItemHandler name="name" type="org.domain.WorkItemHandler"/>
      </workItemHandlers>
      <listeners>
        <ruleRuntimeEventListener type="org.domain.RuleRuntimeListener"/>
        <agendaEventListener type="org.domain.FirstAgendaListener"/>
        <agendaEventListener type="org.domain.SecondAgendaListener"/>
        <processEventListener type="org.domain.ProcessListener"/>
      </listeners>
    </ksession>
  </kbase>
</kmodule>
Here the
tag contains a list of key-value pairs that are the optional properties used to configure the KieBases building process.
For instance this sample kmodule.xml file defines an additional custom operator named supersetOf and implemented by the org.mycompany.SupersetOfEvaluatorDefinition class.
After this 2 KieBases have been defined and it is possible to instance 2 different types of KieSessions from the first one, while only one from the second.
A list of the attributes that can be defined on the kbase tag, together with their meaning and default values follows:
| Attribute name | Default value | Admitted values | Meaning |
|---|---|---|---|
name |
none |
any |
The name with which retrieve this KieBase from the KieContainer. This is the only mandatory attribute. |
includes |
none |
any comma separated list |
A comma separated list of other KieBases contained in this kmodule. The artifacts of all these KieBases will be also included in this one. |
packages |
all |
any comma separated list |
By default all the Drools artifacts under the resources folder, at any level, are included into the KieBase. This attribute allows to limit the artifacts that will be compiled in this KieBase to only the ones belonging to the list of packages. |
default |
false |
true, false |
Defines if this KieBase is the default one for this module, so it can be created from the KieContainer without passing any name to it. There can be at most one default KieBase in each module. |
equalsBehavior |
identity |
identity, equality |
Defines the behavior of Drools when a new fact is inserted into the Working Memory. With identity it always create a new FactHandle unless the same object isn’t already present in the Working Memory, while with equality only if the newly inserted object is not equal (according to its equal method) to an already existing fact. |
eventProcessingMode |
cloud |
cloud, stream |
When compiled in cloud mode the KieBase treats events as normal facts, while in stream mode allow temporal reasoning on them. |
declarativeAgenda |
disabled |
disabled, enabled |
Defines if the Declarative Agenda is enabled or not. |
Similarly all attributes of the ksession tag (except of course the name) have meaningful default. They are listed and described in the following table:
| Attribute name | Default value | Admitted values | Meaning |
|---|---|---|---|
name |
none |
any |
Unique name of this KieSession. Used to fetch the KieSession from the KieContainer. This is the only mandatory attribute. |
type |
stateful |
stateful, stateless |
A stateful session allows to iteratively work with the Working Memory, while a stateless one is a one-off execution of a Working Memory with a provided data set. |
default |
false |
true, false |
Defines if this KieSession is the default one for this module, so it can be created from the KieContainer without passing any name to it. In each module there can be at most one default KieSession for each type. |
clockType |
realtime |
realtime, pseudo |
Defines if events timestamps are determined by the system clock or by a psuedo clock controlled by the application. This clock is specially useful for unit testing temporal rules. |
beliefSystem |
simple |
simple, jtms, defeasible |
Defines the type of belief system used by the KieSession. |
As outlined in the former kmodule.xml sample, it is also possible to declaratively create on each KieSession a file (or a console) logger, one or more WorkItemHandlers and some listeners that can be of 3 different types: ruleRuntimeEventListener, agendaEventListener and processEventListener
Having defined a kmodule.xml like the one in the former sample, it is now possible to simply retrieve the KieBases and KieSessions from the KieContainer using their names.
KieServices kieServices = KieServices.Factory.get();
KieContainer kContainer = kieServices.getKieClasspathContainer();

KieBase kBase1 = kContainer.getKieBase("KBase1");
KieSession kieSession1 = kContainer.newKieSession("KSession2_1");
StatelessKieSession kieSession2 = kContainer.newStatelessKieSession("KSession2_2");
It has to be noted that since KSession2_1 and KSession2_2 are of 2 different types (the first is stateful, while the second is stateless) it is necessary to invoke 2 different methods on the KieContainer according to their declared type.
If the type of the KieSession requested to the KieContainer doesn’t correspond with the one declared in the kmodule.xml file the KieContainer will throw a RuntimeException.
Also since a KieBase and a KieSession have been flagged as default is it possible to get them from the KieContainer without passing any name.
KieContainer kContainer = ...

KieBase kBase1 = kContainer.getKieBase(); // returns KBase1
KieSession kieSession1 = kContainer.newKieSession(); // returns KSession2_1
Since a Kie project is also a Maven project the groupId, artifactId and version declared in the pom.xml file are used to generate a ReleaseId that uniquely identifies this project inside your application.
This allows creation of a new KieContainer from the project by simply passing its ReleaseId to the KieServices.
KieServices kieServices = KieServices.Factory.get();
ReleaseId releaseId = kieServices.newReleaseId( "org.acme", "myartifact", "1.0" );
KieContainer kieContainer = kieServices.newKieContainer( releaseId );
4.2.2.3. Building with Maven
The KIE plugin for Maven ensures that artifact resources are validated and pre-compiled, it is recommended that this is used at all times.
To use the plugin simply add it to the build section of the Maven pom.xml and activate it by using packaging kjar.
  <packaging>kjar</packaging>
  ...
  <build>
    <plugins>
      <plugin>
        <groupId>org.kie</groupId>
        <artifactId>kie-maven-plugin</artifactId>
        <version>7.11.0.Final</version>
        <extensions>true</extensions>
      </plugin>
    </plugins>
  </build>
The plugin comes with support for all the Drools/jBPM knowledge resources.
However, in case you are using specific KIE annotations in your Java classes, like for example @kie.api.Position, you will need to add compile time dependency on kie-api into your project.
We recommend to use the provided scope for all the additional KIE dependencies.
That way the kjar stays as lightweight as possible, and not dependant on any particular KIE version.
Building a KIE module without the Maven plugin will copy all the resources, as is, into the resulting JAR. When that JAR is loaded by the runtime, it will attempt to build all the resources then. If there are compilation issues it will return a null KieContainer. It also pushes the compilation overhead to the runtime. In general this is not recommended, and the Maven plugin should always be used.
4.2.2.4. Defining a KieModule programmatically
It is also possible to define the KieBases and KieSessions belonging to a KieModule programmatically instead of the declarative definition in the kmodule.xml file.
The same programmatic API also allows in explicitly adding the file containing the Kie artifacts instead of automatically read them from the resources folder of your project.
To do that it is necessary to create a KieFileSystem, a sort of virtual file system, and add all the resources contained in your project to it.
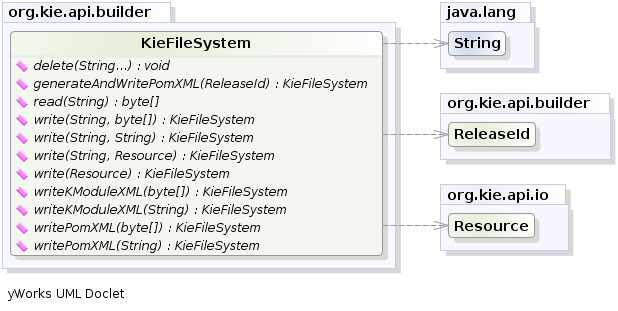
Like all other Kie core components you can obtain an instance of the KieFileSystem from the KieServices.
The kmodule.xml configuration file must be added to the filesystem.
This is a mandatory step.
Kie also provides a convenient fluent API, implemented by the KieModuleModel, to programmatically create this file.
To do this in practice it is necessary to create a KieModuleModel from the KieServices, configure it with the desired KieBases and KieSessions, convert it in XML and add the XML to the KieFileSystem.
This process is shown by the following example:
KieServices kieServices = KieServices.Factory.get();
KieModuleModel kieModuleModel = kieServices.newKieModuleModel();

KieBaseModel kieBaseModel1 = kieModuleModel.newKieBaseModel( "KBase1 ")
        .setDefault( true )
        .setEqualsBehavior( EqualityBehaviorOption.EQUALITY )
        .setEventProcessingMode( EventProcessingOption.STREAM );

KieSessionModel ksessionModel1 = kieBaseModel1.newKieSessionModel( "KSession1" )
        .setDefault( true )
        .setType( KieSessionModel.KieSessionType.STATEFUL )
        .setClockType( ClockTypeOption.get("realtime") );

KieFileSystem kfs = kieServices.newKieFileSystem();
kfs.writeKModuleXML(kieModuleModel.toXML());
At this point it is also necessary to add to the KieFileSystem, through its fluent API, all others Kie artifacts composing your project.
These artifacts have to be added in the same position of a corresponding usual Maven project.
KieFileSystem kfs = ...
kfs.write( "src/main/resources/KBase1/ruleSet1.drl", stringContainingAValidDRL )
        .write( "src/main/resources/dtable.xls",
                kieServices.getResources().newInputStreamResource( dtableFileStream ) );
This example shows that it is possible to add the Kie artifacts both as plain Strings and as Resources.
In the latter case the Resources can be created by the KieResources factory, also provided by the KieServices.
The KieResources provides many convenient factory methods to convert an InputStream, a URL, a File, or a String representing a path of your file system to a Resource that can be managed by the KieFileSystem.
Normally the type of a Resource can be inferred from the extension of the name used to add it to the KieFileSystem.
However it also possible to not follow the Kie conventions about file extensions and explicitly assign a specific ResourceType to a Resource as shown below:
KieFileSystem kfs = ...
kfs.write( "src/main/resources/myDrl.txt",
           kieServices.getResources().newInputStreamResource( drlStream )
                      .setResourceType(ResourceType.DRL) );
Add all the resources to the KieFileSystem and build it by passing the KieFileSystem to a KieBuilder
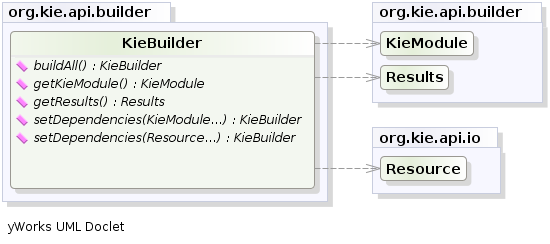
When the contents of a KieFileSystem are successfully built, the resulting KieModule is automatically added to the KieRepository.
The KieRepository is a singleton acting as a repository for all the available KieModules.
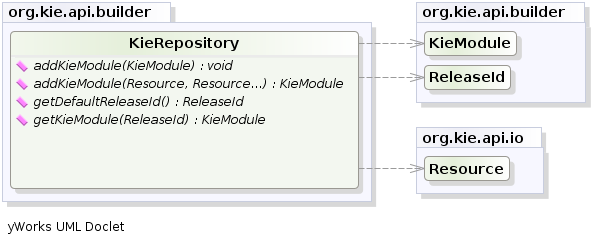
After this it is possible to create through the KieServices a new KieContainer for that KieModule using its ReleaseId.
However, since in this case the KieFileSystem doesn’t contain any pom.xml file (it is possible to add one using the KieFileSystem.writePomXML method), Kie cannot determine the ReleaseId of the KieModule and assign to it a default one.
This default ReleaseId can be obtained from the KieRepository and used to identify the KieModule inside the KieRepository itself.
The following example shows this whole process.
KieServices kieServices = KieServices.Factory.get();
KieFileSystem kfs = ...
kieServices.newKieBuilder( kfs ).buildAll();
KieContainer kieContainer = kieServices.newKieContainer(kieServices.getRepository().getDefaultReleaseId());
At this point it is possible to get KieBases and create new KieSessions from this KieContainer exactly in the same way as in the case of a KieContainer created directly from the classpath.
It is a best practice to check the compilation results.
The KieBuilder reports compilation results of 3 different severities: ERROR, WARNING and INFO.
An ERROR indicates that the compilation of the project failed and in the case no KieModule is produced and nothing is added to the KieRepository.
WARNING and INFO results can be ignored, but are available for inspection.
KieBuilder kieBuilder = kieServices.newKieBuilder( kfs ).buildAll();
assertEquals( 0, kieBuilder.getResults().getMessages( Message.Level.ERROR ).size() );
4.2.2.5. Changing the Default Build Result Severity
In some cases, it is possible to change the default severity of a type of build result. For instance, when a new rule with the same name of an existing rule is added to a package, the default behavior is to replace the old rule by the new rule and report it as an INFO. This is probably ideal for most use cases, but in some deployments the user might want to prevent the rule update and report it as an error.
Changing the default severity for a result type, configured like any other option in Drools, can be done by API calls, system properties or configuration files. As of this version, Drools supports configurable result severity for rule updates and function updates. To configure it using system properties or configuration files, the user has to use the following properties:
// sets the severity of rule updates
drools.kbuilder.severity.duplicateRule = <INFO|WARNING|ERROR>
// sets the severity of function updates
drools.kbuilder.severity.duplicateFunction = <INFO|WARNING|ERROR>
4.2.3. Deploying
4.2.3.1. KieBase
The KieBase is a repository of all the application’s knowledge definitions.
It will contain rules, processes, functions, and type models.
The KieBase itself does not contain data; instead, sessions are created from the KieBase into which data can be inserted and from which process instances may be started.
The KieBase can be obtained from the KieContainer containing the KieModule where the KieBase has been defined.
Sometimes, for instance in a OSGi environment, the KieBase needs to resolve types that are not in the default class loader.
In this case it will be necessary to create a KieBaseConfiguration with an additional class loader and pass it to KieContainer when creating a new KieBase from it.
KieServices kieServices = KieServices.Factory.get();
KieBaseConfiguration kbaseConf = kieServices.newKieBaseConfiguration( null, MyType.class.getClassLoader() );
KieBase kbase = kieContainer.newKieBase( kbaseConf );
4.2.3.2. KieSessions and KieBase Modifications
KieSessions will be discussed in more detail in section "Running". The KieBase creates and returns KieSession objects, and it may optionally keep references to those.
When KieBase modifications occur those modifications are applied against the data in the sessions.
This reference is a weak reference and it is also optional, which is controlled by a boolean flag.
4.2.3.3. KieScanner
The KieScanner allows continuous monitoring of your Maven repository to check whether a new release of a Kie project has been installed.
A new release is deployed in the KieContainer wrapping that project.
The use of the KieScanner requires kie-ci.jar to be on the classpath.
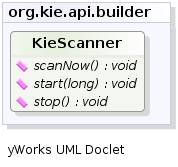
A KieScanner can be registered on a KieContainer as in the following example.
KieServices kieServices = KieServices.Factory.get();
ReleaseId releaseId = kieServices.newReleaseId( "org.acme", "myartifact", "1.0-SNAPSHOT" );
KieContainer kContainer = kieServices.newKieContainer( releaseId );
KieScanner kScanner = kieServices.newKieScanner( kContainer );

// Start the KieScanner polling the Maven repository every 10 seconds
kScanner.start( 10000L );
In this example the KieScanner is configured to run with a fixed time interval, but it is also possible to run it on demand by invoking the scanNow() method on it.
If the KieScanner finds, in the Maven repository, an updated version of the Kie project used by that KieContainer it automatically downloads the new version and triggers an incremental build of the new project.
At this point, existing KieBases and KieSessions under the control of KieContainer will get automatically upgraded with it - specifically, those KieBases obtained with getKieBase() along with their related KieSessions, and any KieSession obtained directly with KieContainer.newKieSession() thus referencing the default KieBase.
Additionally, from this moment on, all the new KieBases and KieSessions created from that KieContainer will use the new project version.
Please notice however any existing KieBase which was obtained via newKieBase() before the KieScanner upgrade, and any of its related KieSessions, will not get automatically upgraded; this is because KieBases obtained via newKieBase() are not under the direct control of the KieContainer.
The KieScanner will only pickup changes to deployed jars if it is using a SNAPSHOT, version range, the LATEST, or the RELEASE setting.
Fixed versions will not automatically update at runtime.
4.2.3.4. Maven Versions and Dependencies
Maven supports a number of mechanisms to manage versioning and dependencies within applications. Modules can be published with specific version numbers, or they can use the SNAPSHOT suffix. Dependencies can specify version ranges to consume, or take avantage of SNAPSHOT mechanism.
StackOverflow provides a very good description for this, which is reproduced below.
| Since Maven 3.x metaversions RELEASE and LATEST are no longer supported for the sake of reproducible builds. |
See the POM Syntax section of the Maven book for more details.
Here’s an example illustrating the various options. In the Maven repository, com.foo:my-foo has the following metadata:
<metadata>
  <groupId>com.foo</groupId>
  <artifactId>my-foo</artifactId>
  <version>2.0.0</version>
  <versioning>
    <release>1.1.1</release>
    <versions>
      <version>1.0</version>
      <version>1.0.1</version>
      <version>1.1</version>
      <version>1.1.1</version>
      <version>2.0.0</version>
    </versions>
    <lastUpdated>20090722140000</lastUpdated>
  </versioning>
</metadata>
If a dependency on that artifact is required, you have the following options (other version ranges can be specified of course, just showing the relevant ones here): Declare an exact version (will always resolve to 1.0.1):
<version>[1.0.1]</version>Declare an explicit version (will always resolve to 1.0.1 unless a collision occurs, when Maven will select a matching version):
<version>1.0.1</version>Declare a version range for all 1.x (will currently resolve to 1.1.1):
<version>[1.0.0,2.0.0)</version>Declare an open-ended version range (will resolve to 2.0.0):
<version>[1.0.0,)</version>Declare the version as LATEST (will resolve to 2.0.0):
<version>LATEST</version>Declare the version as RELEASE (will resolve to 1.1.1):
<version>RELEASE</version>Note that by default your own deployments will update the "latest" entry in the Maven metadata, but to update the "release" entry, you need to activate the "release-profile" from the Maven super POM. You can do this with either "-Prelease-profile" or "-DperformRelease=true"
4.2.3.5. Settings.xml and Remote Repository Setup
The maven settings.xml is used to configure Maven execution. Detailed instructions can be found at the Maven website:
The settings.xml file can be located in 3 locations, the actual settings used is a merge of those 3 locations.
-
The Maven install:
$M2_HOME/conf/settings.xml -
A user’s install:
${user.home}/.m2/settings.xml -
Folder location specified by the system property
kie.maven.settings.custom
The settings.xml is used to specify the location of remote repositories. It is important that you activate the profile that specifies the remote repository, typically this can be done using "activeByDefault":
<profiles>
  <profile>
    <id>profile-1</id>
    <activation>
      <activeByDefault>true</activeByDefault>
    </activation>
    ...
  </profile>
</profiles>
Maven provides detailed documentation on using multiple remote repositories:
4.2.4. Running
4.2.4.1. KieBase
The KieBase is a repository of all the application’s knowledge definitions.
It will contain rules, processes, functions, and type models.
The KieBase itself does not contain data; instead, sessions are created from the KieBase into which data can be inserted and from which process instances may be started.
The KieBase can be obtained from the KieContainer containing the KieModule where the KieBase has been defined.
KieBase kBase = kContainer.getKieBase();4.2.4.2. KieSession
The KieSession stores and executes on the runtime data.
It is created from the KieBase.
KieSession ksession = kbase.newKieSession();4.2.4.3. KieRuntime
KieRuntime
The KieRuntime provides methods that are applicable to both rules and processes, such as setting globals and registering channels.
("Exit point" is an obsolete synonym for "channel".)
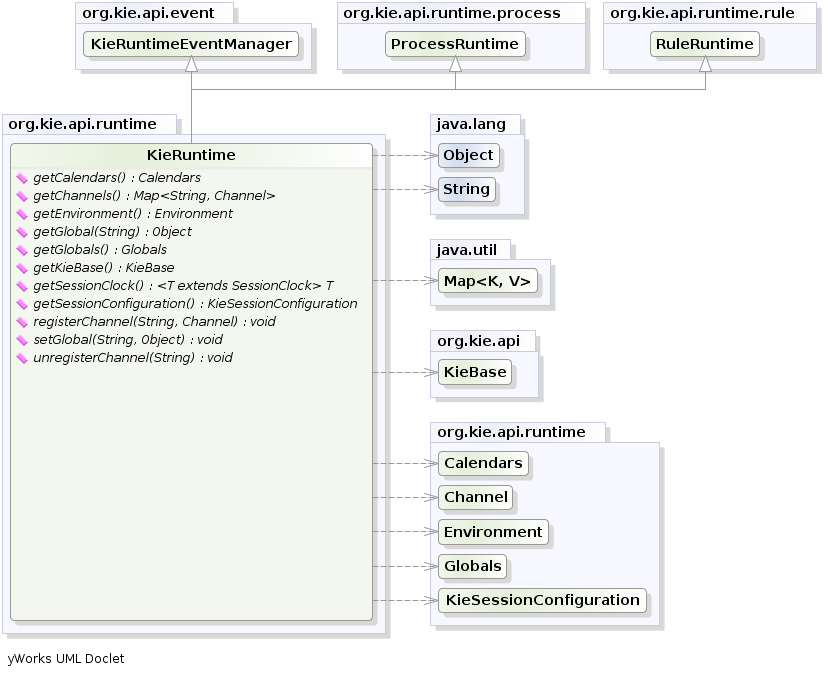
Globals are named objects that are made visible to the rule engine, but in a way that is fundamentally different from the one for facts: changes in the object backing a global do not trigger reevaluation of rules. Still, globals are useful for providing static information, as an object offering services that are used in the RHS of a rule, or as a means to return objects from the rule engine. When you use a global on the LHS of a rule, make sure it is immutable, or, at least, don’t expect changes to have any effect on the behavior of your rules.
A global must be declared in a rules file, and then it needs to be backed up with a Java object.
global java.util.List listWith the Knowledge Base now aware of the global identifier and its type, it is now possible to call ksession.setGlobal() with the global’s name and an object, for any session, to associate the object with the global.
Failure to declare the global type and identifier in DRL code will result in an exception being thrown from this call.
List list = new ArrayList();
ksession.setGlobal("list", list);
Make sure to set any global before it is used in the evaluation of a rule.
Failure to do so results in a NullPointerException.
4.2.4.4. Event Model
The event package provides means to be notified of rule engine events, including rules firing, objects being asserted, etc. This allows separation of logging and auditing activities from the main part of your application (and the rules).
The KieRuntimeEventManager interface is implemented by the KieRuntime which provides two interfaces, RuleRuntimeEventManager and ProcessEventManager.
We will only cover the RuleRuntimeEventManager here.
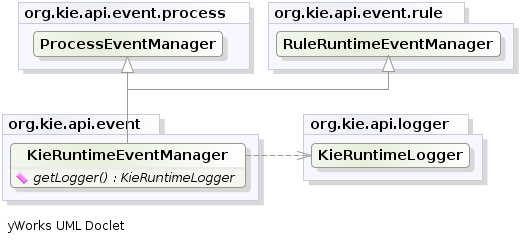
The RuleRuntimeEventManager allows for listeners to be added and removed, so that events for the working memory and the agenda can be listened to.
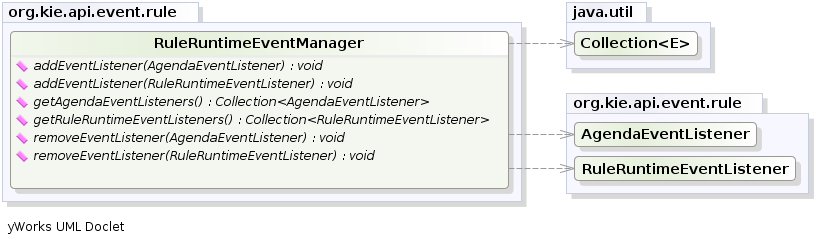
The following code snippet shows how a simple agenda listener is declared and attached to a session. It will print matches after they have fired.
ksession.addEventListener( new DefaultAgendaEventListener() {
    public void afterMatchFired(AfterMatchFiredEvent event) {
        super.afterMatchFired( event );
        System.out.println( event );
    }
});
Drools also provides DebugRuleRuntimeEventListener and DebugAgendaEventListener which implement each method with a debug print statement.
To print all Working Memory events, you add a listener like this:
ksession.addEventListener( new DebugRuleRuntimeEventListener() );All emitted events implement the KieRuntimeEvent interface which can be used to retrieve the actual KnowlegeRuntime the event originated from.
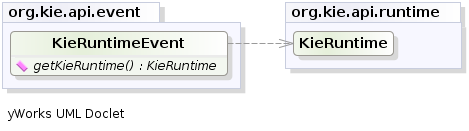
The events currently supported are:
-
MatchCreatedEvent
-
MatchCancelledEvent
-
BeforeMatchFiredEvent
-
AfterMatchFiredEvent
-
AgendaGroupPushedEvent
-
AgendaGroupPoppedEvent
-
ObjectInsertEvent
-
ObjectDeletedEvent
-
ObjectUpdatedEvent
-
ProcessCompletedEvent
-
ProcessNodeLeftEvent
-
ProcessNodeTriggeredEvent
-
ProcessStartEvent
4.2.4.5. KieRuntimeLogger
The KieRuntimeLogger uses the comprehensive event system in Drools to create an audit log that can be used to log the execution of an application for later inspection, using tools such as the Eclipse audit viewer.
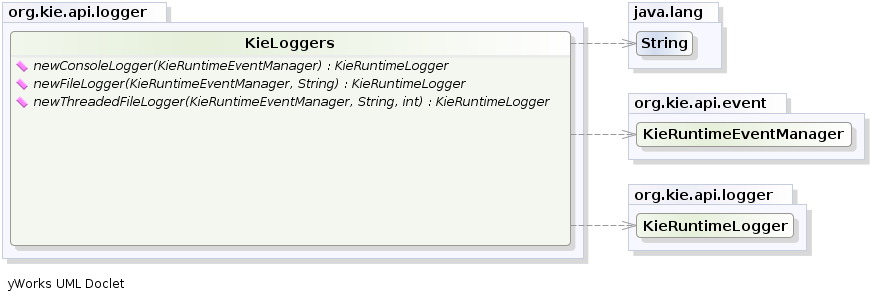
KieRuntimeLogger logger =
  KieServices.Factory.get().getLoggers().newFileLogger(ksession, "logdir/mylogfile");
...
logger.close();
4.2.4.6. Commands and the CommandExecutor
KIE has the concept of stateful or stateless sessions. Stateful sessions have already been covered, which use the standard KieRuntime, and can be worked with iteratively over time. Stateless is a one-off execution of a KieRuntime with a provided data set. It may return some results, with the session being disposed at the end, prohibiting further iterative interactions. You can think of stateless as treating an engine like a function call with optional return results.
The foundation for this is the CommandExecutor interface, which both the stateful and stateless interfaces extend.
This returns an ExecutionResults:
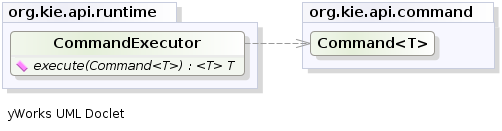
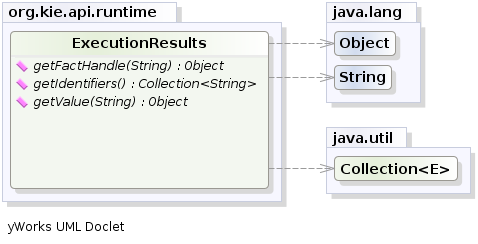
The CommandExecutor allows for commands to be executed on those sessions, the only difference being that the StatelessKieSession executes fireAllRules() at the end before disposing the session.
The commands can be created using the CommandExecutor .The Javadocs provide the full list of the allowed comands using the CommandExecutor.
setGlobal and getGlobal are two commands relevant to both Drools and jBPM.
Set Global calls setGlobal underneath.
The optional boolean indicates whether the command should return the global’s value as part of the ExecutionResults.
If true it uses the same name as the global name.
A String can be used instead of the boolean, if an alternative name is desired.
StatelessKieSession ksession = kbase.newStatelessKieSession();
ExecutionResults bresults =
    ksession.execute( CommandFactory.newSetGlobal( "stilton", new Cheese( "stilton" ), true);
Cheese stilton = bresults.getValue( "stilton" );
Allows an existing global to be returned. The second optional String argument allows for an alternative return name.
StatelessKieSession ksession = kbase.newStatelessKieSession();
ExecutionResults bresults =
    ksession.execute( CommandFactory.getGlobal( "stilton" );
Cheese stilton = bresults.getValue( "stilton" );
All the above examples execute single commands.
The BatchExecution represents a composite command, created from a list of commands.
It will iterate over the list and execute each command in turn.
This means you can insert some objects, start a process, call fireAllRules and execute a query, all in a single execute(…) call, which is quite powerful.
The StatelessKieSession will execute fireAllRules() automatically at the end.
However the keen-eyed reader probably has already noticed the FireAllRules command and wondered how that works with a StatelessKieSession.
The FireAllRules command is allowed, and using it will disable the automatic execution at the end; think of using it as a sort of manual override function.
Any command, in the batch, that has an out identifier set will add its results to the returned ExecutionResults instance.
Let’s look at a simple example to see how this works.
The example presented includes command from the Drools and jBPM, for the sake of illustration.
They are covered in more detail in the Drool and jBPM specific sections.
StatelessKieSession ksession = kbase.newStatelessKieSession();

List cmds = new ArrayList();
cmds.add( CommandFactory.newInsertObject( new Cheese( "stilton", 1), "stilton") );
cmds.add( CommandFactory.newStartProcess( "process cheeses" ) );
cmds.add( CommandFactory.newQuery( "cheeses" ) );
ExecutionResults bresults = ksession.execute( CommandFactory.newBatchExecution( cmds ) );
Cheese stilton = ( Cheese ) bresults.getValue( "stilton" );
QueryResults qresults = ( QueryResults ) bresults.getValue( "cheeses" );
In the above example multiple commands are executed, two of which populate the ExecutionResults.
The query command defaults to use the same identifier as the query name, but it can also be mapped to a different identifier.
All commands support XML and jSON marshalling using XStream, as well as JAXB marshalling. This is covered in section Commands API.
4.2.4.7. StatelessKieSession
The StatelessKieSession wraps the KieSession, instead of extending it.
Its main focus is on the decision service type scenarios.
It avoids the need to call dispose().
Stateless sessions do not support iterative insertions and the method call fireAllRules() from Java code; the act of calling execute() is a single-shot method that will internally instantiate a KieSession, add all the user data and execute user commands, call fireAllRules(), and then call dispose().
While the main way to work with this class is via the BatchExecution (a subinterface of Command) as supported by the CommandExecutor interface, two convenience methods are provided for when simple object insertion is all that’s required.
The CommandExecutor and BatchExecution are talked about in detail in their own section.
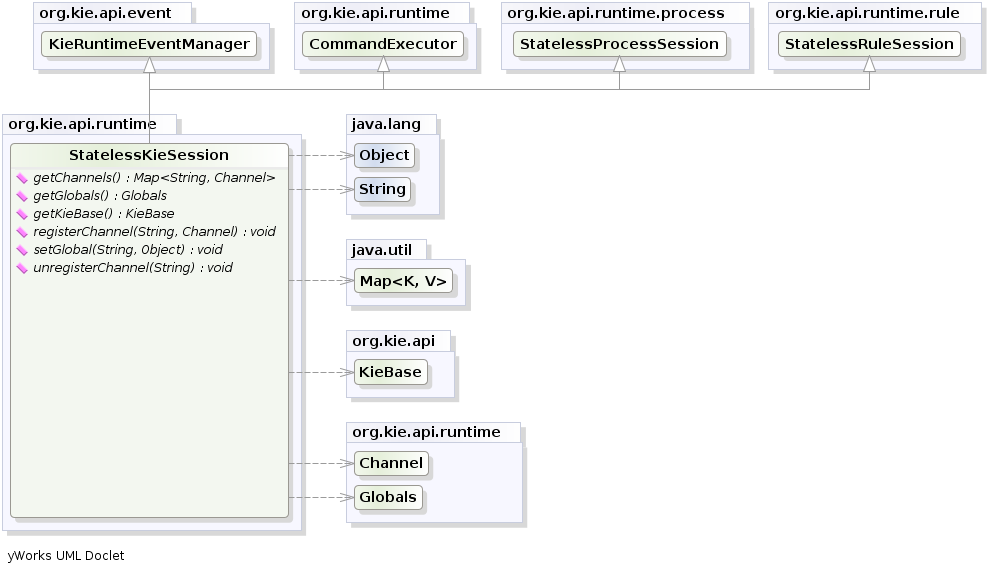
Our simple example shows a stateless session executing a given collection of Java objects using the convenience API. It will iterate the collection, inserting each element in turn.
StatelessKieSession ksession = kbase.newStatelessKieSession();
ksession.execute( collection );
If this was done as a single Command it would be as follows:
ksession.execute( CommandFactory.newInsertElements( collection ) );If you wanted to insert the collection itself, and the collection’s individual elements, then CommandFactory.newInsert(collection) would do the job.
Methods of the CommandFactory create the supported commands, all of which can be marshalled using XStream and the BatchExecutionHelper. BatchExecutionHelper provides details on the XML format as well as how to use Drools Pipeline to automate the marshalling of BatchExecution and ExecutionResults.
StatelessKieSession supports globals, scoped in a number of ways.
We cover the non-command way first, as commands are scoped to a specific execution call.
Globals can be resolved in three ways.
-
The StatelessKieSession method
getGlobals()returns a Globals instance which provides access to the session’s globals. These are shared for all execution calls. Exercise caution regarding mutable globals because execution calls can be executing simultaneously in different threads.Example 46. Session scoped globalStatelessKieSession ksession = kbase.newStatelessKieSession(); // Set a global hbnSession, that can be used for DB interactions in the rules. ksession.setGlobal( "hbnSession", hibernateSession ); // Execute while being able to resolve the "hbnSession" identifier. ksession.execute( collection ); -
Using a delegate is another way of global resolution. Assigning a value to a global (with
setGlobal(String, Object)) results in the value being stored in an internal collection mapping identifiers to values. Identifiers in this internal collection will have priority over any supplied delegate. Only if an identifier cannot be found in this internal collection, the delegate global (if any) will be used. -
The third way of resolving globals is to have execution scoped globals. Here, a
Commandto set a global is passed to theCommandExecutor.
The CommandExecutor interface also offers the ability to export data via "out" parameters.
Inserted facts, globals and query results can all be returned.
// Set up a list of commands
List cmds = new ArrayList();
cmds.add( CommandFactory.newSetGlobal( "list1", new ArrayList(), true ) );
cmds.add( CommandFactory.newInsert( new Person( "jon", 102 ), "person" ) );
cmds.add( CommandFactory.newQuery( "Get People" "getPeople" );

// Execute the list
ExecutionResults results =
  ksession.execute( CommandFactory.newBatchExecution( cmds ) );

// Retrieve the ArrayList
results.getValue( "list1" );
// Retrieve the inserted Person fact
results.getValue( "person" );
// Retrieve the query as a QueryResults instance.
results.getValue( "Get People" );
4.2.4.8. Marshalling
The KieMarshallers are used to marshal and unmarshal KieSessions.
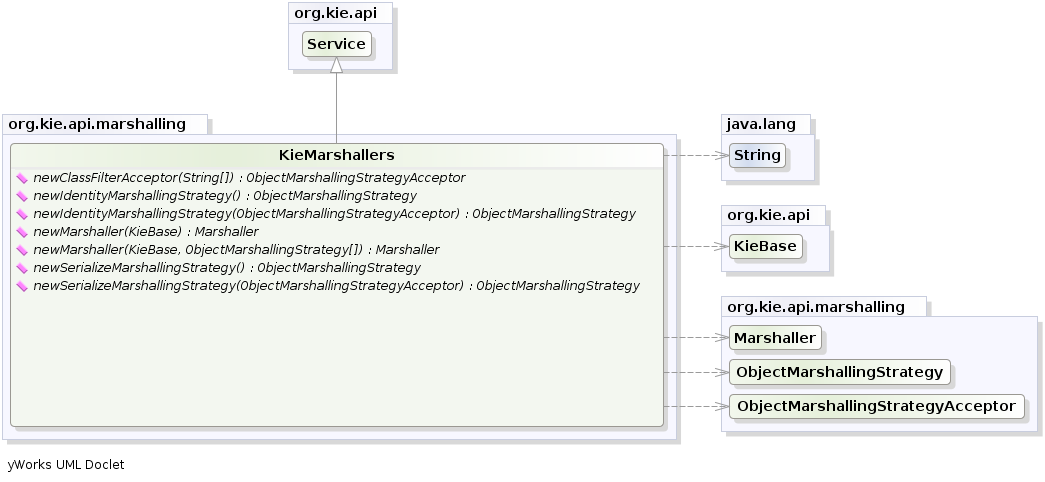
An instance of the KieMarshallers can be retrieved from the KieServices.
A simple example is shown below:
// ksession is the KieSession
// kbase is the KieBase
ByteArrayOutputStream baos = new ByteArrayOutputStream();
Marshaller marshaller = KieServices.Factory.get().getMarshallers().newMarshaller( kbase );
marshaller.marshall( baos, ksession );
baos.close();
However, with marshalling, you will need more flexibility when dealing with referenced user data.
To achieve this use the ObjectMarshallingStrategy interface.
Two implementations are provided, but users can implement their own.
The two supplied strategies are IdentityMarshallingStrategy and SerializeMarshallingStrategy. SerializeMarshallingStrategy is the default, as shown in the example above, and it just calls the Serializable or Externalizable methods on a user instance. IdentityMarshallingStrategy creates an integer id for each user object and stores them in a Map, while the id is written to the stream.
When unmarshalling it accesses the IdentityMarshallingStrategy map to retrieve the instance.
This means that if you use the IdentityMarshallingStrategy, it is stateful for the life of the Marshaller instance and will create ids and keep references to all objects that it attempts to marshal.
Below is the code to use an Identity Marshalling Strategy.
ByteArrayOutputStream baos = new ByteArrayOutputStream();
KieMarshallers kMarshallers = KieServices.Factory.get().getMarshallers()
ObjectMarshallingStrategy oms = kMarshallers.newIdentityMarshallingStrategy()
Marshaller marshaller =
        kMarshallers.newMarshaller( kbase, new ObjectMarshallingStrategy[]{ oms } );
marshaller.marshall( baos, ksession );
baos.close();
Im most cases, a single strategy is insufficient.
For added flexibility, the ObjectMarshallingStrategyAcceptor interface can be used.
This Marshaller has a chain of strategies, and while reading or writing a user object it iterates the strategies asking if they accept responsibility for marshalling the user object.
One of the provided implementations is ClassFilterAcceptor.
This allows strings and wild cards to be used to match class names.
The default is ".", so in the above example the Identity Marshalling Strategy is used which has a default "." acceptor.
Assuming that we want to serialize all classes except for one given package, where we will use identity lookup, we could do the following:
ByteArrayOutputStream baos = new ByteArrayOutputStream();
KieMarshallers kMarshallers = KieServices.Factory.get().getMarshallers()
ObjectMarshallingStrategyAcceptor identityAcceptor =
        kMarshallers.newClassFilterAcceptor( new String[] { "org.domain.pkg1.*" } );
ObjectMarshallingStrategy identityStrategy =
        kMarshallers.newIdentityMarshallingStrategy( identityAcceptor );
ObjectMarshallingStrategy sms = kMarshallers.newSerializeMarshallingStrategy();
Marshaller marshaller =
        kMarshallers.newMarshaller( kbase,
                                    new ObjectMarshallingStrategy[]{ identityStrategy, sms } );
marshaller.marshall( baos, ksession );
baos.close();
Note that the acceptance checking order is in the natural order of the supplied elements.
Also note that if you are using scheduled matches (i.e. some of your rules use timers or calendars) they are marshallable only if, before you use it, you configure your KieSession to use a trackable timer job factory manager as follows:
KieSessionConfiguration ksconf = KieServices.Factory.get().newKieSessionConfiguration();
ksconf.setOption(TimerJobFactoryOption.get("trackable"));
KSession ksession = kbase.newKieSession(ksconf, null);
4.2.4.9. Persistence and Transactions
Longterm out of the box persistence with Java Persistence API (JPA) is possible with Drools. It is necessary to have some implementation of the Java Transaction API (JTA) installed. For development purposes the Bitronix Transaction Manager is suggested, as it’s simple to set up and works embedded, but for production use JBoss Transactions is recommended.
KieServices kieServices = KieServices.Factory.get();
Environment env = kieServices.newEnvironment();
env.set( EnvironmentName.ENTITY_MANAGER_FACTORY,
         Persistence.createEntityManagerFactory( "emf-name" ) );
env.set( EnvironmentName.TRANSACTION_MANAGER,
         TransactionManagerServices.getTransactionManager() );

// KieSessionConfiguration may be null, and a default will be used
KieSession ksession =
        kieServices.getStoreServices().newKieSession( kbase, null, env );
int sessionId = ksession.getId();

UserTransaction ut =
  (UserTransaction) new InitialContext().lookup( "java:comp/UserTransaction" );
ut.begin();
ksession.insert( data1 );
ksession.insert( data2 );
ksession.startProcess( "process1" );
ut.commit();
To use a JPA, the Environment must be set with both the EntityManagerFactory and the TransactionManager.
If rollback occurs the ksession state is also rolled back, hence it is possible to continue to use it after a rollback.
To load a previously persisted KieSession you’ll need the id, as shown below:
KieSession ksession =
        kieServices.getStoreServices().loadKieSession( sessionId, kbase, null, env );
To enable persistence several classes must be added to your persistence.xml, as in the example below:
<persistence-unit name="org.drools.persistence.jpa" transaction-type="JTA">
   <provider>org.hibernate.ejb.HibernatePersistence</provider>
   <jta-data-source>jdbc/BitronixJTADataSource</jta-data-source>
   <class>org.drools.persistence.info.SessionInfo</class>
   <class>org.drools.persistence.info.WorkItemInfo</class>
   <properties>
         <property name="hibernate.dialect" value="org.hibernate.dialect.H2Dialect"/>
         <property name="hibernate.max_fetch_depth" value="3"/>
         <property name="hibernate.hbm2ddl.auto" value="update" />
         <property name="hibernate.show_sql" value="true" />
         <property name="hibernate.transaction.manager_lookup_class"
                      value="org.hibernate.transaction.BTMTransactionManagerLookup" />
   </properties>
</persistence-unit>
The jdbc JTA data source would have to be configured first. Bitronix provides a number of ways of doing this, and its documentation should be consulted for details. For a quick start, here is the programmatic approach:
PoolingDataSource ds = new PoolingDataSource();
ds.setUniqueName( "jdbc/BitronixJTADataSource" );
ds.setClassName( "org.h2.jdbcx.JdbcDataSource" );
ds.setMaxPoolSize( 3 );
ds.setAllowLocalTransactions( true );
ds.getDriverProperties().put( "user", "sa" );
ds.getDriverProperties().put( "password", "sasa" );
ds.getDriverProperties().put( "URL", "jdbc:h2:mem:mydb" );
ds.init();
Bitronix also provides a simple embedded JNDI service, ideal for testing. To use it, add a jndi.properties file to your META-INF folder and add the following line to it:
java.naming.factory.initial=bitronix.tm.jndi.BitronixInitialContextFactory4.2.5. Installation and Deployment Cheat Sheets
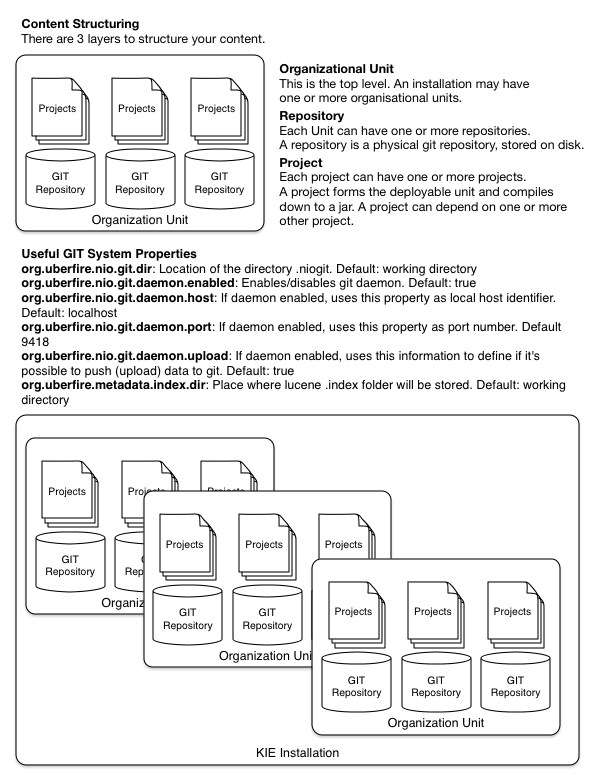
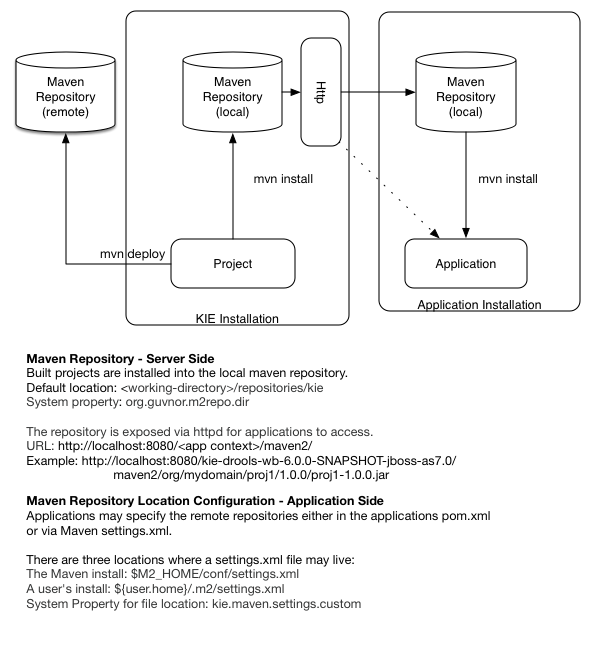
4.2.6. Build, Deploy and Utilize Examples
The best way to learn the new build system is by example. The source project "drools-examples-api" contains a number of examples, and can be found at GitHub:
Each example is described below, the order starts with the simplest (most of the options are defaulted) and working its way up to more complex use cases.
The Deploy use cases shown below all involve mvn install.
Remote deployment of JARs in Maven is well covered in Maven literature.
Utilize refers to the initial act of loading the resources and providing access to the KIE runtimes.
Where as Run refers to the act of interacting with those runtimes.
4.2.6.1. Default KieSession
-
Project: default-kesession.
-
Summary: Empty kmodule.xml KieModule on the classpath that includes all resources in a single default KieBase. The example shows the retrieval of the default KieSession from the classpath.
An empty kmodule.xml will produce a single KieBase that includes all files found under resources path, be it DRL, BPMN2, XLS etc. That single KieBase is the default and also includes a single default KieSession. Default means they can be created without knowing their names.
<kmodule xmlns="http://www.drools.org/xsd/kmodule"> </kmodule>mvn installks.getKieClasspathContainer() returns the KieContainer that contains the KieBases deployed onto the environment classpath. kContainer.newKieSession() creates the default KieSession. Notice that you no longer need to look up the KieBase, in order to create the KieSession. The KieSession knows which KieBase it’s associated with, and use that, which in this case is the default KieBase.
KieServices ks = KieServices.Factory.get();
KieContainer kContainer = ks.getKieClasspathContainer();

KieSession kSession = kContainer.newKieSession();
kSession.setGlobal("out", out);
kSession.insert(new Message("Dave", "Hello, HAL. Do you read me, HAL?"));
kSession.fireAllRules();
4.2.6.2. Named KieSession
-
Project: named-kiesession.
-
Summary: kmodule.xml that has one named KieBase and one named KieSession. The examples shows the retrieval of the named KieSession from the classpath.
kmodule.xml will produce a single named KieBase, 'kbase1' that includes all files found under resources path, be it DRL, BPMN2, XLS etc. KieSession 'ksession1' is associated with that KieBase and can be created by name.
<kmodule xmlns="http://www.drools.org/xsd/kmodule">
    <kbase name="kbase1">
        <ksession name="ksession1"/>
    </kbase>
</kmodule>mvn installks.getKieClasspathContainer() returns the KieContainer that contains the KieBases deployed onto the environment classpath. This time the KieSession uses the name 'ksession1'. You do not need to lookup the KieBase first, as it knows which KieBase 'ksession1' is assocaited with.
KieServices ks = KieServices.Factory.get();
KieContainer kContainer = ks.getKieClasspathContainer();

KieSession kSession = kContainer.newKieSession("ksession1");
kSession.setGlobal("out", out);
kSession.insert(new Message("Dave", "Hello, HAL. Do you read me, HAL?"));
kSession.fireAllRules();
4.2.6.3. KieBase Inheritence
-
Project: kiebase-inclusion.
-
Summary: 'kmodule.xml' demonstrates that one KieBase can include the resources from another KieBase, from another KieModule. In this case it inherits the named KieBase from the 'name-kiesession' example. The included KieBase can be from the current KieModule or any other KieModule that is in the pom.xml dependency list.
kmodule.xml will produce a single named KieBase, 'kbase2' that includes all files found under resources path, be it DRL, BPMN2, XLS etc. Further it will include all the resources found from the KieBase 'kbase1', due to the use of the 'includes' attribute. KieSession 'ksession2' is associated with that KieBase and can be created by name.
<kbase name="kbase2" includes="kbase1">
    <ksession name="ksession2"/>
</kbase>
This example requires that the previous example, 'named-kiesession', is built and installed to the local Maven repository first. Once installed it can be included as a dependency, using the standard Maven <dependencies> element.
<project xmlns="http://maven.apache.org/POM/4.0.0"
         xmlns:xsi="http://www.w3.org/2001/XMLSchema-instance"
         xsi:schemaLocation="http://maven.apache.org/POM/4.0.0 http://maven.apache.org/xsd/maven-4.0.0.xsd">
  <modelVersion>4.0.0</modelVersion>
  <parent>
    <groupId>org.drools</groupId>
    <artifactId>drools-examples-api</artifactId>
    <version>6.0.0/version>
  </parent>

  <artifactId>kiebase-inclusion</artifactId>
  <name>Drools API examples - KieBase Inclusion</name>

  <dependencies>
    <dependency>
      <groupId>org.drools</groupId>
      <artifactId>drools-compiler</artifactId>
    </dependency>
    <dependency>
      <groupId>org.drools</groupId>
      <artifactId>named-kiesession</artifactId>
      <version>6.0.0</version>
    </dependency>
  </dependencies>

</project>
Once 'named-kiesession' is built and installed this example can be built and installed as normal. Again the act of installing, will force the unit tests to run, demonstrating the use case.
mvn installks.getKieClasspathContainer() returns the KieContainer that contains the KieBases deployed onto the environment classpath. This time the KieSession uses the name 'ksession2'. You do not need to lookup the KieBase first, as it knows which KieBase 'ksession1' is assocaited with. Notice two rules fire this time, showing that KieBase 'kbase2' has included the resources from the dependency KieBase 'kbase1'.
KieServices ks = KieServices.Factory.get();
KieContainer kContainer = ks.getKieClasspathContainer();
KieSession kSession = kContainer.newKieSession("ksession2");
kSession.setGlobal("out", out);

kSession.insert(new Message("Dave", "Hello, HAL. Do you read me, HAL?"));
kSession.fireAllRules();

kSession.insert(new Message("Dave", "Open the pod bay doors, HAL."));
kSession.fireAllRules();
4.2.6.4. Multiple KieBases
-
Project: 'multiple-kbases.
-
Summary: Demonstrates that the 'kmodule.xml' can contain any number of KieBase or KieSession declarations. Introduces the 'packages' attribute to select the folders for the resources to be included in the KieBase.
kmodule.xml produces 6 different named KieBases. 'kbase1' includes all resources from the KieModule. The other KieBases include resources from other selected folders, via the 'packages' attribute. Note the use of wildcard '*', to select this package and all packages below it.
<kmodule xmlns="http://www.drools.org/xsd/kmodule">

  <kbase name="kbase1">
    <ksession name="ksession1"/>
  </kbase>

  <kbase name="kbase2" packages="org.some.pkg">
    <ksession name="ksession2"/>
  </kbase>

  <kbase name="kbase3" includes="kbase2" packages="org.some.pkg2">
    <ksession name="ksession3"/>
  </kbase>

  <kbase name="kbase4" packages="org.some.pkg, org.other.pkg">
    <ksession name="ksession4"/>
  </kbase>

  <kbase name="kbase5" packages="org.*">
    <ksession name="ksession5"/>
  </kbase>

  <kbase name="kbase6" packages="org.some.*">
    <ksession name="ksession6"/>
  </kbase>
</kmodule>mvn installOnly part of the example is included below, as there is a test method per KieSession, but each one is a repetition of the other, with different list expectations.
@Test
public void testSimpleKieBase() {
    List<Integer> list = useKieSession("ksession1");
    // no packages imported means import everything
    assertEquals(4, list.size());
    assertTrue( list.containsAll( asList(0, 1, 2, 3) ) );
}

//.. other tests for ksession2 to ksession6 here

private List<Integer> useKieSession(String name) {
    KieServices ks = KieServices.Factory.get();
    KieContainer kContainer = ks.getKieClasspathContainer();
    KieSession kSession = kContainer.newKieSession(name);

    List<Integer> list = new ArrayList<Integer>();
    kSession.setGlobal("list", list);
    kSession.insert(1);
    kSession.fireAllRules();

    return list;
}
4.2.6.5. KieContainer from KieRepository
-
Project: kcontainer-from-repository
-
Summary: The project does not contain a kmodule.xml, nor does the pom.xml have any dependencies for other KieModules. Instead the Java code demonstrates the loading of a dynamic KieModule from a Maven repository.
The pom.xml must include kie-ci as a depdency, to ensure Maven is available at runtime. As this uses Maven under the hood you can also use the standard Maven settings.xml file.
<project xmlns="http://maven.apache.org/POM/4.0.0"
         xmlns:xsi="http://www.w3.org/2001/XMLSchema-instance"
         xsi:schemaLocation="http://maven.apache.org/POM/4.0.0 http://maven.apache.org/xsd/maven-4.0.0.xsd">
  <modelVersion>4.0.0</modelVersion>
  <parent>
    <groupId>org.drools</groupId>
    <artifactId>drools-examples-api</artifactId>
    <version>6.0.0</version>
  </parent>

  <artifactId>kiecontainer-from-kierepo</artifactId>
  <name>Drools API examples - KieContainer from KieRepo</name>

  <dependencies>
    <dependency>
      <groupId>org.kie</groupId>
      <artifactId>kie-ci</artifactId>
    </dependency>
  </dependencies>

</project>mvn installIn the previous examples the classpath KieContainer used. This example creates a dynamic KieContainer as specified by the ReleaseId. The ReleaseId uses Maven conventions for group id, artifact id and version. It also obeys LATEST and SNAPSHOT for versions.
KieServices ks = KieServices.Factory.get();

// Install example1 in the local Maven repo before to do this
KieContainer kContainer = ks.newKieContainer(ks.newReleaseId("org.drools", "named-kiesession", "6.0.0-SNAPSHOT"));

KieSession kSession = kContainer.newKieSession("ksession1");
kSession.setGlobal("out", out);

Object msg1 = createMessage(kContainer, "Dave", "Hello, HAL. Do you read me, HAL?");
kSession.insert(msg1);
kSession.fireAllRules();
4.2.6.6. Default KieSession from File
-
Project: default-kiesession-from-file
-
Summary: Dynamic KieModules can also be loaded from any Resource location. The loaded KieModule provides default KieBase and KieSession definitions.
No kmodue.xml file exists. The project 'default-kiesession' must be built first, so that the resulting JAR, in the target folder, can be referenced as a File.
mvn installAny KieModule can be loaded from a Resource location and added to the KieRepository. Once deployed in the KieRepository it can be resolved via its ReleaseId. Note neither Maven or kie-ci are needed here. It will not set up a transitive dependency parent classloader.
KieServices ks = KieServices.Factory.get();
KieRepository kr = ks.getRepository();

KieModule kModule = kr.addKieModule(ks.getResources().newFileSystemResource(getFile("default-kiesession")));

KieContainer kContainer = ks.newKieContainer(kModule.getReleaseId());

KieSession kSession = kContainer.newKieSession();
kSession.setGlobal("out", out);

Object msg1 = createMessage(kContainer, "Dave", "Hello, HAL. Do you read me, HAL?");
kSession.insert(msg1);
kSession.fireAllRules();
4.2.6.7. Named KieSession from File
-
Project: named-kiesession-from-file
-
Summary: Dynamic KieModules can also be loaded from any Resource location. The loaded KieModule provides named KieBase and KieSession definitions.
No kmodue.xml file exists. The project 'named-kiesession' must be built first, so that the resulting JAR, in the target folder, can be referenced as a File.
mvn installAny KieModule can be loaded from a Resource location and added to the KieRepository. Once in the KieRepository it can be resolved via its ReleaseId. Note neither Maven or kie-ci are needed here. It will not setup a transitive dependency parent classloader.
KieServices ks = KieServices.Factory.get();
KieRepository kr = ks.getRepository();

KieModule kModule = kr.addKieModule(ks.getResources().newFileSystemResource(getFile("named-kiesession")));

KieContainer kContainer = ks.newKieContainer(kModule.getReleaseId());

KieSession kSession = kContainer.newKieSession("ksession1");
kSession.setGlobal("out", out);

Object msg1 = createMessage(kContainer, "Dave", "Hello, HAL. Do you read me, HAL?");
kSession.insert(msg1);
kSession.fireAllRules();
4.2.6.8. KieModule with Dependent KieModule
-
Project: kie-module-form-multiple-files
-
Summary: Programmatically provide the list of dependant KieModules, without using Maven to resolve anything.
No kmodue.xml file exists. The projects 'named-kiesession' and 'kiebase-include' must be built first, so that the resulting JARs, in the target folders, can be referenced as Files.
mvn installCreates two resources. One is for the main KieModule 'exRes1' the other is for the dependency 'exRes2'. Even though kie-ci is not present and thus Maven is not available to resolve the dependencies, this shows how you can manually specify the dependent KieModules, for the vararg.
KieServices ks = KieServices.Factory.get();
KieRepository kr = ks.getRepository();

Resource ex1Res = ks.getResources().newFileSystemResource(getFile("kiebase-inclusion"));
Resource ex2Res = ks.getResources().newFileSystemResource(getFile("named-kiesession"));

KieModule kModule = kr.addKieModule(ex1Res, ex2Res);
KieContainer kContainer = ks.newKieContainer(kModule.getReleaseId());

KieSession kSession = kContainer.newKieSession("ksession2");
kSession.setGlobal("out", out);

Object msg1 = createMessage(kContainer, "Dave", "Hello, HAL. Do you read me, HAL?");
kSession.insert(msg1);
kSession.fireAllRules();

Object msg2 = createMessage(kContainer, "Dave", "Open the pod bay doors, HAL.");
kSession.insert(msg2);
kSession.fireAllRules();
4.2.6.9. Programmaticaly build a Simple KieModule with Defaults
-
Project: kiemoduelmodel-example
-
Summary: Programmaticaly buid a KieModule from just a single file. The POM and models are all defaulted. This is the quickest out of the box approach, but should not be added to a Maven repository.
mvn installThis programmatically builds a KieModule. It populates the model that represents the ReleaseId and kmodule.xml, and it adds the relevant resources. A pom.xml is generated from the ReleaseId.
KieServices ks = KieServices.Factory.get();
KieRepository kr = ks.getRepository();
KieFileSystem kfs = ks.newKieFileSystem();

kfs.write("src/main/resources/org/kie/example5/HAL5.drl", getRule());

KieBuilder kb = ks.newKieBuilder(kfs);

kb.buildAll(); // kieModule is automatically deployed to KieRepository if successfully built.
if (kb.getResults().hasMessages(Level.ERROR)) {
    throw new RuntimeException("Build Errors:\n" + kb.getResults().toString());
}

KieContainer kContainer = ks.newKieContainer(kr.getDefaultReleaseId());

KieSession kSession = kContainer.newKieSession();
kSession.setGlobal("out", out);

kSession.insert(new Message("Dave", "Hello, HAL. Do you read me, HAL?"));
kSession.fireAllRules();
4.2.6.10. Programmaticaly build a KieModule using Meta Models
-
Project: kiemoduelmodel-example
-
Summary: Programmaticaly build a KieModule, by creating its kmodule.xml meta model resources.
mvn installThis programmatically builds a KieModule. It populates the model that represents the ReleaseId and kmodule.xml, as well as add the relevant resources. A pom.xml is generated from the ReleaseId.
KieServices ks = KieServices.Factory.get();
KieFileSystem kfs = ks.newKieFileSystem();

Resource ex1Res = ks.getResources().newFileSystemResource(getFile("named-kiesession"));
Resource ex2Res = ks.getResources().newFileSystemResource(getFile("kiebase-inclusion"));

ReleaseId rid = ks.newReleaseId("org.drools", "kiemodulemodel-example", "6.0.0-SNAPSHOT");
kfs.generateAndWritePomXML(rid);

KieModuleModel kModuleModel = ks.newKieModuleModel();
kModuleModel.newKieBaseModel("kiemodulemodel")
            .addInclude("kiebase1")
            .addInclude("kiebase2")
            .newKieSessionModel("ksession6");

kfs.writeKModuleXML(kModuleModel.toXML());
kfs.write("src/main/resources/kiemodulemodel/HAL6.drl", getRule());

KieBuilder kb = ks.newKieBuilder(kfs);
kb.setDependencies(ex1Res, ex2Res);
kb.buildAll(); // kieModule is automatically deployed to KieRepository if successfully built.
if (kb.getResults().hasMessages(Level.ERROR)) {
    throw new RuntimeException("Build Errors:\n" + kb.getResults().toString());
}

KieContainer kContainer = ks.newKieContainer(rid);

KieSession kSession = kContainer.newKieSession("ksession6");
kSession.setGlobal("out", out);

Object msg1 = createMessage(kContainer, "Dave", "Hello, HAL. Do you read me, HAL?");
kSession.insert(msg1);
kSession.fireAllRules();

Object msg2 = createMessage(kContainer, "Dave", "Open the pod bay doors, HAL.");
kSession.insert(msg2);
kSession.fireAllRules();

Object msg3 = createMessage(kContainer, "Dave", "What's the problem?");
kSession.insert(msg3);
kSession.fireAllRules();
4.3. Security
4.3.1. Security Manager
The KIE engine is a platform for the modelling and execution of business behavior, using a multitude of declarative abstractions and metaphores, like rules, processes, decision tables and etc.
Many times, the authoring of these metaphores is done by third party groups, be it a different group inside the same company, a group from a partner company, or even anonymous third parties on the internet.
Rules and Processes are designed to execute arbitrary code in order to do their job, but in such cases it might be necessary to constrain what they can do.
For instance, it is unlikely a rule should be allowed to create a classloader (what could open the system to an attack) and certainly it should not be allowed to make a call to System.exit().
The Java Platform provides a very comprehensive and well defined security framework that allows users to define policies for what a system can do. The KIE platform leverages that framework and allow application developers to define a specific policy to be applied to any execution of user provided code, be it in rules, processes, work item handlers and etc.
4.3.1.1. How to define a KIE Policy
Rules and processes can run with very restrict permissions, but the engine itself needs to perform many complex operations in order to work. Examples are: it needs to create classloaders, read system properties, access the file system, etc.
Once a security manager is installed, though, it will apply restrictions to all the code executing in the JVM according to the defined policy. For that reason, KIE allows the user to define two different policy files: one for the engine itself and one for the assets deployed into and executed by the engine.
One easy way to setup the enviroment is to give the engine itself a very permissive policy, while providing a constrained policy for rules and processes.
Policy files follow the standard policy file syntax as described in the Java documentation. For more details, see:
A permissive policy file for the engine can look like the following:
grant {
    permission java.security.AllPermission;
}
An example security policy for rules could be:
grant {
    permission java.util.PropertyPermission "*", "read";
    permission java.lang.RuntimePermission "accessDeclaredMembers";
}
Please note that depending on what the rules and processes are supposed to do, many more permissions might need to be granted, like accessing files in the filesystem, databases, etc.
In order to use these policy files, all that is necessary is to execute the application with these files as parameters to the JVM. Three parameters are required:
| Parameter | Meaning |
|---|---|
-Djava.security.manager |
Enables the security manager |
-Djava.security.policy=<jvm_policy_file> |
Defines the global policy file to be applied to the whole application, including the engine |
-Dkie.security.policy=<kie_policy_file> |
Defines the policy file to be applied to rules and processes |
For instance:
java -Djava.security.manager -Djava.security.policy=global.policy -Dkie.security.policy=rules.policy
        foo.bar.MyApp
|
When executing the engine inside a container, use your container’s documentation to find out how to configure the Security Manager and how to define the global security policy.
Define the kie security policy as described above and set the |
|
Please note that unless a Security Manager is configured, the |
|
A Security Manager has a high performance impact in the JVM. Applications with strict performance requirements are strongly discouraged of using a Security Manager. An alternative is the use of other security procedures like the auditing of rules/processes before testing and deployment to prevent malicious code from being deployed to the environment. |
Drools Runtime and Language
Drools is a powerful Hybrid Reasoning System.
5. Hybrid Reasoning
5.1. Artificial Intelligence
5.1.1. A Little History
Over the last few decades artificial intelligence (AI) became an unpopular term, with the well-known "AI Winter". There were large boasts from scientists and engineers looking for funding, which never lived up to expectations, resulting in many failed projects. Thinking Machines Corporation and the 5th Generation Computer (5GP) project probably exemplify best the problems at the time.
Thinking Machines Corporation was one of the leading AI firms in 1990, it had sales of nearly $65 million. Here is a quote from its brochure:
“Some day we will build a thinking machine. It will be a truly intelligent machine. One that can see and hear and speak. A machine that will be proud of us.”
Yet 5 years later it filed for bankruptcy protection under Chapter 11. The site inc.com has a fascinating article titled "The Rise and Fall of Thinking Machines". The article covers the growth of the industry and how a cosy relationship with Thinking Machines and DARPA over-heated the market, to the point of collapse. It explains how and why commerce moved away from AI and towards more practical number-crunching super computers.
The 5th Generation Computer project was a USD 400 million project in Japan to build a next generation computer. Valves (or Tubes) was the first generation, transistors the second, integrated circuits the third and finally microprocessors was the fourth. The fifth was intended to be a machine capable of effective Artificial Intelligence. This project spurred an "arms" race with the UK and USA, that caused much of the AI bubble. The 5GP would provide massive multi-cpu parallel processing hardware along with powerful knowledge representation and reasoning software via Prolog ; a type of [term]_ expert system_ . By 1992 the project was considered a failure and cancelled. It was the largest and most visible commercial venture for Prolog, and many of the failures are pinned on the problems of trying to run a logic based programming language concurrently on multi CPU hardware with effective results. Some believe that the failure of the 5GP project tainted Prolog and relegated it to academia, see "Whatever Happened to Prolog" by John C. Dvorak.
However while research funding dried up and the term AI became less used, many green shoots were planted and continued more quietly under discipline specific names: cognitive systems , machine learning , intelligent systems ,[term]_ knowledge representation and reasoning_ . Offshoots of these then made their way into commercial systems, such as expert systems in the Business Rules Management System (BRMS) market.
Imperative , system based languages, languages such as C, C++, Java and C#/.Net have dominated the last 20 years, enabled by the practicality of the languages and ability to run with good performance on commodity hardware. However many believe there is a renaissance underway in the field of AI, spurred by advances in hardware capabilities and AI research. In 2005 Heather Havenstein authored "Spring comes to AI winter" which outlines a case for this resurgence. Norvig and Russel dedicate several pages to what factors allowed the industry to overcome its problems and the research that came about as a result:
Recent years have seen a revolution in both the content and the methodology of work in artificial intelligence. It is now more common to build on existing theories than to propose brand-new ones, to base claims on rigorous theorems or hard experimental evidence rather than on intuition, and to show relevance to real-world applications rather than toy examples.
Computer vision , neural networks , machine learning and knowledge representation and reasoning (KRR) have made great strides towards becoming practical in commercial environments. For example, vision-based systems can now fully map out and navigate their environments with strong recognition skills. As a result we now have self-driving cars about to enter the commercial market. Ontological research, based around description logic, has provided very rich semantics to represent our world. Algorithms such as the tableaux algorithm have made it possible to use those rich semantics effectively in large complex ontologies. Early KRR systems, like Prolog in 5GP, were dogged by the limited semantic capabilities and memory restrictions on the size of those ontologies.
5.1.2. Knowledge Representation and Reasoning
In A Little History talks about AI as a broader subject and touches on Knowledge Representation and Reasoning (KRR) and also Expert Systems, I’ll come back to Expert Systems later.
KRR is about how we represent our knowledge in symbolic form, i.e. how we describe something. Reasoning is about how we go about the act of thinking using this knowledge. System based object-oriented languages, like C++, Java and C#, have data definitions called classes for describing the composition and behaviour of modeled entities. In Java we call exemplars of these described things beans or instances. However those classification systems are limited to ensure computational efficiency. Over the years researchers have developed increasingly sophisticated ways to represent our world. Many of you may already have heard of OWL (Web Ontology Language). There is always a gap between what can be theoretically represented and what can be used computationally in practically timely manner, which is why OWL has different sub-languages from Lite to Full. It is not believed that any reasoning system can support OWL Full. However, algorithmic advances continue to narrow that gap and improve the expressiveness available to reasoning engines.
There are also many approaches to how these systems go about thinking. You may have heard discussions comparing the merits of forward chaining, which is reactive and data driven, with backward chaining, which is passive and query driven. Many other types of reasoning techniques exist, each of which enlarges the scope of the problems we can tackle declaratively. To list just a few: imperfect reasoning (fuzzy logic, certainty factors), defeasible logic, belief systems, temporal reasoning and correlation. You don’t need to understand all these terms to understand and use Drools. They are just there to give an idea of the range of scope of research topics, which is actually far more extensive, and continues to grow as researchers push new boundaries.
KRR is often referred to as the core of Artificial Intelligence. Even when using biological approaches like neural networks, which model the brain and are more about pattern recognition than thinking, they still build on KRR theory. My first endeavours with Drools were engineering oriented, as I had no formal training or understanding of KRR. Learning KRR has allowed me to get a much wider theoretical background, and to better understand both what I’ve done and where I’m going, as it underpins nearly all of the theoretical side to our Drools R&D. It really is a vast and fascinating subject that will pay dividends for those who take the time to learn. I know it did and still does for me. Bracham and Levesque have written a seminal piece of work, called "Knowledge Representation and Reasoning" that is a must read for anyone wanting to build strong foundations. I would also recommend the Russel and Norvig book "Artificial Intelligence, a modern approach" which also covers KRR.
5.1.3. Rule Engines and Production Rule Systems (PRS)
We’ve now covered a brief history of AI and learnt that the core of AI is formed around KRR. We’ve shown than KRR is a vast and fascinating subject which forms the bulk of the theory driving Drools R&D.
The rule engine is the computer program that delivers KRR functionality to the developer. At a high level it has three components:
-
Ontology
-
Rules
-
Data
As previously mentioned the ontology is the representation model we use for our "things". It could use records or Java classes or full-blown OWL based ontologies. The rules perform the reasoning, i.e., they facilitate "thinking". The distinction between rules and ontologies blurs a little with OWL based ontologies, whose richness is rule based.
The term "rules engine" is quite ambiguous in that it can be any system that uses rules, in any form, that can be applied to data to produce outcomes. This includes simple systems like form validation and dynamic expression engines. The book "How to Build a Business Rules Engine" (2004) by Malcolm Chisholm exemplifies this ambiguity. The book is actually about how to build and alter a database schema to hold validation rules. The book then shows how to generate Visual Basic code from those validation rules to validate data entry. While perfectly valid, this is very different to what we are talking about.
Drools started life as a specific type of rule engine called a Production Rule System (PRS) and was based around the Rete algorithm (usually pronounced as two syllables, e.g., REH-te or RAY-tay). The Rete algorithm, developed by Charles Forgy in 1974, forms the brain of a Production Rule System and is able to scale to a large number of rules and facts. A Production Rule is a two-part structure: the engine matches facts and data against Production Rules - also called Productions or just Rules - to infer conclusions which result in actions.
when
    <conditions>
then
    <actions>;
The process of matching the new or existing facts against Production Rules is called pattern matching , which is performed by the inference engine . Actions execute in response to changes in data, like a database trigger; we say this is a data driven approach to reasoning. The actions themselves can change data, which in turn could match against other rules causing them to fire; this is referred to as forward chaining
Drools 5.x implements and extends the Rete algorithm. This extended Rete algorithm is named ReteOO , signifying that Drools has an enhanced and optimized implementation of the Rete algorithm for object oriented systems. Other Rete based engines also have marketing terms for their proprietary enhancements to Rete, like RetePlus and Rete III. The most common enhancements are covered in "Production Matching for Large Learning Systems" (1995) by Robert B. Doorenbos' thesis, which presents Rete/UL. Drools 6.x introduces a new lazy algorithm named PHREAK ; which is covered in more detail in the PHREAK algorithm section.
The Rules are stored in the Production Memory and the facts that the Inference Engine matches against are kept in the Working Memory. Facts are asserted into the Working Memory where they may then be modified or retracted. A system with a large number of rules and facts may result in many rules being true for the same fact assertion; these rules are said to be in conflict. The Agenda manages the execution order of these conflicting rules using a Conflict Resolution strategy.
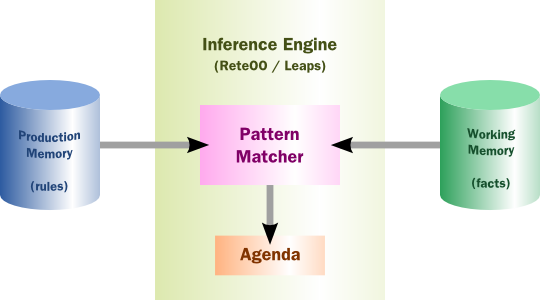
5.1.4. Hybrid Reasoning Systems (HRS)
You may have read discussions comparing the merits of forward chaining (reactive and data driven) or backward chaining (passive query). Here is a quick explanation of these two main types of reasoning.
Forward chaining is "data-driven" and thus reactionary, with facts being asserted into working memory, which results in one or more rules being concurrently true and scheduled for execution by the Agenda. In short, we start with a fact, it propagates through the rules, and we end in a conclusion.
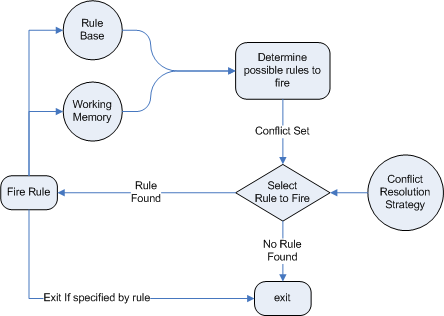
Backward chaining is "goal-driven", meaning that we start with a conclusion which the engine tries to satisfy. If it can’t, then it searches for conclusions that it can satisfy. These are known as subgoals, that will help satisfy some unknown part of the current goal. It continues this process until either the initial conclusion is proven or there are no more subgoals. Prolog is an example of a Backward Chaining engine. Drools can also do backward chaining, which we refer to as derivation queries.

Historically you would have to make a choice between systems like OPS5 (forward) or Prolog (backward). Nowadays many modern systems provide both types of reasoning capabilities. There are also many other types of reasoning techniques, each of which enlarges the scope of the problems we can tackle declaratively. To list just a few: imperfect reasoning (fuzzy logic, certainty factors), defeasible logic, belief systems, temporal reasoning and correlation. Modern systems are merging these capabilities, and others not listed, to create hybrid reasoning systems (HRS).
While Drools started out as a PRS, 5.x introduced Prolog style backward chaining reasoning as well as some functional programming styles. For this reason we now prefer the term Hybrid Reasoning System when describing Drools.
Drools currently provides crisp reasoning, but imperfect reasoning is almost ready. Initially this will be imperfect reasoning with fuzzy logic; later we’ll add support for other types of uncertainty. Work is also under way to bring OWL based ontological reasoning, which will integrate with our traits system. We also continue to improve our functional programming capabilities.
5.1.5. Expert Systems
You will often hear the terms expert systems used to refer to production rule systems or Prolog -like systems. While this is normally acceptable, it’s technically incorrect as these are frameworks to build expert systems with, rather than expert systems themselves. It becomes an expert system once there is an ontological model to represent the domain and there are facilities for knowledge acquisition and explanation.
Mycin is the most famous expert system, built during the 70s. It is still heavily covered in academic literature, such as the recommended book "Expert Systems" by Peter Jackson.
5.1.6. Recommended Reading
* General AI, KRR and Expert System Books*
For those wanting to get a strong theoretical background in KRR and expert systems, I’d strongly recommend the following books. "Artificial Intelligence: A Modern Approach" is a must have, for anyone’s bookshelf.
-
Introduction to Expert Systems
-
Peter Jackson
-
-
Expert Systems: Principles and Programming
-
Joseph C. Giarratano, Gary D. Riley
-
-
Knowledge Representation and Reasoning
-
Ronald J. Brachman, Hector J. Levesque
-
-
Artificial Intelligence : A Modern Approach.
-
Stuart Russell and Peter Norvig
-

* Papers*
Here are some recommended papers that cover interesting areas in rule engine research:
-
Production Matching for Large Learning Systems: Rete/UL (1993)
-
Robert B. Doorenbos
-
-
Advances In Rete Pattern Matching
-
Marshall Schor, Timothy P. Daly, Ho Soo Lee, Beth R. Tibbitts (AAAI 1986)
-
-
Collection-Oriented Match
-
Anurag Acharya and Milind Tambe (1993)
-
-
The Leaps Algorithm
-
Don Batery (1990)
-
-
Gator: An Optimized Discrimination Network for Active Database Rule Condition Testing
-
Eric Hanson , Mohammed S. Hasan (1993)
-
* Drools Books*
There are currently three Drools books, all from Packt Publishing.
-
JBoss Drools Business Rules
-
Paul Browne
-
-
Drools JBoss Rules 5.0 Developers Guide
-
Michal Bali
-
-
Drools Developer’s Cookbook
-
Lucas Amador
-
5.2. Rete Algorithm
The Rete algorithm was invented by Dr. Charles Forgy and documented in his PhD thesis in 1978-79. A simplified version of the paper was published in 1982 (http://citeseer.ist.psu.edu/context/505087/0). The Latin word "rete" means "net" or "network". The Rete algorithm can be broken into 2 parts: rule compilation and runtime execution.
The compilation algorithm describes how the Rules in the Production Memory are processed to generate an efficient discrimination network. In non-technical terms, a discrimination network is used to filter data as it propagates through the network. The nodes at the top of the network would have many matches, and as we go down the network, there would be fewer matches. At the very bottom of the network are the terminal nodes. In Dr. Forgy’s 1982 paper, he described 4 basic nodes: root, 1-input, 2-input and terminal.

The root node is where all objects enter the network.
From there, it immediately goes to the ObjectTypeNode.
The purpose of the ObjectTypeNode is to make sure the engine doesn’t do more work than it needs to.
For example, say we have 2 objects: Account and Order.
If the rule engine tried to evaluate every single node against every object, it would waste a lot of cycles.
To make things efficient, the engine should only pass the object to the nodes that match the object type.
The easiest way to do this is to create an ObjectTypeNode and have all 1-input and 2-input nodes descend from it.
This way, if an application asserts a new Account, it won’t propagate to the nodes for the Order object.
In Drools when an object is asserted it retrieves a list of valid ObjectTypesNodes via a lookup in a HashMap from the object’s Class; if this list doesn’t exist it scans all the ObjectTypeNodes finding valid matches which it caches in the list.
This enables Drools to match against any Class type that matches with an instanceof check.
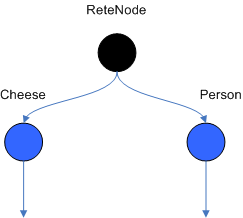
ObjectTypeNodes can propagate to AlphaNodes, LeftInputAdapterNodes and BetaNodes.
AlphaNodes are used to evaluate literal conditions.
Although the 1982 paper only covers equality conditions, many RETE implementations support other operations.
For example, Account.name == "Mr
Trout" is a literal condition.
When a rule has multiple literal conditions for a single object type, they are linked together.
This means that if an application asserts an Account object, it must first satisfy the first literal condition before it can proceed to the next AlphaNode.
In Dr.
Forgy’s paper, he refers to these as IntraElement conditions.
The following diagram shows the AlphaNode combinations for Cheese( name == "cheddar", strength == "strong" ):
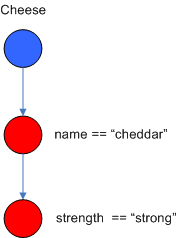
Drools extends Rete by optimizing the propagation from ObjectTypeNode to AlphaNode using hashing. Each time an AlphaNode is added to an ObjectTypeNode it adds the literal value as a key to the HashMap with the AlphaNode as the value. When a new instance enters the ObjectType node, rather than propagating to each AlphaNode, it can instead retrieve the correct AlphaNode from the HashMap, thereby avoiding unnecessary literal checks.
There are two two-input nodes, JoinNode and NotNode, and both are types of BetaNodes. BetaNodes are used to compare 2 objects, and their fields, to each other. The objects may be the same or different types. By convention we refer to the two inputs as left and right. The left input for a BetaNode is generally a list of objects; in Drools this is a Tuple. The right input is a single object. Two Nodes can be used to implement 'exists' checks. BetaNodes also have memory. The left input is called the Beta Memory and remembers all incoming tuples. The right input is called the Alpha Memory and remembers all incoming objects. Drools extends Rete by performing indexing on the BetaNodes. For instance, if we know that a BetaNode is performing a check on a String field, as each object enters we can do a hash lookup on that String value. This means when facts enter from the opposite side, instead of iterating over all the facts to find valid joins, we do a lookup returning potentially valid candidates. At any point a valid join is found the Tuple is joined with the Object; which is referred to as a partial match; and then propagated to the next node.
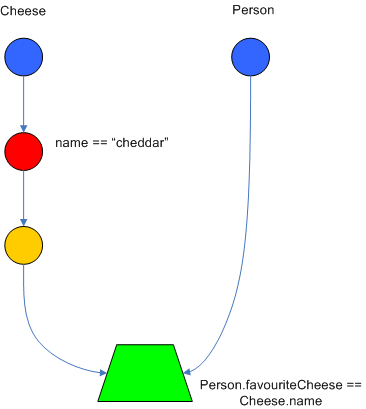
To enable the first Object, in the above case Cheese, to enter the network we use a LeftInputNodeAdapter - this takes an Object as an input and propagates a single Object Tuple.
Terminal nodes are used to indicate a single rule having matched all its conditions; at this point we say the rule has a full match. A rule with an 'or' conditional disjunctive connective results in subrule generation for each possible logical branch; thus one rule can have multiple terminal nodes.
Drools also performs node sharing. Many rules repeat the same patterns, and node sharing allows us to collapse those patterns so that they don’t have to be re-evaluated for every single instance. The following two rules share the first pattern, but not the last:
rule
when
    Cheese( $cheddar : name == "cheddar" )
    $person : Person( favouriteCheese == $cheddar )
then
    System.out.println( $person.getName() + " likes cheddar" );
end
rule
when
Cheese( $cheddar : name == "cheddar" )
$person : Person( favouriteCheese != $cheddar )
then
System.out.println( $person.getName() + " does not like cheddar" );
endAs you can see below, the compiled Rete network shows that the alpha node is shared, but the beta nodes are not. Each beta node has its own TerminalNode. Had the second pattern been the same it would have also been shared.
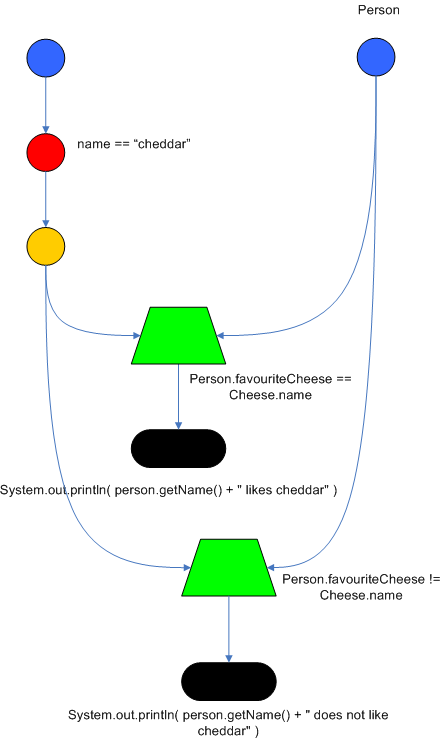
5.3. ReteOO Algorithm
The ReteOO was developed throughout the 3, 4 and 5 series releases. It takes the RETE algorithm and applies well known enhancements, all of which are covered by existing academic literature:
Node sharing
-
Sharing is applied to both the alpha and beta network. The beta network sharing is always from the root pattern.
Alpha indexing
-
Alpha Nodes with many children use a hash lookup mechanism to avoid testing each result.
Beta indexing
-
Join, Not and Exist nodes index their memories using a hash. This reduces the join attempts for equal checks. Recently range indexing was added to Not and Exists.
Tree based graphs
-
Join matches did not contain any references to their parent or children matches. Deletions would have to recalculate all join matches again, which involves recreating all those join match objects, to be able to find the parts of the network where the tuples should be deleted. This is called symmetrical propagation. A tree graph provides parent and children references, so a deletion is just a matter of following those references. This is asymmetrical propagation. The result is faster and makes less impact on the GC. It is also more robust because changes in values will not cause memory leaks if they happen without the engine being notified.
Modify-in-place
-
Traditional RETE implements a modify as a delete + insert. This causes all join tuples to be GC’d, many of which are recreated again as part of the insert. Modify-in-place instead propagates as a single pass; every node is inspected.
Property reactive
-
Also called "new trigger condition". Allows more fine grained reactivity to updates. A Pattern can react to changes to specific properties and ignore others. This alleviates problems of recursion and also helps with performance.
Sub-networks
-
Not, Exists and Accumulate can each have nested conditional elements, which forms sub networks.
Backward Chaining
-
Prolog style derivation trees for backward chaining are supported. The implementation is stack based, so does not have method recursion issues for large graphs.
Lazy Truth Maintenance
-
Truth maintenance has a runtime cost which is incurred whether TMS is used or not. Lazy TMS enables it only on first use; further it is activated per object type, so irrelevant object types do not incur the runtime cost.
Heap based agenda
-
The agenda uses a binary heap queue to sort rule matches by salience, rather than any linear search or maintenance approach.
Dynamic Rules
-
Rules can be added and removed at runtime, while the engine is still populated with data.
5.4. PHREAK Algorithm
Drools 6 introduces a new algorithm, that attempts to address some of the core issues of RETE. The algorithm is not a rewrite from scratch: it incorporates all of the existing code and enhancements from ReteOO. While PHREAK is an evolution of the RETE algorithm, it is no longer classified as a RETE implementation. Once an animal evolves beyond a certain point and key characteristics are changed, the animal becomes classified as a new species; in the same way PHREAK cannot be considered RETE. There are two key RETE characteristics that strongly identify any derivative strains, regardless of optimizations:
-
That it is an eager, data oriented algorithm.
-
All work is done using the insert, update or delete actions, eagerly producing all partial matches for all rules.
PHREAK in contrast is characterised as a lazy, goal oriented algorithm, where partial matching is aggressively delayed.
This eagerness of RETE can lead to a lot of churn in large systems, and much wasted work, where "wasted work" is defined as matching efforts that do not result in a rule firing.
PHREAK was heavily inspired by a number of algorithms, including (but not limited to) LEAPS, RETE/UL and Collection-Oriented Match. PHREAK has all enhancements listed in the ReteOO section. In addition it adds the following set of enhancements, which are explained in more detail in the following paragraphs.
-
Three layers of contextual memory; Node, Segment and Rule memories.
-
Rule, segment and node based linking.
-
Lazy (delayed) rule evaluation.
-
Isolated rule evaluation.
-
Set oriented propagations.
-
Stack based evaluations, with pause and resume.
When the PHREAK engine is started all rules are said to be unlinked; no rule evaluation can happen while rules are unlinked. The insert, update and delete actions are queued before entering the beta network. A simple heuristic, based on the rule most likely to result in firings, is used to select the next rule for evaluation; this delays the evaluation and firing of the other rules. Only once a rule has all right inputs populated will the rule be considered linked in, although no work is yet done. Instead a goal is created, that represents the rule, and placed into a priority queue; which is ordered by salience. Each queue itself is associated with an AgendaGroup. Only the active AgendaGroup will inspect its queue, popping the goal for the rule with the highest salience and submitting it for evaluation. So the work done shifts from the insert, update, delete phase to the fireAllRules phase. Only the rule for which the goal was created is evaluated, other potential rule evaluations from those facts are delayed. While individual rules are evaluated, node sharing is still achieved through the process of segmentation, which is explained later.
Each successful join attempt in RETE produces a tuple (or token, or partial match) that will be propagated to the child nodes. For this reason it is characterised as a tuple oriented algorithm. For each child node that it reaches it will attempt to join with the other side of the node; again each successful join attempt will be propagated straight away. This creates a descent recursion effect, thrashing the network of nodes as it ripples up and down, left and right from the point of entry into the beta network to all the reachable leaf nodes.
PHREAK propagation is set oriented (or collection-oriented), instead of tuple oriented. For the rule being evaluated it will visit the first node and process all queued inserts, updates and deletes. The results are added to a set and the set is propagated to the child node. In the child node all queued inserts, updates and deletes are processed, adding the results to the same set. Once finished that set is propagated to the next child node, and so on until the terminal node is reached. This creates a single pass, pipeline type effect that is isolated to the current rule being evaluated. This creates a batch process effect which can provide performance advantages for certain rule constructs, such as sub-networks with accumulates. In the future it will lend itself to being able to exploit multi-core machines in a number of ways.
The Linking and Unlinking uses a layered bit mask system, based on a network segmentation. When the rule network is built segments are created for nodes that are shared by the same set of rules. A rule itself is made up from a path of segments, although if there is no sharing that will be a single segment. A bit-mask offset is assigned to each node in the segment. Also another bit mask (the layering) is assigned to each segment in the rule’s path. When there is at least one input (data propagation) the node’s bit is set to on. When each node has its bit set to on the segment’s bit is also set to on. Conversely if any node’s bit is set to off, the segment is then also set to off. If each segment in the rule’s path is set to on, the rule is said to be linked in and a goal is created to schedule the rule for evaluation. The same bit-mask technique is used to also track dirty node, segments and rules; this allows for a rule already linked in to be scheduled for evaluation if it’s considered dirty since it was last evaluated.
This ensures that no rule will ever evaluate partial matches, if it’s impossible for it to result in rule instances because one of the joins has no data. This is possible in RETE and it will merrily churn away producing partial match attempts for all nodes, even if the last join is empty.
While the incremental rule evaluation always starts from the root node, the dirty bit masks are used to allow nodes and segments that are not dirty to be skipped.
Using the existence of at at least one items of data per node is a fairly basic heuristic. Future work would attempt to delay the linking even further, using techniques such as arc consistency to determine whether or not matching will result in rule instance firings.
Where as RETE has just a singe unit of memory, the node memory, PHREAK has 3 levels of memory. This allows for much more contextual understanding during evaluation of a Rule.
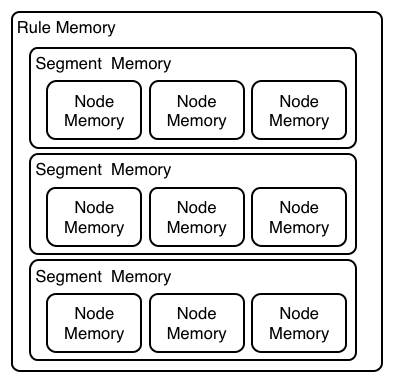
Example 1 shows a single rule with three patterns: A, B and C. It forms a single segment, with bits 1, 2 and 4 for the nodes. The single segment has a bit offset of 1.
Example 2 demonstrates what happens when another rule is added that shares the pattern A. A is placed in its own segment, resulting in two segments per rule. Those two segments form a path for their respective rules. The first segment is shared by both paths. When A is linked the segment becomes linked. It then iterates each path the segment is shared by, setting the bit 1 to on. If B and C are later turned on, the second segment for path R1 is linked in; this causes bit 2 to be turned on for R1. With bit 1 and bit 2 set to on for R1, the rule is now linked and a goal created to schedule the rule for later evaluation and firing.
When a rule is evaluated it is the segments that allow the results of matching to be shared. Each segment has a staging memory to queue all inserts, updates and deletes for that segment. If R1 were to be evaluated it would process A and result in a set of tuples. The algorithm detects that there is a segmentation split and will create peered tuples for each insert, update and delete in the set and add them to R2’s staging memory. Those tuples will be merged with any existing staged tuples and wait for R2 to eventually be evaluated.
Example 3 adds a third rule and demonstrates what happens when A and B are shared. Only the bits for the segments are shown this time. Demonstrating that R4 has 3 segments, R3 has 3 segments and R1 has 2 segments. A and B are shared by R1, R3 and R4. While D is shared by R3 and R4.
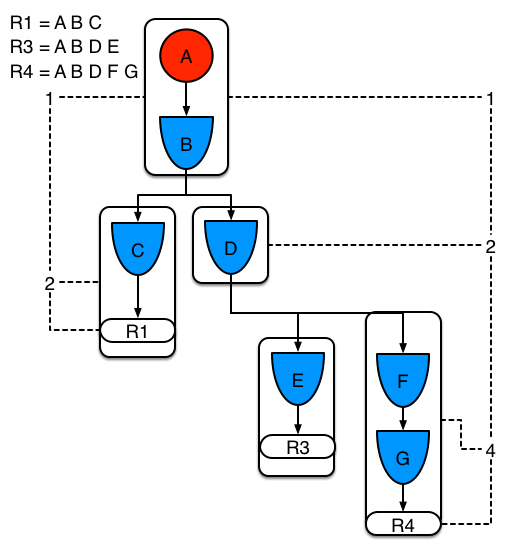
Sub-networks are formed when a Not, Exists or Accumulate node contains more than one element. In Example 4 "B not( C )" forms the sub network, note that "not( C )" is a single element which does not require a sub network and is therefore merged inside of the Not node.
The sub network gets its own segment. R1 still has a path of two segments. The sub network forms another "inner" path. When the sub network is linked in, it will link in the outer segment.
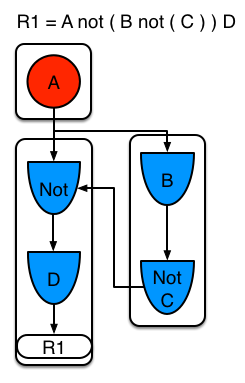
Example 5 shows that the sub-network nodes can be shared by a rule that does not have a sub-network. This results in the sub-network segment being split into two.
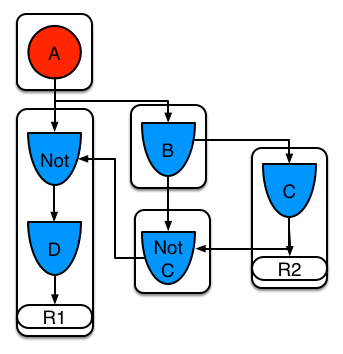
Constrained Not nodes and Accumulate nodes have special behaviour: these can never unlink a segment, and are always considered to have their bits on.
All rule evaluations are incremental, and will not waste work recomputing matches already produced.
The evaluation algorithm is stack, instead of method recursion, based. Evaluation can be paused and resumed at any time, via the use of a StackEntry to represent the node currently being evaluated.
When a rule evaluation reaches a sub-network a StackEntry is created for the outer path segment and the sub-network segment. The sub-network segment is evaluated first; when the set reaches the end of the sub-network path it is merged into a staging list for the outer node it feeds into. The previous StackEntry is then resumed and can now process the results of the sub network. This has the added benefit that all work is processed in a batch, before propagating to the child node; this is much more efficient for Accumulate nodes.
The same stack system can be used for efficient backward chaining. When a rule evaluation reaches a query node it again pauses the current evaluation, by placing it on the stack. The query is then evaluated which produces a result set, which is saved in a memory location for the resumed StackEntry to pick up and propagate to the child node. If the query itself called other queries the process would repeat, with the current query being paused and a new evaluation setup for the current query node.
One final point on performance: One single rule in general will not evaluate any faster with PHREAK than it does with RETE. For a given rule and same data set, which using a root context object to enable and disable matching, both attempt the same number of matches, produce the same number of rule instances and take roughly the same amount of time, except for the use case with subnetworks and Accumulates.
PHREAK can however be considered more forgiving that RETE for poorly written rule bases and with a more graceful degradation of performance as the number of rules and complexity increases.
RETE will also churn away producing partial matches for rules that do not have data in all the joins, whereas PHREAK will avoid this.
So it’s not that PHREAK is faster than RETE; it just won’t slow down as much as your system grows :)
AgendaGroups did not help in RETE performance, as all rules were evaluated at all times, regardless of the group. The same is true for salience, which is why root context objects are often used to limit matching attempts. PHREAK only evaluates rules for the active AgendaGroup, and within that group will attempt to avoid evaluation of rules (via salience) that do not result in rule instance firings.
With PHREAK AgendaGroups and salience now become useful performance tools. The root context objects are no longer needed and are potentially counterproductive to performance, as they force the flushing and recreation of matches for rules.
6. User Guide
6.1. The Basics
6.1.1. Stateless Knowledge Session
So where do we get started? There are so many use cases and so much functionality in a rule engine such as Drools that it becomes beguiling. Have no fear my intrepid adventurer, the complexity is layered and you can ease yourself in with simple use cases.
Stateless session, not utilising inference, forms the simplest use case. A stateless session can be called like a function passing it some data and then receiving some results back. Some common use cases for stateless sessions are, but not limited to:
-
Validation
-
Is this person eligible for a mortgage?
-
-
Calculation
-
Compute a mortgage premium.
-
-
Routing and Filtering
-
Filter incoming messages, such as emails, into folders.
-
Send incoming messages to a destination.
-
So let’s start with a very simple example using a driving license application.
public class Applicant {
    private String name;
    private int age;
    private boolean valid;
    // getter and setter methods here
}
Now that we have our data model we can write our first rule. We assume that the application uses rules to reject invalid applications. As this is a simple validation use case we will add a single rule to disqualify any applicant younger than 18.
package com.company.license

rule "Is of valid age"
when
    $a : Applicant( age < 18 )
then
    $a.setValid( false );
end
To make the engine aware of data, so it can be processed against the rules, we have to insert the data, much like with a database.
When the Applicant instance is inserted into the engine it is evaluated against the constraints of the rules, in this case just two constraints for one rule.
We say two because the type Applicant is the first object type constraint, and age < 18 is the second field constraint.
An object type constraint plus its zero or more field constraints is referred to as a pattern.
When an inserted instance satisfies both the object type constraint and all the field constraints, it is said to be matched.
The $a is a binding variable which permits us to reference the matched object in the consequence.
There its properties can be updated.
The dollar character ('$') is optional, but it helps to differentiate variable names from field names.
The process of matching patterns against the inserted data is, not surprisingly, often referred to as pattern matching.
To use this rule it is necessary to put it a Drools file, just a plain text file with .drl extension , short for "Drools Rule Language". Let’s call this file licenseApplication.drl, and store it in a Kie Project.
A Kie Project has the structure of a normal Maven project with an additional file (kmodule.xml) defining the KieBases and KieSessions that can be created.
This file has to be placed in the resources/META-INF folder of the Maven project while all the other Drools artifacts, such as the licenseApplication.drl containing the former rule, must be stored in the resources folder or in any other subfolder under it.
Since meaningful defaults have been provided for all configuration aspects, the simplest kmodule.xml file can contain just an empty kmodule tag like the following:
<?xml version="1.0" encoding="UTF-8"?>
<kmodule xmlns="http://www.drools.org/xsd/kmodule"/>
At this point it is possible to create a KieContainer that reads the files to be built, from the classpath.
KieServices kieServices = KieServices.Factory.get();
KieContainer kContainer = kieServices.getKieClasspathContainer();
The above code snippet compiles all the DRL files found on the classpath and put the result of this compilation, a KieModule, in the KieContainer.
If there are no errors, we are now ready to create our session from the KieContainer and execute against some data:
StatelessKieSession kSession = kContainer.newStatelessKieSession();
Applicant applicant = new Applicant( "Mr John Smith", 16 );
assertTrue( applicant.isValid() );
ksession.execute( applicant );
assertFalse( applicant.isValid() );
The preceding code executes the data against the rules. Since the applicant is under the age of 18, the application is marked as invalid.
So far we’ve only used a single instance, but what if we want to use more than one? We can execute against any object implementing Iterable, such as a collection.
Let’s add another class called Application, which has the date of the application, and we’ll also move the boolean valid field to the Application class.
public class Applicant {
    private String name;
    private int age;
    // getter and setter methods here
}

public class Application {
    private Date dateApplied;
    private boolean valid;
    // getter and setter methods here
}
We will also add another rule to validate that the application was made within a period of time.
package com.company.license

rule "Is of valid age"
when
    Applicant( age < 18 )
    $a : Application()
then
    $a.setValid( false );
end

rule "Application was made this year"
when
    $a : Application( dateApplied > "01-jan-2009" )
then
    $a.setValid( false );
end
Unfortunately a Java array does not implement the Iterable interface, so we have to use the JDK converter method Arrays.asList(…).
The code shown below executes against an iterable list, where all collection elements are inserted before any matched rules are fired.
StatelessKieSession kSession = kContainer.newStatelessKieSession();
Applicant applicant = new Applicant( "Mr John Smith", 16 );
Application application = new Application();
assertTrue( application.isValid() );
ksession.execute( Arrays.asList( new Object[] { application, applicant } ) );
assertFalse( application.isValid() );
The two execute methods execute(Object object) and execute(Iterable objects) are actually convenience methods for the interface BatchExecutor's method execute(Command command).
The KieCommands commands factory, obtainable from the KieServices like all other factories of the KIE API, is used to create commands, so that the following is equivalent to execute(Iterable it):
ksession.execute( kieServices.getCommands().newInsertElements( Arrays.asList( new Object[] { application, applicant } ) );Batch Executor and Command Factory are particularly useful when working with multiple Commands and with output identifiers for obtaining results.
KieCommands kieCommands = kieServices.getCommands();
List<Command> cmds = new ArrayList<Command>();
cmds.add( kieCommands.newInsert( new Person( "Mr John Smith" ), "mrSmith", true, null ) );
cmds.add( kieCommands.newInsert( new Person( "Mr John Doe" ), "mrDoe", true, null ) );
BatchExecutionResults results = ksession.execute( kieCommands.newBatchExecution( cmds ) );
assertEquals( new Person( "Mr John Smith" ), results.getValue( "mrSmith" ) );
CommandFactory supports many other Commands that can be used in the BatchExecutor like StartProcess, Query, and SetGlobal.
6.1.2. Stateful Knowledge Session
Stateful Sessions are long lived and allow iterative changes over time. Some common use cases for Stateful Sessions are, but not limited to:
-
Monitoring
-
Stock market monitoring and analysis for semi-automatic buying.
-
-
Diagnostics
-
Fault finding, medical diagnostics
-
-
Logistics
-
Parcel tracking and delivery provisioning
-
-
Compliance
-
Validation of legality for market trades.
-
In contrast to a Stateless Session, the dispose() method must be called afterwards to ensure there are no memory leaks, as the KieBase contains references to Stateful Knowledge Sessions when they are created.
Since Stateful Knowledge Session is the most commonly used session type it is just named KieSession in the KIE API. KieSession also supports the BatchExecutor interface, like StatelessKieSession, the only difference being that the FireAllRules command is not automatically called at the end for a Stateful Session.
We illustrate the monitoring use case with an example for raising a fire alarm.
Using just four classes, we represent rooms in a house, each of which has one sprinkler.
If a fire starts in a room, we represent that with a single Fire instance.
public class Room {
    private String name
    // getter and setter methods here
}
public class Sprinkler {
    private Room room;
    private boolean on;
    // getter and setter methods here
}
public class Fire {
    private Room room;
    // getter and setter methods here
}
public class Alarm {
}
In the previous section on Stateless Sessions the concepts of inserting and matching against data were introduced. That example assumed that only a single instance of each object type was ever inserted and thus only used literal constraints. However, a house has many rooms, so rules must express relationships between objects, such as a sprinkler being in a certain room. This is best done by using a binding variable as a constraint in a pattern. This "join" process results in what is called cross products, which are covered in the next section.
When a fire occurs an instance of the Fire class is created, for that room, and inserted into the session.
The rule uses a binding on the room field of the Fire object to constrain matching to the sprinkler for that room, which is currently off.
When this rule fires and the consequence is executed the sprinkler is turned on.
rule "When there is a fire turn on the sprinkler"
when
    Fire($room : room)
    $sprinkler : Sprinkler( room == $room, on == false )
then
    modify( $sprinkler ) { setOn( true ) };
    System.out.println( "Turn on the sprinkler for room " + $room.getName() );
end
Whereas the Stateless Session uses standard Java syntax to modify a field, in the above rule we use the modify statement, which acts as a sort of "with" statement.
It may contain a series of comma separated Java expressions, i.e., calls to setters of the object selected by the modify statement’s control expression.
This modifies the data, and makes the engine aware of those changes so it can reason over them once more.
This process is called inference, and it’s essential for the working of a Stateful Session.
Stateless Sessions typically do not use inference, so the engine does not need to be aware of changes to data.
Inference can also be turned off explicitly by using the sequential mode.
So far we have rules that tell us when matching data exists, but what about when it does not exist? How do we determine that a fire has been extinguished, i.e., that there isn’t a Fire object any more? Previously the constraints have been sentences according to Propositional Logic, where the engine is constraining against individual instances.
Drools also has support for First Order Logic that allows you to look at sets of data.
A pattern under the keyword not matches when something does not exist.
The rule given below turns the sprinkler off as soon as the fire in that room has disappeared.
rule "When the fire is gone turn off the sprinkler"
when
    $room : Room( )
    $sprinkler : Sprinkler( room == $room, on == true )
    not Fire( room == $room )
then
    modify( $sprinkler ) { setOn( false ) };
    System.out.println( "Turn off the sprinkler for room " + $room.getName() );
end
While there is one sprinkler per room, there is just a single alarm for the building.
An Alarm object is created when a fire occurs, but only one Alarm is needed for the entire building, no matter how many fires occur.
Previously not was introduced to match the absence of a fact; now we use its complement exists which matches for one or more instances of some category.
rule "Raise the alarm when we have one or more fires"
when
    exists Fire()
then
    insert( new Alarm() );
    System.out.println( "Raise the alarm" );
end
Likewise, when there are no fires we want to remove the alarm, so the not keyword can be used again.
rule "Cancel the alarm when all the fires have gone"
when
    not Fire()
    $alarm : Alarm()
then
    delete( $alarm );
    System.out.println( "Cancel the alarm" );
end
Finally there is a general health status message that is printed when the application first starts and after the alarm is removed and all sprinklers have been turned off.
rule "Status output when things are ok"
when
    not Alarm()
    not Sprinkler( on == true )
then
    System.out.println( "Everything is ok" );
end
As we did in the Stateless Session example, the above rules should be placed in a single DRL file and saved into the resouces folder of your Maven project or any of its subfolder.
As before, we can then obtain a KieSession from the KieContainer.
The only difference is that this time we create a Stateful Session, whereas before we created a Stateless Session.
KieServices kieServices = KieServices.Factory.get();
KieContainer kContainer = kieServices.getKieClasspathContainer();
KieSession ksession = kContainer.newKieSession();
With the session created it is now possible to iteratively work with it over time.
Four Room objects are created and inserted, as well as one Sprinkler object for each room.
At this point the engine has done all of its matching, but no rules have fired yet.
Calling ksession.fireAllRules() allows the matched rules to fire, but without a fire that will just produce the health message.
String[] names = new String[]{"kitchen", "bedroom", "office", "livingroom"};
Map<String,Room> name2room = new HashMap<String,Room>();
for( String name: names ){
    Room room = new Room( name );
    name2room.put( name, room );
    ksession.insert( room );
    Sprinkler sprinkler = new Sprinkler( room );
    ksession.insert( sprinkler );
}

ksession.fireAllRules();
> Everything is okWe now create two fires and insert them; this time a reference is kept for the returned FactHandle.
A Fact Handle is an internal engine reference to the inserted instance and allows instances to be retracted or modified at a later point in time.
With the fires now in the engine, once fireAllRules() is called, the alarm is raised and the respective sprinklers are turned on.
Fire kitchenFire = new Fire( name2room.get( "kitchen" ) );
Fire officeFire = new Fire( name2room.get( "office" ) );

FactHandle kitchenFireHandle = ksession.insert( kitchenFire );
FactHandle officeFireHandle = ksession.insert( officeFire );

ksession.fireAllRules();
> Raise the alarm
> Turn on the sprinkler for room kitchen
> Turn on the sprinkler for room officeAfter a while the fires will be put out and the Fire instances are retracted.
This results in the sprinklers being turned off, the alarm being cancelled, and eventually the health message is printed again.
ksession.delete( kitchenFireHandle );
ksession.delete( officeFireHandle );

ksession.fireAllRules();
> Cancel the alarm
> Turn off the sprinkler for room office
> Turn off the sprinkler for room kitchen
> Everything is okEveryone still with me? That wasn’t so hard and already I’m hoping you can start to see the value and power of a declarative rule system.
6.1.3. Methods versus Rules
People often confuse methods and rules, and new rule users often ask, "How do I call a rule?" After the last section, you are now feeling like a rule expert and the answer to that is obvious, but let’s summarize the differences nonetheless.
public void helloWorld(Person person) {
    if ( person.getName().equals( "Chuck" ) ) {
        System.out.println( "Hello Chuck" );
    }
}-
Methods are called directly.
-
Specific instances are passed.
-
One call results in a single execution.
rule "Hello World" when
    Person( name == "Chuck" )
then
    System.out.println( "Hello Chuck" );
end-
Rules execute by matching against any data as long it is inserted into the engine.
-
Rules can never be called directly.
-
Specific instances cannot be passed to a rule.
-
Depending on the matches, a rule may fire once or several times, or not at all.
6.1.4. Cross Products
Earlier the term "cross product" was mentioned, which is the result of a join. Imagine for a moment that the data from the fire alarm example were used in combination with the following rule where there are no field constraints:
rule "Show Sprinklers" when
    $room : Room()
    $sprinkler : Sprinkler()
then
    System.out.println( "room:" + $room.getName() +
                        " sprinkler:" + $sprinkler.getRoom().getName() );
end
In SQL terms this would be like doing select * from Room,
Sprinkler and every row in the Room table would be joined with every row in the Sprinkler table resulting in the following output:
room:office sprinkler:office
room:office sprinkler:kitchen
room:office sprinkler:livingroom
room:office sprinkler:bedroom
room:kitchen sprinkler:office
room:kitchen sprinkler:kitchen
room:kitchen sprinkler:livingroom
room:kitchen sprinkler:bedroom
room:livingroom sprinkler:office
room:livingroom sprinkler:kitchen
room:livingroom sprinkler:livingroom
room:livingroom sprinkler:bedroom
room:bedroom sprinkler:office
room:bedroom sprinkler:kitchen
room:bedroom sprinkler:livingroom
room:bedroom sprinkler:bedroom
These cross products can obviously become huge, and they may very well contain spurious data. The size of cross products is often the source of performance problems for new rule authors. From this it can be seen that it’s always desirable to constrain the cross products, which is done with the variable constraint.
rule
when
    $room : Room()
    $sprinkler : Sprinkler( room == $room )
then
    System.out.println( "room:" + $room.getName() +
                        " sprinkler:" + $sprinkler.getRoom().getName() );
end
This results in just four rows of data, with the correct Sprinkler for each Room.
In SQL (actually HQL) the corresponding query would be select * from Room, Sprinkler where Room ==
Sprinkler.room.
room:office sprinkler:office
room:kitchen sprinkler:kitchen
room:livingroom sprinkler:livingroom
room:bedroom sprinkler:bedroom
6.2. Execution Control
6.2.1. Agenda
The Agenda is a Rete feature. It maintains set of rules that are able to execute, its job is to schedule that execution in a deterministic order.
During actions on the RuleRuntime, rules may become fully matched and eligible for execution; a single Rule Runtime Action can result in multiple eligible rules.
When a rule is fully matched a Rule Match is created, referencing the rule and the matched facts, and placed onto the Agenda.
The Agenda controls the execution order of these Matches using a Conflict Resolution strategy.
The engine cycles repeatedly through two phases:
-
Rule Runtime Actions. This is where most of the work takes place, either in the Consequence (the RHS itself) or the main Java application process. Once the Consequence has finished or the main Java application process calls
fireAllRules()the engine switches to the Agenda Evaluation phase. -
Agenda Evaluation. This attempts to select a rule to fire. If no rule is found it exits, otherwise it fires the found rule, switching the phase back to Rule Runtime Actions.
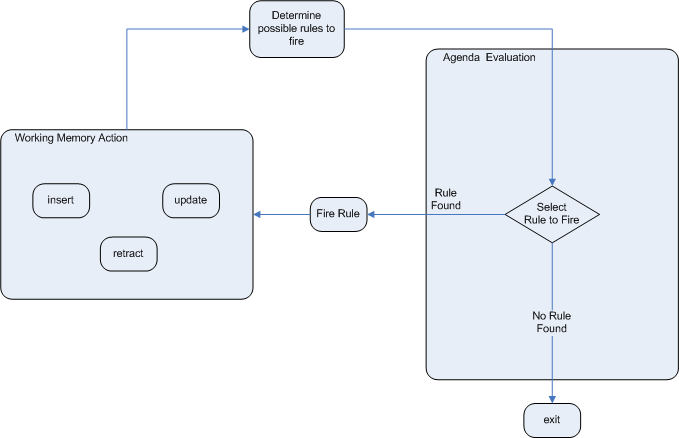
The process repeats until the agenda is clear, in which case control returns to the calling application. When Rule Runtime Actions are taking place, no rules are being fired.
6.2.2. Rule Matches and Conflict Sets.
6.2.2.1. Cashflow Example
So far the data and the matching process has been simple and small. To mix things up a bit a new example will be explored that handles cashflow calculations over date periods. The state of the engine will be illustratively shown at key stages to help get a better understanding of what is actually going on under the hood. Three classes will be used, as shown below. This will help us grow our understanding of pattern matching and joins further. We will then use this to illustrate different techniques for execution control.
public class CashFlow {
    private Date   date;
    private double amount;
    private int    type;
    long           accountNo;
    // getter and setter methods here
}

public class Account {
    private long   accountNo;
    private double balance;
    // getter and setter methods here
}

public AccountPeriod {
    private Date start;
    private Date end;
    // getter and setter methods here
}
By now you already know how to create KieBases and how to instantiate facts to populate the KieSession, so tables will be used to show the state of the inserted data, as it makes things clearer for illustration purposes.
The tables below show that a single fact was inserted for the Account.
Also inserted are a series of debits and credits as CashFlow objects for that account, extending over two quarters.
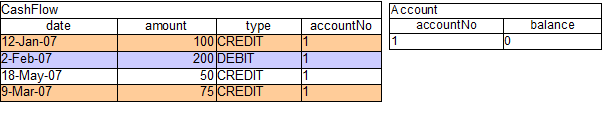
Two rules can be used to determine the debit and credit for that quarter and update the Account balance. The two rules below constrain the cashflows for an account for a given time period. Notice the "&&" which use short cut syntax to avoid repeating the field name twice.
|
|
Earlier we showed how rules would equate to SQL, which can often help people with an SQL background to understand rules. The two rules above can be represented with two views and a trigger for each view, as below:
|
|
|
|
If the AccountPeriod is set to the first quarter we constrain the rule "increase balance for credits" to fire on two rows of data and "decrease balance for debits" to act on one row of data.
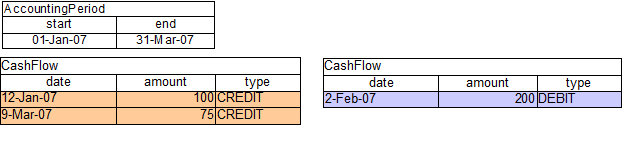
The two cashflow tables above represent the matched data for the two rules.
The data is matched during the insertion stage and, as you discovered in the previous chapter, does not fire straight away, but only after fireAllRules() is called.
Meanwhile, the rule plus its matched data is placed on the Agenda and referred to as an RuIe Match or Rule Instance.
The Agenda is a table of Rule Matches that are able to fire and have their consequences executed, as soon as fireAllRules() is called.
Rule Matches on the Agenda are referred to as a conflict set
and their execution is determine by a conflict resolution strategy.
Notice that the order of execution so far is considered arbitrary.
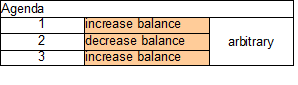
After all of the above activations are fired, the account has a balance of -25.
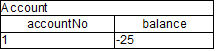
If the AccountPeriod is updated to the second quarter, we have just a single matched row of data, and thus just a single Rule Match on the Agenda.
The firing of that Activation results in a balance of 25.
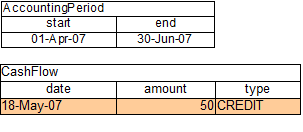
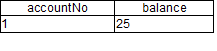
6.2.2.2. Conflict Resolution
What if you don’t want the order of rule execution to be arbitrary? When there is one or more Rule Match on the Agenda they are said to be in conflict, and a conflict resolution strategy is used to determine the order of execution. The Drools strategy is very simple and based around a salience value, which assigns a priority to a rule. Each rule has a default value of 0, the higher the value the higher the priority.
As a general rule, it is a good idea not to count on rules firing in any particular order, and to author the rules without worrying about a "flow". However when a flow is needed a number of possibilities exist beyond salience: agenda groups, rule flow groups, activation groups and control/semaphore facts.
As of Drools 6.0 rule definition order in the source file is used to set priority after salience.
6.2.2.3. Salience
To illustrate Salience we add a rule to print the account balance, where we want this rule to be executed after all the debits and credits have been applied for all accounts. We achieve this by assigning a negative salience to this rule so that it fires after all rules with the default salience 0.
|
The table below depicts the resulting Agenda. The three debit and credit rules are shown to be in arbitrary order, while the print rule is ranked last, to execute afterwards.
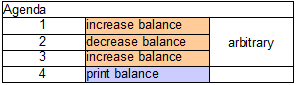
6.2.2.4. Agenda Groups
Agenda groups allow you to place rules into groups, and to place those groups onto a stack. The stack has push/pop bevaviour. Calling "setFocus" places the group onto the stack:
ksession.getAgenda().getAgendaGroup( "Group A" ).setFocus();The agenda always evaluates the top of the stack. When all the rules have fired for a group, it is popped from the stack and the next group is evaluated.
|
|
First set the focus to the "report" group and then by placing the focus on "calculation" we ensure that group is evaluated first.
Agenda agenda = ksession.getAgenda();
agenda.getAgendaGroup( "report" ).setFocus();
agenda.getAgendaGroup( "calculation" ).setFocus();
ksession.fireAllRules();
6.2.2.5. Rule Flow
Drools also features ruleflow-group attributes which allows workflow diagrams to declaratively specify when rules are allowed to fire. The screenshot below is taken from Eclipse using the Drools plugin. It has two ruleflow-group nodes which ensures that the calculation rules are executed before the reporting rules.
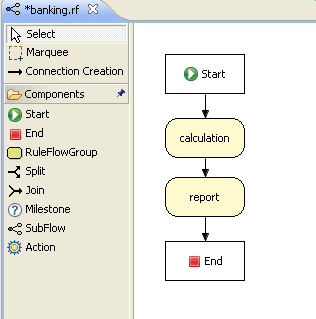
The use of the ruleflow-group attribute in a rule is shown below.
|
|
6.3. Inference
6.3.1. Bus Pass Example
Inference has a bad name these days, as something not relevant to business use cases and just too complicated to be useful. It is true that contrived and complicated examples occur with inference, but that should not detract from the fact that simple and useful ones exist too. But more than this, correct use of inference can crate more agile and less error prone business rules, which are easier to maintain.
So what is inference? Something is inferred when we gain knowledge of something from using previous knowledge. For example, given a Person fact with an age field and a rule that provides age policy control, we can infer whether a Person is an adult or a child and act on this.
rule "Infer Adult"
when
  $p : Person( age >= 18 )
then
  insert( new IsAdult( $p ) )
end
Due to the preceding rule, every Person who is 18 or over will have an instance of IsAdult inserted for them. This fact is special in that it is known as a relation. We can use this inferred relation in any rule:
$p : Person()
IsAdult( person == $p )
So now we know what inference is, and have a basic example, how does this facilitate good rule design and maintenance?
Let’s take a government department that are responsible for issuing ID cards when children become adults, henceforth referred to as ID department. They might have a decision table that includes logic like this, which says when an adult living in London is 18 or over, issue the card:
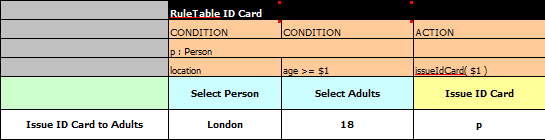
However the ID department does not set the policy on who an adult is. That’s done at a central government level. If the central government were to change that age to 21, this would initiate a change management process. Someone would have to liaise with the ID department and make sure their systems are updated, in time for the law going live.
This change management process and communication between departments is not ideal for an agile environment, and change becomes costly and error prone. Also the card department is managing more information than it needs to be aware of with its "monolithic" approach to rules management which is "leaking" information better placed elsewhere. By this I mean that it doesn’t care what explicit information determines whether someone is an adult, only that they are an adult.
In contrast to this, let’s pursue an approach where we split (de-couple) the authoring responsibilities, so that both the central government and the ID department maintain their own rules.
It’s the central government’s job to determine who is an adult. If they change the law they just update their central repository with the new rules, which others use:
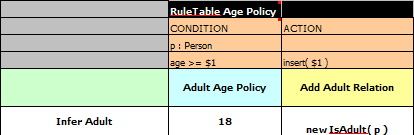
The IsAdult fact, as discussed previously, is inferred from the policy rules. It encapsulates the seemingly arbitrary piece of logic and provides semantic abstractions for its meaning. Now if anyone uses the above rules, they no longer need to be aware of explicit information that determines whether someone is an adult or not. They can just use the inferred fact:
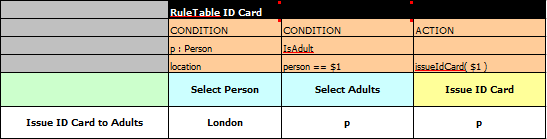
While the example is very minimal and trivial it illustrates some important points. We started with a monolithic and leaky approach to our knowledge engineering. We created a single decision table that had all possible information in it and that leaks information from central government that the ID department did not care about and did not want to manage.
We first de-coupled the knowledge process so each department was responsible for only what it needed to know. We then encapsulated this leaky knowledge using an inferred fact IsAdult. The use of the term IsAdult also gave a semantic abstraction to the previously arbitrary logic .
So a general rule of thumb when doing your knowledge engineering is:
-
Bad
-
Monolithic
-
Leaky
-
-
Good
-
De-couple knowledge responsibilities
-
Encapsulate knowledge
-
Provide semantic abstractions for those encapsulations
-
6.4. Truth Maintenance with Logical Objects
6.4.1. Overview
After regular inserts you have to retract facts explicitly. With logical assertions, the fact that was asserted will be automatically retracted when the conditions that asserted it in the first place are no longer true. Actually, it’s even cleverer then that, because it will be retracted only if there isn’t any single condition that supports the logical assertion.
Normal insertions are said to be stated, i.e., just like the intuitive meaning of "stating a fact" implies.
Using a HashMap and a counter, we track how many times a particular equality is stated; this means we count how many different instances are equal.
When we logically insert an object during a RHS execution we are said to justify it, and it is considered to be justified by the firing rule. For each logical insertion there can only be one equal object, and each subsequent equal logical insertion increases the justification counter for this logical assertion. A justification is removed by the LHS of the creating rule becoming untrue, and the counter is decreased accordingly. As soon as we have no more justifications the logical object is automatically retracted.
If we try to logically insert an object when there is an equal stated object, this will fail and return null.
If we state an object that has an existing equal object that is justified we override the Fact; how this override works depends on the configuration setting WM_BEHAVIOR_PRESERVE.
When the property is set to discard we use the existing handle and replace the existing instance with the new Object, which is the default behavior; otherwise we override it to stated but we create an new FactHandle.
This can be confusing on a first read, so hopefully the flow charts below help.
When it says that it returns a new FactHandle, this also indicates the Object was propagated through the network.
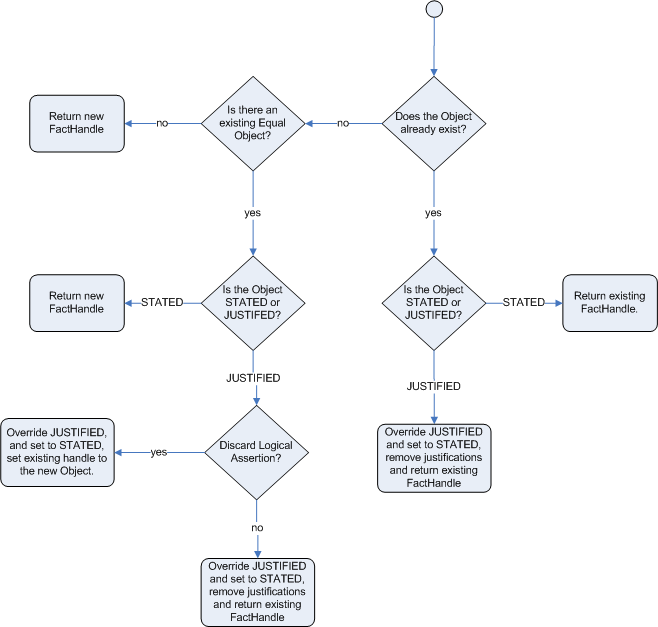

6.4.1.1. Bus Pass Example With Inference and TMS
The previous example was issuing ID cards to over 18s, in this example we now issue bus passes, either a child or adult pass.
rule "Issue Child Bus Pass" when
    $p : Person( age < 16 )
then
    insert(new ChildBusPass( $p ) );
end

rule "Issue Adult Bus Pass" when
    $p : Person( age >= 16 )
then
    insert(new AdultBusPass( $p ) );
end
As before the above example is considered monolithic, leaky and providing poor separation of concerns.
As before we can provide a more robust application with a separation of concerns using inference. Notice this time we don’t just insert the inferred object, we use "insertLogical":
rule "Infer Child" when
    $p : Person( age < 16 )
then
    insertLogical( new IsChild( $p ) )
end
rule "Infer Adult" when
    $p : Person( age >= 16 )
then
    insertLogical( new IsAdult( $p ) )
end
A "insertLogical" is part of the Drools Truth Maintenance System (TMS). When a fact is logically inserted, this fact is dependant on the truth of the "when" clause. It means that when the rule becomes false the fact is automatically retracted. This works particularly well as the two rules are mutually exclusive. So in the above rules if the person is under 16 it inserts an IsChild fact, once the person is 16 or over the IsChild fact is automatically retracted and the IsAdult fact inserted.
Returning to the code to issue bus passes, these two rules can + logically insert the ChildBusPass and AdultBusPass facts, as the TMS + supports chaining of logical insertions for a cascading set of retracts.
rule "Issue Child Bus Pass" when
    $p : Person( )
         IsChild( person == $p )
then
    insertLogical(new ChildBusPass( $p ) );
end

rule "Issue Adult Bus Pass" when
    $p : Person( age >= 16 )
         IsAdult( person =$p )
then
    insertLogical(new AdultBusPass( $p ) );
end
Now when a person changes from being 15 to 16, not only is the IsChild fact automatically retracted, so is the person’s ChildBusPass fact. For bonus points we can combine this with the 'not' conditional element to handle notifications, in this situation, a request for the returning of the pass. So when the TMS automatically retracts the ChildBusPass object, this rule triggers and sends a request to the person:
rule "Return ChildBusPass Request "when
    $p : Person( )
         not( ChildBusPass( person == $p ) )
then
    requestChildBusPass( $p );
end
6.4.1.2. Important note: Equality for Java objects
It is important to note that for Truth Maintenance (and logical assertions) to work at all, your Fact objects (which may be JavaBeans) must override equals and hashCode methods (from java.lang.Object) correctly. As the truth maintenance system needs to know when two different physical objects are equal in value, both equals and hashCode must be overridden correctly, as per the Java standard.
Two objects are equal if and only if their equals methods return true for each other and if their hashCode methods return the same values. See the Java API for more details (but do keep in mind you MUST override both equals and hashCode).
TMS behaviour is not affected by theruntime configuration of Identity vs Equality, TMS is always equality.
6.4.1.3. Deleting stated or logically asserted facts from the working memory
By default when a fact is deleted from the working memory Drools attempts to remove it both from the set of stated facts and also from the Truth Maintenance System in case it has been logically asserted. However, using an overload of the delete method, it is also possible to remove it only from one of the 2. For instance invoking:
ksession.delete( factHandle, FactHandle.State.LOGICAL );the fact is removed only if it has been logically asserted, but not if it is a stated fact. In this case, if the fact has been stated its deletion fails silently and it is ignored.
6.5. Decision Tables in Spreadsheets
Decision tables are a "precise yet compact" (ref. Wikipedia) way of representing conditional logic, and are well suited to business level rules.
Drools supports managing rules in a spreadsheet format. Supported formats are Excel (XLS), and CSV, which means that a variety of spreadsheet programs (such as Microsoft Excel, OpenOffice.org Calc amongst others) can be utilized. It is expected that web based decision table editors will be included in a near future release.
Decision tables are an old concept (in software terms) but have proven useful over the years. Very briefly speaking, in Drools decision tables are a way to generate rules driven from the data entered into a spreadsheet. All the usual features of a spreadsheet for data capture and manipulation can be taken advantage of.
6.5.1. When to Use Decision Tables
Consider decision tables as a course of action if rules exist that can be expressed as rule templates and data: each row of a decision table provides data that is combined with a template to generate a rule.
Many businesses already use spreadsheets for managing data, calculations, etc. If you are happy to continue this way, you can also manage your business rules this way. This also assumes you are happy to manage packages of rules in .xls or .csv files. Decision tables are not recommended for rules that do not follow a set of templates, or where there are a small number of rules (or if there is a dislike towards software like Excel or OpenOffice.org). They are ideal in the sense that there can be control over what parameters of rules can be edited, without exposing the rules directly.
Decision tables also provide a degree of insulation from the underlying object model.
6.5.2. Overview
Here are some examples of real world decision tables (slightly edited to protect the innocent).
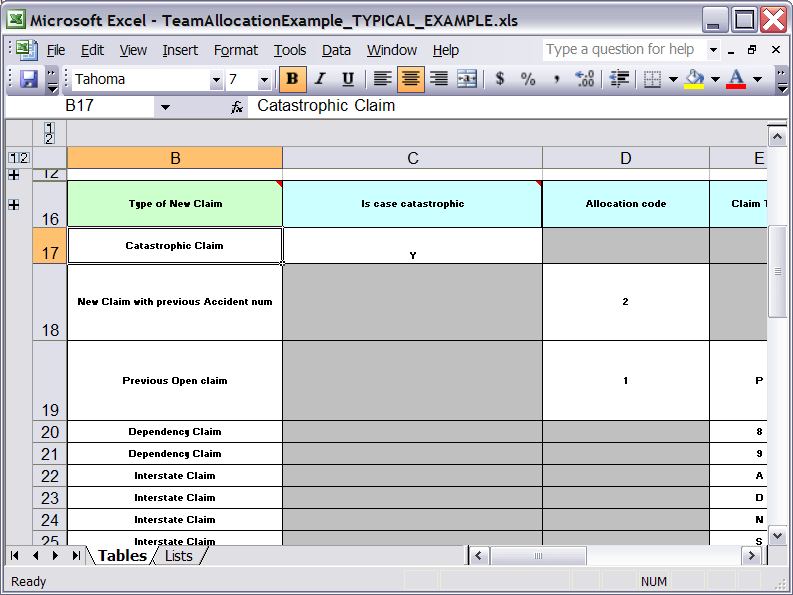
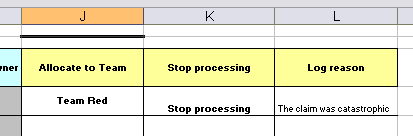
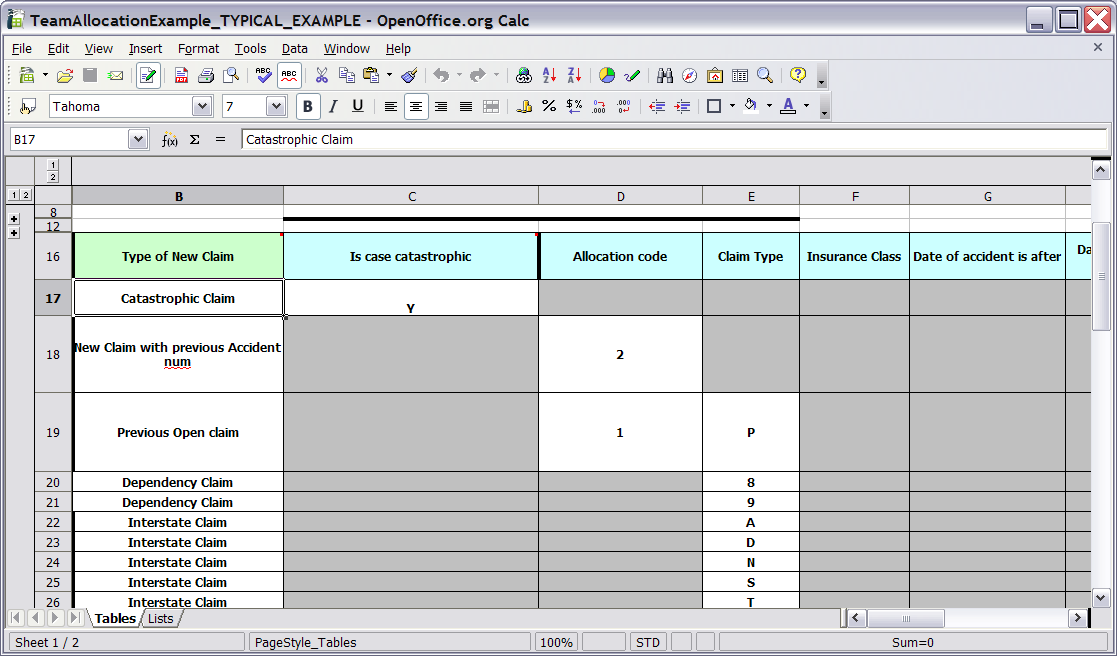
In the above examples, the technical aspects of the decision table have been collapsed away (using a standard spreadsheet feature).
The rules start from row 17, with each row resulting in a rule. The conditions are in columns C, D, E, etc., the actions being off-screen. The values in the cells are quite simple, and their meaning is indicated by the headers in Row 16. Column B is just a description. It is customary to use color to make it obvious what the different areas of the table mean.
|
Note that although the decision tables look like they process top down, this is not necessarily the case. Ideally, rules are authored without regard for the order of rows, simply because this makes maintenance easier, as rows will not need to be shifted around all the time. |
As each row is a rule, the same principles apply. As the rule engine processes the facts, any rules that match may fire. (Some people are confused by this. It is possible to clear the agenda when a rule fires and simulate a very simple decision table where only the first match effects an action.) Also note that you can have multiple tables on one spreadsheet. This way, rules can be grouped where they share common templates, yet at the end of the day they are all combined into one rule package. Decision tables are essentially a tool to generate DRL rules automatically.
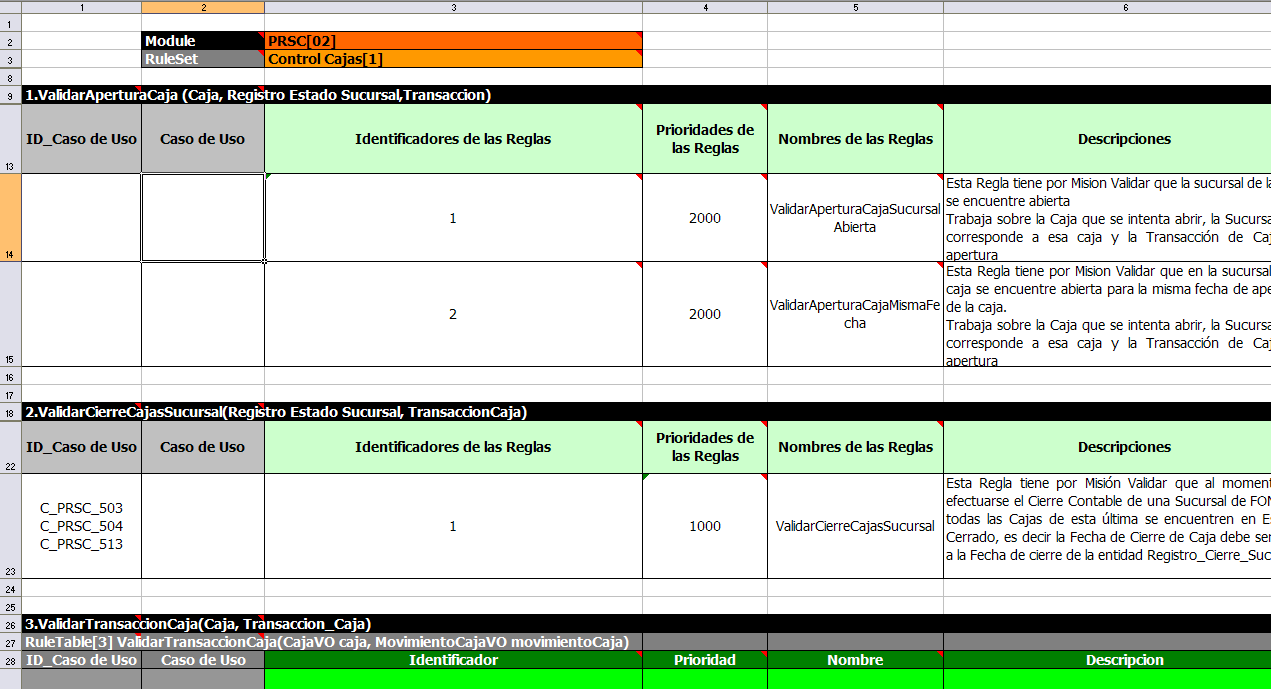
6.5.3. How Decision Tables Work
The key point to keep in mind is that in a decision table each row is a rule, and each column in that row is either a condition or action for that rule.
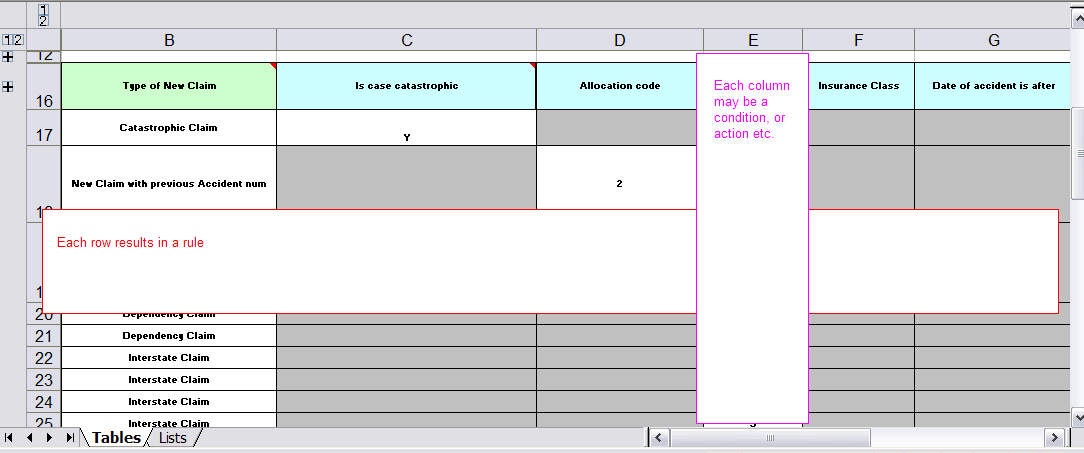
The spreadsheet looks for the RuleTable keyword to indicate the start of a rule table (both the starting row and column). Other keywords are also used to define other package level attributes (covered later). It is important to keep the keywords in one column. By convention the second column ("B") is used for this, but it can be any column (convention is to leave a margin on the left for notes). In the following diagram, C is actually the column where it starts. Everything to the left of this is ignored.
If we expand the hidden sections, it starts to make more sense how it works; note the keywords in column C.
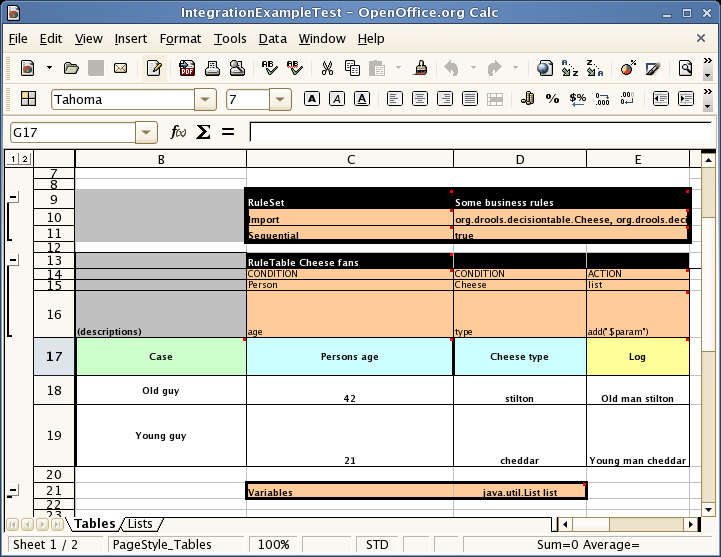
Now the hidden magic which makes it work can be seen. The RuleSet keyword indicates the name to be used in the rule package that will encompass all the rules. This name is optional, using a default, but it must have the RuleSet keyword in the cell immediately to the right.
The other keywords visible in Column C are Import and Sequential which will be covered later. The RuleTable keyword is important as it indicates that a chunk of rules will follow, based on some rule templates. After the RuleTable keyword there is a name, used to prefix the names of the generated rules. The sheet name and row numbers are appended to guarantee unique rule names.
|
The RuleTable name combined with the sheet name must be unique across all spreadsheet files in the same KieBase. If that’s not the case, some rules might have the same name and only 1 of them will be applied. To show such ignored rules, raise the severity of such rule name conflicts. |
The column of RuleTable indicates the column in which the rules start; columns to the left are ignored.
|
In general the keywords make up name-value pairs. |
Referring to row 14 (the row immediately after RuleTable), the keywords CONDITION and ACTION indicate that the data in the columns below are for either the LHS or the RHS parts of a rule. There are other attributes on the rule which can also be optionally set this way.
Row 15 contains declarations of ObjectTypes
.
The content in this row is optional, but if this option is not in use, the row must be left blank; however this option is usually found to be quite useful.
When using this row, the values in the cells below (row 16) become constraints on that object type.
In the above case, it generates Person(age=="42") and Cheese(type=="stilton"), where 42 and "stilton" come from row 18.
In the above example, the "==" is implicit; if just a field name is given the translator assumes that it is to generate an exact match.
|
An ObjectType declaration can span columns (via merged cells), meaning that all columns below the merged range are to be combined into one set of constraints within a single pattern matching a single fact at a time, as opposed to non-merged cells containing the same ObjectType, but resulting in different patterns, potentially matching different or identical facts. |
Row 16 contains the rule templates themselves. They can use the "$param" placeholder to indicate where data from the cells below should be interpolated. (For multiple insertions, use "$1", "$2", etc., indicating parameters from a comma-separated list in a cell below.) Row 17 is ignored; it may contain textual descriptions of the column’s purpose.
Rows 18 and 19 show data, which will be combined (interpolated) with the templates in row 15, to generate rules. If a cell contains no data, then its template is ignored. (This would mean that some condition or action does not apply for that rule row.) Rule rows are read until there is a blank row. Multiple RuleTables can exist in a sheet. Row 20 contains another keyword, and a value. The row positions of keywords like this do not matter (most people put them at the top) but their column should be the same one where the RuleTable or RuleSet keywords should appear. In our case column C has been chosen to be significant, but any other column could be used instead.
In the above example, rules would be rendered like the following (as it uses the "ObjectType" row):
//row 18
rule "Cheese_fans_18"
when
    Person(age=="42")
    Cheese(type=="stilton")
then
    list.add("Old man stilton");
end
|
The constraints |
|
Very large decision tables may have very large memory requirements. |
6.5.4. Spreadsheet Syntax
6.5.4.1. Spreadsheet Structure
There are two types of rectangular areas defining data that is used for generating a DRL file.
One, marked by a cell labelled RuleSet, defines all DRL items except rules.
The other one may occur repeatedly and is to the right and below a cell whose contents begin with RuleTable.
These areas represent the actual decision tables, each area resulting in a set of rules of similar structure.
A Rule Set area may contain cell pairs, one below the RuleSet cell and containing a keyword designating the kind of value contained in the other one that follows in the same row.
The columns of a Rule Table area define patterns and constraints for the left hand sides of the rules derived from it, actions for the consequences of the rules, and the values of individual rule attributes.
Thus, a Rule Table area should contain one or more columns, both for conditions and actions, and an arbitrary selection of columns for rule attributes, at most one column for each of these.
The first four rows following the row with the cell marked with RuleTable are earmarked as header area, mostly used for the definition of code to construct the rules.
It is any additional row below these four header rows that spawns another rule, with its data providing for variations in the code defined in the Rule Table header.
All keywords are case insensitive.
Only the first worksheet is examined for decision tables.
6.5.4.2. Rule Set Entries
Entries in a Rule Set area may define DRL constructs (except rules), and specify rule attributes. While entries for constructs may be used repeatedly, each rule attribute may be given at most once, and it applies to all rules unless it is overruled by the same attribute being defined within the Rule Table area.
Entries must be given in a vertically stacked sequence of cell pairs.
The first one contains a keyword and the one to its right the value, as shown in the table below.
This sequence of cell pairs may be interrupted by blank rows or even a Rule Table, as long as the column marked by RuleSet is upheld as the one containing the keyword.
| Keyword | Value | Usage |
|---|---|---|
RuleSet |
The package name for the generated DRL file. Optional, the default is
|
Must be First entry. |
Sequential |
"true" or "false". If "true", then salience is used to ensure that rules fire from the top down. |
Optional, at most once. If omitted, no firing order is imposed. |
SequentialMaxPriority |
Integer numeric value |
Optional, at most once. In sequential mode, this option is used to set the start value of the salience. If omitted, the default value is 65535. |
SequentialMinPriority |
Integer numeric value |
Optional, at most once. In sequential mode this option is used to check if this minimum salience value is not violated. If omitted the default value is 0. |
EscapeQuotes |
"true" or "false". If "true", then quotation marks are escaped so that they appear literally in the DRL. |
Optional, at most once. If omitted, quotation marks are escaped. |
NumericDisabled |
"true" or "false". If "true", then a String representation is used for DRL instead of a double value from a Numeric cell |
Optional, at most once. If omitted, a double value is used. |
Import |
A comma-separated list of Java classes to import. |
Optional, may be used repeatedly. |
Variables |
Declarations of DRL globals, i.e., a type followed by a variable name. Multiple global definitions must be separated with a comma. |
Optional, may be used repeatedly. |
Functions |
One or more function definitions, according to DRL syntax. |
Optional, may be used repeatedly. |
Queries |
One or more query definitions, according to DRL syntax. |
Optional, may be used repeatedly. |
Declare |
One or more declarative types, according to DRL syntax. |
Optional, may be used repeatedly. |
|
In some locales, MS Office, LibreOffice and OpenOffice will encode a double quote |
For defining rule attributes that apply to all rules in the generated DRL file you can use any of the entries in the following table. Notice, however, that the proper keyword must be used. Also, each of these attributes may be used only once.
|
Rule attributes specified in a Rule Set area will affect all rule assets in the same package (not only in the spreadsheet). Unless you are sure that the spreadsheet is the only one rule asset in the package, the recommendation is to specify rule attributes not in a Rule Set area but in a Rule Table columns for each rule instead. |
| Keyword | Initial | Value |
|---|---|---|
PRIORITY |
P |
An integer defining the "salience" value for the rule. Overridden by the "Sequential" flag. |
DURATION |
D |
A long integer value defining the "duration" value for the rule. |
TIMER |
T |
A timer definition. See "Timers and Calendars". |
ENABLED |
B |
A Boolean value. "true" enables the rule; "false" disables the rule. |
CALENDARS |
E |
A calendars definition. See "Timers and Calendars". |
NO-LOOP |
U |
A Boolean value. "true" inhibits looping of rules due to changes made by its consequence. |
LOCK-ON-ACTIVE |
L |
A Boolean value. "true" inhibits additional activations of all rules with this flag set within the same ruleflow or agenda group. |
AUTO-FOCUS |
F |
A Boolean value. "true" for a rule within an agenda group causes activations of the rule to automatically give the focus to the group. |
ACTIVATION-GROUP |
X |
A string identifying an activation (or XOR) group. Only one rule within an activation group will fire, i.e., the first one to fire cancels any existing activations of other rules within the same group. |
AGENDA-GROUP |
G |
A string identifying an agenda group, which has to be activated by giving it the "focus", which is one way of controlling the flow between groups of rules. |
RULEFLOW-GROUP |
R |
A string identifying a rule-flow group. |
6.5.4.3. Rule Tables
All Rule Tables begin with a cell containing "RuleTable", optionally followed by a string within the same cell. The string is used as the initial part of the name for all rules derived from this Rule Table, with the row number appended for distinction. (This automatic naming can be overridden by using a NAME column.) All other cells defining rules of this Rule Table are below and to the right of this cell.
The next row defines the column type, with each column resulting in a part of the condition or the consequence, or providing some rule attribute, the rule name or a comment. The table below shows which column headers are available; additional columns may be used according to the table showing rule attribute entries given in the preceding section. Note that each attribute column may be used at most once. For a column header, either use the keyword or any other word beginning with the letter given in the "Initial" column of these tables.
| Keyword | Initial | Value | Usage |
|---|---|---|---|
NAME |
N |
Provides the name for the rule generated from that row. The default is constructed from the text following the RuleTable tag and the row number. |
At most one column |
DESCRIPTION |
I |
A text, resulting in a comment within the generated rule. |
At most one column |
CONDITION |
C |
Code snippet and interpolated values for constructing a constraint within a pattern in a condition. |
At least one per rule table |
ACTION |
A |
Code snippet and interpolated values for constructing an action for the consequence of the rule. |
At least one per rule table |
METADATA |
@ |
Code snippet and interpolated values for constructing a metadata entry for the rule. |
Optional, any number of columns |
Given a column headed CONDITION, the cells in successive lines result in a conditional element.
-
Text in the first cell below CONDITION develops into a pattern for the rule condition, with the snippet in the next line becoming a constraint. If the cell is merged with one or more neighbours, a single pattern with multiple constraints is formed: all constraints are combined into a parenthesized list and appended to the text in this cell. The cell may be left blank, which means that the code snippet in the next row must result in a valid conditional element on its own.
To include a pattern without constraints, you can write the pattern in front of the text for another pattern.
The pattern may be written with or without an empty pair of parentheses. A "from" clause may be appended to the pattern.
If the pattern ends with "eval", code snippets are supposed to produce boolean expressions for inclusion into a pair of parentheses after "eval".
-
Text in the second cell below CONDITION is processed in two steps.
-
The code snippet in this cell is modified by interpolating values from cells farther down in the column. If you want to create a constraint consisting of a comparison using "==" with the value from the cells below, the field selector alone is sufficient. Any other comparison operator must be specified as the last item within the snippet, and the value from the cells below is appended. For all other constraint forms, you must mark the position for including the contents of a cell with the symbol
$param. Multiple insertions are possible by using the symbols$1,$2, etc., and a comma-separated list of values in the cells below.A text according to the pattern
forall(delimiter){snippet}is expanded by repeating the snippet once for each of the values of the comma-separated list of values in each of the cells below, inserting the value in place of the symbol$and by joining these expansions by the given delimiter. Note that the forall construct may be surrounded by other text. -
If the cell in the preceding row is not empty, the completed code snippet is added to the conditional element from that cell. A pair of parentheses is provided automatically, as well as a separating comma if multiple constraints are added to a pattern in a merged cell.
If the cell above is empty, the interpolated result is used as is.
-
-
Text in the third cell below CONDITION is for documentation only. It should be used to indicate the column’s purpose to a human reader.
-
From the fourth row on, non-blank entries provide data for interpolation as described above. A blank cell results in the omission of the conditional element or constraint for this rule.
Given a column headed ACTION, the cells in successive lines result in an action statement.
-
Text in the first cell below ACTION is optional. If present, it is interpreted as an object reference.
-
Text in the second cell below ACTION is processed in two steps.
-
The code snippet in this cell is modified by interpolating values from cells farther down in the column. For a singular insertion, mark the position for including the contents of a cell with the symbol
$param. Multiple insertions are possible by using the symbols$1,$2, etc., and a comma-separated list of values in the cells below.A method call without interpolation can be achieved by a text without any marker symbols. In this case, use any non-blank entry in a row below to include the statement.
The forall construct is available here, too.
-
If the first cell is not empty, its text, followed by a period, the text in the second cell and a terminating semicolon are stringed together, resulting in a method call which is added as an action statement for the consequence.
If the cell above is empty, the interpolated result is used as is.
-
-
Text in the third cell below ACTION is for documentation only. It should be used to indicate the column’s purpose to a human reader.
-
From the fourth row on, non-blank entries provide data for interpolation as described above. A blank cell results in the omission of the action statement for this rule.
|
Using |
Given a column headed METADATA, the cells in successive lines result in a metadata annotation for the generated rules.
-
Text in the first cell below METADATA is ignored.
-
Text in the second cell below METADATA is subject to interpolation, as described above, using values from the cells in the rule rows. The metadata marker character
@is prefixed automatically, and thus it should not be included in the text for this cell. -
Text in the third cell below METADATA is for documentation only. It should be used to indicate the column’s purpose to a human reader.
-
From the fourth row on, non-blank entries provide data for interpolation as described above. A blank cell results in the omission of the metadata annotation for this rule.
6.5.4.4. Examples
The various interpolations are illustrated in the following example.
If the template is Foo(bar == $param) and the cell is 42, then the result is Foo(bar == 42).
If the template is Foo(bar < $1, baz == $2) and the cell contains 42,43, the result will be Foo(bar < 42, baz ==43).
The template forall(&&){bar != $} with a cell containing 42,43 results in bar != 42 && bar != 43.
The next example demonstrates the joint effect of a cell defining the pattern type and the code snippet below it.
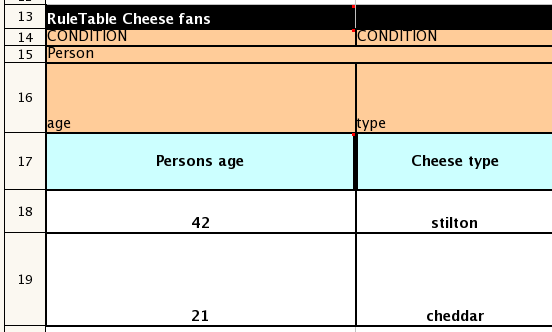
This spreadsheet section shows how the Person type declaration spans 2 columns, and thus both constraints will appear as Person(age == …, type == …).
Since only the field names are present in the snippet, they imply an equality test.
In the following example the marker symbol $param is used.

The result of this column is the pattern Person(age == "42")).
You may have noticed that the marker and the operator "==" are redundant.
The next example illustrates that a trailing insertion marker can be omitted.
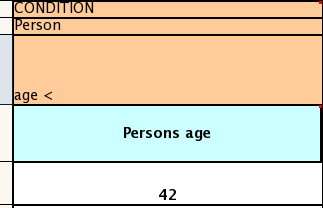
Here, appending the value from the cell is implied, resulting in Person(age < "42")).
You can provide the definition of a binding variable, as in the example below.
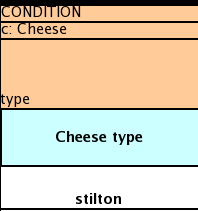
Here, the result is c: Cheese(type == "stilton"). Note that the quotes are provided automatically.
Actually, anything can be placed in the object type row.
Apart from the definition of a binding variable, it could also be an additional pattern that is to be inserted literally.
A simple construction of an action statement with the insertion of a single value is shown below.
The cell below the ACTION header is left blank. Using this style, anything can be placed in the consequence, not just a single method call. (The same technique is applicable within a CONDITION column as well.)
Below is a comprehensive example, showing the use of various column headers. It is not an error to have no value below a column header (as in the NO-LOOP column): here, the attribute will not be applied in any of the rules.

And, finally, here is an example of Import, Variables and Functions.
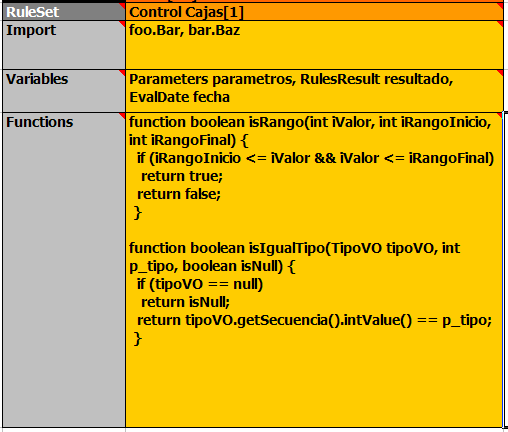
Multiple package names within the same cell must be separated by a comma. Also, the pairs of type and variable names must be comma-separated. Functions, however, must be written as they appear in a DRL file. This should appear in the same column as the "RuleSet" keyword; it could be above, between or below all the rule rows.
|
It may be more convenient to use Import, Variables, Functions and Queries repeatedly rather than packing several definitions into a single cell. |
6.5.5. Creating and integrating Spreadsheet based Decision Tables
The API to use spreadsheet based decision tables is in the drools-decisiontables module.
There is really only one class to look at: SpreadsheetCompiler.
This class will take spreadsheets in various formats, and generate rules in DRL (which you can then use in the normal way). The SpreadsheetCompiler can just be used to generate partial rule files if it is wished, and assemble it into a complete rule package after the fact (this allows the separation of technical and non-technical aspects of the rules if needed).
To get started, a sample spreadsheet can be used as a base. Alternatively, if the plug-in is being used (Rule Workbench IDE), the wizard can generate a spreadsheet from a template (to edit it an xls compatible spreadsheet editor will need to be used).
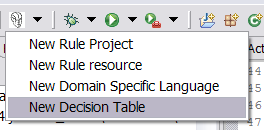
6.5.6. Managing Business Rules in Decision Tables
6.5.6.1. Workflow and Collaboration
Spreadsheets are well established business tools (in use for over 25 years). Decision tables lend themselves to close collaboration between IT and domain experts, while making the business rules clear to business analysts, it is an ideal separation of concerns.
Typically, the whole process of authoring rules (coming up with a new decision table) would be something like:
-
Business analyst takes a template decision table (from a repository, or from IT)
-
Decision table business language descriptions are entered in the table(s)
-
Decision table rules (rows) are entered (roughly)
-
Decision table is handed to a technical resource, who maps the business language (descriptions) to scripts (this may involve software development of course, if it is a new application or data model)
-
Technical person hands back and reviews the modifications with the business analyst.
-
The business analyst can continue editing the rule rows as needed (moving columns around is also fine etc).
-
In parallel, the technical person can develop test cases for the rules (liaising with business analysts) as these test cases can be used to verify rules and rule changes once the system is running.
6.5.6.2. Using spreadsheet features
Features of applications like Excel can be used to provide assistance in entering data into spreadsheets, such as validating fields. Lists that are stored in other worksheets can be used to provide valid lists of values for cells, like in the following diagram.
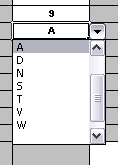
Some applications provide a limited ability to keep a history of changes, but it is recommended to use an alternative means of revision control. When changes are being made to rules over time, older versions are archived (many open source solutions exist for this, such as Subversion or Git).
6.5.7. Rule Templates
Related to decision tables (but not necessarily requiring a spreadsheet) are "Rule Templates" (in the drools-templates module). These use any tabular data source as a source of rule data - populating a template to generate many rules. This can allow both for more flexible spreadsheets, but also rules in existing databases for instance (at the cost of developing the template up front to generate the rules).
With Rule Templates the data is separated from the rule and there are no restrictions on which part of the rule is data-driven. So whilst you can do everything you could do in decision tables you can also do the following:
-
store your data in a database (or any other format)
-
conditionally generate rules based on the values in the data
-
use data for any part of your rules (e.g. condition operator, class name, property name)
-
run different templates over the same data
As an example, a more classic decision table is shown, but without any hidden rows for the rule meta data (so the spreadsheet only contains the raw data to generate the rules).
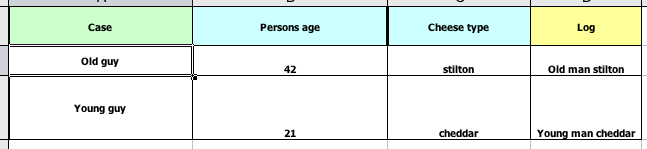
See the ExampleCheese.xls in the examples download for the above spreadsheet.
If this was a regular decision table there would be hidden rows before row 1 and between rows 1 and 2 containing rule metadata. With rule templates the data is completely separate from the rules. This has two handy consequences - you can apply multiple rule templates to the same data and your data is not tied to your rules at all. So what does the template look like?
1  template header
2  age
3  type
4  log
5
6  package org.drools.examples.templates;
7
8  global java.util.List list;
9
10 template "cheesefans"
11
12 rule "Cheese fans_@{row.rowNumber}"
13 when
14    Person(age == @{age})
15    Cheese(type == "@{type}")
16 then
17    list.add("@{log}");
18 end
19
20 end template
Annotations to the preceding program listing:
-
Line 1: All rule templates start with
template header. -
Lines 2-4: Following the header is the list of columns in the order they appear in the data. In this case we are calling the first column
age, the secondtypeand the thirdlog. -
Line 5: An empty line signifies the end of the column definitions.
-
Lines 6-9: Standard rule header text. This is standard rule DRL and will appear at the top of the generated DRL. Put the package statement and any imports and global and function definitions into this section.
-
Line 10: The keyword
templatesignals the start of a rule template. There can be more than one template in a template file, but each template should have a unique name. -
Lines 11-18: The rule template - see below for details.
-
Line 20: The keywords
end templatesignify the end of the template.
The rule templates rely on MVEL to do substitution using the syntax @{token_name}. There is currently one built-in expression, @{row.rowNumber} which gives a unique number for each row of data and enables you to generate unique rule names. For each row of data a rule will be generated with the values in the data substituted for the tokens in the template.
A rule template has to be included in a file with extension .drt and associated to the corresponding decision table when defining the kbase in the kmodule.xml file as in the following example
<?xml version="1.0" encoding="UTF-8"?>
<kmodule xmlns="http://drools.org/xsd/kmodule">
  <kbase name="TemplatesKB" packages="org.drools.examples.templates">
    <ruleTemplate dtable="org/drools/examples/templates/ExampleCheese.xls"
                  template="org/drools/examples/templates/Cheese.drt"
                  row="2" col="2"/>
      <ksession name="TemplatesKS"/>
      </kbase>
</kmodule>
With the example data above the following rule file would be generated:
package org.drools.examples.templates;

global java.util.List list;

rule "Cheese fans_1"
when
  Person(age == 42)
  Cheese(type == "stilton")
then
  list.add("Old man stilton");
end

rule "Cheese fans_2"
when
  Person(age == 21)
  Cheese(type == "cheddar")
then
  list.add("Young man cheddar");
end
At this point the KieSession named "TemplatesKS" and containing the rules generated from the template can be simply created from the KieContainer and used as any other KieSession.
KieSession ksession = kc.newKieSession( "TemplatesKS" );

// now create some test data
ksession.insert( new Cheese( "stilton", 42 ) );
ksession.insert( new Person( "michael", "stilton", 42 ) );
final List<String> list = new ArrayList<String>();
ksession.setGlobal( "list", list );

ksession.fireAllRules();
6.6. Logging
One way to illuminate the black box that is a rule engine, is to play with the logging level.
Everything is logged to SLF4J, which is a simple logging facade that can delegate any log to Logback, Apache Commons Logging, Log4j or java.util.logging. Add a dependency to the logging adaptor for your logging framework of choice. If you’re not using any logging framework yet, you can use Logback by adding this Maven dependency:
    <dependency>
      <groupId>ch.qos.logback</groupId>
      <artifactId>logback-classic</artifactId>
      <version>1.x</version>
</dependency>|
If you’re developing for an ultra light environment, use |
Configure the logging level on the package org.drools.
For example:
In Logback, configure it in your logback.xml file:
<configuration>

    <logger name="org.drools" level="debug"/>

    ...

<configuration>
In Log4J, configure it in your log4j.xml file:
<log4j:configuration xmlns:log4j="http://jakarta.apache.org/log4j/">

    <category name="org.drools">
      <priority value="debug" />
    </category>

    ...

</log4j:configuration>
7. Running
Ths sections extends the KIE Running section, which should be read first, with specifics for the Drools runtime.
7.1. KieRuntime
7.1.1. EntryPoint
The EntryPoint provides the methods around inserting, updating and deleting facts.
The term "entry point" is related to the fact that we have multiple partitions in a Working Memory and you can choose which one you are inserting into.
The use of multiple entry points is more common in event processing use cases, but they can be used by pure rule applications as well.
The KieRuntime interface provides the main interaction with the engine.
It is available in rule consequences and process actions.
In this manual the focus is on the methods and interfaces related to rules, and the methods pertaining to processes will be ignored for now.
But you’ll notice that the KieRuntime inherits methods from both the WorkingMemory and the ProcessRuntime, thereby providing a unified API to work with processes and rules.
When working with rules, three interfaces form the KieRuntime: EntryPoint, WorkingMemory and the KieRuntime itself.
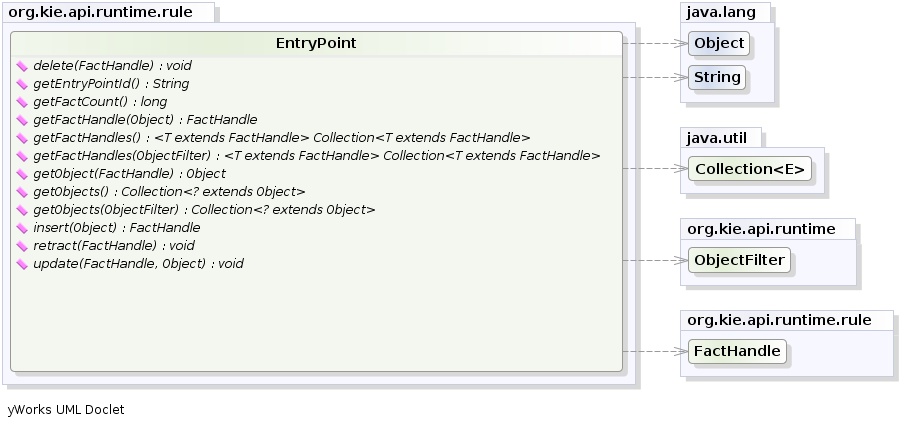
7.1.1.1. Insert
In order for a fact to be evaluated against the rules in a KieBase, it has to be inserted into the session.
This is done by calling the method insert(yourObject).
When a fact is inserted into the session, some of its properties might be immediately evaluated (eager evaluation) and some might be deferred for later evaluation (lazy evaluation). The exact behaviour depends on the rules engine algorithm being used.
|
Expert systems typically use the term assert or assertion to refer to facts made available to the system.
However, due to "assert" being a keyword in most languages, we have decided to use the |
When an Object is inserted it returns a FactHandle.
This FactHandle is the token used to represent your inserted object within the WorkingMemory.
It is also used for interactions with the WorkingMemory when you wish to delete or modify an object.
Cheese stilton = new Cheese("stilton");
FactHandle stiltonHandle = ksession.insert( stilton );
As mentioned in the KieBase section, a Working Memory may operate in two assertion modes: either equality or identity. Identity is the default.
Identity means that the Working Memory uses an IdentityHashMap to store all asserted objects.
New instance assertions always result in the return of new FactHandle, but if an instance is asserted again then it returns the original fact handle, i.e., it ignores repeated insertions for the same object.
Equality means that the Working Memory uses a HashMap to store all asserted objects.
An object instance assertion will only return a new FactHandle if the inserted object is not equal (according to its equal()/hashcode() methods) to an already existing fact.
7.1.1.2. Delete
In order to remove a fact from the session, the method delete() is used.
When a fact is deleted, any matches that are active and depend on that fact will be cancelled.
Note that it is possible to have rules that depend on the nonexistence of a fact, in which case deleting a fact may cause a rule to activate.
(See the not and exists keywords).
|
Expert systems typically use the term retract or retraction to refer to the operation of removing facts from the Working Memory.
Drools prefers the keyword |
Retraction may be done using the FactHandle that was returned by the insert call.
On the right hand side of a rule the delete statement is used, which works with a simple object reference.
Cheese stilton = new Cheese("stilton");
FactHandle stiltonHandle = ksession.insert( stilton );
....
ksession.delete( stiltonHandle );
7.1.1.3. Update
The Rule Engine must be notified of modified facts, so that they can be reprocessed.
You must use the update() method to notify the WorkingMemory of changed objects for those objects that are not able to notify the WorkingMemory themselves.
Notice that update() always takes the modified object as a second parameter, which allows you to specify new instances for immutable objects.
On the right hand side of a rule the modify statement is recommended, as it makes the changes and notifies the engine in a single statement.
Alternatively, after changing a fact object’s field values through calls of setter methods you must invoke update immediately, event before changing another fact, or you will cause problems with the indexing within the rule engine.
The modify statement avoids this problem.
Cheese stilton = new Cheese("stilton");
FactHandle stiltonHandle = workingMemory.insert( stilton );
...
stilton.setPrice( 100 );
workingMemory.update( stiltonHandle, stilton );
7.1.2. RuleRuntime
The RuleRuntime provides access to the Agenda, permits query executions, and lets you access named Entry Points.
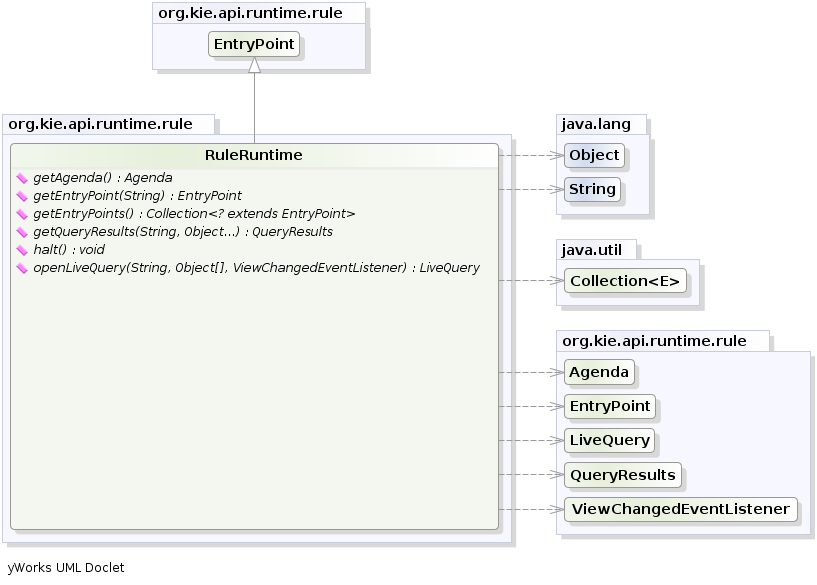
7.1.2.1. Query
Queries are used to retrieve fact sets based on patterns, as they are used in rules.
Patterns may make use of optional parameters.
Queries can be defined in the Knowledge Base, from where they are called up to return the matching results.
While iterating over the result collection, any identifier bound in the query can be used to access the corresponding fact or fact field by calling the get method with the binding variable’s name as its argument.
If the binding refers to a fact object, its FactHandle can be retrieved by calling getFactHandle, again with the variable’s name as the parameter.
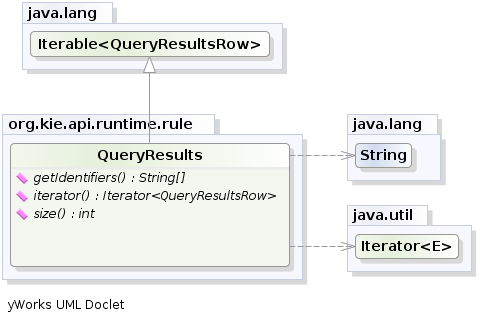
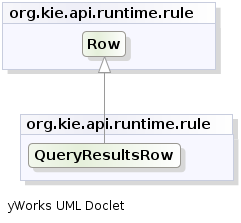
QueryResults results =
    ksession.getQueryResults( "my query", new Object[] { "string" } );
for ( QueryResultsRow row : results ) {
    System.out.println( row.get( "varName" ) );
}
7.1.2.2. Live Queries
Invoking queries and processing the results by iterating over the returned set is not a good way to monitor changes over time.
To alleviate this, Drools provides Live Queries, which have a listener attached instead of returning an iterable result set.
These live queries stay open by creating a view and publishing change events for the contents of this view.
To activate, you start your query with parameters and listen to changes in the resulting view.
The dispose method terminates the query and discontinues this reactive scenario.
final List updated = new ArrayList();
final List removed = new ArrayList();
final List added = new ArrayList();

ViewChangedEventListener listener = new ViewChangedEventListener() {
 public void rowUpdated(Row row) {
  updated.add( row.get( "$price" ) );
 }

 public void rowRemoved(Row row) {
  removed.add( row.get( "$price" ) );
 }

 public void rowAdded(Row row) {
  added.add( row.get( "$price" ) );
 }
};

// Open the LiveQuery
LiveQuery query = ksession.openLiveQuery( "cheeses",
                                          new Object[] { "cheddar", "stilton" },
                                          listener );
...
...
query.dispose() // calling dispose to terminate the live query
A Drools blog article contains an example of Glazed Lists integration for live queries:
7.1.3. StatefulRuleSession
The StatefulRuleSession is inherited by the KieSession and provides the rule related methods that are relevant from outside of the engine.
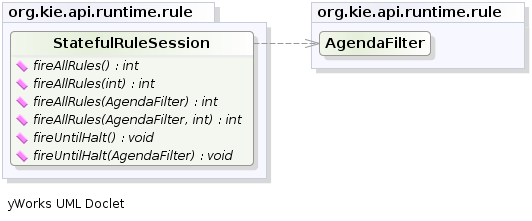
7.1.3.1. Agenda Filters
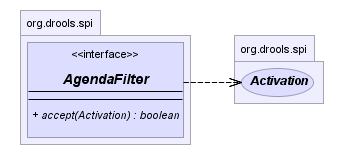
` AgendaFilter` objects are optional implementations of the filter interface which are used to allow or deny the firing of a match. What you filter on is entirely up to the implementation. Drools 4.0 used to supply some out of the box filters, which have not be exposed in drools 5.0 knowledge-api, but they are simple to implement and the Drools 4.0 code base can be referred to.
To use a filter specify it while calling fireAllRules().
The following example permits only rules ending in the string "Test".
All others will be filtered out.
ksession.fireAllRules( new RuleNameEndsWithAgendaFilter( "Test" ) );7.2. Agenda
The Agenda is a Rete feature.
During actions on the WorkingMemory, rules may become fully matched and eligible for execution; a single Working Memory Action can result in multiple eligible rules.
When a rule is fully matched a Match is created, referencing the rule and the matched facts, and placed onto the Agenda.
The Agenda controls the execution order of these Matches using a Conflict Resolution strategy.
The engine cycles repeatedly through two phases:
-
Working Memory Actions. This is where most of the work takes place, either in the Consequence (the RHS itself) or the main Java application process. Once the Consequence has finished or the main Java application process calls
fireAllRules()the engine switches to the Agenda Evaluation phase. -
Agenda Evaluation. This attempts to select a rule to fire. If no rule is found it exits, otherwise it fires the found rule, switching the phase back to Working Memory Actions.

The process repeats until the agenda is clear, in which case control returns to the calling application. When Working Memory Actions are taking place, no rules are being fired.
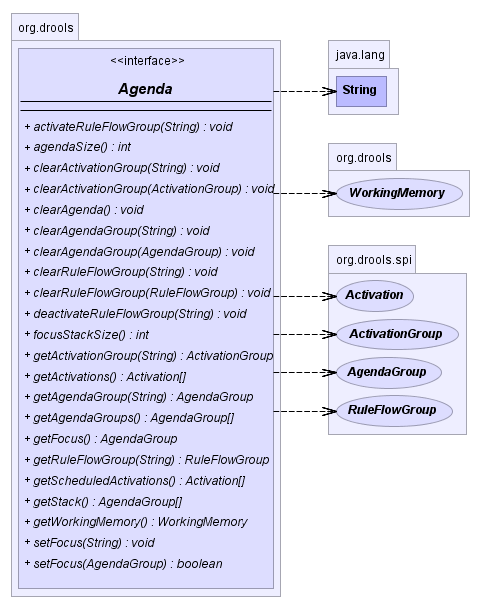
7.2.1. Conflict Resolution
Conflict resolution is required when there are multiple rules on the agenda. (The basics to this are covered in chapter "Quick Start".) As firing a rule may have side effects on the working memory, the rule engine needs to know in what order the rules should fire (for instance, firing ruleA may cause ruleB to be removed from the agenda).
The default conflict resolution strategies employed by Drools are: Salience and LIFO (last in, first out).
The most visible one is salience (or priority), in which case a user can specify that a certain rule has a higher priority (by giving it a higher number) than other rules. In that case, the rule with higher salience will be preferred. LIFO priorities are based on the assigned Working Memory Action counter value, with all rules created during the same action receiving the same value. The execution order of a set of firings with the same priority value is arbitrary.
As a general rule, it is a good idea not to count on rules firing in any particular order, and to author the rules without worrying about a "flow". However when a flow is needed a number of possibilities exist, including but not limited to: agenda groups, rule flow groups, activation groups, control/semaphore facts. These are discussed in later sections.
Drools 4.0 supported custom conflict resolution strategies; while this capability still exists in Drools it has not yet been exposed to the end user via knowledge-api in Drools 5.0.
7.2.2. AgendaGroup
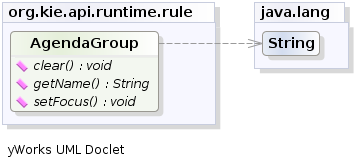
Agenda groups are a way to partition rules (matches, actually) on the agenda. At any one time, only one group has "focus" which means that matches for rules in that group only will take effect. You can also have rules with "auto focus" which means that the focus is taken for its agenda group when that rule’s conditions are true.
Agenda groups are known as "modules" in CLIPS terminology. While it best to design rules that do not need control flow, this is not always possible. Agenda groups provide a handy way to create a "flow" between grouped rules. You can switch the group which has focus either from within the rule engine, or via the API. If your rules have a clear need for multiple "phases" or "sequences" of processing, consider using agenda-groups for this purpose.
Each time setFocus() is called it pushes that Agenda Group onto a stack.
When the focus group is empty it is popped from the stack and the focus group that is now on top evaluates.
An Agenda Group can appear in multiple locations on the stack.
The default Agenda Group is "MAIN", with all rules which do not specify an Agenda Group being in this group.
It is also always the first group on the stack, given focus initially, by default.
ksession.getAgenda().getAgendaGroup( "Group A" ).setFocus();The clear() method can be used to cancel all the activations generated by the rules belonging to a given Agenda Group before one has had a chance to fire.
ksession.getAgenda().getAgendaGroup( "Group A" ).clear();Note that, due to the lazy nature of the phreak algorithm used by Drools, the activations are by default materialized only at firing time, but it is possible to anticipate the evaluation and then the activation of a given rule at the moment when a fact is inserted into the session by annotating it with @Propagation(IMMEDIATE) as explained in the Propagation modes section.
7.2.3. ActivationGroup
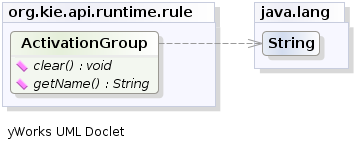
An activation group is a set of rules bound together by the same "activation-group" rule attribute.
In this group only one rule can fire, and after that rule has fired all the other rules are cancelled from the agenda.
The clear() method can be called at any time, which cancels all of the activations before one has had a chance to fire.
ksession.getAgenda().getActivationGroup( "Group B" ).clear();7.2.4. RuleFlowGroup
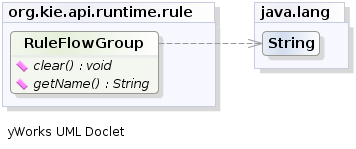
A rule flow group is a group of rules associated by the "ruleflow-group" rule attribute.
These rules can only fire when the group is activated.
The group itself can only become active when the elaboration of the ruleflow diagram reaches the node representing the group.
Here too, the clear() method can be called at any time to cancels all matches still remaining on the Agenda.
ksession.getAgenda().getRuleFlowGroup( "Group C" ).clear();7.3. Event Model
The event package provides means to be notified of rule engine events, including rules firing, objects being asserted, etc. This allows you, for instance, to separate logging and auditing activities from the main part of your application (and the rules).
The WorkingMemoryEventManager allows for listeners to be added and removed, so that events for the working memory and the agenda can be listened to.
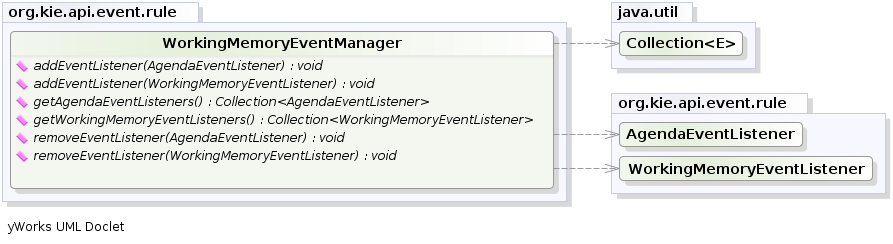
The following code snippet shows how a simple agenda listener is declared and attached to a session. It will print matches after they have fired.
ksession.addEventListener( new DefaultAgendaEventListener() {
   public void afterMatchFired(AfterMatchFiredEvent event) {
       super.afterMatchFired( event );
       System.out.println( event );
   }
});
Drools also provides DebugRuleRuntimeEventListener and DebugAgendaEventListener which implement each method with a debug print statement.
To print all Working Memory events, you add a listener like this:
ksession.addEventListener( new DebugRuleRuntimeEventListener() );The events currently supported are:
-
MatchCreatedEvent
-
MatchCancelledEvent
-
BeforeMatchFiredEvent
-
AfterMatchFiredEvent
-
AgendaGroupPushedEvent
-
AgendaGroupPoppedEvent
-
ObjectInsertEvent
-
ObjectDeletedEvent
-
ObjectUpdatedEvent
-
ProcessCompletedEvent
-
ProcessNodeLeftEvent
-
ProcessNodeTriggeredEvent
-
ProcessStartEvent
7.4. StatelessKieSession
The StatelessKieSession wraps the KieSession, instead of extending it.
Its main focus is on decision service type scenarios.
It avoids the need to call dispose().
Stateless sessions do not support iterative insertions and the method call fireAllRules() from Java code; the act of calling execute() is a single-shot method that will internally instantiate a KieSession, add all the user data and execute user commands, call fireAllRules(), and then call dispose().
While the main way to work with this class is via the BatchExecution (a subinterface of Command) as supported by the CommandExecutor interface, two convenience methods are provided for when simple object insertion is all that’s required.
The CommandExecutor and BatchExecution are talked about in detail in their own section.

Our simple example shows a stateless session executing a given collection of Java objects using the convenience API. It will iterate the collection, inserting each element in turn.
StatelessKieSession ksession = kbase.newStatelessKieSession();
ksession.execute( collection );
If this was done as a single Command it would be as follows:
ksession.execute( CommandFactory.newInsertElements( collection ) );If you wanted to insert the collection itself, and the collection’s individual elements, then CommandFactory.newInsert(collection) would do the job.
Methods of the CommandFactory create the supported commands, all of which can be marshalled using XStream and the BatchExecutionHelper. BatchExecutionHelper provides details on the XML format as well as how to use Drools Pipeline to automate the marshalling of BatchExecution and ExecutionResults.
StatelessKieSession supports globals, scoped in a number of ways.
I’ll cover the non-command way first, as commands are scoped to a specific execution call.
Globals can be resolved in three ways.
-
The StatelessKieSession method
getGlobals()returns a Globals instance which provides access to the session’s globals. These are shared for all execution calls. Exercise caution regarding mutable globals because execution calls can be executing simultaneously in different threads.Example 92. Session scoped globalStatelessKieSession ksession = kbase.newStatelessKieSession(); // Set a global hbnSession, that can be used for DB interactions in the rules. ksession.setGlobal( "hbnSession", hibernateSession ); // Execute while being able to resolve the "hbnSession" identifier. ksession.execute( collection ); -
Using a delegate is another way of global resolution. Assigning a value to a global (with
setGlobal(String, Object)) results in the value being stored in an internal collection mapping identifiers to values. Identifiers in this internal collection will have priority over any supplied delegate. Only if an identifier cannot be found in this internal collection, the delegate global (if any) will be used. -
The third way of resolving globals is to have execution scoped globals. Here, a
Commandto set a global is passed to theCommandExecutor.
The CommandExecutor interface also offers the ability to export data via "out" parameters.
Inserted facts, globals and query results can all be returned.
// Set up a list of commands
List cmds = new ArrayList();
cmds.add( CommandFactory.newSetGlobal( "list1", new ArrayList(), true ) );
cmds.add( CommandFactory.newInsert( new Person( "jon", 102 ), "person" ) );
cmds.add( CommandFactory.newQuery( "Get People" "getPeople" );

// Execute the list
ExecutionResults results =
  ksession.execute( CommandFactory.newBatchExecution( cmds ) );

// Retrieve the ArrayList
results.getValue( "list1" );
// Retrieve the inserted Person fact
results.getValue( "person" );
// Retrieve the query as a QueryResults instance.
results.getValue( "Get People" );
7.4.1. Sequential Mode
With Rete you have a stateful session where objects can be asserted and modified over time, and where rules can also be added and removed. Now what happens if we assume a stateless session, where after the initial data set no more data can be asserted or modified and rules cannot be added or removed? Certainly it won’t be necessary to re-evaluate rules, and the engine will be able to operate in a simplified way.
-
Order the Rules by salience and position in the ruleset (by setting a sequence attribute on the rule terminal node).
-
Create an elements, one element for each possible rule match; element position indicates firing order.
-
Turn off all node memories, except the right-input Object memory.
-
Disconnect the Left Input Adapter Node propagation, and let the Object plus the Node be referenced in a Command object, which is added to a list on the Working Memory for later execution.
-
Assert all objects, and, when all assertions are finished and thus right-input node memories are populated, check the Command list and execute each in turn.
-
All resulting Matches should be placed in the elements, based upon the determined sequence number of the Rule. Record the first and last populated elements, to reduce the iteration range.
-
Iterate the elements of Matches, executing populated element in turn.
-
If we have a maximum number of allowed rule executions, we can exit our network evaluations early to fire all the rules in the elements.
The LeftInputAdapterNode no longer creates a Tuple, adding the Object, and then propagate the Tuple – instead a Command object is created and added to a list in the Working Memory.
This Command object holds a reference to the LeftInputAdapterNode and the propagated object.
This stops any left-input propagations at insertion time, so that we know that a right-input propagation will never need to attempt a join with the left-inputs (removing the need for left-input memory). All nodes have their memory turned off, including the left-input Tuple memory but excluding the right-input object memory, which means that the only node remembering an insertion propagation is the right-input object memory.
Once all the assertions are finished and all right-input memories populated, we can then iterate the list of LeftInputAdatperNode Command objects calling each in turn.
They will propagate down the network attempting to join with the right-input objects, but they won’t be remembered in the left input as we know there will be no further object assertions and thus propagations into the right-input memory.
There is no longer an Agenda, with a priority queue to schedule the Tuples; instead, there is simply an elements for the number of rules.
The sequence number of the RuleTerminalNode indicates the element within the elements where to place the Match.
Once all Command objects have finished we can iterate our elements, checking each element in turn, and firing the Matches if they exist.
To improve performance, we remember the first and the last populated cell in the elements.
The network is constructed, with each RuleTerminalNode being given a sequence number based on a salience number and its order of being added to the network.
Typically the right-input node memories are Hash Maps, for fast object deletion; here, as we know there will be no object deletions, we can use a list when the values of the object are not indexed. For larger numbers of objects indexed Hash Maps provide a performance increase; if we know an object type has only a few instances, indexing is probably not advantageous, and a list can be used.
Sequential mode can only be used with a Stateless Session and is off by default.
To turn it on, either call RuleBaseConfiguration.setSequential(true), or set the rulebase configuration property drools.sequential to true.
Sequential mode can fall back to a dynamic agenda by calling setSequentialAgenda with SequentialAgenda.DYNAMIC.
You may also set the "drools.sequential.agenda" property to "sequential" or "dynamic".
7.5. Rule Execution Modes
Drools provides two modes for rule execution - passive and active.
As a general guideline, Passive Mode is most suitable for Rule Engine applications which need to explicitly control when the engine shall evaluate and fire the rules, or for CEP applications making use of the Pseudo Clock. Active Mode is most effective for Rule Engine applications which delegate control of when rules are evaluated and fired to the engine, or for typical CEP application making use of the Real Time Clock.
7.5.1. Passive Mode
With Passive mode not only is the user responsible for working memory operations, such as insert(), but also for when the rules are to evaluate the data and fire the resulting rule instantiations - using fireAllRules() .
An example outline of Drools code for a CEP application making use of Passive Mode:
KieSessionConfiguration config = KieServices.Factory.get().newKieSessionConfiguration();
config.setOption( ClockTypeOption.get("pseudo") );
KieSession session = kbase.newKieSession( conf, null );
SessionPseudoClock clock = session.getSessionClock();

session.insert( tick1 );
session.fireAllRules();

clock.advanceTime(1, TimeUnit.SECONDS);
session.insert( tick2 );
session.fireAllRules();

clock.advanceTime(1, TimeUnit.SECONDS);
session.insert( tick3 );
session.fireAllRules();

session.dispose();
7.5.2. Active Mode
Drools offers a fireUntilHalt() method, that starts the engine in Active Mode, which is asynchronous in behavior, where rules will be continually evaluated and fired, until a halt() call is made.
This is specially useful for CEP scenarios that require what is commonly known as "active queries".
Please note calling fireUntilHalt() blocks the current thread, while the engine will start and continue running asynchronously until the halt() is called on the KieSession. It is suggested therefore to call fireUntilHalt() from a dedicated thread, so the current thread does not get blocked indefinitely; this also enable the current thread to call halt() at a later stage, ref. examples below.
An example outline of Drools code for a CEP application making use of Active Mode:
KieSessionConfiguration config = KieServices.Factory.get().newKieSessionConfiguration();
config.setOption( ClockTypeOption.get("realtime") );
KieSession session = kbase.newKieSession( conf, null );

new Thread( new Runnable() {
  @Override
  public void run() {
      session.fireUntilHalt();
  }
} ).start();

session.insert( tick1 );

... Thread.sleep( 1000L ); ...

session.insert( tick2 );

... Thread.sleep( 1000L ); ...

session.insert( tick3 );

session.halt();
session.dispose();
Generally, it is not recommended mixing fireAllRules() and fireUntilHalt(), especially from different threads. However the engine is able to handle such situations safely, thanks to the internal state machine. If fireAllRules() is running and a call fireUntilHalt() is made, the engine will wait until the fireAllRules() is finished and then start fireUntilHalt(). However if fireUntilHalt() is running and fireAllRules() is called, the later is ignored and will just return directly. For more details about thread-safety and the internal state machine, reference section "Improved multi-threading behaviour".
|
7.5.2.1. Performing KieSession operations atomically when in Active Mode
When in Active Mode, the Drools engine is in control of when the rule shall be evaluated and fired; therefore it is important that operations on the KieSession are performed in a thread-safe manner. Additionally, from a client-side perspective, there might be the need for more than one operations to be called on the KieSession in between rule evaluations, but for engine to consider these as an atomic operation: for example, inserting more than one Fact at a given time, but for the engine to await until all the inserts are done, before evaluating the rules again.
Drools offers a submit() method to group and perform operations on the KieSession as a thread-safe atomic action, while in Active Mode.
An example outline of Drools code to perform KieSession operations atomically when in Active Mode:
KieSession session = ...;

new Thread( new Runnable() {
  @Override
  public void run() {
      session.fireUntilHalt();
  }
} ).start();

final FactHandle fh = session.insert( fact_a );

... Thread.sleep( 1000L ); ...

session.submit( new KieSession.AtomicAction() {
  @Override
  public void execute( KieSession kieSession ) {
    fact_a.setField("value");
    kieSession.update( fh, fact_a );
    kieSession.insert( fact_1 );
    kieSession.insert( fact_2 );
    kieSession.insert( fact_3 );
  }
} );

... Thread.sleep( 1000L ); ...

session.insert( fact_z );

session.halt();
session.dispose();
As a reminder example, the fact handle could also be retrieved from the KieSession:
...
session.insert( fact_a );

... Thread.sleep( 1000L ); ...

session.submit( new KieSession.AtomicAction() {
  @Override
  public void execute( KieSession kieSession ) {
    final FactHandle fh = kieSession.getFactHandle( fact_a );
    fact_a.setField("value");
    kieSession.update( fh, fact_a );
    kieSession.insert( fact_1 );
    kieSession.insert( fact_2 );
    kieSession.insert( fact_3 );
  }
} );

...
7.6. Propagation modes
The introduction of PHREAK as default algorithm for the Drools engine made the rules' evaluation lazy. This new Drools lazy behavior allowed a relevant performance boost but, in some very specific cases, breaks the semantic of a few Drools features.
More precisely in some circumstances it is necessary to propagate the insertion of new fact into th session immediately. For instance Drools allows a query to be executed in pull only (or passive) mode by prepending a '?' symbol to its invocation as in the following example:
query Q (Integer i)
    String( this == i.toString() )
end
rule R when
    $i : Integer()
    ?Q( $i; )
then
    System.out.println( $i );
end
In this case, since the query is passive, it shouldn’t react to the insertion of a String matching the join condition in the query itself. In other words this sequence of commands
KieSession ksession = ...
ksession.insert(1);
ksession.insert("1");
ksession.fireAllRules();
shouldn’t cause the rule R to fire because the String satisfying the query condition has been inserted after the Integer and the passive query shouldn’t react to this insertion. Conversely the rule should fire if the insertion sequence is inverted because the insertion of the Integer, when the passive query can be satisfied by the presence of an already existing String, will trigger it.
Unfortunately the lazy nature of PHREAK doesn’t allow the engine to make any distinction regarding the insertion sequence of the two facts, so the rule will fire in both cases. In circumstances like this it is necessary to evaluate the rule eagerly as done by the old RETEOO-based engine.
In other cases it is required that the propagation is eager, meaning that it is not immedate, but anyway has to happen before the engine/agenda starts scheduled evaluations. For instance this is necessary when a rule has the no-loop or the lock-on-active attribute and in fact when this happens this propagation mode is automatically enforced by the engine.
To cover these use cases, and in all other situations where an immediate or eager rule evaluation is required, it is possible to declaratively specify so by annotating the rule itself with @Propagation(Propagation.Type), where Propagation.Type is an enumeration with 3 possible values:
-
IMMEDIATE means that the propagation is performed immediately.
-
EAGER means that the propagation is performed lazily but eagerly evaluated before scheduled evaluations.
-
LAZY means that the propagation is totally lazy and this is default PHREAK behaviour
This means that the following drl:
query Q (Integer i)
    String( this == i.toString() )
end
rule R @Propagation(IMMEDIATE) when
    $i : Integer()
    ?Q( $i; )
then
    System.out.println( $i );
end
will make the rule R to fire if and only if the Integer is inserted after the String, thus behaving in accordance with the semantic of the passive query.
7.7. Commands and the CommandExecutor
The CommandFactory allows for commands to be executed on those sessions, the only difference being that the Stateless Knowledge Session executes fireAllRules() at the end before disposing the session.
The currently supported commands are:
-
FireAllRules
-
GetGlobal
-
SetGlobal
-
InsertObject
-
InsertElements
-
Query
-
StartProcess
-
BatchExecution
`
InsertObject` will insert a single object, with an optional "out" identifier. InsertElements will iterate an Iterable, inserting each of the elements.
What this means is that a Stateless Knowledge Session is no longer limited to just inserting objects, it can now start processes or execute queries, and do this in any order.
StatelessKieSession ksession = kbase.newStatelessKieSession();
ExecutionResults bresults =
  ksession.execute( CommandFactory.newInsert( new Cheese( "stilton" ), "stilton_id" ) );
Stilton stilton = bresults.getValue( "stilton_id" );
The execute method always returns an ExecutionResults instance, which allows access to any command results if they specify an out identifier such as the "stilton_id" above.
StatelessKieSession ksession = kbase.newStatelessKieSession();
Command cmd = CommandFactory.newInsertElements( Arrays.asList( Object[] {
                  new Cheese( "stilton" ),
                  new Cheese( "brie" ),
                  new Cheese( "cheddar" ),
              });
ExecutionResults bresults = ksession.execute( cmd );
The execute method only allows for a single command.
That’s where BatchExecution comes in, which represents a composite command, created from a list of commands.
Now, execute will iterate over the list and execute each command in turn.
This means you can insert some objects, start a process, call fireAllRules and execute a query, all in a single execute(…) call, which is quite powerful.
As mentioned previosly, the StatelessKieSession will execute fireAllRules() automatically at the end.
However the keen-eyed reader probably has already noticed the FireAllRules command and wondered how that works with a StatelessKieSession.
The FireAllRules command is allowed, and using it will disable the automatic execution at the end; think of using it as a sort of manual override function.
A custom XStream marshaller can be used with the Drools Pipeline to achieve XML scripting, which is perfect for services.
Here are two simple XML samples, one for the BatchExecution and one for the ExecutionResults.
<batch-execution>
   <insert out-identifier='outStilton'>
      <org.drools.compiler.Cheese>
         <type>stilton</type>
         <price>25</price>
         <oldPrice>0</oldPrice>
      </org.drools.compiler.Cheese>
   </insert>
</batch-execution><execution-results>
<result identifier='outStilton'>
<org.drools.compiler.Cheese>
<type>stilton</type>
<oldPrice>25</oldPrice>
<price>30</price>
</org.drools.compiler.Cheese>
</result>
</execution-results>Spring and Camel, covered in the integrations book, facilitate declarative services.
<batch-execution>
  <insert out-identifier="stilton">
    <org.drools.compiler.Cheese>
      <type>stilton</type>
      <price>1</price>
      <oldPrice>0</oldPrice>
    </org.drools.compiler.Cheese>
  </insert>
  <query out-identifier='cheeses2' name='cheesesWithParams'>
    <string>stilton</string>
    <string>cheddar</string>
  </query>
</batch-execution>
The CommandExecutor returns an ExecutionResults, and this is handled by the pipeline code snippet as well.
A similar output for the <batch-execution> XML sample above would be:
<execution-results>
  <result identifier="stilton">
    <org.drools.compiler.Cheese>
      <type>stilton</type>
      <price>2</price>
    </org.drools.compiler.Cheese>
  </result>
  <result identifier='cheeses2'>
    <query-results>
      <identifiers>
        <identifier>cheese</identifier>
      </identifiers>
      <row>
        <org.drools.compiler.Cheese>
          <type>cheddar</type>
          <price>2</price>
          <oldPrice>0</oldPrice>
        </org.drools.compiler.Cheese>
      </row>
      <row>
        <org.drools.compiler.Cheese>
          <type>cheddar</type>
          <price>1</price>
          <oldPrice>0</oldPrice>
        </org.drools.compiler.Cheese>
      </row>
    </query-results>
  </result>
</execution-results>
The BatchExecutionHelper provides a configured XStream instance to support the marshalling of Batch Executions, where the resulting XML can be used as a message format, as shown above.
Configured converters only exist for the commands supported via the Command Factory.
The user may add other converters for their user objects.
This is very useful for scripting stateless or stateful knowledge sessions, especially when services are involved.
There is currently no XML schema to support schema validation.
The basic format is outlined here, and the drools-pipeline module has an illustrative unit test in the XStreamBatchExecutionTest unit test.
The root element is <batch-execution> and it can contain zero or more commands elements.
<batch-execution>
...
</batch-execution>
This contains a list of elements that represent commands, the supported commands is limited to those Commands provided by the Command Factory. The most basic of these is the <insert> element, which inserts objects. The contents of the insert element is the user object, as dictated by XStream.
<batch-execution>
   <insert>
      ...<!-- any user object -->
   </insert>
</batch-execution>
The insert element features an "out-identifier" attribute, demanding that the inserted object will also be returned as part of the result payload.
<batch-execution>
   <insert out-identifier='userVar'>
      ...
   </insert>
</batch-execution>
It’s also possible to insert a collection of objects using the <insert-elements> element.
This command does not support an out-identifier.
The org.domain.UserClass is just an illustrative user object that XStream would serialize.
<batch-execution>
   <insert-elements>
      <org.domain.UserClass>
         ...
      </org.domain.UserClass>
      <org.domain.UserClass>
         ...
      </org.domain.UserClass>
      <org.domain.UserClass>
         ...
      </org.domain.UserClass>
   </insert-elements>
</batch-execution>
While the out attribute is useful in returning specific instances as a result payload, we often wish to run actual queries.
Both parameter and parameterless queries are supported.
The name attribute is the name of the query to be called, and the out-identifier is the identifier to be used for the query results in the <execution-results> payload.
<batch-execution>
   <query out-identifier='cheeses' name='cheeses'/>
   <query out-identifier='cheeses2' name='cheesesWithParams'>
      <string>stilton</string>
      <string>cheddar</string>
   </query>
</batch-execution>
8. Rule Language Reference
8.1. Overview
Drools has a "native" rule language. This format is very light in terms of punctuation, and supports natural and domain specific languages via "expanders" that allow the language to morph to your problem domain. This chapter is mostly concerted with this native rule format. The diagrams used to present the syntax are known as "railroad" diagrams, and they are basically flow charts for the language terms. The technically very keen may also refer to DRL.g which is the Antlr3 grammar for the rule language. If you use the Rule Workbench, a lot of the rule structure is done for you with content assistance, for example, type "ru" and press ctrl+space, and it will build the rule structure for you.
8.1.1. A rule file
A rule file is typically a file with a .drl extension. In a DRL file you can have multiple rules, queries and functions, as well as some resource declarations like imports, globals and attributes that are assigned and used by your rules and queries. However, you are also able to spread your rules across multiple rule files (in that case, the extension .rule is suggested, but not required) - spreading rules across files can help with managing large numbers of rules. A DRL file is simply a text file.
The overall structure of a rule file is:
package package-name

imports

globals

functions

queries

rules
The order in which the elements are declared is not important, except for the package name that, if declared, must be the first element in the rules file. All elements are optional, so you will use only those you need. We will discuss each of them in the following sections.
8.1.2. What makes a rule
For the impatient, just as an early view, a rule has the following rough structure:
rule "name"
    attributes
    when
        LHS
    then
        RHS
end
It’s really that simple. Mostly punctuation is not needed, even the double quotes for "name" are optional, as are newlines. Attributes are simple (always optional) hints to how the rule should behave. LHS is the conditional parts of the rule, which follows a certain syntax which is covered below. RHS is basically a block that allows dialect specific semantic code to be executed.
It is important to note that white space is not important, except in the case of domain specific languages, where lines are processed one by one and spaces may be significant to the domain language.
8.2. Keywords
Drools 5 introduces the concept of hard and soft keywords.
Hard keywords are reserved, you cannot use any hard keyword when naming your domain objects, properties, methods, functions and other elements that are used in the rule text.
Here is the list of hard keywords that must be avoided as identifiers when writing rules:
-
true -
false -
null
Soft keywords are just recognized in their context, enabling you to use these words in any other place if you wish, although, it is still recommended to avoid them, to avoid confusions, if possible. Here is a list of the soft keywords:
-
lock-on-active -
date-effective -
date-expires -
no-loop -
auto-focus -
activation-group -
agenda-group -
ruleflow-group -
entry-point -
duration -
package -
import -
dialect -
salience -
enabled -
attributes -
rule -
extend -
when
-
then
-
template -
query -
declare -
function -
global -
eval -
not -
in -
or -
and -
exists -
forall -
accumulate
-
collect
-
from
-
action -
reverse -
result -
end -
over
-
init
Of course, you can have these (hard and soft) words as part of a method name in camel case, like notSomething() or accumulateSomething() - there are no issues with that scenario.
Although the 3 hard keywords above are unlikely to be used in your existing domain models, if you absolutely need to use them as identifiers instead of keywords, the DRL language provides the ability to escape hard keywords on rule text. To escape a word, simply enclose it in grave accents, like this:
Holiday( `true` == "yes" ) // please note that Drools will resolve that reference to the method Holiday.isTrue()8.3. Comments
Comments are sections of text that are ignored by the rule engine. They are stripped out when they are encountered, except inside semantic code blocks, like the RHS of a rule.
8.3.1. Single line comment
To create single line comments, you can use '//'. The parser will ignore anything in the line after the comment symbol. Example:
rule "Testing Comments"
when
    // this is a single line comment
    eval( true ) // this is a comment in the same line of a pattern
then
    // this is a comment inside a semantic code block
end|
'#' for comments has been removed. |
8.3.2. Multi-line comment

Multi-line comments are used to comment blocks of text, both in and outside semantic code blocks. Example:
rule "Test Multi-line Comments"
when
    /* this is a multi-line comment
       in the left hand side of a rule */
    eval( true )
then
    /* and this is a multi-line comment
       in the right hand side of a rule */
end
8.4. Error Messages
Drools 5 introduces standardized error messages. This standardization aims to help users to find and resolve problems in a easier and faster way. In this section you will learn how to identify and interpret those error messages, and you will also receive some tips on how to solve the problems associated with them.
8.4.1. Message format
The standardization includes the error message format and to better explain this format, let’s use the following example:

1st Block: This area identifies the error code.
2nd Block: Line and column information.
3rd Block: Some text describing the problem.
4th Block: This is the first context. Usually indicates the rule, function, template or query where the error occurred. This block is not mandatory.
5th Block: Identifies the pattern where the error occurred. This block is not mandatory.
8.4.2. Error Messages Description
8.4.2.1. 101: No viable alternative
Indicates the most common errors, where the parser came to a decision point but couldn’t identify an alternative. Here are some examples:
1: rule one
2:   when
3:     exists Foo()
4:     exits Bar()  // "exits"
5:   then
6: end
The above example generates this message:
-
[ERR 101] Line 4:4 no viable alternative at input 'exits' in rule one
At first glance this seems to be valid syntax, but it is not (exits != exists). Let’s take a look at next example:
1: package org.drools.examples;
2: rule
3:   when
4:     Object()
5:   then
6:     System.out.println("A RHS");
7: end
Now the above code generates this message:
-
[ERR 101] Line 3:2 no viable alternative at input 'WHEN'
This message means that the parser encountered the token WHEN, actually a hard keyword, but it’s in the wrong place since the the rule name is missing.
The error "no viable alternative" also occurs when you make a simple lexical mistake. Here is a sample of a lexical problem:
1: rule simple_rule
2:   when
3:     Student( name == "Andy )
4:   then
5: end
The above code misses to close the quotes and because of this the parser generates this error message:
-
[ERR 101] Line 0:-1 no viable alternative at input '<eof>' in rule simple_rule in pattern Student
|
Usually the Line and Column information are accurate, but in some cases (like unclosed quotes), the parser generates a 0:-1 position. In this case you should check whether you didn’t forget to close quotes, apostrophes or parentheses. |
8.4.2.2. 102: Mismatched input
This error indicates that the parser was looking for a particular symbol that it didn’t find at the current input position. Here are some samples:
1: rule simple_rule
2:   when
3:     foo3 : Bar(
The above example generates this message:
-
[ERR 102] Line 0:-1 mismatched input '<eof>' expecting ')' in rule simple_rule in pattern Bar
To fix this problem, it is necessary to complete the rule statement.
|
Usually when you get a 0:-1 position, it means that parser reached the end of source. |
The following code generates more than one error message:
1: package org.drools.examples;
2:
3: rule "Avoid NPE on wrong syntax"
4:   when
5:     not( Cheese( ( type == "stilton", price == 10 ) || ( type == "brie", price == 15 ) ) from $cheeseList )
6:   then
7:     System.out.println("OK");
8: end
These are the errors associated with this source:
-
[ERR 102] Line 5:36 mismatched input ',' expecting ')' in rule "Avoid NPE on wrong syntax" in pattern Cheese
-
[ERR 101] Line 5:57 no viable alternative at input 'type' in rule "Avoid NPE on wrong syntax"
-
[ERR 102] Line 5:106 mismatched input ')' expecting 'then' in rule "Avoid NPE on wrong syntax"
Note that the second problem is related to the first. To fix it, just replace the commas (',') by AND operator ('&&').
|
In some situations you can get more than one error message. Try to fix one by one, starting at the first one. Some error messages are generated merely as consequences of other errors. |
8.4.2.3. 103: Failed predicate
A validating semantic predicate evaluated to false. Usually these semantic predicates are used to identify soft keywords. This sample shows exactly this situation:
 1: package nesting;
 2: dialect "mvel"
 3:
 4: import org.drools.compiler.Person
 5: import org.drools.compiler.Address
 6:
 7: fdsfdsfds
 8:
 9: rule "test something"
10:   when
11:     p: Person( name=="Michael" )
12:   then
13:     p.name = "other";
14:     System.out.println(p.name);
15: end
With this sample, we get this error message:
-
[ERR 103] Line 7:0 rule 'rule_key' failed predicate: {(validateIdentifierKey(DroolsSoftKeywords.RULE))}? in rule
The fdsfdsfds text is invalid and the parser couldn’t identify it as the soft keyword rule.
|
This error is very similar to 102: Mismatched input, but usually involves soft keywords. |
8.4.2.4. 104: Trailing semi-colon not allowed
This error is associated with the eval clause, where its expression may not be terminated with a semicolon.
Check this example:
1: rule simple_rule
2:   when
3:     eval(abc();)
4:   then
5: end
Due to the trailing semicolon within eval, we get this error message:
-
[ERR 104] Line 3:4 trailing semi-colon not allowed in rule simple_rule
This problem is simple to fix: just remove the semi-colon.
8.4.2.5. 105: Early Exit
The recognizer came to a subrule in the grammar that must match an alternative at least once, but the subrule did not match anything. Simply put: the parser has entered a branch from where there is no way out. This example illustrates it:
1: template test_error
2:   aa s  11;
3: end
This is the message associated to the above sample:
-
[ERR 105] Line 2:2 required (…)+ loop did not match anything at input 'aa' in template test_error
To fix this problem it is necessary to remove the numeric value as it is neither a valid data type which might begin a new template slot nor a possible start for any other rule file construct.
8.4.3. Other Messages
Any other message means that something bad has happened, so please contact the development team.
8.5. Package
A package is a collection of rules and other related constructs, such as imports and globals. The package members are typically related to each other - perhaps HR rules, for instance. A package represents a namespace, which ideally is kept unique for a given grouping of rules. The package name itself is the namespace, and is not related to files or folders in any way.
It is possible to assemble rules from multiple rule sources, and have one top level package configuration that all the rules are kept under (when the rules are assembled). Although, it is not possible to merge into the same package resources declared under different names. A single Rulebase may, however, contain multiple packages built on it. A common structure is to have all the rules for a package in the same file as the package declaration (so that is it entirely self-contained).
The following railroad diagram shows all the components that may make up a package.
Note that a package must have a namespace and be declared using standard Java conventions for package names; i.e., no spaces, unlike rule names which allow spaces.
In terms of the order of elements, they can appear in any order in the rule file, with the exception of the package statement, which must be at the top of the file.
In all cases, the semicolons are optional.
Notice that any rule attribute (as described the section Rule Attributes) may also be written at package level, superseding the attribute’s default value. The modified default may still be replaced by an attribute setting within a rule.
8.5.1. import

Import statements work like import statements in Java.
You need to specify the fully qualified paths and type names for any objects you want to use in the rules.
Drools automatically imports classes from the Java package of the same name, and also from the package java.lang.
8.5.2. global

With global you define global variables.
They are used to make application objects available to the rules.
Typically, they are used to provide data or services that the rules use, especially application services used in rule consequences, and to return data from the rules, like logs or values added in rule consequences, or for the rules to interact with the application, doing callbacks.
Globals are not inserted into the Working Memory, and therefore a global should never be used to establish conditions in rules except when it has a constant immutable value.
The engine cannot be notified about value changes of globals and does not track their changes.
Incorrect use of globals in constraints may yield surprising results - surprising in a bad way.
If multiple packages declare globals with the same identifier they must be of the same type and all of them will reference the same global value.
In order to use globals you must:
-
Declare your global variable in your rules file and use it in rules. For example:
global java.util.List myGlobalList; rule "Using a global" when eval( true ) then myGlobalList.add( "Hello World" ); end -
Set the global value on your working memory. It is a best practice to set all global values before asserting any fact to the working memory. Example:
List list = new ArrayList();
KieSession kieSession = kiebase.newKieSession();
kieSession.setGlobal( "myGlobalList", list );
Note that these are just named instances of objects that you pass in from your application to the working memory.
This means you can pass in any object you want: you could pass in a service locator, or perhaps a service itself.
With the new from element it is now common to pass a Hibernate session as a global, to allow from to pull data from a named Hibernate query.
One example may be an instance of a Email service. In your integration code that is calling the rule engine, you obtain your emailService object, and then set it in the working memory. In the DRL, you declare that you have a global of type EmailService, and give it the name "email". Then in your rule consequences, you can use things like email.sendSMS(number, message).
Globals are not designed to share data between rules and they should never be used for that purpose. Rules always reason and react to the working memory state, so if you want to pass data from rule to rule, assert the data as facts into the working memory.
Care must be taken when changing data held by globals because the rule engine is not aware of those changes, hence cannot react to them.
8.6. Function
Functions are a way to put semantic code in your rule source file, as opposed to in normal Java classes.
They can’t do anything more than what you can do with helper classes.
(In fact, the compiler generates the helper class for you behind the scenes.) The main advantage of using functions in a rule is that you can keep the logic all in one place, and you can change the functions as needed (which can be a good or a bad thing). Functions are most useful for invoking actions on the consequence (then) part of a rule, especially if that particular action is used over and over again, perhaps with only differing parameters for each rule.
A typical function declaration looks like:
function String hello(String name) {
    return "Hello "+name+"!";
}
Note that the function keyword is used, even though its not really part of Java.
Parameters to the function are defined as for a method, and you don’t have to have parameters if they are not needed.
The return type is defined just like in a regular method.
Alternatively, you could use a static method in a helper class, e.g., Foo.hello().
Drools supports the use of function imports, so all you would need to do is:
import function my.package.Foo.helloIrrespective of the way the function is defined or imported, you use a function by calling it by its name, in the consequence or inside a semantic code block. Example:
rule "using a static function"
when
    eval( true )
then
    System.out.println( hello( "Bob" ) );
end
8.7. Type Declaration

Type declarations have two main goals in the rules engine: to allow the declaration of new types, and to allow the declaration of metadata for types.
-
Declaring new types: Drools works out of the box with plain Java objects as facts. Sometimes, however, users may want to define the model directly to the rules engine, without worrying about creating models in a lower level language like Java. At other times, there is a domain model already built, but eventually the user wants or needs to complement this model with additional entities that are used mainly during the reasoning process.
-
Declaring metadata: facts may have meta information associated to them. Examples of meta information include any kind of data that is not represented by the fact attributes and is consistent among all instances of that fact type. This meta information may be queried at runtime by the engine and used in the reasoning process.
8.7.1. Declaring New Types
To declare a new type, all you need to do is use the keyword declare, followed by the list of fields, and the keyword end.
A new fact must have a list of fields, otherwise the engine will look for an existing fact class in the classpath and raise an error if not found.
declare Address
   number : int
   streetName : String
   city : String
end
The previous example declares a new fact type called Address.
This fact type will have three attributes: number, streetName and city.
Each attribute has a type that can be any valid Java type, including any other class created by the user or even other fact types previously declared.
For instance, we may want to declare another fact type Person:
declare Person
    name : String
    dateOfBirth : java.util.Date
    address : Address
end
As we can see on the previous example, dateOfBirth is of type java.util.Date, from the Java API, while address is of the previously defined fact type Address.
You may avoid having to write the fully qualified name of a class every time you write it by using the import clause, as previously discussed.
import java.util.Date

declare Person
    name : String
    dateOfBirth : Date
    address : Address
end
When you declare a new fact type, Drools will, at compile time, generate bytecode that implements a Java class representing the fact type. The generated Java class will be a one-to-one Java Bean mapping of the type definition. So, for the previous example, the generated Java class would be:
public class Person implements Serializable {
    private String name;
    private java.util.Date dateOfBirth;
    private Address address;

    // empty constructor
    public Person() {...}

    // constructor with all fields
    public Person( String name, Date dateOfBirth, Address address ) {...}

    // if keys are defined, constructor with keys
    public Person( ...keys... ) {...}

    // getters and setters
    // equals/hashCode
    // toString
}
Since the generated class is a simple Java class, it can be used transparently in the rules, like any other fact.
rule "Using a declared Type"
when<
$p : Person( name == "Bob" )
then
// Insert Mark, who is Bob's mate.
Person mark = new Person();
mark.setName("Mark");
insert( mark );
end8.7.1.1. Declaring enumerative types
DRL also supports the declaration of enumerative types. Such type declarations require the additional keyword enum, followed by a comma separated list of admissible values terminated by a semicolon.
rule "Using a declared Type"
when
$p : Person( name == "Bob" )
then
// Insert Mark, who is Bob's mate.
Person mark = new Person();
mark.setName("Mark");
insert( mark );
endThe compiler will generate a valid Java enum, with static methods valueOf() and values(), as well as instance methods ordinal(), compareTo() and name().
Complex enums are also partially supported, declaring the internal fields similarly to a regular type declaration. Notice that as of version 6.x, enum fields do NOT support other declared types or enums
declare enum DaysOfWeek
SUN("Sunday"),MON("Monday"),TUE("Tuesday"),WED("Wednesday"),THU("Thursday"),FRI("Friday"),SAT("Saturday");
fullName : String
endEnumeratives can then be used in rules
rule "Using a declared Enum"
when
$p : Employee( dayOff == DaysOfWeek.MONDAY )
then
...
end8.7.2. Declaring Metadata
Metadata may be assigned to several different constructions in Drools: fact types, fact attributes and rules. Drools uses the at sign ('@') to introduce metadata, and it always uses the form:
@metadata_key( metadata_value )The parenthesized metadata_value is optional.
For instance, if you want to declare a metadata attribute like author, whose value is Bob, you could simply write:
@author( Bob )Drools allows the declaration of any arbitrary metadata attribute, but some will have special meaning to the engine, while others are simply available for querying at runtime. Drools allows the declaration of metadata both for fact types and for fact attributes. Any metadata that is declared before the attributes of a fact type are assigned to the fact type, while metadata declared after an attribute are assigned to that particular attribute.
import java.util.Date
declare Person
@author( Bob )
@dateOfCreation( 01-Feb-2009 )
name : String @key @maxLength( 30 )
dateOfBirth : Date
address : Address
endIn the previous example, there are two metadata items declared for the fact type (@author and @dateOfCreation) and two more defined for the name attribute (@key and @maxLength). Please note that the @key metadata has no required value, and so the parentheses and the value were omitted.:
8.7.2.1. Predefined class level annotations
Some annotations have predefined semantics that are interpreted by the engine. The following is a list of some of these predefined annotations and their meaning.
@role( <fact | event> )
The @role annotation defines how the engine should handle instances of that type: either as regular facts or as events. It accepts two possible values:
-
fact : this is the default, declares that the type is to be handled as a regular fact.
-
event : declares that the type is to be handled as an event.
The following example declares that the fact type StockTick in a stock broker application is to be handled as an event.
import some.package.StockTick
declare StockTick
@role( event )
endThe same applies to facts declared inline. If StockTick was a fact type declared in the DRL itself, instead of a previously existing class, the code would be:
declare StockTick
@role( event )
datetime : java.util.Date
symbol : String
price : double
end@typesafe( <boolean> )
By default all type declarations are compiled with type safety enabled; @typesafe( false ) provides a means to override this behaviour by permitting a fall-back, to type unsafe evaluation where all constraints are generated as MVEL constraints and executed dynamically. This can be important when dealing with collections that do not have any generics or mixed type collections.
@timestamp( <attribute name> )
Every event has an associated timestamp assigned to it. By default, the timestamp for a given event is read from the Session Clock and assigned to the event at the time the event is inserted into the working memory. Although, sometimes, the event has the timestamp as one of its own attributes. In this case, the user may tell the engine to use the timestamp from the event’s attribute instead of reading it from the Session Clock.
@timestamp( <attributeName> )To tell the engine what attribute to use as the source of the event’s timestamp, just list the attribute name as a parameter to the @timestamp tag.
declare VoiceCall
@role( event )
@timestamp( callDateTime )
end@duration( <attribute name> )
Drools supports both event semantics: point-in-time events and interval-based events. A point-in-time event is represented as an interval-based event whose duration is zero. By default, all events have duration zero. The user may attribute a different duration for an event by declaring which attribute in the event type contains the duration of the event.
@duration( <attributeName> )So, for our VoiceCall fact type, the declaration would be:
declare VoiceCall
@role( event )
@timestamp( callDateTime )
@duration( callDuration )
end@expires( <time interval> )
|
This tag is only considered when running the engine in STREAM mode. Also, additional discussion on the effects of using this tag is made on the Memory Management section. It is included here for completeness. |
Events may be automatically expired after some time in the working memory. Typically this happens when, based on the existing rules in the knowledge base, the event can no longer match and activate any rules. Although, it is possible to explicitly define when an event should expire.
@expires( <timeOffset> )The value of timeOffset is a temporal interval in the form:
[#d][#h][#m][#s][#[ms]]Where [ ] means an optional parameter and \# means a numeric value.
So, to declare that the VoiceCall facts should be expired after 1 hour and 35 minutes after they are inserted into the working memory, the user would write:
declare VoiceCall
@role( event )
@timestamp( callDateTime )
@duration( callDuration )
@expires( 1h35m )
endThe @expires policy will take precedence and override the implicit expiration offset calculated from temporal constraints and sliding windows in the knowledge base.
@propertyChangeSupport
Facts that implement support for property changes as defined in the Javabean(tm) spec, now can be annotated so that the engine register itself to listen for changes on fact properties. The boolean parameter that was used in the insert() method in the Drools 4 API is deprecated and does not exist in the drools-api module.
declare Person
@propertyChangeSupport
end@propertyReactive
Make this type property reactive. See Fine grained property change listeners section for details.
8.7.2.2. Predefined attribute level annotations
As noted before, Drools also supports annotations in type attributes. Here is a list of predefined attribute annotations.
@key
Declaring an attribute as a key attribute has 2 major effects on generated types:
-
The attribute will be used as a key identifier for the type, and as so, the generated class will implement the equals() and hashCode() methods taking the attribute into account when comparing instances of this type.
-
Drools will generate a constructor using all the key attributes as parameters.
For instance:
declare Person
firstName : String @key
lastName : String @key
age : int
endFor the previous example, Drools will generate equals() and hashCode() methods that will check the firstName and lastName attributes to determine if two instances of Person are equal to each other, but will not check the age attribute. It will also generate a constructor taking firstName and lastName as parameters, allowing one to create instances with a code like this:
Person person = new Person( "John", "Doe" );@position
Patterns support positional arguments on type declarations.
Positional arguments are ones where you don’t need to specify the field name, as the position maps to a known named field. i.e. Person( name == "mark" ) can be rewritten as Person( "mark"; ). The semicolon ';' is important so that the engine knows that everything before it is a positional argument. Otherwise we might assume it was a boolean expression, which is how it could be interpreted after the semicolon. You can mix positional and named arguments on a pattern by using the semicolon ';' to separate them. Any variables used in a positional that have not yet been bound will be bound to the field that maps to that position.
declare Cheese
name : String
shop : String
price : int
endThe default order is the declared order, but this can be overridden using @position
declare Cheese
name : String @position(1)
shop : String @position(2)
price : int @position(0)
endThe @Position annotation, in the org.drools.definition.type package, can be used to annotate original pojos on the classpath. Currently only fields on classes can be annotated. Inheritance of classes is supported, but not interfaces of methods yet.
Example patterns, with two constraints and a binding. Remember semicolon ';' is used to differentiate the positional section from the named argument section. Variables and literals and expressions using just literals are supported in positional arguments, but not variables.
Cheese( "stilton", "Cheese Shop", p; )
Cheese( "stilton", "Cheese Shop"; p : price )
Cheese( "stilton"; shop == "Cheese Shop", p : price )
Cheese( name == "stilton"; shop == "Cheese Shop", p : price )@Position is inherited when beans extend each other; while not recommended, two fields may have the same @position value, and not all consecutive values need be declared. If a @position is repeated, the conflict is solved using inheritance (fields in the superclass have the precedence) and the declaration order. If a @position value is missing, the first field without an explicit @position (if any) is selected to fill the gap. As always, conflicts are resolved by inheritance and declaration order.
declare Cheese
name : String
shop : String @position(2)
price : int @position(0)
end
declare SeasonedCheese extends Cheese
year : Date @position(0)
origin : String @position(6)
country : String
endIn the example, the field order would be : price (@position 0 in the superclass), year (@position 0 in the subclass), name (first field with no @position), shop (@position 2), country (second field without @position), origin.
8.7.3. Declaring Metadata for Existing Types
Drools allows the declaration of metadata attributes for existing types in the same way as when declaring metadata attributes for new fact types. The only difference is that there are no fields in that declaration.
For instance, if there is a class org.drools.examples.Person, and one wants to declare metadata for it, it’s possible to write the following code:
import org.drools.examples.Person
declare Person
@author( Bob )
@dateOfCreation( 01-Feb-2009 )
endInstead of using the import, it is also possible to reference the class by its fully qualified name, but since the class will also be referenced in the rules, it is usually shorter to add the import and use the short class name everywhere.
declare org.drools.examples.Person
@author( Bob )
@dateOfCreation( 01-Feb-2009 )
end8.7.4. Parametrized constructors for declared types
Generate constructors with parameters for declared types.
Example: for a declared type like the following:
declare Person
firstName : String @key
lastName : String @key
age : int
endThe compiler will implicitly generate 3 constructors: one without parameters, one with the @key fields, and one with all fields.
Person() // parameterless constructor
Person( String firstName, String lastName )
Person( String firstName, String lastName, int age )8.7.5. Non Typesafe Classes
@typesafe( <boolean>) has been added to type declarations. By default all type declarations are compiled with type safety enabled; @typesafe( false ) provides a means to override this behaviour by permitting a fall-back, to type unsafe evaluation where all constraints are generated as MVEL constraints and executed dynamically. This can be important when dealing with collections that do not have any generics or mixed type collections.
8.7.6. Accessing Declared Types from the Application Code
Declared types are usually used inside rules files, while Java models are used when sharing the model between rules and applications. Although, sometimes, the application may need to access and handle facts from the declared types, especially when the application is wrapping the rules engine and providing higher level, domain specific user interfaces for rules management.
In such cases, the generated classes can be handled as usual with the Java Reflection API, but, as we know, that usually requires a lot of work for small results. Therefore, Drools provides a simplified API for the most common fact handling the application may want to do.
The first important thing to realize is that a declared fact will belong to the package where it was declared.
So, for instance, in the example below, Person will belong to the org.drools.examples package, and so the fully qualified name of the generated class will be org.drools.examples.Person.
package org.drools.examples
import java.util.Date
declare Person
name : String
dateOfBirth : Date
address : Address
endDeclared types, as discussed previously, are generated at knowledge base compilation time, i.e., the application will only have access to them at application run time. Therefore, these classes are not available for direct reference from the application.
Drools then provides an interface through which users can handle declared types from the application code: org.drools.definition.type.FactType.
Through this interface, the user can instantiate, read and write fields in the declared fact types.
// get a reference to a knowledge base with a declared type:
KieBase kbase = ...
// get the declared FactType
FactType personType = kbase.getFactType( "org.drools.examples",
"Person" );
// handle the type as necessary:
// create instances:
Object bob = personType.newInstance();
// set attributes values
personType.set( bob,
"name",
"Bob" );
personType.set( bob,
"age",
42 );
// insert fact into a session
KieSession ksession = ...
ksession.insert( bob );
ksession.fireAllRules();
// read attributes
String name = personType.get( bob, "name" );
int age = personType.get( bob, "age" );The API also includes other helpful methods, like setting all the attributes at once, reading values from a Map, or reading all attributes at once, into a Map.
Although the API is similar to Java reflection (yet much simpler to use), it does not use reflection underneath, relying on much more performant accessors implemented with generated bytecode.
8.7.7. Type Declaration 'extends'
Type declarations now support 'extends' keyword for inheritance
In order to extend a type declared in Java by a DRL declared subtype, repeat the supertype in a declare statement without any fields.
import org.people.Person
declare Person end
declare Student extends Person
school : String
end
declare LongTermStudent extends Student
years : int
course : String
end8.8. Rule
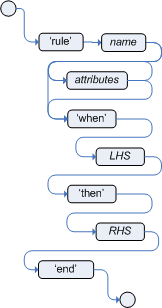
A rule specifies that when a particular set of conditions occur, specified in the Left Hand Side (LHS), then do what queryis specified as a list of actions in the Right Hand Side (RHS). A common question from users is "Why use when instead of if?" "When" was chosen over "if" because "if" is normally part of a procedural execution flow, where, at a specific point in time, a condition is to be checked.
In contrast, "when" indicates that the condition evaluation is not tied to a specific evaluation sequence or point in time, but that it happens continually, at any time during the life time of the engine; whenever the condition is met, the actions are executed.
A rule must have a name, unique within its rule package. If you define a rule twice in the same DRL it produces an error while loading. If you add a DRL that includes a rule name already in the package, it replaces the previous rule. If a rule name is to have spaces, then it will need to be enclosed in double quotes (it is best to always use double quotes).
Attributes - described below - are optional. They are best written one per line.
The LHS of the rule follows the when keyword (ideally on a new line), similarly the RHS follows
the then keyword (again, ideally on a newline). The rule is terminated by the keyword end.
Rules cannot be nested.
rule "<name>"
<attribute>*
when
<conditional element>*
then
<action>*
endrule "Approve if not rejected"
salience -100
agenda-group "approval"
when
not Rejection()
p : Policy(approved == false, policyState:status)
exists Driver(age > 25)
Process(status == policyState)
then
log("APPROVED: due to no objections.");
p.setApproved(true);
end8.8.1. Rule Attributes
Rule attributes provide a declarative way to influence the behavior of the rule. Some are quite simple, while others are part of complex subsystems such as ruleflow. To get the most from Drools you should make sure you have a proper understanding of each attribute.
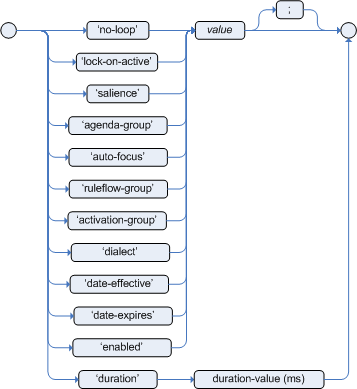
no-loop-
default value:
falsetype: Boolean
When a rule’s consequence modifies a fact it may cause the rule to activate again, causing an infinite loop. Setting no-loop to true will skip the creation of another Activation for the rule with the current set of facts.
ruleflow-group-
default value: N/A
type: String
Ruleflow is a Drools feature that lets you exercise control over the firing of rules. Rules that are assembled by the same ruleflow-group identifier fire only when their group is active.
lock-on-active-
default value:
falsetype: Boolean
Whenever a ruleflow-group becomes active or an agenda-group receives the focus, any rule within that group that has lock-on-active set to true will not be activated any more; irrespective of the origin of the update, the activation of a matching rule is discarded. This is a stronger version of
no-loop, because the change could now be caused not only by the rule itself. It’s ideal for calculation rules where you have a number of rules that modify a fact and you don’t want any rule re-matching and firing again. Only when the ruleflow-group is no longer active or the agenda-group loses the focus those rules with lock-on-active set to true become eligible again for their activations to be placed onto the agenda. salience-
default value:
0type: integer
Each rule has an integer salience attribute which defaults to zero and can be negative or positive. Salience is a form of priority where rules with higher salience values are given higher priority when ordered in the Activation queue.
Drools also supports dynamic salience where you can use an expression involving bound variables.
rule "Fire in rank order 1,2,.."
salience( -$rank )
when
Element( $rank : rank,... )
then
...
endagenda-group-
default value: MAIN
type: String
Agenda groups allow the user to partition the Agenda providing more execution control. Only rules in the agenda group that has acquired the focus are allowed to fire.
auto-focus-
default value:
falsetype: Boolean
When a rule is activated where the
auto-focusvalue is true and the rule’s agenda group does not have focus yet, then it is given focus, allowing the rule to potentially fire. activation-group-
default value: N/A
type: String
Rules that belong to the same activation-group, identified by this attribute’s string value, will only fire exclusively. More precisely, the first rule in an activation-group to fire will cancel all pending activations of all rules in the group, i.e., stop them from firing.
Note: This used to be called Xor group, but technically it’s not quite an Xor. You may still hear people mention Xor group; just swap that term in your mind with activation-group.
dialect-
default value: as specified by the package
type: String
possible values: "java" or "mvel"
The dialect species the language to be used for any code expressions in the LHS or the RHS code block. Currently two dialects are available, Java and MVEL. While the dialect can be specified at the package level, this attribute allows the package definition to be overridden for a rule.
date-effective-
default value: N/A
type: String, containing a date and time definition
A rule can only activate if the current date and time is after date-effective attribute.
date-expires-
default value: N/A
type: String, containing a date and time definition
A rule cannot activate if the current date and time is after the date-expires attribute.
duration-
default value: no default value
type: long
The duration dictates that the rule will fire after a specified duration, if it is still true.
rule "my rule"
salience 42
agenda-group "number 1"
when ...8.8.2. Timers and Calendars
Rules now support both interval and cron based timers, which replace the now deprecated duration attribute.
timer ( int: <initial delay> <repeat interval>? )
timer ( int: 30s )
timer ( int: 30s 5m )
timer ( cron: <cron expression> )
timer ( cron:* 0/15 * * * ? )Interval (indicated by "int:") timers follow the semantics of java.util.Timer objects, with an initial delay and an optional repeat interval. Cron (indicated by "cron:") timers follow standard Unix cron expressions:
rule "Send SMS every 15 minutes"
timer (cron:* 0/15 * * * ?)
when
$a : Alarm( on == true )
then
channels[ "sms" ].insert( new Sms( $a.mobileNumber, "The alarm is still on" );
endA rule controlled by a timer becomes active when it matches, and once for each individual match. Its consequence is executed repeatedly, according to the timer’s settings. This stops as soon as the condition doesn’t match any more.
Consequences are executed even after control returns from a call to fireUntilHalt. Moreover, the Engine remains reactive to any changes made to the Working Memory. For instance, removing a fact that was involved in triggering the timer rule’s execution causes the repeated execution to terminate, or inserting a fact so that some rule matches will cause that rule to fire. But the Engine is not continually active, only after a rule fires, for whatever reason. Thus, reactions to an insertion done asynchronously will not happen until the next execution of a timer-controlled rule. Disposing a session puts an end to all timer activity.
Conversely when the rule engine runs in passive mode (i.e.: using fireAllRules instead of fireUntilHalt) by default it doesn’t fire consequences of timed rules unless fireAllRules isn’t invoked again.
However it is possible to change this default behavior by configuring the KieSession with a TimedRuleExecutionOption as shown in the following example.
KieSessionConfiguration ksconf = KieServices.Factory.get().newKieSessionConfiguration();
ksconf.setOption( TimedRuleExecutionOption.YES );
KSession ksession = kbase.newKieSession(ksconf, null);It is also possible to have a finer grained control on the timed rules that have to be automatically executed.
To do this it is necessary to set a FILTERED TimedRuleExecutionOption that allows to define a
callback to filter those rules, as done in the next example.
KieSessionConfiguration ksconf = KieServices.Factory.get().newKieSessionConfiguration();
conf.setOption( new TimedRuleExecutionOption.FILTERED(new TimedRuleExecutionFilter() {
public boolean accept(Rule[] rules) {
return rules[0].getName().equals("MyRule");
}
}) );For what regards interval timers it is also possible to define both the delay and interval as an expression instead of a fixed value. To do that it is necessary to use an expression timer (indicated by "expr:") as in the following example:
declare Bean
delay : String = "30s"
period : long = 60000
end
rule "Expression timer"
timer( expr: $d, $p )
when
Bean( $d : delay, $p : period )
then
endThe expressions, $d and $p in this case, can use any variable defined in the pattern matching part
of the rule and can be any String that can be parsed in a time duration or any numeric value that
will be internally converted in a long representing a duration expressed in milliseconds.
Both interval and expression timers can have 3 optional parameters named "start", "end" and "repeat-limit". When one or more of these parameters are used the first part of the timer definition must be followed by a semicolon ';' and the parameters have to be separated by a comma ',' as in the following example:
timer (int: 30s 10s; start=3-JAN-2010, end=5-JAN-2010)The value for start and end parameters can be a Date, a String representing a Date or a long, or more in general any Number, that will be transformed in a Java Date applying the following conversion:
new Date( ((Number) n).longValue() )Conversely the repeat-limit can be only an integer and it defines the maximum number of repetitions allowed by the timer. If both the end and the repeat-limit parameters are set the timer will stop when the first of the two will be matched.
The using of the start parameter implies the definition of a phase for the timer, where the beginning of the phase is given by the start itself plus the eventual delay. In other words in this case the timed rule will then be scheduled at times:
start + delay + n*periodfor up to repeat-limit times and no later than the end timestamp (whichever first). For instance the rule having the following interval timer
timer ( int: 30s 1m; start="3-JAN-2010" )will be scheduled at the 30th second of every minute after the midnight of the 3-JAN-2010. This also means that if for example you turn the system on at midnight of the 3-FEB-2010 it won’t be scheduled immediately but will preserve the phase defined by the timer and so it will be scheduled for the first time 30 seconds after the midnight.
If for some reason the system is paused (e.g. the session is serialized and then deserialized after a while) the rule will be scheduled only once to recover from missing activations (regardless of how many activations we missed) and subsequently it will be scheduled again in phase with the timer.
Calendars are used to control when rules can fire. The Calendar API is modelled on Quartz:
Calendar weekDayCal = QuartzHelper.quartzCalendarAdapter(org.quartz.Calendar quartzCal)Calendars are registered with the KieSession:
ksession.getCalendars().set( "weekday", weekDayCal );They can be used in conjunction with normal rules and rules including timers. The rule attribute "calendars" may contain one or more comma-separated calendar names written as string literals.
rule "weekdays are high priority"
calendars "weekday"
timer (int:0 1h)
when
Alarm()
then
send( "priority high - we have an alarm" );
end
rule "weekend are low priority"
calendars "weekend"
timer (int:0 4h)
when
Alarm()
then
send( "priority low - we have an alarm" );
end8.8.3. Left Hand Side (when) syntax
8.8.3.1. What is the Left Hand Side?
The Left Hand Side (LHS) is a common name for the conditional part of the rule. It consists of zero or more Conditional Elements. If the LHS is empty, it will be considered as a condition element that is always true and it will be activated once, when a new WorkingMemory session is created.

rule "no CEs"
when
// empty
then
... // actions (executed once)
end
// The above rule is internally rewritten as:
rule "eval(true)"
when
eval( true )
then
... // actions (executed once)
endConditional elements work on one or more patterns (which are described below). The most common
conditional element is " and". Therefore it is implicit when you have multiple patterns in the
LHS of a rule that are not connected in any way:
rule "2 unconnected patterns"
when
Pattern1()
Pattern2()
then
... // actions
end
// The above rule is internally rewritten as:
rule "2 and connected patterns"
when
Pattern1()
and Pattern2()
then
... // actions
end|
An “and” cannot have a leading declaration binding (unlike for example |
8.8.3.2. Pattern (conditional element)
What is a pattern?
A pattern element is the most important Conditional Element. It can potentially match on each fact that is inserted in the working memory.
A pattern contains of zero or more constraints and has an optional pattern binding. The railroad diagram below shows the syntax for this.

In its simplest form, with no constraints, a pattern matches against a fact of the given type.
In the following case the type is Cheese, which means that the pattern will match against all Person objects in the Working Memory:
Person()The type need not be the actual class of some fact object. Patterns may refer to superclasses or even interfaces, thereby potentially matching facts from many different classes.
Object() // matches all objects in the working memoryInside of the pattern parenthesis is where all the action happens: it defines the constraints for that pattern. For example, with a age related constraint:
Person( age == 100 )|
For backwards compatibility reasons it’s allowed to suffix patterns with the |
Pattern binding
For referring to the matched object, use a pattern binding variable such as $p.
rule ...
when
$p : Person()
then
System.out.println( "Person " + $p );
endThe prefixed dollar symbol ($) is just a convention; it can be useful in complex rules where it helps to easily differentiate between variables and fields, but it is not mandatory.
8.8.3.3. Constraint (part of a pattern)
What is a constraint?
A constraint is an expression that returns true or false.
This example has a constraint that states 5 is smaller than
6:
Person( 5 < 6 ) // just an example, as constraints like this would be useless in a real patternIn essence, it’s a Java expression with some enhancements (such as property access) and a few differences (such as equals() semantics for ==). Let’s take a deeper look.
Property access on Java Beans (POJO’s)
Any bean property can be used directly.
A bean property is exposed using a standard Java bean getter: a method getMyProperty() (or isMyProperty() for a primitive boolean) which takes no arguments and return something.
For example: the age property is written as age in DRL instead of the getter getAge():
Person( age == 50 )
// this is the same as:
Person( getAge() == 50 )Drools uses the standard JDK Introspector class to do this mapping, so it follows the standard Java bean specification.
|
We recommend using property access ( |
|
Property accessors must not change the state of the object in a way that may effect the rules. Remember that the rule engine effectively caches the results of its matching in between invocations to make it faster. To solve this latter case, insert a fact that wraps the current date into working memory and update that fact between |
|
The following fallback applies: if the getter of a property cannot be found, the compiler will resort to using the property name as a method name and without arguments: |
Nested property access is also supported:
Person( address.houseNumber == 50 )
// this is the same as:
Person( getAddress().getHouseNumber() == 50 )Nested properties are also indexed.
|
In a stateful session, care should be taken when using nested accessors as the Working Memory is not aware of any of the nested values, and does not know when they change.
Either consider them immutable while any of their parent references are inserted into the Working Memory.
Or, instead, if you wish to modify a nested value you should mark all of the outer facts as updated.
In the above example, when the |
Java expression
You can use any Java expression that returns a boolean as a constraint inside the parentheses of a pattern.
Java expressions can be mixed with other expression enhancements, such as property access:
Person( age == 50 )It is possible to change the evaluation priority by using parentheses, as in any logic or mathematical expression:
Person( age > 100 && ( age % 10 == 0 ) )It is possible to reuse Java methods:
Person( Math.round( weight / ( height * height ) ) < 25.0 )|
As for property accessors, methods must not change the state of the object in a way that may affect the rules. Any method executed on a fact in the LHS should be a read only method. |
|
The state of a fact should not change between rule invocations (unless those facts are marked as updated to the working memory on every change): |
Normal Java operator precedence applies, see the operator precedence list below.
|
All operators have normal Java semantics except for The The |
Type coercion is always attempted if the field and the value are of different types; exceptions will be thrown if a bad coercion is attempted. For instance, if "ten" is provided as a string in a numeric evaluator, an exception is thrown, whereas "10" would coerce to a numeric 10. Coercion is always in favor of the field type and not the value type:
Person( age == "10" ) // "10" is coerced to 10Comma separated AND
The comma character (‘`,`’) is used to separate constraint groups. It has implicit AND connective semantics.
// Person is at least 50 and weighs at least 80 kg
Person( age > 50, weight > 80 )// Person is at least 50, weighs at least 80 kg and is taller than 2 meter.
Person( age > 50, weight > 80, height > 2 )|
Although the The comma operator should be preferred at the top level constraint, as it makes constraints easier to read and the engine will often be able to optimize them better. |
The comma (,) operator cannot be embedded in a composite constraint expression, such as parentheses:
Person( ( age > 50, weight > 80 ) || height > 2 ) // Do NOT do this: compile error
// Use this instead
Person( ( age > 50 && weight > 80 ) || height > 2 )Binding variables
A property can be bound to a variable:
// 2 persons of the same age
Person( $firstAge : age ) // binding
Person( age == $firstAge ) // constraint expressionThe prefixed dollar symbol ($) is just a convention; it can be useful in complex rules where it helps to easily differentiate between variables and fields.
|
For backwards compatibility reasons, It’s allowed (but not recommended) to mix a constraint binding and constraint expressions as such: |
Bound variable restrictions using the operator == provide for very fast execution as it use hash indexing to improve performance.
Unification
Drools does not allow bindings to the same declaration. However this is an important aspect to derivation query unification. While positional arguments are always processed with unification a special unification symbol, ':=', was introduced for named arguments named arguments. The following "unifies" the age argument across two people.
Person( $age := age )
Person( $age := age)In essence unification will declare a binding for the first occurrence and constrain to the same value of the bound field for sequence occurrences.
Grouped accessors for nested objects
Often it happens that it is necessary to access multiple properties of a nested object as in the following example
Person( name == "mark", address.city == "london", address.country == "uk" )These accessors to nested objects can be grouped with a '.(…)' syntax providing more readable rules as in
Person( name == "mark", address.( city == "london", country == "uk") )Note the '.' prefix, this is necessary to differentiate the nested object constraints from a method call.
Inline casts and coercion
When dealing with nested objects, it also quite common the need to cast to a subtype. It is possible to do that via the # symbol as in:
Person( name == "mark", address#LongAddress.country == "uk" )This example casts Address to LongAddress, making its getters available. If the cast is not possible (instanceof returns false), the evaluation will be considered false. Also fully qualified names are supported:
Person( name == "mark", address#org.domain.LongAddress.country == "uk" )It is possible to use multiple inline casts in the same expression:
Person( name == "mark", address#LongAddress.country#DetailedCountry.population > 10000000 )moreover, since we also support the instanceof operator, if that is used we will infer its results for further uses of that field, within that pattern:
Person( name == "mark", address instanceof LongAddress, address.country == "uk" )Special literal support
Besides normal Java literals (including Java 5 enums), this literal is also supported:
Date literal
The date format dd-mmm-yyyy is supported by default.
You can customize this by providing an alternative date format mask as the System property named drools.dateformat.
If more control is required, use a restriction.
Cheese( bestBefore < "27-Oct-2009" )List and Map access
It’s possible to directly access a List value by index:
// Same as childList(0).getAge() == 18
Person( childList[0].age == 18 )It’s also possible to directly access a Map value by key:
// Same as credentialMap.get("jsmith").isValid()
Person( credentialMap["jsmith"].valid )Abbreviated combined relation condition
This allows you to place more than one restriction on a field using the restriction connectives && or ||.
Grouping via parentheses is permitted, resulting in a recursive syntax pattern.
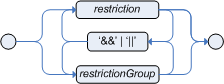

// Simple abbreviated combined relation condition using a single &&
Person( age > 30 && < 40 )// Complex abbreviated combined relation using groupings
Person( age ( (> 30 && < 40) ||
(> 20 && < 25) ) )// Mixing abbreviated combined relation with constraint connectives
Person( age > 30 && < 40 || location == "london" )Special DRL operators

Coercion to the correct value for the evaluator and the field will be attempted.
The operators < ⇐ > >=
These operators can be used on properties with natural ordering.
For example, for Date fields, < means before, for String fields, it means alphabetically lower.
Person( firstName < $otherFirstName )Person( birthDate < $otherBirthDate )Only applies on Comparable properties.
Null-safe dereferencing operator
The !. operator allows to derefencing in a null-safe way. More in details the matching algorithm requires the value to the left of the !. operator to be not null in order to give a positive result for pattern matching itself. In other words the pattern:
Person( $streetName : address!.street )will be internally translated in:
Person( address != null, $streetName : address.street )The operator matches
Matches a field against any valid Java Regular Expression. Typically that regexp is a string literal, but variables that resolve to a valid regexp are also allowed.
Cheese( type matches "(Buffalo)?\\S*Mozzarella" )|
Like in Java, regular expressions written as string literals need to escape '\\'. |
Only applies on String properties.
Using matches against a null value always evaluates to false.
The operator not matches
The operator returns true if the String does not match the regular expression.
The same rules apply as for the matches operator.
Example:
Cheese( type not matches "(Buffalo)?\\S*Mozzarella" )Only applies on String properties.
Using not matches against a null value always evaluates to true.
The operator contains
The operator contains is used to check whether a field that is a
Collection or elements contains the specified value.
CheeseCounter( cheeses contains "stilton" ) // contains with a String literal
CheeseCounter( cheeses contains $var ) // contains with a variableOnly applies on Collection properties.
The operator contains can also be used in place of String.contains() constraints checks.
Cheese( name contains "tilto" )
Person( fullName contains "Jr" )
String( this contains "foo" )The operator not contains
The operator not contains is used to check whether a field that is a
Collection or elements does not contain the specified value.
CheeseCounter( cheeses not contains "cheddar" ) // not contains with a String literal
CheeseCounter( cheeses not contains $var ) // not contains with a variableOnly applies on Collection properties.
|
For backward compatibility, the |
The operator not contains can also be used in place of the logical negation of String.contains() for constraints checks - i.e.: ! String.contains()
Cheese( name not contains "tilto" )
Person( fullName not contains "Jr" )
String( this not contains "foo" )The operator memberOf
The operator memberOf is used to check whether a field is a member of a collection or elements; that collection must be a variable.
CheeseCounter( cheese memberOf $matureCheeses )The operator not memberOf
The operator not memberOf is used to check whether a field is not a member of a collection or elements; that collection must be a variable.
CheeseCounter( cheese not memberOf $matureCheeses )The operator soundslike
This operator is similar to matches, but it checks whether a word has almost the same sound (using English pronunciation) as the given value.
This is based on the Soundex algorithm (see http://en.wikipedia.org/wiki/Soundex).
// match cheese "fubar" or "foobar"
Cheese( name soundslike 'foobar' )The operator str
This operator str is used to check whether a field that is a String starts with or ends with a certain value.
It can also be used to check the length of the String.
Message( routingValue str[startsWith] "R1" )Message( routingValue str[endsWith] "R2" )Message( routingValue str[length] 17 )The operators in and notin (compound value restriction)
The compound value restriction is used where there is more than one possible value to match.
Currently only the in and not in evaluators support this.
The second operand of this operator must be a comma-separated list of values, enclosed in parentheses.
Values may be given as variables, literals, return values or qualified identifiers.
Both evaluators are actually syntactic
sugar, internally rewritten as a list of multiple restrictions using the operators != and ==.
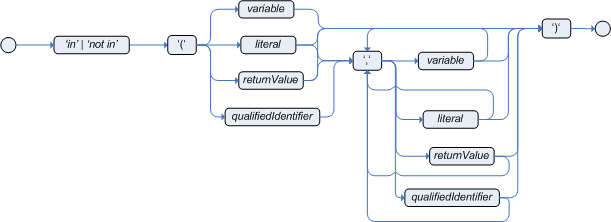
Person( $cheese : favouriteCheese )
Cheese( type in ( "stilton", "cheddar", $cheese ) )Inline eval operator (deprecated)

An inline eval constraint can use any valid dialect expression as long as it results to a primitive boolean. The expression must be constant over time. Any previously bound variable, from the current or previous pattern, can be used; autovivification is also used to auto-create field binding variables. When an identifier is found that is not a current variable, the builder looks to see if the identifier is a field on the current object type, if it is, the field binding is auto-created as a variable of the same name. This is called autovivification of field variables inside of inline eval’s.
This example will find all male-female pairs where the male is 2 years older than the female; the variable age is auto-created in the second pattern by the autovivification process.
Person( girlAge : age, sex = "F" )
Person( eval( age == girlAge + 2 ), sex = 'M' ) // eval() is actually obsolete in this example|
Inline eval’s are effectively obsolete as their inner syntax is now directly supported. It’s recommended not to use them. Simply write the expression without wrapping eval() around it. |
Operator precedence
The operators are evaluated in this precedence:
| Operator type | Operators | Notes |
|---|---|---|
(nested / null safe) property access |
|
Not normal Java semantics |
List/Map access |
|
Not normal Java semantics |
constraint binding |
|
Not normal Java semantics |
multiplicative |
|
|
additive |
|
|
shift |
|
|
relational |
|
|
equality |
|
Does not use normal Java (not) same semantics: uses (not) equals semantics instead. |
non-short circuiting AND |
|
|
non-short circuiting exclusive OR |
|
|
non-short circuiting inclusive OR |
|
|
logical AND |
|
|
logical OR |
|
|
ternary |
|
|
Comma separated AND |
|
Not normal Java semantics |
8.8.3.4. Positional Arguments
Patterns now support positional arguments on type declarations.
Positional arguments are ones where you don’t need to specify the field name, as the position maps to a known named field. i.e. Person( name == "mark" ) can be rewritten as Person( "mark"; ). The semicolon ';' is important so that the engine knows that everything before it is a positional argument. Otherwise we might assume it was a boolean expression, which is how it could be interpreted after the semicolon. You can mix positional and named arguments on a pattern by using the semicolon ';' to separate them. Any variables used in a positional that have not yet been bound will be bound to the field that maps to that position.
declare Cheese
name : String
shop : String
price : int
endExample patterns, with two constraints and a binding. Remember semicolon ';' is used to differentiate the positional section from the named argument section. Variables and literals and expressions using just literals are supported in positional arguments, but not variables. Positional arguments are always resolved using unification.
Cheese( "stilton", "Cheese Shop", p; )
Cheese( "stilton", "Cheese Shop"; p : price )
Cheese( "stilton"; shop == "Cheese Shop", p : price )
Cheese( name == "stilton"; shop == "Cheese Shop", p : price )Positional arguments that are given a previously declared binding will constrain against that using unification; these are referred to as input arguments. If the binding does not yet exist, it will create the declaration binding it to the field represented by the position argument; these are referred to as output arguments.
8.8.3.5. Fine grained property change listeners
When you call modify() (see the modify statement section) on a given object it will trigger a revaluation of all patterns of the matching object type in the knowledge base. This can can lead to unwanted and useless evaluations and in the worst cases to infinite recursions. The only workaround to avoid it was to split up your objects into smaller ones having a 1 to 1 relationship with the original object.
This has been introduced to provide an easier and more consistent way to overcome this problem. In fact it allows the pattern matching to only react to modification of properties actually constrained or bound inside of a given pattern. That will help with performance and recursion and avoid artificial object splitting.
This feature is enabled by default, but in case you need or want to dectivate it on a specific bean you can annotate it with @classReactive. This annotation works both on DRL type declarations:
declare Person
@classReactive
firstName : String
lastName : String
endand on Java classes:
@ClassReactive
public static class Person {
private String firstName;
private String lastName;
}By using this feature, for instance, if you have a rule like the following:
rule "Every person named Mario is a male" when
$person : Person( firstName == "Mario" )
then
modify ( $person ) { setMale( true ) }
endyou won’t have to add the no-loop attribute to it in order to avoid an infinite recursion because the engine recognizes that the pattern matching is done on the 'firstName' property while the RHS of the rule modifies the 'male' one. Note that this feature does not work for update(), and this is one of the reasons why we promote modify() since it encapsulates the field changes within the statement. Moreover, on Java classes, you can also annotate any method to say that its invocation actually modifies other properties. For instance in the former Person class you could have a method like:
@Modifies( { "firstName", "lastName" } )
public void setName(String name) {
String[] names = name.split("\\s");
this.firstName = names[0];
this.lastName = names[1];
}That means that if a rule has a RHS like the following:
modify($person) { setName("Mario Fusco") }it will correctly recognize that the values of both properties 'firstName' and 'lastName' could have potentially been modified and act accordingly, not missing of reevaluating the patterns constrained on them. At the moment the usage of @Modifies is not allowed on fields but only on methods. This is coherent with the most common scenario where the @Modifies will be used for methods that are not related with a class field as in the Person.setName() in the former example. Also note that @Modifies is not transitive, meaning that if another method internally invokes the Person.setName() one it won’t be enough to annotate it with @Modifies( { "name" } ), but it is necessary to use @Modifies( { "firstName", "lastName" } ) even on it. Very likely @Modifies transitivity will be implemented in the next release.
For what regards nested accessors, the engine will be notified only for top level fields. In other words a pattern matching like:
Person ( address.city.name == "London )will be revaluated only for modification of the 'address' property of a Person object. In the same way the constraints analysis is currently strictly limited to what there is inside a pattern. Another example could help to clarify this. An LHS like the following:
$p : Person( )
Car( owner = $p.name )will not listen on modifications of the person’s name, while this one will do:
Person( $name : name )
Car( owner = $name )To overcome this problem it is possible to annotate a pattern with @watch as it follows:
$p : Person( ) @watch ( name )
Car( owner = $p.name )Indeed, annotating a pattern with @watch allows you to modify the inferred set of properties for which that pattern will react. Note that the properties named in the @watch annotation are actually added to the ones automatically inferred, but it is also possible to explicitly exclude one or more of them prepending their name with a ! and to make the pattern to listen for all or none of the properties of the type used in the pattern respectively with the wildcrds * and !*. So, for example, you can annotate a pattern in the LHS of a rule like:
// listens for changes on both firstName (inferred) and lastName
Person( firstName == $expectedFirstName ) @watch( lastName )
// listens for all the properties of the Person bean
Person( firstName == $expectedFirstName ) @watch( * )
// listens for changes on lastName and explicitly exclude firstName
Person( firstName == $expectedFirstName ) @watch( lastName, !firstName )
// listens for changes on all the properties except the age one
Person( firstName == $expectedFirstName ) @watch( *, !age )Since it doesn’t make sense to use this annotation on a pattern using a type annotated with @ClassReactive the rule compiler will raise a compilation error if you try to do so. Also the duplicated usage of the same property in @watch (for example like in: @watch( firstName, ! firstName ) ) will end up in a compilation error. In a next release we will make the automatic detection of the properties to be listened smarter by doing analysis even outside of the pattern.
It is also possible to enable this feature only on specific types of your model or to completely disallow it by using on option of the KnowledgeBuilderConfiguration. In particular this new PropertySpecificOption can have one of the following 3 values:
- DISABLED => the feature is turned off and all the other related annotations are just ignored
- ALLOWED => types are not property reactive unless they are not annotated with @PropertyReactive (which is the dual of @ClassReactive)
- ALWAYS => all types are property reactive. This is the default behaviorSo, for example, to have a KnowledgeBuilder for which property reactivity is disabled by default:
KnowledgeBuilderConfiguration config = KnowledgeBuilderFactory.newKnowledgeBuilderConfiguration();
config.setOption(PropertySpecificOption.ALLOWED);
KnowledgeBuilder kbuilder = KnowledgeBuilderFactory.newKnowledgeBuilder(config);In this last case it will be possible to reenable the property reactivity feature on a specific type by annotating it with @PropertyReactive.
It is important to notice that property reactivity is automatically available only for modifications performed inside the consequence of a rule. Conversely a programmatic update is unaware of the object’s properties that have been changed, so it is unable of using this feature.
To workaround this limitation it is possible to optionally specify in an update statement the names of the properties that have been changed in the modified object as in the following example:
Person me = new Person("me", 40);
FactHandle meHandle = ksession.insert( me );
me.setAge(41);
me.setAddress("California Avenue");
ksession.update( meHandle, me, "age", "address" );8.8.3.6. Basic conditional elements
Conditional Element and
The Conditional Element "and" is used to group other Conditional Elements into a logical conjunction.
Drools supports both prefix and and infix and.

Traditional infix and is supported:
//infixAnd
Cheese( cheeseType : type ) and Person( favouriteCheese == cheeseType )Explicit grouping with parentheses is also supported:
//infixAnd with grouping
( Cheese( cheeseType : type ) and
( Person( favouriteCheese == cheeseType ) or
Person( favouriteCheese == cheeseType ) )|
The symbol |

Prefix and is also supported:
(and Cheese( cheeseType : type )
Person( favouriteCheese == cheeseType ) )The root element of the LHS is an implicit prefix and and doesn’t need to be specified:
when
Cheese( cheeseType : type )
Person( favouriteCheese == cheeseType )
then
...Conditional Element or
The Conditional Element or is used to group other Conditional Elements into a logical disjunction.
Drools supports both prefix or and infix or.

Traditional infix or is supported:
//infixOr
Cheese( cheeseType : type ) or Person( favouriteCheese == cheeseType )Explicit grouping with parentheses is also supported:
//infixOr with grouping
( Cheese( cheeseType : type ) or
( Person( favouriteCheese == cheeseType ) and
Person( favouriteCheese == cheeseType ) )|
The symbol |

Prefix or is also supported:
(or Person( sex == "f", age > 60 )
Person( sex == "m", age > 65 )
)|
The behavior of the Conditional Element |
The Conditional Element or also allows for optional pattern binding.
This means that each resulting subrule will bind its pattern to the pattern binding.
Each pattern must be bound separately, using eponymous variables:
pensioner : ( Person( sex == "f", age > 60 ) or Person( sex == "m", age > 65 ) )(or pensioner : Person( sex == "f", age > 60 )
pensioner : Person( sex == "m", age > 65 ) )Since the conditional element or results in multiple subrule generation, one for each possible logically outcome, the example above would result in the internal generation of two rules.
These two rules work independently within the Working Memory, which means both can match, activate and fire - there is no shortcutting.
The best way to think of the conditional element or is as a shortcut for generating two or more similar rules.
When you think of it that way, it’s clear that for a single rule there could be multiple activations if two or more terms of the disjunction are true.
Conditional Element not

The CE not is first order logic’s non-existential quantifier and checks for the non-existence of something in the Working Memory.
Think of "not" as meaning "there must be none of…".
The keyword not may be followed by parentheses around the CEs that it applies to.
In the simplest case of a single pattern (like below) you may optionally omit the parentheses.
not Bus()// Brackets are optional:
not Bus(color == "red")
// Brackets are optional:
not ( Bus(color == "red", number == 42) )
// "not" with nested infix and - two patterns,
// brackets are requires:
not ( Bus(color == "red") and
Bus(color == "blue") )Conditional Element exists

The CE exists is first order logic’s existential quantifier and checks for the existence of something in the Working Memory.
Think of "exists" as meaning "there is at least one..". It is different from just having the pattern on its own, which is more like saying "for each one of…". If you use exists with a pattern, the rule will only activate at most once, regardless of how much data there is in working memory that matches the condition inside of the exists pattern.
Since only the existence matters, no bindings will be established.
The keyword exists must be followed by parentheses around the CEs that it applies to.
In the simplest case of a single pattern (like below) you may omit the parentheses.
exists Bus()exists Bus(color == "red")
// brackets are optional:
exists ( Bus(color == "red", number == 42) )
// "exists" with nested infix and,
// brackets are required:
exists ( Bus(color == "red") and
Bus(color == "blue") )8.8.3.7. Advanced conditional elements
Conditional Element forall

The Conditional Element forall completes the First Order Logic support in Drools.
The Conditional Element forall evaluates to true when all facts that match the first pattern match all the remaining patterns.
Example:
rule "All English buses are red"
when
forall( $bus : Bus( type == 'english')
Bus( this == $bus, color = 'red' ) )
then
// all English buses are red
endIn the above rule, we "select" all Bus objects whose type is "english". Then, for each fact that matches this pattern we evaluate the following patterns and if they match, the forall CE will evaluate to true.
To state that all facts of a given type in the working memory must match a set of constraints, forall can be written with a single pattern for simplicity.
Example:
rule "All Buses are Red"
when
forall( Bus( color == 'red' ) )
then
// all Bus facts are red
endAnother example shows multiple patterns inside the forall:
rule "all employees have health and dental care programs"
when
forall( $emp : Employee()
HealthCare( employee == $emp )
DentalCare( employee == $emp )
)
then
// all employees have health and dental care
endForall can be nested inside other CEs.
For instance, forall can be used inside a not CE.
Note that only single patterns have optional parentheses, so that with a nested forall parentheses must be used:
rule "not all employees have health and dental care"
when
not ( forall( $emp : Employee()
HealthCare( employee == $emp )
DentalCare( employee == $emp ) )
)
then
// not all employees have health and dental care
endAs a side note, forall( p1 p2 p3…) is equivalent to writing:
not(p1 and not(and p2 p3...))Also, it is important to note that forall is a scope delimiter.
Therefore, it can use any previously bound variable, but no variable bound inside it will be available for use outside of it.
Conditional Element from

The Conditional Element from enables users to specify an arbitrary source for data to be matched by LHS patterns.
This allows the engine to reason over data not in the Working Memory.
The data source could be a sub-field on a bound variable or the results of a method call.
It is a powerful construction that allows out of the box integration with other application components and frameworks.
One common example is the integration with data retrieved on-demand from databases using hibernate named queries.
The expression used to define the object source is any expression that follows regular MVEL syntax. Therefore, it allows you to easily use object property navigation, execute method calls and access maps and collections elements.
Here is a simple example of reasoning and binding on another pattern sub-field:
rule "validate zipcode"
when
Person( $personAddress : address )
Address( zipcode == "23920W") from $personAddress
then
// zip code is ok
endWith all the flexibility from the new expressiveness in the Drools engine you can slice and dice this problem many ways. This is the same but shows how you can use a graph notation with the 'from':
rule "validate zipcode"
when
$p : Person( )
$a : Address( zipcode == "23920W") from $p.address
then
// zip code is ok
endPrevious examples were evaluations using a single pattern.
The CE from also support object sources that return a collection of objects.
In that case, from will iterate over all objects in the collection and try to match each of them individually.
For instance, if we want a rule that applies 10% discount to each item in an order, we could do:
rule "apply 10% discount to all items over US$ 100,00 in an order"
when
$order : Order()
$item : OrderItem( value > 100 ) from $order.items
then
// apply discount to $item
endThe above example will cause the rule to fire once for each item whose value is greater than 100 for each given order.
You must take caution, however, when using from, especially in conjunction with the lock-on-active rule attribute as it may produce unexpected results.
Consider the example provided earlier, but now slightly modified as follows:
rule "Assign people in North Carolina (NC) to sales region 1"
ruleflow-group "test"
lock-on-active true
when
$p : Person( )
$a : Address( state == "NC") from $p.address
then
modify ($p) {} // Assign person to sales region 1 in a modify block
end
rule "Apply a discount to people in the city of Raleigh"
ruleflow-group "test"
lock-on-active true
when
$p : Person( )
$a : Address( city == "Raleigh") from $p.address
then
modify ($p) {} // Apply discount to person in a modify block
endIn the above example, persons in Raleigh, NC should be assigned to sales region 1 and receive a discount; i.e., you would expect both rules to activate and fire. Instead you will find that only the second rule fires.
If you were to turn on the audit log, you would also see that when the second rule fires, it deactivates the first rule.
Since the rule attribute lock-on-active prevents a rule from creating new activations when a set of facts change, the first rule fails to reactivate.
Though the set of facts have not changed, the use of from returns a new fact for all intents and purposes each time it is evaluated.
First, it’s important to review why you would use the above pattern.
You may have many rules across different rule-flow groups.
When rules modify working memory and other rules downstream of your RuleFlow (in different rule-flow groups) need to be reevaluated, the use of modify is critical.
You don’t, however, want other rules in the same rule-flow group to place activations on one another recursively.
In this case, the no-loop attribute is ineffective, as it would only prevent a rule from activating itself recursively.
Hence, you resort to lock-on-active.
There are several ways to address this issue:
-
Avoid the use of
fromwhen you can assert all facts into working memory or use nested object references in your constraint expressions (shown below). -
Place the variable assigned used in the modify block as the last sentence in your condition (LHS).
-
Avoid the use of
lock-on-activewhen you can explicitly manage how rules within the same rule-flow group place activations on one another (explained below).
The preferred solution is to minimize use of from when you can assert all your facts into working memory directly.
In the example above, both the Person and Address instance can be asserted into working memory.
In this case, because the graph is fairly simple, an even easier solution is to modify your rules as follows:
rule "Assign people in North Carolina (NC) to sales region 1"
ruleflow-group "test"
lock-on-active true
when
$p : Person(address.state == "NC" )
then
modify ($p) {} // Assign person to sales region 1 in a modify block
end
rule "Apply a discount to people in the city of Raleigh"
ruleflow-group "test"
lock-on-active true
when
$p : Person(address.city == "Raleigh" )
then
modify ($p) {} //Apply discount to person in a modify block
endNow, you will find that both rules fire as expected.
However, it is not always possible to access nested facts as above.
Consider an example where a Person holds one or more Addresses and you wish to use an existential quantifier to match people with at least one address that meets certain conditions.
In this case, you would have to resort to the use of from to reason over the collection.
There are several ways to use from to achieve this and not all of them exhibit an issue with the use of lock-on-active.
For example, the following use of from causes both rules to fire as expected:
rule "Assign people in North Carolina (NC) to sales region 1"
ruleflow-group "test"
lock-on-active true
when
$p : Person($addresses : addresses)
exists (Address(state == "NC") from $addresses)
then
modify ($p) {} // Assign person to sales region 1 in a modify block
end
rule "Apply a discount to people in the city of Raleigh"
ruleflow-group "test"
lock-on-active true
when
$p : Person($addresses : addresses)
exists (Address(city == "Raleigh") from $addresses)
then
modify ($p) {} // Apply discount to person in a modify block
endHowever, the following slightly different approach does exhibit the problem:
rule "Assign people in North Carolina (NC) to sales region 1"
ruleflow-group "test"
lock-on-active true
when
$assessment : Assessment()
$p : Person()
$addresses : List() from $p.addresses
exists (Address( state == "NC") from $addresses)
then
modify ($assessment) {} // Modify assessment in a modify block
end
rule "Apply a discount to people in the city of Raleigh"
ruleflow-group "test"
lock-on-active true
when
$assessment : Assessment()
$p : Person()
$addresses : List() from $p.addresses
exists (Address( city == "Raleigh") from $addresses)
then
modify ($assessment) {} // Modify assessment in a modify block
endIn the above example, the $addresses variable is returned from the use of from.
The example also introduces a new object, assessment, to highlight one possible solution in this case.
If the $assessment variable assigned in the condition (LHS) is moved to the last condition in each rule, both rules fire as expected.
Though the above examples demonstrate how to combine the use of from with lock-on-active where no loss of rule activations occurs, they carry the drawback of placing a dependency on the order of conditions on the LHS.
In addition, the solutions present greater complexity for the rule author in terms of keeping track of which conditions may create issues.
A better alternative is to assert more facts into working memory.
In this case, a person’s addresses may be asserted into working memory and the use of from would not be necessary.
There are cases, however, where asserting all data into working memory is not practical and we need to find other solutions.
Another option is to reevaluate the need for lock-on-active.
An alternative to lock-on-active is to directly manage how rules within the same rule-flow group activate one another by including conditions in each rule that prevent rules from activating each other recursively when working memory is modified.
For example, in the case above where a discount is applied to citizens of Raleigh, a condition may be added to the rule that checks whether the discount has already been applied.
If so, the rule does not activate.
|
The pattern containing a from clause cannot be followed by another pattern starting with a parenthesis as in the following example This is because in that case the DRL parser reads the from expression as "from $l (String() or Number())" and it is impossible to disambiguate this expression from a function call. The straightforward fix to this is wrapping also the from clause in parenthesis as it follows: |
Conditional Element collect
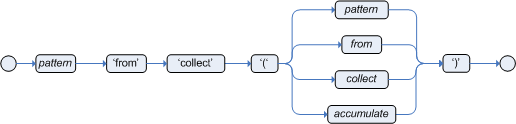
The Conditional Element collect allows rules to reason over a collection of objects obtained from the given source or from the working memory.
In First Oder Logic terms this is the cardinality quantifier.
A simple example:
import java.util.ArrayList
rule "Raise priority if system has more than 3 pending alarms"
when
$system : System()
$alarms : ArrayList( size >= 3 )
from collect( Alarm( system == $system, status == 'pending' ) )
then
// Raise priority, because system $system has
// 3 or more alarms pending. The pending alarms
// are $alarms.
endIn the above example, the rule will look for all pending alarms in the working memory for each given system and group them in ArrayLists. If 3 or more alarms are found for a given system, the rule will fire.
The result pattern of collect can be any concrete class that implements the java.util.Collection interface and provides a default no-arg public constructor.
This means that you can use Java collections like ArrayList, LinkedList, HashSet, etc., or your own class, as long as it implements the java.util.Collection interface and provide a default no-arg public constructor.
Both source and result patterns can be constrained as any other pattern.
Variables bound before the collect CE are in the scope of both source and result patterns and therefore you can use them to constrain both your source and result patterns.
But note that collect is a scope delimiter for bindings, so that any binding made inside of it is not available for use outside of it.
Collect accepts nested from CEs.
The following example is a valid use of "collect":
import java.util.LinkedList;
rule "Send a message to all mothers"
when
$town : Town( name == 'Paris' )
$mothers : LinkedList()
from collect( Person( gender == 'F', children > 0 )
from $town.getPeople()
)
then
// send a message to all mothers
endConditional Element accumulate
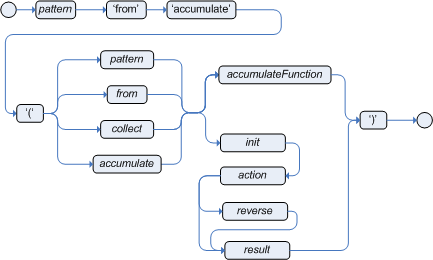
The Conditional Element accumulate is a more flexible and powerful form of collect, in the sense that it can be used to do what collect does and also achieve results that the CE collect is not capable of achieving.
Accumulate allows a rule to iterate over a collection of objects, executing custom actions for each of the elements, and at the end, it returns a result object.
Accumulate supports both the use of pre-defined accumulate functions, or the use of inline custom code. Inline custom code should be avoided though, as it is harder for rule authors to maintain, and frequently leads to code duplication. Accumulate functions are easier to test and reuse.
The Accumulate CE also supports multiple different syntaxes. The preferred syntax is the top level accumulate, as noted bellow, but all other syntaxes are supported for backward compatibility.
Accumulate CE (preferred syntax)
The top level accumulate syntax is the most compact and flexible syntax. The simplified syntax is as follows:
accumulate( <source pattern>; <functions> [;<constraints>] )For instance, a rule to calculate the minimum, maximum and average temperature reading for a given sensor and that raises an alarm if the minimum temperature is under 20C degrees and the average is over 70C degrees could be written in the following way, using Accumulate:
|
The DRL language defines “`acc`” as a synonym of “`accumulate`”. The author might prefer to use “`acc`” as a less verbose keyword or the full keyword “`accumulate`” for legibility. |
rule "Raise alarm"
when
$s : Sensor()
accumulate( Reading( sensor == $s, $temp : temperature );
$min : min( $temp ),
$max : max( $temp ),
$avg : average( $temp );
$min < 20, $avg > 70 )
then
// raise the alarm
endIn the above example, min, max and average are Accumulate Functions and will calculate the minimum, maximum and average temperature values over all the readings for each sensor.
Drools ships with several built-in accumulate functions, including:
-
average
-
min
-
max
-
count
-
sum
-
variance
-
standardDeviation
-
collectList
-
collectSet
These common functions accept any expression as input. For instance, if someone wants to calculate the average profit on all items of an order, a rule could be written using the average function:
rule "Average profit"
when
$order : Order()
accumulate( OrderItem( order == $order, $cost : cost, $price : price );
$avgProfit : average( 1 - $cost / $price ) )
then
// average profit for $order is $avgProfit
endAccumulate Functions are all pluggable.
That means that if needed, custom, domain specific functions can easily be added to the engine and rules can start to use them without any restrictions.
To implement a new Accumulate Function all one needs to do is to create a Java class that implements the org.kie.api.runtime.rule.AccumulateFunction interface.
As an example of an Accumulate Function implementation, the following is the implementation of the average function:
/**
* An implementation of an accumulator capable of calculating average values
*/
public class AverageAccumulateFunction implements org.kie.api.runtime.rule.AccumulateFunction<AverageAccumulateFunction.AverageData> {
public void readExternal(ObjectInput in) throws IOException, ClassNotFoundException {
}
public void writeExternal(ObjectOutput out) throws IOException {
}
public static class AverageData implements Externalizable {
public int count = 0;
public double total = 0;
public AverageData() {}
public void readExternal(ObjectInput in) throws IOException, ClassNotFoundException {
count = in.readInt();
total = in.readDouble();
}
public void writeExternal(ObjectOutput out) throws IOException {
out.writeInt(count);
out.writeDouble(total);
}
}
/* (non-Javadoc)
* @see org.kie.api.runtime.rule.AccumulateFunction#createContext()
*/
public AverageData createContext() {
return new AverageData();
}
/* (non-Javadoc)
* @see org.kie.api.runtime.rule.AccumulateFunction#init(java.io.Serializable)
*/
public void init(AverageData context) {
context.count = 0;
context.total = 0;
}
/* (non-Javadoc)
* @see org.kie.api.runtime.rule.AccumulateFunction#accumulate(java.io.Serializable, java.lang.Object)
*/
public void accumulate(AverageData context,
Object value) {
context.count++;
context.total += ((Number) value).doubleValue();
}
/* (non-Javadoc)
* @see org.kie.api.runtime.rule.AccumulateFunction#reverse(java.io.Serializable, java.lang.Object)
*/
public void reverse(AverageData context, Object value) {
context.count--;
context.total -= ((Number) value).doubleValue();
}
/* (non-Javadoc)
* @see org.kie.api.runtime.rule.AccumulateFunction#getResult(java.io.Serializable)
*/
public Object getResult(AverageData context) {
return new Double( context.count == 0 ? 0 : context.total / context.count );
}
/* (non-Javadoc)
* @see org.kie.api.runtime.rule.AccumulateFunction#supportsReverse()
*/
public boolean supportsReverse() {
return true;
}
/* (non-Javadoc)
* @see org.kie.api.runtime.rule.AccumulateFunction#getResultType()
*/
public Class< ? > getResultType() {
return Number.class;
}
}The code for the function is very simple, as we could expect, as all the "dirty" integration work is done by the engine. Finally, to use the function in the rules, the author can import it using the "import accumulate" statement:
import accumulate <class_name> <function_name>For instance, if one implements the class some.package.VarianceFunction function that implements the variance function and wants to use it in the rules, he would do the following:
import accumulate some.package.VarianceFunction variance
rule "Calculate Variance"
when
accumulate( Test( $s : score ), $v : variance( $s ) )
then
// the variance of the test scores is $v
end|
The built in functions (sum, average, etc) are imported automatically by the engine. Only user-defined custom accumulate functions need to be explicitly imported. |
|
For backward compatibility, Drools still supports the configuration of accumulate functions through configuration files and system properties, but this is a deprecated method. In order to configure the variance function from the previous example using the configuration file or system property, the user would set a property like this: Please note that " |
Alternate Syntax: single function with return type
The accumulate syntax evolved over time with the goal of becoming more compact and expressive. Nevertheless, Drools still supports previous syntaxes for backward compatibility purposes.
In case the rule is using a single accumulate function on a given accumulate, the author may add a pattern for the result object and use the "from" keyword to link it to the accumulate result. Example: a rule to apply a 10% discount on orders over $100 could be written in the following way:
rule "Apply 10% discount to orders over US$ 100,00"
when
$order : Order()
$total : Number( doubleValue > 100 )
from accumulate( OrderItem( order == $order, $value : value ),
sum( $value ) )
then
// apply discount to $order
endIn the above example, the accumulate element is using only one function (sum), and so, the rules author opted to explicitly write a pattern for the result type of the accumulate function (Number) and write the constraints inside it. There are no problems in using this syntax over the compact syntax presented before, except that is is a bit more verbose. Also note that it is not allowed to use both the return type and the functions binding in the same accumulate statement.
Compile-time checks are performed in order to ensure the pattern used with the "from" keyword is assignable from the result of the accumulate function used.
|
With this syntax, the " |
In the above example, "$total" is bound to the result returned by the accumulate sum() function.
As another example however, if the result of the accumulate function is a collection, "from" still binds to the single result and it does not iterate:
rule "Person names"
when
$x : Object() from accumulate(MyPerson( $val : name );
collectList( $val ) )
then
// $x is a List
endThe binded "$x : Object()" is the List itself, returned by the collectList accumulate function used.
This is an important distinction to highlight, as the "from" keyword can also be used separately of accumulate, to iterate over the elements of a collection:
rule "Iterate the numbers"
when
$xs : List()
$x : Integer() from $xs
then
// $x matches and binds to each Integer in the collection
endWhile this syntax is still supported for backward compatibility purposes, for this and other reasons we encourage rule authors to make use instead of the Accumulate CE preferred syntax (described in the previous chapter), so to avoid any potential pitfalls, as described by these examples.
Accumulate with inline custom code
|
The use of accumulate with inline custom code is not a good practice for several reasons, including difficulties on maintaining and testing rules that use them, as well as the inability of reusing that code. Implementing your own accumulate functions is very simple and straightforward, they are easy to unit test and to use. This form of accumulate is supported for backward compatibility only. |
Another possible syntax for the accumulate is to define inline custom code, instead of using accumulate functions. As noted on the previous warned, this is discouraged though for the stated reasons.
The general syntax of the accumulate CE with inline custom code is:
<result pattern> from accumulate( <source pattern>,
init( <init code> ),
action( <action code> ),
reverse( <reverse code> ),
result( <result expression> ) )The meaning of each of the elements is the following:
-
<source pattern>: the source pattern is a regular pattern that the engine will try to match against each of the source objects.
-
<init code>: this is a semantic block of code in the selected dialect that will be executed once for each tuple, before iterating over the source objects.
-
<action code>: this is a semantic block of code in the selected dialect that will be executed for each of the source objects.
-
<reverse code>: this is an optional semantic block of code in the selected dialect that if present will be executed for each source object that no longer matches the source pattern. The objective of this code block is to undo any calculation done in the <action code> block, so that the engine can do decremental calculation when a source object is modified or deleted, hugely improving performance of these operations.
-
<result expression>: this is a semantic expression in the selected dialect that is executed after all source objects are iterated.
-
<result pattern>: this is a regular pattern that the engine tries to match against the object returned from the <result expression>. If it matches, the
accumulateconditional element evaluates to true and the engine proceeds with the evaluation of the next CE in the rule. If it does not matches, theaccumulateCE evaluates to false and the engine stops evaluating CEs for that rule.
It is easier to understand if we look at an example:
rule "Apply 10% discount to orders over US$ 100,00"
when
$order : Order()
$total : Number( doubleValue > 100 )
from accumulate( OrderItem( order == $order, $value : value ),
init( double total = 0; ),
action( total += $value; ),
reverse( total -= $value; ),
result( total ) )
then
// apply discount to $order
endIn the above example, for each Order in the Working Memory, the engine will execute the init
code initializing the total variable to zero.
Then it will iterate over all OrderItem objects for that order, executing the action for each one (in the example, it will sum the value of all items into the total variable). After iterating over all OrderItem objects, it will return the value corresponding to the result
expression (in the above example, the value of variable total). Finally, the engine will try to match the result with the Number pattern, and if the double value is greater than 100, the rule will fire.
The example used Java as the semantic dialect, and as such, note that the usage of the semicolon as statement delimiter is mandatory in the init, action and reverse code blocks. The result is an expression and, as such, it does not admit ';'. If the user uses any other dialect, he must comply to that dialect’s specific syntax.
As mentioned before, the reverse code is optional, but it is strongly recommended that the user writes it in order to benefit from the improved performance on update and delete.
The accumulate CE can be used to execute any action on source objects.
The following example instantiates and populates a custom object:
rule "Accumulate using custom objects"
when
$person : Person( $likes : likes )
$cheesery : Cheesery( totalAmount > 100 )
from accumulate( $cheese : Cheese( type == $likes ),
init( Cheesery cheesery = new Cheesery(); ),
action( cheesery.addCheese( $cheese ); ),
reverse( cheesery.removeCheese( $cheese ); ),
result( cheesery ) );
then
// do something
end8.8.3.8. Conditional Element eval

The conditional element eval is essentially a catch-all which allows any semantic code (that returns a primitive boolean) to be executed.
This code can refer to variables that were bound in the LHS of the rule, and functions in the rule package.
Overuse of eval reduces the declarativeness of your rules and can result in a poorly performing engine.
While eval can be used anywhere in the patterns, the best practice is to add it as the last conditional element in the LHS of a rule.
Evals cannot be indexed and thus are not as efficient as Field Constraints. However this makes them ideal for being used when functions return values that change over time, which is not allowed within Field Constraints.
For folks who are familiar with Drools 2.x lineage, the old Drools parameter and condition tags are equivalent to binding a variable to an appropriate type, and then using it in an eval node.
p1 : Parameter()
p2 : Parameter()
eval( p1.getList().containsKey( p2.getItem() ) )p1 : Parameter()
p2 : Parameter()
// call function isValid in the LHS
eval( isValid( p1, p2 ) )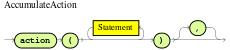

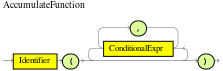
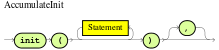
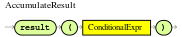


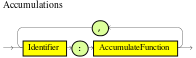
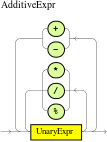

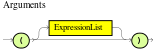
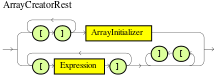
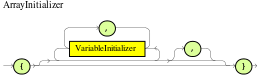

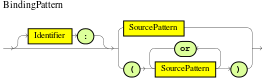


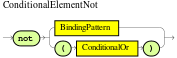
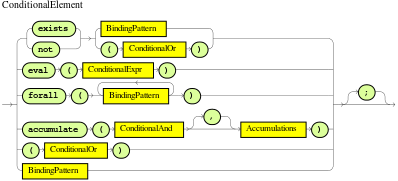

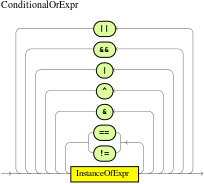

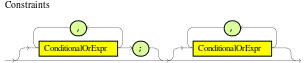


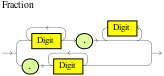


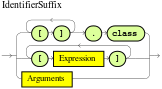
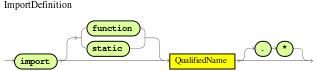


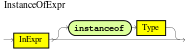
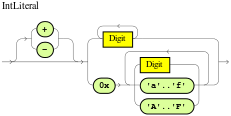
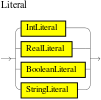
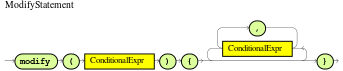

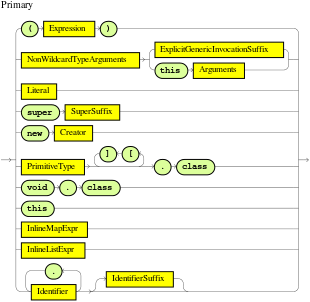
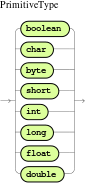


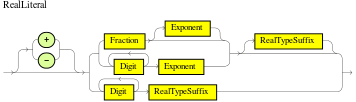

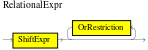
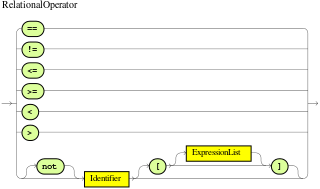
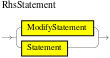
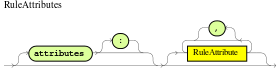
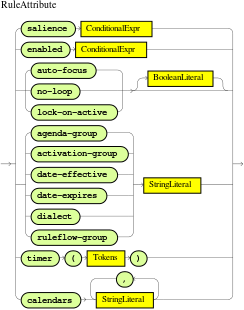


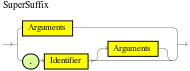
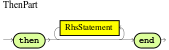
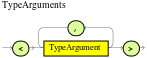
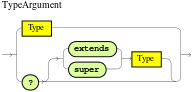


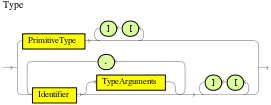
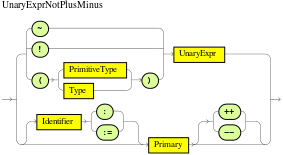
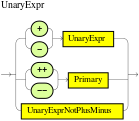
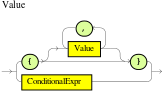
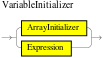
8.8.4. The Right Hand Side (then)
8.8.4.1. Usage
The Right Hand Side (RHS) is a common name for the consequence or action part of the rule; this part should contain a list of actions to be executed. It is bad practice to use imperative or conditional code in the RHS of a rule; as a rule should be atomic in nature - "when this, then do this", not "when this, maybe do this". The RHS part of a rule should also be kept small, thus keeping it declarative and readable. If you find you need imperative and/or conditional code in the RHS, then maybe you should be breaking that rule down into multiple rules. The main purpose of the RHS is to insert, delete or modify working memory data. To assist with that there are a few convenience methods you can use to modify working memory; without having to first reference a working memory instance.
update(object,
handle); will tell the engine that an object has changed (one that has been bound to something on the LHS) and rules may need to be reconsidered.
update(object); can also be used; here the Knowledge Helper will look up the facthandle for you, via an identity check, for the passed object.
(Note that if you provide Property Change Listeners to your Java beans that you are inserting into the engine, you can avoid the need to call update() when the object changes.). After a fact’s field values have changed you must call update before changing another fact, or you will cause problems with the indexing within the rule engine.
The modify keyword avoids this problem.
insert(newSomething()); will place a new object of your creation into the Working Memory.
insertLogical(newSomething()); is similar to insert, but the object will be automatically deleted when there are no more facts to support the truth of the currently firing rule.
delete(handle); removes an object from Working Memory.
These convenience methods are basically macros that provide short cuts to the KnowledgeHelper instance that lets you access your Working Memory from rules files.
The predefined variable drools of type KnowledgeHelper lets you call several other useful methods.
(Refer to the KnowledgeHelper interface documentation for more advanced operations).
-
The call
drools.halt()terminates rule execution immediately. This is required for returning control to the point whence the current session was put to work withfireUntilHalt(). -
Methods
insert(Object o),update(Object o)anddelete(Object o)can be called ondroolsas well, but due to their frequent use they can be called without the object reference. -
drools.getWorkingMemory()returns theWorkingMemoryobject. -
drools.setFocus( String s)sets the focus to the specified agenda group. -
drools.getRule().getName(), called from a rule’s RHS, returns the name of the rule. -
drools.getTuple()returns the Tuple that matches the currently executing rule, anddrools.getActivation()delivers the corresponding Activation. (These calls are useful for logging and debugging purposes.)
The full Knowledge Runtime API is exposed through another predefined variable, kcontext, of type KieContext.
Its method getKieRuntime() delivers an object of type KieRuntime, which, in turn, provides access to a wealth of methods, many of which are quite useful for coding RHS logic.
-
The call
kcontext.getKieRuntime().halt()terminates rule execution immediately. -
The accessor
getAgenda()returns a reference to this session’sAgenda, which in turn provides access to the various rule groups: activation groups, agenda groups, and rule flow groups. A fairly common paradigm is the activation of some agenda group, which could be done with the lengthy call:// give focus to the agenda group CleanUp kcontext.getKieRuntime().getAgenda().getAgendaGroup( "CleanUp" ).setFocus();(You can achieve the same using
drools.setFocus( "CleanUp" ).) -
To run a query, you call
getQueryResults(String query), whereupon you may process the results, as explained in section Query. Usingkcontext.getKieRuntime().getQueryResults()or usingdrools.getKieRuntime().getQueryResults()is the proper method of running a query from a rule’s RHS, and the only supported way. -
A set of methods dealing with event management lets you, among other things, add and remove event listeners for the Working Memory and the Agenda.
-
Method
getKieBase()returns theKieBaseobject, the backbone of all the Knowledge in your system, and the originator of the current session. -
You can manage globals with
setGlobal(…),getGlobal(…)andgetGlobals(). -
Method
getEnvironment()returns the runtime’sEnvironmentwhich works much like what you know as your operating system’s environment.
8.8.4.2. The modify Statement
This language extension provides a structured approach to fact updates.
It combines the update operation with a number of setter calls to change the object’s fields.
This is the syntax schema for the modify statement:
modify ( <fact-expression> ) {
<expression> [ , <expression> ]*
}The parenthesized <fact-expression> must yield a fact object reference. The expression list in the block should consist of setter calls for the given object, to be written without the usual object reference, which is automatically prepended by the compiler.
The example illustrates a simple fact modification.
rule "modify stilton"
when
$stilton : Cheese(type == "stilton")
then
modify( $stilton ){
setPrice( 20 ),
setAge( "overripe" )
}
endThe advantages in using the modify statment are particularly clear when used in conjuction with fine grained property change listeners. See the corresponding section for more details.
8.8.5. Conditional named consequences
Sometimes the constraint of having one single consequence for each rule can be somewhat limiting and leads to verbose and difficult to be maintained repetitions like in the following example:
rule "Give 10% discount to customers older than 60"
when
$customer : Customer( age > 60 )
then
modify($customer) { setDiscount( 0.1 ) };
end
rule "Give free parking to customers older than 60"
when
$customer : Customer( age > 60 )
$car : Car ( owner == $customer )
then
modify($car) { setFreeParking( true ) };
endIt is already possible to partially overcome this problem by making the second rule extending the first one like in:
rule "Give 10% discount to customers older than 60"
when
$customer : Customer( age > 60 )
then
modify($customer) { setDiscount( 0.1 ) };
end
rule "Give free parking to customers older than 60"
extends "Give 10% discount to customers older than 60"
when
$car : Car ( owner == $customer )
then
modify($car) { setFreeParking( true ) };
endAnyway this feature makes it possible to define more labelled consequences other than the default one in a single rule, so, for example, the 2 former rules can be compacted in only one like it follows:
rule "Give 10% discount and free parking to customers older than 60"
when
$customer : Customer( age > 60 )
do[giveDiscount]
$car : Car ( owner == $customer )
then
modify($car) { setFreeParking( true ) };
then[giveDiscount]
modify($customer) { setDiscount( 0.1 ) };
endThis last rule has 2 consequences, the usual default one, plus another one named "giveDiscount" that is activated, using the keyword do, as soon as a customer older than 60 is found in the knowledge base, regardless of the fact that he owns a car or not. The activation of a named consequence can be also guarded by an additional condition like in this further example:
rule "Give free parking to customers older than 60 and 10% discount to golden ones among them"
when
$customer : Customer( age > 60 )
if ( type == "Golden" ) do[giveDiscount]
$car : Car ( owner == $customer )
then
modify($car) { setFreeParking( true ) };
then[giveDiscount]
modify($customer) { setDiscount( 0.1 ) };
endThe condition in the if statement is always evaluated on the pattern immediately preceding it. In the end this last, a bit more complicated, example shows how it is possible to switch over different conditions using a nested if/else statement:
rule "Give free parking and 10% discount to over 60 Golden customer and 5% to Silver ones"
when
$customer : Customer( age > 60 )
if ( type == "Golden" ) do[giveDiscount10]
else if ( type == "Silver" ) break[giveDiscount5]
$car : Car ( owner == $customer )
then
modify($car) { setFreeParking( true ) };
then[giveDiscount10]
modify($customer) { setDiscount( 0.1 ) };
then[giveDiscount5]
modify($customer) { setDiscount( 0.05 ) };
endHere the purpose is to give a 10% discount AND a free parking to Golden customers over 60, but only a 5% discount (without free parking) to the Silver ones. This result is achieved by activating the consequence named "giveDiscount5" using the keyword break instead of do. In fact do just schedules a consequence in the agenda, allowing the remaining part of the LHS to continue of being evaluated as per normal, while break also blocks any further pattern matching evaluation. Note, of course, that the activation of a named consequence not guarded by any condition with break doesn’t make sense (and generates a compile time error) since otherwise the LHS part following it would be never reachable.
8.8.6. A Note on Auto-boxing and Primitive Types
Drools attempts to preserve numbers in their primitive or object wrapper form, so a variable bound to an int primitive when used in a code block or expression will no longer need manual unboxing; unlike Drools 3.0 where all primitives were autoboxed, requiring manual unboxing. A variable bound to an object wrapper will remain as an object; the existing JDK 1.5 and JDK 5 rules to handle auto-boxing and unboxing apply in this case. When evaluating field constraints, the system attempts to coerce one of the values into a comparable format; so a primitive is comparable to an object wrapper.
8.9. Query
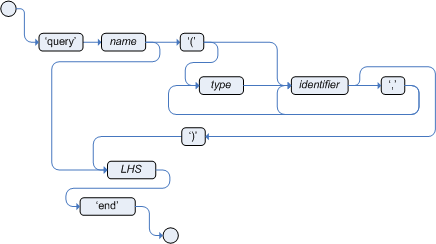
A query is a simple way to search the working memory for facts that match the stated conditions. Therefore, it contains only the structure of the LHS of a rule, so that you specify neither "when" nor "then". A query has an optional set of parameters, each of which can be optionally typed. If the type is not given, the type Object is assumed. The engine will attempt to coerce the values as needed. Query names are global to the KieBase; so do not add queries of the same name to different packages for the same RuleBase.
To return the results use ksession.getQueryResults("name"), where "name" is the query’s name.
This returns a list of query results, which allow you to retrieve the objects that matched the query.
The first example presents a simple query for all the people over the age of 30. The second one, using parameters, combines the age limit with a location.
query "people over the age of 30"
person : Person( age > 30 )
endquery "people over the age of x" (int x, String y)
person : Person( age > x, location == y )
endWe iterate over the returned QueryResults using a standard "for" loop. Each element is a QueryResultsRow which we can use to access each of the columns in the tuple. These columns can be accessed by bound declaration name or index position.
QueryResults results = ksession.getQueryResults( "people over the age of 30" );
System.out.println( "we have " + results.size() + " people over the age of 30" );
System.out.println( "These people are are over 30:" );
for ( QueryResultsRow row : results ) {
Person person = ( Person ) row.get( "person" );
System.out.println( person.getName() + "\n" );
}Support for positional syntax has been added for more compact code. By default the declared type order in the type declaration matches the argument position. But it possible to override these using the @position annotation. This allows patterns to be used with positional arguments, instead of the more verbose named arguments.
declare Cheese
name : String @position(1)
shop : String @position(2)
price : int @position(0)
endThe @Position annotation, in the org.drools.definition.type package, can be used to annotate original pojos on the classpath.
Currently only fields on classes can be annotated.
Inheritance of classes is supported, but not interfaces or methods.
The isContainedIn query below demonstrates the use of positional arguments in a pattern; Location(x, y;) instead of Location( thing == x, location == y).
Queries can now call other queries, this combined with optional query arguments provides derivation query style backward chaining. Positional and named syntax is supported for arguments. It is also possible to mix both positional and named, but positional must come first, separated by a semi colon. Literal expressions can be passed as query arguments, but at this stage you cannot mix expressions with variables. Here is an example of a query that calls another query. Note that 'z' here will always be an 'out' variable. The '?' symbol means the query is pull only, once the results are returned you will not receive further results as the underlying data changes.
declare Location
thing : String
location : String
end
query isContainedIn( String x, String y )
Location(x, y;)
or
( Location(z, y;) and ?isContainedIn(x, z;) )
endAs previously mentioned you can use live "open" queries to reactively receive changes over time from the query results, as the underlying data it queries against changes. Notice the "look" rule calls the query without using '?'.
query isContainedIn( String x, String y )
Location(x, y;)
or
( Location(z, y;) and isContainedIn(x, z;) )
end
rule look when
Person( $l : likes )
isContainedIn( $l, 'office'; )
then
insertLogical( $l 'is in the office' );
endDrools supports unification for derivation queries, in short this means that arguments are optional. It is possible to call queries from Java leaving arguments unspecified using the static field org.drools.core.runtime.rule.Variable.v - note you must use 'v' and not an alternative instance of Variable. These are referred to as 'out' arguments. Note that the query itself does not declare at compile time whether an argument is in or an out, this can be defined purely at runtime on each use. The following example will return all objects contained in the office.
results = ksession.getQueryResults( "isContainedIn", new Object[] { Variable.v, "office" } );
l = new ArrayList<List<String>>();
for ( QueryResultsRow r : results ) {
l.add( Arrays.asList( new String[] { (String) r.get( "x" ), (String) r.get( "y" ) } ) );
}The algorithm uses stacks to handle recursion, so the method stack will not blow up.
It is also possible to use as input argument for a query both the field of a fact as in:
query contains(String $s, String $c)
$s := String( this.contains( $c ) )
end
rule PersonNamesWithA when
$p : Person()
contains( $p.name, "a"; )
then
endand more in general any kind of valid expression like in:
query checkLength(String $s, int $l)
$s := String( length == $l )
end
rule CheckPersonNameLength when
$i : Integer()
$p : Person()
checkLength( $p.name, 1 + $i + $p.age; )
then
endThe following is not yet supported:
-
List and Map unification
-
Expression unification - pred( X, X + 1, X * Y / 7 )
8.10. Domain Specific Languages
Domain Specific Languages (or DSLs) are a way of creating a rule language that is dedicated to your problem domain. A set of DSL definitions consists of transformations from DSL "sentences" to DRL constructs, which lets you use of all the underlying rule language and engine features. Given a DSL, you write rules in DSL rule (or DSLR) files, which will be translated into DRL files.
DSL and DSLR files are plain text files, and you can use any text editor to create and modify them. But there are also DSL and DSLR editors, both in the IDE as well as in the web based BRMS, and you can use those as well, although they may not provide you with the full DSL functionality.
8.10.1. When to Use a DSL
DSLs can serve as a layer of separation between rule authoring (and rule authors) and the technical intricacies resulting from the modelling of domain object and the rule engine’s native language and methods. If your rules need to be read and validated by domain experts (such as business analysts, for instance) who are not programmers, you should consider using a DSL; it hides implementation details and focuses on the rule logic proper. DSL sentences can also act as "templates" for conditional elements and consequence actions that are used repeatedly in your rules, possibly with minor variations. You may define DSL sentences as being mapped to these repeated phrases, with parameters providing a means for accommodating those variations.
DSLs have no impact on the rule engine at runtime, they are just a compile time feature, requiring a special parser and transformer.
8.10.2. DSL Basics
The Drools DSL mechanism allows you to customise conditional expressions and consequence actions. A global substitution mechanism ("keyword") is also available.
[when]Something is {colour}=Something(colour=="{colour}")In the preceding example, [when] indicates the scope of the expression, i.e., whether it is valid for the LHS or the RHS of a rule.
The part after the bracketed keyword is the expression that you use in the rule; typically a natural language expression, but it doesn’t have to be.
The part to the right of the equal sign ("=") is the mapping of the expression into the rule language.
The form of this string depends on its destination, RHS or LHS.
If it is for the LHS, then it ought to be a term according to the regular LHS syntax; if it is for the RHS then it might be a Java statement.
Whenever the DSL parser matches a line from the rule file written in the DSL with an expression in the DSL definition, it performs three steps of string manipulation.
First, it extracts the string values appearing where the expression contains variable names in braces (here: {colour}). Then, the values obtained from these captures are then interpolated wherever that name, again enclosed in braces, occurs on the right hand side of the mapping.
Finally, the interpolated string replaces whatever was matched by the entire expression in the line of the DSL rule file.
Note that the expressions (i.e., the strings on the left hand side of the equal sign) are used as regular expressions in a pattern matching operation against a line of the DSL rule file, matching all or part of a line. This means you can use (for instance) a '?' to indicate that the preceding character is optional. One good reason to use this is to overcome variations in natural language phrases of your DSL. But, given that these expressions are regular expression patterns, this also means that all "magic" characters of Java’s pattern syntax have to be escaped with a preceding backslash ('\').
It is important to note that the compiler transforms DSL rule files line by line. In the above example, all the text after "Something is " to the end of the line is captured as the replacement value for "{colour}", and this is used for interpolating the target string. This may not be exactly what you want. For instance, when you intend to merge different DSL expressions to generate a composite DRL pattern, you need to transform a DSLR line in several independent operations. The best way to achieve this is to ensure that the captures are surrounded by characteristic text - words or even single characters. As a result, the matching operation done by the parser plucks out a substring from somewhere within the line. In the example below, quotes are used as distinctive characters. Note that the characters that surround the capture are not included during interpolation, just the contents between them.
As a rule of thumb, use quotes for textual data that a rule editor may want to enter.
You can also enclose the capture with words to ensure that the text is correctly matched.
Both is illustrated by the following example.
Note that a single line such as Something is "green" and
another solid thing is now correctly expanded.
[when]something is "{colour}"=Something(colour=="{colour}")
[when]another {state} thing=OtherThing(state=="{state})"It is a good idea to avoid punctuation (other than quotes or apostrophes) in your DSL expressions as much as possible. The main reason is that punctuation is easy to forget for rule authors using your DSL. Another reason is that parentheses, the period and the question mark are magic characters, requiring escaping in the DSL definition.
In a DSL mapping, the braces "{" and "}" should only be used to enclose a variable definition or reference, resulting in a capture. If they should occur literally, either in the expression or within the replacement text on the right hand side, they must be escaped with a preceding backslash ("\"):
[then]do something= if (foo) \{ doSomething(); \}|
If braces "{" and "}" should appear in the replacement string of a DSL definition, escape them with a backslash ('\'). |
# This is a comment to be ignored.
[when]There is a person with name of "{name}"=Person(name=="{name}")
[when]Person is at least {age} years old and lives in "{location}"=
Person(age >= {age}, location=="{location}")
[then]Log "{message}"=System.out.println("{message}");
[when]And = andGiven the above DSL examples, the following examples show the expansion of various DSLR snippets:
There is a person with name of "Kitty"
==> Person(name="Kitty")
Person is at least 42 years old and lives in "Atlanta"
==> Person(age >= 42, location="Atlanta")
Log "boo"
==> System.out.println("boo");
There is a person with name of "Bob" And Person is at least 30 years old and lives in "Utah"
==> Person(name="Bob") and Person(age >= 30, location="Utah")|
Don’t forget that if you are capturing plain text from a DSL rule line and want to use it as a string literal in the expansion, you must provide the quotes on the right hand side of the mapping. |
You can chain DSL expressions together on one line, as long as it is clear to the parser where one ends and the next one begins and where the text representing a parameter ends. (Otherwise you risk getting all the text until the end of the line as a parameter value.) The DSL expressions are tried, one after the other, according to their order in the DSL definition file. After any match, all remaining DSL expressions are investigated, too.
The resulting DRL text may consist of more than one line.
Line ends are in the replacement text are written as \n.
8.10.3. Adding Constraints to Facts
A common requirement when writing rule conditions is to be able to add an arbitrary combination of constraints to a pattern. Given that a fact type may have many fields, having to provide an individual DSL statement for each combination would be plain folly.
The DSL facility allows you to add constraints to a pattern by a simple convention: if your DSL expression starts with a hyphen (minus character, "-") it is assumed to be a field constraint and, consequently, is is added to the last pattern line preceding it.
For an example, lets take look at class Cheese, with the following fields: type, price, age and country.
We can express some LHS condition in normal DRL like the following
Cheese(age < 5, price == 20, type=="stilton", country=="ch")The DSL definitions given below result in three DSL phrases which may be used to create any combination of constraint involving these fields.
[when]There is a Cheese with=Cheese()
[when]- age is less than {age}=age<{age}
[when]- type is '{type}'=type=='{type}'
[when]- country equal to '{country}'=country=='{country}'You can then write rules with conditions like the following:
There is a Cheese with
- age is less than 42
- type is 'stilton'The parser will pick up a line beginning with "-" and add it as a constraint to the preceding pattern, inserting a comma when it is required. For the preceding example, the resulting DRL is:
Cheese(age<42, type=='stilton')Combining all numeric fields with all relational operators (according to the DSL expression "age is less than…" in the preceding example) produces an unwieldy amount of DSL entries. But you can define DSL phrases for the various operators and even a generic expression that handles any field constraint, as shown below. (Notice that the expression definition contains a regular expression in addition to the variable name.)
[when][]is less than or equal to=<=
[when][]is less than=<
[when][]is greater than or equal to=>=
[when][]is greater than=>
[when][]is equal to===
[when][]equals===
[when][]There is a Cheese with=Cheese()
[when][]- {field:\w*} {operator} {value:\d*}={field} {operator} {value}Given these DSL definitions, you can write rules with conditions such as:
There is a Cheese with
- age is less than 42
- rating is greater than 50
- type equals 'stilton'In this specific case, a phrase such as "is less than" is replaced by <, and then the line matches the last DSL entry.
This removes the hyphen, but the final result is still added as a constraint to the preceding pattern.
After processing all of the lines, the resulting DRL text is:
Cheese(age<42, rating > 50, type=='stilton')|
The order of the entries in the DSL is important if separate DSL expressions are intended to match the same line, one after the other. |
8.10.4. Developing a DSL
A good way to get started is to write representative samples of the rules your application requires, and to test them as you develop. This will provide you with a stable framework of conditional elements and their constraints. Rules, both in DRL and in DSLR, refer to entities according to the data model representing the application data that should be subject to the reasoning process defined in rules. Notice that writing rules is generally easier if most of the data model’s types are facts.
Given an initial set of rules, it should be possible to identify recurring or similar code snippets and to mark variable parts as parameters. This provides reliable leads as to what might be a handy DSL entry. Also, make sure you have a full grasp of the jargon the domain experts are using, and base your DSL phrases on this vocabulary.
You may postpone implementation decisions concerning conditions and actions during this first design phase by leaving certain conditional elements and actions in their DRL form by prefixing a line with a greater sign (">"). (This is also handy for inserting debugging statements.)
During the next development phase, you should find that the DSL configuration stabilizes pretty quickly. New rules can be written by reusing the existing DSL definitions, or by adding a parameter to an existing condition or consequence entry.
Try to keep the number of DSL entries small. Using parameters lets you apply the same DSL sentence for similar rule patterns or constraints. But do not exaggerate: authors using the DSL should still be able to identify DSL phrases by some fixed text.
8.10.5. DSL and DSLR Reference
A DSL file is a text file in a line-oriented format. Its entries are used for transforming a DSLR file into a file according to DRL syntax.
-
A line starting with "" or "//" (with or without preceding white space) is treated as a comment. A comment line starting with "/" is scanned for words requesting a debug option, see below.
-
Any line starting with an opening bracket ("[") is assumed to be the first line of a DSL entry definition.
-
Any other line is appended to the preceding DSL entry definition, with the line end replaced by a space.
A DSL entry consists of the following four parts:
-
A scope definition, written as one of the keywords "when" or "condition", "then" or "consequence", "*" and "keyword", enclosed in brackets ("[" and "]"). This indicates whether the DSL entry is valid for the condition or the consequence of a rule, or both. A scope indication of "keyword" means that the entry has global significance, i.e., it is recognized anywhere in a DSLR file.
-
A type definition, written as a Java class name, enclosed in brackets. This part is optional unless the the next part begins with an opening bracket. An empty pair of brackets is valid, too.
-
A DSL expression consists of a (Java) regular expression, with any number of embedded variable definitions, terminated by an equal sign ("="). A variable definition is enclosed in braces ("{" and "}"). It consists of a variable name and two optional attachments, separated by colons (":"). If there is one attachment, it is a regular expression for matching text that is to be assigned to the variable; if there are two attachments, the first one is a hint for the GUI editor and the second one the regular expression.
Note that all characters that are "magic" in regular expressions must be escaped with a preceding backslash ("\") if they should occur literally within the expression.
-
The remaining part of the line after the delimiting equal sign is the replacement text for any DSLR text matching the regular expression. It may contain variable references, i.e., a variable name enclosed in braces. Optionally, the variable name may be followed by an exclamation mark ("!") and a transformation function, see below.
Note that braces ("{" and "}") must be escaped with a preceding backslash ("\") if they should occur literally within the replacement string.
Debugging of DSL expansion can be turned on, selectively, by using a comment line starting with "#/" which may contain one or more words from the table presented below. The resulting output is written to standard output.
| Word | Description |
|---|---|
result |
Prints the resulting DRL text, with line numbers. |
steps |
Prints each expansion step of condition and consequence lines. |
keyword |
Dumps the internal representation of all DSL entries with scope "keyword". |
when |
Dumps the internal representation of all DSL entries with scope "when" or "*". |
then |
Dumps the internal representation of all DSL entries with scope "then" or "*". |
usage |
Displays a usage statistic of all DSL entries. |
Below are some sample DSL definitions, with comments describing the language features they illustrate.
# Comment: DSL examples
#/ debug: display result and usage
# keyword definition: replaces "regula" by "rule"
[keyword][]regula=rule
# conditional element: "T" or "t", "a" or "an", convert matched word
[when][][Tt]here is an? {entity:\w+}=
${entity!lc}: {entity!ucfirst} ()
# consequence statement: convert matched word, literal braces
[then][]update {entity:\w+}=modify( ${entity!lc} )\{ \}The transformation of a DSLR file proceeds as follows:
-
The text is read into memory.
-
Each of the "keyword" entries is applied to the entire text. First, the regular expression from the keyword definition is modified by replacing white space sequences with a pattern matching any number of white space characters, and by replacing variable definitions with a capture made from the regular expression provided with the definition, or with the default (".*?"). Then, the DSLR text is searched exhaustively for occurrences of strings matching the modified regular expression. Substrings of a matching string corresponding to variable captures are extracted and replace variable references in the corresponding replacement text, and this text replaces the matching string in the DSLR text.
-
Sections of the DSLR text between "when" and "then", and "then" and "end", respectively, are located and processed in a uniform manner, line by line, as described below.
For a line, each DSL entry pertaining to the line’s section is taken in turn, in the order it appears in the DSL file. Its regular expression part is modified: white space is replaced by a pattern matching any number of white space characters; variable definitions with a regular expression are replaced by a capture with this regular expression, its default being ".*?". If the resulting regular expression matches all or part of the line, the matched part is replaced by the suitably modified replacement text.
Modification of the replacement text is done by replacing variable references with the text corresponding to the regular expression capture. This text may be modified according to the string transformation function given in the variable reference; see below for details.
If there is a variable reference naming a variable that is not defined in the same entry, the expander substitutes a value bound to a variable of that name, provided it was defined in one of the preceding lines of the current rule.
-
If a DSLR line in a condition is written with a leading hyphen, the expanded result is inserted into the last line, which should contain a pattern CE, i.e., a type name followed by a pair of parentheses. if this pair is empty, the expanded line (which should contain a valid constraint) is simply inserted, otherwise a comma (",") is inserted beforehand.
If a DSLR line in a consequence is written with a leading hyphen, the expanded result is inserted into the last line, which should contain a "modify" statement, ending in a pair of braces ("{" and "}"). If this pair is empty, the expanded line (which should contain a valid method call) is simply inserted, otherwise a comma (",") is inserted beforehand.
|
It is currently not possible to use a line with a leading hyphen to insert text into other conditional element forms (e.g., "accumulate") or it may only work for the first insertion (e.g., "eval"). |
All string transformation functions are described in the following table.
| Name | Description |
|---|---|
uc |
Converts all letters to upper case. |
lc |
Converts all letters to lower case. |
ucfirst |
Converts the first letter to upper case, and all other letters to lower case. |
num |
Extracts all digits and "-" from the string. If the last two digits in the original string are preceded by "." or ",", a decimal period is inserted in the corresponding position. |
a?b/c |
Compares the string with string a, and if they are equal, replaces it with b, otherwise with c. But c can be another triplet a, b, c, so that the entire structure is, in fact, a translation table. |
The following DSL examples show how to use string transformation functions.
# definitions for conditions
[when][]There is an? {entity}=${entity!lc}: {entity!ucfirst}()
[when][]- with an? {attr} greater than {amount}={attr} <= {amount!num}
[when][]- with a {what} {attr}={attr} {what!positive?>0/negative?%lt;0/zero?==0/ERROR}A file containing a DSL definition has to be put under the resources folder or any of its subfolders like any other drools artifact.
It must have the extension .dsl, or alternatively be marked with type ResourceType.DSL.
when programmatically added to a KieFileSystem.
For a file using DSL definition, the extension .dslr should be used, while it can be added to a KieFileSystem with type ResourceType.DSLR.
For parsing and expanding a DSLR file the DSL configuration is read and supplied to the parser. Thus, the parser can "recognize" the DSL expressions and transform them into native rule language expressions.
9. Complex Event Processing
9.1. Complex Event Processing
There is no broadly accepted definition on the term Complex Event Processing. The term Event by itself is frequently overloaded and used to refer to several different things, depending on the context it is used. Defining terms is not the goal of this guide and as so, lets adopt a loose definition that, although not formal, will allow us to proceed with a common understanding.
So, in the scope of this guide:
|
Event, is a record of a significant change of state in the application domain at a given point in time. |
For instance, on a Stock Broker application, when a sale operation is executed, it causes a change of state in the domain. This change of state can be observed on several entities in the domain, like the price of the securities that changed to match the value of the operation, the ownership of the traded assets that changed from the seller to the buyer, the balance of the accounts from both seller and buyer that are credited and debited, etc. Depending on how the domain is modelled, this change of state may be represented by a single event, multiple atomic events or even hierarchies of correlated events. In any case, in the context of this guide, Event is the record of the change of a particular piece of data in the domain.
Events are processed by computer systems since they were invented, and throughout the history, systems responsible for that were given different names and different methodologies were employed. It wasn’t until the 90’s though, that a more focused work started on EDA (Event Driven Architecture) with a more formal definition on the requirements and goals for event processing. Old messaging systems started to change to address such requirements and new systems started to be developed with the single purpose of event processing. Two trends were born under the names of Event Stream Processing and Complex Event Processing.
In the very beginnings, Event Stream Processing was focused on the capabilities of processing streams of events in (near) real time, while the main focus of Complex Event Processing was on the correlation and composition of atomic events into complex (compound) events. An important (maybe the most important) milestone was the publishing of Dr. David Luckham’s book "The Power of Events" in 2002. In the book, Dr Luckham introduces the concept of Complex Event Processing and how it can be used to enhance systems that deal with events. Over the years, both trends converged to a common understanding and today these systems are all referred to as CEP systems.
This is a very simplistic explanation to a really complex and fertile field of research, but sets a high level and common understanding of the concepts that this guide will introduce.
The current understanding of what Complex Event Processing is may be briefly described as the following quote from Wikipedia:
— http://en.wikipedia.org/wiki/Complex_event_processing
|
In other words, CEP is about detecting and selecting the interesting events (and only them) from an event cloud, finding their relationships and inferring new data from them and their relationships.
|
For the remaining of this guide, we will use the terms Complex Event Processing and CEP as a broad reference for any of the related technologies and techniques, including but not limited to, CEP, Complex Event Processing, ESP, Event Stream Processing and Event Processing in general. |
9.2. Drools Fusion
Event Processing use cases, in general, share several requirements and goals with Business Rules use cases. These overlaps happen both on the business side and on the technical side.
On the Business side:
-
Business rules are frequently defined based on the occurrence of scenarios triggered by events. Examples could be:
-
On an algorithmic trading application: take an action if the security price increases X% compared to the day opening price, where the price increases are usually denoted by events on a Stock Trade application.
-
On a monitoring application: take an action if the temperature on the server room increases X degrees in Y minutes, where sensor readings are usually denoted by events.
-
-
Both business rules and event processing queries change frequently and require immediate response for the business to adapt itself to new market conditions, new regulations and new enterprise policies.
From a technical perspective:
-
Both require seamless integration with the enterprise infrastructure and applications, specially on autonomous governance, including, but not limited to, lifecycle management, auditing, security, etc.
-
Both have functional requirements like pattern matching and non-functional requirements like response time and query/rule explanation.
Even sharing requirements and goals, historically, both fields were born appart and although the industry evolved and one can find good products on the market, they either focus on event processing or on business rules management. That is due not only because of historical reasons but also because, even overlapping in part, use cases do have some different requirements.
|
Drools was also born as a rules engine several years ago, but following the vision of becoming a single platform for behavioral modelling, it soon realized that it could only achieve this goal by crediting the same importance to the three complementary business modelling techniques:
|
In this context, Drools Fusion is the module responsible for adding event processing capabilities into the platform.
Supporting Complex Event Processing, though, is much more than simply understanding what an event is. CEP scenarios share several common and distinguishing characteristics:
-
Usually required to process huge volumes of events, but only a small percentage of the events are of real interest.
-
Events are usually immutable, since they are a record of state change.
-
Usually the rules and queries on events must run in reactive modes, i.e., react to the detection of event patterns.
-
Usually there are strong temporal relationships between related events.
-
Individual events are usually not important. The system is concerned about patterns of related events and their relationships.
-
Usually, the system is required to perform composition and aggregation of events.
Based on this general common characteristics, Drools Fusion defined a set of goals to be achieved in order to support Complex Event Processing appropriately:
-
Support Events, with their proper semantics, as first class citizens.
-
Allow detection, correlation, aggregation and composition of events.
-
Support processing of Streams of events.
-
Support temporal constraints in order to model the temporal relationships between events.
-
Support sliding windows of interesting events.
-
Support a session scoped unified clock.
-
Support the required volumes of events for CEP use cases.
-
Support to (re)active rules.
-
Support adapters for event input into the engine (pipeline).
The above list of goals are based on the requirements not covered by Drools Expert itself, since in a unified platform, all features of one module are leveraged by the other modules. This way, Drools Fusion is born with enterprise grade features like Pattern Matching, that is paramount to a CEP product, but that is already provided by Drools Expert. In the same way, all features provided by Drools Fusion are leveraged by Drools Flow (and vice-versa) making process management aware of event processing and vice-versa.
For the remaining of this guide, we will go through each of the features Drools Fusion adds to the platform. All these features are available to support different use cases in the CEP world, and the user is free to select and use the ones that will help him model his business use case.
9.3. Event Semantics
An event is a fact that present a few distinguishing characteristics:
-
Usually immutables: since, by the previously discussed definition, events are a record of a state change in the application domain, i.e., a record of something that already happened, and the past can not be "changed", events are immutables. This constraint is an important requirement for the development of several optimizations and for the specification of the event lifecycle. This does not mean that the Java object representing the object must be immutable. Quite the contrary, the engine does not enforce immutability of the object model, because one of the most common use cases for rules is event data enrichment.
As a best practice, the application is allowed to populate un-populated event attributes (to enrich the event with inferred data), but already populated attributes should never be changed.
-
Strong temporal constraints: rules involving events usually require the correlation of multiple events, specially temporal correlations where events are said to happen at some point in time relative to other events.
-
Managed lifecycle: due to their immutable nature and the temporal constraints, events usually will only match other events and facts during a limited window of time, making it possible for the engine to manage the lifecycle of the events automatically. In other words, one an event is inserted into the working memory, it is possible for the engine to find out when an event can no longer match other facts and automatically delete it, releasing its associated resources.
-
Use of sliding windows: since all events have timestamps associated to them, it is possible to define and use sliding windows over them, allowing the creation of rules on aggregations of values over a period of time. Example: average of an event value over 60 minutes.
Drools supports the declaration and usage of events with both semantics: point-in-time events and interval-based events.
|
A simplistic way to understand the unitification of the semantics is to consider a point-in-time event as an interval-based event whose duration is zero. |
9.4. Event Processing Modes
Rules engines in general have a well known way of processing data and rules and provide the application with the results. Also, there is not many requirements on how facts should be presented to the rules engine, specially because in general, the processing itself is time independent. That is a good assumption for most scenarios, but not for all of them. When the requirements include the processing of real time or near real time events, time becomes and important variable of the reasoning process.
The following sections will explain the impact of time on rules reasoning and the two modes provided by Drools for the reasoning process.
9.4.1. Cloud Mode
The CLOUD processing mode is the default processing mode. Users of rules engine are familiar with this mode because it behaves in exactly the same way as any pure forward chaining rules engine, including previous versions of Drools.
When running in CLOUD mode, the engine sees all facts in the working memory, does not matter if they are regular facts or events, as a whole. There is no notion of flow of time, although events have a timestamp as usual. In other words, although the engine knows that a given event was created, for instance, on January 1st 2009, at 09:35:40.767, it is not possible for the engine to determine how "old" the event is, because there is no concept of "now".
In this mode, the engine will apply its usual many-to-many pattern matching algorithm, using the rules constraints to find the matching tuples, activate and fire rules as usual.
This mode does not impose any kind of additional requirements on facts. So for instance:
-
There is no notion of time. No requirements clock synchronization.
-
There is no requirement on event ordering. The engine looks at the events as an unordered cloud against which the engine tries to match rules.
On the other hand, since there is no requirements, some benefits are not available either. For instance, in CLOUD mode, it is not possible to use sliding windows, because sliding windows are based on the concept of "now" and there is no concept of "now" in CLOUD mode.
Since there is no ordering requirement on events, it is not possible for the engine to determine when events can no longer match and as so, there is no automatic life-cycle management for events. I.e., the application must explicitly delete events when they are no longer necessary, in the same way the application does with regular facts.
Cloud mode is the default execution mode for Drools, but in any case, as any other configuration in Drools, it is possible to change this behavior either by setting a system property, using configuration property files or using the API. The corresponding property is:
KieBaseConfiguration config = KieServices.Factory.get().newKieBaseConfiguration();
config.setOption( EventProcessingOption.CLOUD );The equivalent property is:
drools.eventProcessingMode = cloud9.4.2. Stream Mode
The STREAM processing mode is the mode of choice when the application needs to process streams of events. It adds a few common requirements to the regular processing, but enables a whole lot of features that make stream event processing a lot simpler.
The main requirements to use STREAM mode are:
-
Events in each stream must be time-ordered. I.e., inside a given stream, events that happened first must be inserted first into the engine.
-
The engine will force synchronization between streams through the use of the session clock, so, although the application does not need to enforce time ordering between streams, the use of non-time-synchronized streams may result in some unexpected results.
Given that the above requirements are met, the application may enable the STREAM mode using the following API:
KieBaseConfiguration config = KieServices.Factory.get().newKieBaseConfiguration();
config.setOption( EventProcessingOption.STREAM );Or, the equivalent property:
drools.eventProcessingMode = streamWhen using the STREAM, the engine knows the concept of flow of time and the concept of "now", i.e., the engine understands how old events are based on the current timestamp read from the Session Clock. This characteristic allows the engine to provide the following additional features to the application:
-
Sliding Window support
-
Automatic Event Lifecycle Management
-
Automatic Rule Delaying when using Negative Patterns
All these features are explained in the following sections.
9.4.2.1. Role of Session Clock in Stream mode
When running the engine in CLOUD mode, the session clock is used only to time stamp the arriving events that don’t have a previously defined timestamp attribute. Although, in STREAM mode, the Session Clock assumes an even more important role.
In STREAM mode, the session clock is responsible for keeping the current timestamp, and based on it, the engine does all the temporal calculations on event’s aging, synchronizes streams from multiple sources, schedules future tasks and so on.
Check the documentation on the Session Clock section to know how to configure and use different session clock implementations.
9.4.2.2. Negative Patterns in Stream Mode
Negative patterns behave different in STREAM mode when compared to CLOUD mode. In CLOUD mode, the engine assumes that all facts and events are known in advance (there is no concept of flow of time) and so, negative patterns are evaluated immediately.
When running in STREAM mode, negative patterns with temporal constraints may require the engine to wait for a time period before activating a rule. The time period is automatically calculated by the engine in a way that the user does not need to use any tricks to achieve the desired result.
For instance:
rule "Sound the alarm"
when
$f : FireDetected( )
not( SprinklerActivated( ) )
then
// sound the alarm
endThe above rule has no temporal constraints that would require delaying the rule, and so, the rule activates immediately. The following rule on the other hand, must wait for 10 seconds before activating, since it may take up to 10 seconds for the sprinklers to activate:
rule "Sound the alarm"
when
$f : FireDetected( )
not( SprinklerActivated( this after[0s,10s] $f ) )
then
// sound the alarm
endThis behaviour allows the engine to keep consistency when dealing with negative patterns and temporal constraints at the same time. The above would be the same as writing the rule as below, but does not burden the user to calculate and explicitly write the appropriate duration parameter:
rule "Sound the alarm"
duration( 10s )
when
$f : FireDetected( )
not( SprinklerActivated( this after[0s,10s] $f ) )
then
// sound the alarm
endThe following rule expects every 10 seconds at least one “Heartbeat” event, if not the rule fires. The special case in this rule is that we use the same type of the object in the first pattern and in the negative pattern. The negative pattern has the temporal constraint to wait between 0 to 10 seconds before firing and it excludes the Heartbeat bound to $h. Excluding the bound Heartbeat is important since the temporal constraint [0s, …] does not exclude by itself the bound event $h from being matched again, thus preventing the rule to fire.
rule "Sound the alarm"
when
$h: Heartbeat( ) from entry-point "MonitoringStream"
not( Heartbeat( this != $h, this after[0s,10s] $h ) from entry-point "MonitoringStream" )
then
// Sound the alarm
end9.5. Session Clock
Reasoning over time requires a reference clock. Just to mention one example, if a rule reasons over the average price of a given stock over the last 60 minutes, how the engine knows what stock price changes happened over the last 60 minutes in order to calculate the average? The obvious response is: by comparing the timestamp of the events with the "current time". How the engine knows what time is now? Again, obviously, by querying the Session Clock.
The session clock implements a strategy pattern, allowing different types of clocks to be plugged and used by the engine. This is very important because the engine may be running in an elements of different scenarios that may require different clock implementations. Just to mention a few:
-
Rules testing: testing always requires a controlled environment, and when the tests include rules with temporal constraints, it is necessary to not only control the input rules and facts, but also the flow of time.
-
Regular execution: usually, when running rules in production, the application will require a real time clock that allows the rules engine to react immediately to the time progression.
-
Special environments: specific environments may have specific requirements on time control. Cluster environments may require clock synchronization through heart beats, or JEE environments may require the use of an AppServer provided clock, etc.
-
Rules replay or simulation: to replay scenarios or simulate scenarios it is necessary that the application also controls the flow of time.
9.5.1. Available Clock Implementations
Drools 5 provides 2 clock implementations out of the box. The default real time clock, based on the system clock, and an optional pseudo clock, controlled by the application.
9.5.1.1. Real Time Clock
By default, Drools uses a real time clock implementation that internally uses the system clock to determine the current timestamp.
To explicitly configure the engine to use the real time clock, just set the session configuration parameter to real time:
KieSessionConfiguration config = KieServices.Factory.get().newKieSessionConfiguration();
config.setOption( ClockTypeOption.get("realtime") );9.5.1.2. Pseudo Clock
Drools also offers out of the box an implementation of a clock that is controlled by the application that is called Pseudo Clock. This clock is specially useful for unit testing temporal rules since it can be controlled by the application and so the results become deterministic.
To configure the pseudo session clock, do:
KieSessionConfiguration config = KieServices.Factory.get().newKieSessionConfiguration();
config.setOption( ClockTypeOption.get("pseudo") );As an example of how to control the pseudo session clock:
KieSessionConfiguration config = KieServices.Factory.get().newKieSessionConfiguration();
conf.setOption( ClockTypeOption.get( "pseudo" ) );
KieSession session = kbase.newKieSession( conf, null );
SessionPseudoClock clock = session.getSessionClock();
// then, while inserting facts, advance the clock as necessary:
FactHandle handle1 = session.insert( tick1 );
clock.advanceTime( 10, TimeUnit.SECONDS );
FactHandle handle2 = session.insert( tick2 );
clock.advanceTime( 30, TimeUnit.SECONDS );
FactHandle handle3 = session.insert( tick3 );9.6. Sliding Windows
Sliding Windows are a way to scope the events of interest by defining a window that is constantly moving. The two most common types of sliding window implementations are time based windows and length based windows.
The next sections will detail each of them.
|
Sliding Windows are only available when running the engine in STREAM mode. Check the Event Processing Mode section for details on how the STREAM mode works. |
|
Sliding windows start to match immediately and defining a sliding window does not imply that the rule has to wait for the sliding window to be "full" in order to match. For instance, a rule that calculates the average of an event property on a window:length(10) will start calculating the average immediately, and it will start at 0 (zero) for no-events, and will update the average as events arrive one by one. |
9.6.1. Sliding Time Windows
Sliding Time Windows allow the user to write rules that will only match events occurring in the last X time units.
For instance, if the user wants to consider only the Stock Ticks that happened in the last 2 minutes, the pattern would look like this:
StockTick() over window:time( 2m )Drools uses the "over" keyword to associate windows to patterns.
On a more elaborate example, if the user wants to sound an alarm in case the average temperature over the last 10 minutes read from a sensor is above the threshold value, the rule would look like:
rule "Sound the alarm in case temperature rises above threshold"
when
TemperatureThreshold( $max : max )
Number( doubleValue > $max ) from accumulate(
SensorReading( $temp : temperature ) over window:time( 10m ),
average( $temp ) )
then
// sound the alarm
endThe engine will automatically disregard any SensorReading older than 10 minutes and keep the calculated average consistent.
|
Please note that time based windows are considered when calculating the interval an event remains in the working memory before being expired, but an event falling off a sliding window does not mean by itself that the event will be discarded from the working memory, as there might be other rules that depend on that event. The engine will discard events only when no other rules depend on that event and the expiration policy for that event type is fulfilled. |
9.6.2. Sliding Length Windows
Sliding Length Windows work the same way as Time Windows, but consider events based on order of their insertion into the session instead of flow of time.
For instance, if the user wants to consider only the last 10 RHT Stock Ticks, independent of how old they are, the pattern would look like this:
StockTick( company == "RHT" ) over window:length( 10 )As you can see, the pattern is similar to the one presented in the previous section, but instead of using window:time to define the sliding window, it uses window:length.
Using a similar example to the one in the previous section, if the user wants to sound an alarm in case the average temperature over the last 100 readings from a sensor is above the threshold value, the rule would look like:
rule "Sound the alarm in case temperature rises above threshold"
when
TemperatureThreshold( $max : max )
Number( doubleValue > $max ) from accumulate(
SensorReading( $temp : temperature ) over window:length( 100 ),
average( $temp ) )
then
// sound the alarm
endThe engine will keep only consider the last 100 readings to calculate the average temperature.
|
Please note that falling off a length based window is not criteria for event expiration in the session. The engine disregards events that fall off a window when calculating that window, but does not remove the event from the session based on that condition alone as there might be other rules that depend on that event. |
|
Please note that length based windows do not define temporal constraints for event expiration from the session, and the engine will not consider them. If events have no other rules defining temporal constraints and no explicit expiration policy, the engine will keep them in the session indefinitely. |
When using a sliding window, alpha constraints are evaluated before the window is considered, but beta (join) constraints are evaluated afterwards. This usually doesn’t make a difference when time windows are concerned, but it’s important when using a length window. For example this pattern:
StockTick( company == "RHT" ) over window:length( 10 )defines a window of (at most) 10 StockTicks all having company equal to "RHT", while the following one:
$s : String()
StockTick( company == $s ) over window:length( 10 )first creates a window of (at most) 10 StockTicks regardless of the value of their company attribute and then filters among them only the ones having the company equal to the String selected from the working memory.
9.6.3. Window Declaration
The engine also supports the declaration of Windows. This promotes a clear separation between what are the filters applied to the window and what are the constraints applied to the result of window. It also allows easy reuse of windows among multiple rules.
Another benefit is a new implementation of the basic window support in the engine, increasing the overall performance of the rules that use sliding windows.
The simplified EBNF to declare a window is:
windowDeclaration := DECLARE WINDOW ID annotation* lhsPatternBind ENDFor example a window containing only the last 10 stock ticks from a given source can be defined like:
declare window Ticks
StockTick( source == "NYSE" )
over window:length( 10 )
from entry-point STStream
endRules can then use this declared window by using it as a source for a FROM as in:
rule "RHT ticks in the window"
when
accumulate( StockTick( company == "RHT" ) from window Ticks,
$cnt : count(1) )
then
// there has been $cnt RHT ticks over the last 10 ticks
endNote that this example also demonstrates how the window declaration allows to separate the constraints applied to the window (only the StockTicks having "NYSE" as source are among the 10 events included into window) and the constraints applied to the window result (among the last 10 events having "NYSE" as source only the ones with company equal to "RHT" are selected).
9.7. Streams Support
Most CEP use cases have to deal with streams of events. The streams can be provided to the application in various forms, from JMS queues to flat text files, from database tables to raw sockets or even through web service calls. In any case, the streams share a common set of characteristics:
-
events in the stream are ordered by a timestamp. The timestamp may have different semantics for different streams but they are always ordered internally.
-
volumes of events are usually high.
-
atomic events are rarely useful by themselves. Usually meaning is extracted from the correlation between multiple events from the stream and also from other sources.
-
streams may be homogeneous, i.e. contain a single type of events, or heterogeneous, i.e. contain multiple types of events.
Drools generalized the concept of a stream as an "entry point" into the engine. An entry point is for drools a gate from which facts come. The facts may be regular facts or special facts like events.
In Drools, facts from one entry point (stream) may join with facts from any other entry point or event with facts from the working memory. Although, they never mix, i.e., they never lose the reference to the entry point through which they entered the engine. This is important because one may have the same type of facts coming into the engine through several entry points, but one fact that is inserted into the engine through entry point A will never match a pattern from a entry point B, for example.
9.7.1. Declaring and Using Entry Points
Entry points are declared implicitly in Drools by directly making use of them in rules. I.e. referencing an entry point in a rule will make the engine, at compile time, to identify and create the proper internal structures to support that entry point.
So, for instance, lets imagine a banking application, where transactions are fed into the system coming from streams. One of the streams contains all the transactions executed in ATM machines. So, if one of the rules says: a withdraw is authorized if and only if the account balance is over the requested withdraw amount, the rule would look like:
rule "authorize withdraw"
when
WithdrawRequest( $ai : accountId, $am : amount ) from entry-point "ATM Stream"
CheckingAccount( accountId == $ai, balance > $am )
then
// authorize withdraw
endIn the previous example, the engine compiler will identify that the pattern is tied to the entry point "ATM Stream" and will both create all the necessary structures for the rulebase to support the "ATM Stream" and will only match WithdrawRequests coming from the "ATM Stream". In the previous example, the rule is also joining the event from the stream with a fact from the main working memory (CheckingAccount).
Now, lets imagine a second rule that states that a fee of $2 must be applied to any account for which a withdraw request is placed at a bank branch:
rule "apply fee on withdraws on branches"
when
WithdrawRequest( $ai : accountId, processed == true ) from entry-point "Branch Stream"
CheckingAccount( accountId == $ai )
then
// apply a $2 fee on the account
endThe previous rule will match events of the exact same type as the first rule (WithdrawRequest), but from two different streams, so an event inserted into "ATM Stream" will never be evaluated against the pattern on the second rule, because the rule states that it is only interested in patterns coming from the "Branch Stream".
So, entry points, besides being a proper abstraction for streams, are also a way to scope facts in the working memory, and a valuable tool for reducing cross products explosions. But that is a subject for another time.
Inserting events into an entry point is equally simple. Instead of inserting events directly into the working memory, insert them into the entry point as shown in the example below:
// create your rulebase and your session as usual
KieSession session = ...
// get a reference to the entry point
EntryPoint atmStream = session.getEntryPoint( "ATM Stream" );
// and start inserting your facts into the entry point
atmStream.insert( aWithdrawRequest );The previous example shows how to manually insert facts into a given entry point. Although, usually, the application will use one of the many adapters to plug a stream end point, like a JMS queue, directly into the engine entry point, without coding the inserts manually. The Drools pipeline API has several adapters and helpers to do that as well as examples on how to do it.
9.8. Memory Management for Events
|
The automatic memory management for events is only performed when running the engine in STREAM mode. Check the Event Processing Mode section for details on how the STREAM mode works. |
One of the benefits of running the engine in STREAM mode is that the engine can detect when an event can no longer match any rule due to its temporal constraints. When that happens, the engine can safely delete the event from the session without side effects and release any resources used by that event.
There are basically 2 ways for the engine to calculate the matching window for a given event:
-
explicitly, using the expiration policy
-
implicitly, analyzing the temporal constraints on events
9.8.1. Explicit expiration offset
The first way of allowing the engine to calculate the window of interest for a given event type is by explicitly setting it. To do that, just use the declare statement and define an expiration for the fact type:
declare StockTick
@expires( 30m )
endThe above example declares an expiration offset of 30 minutes for StockTick events. After that time, assuming no rule still needs the event, the engine will expire and remove the event from the session automatically.
|
An explicit expiration policy for a given event type overrides any inferred expiration offset for that same type. |
9.8.2. Inferred expiration offset
Another way for the engine to calculate the expiration offset for a given event is implicitly, by analyzing the temporal constraints in the rules. For instance, given the following rule:
rule "correlate orders"
when
$bo : BuyOrderEvent( $id : id )
$ae : AckEvent( id == $id, this after[0,10s] $bo )
then
// do something
endAnalyzing the above rule, the engine automatically calculates that whenever a BuyOrderEvent matches, it needs to store it for up to 10 seconds to wait for matching AckEvent’s. So, the implicit expiration offset for BuyOrderEvent will be 10 seconds. AckEvent, on the other hand, can only match existing BuyOrderEvent’s, and so its expiration offset will be zero seconds.
The engine will make this analysis for the whole rulebase and find the offset for every event type.
|
An explicit expiration policy for a given event type overrides any inferred expiration offset for that same type. |
9.9. Temporal Reasoning
Temporal reasoning is another requirement of any CEP system. As discussed previously, one of the distinguishing characteristics of events is their strong temporal relationships.
Temporal reasoning is an extensive field of research, from its roots on Temporal Modal Logic to its more practical applications in business systems. There are hundreds of papers and thesis written and approaches are described for several applications. Drools once more takes a pragmatic and simple approach based on several sources, but specially worth noting the following papers:
-
[ALLEN81] Allen, J.F.. An Interval-based Representation of Temporal Knowledge. 1981.
-
[ALLEN83] Allen, J.F.. Maintaining knowledge about temporal intervals. 1983.
-
[BENNE00] Bennet, Brandon and Galton, Antony P.. A Unifying Semantics for Time and Events. 2005.
-
[YONEK05] Yoneki, Eiko and Bacon, Jean. Unified Semantics for Event Correlation Over Time and Space in Hybrid Network Environments. 2005.
Drools implements the Interval-based Time Event Semantics described by Allen, and represents Point-in-Time Events as Interval-based evens with duration 0 (zero).
|
For all temporal operator intervals, the "" (star) symbol is used to indicate positive infinity and the "-" (minus star) is used to indicate negative infinity. |
9.9.1. Temporal Operators
Drools implements all 13 operators defined by Allen and also their logical complement (negation). This section details each of the operators and their parameters.
9.9.1.1. After
The after evaluator correlates two events and matches when the temporal distance from the current event to the event being correlated belongs to the distance range declared for the operator.
Lets look at an example:
$eventA : EventA( this after[ 3m30s, 4m ] $eventB )The previous pattern will match if and only if the temporal distance between the time when $eventB finished and the time when $eventA started is between ( 3 minutes and 30 seconds ) and ( 4 minutes ). In other words:
3m30s <= $eventA.startTimestamp - $eventB.endTimeStamp <= 4mThe temporal distance interval for the after operator is optional:
-
If two values are defined (like in the example below), the interval starts on the first value and finishes on the second.
-
If only one value is defined, the interval starts on the value and finishes on the positive infinity.
-
If no value is defined, it is assumed that the initial value is 1ms and the final value is the positive infinity.
|
It is possible to define negative distances for this operator. Example: |
|
If the first value is greater than the second value, the engine automatically reverses them, as there is no reason to have the first value greater than the second value. Example: the following two patterns are considered to have the same semantics: |
|
The after, before and coincides operators can be used to define constraints between events, java.util.Date attributes, and long attributes (interpreted as timestamps since epoch) in any combination. Example: |
9.9.1.2. Before
The before evaluator correlates two events and matches when the temporal distance from the event being correlated to the current correlated belongs to the distance range declared for the operator.
Lets look at an example:
$eventA : EventA( this before[ 3m30s, 4m ] $eventB )The previous pattern will match if and only if the temporal distance between the time when $eventA finished and the time when $eventB started is between ( 3 minutes and 30 seconds ) and ( 4 minutes ). In other words:
3m30s <= $eventB.startTimestamp - $eventA.endTimeStamp <= 4mThe temporal distance interval for the before operator is optional:
-
If two values are defined (like in the example below), the interval starts on the first value and finishes on the second.
-
If only one value is defined, then the interval starts on the value and finishes on the positive infinity.
-
If no value is defined, it is assumed that the initial value is 1ms and the final value is the positive infinity.
|
It is possible to define negative distances for this operator. Example: |
|
If the first value is greater than the second value, the engine automatically reverses them, as there is no reason to have the first value greater than the second value. Example: the following two patterns are considered to have the same semantics: |
|
The after, before and coincides operators can be used to define constraints between events, java.util.Date attributes, and long attributes (interpreted as timestamps since epoch) in any combination. Example: |
9.9.1.3. Coincides
The coincides evaluator correlates two events and matches when both happen at the same time. Optionally, the evaluator accept thresholds for the distance between events' start and finish timestamps.
Lets look at an example:
$eventA : EventA( this coincides $eventB )The previous pattern will match if and only if the start timestamps of both $eventA and $eventB are the same AND the end timestamp of both $eventA and $eventB also are the same.
Optionally, this operator accepts one or two parameters. These parameters are the thresholds for the distance between matching timestamps.
-
If only one parameter is given, it is used for both start and end timestamps.
-
If two parameters are given, then the first is used as a threshold for the start timestamp and the second one is used as a threshold for the end timestamp.
In other words:
$eventA : EventA( this coincides[15s, 10s] $eventB )Above pattern will match if and only if:
abs( $eventA.startTimestamp - $eventB.startTimestamp ) <= 15s &&
abs( $eventA.endTimestamp - $eventB.endTimestamp ) <= 10s|
It makes no sense to use negative interval values for the parameters and the engine will raise an error if that happens. |
|
The after, before and coincides operators can be used to define constraints between events, java.util.Date attributes, and long attributes (interpreted as timestamps since epoch) in any combination. Example: |
9.9.1.4. During
The during evaluator correlates two events and matches when the current event happens during the occurrence of the event being correlated.
Lets look at an example:
$eventA : EventA( this during $eventB )The previous pattern will match if and only if the $eventA starts after $eventB starts and finishes before $eventB finishes.
In other words:
$eventB.startTimestamp < $eventA.startTimestamp <= $eventA.endTimestamp < $eventB.endTimestampThe during operator accepts 1, 2 or 4 optional parameters as follow:
-
If one value is defined, this will be the maximum distance between the start timestamp of both event and the maximum distance between the end timestamp of both events in order to operator match. Example:
$eventA : EventA( this during[ 5s ] $eventB )Will match if and only if:
0 < $eventA.startTimestamp - $eventB.startTimestamp <= 5s && 0 < $eventB.endTimestamp - $eventA.endTimestamp <= 5s -
If two values are defined, the first value will be the minimum distance between the timestamps of both events, while the second value will be the maximum distance between the timestamps of both events. Example:
$eventA : EventA( this during[ 5s, 10s ] $eventB )Will match if and only if:
5s <= $eventA.startTimestamp - $eventB.startTimestamp <= 10s && 5s <= $eventB.endTimestamp - $eventA.endTimestamp <= 10s -
If four values are defined, the first two values will be the minimum and maximum distances between the start timestamp of both events, while the last two values will be the minimum and maximum distances between the end timestamp of both events. Example:
$eventA : EventA( this during[ 2s, 6s, 4s, 10s ] $eventB )Will match if and only if:
2s <= $eventA.startTimestamp - $eventB.startTimestamp <= 6s && 4s <= $eventB.endTimestamp - $eventA.endTimestamp <= 10s
9.9.1.5. Finishes
The finishes evaluator correlates two events and matches when the current event’s start timestamp happens after the correlated event’s start timestamp, but both end timestamps occur at the same time.
Lets look at an example:
$eventA : EventA( this finishes $eventB )The previous pattern will match if and only if the $eventA starts after $eventB starts and finishes at the same time $eventB finishes.
In other words:
$eventB.startTimestamp < $eventA.startTimestamp &&
$eventA.endTimestamp == $eventB.endTimestampThe finishes evaluator accepts one optional parameter. If it is defined, it determines the maximum distance between the end timestamp of both events in order for the operator to match. Example:
$eventA : EventA( this finishes[ 5s ] $eventB )Will match if and only if:
$eventB.startTimestamp < $eventA.startTimestamp &&
abs( $eventA.endTimestamp - $eventB.endTimestamp ) <= 5s|
It makes no sense to use a negative interval value for the parameter and the engine will raise an exception if that happens. |
9.9.1.6. Finished By
The finishedby evaluator correlates two events and matches when the current event start timestamp happens before the correlated event start timestamp, but both end timestamps occur at the same time. This is the symmetrical opposite of finishes evaluator.
Lets look at an example:
$eventA : EventA( this finishedby $eventB )The previous pattern will match if and only if the $eventA starts before $eventB starts and finishes at the same time $eventB finishes.
In other words:
$eventA.startTimestamp < $eventB.startTimestamp &&
$eventA.endTimestamp == $eventB.endTimestampThe finishedby evaluator accepts one optional parameter. If it is defined, it determines the maximum distance between the end timestamp of both events in order for the operator to match. Example:
$eventA : EventA( this finishedby[ 5s ] $eventB )Will match if and only if:
$eventA.startTimestamp < $eventB.startTimestamp &&
abs( $eventA.endTimestamp - $eventB.endTimestamp ) <= 5s|
It makes no sense to use a negative interval value for the parameter and the engine will raise an exception if that happens. |
9.9.1.7. Includes
The includes evaluator correlates two events and matches when the event being correlated happens during the current event. It is the symmetrical opposite of during evaluator.
Lets look at an example:
$eventA : EventA( this includes $eventB )The previous pattern will match if and only if the $eventB starts after $eventA starts and finishes before $eventA finishes.
In other words:
$eventA.startTimestamp < $eventB.startTimestamp <= $eventB.endTimestamp < $eventA.endTimestampThe includes operator accepts 1, 2 or 4 optional parameters as follow:
-
If one value is defined, this will be the maximum distance between the start timestamp of both event and the maximum distance between the end timestamp of both events in order to operator match. Example:
$eventA : EventA( this includes[ 5s ] $eventB )Will match if and only if:
0 < $eventB.startTimestamp - $eventA.startTimestamp <= 5s && 0 < $eventA.endTimestamp - $eventB.endTimestamp <= 5s -
If two values are defined, the first value will be the minimum distance between the timestamps of both events, while the second value will be the maximum distance between the timestamps of both events. Example:
$eventA : EventA( this includes[ 5s, 10s ] $eventB )Will match if and only if:
5s <= $eventB.startTimestamp - $eventA.startTimestamp <= 10s && 5s <= $eventA.endTimestamp - $eventB.endTimestamp <= 10s -
If four values are defined, the first two values will be the minimum and maximum distances between the start timestamp of both events, while the last two values will be the minimum and maximum distances between the end timestamp of both events. Example:
$eventA : EventA( this includes[ 2s, 6s, 4s, 10s ] $eventB )Will match if and only if:
2s <= $eventB.startTimestamp - $eventA.startTimestamp <= 6s && 4s <= $eventA.endTimestamp - $eventB.endTimestamp <= 10s
9.9.1.8. Meets
The meets evaluator correlates two events and matches when the current event’s end timestamp happens at the same time as the correlated event’s start timestamp.
Lets look at an example:
$eventA : EventA( this meets $eventB )The previous pattern will match if and only if the $eventA finishes at the same time $eventB starts.
In other words:
abs( $eventB.startTimestamp - $eventA.endTimestamp ) == 0The meets evaluator accepts one optional parameter. If it is defined, it determines the maximum distance between the end timestamp of current event and the start timestamp of the correlated event in order for the operator to match. Example:
$eventA : EventA( this meets[ 5s ] $eventB )Will match if and only if:
abs( $eventB.startTimestamp - $eventA.endTimestamp) <= 5s|
It makes no sense to use a negative interval value for the parameter and the engine will raise an exception if that happens. |
9.9.1.9. Met By
The metby evaluator correlates two events and matches when the current event’s start timestamp happens at the same time as the correlated event’s end timestamp.
Lets look at an example:
$eventA : EventA( this metby $eventB )The previous pattern will match if and only if the $eventA starts at the same time $eventB finishes.
In other words:
abs( $eventA.startTimestamp - $eventB.endTimestamp ) == 0The metby evaluator accepts one optional parameter. If it is defined, it determines the maximum distance between the end timestamp of the correlated event and the start timestamp of the current event in order for the operator to match. Example:
$eventA : EventA( this metby[ 5s ] $eventB )Will match if and only if:
abs( $eventA.startTimestamp - $eventB.endTimestamp) <= 5s|
It makes no sense to use a negative interval value for the parameter and the engine will raise an exception if that happens. |
9.9.1.10. Overlaps
The overlaps evaluator correlates two events and matches when the current event starts before the correlated event starts and finishes after the correlated event starts, but before the correlated event finishes. In other words, both events have an overlapping period.
Lets look at an example:
$eventA : EventA( this overlaps $eventB )The previous pattern will match if and only if:
$eventA.startTimestamp < $eventB.startTimestamp < $eventA.endTimestamp < $eventB.endTimestampThe overlaps operator accepts 1 or 2 optional parameters as follow:
-
If one parameter is defined, this will be the maximum distance between the start timestamp of the correlated event and the end timestamp of the current event. Example:
$eventA : EventA( this overlaps[ 5s ] $eventB )Will match if and only if:
$eventA.startTimestamp < $eventB.startTimestamp < $eventA.endTimestamp < $eventB.endTimestamp && 0 <= $eventA.endTimestamp - $eventB.startTimestamp <= 5s -
If two values are defined, the first value will be the minimum distance and the second value will be the maximum distance between the start timestamp of the correlated event and the end timestamp of the current event. Example:
$eventA : EventA( this overlaps[ 5s, 10s ] $eventB )Will match if and only if:
$eventA.startTimestamp < $eventB.startTimestamp < $eventA.endTimestamp < $eventB.endTimestamp && 5s <= $eventA.endTimestamp - $eventB.startTimestamp <= 10s
9.9.1.11. Overlapped By
The overlappedby evaluator correlates two events and matches when the correlated event starts before the current event starts and finishes after the current event starts, but before the current event finishes. In other words, both events have an overlapping period.
Lets look at an example:
$eventA : EventA( this overlappedby $eventB )The previous pattern will match if and only if:
$eventB.startTimestamp < $eventA.startTimestamp < $eventB.endTimestamp < $eventA.endTimestampThe overlappedby operator accepts 1 or 2 optional parameters as follow:
-
If one parameter is defined, this will be the maximum distance between the start timestamp of the current event and the end timestamp of the correlated event. Example:
$eventA : EventA( this overlappedby[ 5s ] $eventB )Will match if and only if:
$eventB.startTimestamp < $eventA.startTimestamp < $eventB.endTimestamp < $eventA.endTimestamp && 0 <= $eventB.endTimestamp - $eventA.startTimestamp <= 5s -
If two values are defined, the first value will be the minimum distance and the second value will be the maximum distance between the start timestamp of the current event and the end timestamp of the correlated event. Example:
$eventA : EventA( this overlappedby[ 5s, 10s ] $eventB )Will match if and only if:
$eventB.startTimestamp < $eventA.startTimestamp < $eventB.endTimestamp < $eventA.endTimestamp && 5s <= $eventB.endTimestamp - $eventA.startTimestamp <= 10s
9.9.1.12. Starts
The starts evaluator correlates two events and matches when the current event’s end timestamp happens before the correlated event’s end timestamp, but both start timestamps occur at the same time.
Lets look at an example:
$eventA : EventA( this starts $eventB )The previous pattern will match if and only if the $eventA finishes before $eventB finishes and starts at the same time $eventB starts.
In other words:
$eventA.startTimestamp == $eventB.startTimestamp &&
$eventA.endTimestamp < $eventB.endTimestampThe starts evaluator accepts one optional parameter. If it is defined, it determines the maximum distance between the start timestamp of both events in order for the operator to match. Example:
$eventA : EventA( this starts[ 5s ] $eventB )Will match if and only if:
abs( $eventA.startTimestamp - $eventB.startTimestamp ) <= 5s &&
$eventA.endTimestamp < $eventB.endTimestamp|
It makes no sense to use a negative interval value for the parameter and the engine will raise an exception if that happens. |
9.9.1.13. Started By
The startedby evaluator correlates two events and matches when the correlating event’s end timestamp happens before the current event’s end timestamp, but both start timestamps occur at the same time. Lets look at an example:
$eventA : EventA( this startedby $eventB )The previous pattern will match if and only if the $eventB finishes before $eventA finishes and starts at the same time $eventB starts.
In other words:
$eventA.startTimestamp == $eventB.startTimestamp &&
$eventA.endTimestamp > $eventB.endTimestampThe startedby evaluator accepts one optional parameter. If it is defined, it determines the maximum distance between the start timestamp of both events in order for the operator to match. Example:
$eventA : EventA( this starts[ 5s ] $eventB )Will match if and only if:
abs( $eventA.startTimestamp - $eventB.startTimestamp ) <= 5s &&
$eventA.endTimestamp > $eventB.endTimestamp|
It makes no sense to use a negative interval value for the parameter and the engine will raise an exception if that happens. |
10. Decision Model and Notation
10.1. Decision Model and Notation
The Decision Model and Notation, or DMN, is a relatively new standard by the Object Management Group, or OMG. It bridges the gap between business models and executable implementations by defining a high level language with a common notation that is readily understandable by users across the business, from analysts to developers.
The actual specification builds on the experience acquired defining the Business Process Model and Notation, or BPMN, it’s sibling specification, that is used to model Business Processes. Interoperability and seamless integration between BPMN and DMN is also a goal of the specification.
10.1.1. Conformance Levels
The DMN specification defines three incremental levels of conformance. For the formal definition of each conformance level, please refer to the DMN 1.1 specification, page 9. Here is an informal way of understanding the compliance levels:
- Conformance Level 1
-
A conformance level 1 implementation is required to support Decision Requirement Diagrams, Decision Logic, and Decision Tables, but the model does not need to be executable. Any language can be used to define the expressions, including natural, unstructured languages.
- Conformance Level 2
-
A conformance level 2 implementation is required to support the same as Conformance Level 1, but expressions should be written using the S-FEEL (Simplified FEEL) language, as defined in chapter 9 of the specification and the models should be fully executable.
- Conformance Level 3
-
A conformance level 3 implementation is required to support the same as Conformance Level 2, but expressions can be written using the full FEEL language, as defined in chapter 10 of the specification. The implementation also has to support the full set of boxed expressions and be fully executable.
10.2. Executing DMN services embedded in the application
This section explains how to interact with a Kie Container in order to execute decision services for the DMN models.
-
a KJAR containing the DMN model to be executed
-
the following dependencies are required:
<dependency> <groupId>org.kie</groupId> <artifactId>kie-ci</artifactId> </dependency> <dependency> <groupId>org.kie</groupId> <artifactId>kie-dmn-core</artifactId> </dependency>
-
Create a Kie Container, either from ReleaseId or classpath:
The following snippet provides a basic example:
Creating a Kie Container from ReleaseIdKieServices kieServices = KieServices.Factory.get(); ReleaseId releaseId = kieServices.newReleaseId( "org.acme", "my-kjar", "1.0.0" ); KieContainer kieContainer = kieServices.newKieContainer( releaseId );or alternatively:
Creating a Kie Container from classpathKieServices kieServices = KieServices.Factory.get(); KieContainer kieContainer = kieServices.getKieClasspathContainer();in case the Kie Container is created from the classpath, the dependency kie-ciis not required. -
Obtain
DMNRuntimefrom the Kie Container, and in turn a reference to the DMN model to be evaluated, by using the model namespace and model name.DMNRuntime dmnRuntime = kieContainer.newKieSession().getKieRuntime( DMNRuntime.class ); DMNModel dmnModel = dmnRuntime.getModel( "https://github.com/kiegroup/kie-dmn/input-data-string", // model namespace "input-data-string" // model name ); -
Execute the decision services for the desired model
The following snippet provides a basic example:
DMNContext dmnContext = dmnRuntime.newContext(); (1) dmnContext.set( "Full Name", "John Doe" ); (2) DMNResult dmnResult = dmnRuntime.evaluateAll( dmnModel, dmnContext ); (3) for ( DMNDecisionResult dr : dmnResult.getDecisionResults() ) { System.out.println( "Decision '" + dr.getDecisionName() + "' : " + dr.getResult() ); }1 Instantiate a new DMN Context to be the input for the model evaluation 2 Assign input variables for the input DMN Context 3 Evaluate all the DMN Decisions defined in the DMN model; the DMN Result contains the result of all the evluations and would print the following output:
Decision 'Greeting Message' : Hello John DoeIt is also possible to cycle over all the evaluations, in order to get the result for each decision respectively as shown in the example
-
For creating a KJAR and for creating a Kie Container, reference "Build, Deploy, Utilize and Run". Ref. Build, Deploy, Utilize and Run
10.3. Executing DMN services remotely on the Kie Server
This section explain how to interact with a Kie Container deployed on a Kie Execution Server, in order to execute decision services for the DMN models available inside the Kie Container.
-
Kie Execution Server installed and configured
-
a Kie Container deployed in the Kie Execution Server, for a KJAR containing the DMN model to be executed
-
a Kie Server Java Client connected to the related Kie Execution Server
-
Obtain a DMNServicesClient from the Kie Server Java Client connected to the related Kie Execution Server
This can be obtained invoking the method
getServicesClient()on the Kie Server Java client instance, as shown in the following snippet:DMNServicesClient dmnClient = kieServicesClient.getServicesClient( DMNServicesClient.class );The
dmnClientcan now be used to execute decision services on the Kie Execution Server. -
Execute the decision services for the desired model
The following snippet provides a basic example:
DMNContext dmnContext = dmnClient.newContext(); (1) dmnContext.set( "Full Name", "John Doe" ); (2) ServiceResponse<DMNResult> serverResp = dmnClient.evaluateAll($containerId, (3) $modelnamespace, $modelname, dmnContext); DMNResult dmnResult = serverResp.getResult(); (4)1 Instantiate a new DMN Context to be the input for the model evaluation 2 Assign input variables for the input DMN Context 3 Evaluate all the DMN Decisions defined in the DMN model 4 The DMN Result object is available from the server response where
$containerIdis the ID of the container where the kjar containing the DMN model is deployed,$modelnamespacethe namespace for the model,$modelnameis the name for the model.At this point, the
dmnResultcontains all the decision results from the evaluated DMN model.It is possible to execute only a specific DMN Decision in the model, by making use of alternative methods of the DMNServicesClient.If the Kie Container contains 1 and only 1 DMN Model, it is possible to omit $modelnamespaceand$modelname; the only model available will be the one referenced by default in order to execute the decision services.
-
Installing the KIE Server. Ref. Installing the KIE Server
-
Creating a Kie Container. Ref. Creating a Kie Container
-
Kie Server Java Client API, describes also the required dependencies. Ref. Kie Server Java Client API
-
Available Clients for the Decision Server. Ref. Available Clients for the Decision Server
10.4. FEEL Language Reference
Friendly Enough Expression Language (FEEL) is an expression language defined by the DMN specification. Any user capable of authoring expressions in a spreadsheet can easily write FEEL expressions.
DMN completely defines the semantics of FEEL execution. Any expression that does not invoke externally defined functions should produce the exact same result in any compliant implementation. The FEEL language is side-effect free and any externally defined function should be side-effect free as well.
10.4.1. FEEL Language Semantics
10.4.1.1. Variable and Function Names
One of the biggest differences between FEEL and traditional languages is the support for spaces and a few special characters as part of variable and function names in FEEL.
A FEEL name must start with a letter, ? or _. The unicode letter characters are also allowed.
The remaining characters in the name can be any of the starting characters, as well as digits,
white spaces, and special characters like +, -, /, *, ' and .. The following names are all valid
FEEL names:
-
Age
-
Birth Date
-
Flight 234 pre-check procedure
Note that, a variable name can not start with a language keyword, like and, true, every, etc.
|
Ambiguity
The use of spaces, keywords and other special characters as part of names makes the language
ambiguous. The ambiguities are resolved in the context of the expression, matching names from
left to right. The parser resolves the variable name as the longest name matched in scope.
The user can use |
|
Spaces in Names
The specification limits the use of spaces in FEEL names. According to the specification, names can contain multiple spaces as long as there are no two consecutive spaces. The use of spaces in names makes expressions easier to read for non-technical users, However, this might lead to problems that are difficult to find. For instance, it might be difficult for a user to visually distinguish one space from two consecutive spaces. In order to make the language easier to use and avoid common errors due to spaces, Drools
removed the limitation on the use of consecutive spaces. Instead, Drools supports variable
names with any number of consecutive spaces, but normalizes them into a single space. For
instance, the two variable references Drools also normalizes the use of other white spaces, like the |
|
The keyword
inThe keyword |
10.4.1.2. Data Types
FEEL explicitly defines several built-in data types:
FEEL also implicitly defines a few other built-in data types. These types are not a consensus between different implementations but are supported by Drools:
10.4.1.3. Numbers
Numbers in FEEL are based on the IEEE 754-2008 Decimal 128
format, with 34 digits of precision. Internally they are represented in Java as
BigDecimals with MathContext DECIMAL128.
There is only one "type" of numbers in FEEL, so the same type is used to represent both integers and floating
point numbers.
FEEL numbers use '.' (dot) as its decimal separator. There is no support for -INF, +INF or NaN. FEEL uses
null to represent invalid numbers.
|
Additional Supported Number Syntaxes
Drools extends the specification and supports additional number notations:
|
10.4.1.4. Strings
Strings in FEEL are any sequence of characters delimited by double quotes. For example, "John Doe".
10.4.1.5. Boolean Values
FEEL uses the literal symbols true and false to represent boolean values.
FEEL uses 3-valued boolean logic, so a boolean logic expression may have results
true, false or null.
|
10.4.1.6. Dates
FEEL does not have date literals, but the built-in date() function can be used to construct
date values. For example,
date( "2017-06-23" )The date strings in FEEL follow the format defined in the XML Schema Part 2 Datatypes
document. The format is "YYYY-MM-DD" where YYYY is the year with 4 digits, MM is the number of the month with
2 digits (such as January is 01, February is 02), and DD is the number of the day.
Date objects have time part equal to "00:00:00", which is midnight. The dates are considered to be local, without a timezone.
10.4.1.7. Time
FEEL does not have time literals, but the built-in time() function can be used to construct
time values. For example,
time( "04:25:12" )
time( "14:10:00+02:00" )
time( "22:35:40.345-05:00" )
time( "15:00:30z" )Time strings in FEEL follow the format defined in the XML Schema Part 2 Datatypes
document. I.e., the format is "hh:mm:ss[.uuu][(+-)hh:mm]" where hh is the hour of the day (from 00 to 24), mm is the
minutes in the hour and ss is the number of seconds in the minute. Optionally, the string may define the
number of milliseconds (uuu) within the second and/or contain a positive (+)
or negative (-) offset from UTC time to define it’s timezone. Instead of an offset, the letter "z" can be
used to represent the UTC time, that is same as offset -00:00. If no offset is defined, the time is considered
to be local.
Time values that define an offset/timezone cannot be compared to local times that do not define an offset/timezone.
10.4.1.8. Date and Time
FEEL does not have date and time literals, but the built-in date and time() function can be used to construct
date and time values. For example,
date and time( "2017-10-22T23:59:00" )
date and time( "2017-06-13T14:10:00+02:00" )
date and time( "2017-02-05T22:35:40.345-05:00" )
date and time( "2017-06-13T15:00:30z" )Date and Time strings in FEEL follow the format defined in the XML Schema Part 2 Datatypesdocument. The format is a date string and a time concatenated with a character "T" dividing the date part from the time part. See the sections in FEEL date and FEEL time for details.
Date and Time values that define an offset/timezone cannot be compared to local date and time values that do not define an offset/timezone.
the keyword dateTime is a synonym of date and time. It is useful when defining a date and time
variable in DMN, as the XML schema does not support type names that contain spaces.
|
10.4.1.9. Days and Time Duration
FEEL does not have days and time duration literals, but the built-in duration() function can be used to construct
days and time duration values. For example,
duration( "P1DT23H12M30S" )
duration( "P23D" )
duration( "PT12H" )
duration( "PT35M" )Days and Time Duration strings in FEEL follow the format defined in the XML Schema Part 2 Datatypes document, but restricted to only days, hours, minutes and seconds. Months and years are not allowed.
The keyword dayTimeDuration is a synonym of days and time duration. It is useful when defining a
days and time duration variable in DMN, as the XML schema does not support type names that contain spaces.
|
10.4.1.10. Years and Months Duration
FEEL does not have years and months duration literals, but the built-in duration() function can be used to construct
days and time duration values. For example,
duration( "P3Y5M" )
duration( "P2Y" )
duration( "P10M" )
duration( "P25M" )Years and Months Duration strings in FEEL follow the format defined in the XML Schema Part 2 Datatypes document, but restricted to only years and months. Days, hours, minutes, or seconds are not allowed.
The keyword yearMonthDuration is a synonym of years and months duration. It is useful when defining a
years and months duration variable in DMN, as the XML schema does not support type names that contain spaces.
|
10.4.1.11. Functions
FEEL allows the creation of functions through function literals (or anonymous functions). For example, the following
FEEL expression creates a function that adds the parameters a and b and returns the result:
function(a, b) a + bThere is no explicit way of declaring a variable as a function in the DMN specification. Drools extends the
DMN built-in types with the function type for that reason.
A function datatype is an extension of the specification and is subject to change if the DMN specification
provides a standard way to declare functions in the future.
|
10.4.1.12. Contexts
FEEL allows creating contexts through context literals. A context in FEEL is a list of key/value pairs,
similar to Maps in languages like Java. For example, the following literal expression creates a context with two entries,
x and y, representing a coordinate in a chart:
{ x : 5, y : 3 }There is no explicit way of declaring a variable as a context in the DMN specification. Drools extends the
DMN built-in types with the context type for that reason.
A context datatype is an extension of the specification and is subject to change if the DMN specification
provides a standard way to declare contexts in the future. In DMN 1.1, the recommended way of declaring contexts is to
create an item definition that contains the list of keys as attributes, and then declare the variable as having that
item definition type.
|
10.4.1.13. Ranges (or Intervals)
FEEL allows the creation of ranges, also known as intervals, through range literals. A range in FEEL is a
value that defines a lower and an upper bound, where either can be open or closed. The syntax of a range is defined
as:
range := interval_start endpoint '..' endpoint interval_end
interval_start := open_start | closed_start
open_start := '(' | ']'
closed_start := '['
interval_end := open_end | closed_end
open_end := ')' | '['
closed_end := ']'
endpoint := expressionThe expression for the endpoint must return a comparable value, and the lower bound endpoint must be lower than the upper bound endpoint.
For instance, the following literal expression defines an interval between 1 and 10, including the boundaries (that is, a closed interval on both endpoints):
[ 1 .. 10 ]The following literal expression defines an interval between 1 hour and 12 hours, including the lower boundary (that is, a closed interval), but excluding the upper boundary (an open interval):
[ duration("PT1H") .. duration("PT12H") [Ranges are specially useful in decision tables when testing for ranges of value, but can also be used in simple literal expressions. For instance, the following literal expression returns true if the value of a variable x is between 0 and 100:
x in [ 1 .. 100 ]| A range literal is not a valid expression in the FEEL specification. It has to always be contained within other expressions. Drools extends the specification and allows range values to be defined directly and even assigned to variables. |
10.4.1.14. Lists
Lists in FEEL are represented by a comma separated list of values enclosed in square brackets. For instance:
[ 2, 3, 4, 5 ]All lists in FEEL are homogeneous (that is, all elements in a list are of the same type) and immutable. Elements in a list can be accessed by index, where the first element is 1. Negative indexes can be used to access elements starting from the end of the list, so -1 is the last element. For instance, the following expression returns the second element of a list x:
x[2]The following expression returns the second to last element:
x[-2]| The DMN specification does not allow a variable to be defined as a generic list type. Drools extends the specification to support that. |
10.5. DMN Support in Drools
Drools 7.0 includes full runtime support for DMN 1.1 models at conformance level 3. It does not, however, include any editor for DMN models. Editors for DMN models will be added to the platform in the near future, but meanwhile we recommend looking at one of several DMN compliant editors available in the market.
From a platform perspective, DMN models are just another type of asset that can be included in a Drools kjar and deployed to the runtime. It means that Drool 7.0 can consume and execute DMN models as well as any of the other supported assets (such as DRL files and native decision tables) from the same kjar. This enables users to always use the best tool for the job at hand. In fact, it is common to have BPMN models directly invoke DMN decision services from their decision task nodes.
10.5.1. DMN ItemDefinition and Drools code
End-user of the Drools Kie DMN API can represent DMN ItemDefinition structural types in a DMNContext in two ways:
-
by representing the DMN ItemDefinition with a user-defined Java type: must be a valid JavaBeans pojo defining properties and getters for each of the components in the DMN ItemDefinition. If necessary, it is possible to leverage the
@FEELPropertyannotation for those getters representing a component name which would result in an invalid Java identifier. -
by representing the DMN ItemDefinition with a
java.util.Map: the maps needs to define the appropriate entries, with the keys corresponding to the components name in the DMN ItemDefinition.
10.5.2. DMN Implementation Details
The DMN specification defines both syntax and semantic for the models. Note that, there are a few bugs and ambiguities in the specifications. At the moment, there is no Technology Compatibility Kit (TCK) or official reference implementation for DMN v1.1, to resolve these ambiguities. A vendor neutral effort for a TCK is available here.
Drools strives to be as compliant as possible with the specification, however the following categories of differences exist:
-
Fixes to bugs in the specification, and
-
Extensions to the specification to better support use cases, without prejudice to strict models.
The differences are also categorized between the FEEL language differences and the DMN model differences.
10.5.2.1. a. Fixes to bugs and changes in the FEEL language
-
Space Sensitivity: This implementation of the FEEL language is space insensitive. The goal is to avoid non-deterministic behavior based on the context and differences in behavior based on invisible characters (For example, white spaces). This means that for this implementation, a variable named
first namewith one space is exactly the same asfirst namewith two spaces in it. -
List functions
or()andand(): The specification defines two list functions namedor()andand(). However, according to the FEEL grammar, these are not valid function names, asandandorare reserved keywords. This implementation renames these functions toany()andall()respectively, in anticipation for DMN 1.2. -
Keyword
incannot be used in variable names: The specification defines that any keyword can be reused as part of a variable name, but the ambiguities caused with thefor … in … returnloop prevent the reuse of theinkeyword. All other keywords are supported as part of variable names. -
Keywords are not supported in attributes of anonymous types: FEEL is not a strongly typed language and the parser must resolve ambiguity in name parts of an attribute of an anonymous type. The parser supports reusable keywords as part of a variable name defined in the scope, but the parser does not support keywords in attributes of an anonymous type. For example,
for item in Order.items return Federal Tax for Item( item )is a valid and supported FEEL expression, where a function namedFederal Tax for Item(…)can be defined and invoked correctly in the scope. However, the expressionfor i in [ {x and y : true, n : 1}, {x and y : false, n: 2} ] return i.x and yis not supported because anonymous types are defined in the iteration context of theforexpression and the parser cannot resolve the ambiguity. -
Support for date and time literals on ranges: According to the grammar rules #8, #18, #19, #34 and #62,
date and timeliterals are supported in ranges (pages 110-111). Chapter 10.3.2.7 on page 114, on the other hand, contradicts the grammar and says they are not supported. This implementation chose to follow the grammar and supportdate and timeliterals on ranges, as well as extend the specification to support any arbitrary expression (see extensions below). -
Invalid time syntax: Chapter 10.3.2.3.4 on page 112 and bullet point about
timeon page 131 both state that thetimestring lexical representation follows the XML Schema Datatypes specification as well as ISO 8601. According to the XML Schema specification (https://www.w3.org/TR/xmlschema-2/#time), the lexical representation of a time follows the patternhh:mm:ss.ssswithout any leading character. The DMN specification uses a leading "T" in several examples, that we understand is a typo and not in accordance with the standard.
10.5.2.2. b. Extensions to the FEEL language specification
-
Support for scientific and hexadecimal notations: This implementation supports scientific and hexadecimal notation for numbers. For example,
1.2e5(scientific notation),0xD5(hexadecimal notation). -
Support for expressions as end points in ranges: This implementation supports expressions as endpoints for ranges. For example,
[date("2016-11-24")..date("2016-11-27")] -
Support for additional types: The specification only defines the following as basic types of the language:
-
number
-
string
-
boolean
-
days and time duration
-
years and month duration
-
time
-
date and time
For completeness and orthogonality, this implementation also supports the following types:
-
context
-
list
-
range
-
function
-
unary test
-
-
Support for unary tests: For completeness and orthogonality, unary tests are supported as first class citizens in the language. They are functions with an implicit single parameter and can be invoked in the same way as functions. For example,
UnaryTestAsFunction.feel{ is minor : < 18, Bob is minor : is minor( bob.age ) } -
Support for additional built-in functions: The following additional functions are supported:
-
now(): Returns the current local date and time. -
today(): Returns the current local date. -
decision table(): Returns a decision table function, although the specification mentions a decision table. The function on page 114 is not implementable as defined. -
string( mask, p… ): Returns a string formatted as per the mask. See Java String.format() for details on the mask syntax. For example,string( "%4.2f", 7.1298 )returns the string"7.12".
-
-
Support for additional date and time arithmetics: Subtracting two dates returns a day and time duration with the number of days between the two dates, ignoring daylight savings. For example,
DateArithmetic.feeldate( "2017-05-12" ) - date( "2017-04-25" ) = duration( "P17D" )
10.5.2.3. c. Fixes to bugs and changes to the DMN model
-
Support for types with spaces on names: The DMN XML schema defines type refs as QNames. The QNames do not allow spaces. Therefore, it is not possible to use types like FEEL
date and time,days and time durationoryears and months duration. This implementation does parse such typerefs as strings and allows type names with spaces. However, in order to comply with the XML schema, it also adds the following aliases to such types that can be used instead:-
date and time=dateTime -
days and time duration=durationordayTimeDuration -
years and months duration=durationoryearMonthDurationNote that, for the "duration" types, the user can simply use
durationand the engine will infer the proper duration, eitherdays and time durationoryears and months duration.
-
10.5.2.4. d. Extensions to the DMN model specification
-
Lists support heterogeneous element types: Currently this implementation supports lists with heterogeneous element types. This is an experimental extension and does limit the functionality of some functions and filters. This decision will be re-evaluated in the future.
-
TypeRef link between Decision Tables and Item Definitions: On decision tables/input clause, if no values list is defined, the engine automatically checks the type reference and applies the allowed values check if it is defined.
11. Experimental Features
11.1. Declarative Agenda
|
Declarative Agenda is experimental, and all aspects are highly likely to change in the future. @Eager and @Direct are temporary annotations to control the behaviour of rules, which will also change as Declarative Agenda evolves. Annotations instead of attributes where chosen, to reflect their experimental nature. |
The declarative agenda allows to use rules to control which other rules can fire and when. While this will add a lot more overhead than the simple use of salience, the advantage is it is declarative and thus more readable and maintainable and should allow more use cases to be achieved in a simpler fashion.
This feature is off by default and must be explicitly enabled, that is because it is considered highly experimental for the moment and will be subject to change, but can be activated on a given KieBase by adding the declarativeAgenda='enabled' attribute in the corresponding kbase tag of the kmodule.xml file as in the following example.
<kmodule xmlns:xsi="http://www.w3.org/2001/XMLSchema-instance"
xmlns="http://www.drools.org/xsd/kmodule">
<kbase name="DeclarativeKBase" declarativeAgenda="enabled">
<ksession name="KSession">
</kbase>
</kmodule>The basic idea is:
-
All rule’s Matches are inserted into WorkingMemory as facts. So you can now do pattern matching against a Match. The rule’s metadata and declarations are available as fields on the Match object.
-
You can use the kcontext.blockMatch( Match match ) for the current rule to block the selected match. Only when that rule becomes false will the match be eligible for firing. If it is already eligible for firing and is later blocked, it will be removed from the agenda until it is unblocked.
-
A match may have multiple blockers and a count is kept. All blockers must became false for the counter to reach zero to enable the Match to be eligible for firing.
-
kcontext.unblockAllMatches( Match match ) is an over-ride rule that will remove all blockers regardless
-
An activation may also be cancelled, so it never fires with cancelMatch
-
An unblocked Match is added to the Agenda and obeys normal salience, agenda groups, ruleflow groups etc.
-
The @Direct annotations allows a rule to fire as soon as it’s matched, this is to be used for rules that block/unblock matches, it is not desirable for these rules to have side effects that impact else where.
void blockMatch(Match match);
void unblockAllMatches(Match match);
void cancelMatch(Match match);Here is a basic example that will block all matches from rules that have metadata @department('sales'). They will stay blocked until the blockerAllSalesRules rule becomes false, i.e. "go2" is retracted.
rule rule1 @Eager @department('sales') when
$s : String( this == 'go1' )
then
list.add( kcontext.rule.name + ':' + $s );
end
rule rule2 @Eager @department('sales') when
$s : String( this == 'go1' )
then
list.add( kcontext.rule.name + ':' + $s );
end
rule blockerAllSalesRules @Direct @Eager when
$s : String( this == 'go2' )
$i : Match( department == 'sales' )
then
list.add( $i.rule.name + ':' + $s );
kcontext.blockMatch( $i );
end|
Further than annotate the blocking rule with @Direct, it is also necessary to annotate all the rules that could be potentially blocked by it with @Eager. This is because, since the Match has to be evaluated by the pattern matching of the blocking rule, the potentially blocked ones cannot be evaluated lazily, otherwise won’t be any Match to be evaluated. |
This example shows how you can use active property to count the number of active or inactive (already fired) matches.
rule rule1 @Eager @department('sales') when
$s : String( this == 'go1' )
then
list.add( kcontext.rule.name + ':' + $s );
end
rule rule2 @Eager @department('sales') when
$s : String( this == 'go1' )
then
list.add( kcontext.rule.name + ':' + $s );
end
rule rule3 @Eager @department('sales') when
$s : String( this == 'go1' )
then
list.add( kcontext.rule.name + ':' + $s );
end
rule countActivateInActive @Direct @Eager when
$s : String( this == 'go2' )
$active : Number( this == 1 ) from accumulate( $a : Match( department == 'sales', active == true ), count( $a ) )
$inActive : Number( this == 2 ) from accumulate( $a : Match( department == 'sales', active == false ), count( $a ) )
then
kcontext.halt( );
end11.2. Browsing graphs of objects with OOPath
When the field of a fact is a collection it is possible to bind and reason over all the items in that collection on by one using the from keyword.
Nevertheless, when it is required to browse a graph of object the extensive use of the from conditional element may result in a verbose and cubersome syntax like in the following example:
rule "Find all grades for Big Data exam" when
$student: Student( $plan: plan )
$exam: Exam( course == "Big Data" ) from $plan.exams
$grade: Grade() from $exam.grades
then /* RHS */ endIn this example it has been assumed to use a domain model consisting of a Student who has a Plan of study: a Plan can have zero or more Exams and an Exam zero or more Grades.
Note that only the root object of the graph (the Student in this case) needs to be in the working memory in order to make this works.
By borrowing ideas from XPath, this syntax can be made more succinct, as XPath has a compact notation for navigating through related elements while handling collections and filtering constraints.
This XPath-inspired notation has been called OOPath since it is explictly intended to browse graph of objects.
Using this notation the former example can be rewritten as it follows:
rule "Find all grades for Big Data exam" when
Student( $grade: /plan/exams[course == "Big Data"]/grades )
then /* RHS */ endFormally, the core grammar of an OOPath expression can be defined in EBNF notation in this way.
OOPExpr = [ID ( ":" | ":=" )] ( "/" | "?/" ) OOPSegment { ( "/" | "?/" | "." ) OOPSegment } ;
OOPSegment = ID ["#" ID] ["[" ( Number | Constraints ) "]"]In practice an OOPath expression has the following features.
-
It has to start with
/or with a?/in case of a completely non-reactive OOPath (see below). -
It can dereference a single property of an object with the
.operator -
It can dereference a multiple property of an object using the
/operator. If a collection is returned, it will iterate over the values in the collection -
While traversing referenced objects it can filter away those not satisfying one or more constraints, written as predicate expressions between square brackets like in:
Student( $grade: /plan/exams[ course == "Big Data" ]/grades ) -
During oopath traversal it is also possible to downcast the traversed object to a subclass of the class declared in the generic collection. In this way subsequent constraints can also safely access to properties declared only in that subclass like in:
Student( $grade: /plan/exams#AdvancedExam[ course == "Big Data", level > 3 ]/grades )Objects that are not instances of the class specificed in this inline cast will be automatically filtered away.
-
A constraint can also have a beckreference to an object of the graph traversed before the currently iterated one. For example the following OOPath:
Student( $grade: /plan/exams/grades[ result > ../averageResult ] )will match only the grades having a result above the average for the passed exam.
-
A constraint can also recursively be another OOPath as it follows:
Student( $exam: /plan/exams[ /grades[ result > 20 ] ] ) -
Items can also be accessed by their index by putting it between square brackets like in:
Student( $grade: /plan/exams[0]/grades )To adhere to Java convention OOPath indexes are 0-based, compared to XPath 1-based
11.2.1. Reactive and Non-Reactive OOPath
At the moment Drools is not able to react to updates involving a deeply nested object traversed during the evaluation of an OOPath expression.
To make these objects reactive to changes it is then necessary to make them extend the class org.drools.core.phreak.ReactiveObject.
It is planned to overcome this limitation by implementing a mechanism that automatically instruments the classes belonging to a specific domain model.
Having extendend that class, the domain objects can notify the engine when one of its field has been updated by invoking the inherited method notifyModification as in the following example:
public void setCourse(String course) {
this.course = course;
notifyModification(this);
}In this way when using an OOPath like the following:
Student( $grade: /plan/exams[ course == "Big Data" ]/grades )if an exam is moved to a different course, the rule is re-triggered and the list of grades matching the rule recomputed.
It is also possible to have reactivity only in one subpart of the OOPath as in:
Student( $grade: /plan/exams[ course == "Big Data" ]?/grades )Here, using the ?/ separator instead of the / one, the engine will react to a change made to an exam, or if an exam is added to the plan, but not if a new grade is added to an existing exam.
Of course if a OOPath chunk is not reactive, all remaining part of the OOPath from there till the end of the expression will be non-reactive as well.
For instance the following OOPath
Student( $grade: ?/plan/exams[ course == "Big Data" ]/grades )will be completely non-reactive.
For this reason it is not allowed to use the ?/ separator more than once in the same OOPath so an expression like:
Student( $grade: /plan?/exams[ course == "Big Data" ]?/grades )will cause a compile time error.
11.3. Traits
WARNING : this feature is still experimental and subject to changes
The same fact may have multiple dynamic types which do not fit naturally in a class hierarchy. Traits allow to model this very common scenario. A trait is an interface that can be applied (and eventually removed) to an individual object at runtime. To create a trait rather than a traditional bean, one has to declare them explicitly as in the following example:
declare trait GoldenCustomer
// fields will map to getters/setters
code : String
balance : long
discount : int
maxExpense : long
endAt runtime, this declaration results in an interface, which can be used to write patterns, but can not be instantiated directly. In order to apply a trait to an object, we provide the new don keyword, which can be used as simply as this:
when
$c : Customer()
then
GoldenCustomer gc = don( $c, GoldenCustomer.class );
endwhen a core object dons a trait, a proxy class is created on the fly (one such class will be generated lazily for each core/trait class combination). The proxy instance, which wraps the core object and implements the trait interface, is inserted automatically and will possibly activate other rules. An immediate advantage of declaring and using interfaces, getting the implementation proxy for free from the engine, is that multiple inheritance hierarchies can be exploited when writing rules. The core classes, however, need not implement any of those interfaces statically, also facilitating the use of legacy classes as cores. In fact, any object can don a trait, provided that they are declared as @Traitable. Notice that this annotation used to be optional, but now is mandatory.
import org.drools.core.factmodel.traits.Traitable;
declare Customer
@Traitable
code : String
balance : long
endThe only connection between core classes and trait interfaces is at the proxy level: a trait is not specifically tied to a core class. This means that the same trait can be applied to totally different objects. For this reason, the trait does not transparently expose the fields of its core object. So, when writing a rule using a trait interface, only the fields of the interface will be available, as usual. However, any field in the interface that corresponds to a core object field, will be mapped by the proxy class:
when
$o: OrderItem( $p : price, $code : custCode )
$c: GoldenCustomer( code == $code, $a : balance, $d: discount )
then
$c.setBalance( $a - $p*$d );
endIn this case, the code and balance would be read from the underlying Customer object. Likewise, the setAccount will modify the underlying object, preserving a strongly typed access to the data structures. A hard field must have the same name and type both in the core class and all donned interfaces. The name is used to establish the mapping: if two fields have the same name, then they must also have the same declared type. The annotation @org.drools.core.factmodel.traits.Alias allows to relax this restriction. If an @Alias is provided, its value string will be used to resolve mappings instead of the original field name. @Alias can be applied both to traits and core beans.
import org.drools.core.factmodel.traits.*;
declare trait GoldenCustomer
balance : long @Alias( "org.acme.foo.accountBalance" )
end
declare Person
@Traitable
name : String
savings : long @Alias( "org.acme.foo.accountBalance" )
end
when
GoldenCustomer( balance > 1000 ) // will react to new Person( 2000 )
then
endMore work is being done on relaxing this constraint (see the experimental section on "logical" traits later). Now, one might wonder what happens when a core class does NOT provide the implementation for a field defined in an interface. We call hard fields those trait fields which are also core fields and thus readily available, while we define soft those fields which are NOT provided by the core class. Hidden fields, instead, are fields in the core class not exposed by the interface.
So, while hard field management is intuitive, there remains the problem of soft and hidden fields. Hidden fields are normally only accessible using the core class directly. However, the "fields" Map can be used on a trait interface to access a hidden field. If the field can’t be resolved, null will be returned. Notice that this feature is likely to change in the future.
when
$sc : GoldenCustomer( fields[ "age" ] > 18 ) // age is declared by the underlying core class, but not by GoldenCustomer
thenSoft fields, instead, are stored in a Map-like data structure that is specific to each core object and referenced by the proxy(es), so that they are effectively shared even when an object dons multiple traits.
when
$sc : GoldenCustomer( $c : code, // hard getter
$maxExpense : maxExpense > 1000 // soft getter
)
then
$sc.setDiscount( ... ); // soft setter
endA core object also holds a reference to all its proxies, so that it is possible to track which type(s) have been added to an object, using a sort of dynamic "instanceof" operator, which we called isA. The operator can accept a String, a class literal or a list of class literals. In the latter case, the constraint is satisfied only if all the traits have been donned.
$sc : GoldenCustomer( $maxExpense : maxExpense > 1000,
this isA "SeniorCustomer", this isA [ NationalCustomer.class, OnlineCustomer.class ]
)Eventually, the business logic may require that a trait is removed from a wrapped object. To this end, we provide two options. The first is a "logical don", which will result in a logical insertion of the proxy resulting from the traiting operation. The TMS will ensure that the trait is removed when its logical support is removed in the first place.
then
don( $x, // core object
Customer.class, // trait class
true // optional flag for logical insertion
)The second is the use of the "shed" keyword, which causes the removal of any type that is a subtype (or equivalent) of the one passed as an argument. Notice that, as of version 5.5, shed would only allow to remove a single specific trait.
then
Thing t = shed( $x, GoldenCustomer.class ) // also removes any trait thatThis operation returns another proxy implementing the org.drools.core.factmodel.traits.Thing interface, where the getFields() and getCore() methods are defined. Internally, in fact, all declared traits are generated to extend this interface (in addition to any others specified). This allows to preserve the wrapper with the soft fields which would otherwise be lost.
A trait and its proxies are also correlated in another way. Starting from version 5.6, whenever a core object is "modified", its proxies are "modified" automatically as well, to allow trait-based patterns to react to potential changes in hard fields. Likewise, whenever a trait proxy (mached by a trait pattern) is modified, the modification is propagated to the core class and the other traits. Morover, whenever a don operation is performed, the core object is also modified automatically, to reevaluate any "isA" operation which may be triggered.
Potentially, this may result in a high number of modifications, impacting performance (and correctness) heavily. So two solutions are currently implemented. First, whenever a core object is modified, only the most specific traits (in the sense of inheritance between trait interfaces) are updated and an internal blocking mechanism is in place to ensure that each potentially matching pattern is evaluated once and only once. So, in the following situation:
declare trait GoldenCustomer end
declare trait NationalGoldenustomer extends GoldenCustomer end
declare trait SeniorGoldenCustomer extends GoldenCustomer enda modification of an object that is both a GoldenCustomer, a NationalGoldenCustomer and a SeniorGoldenCustomer wold cause only the latter two proxies to be actually modified. The first would match any pattern for GoldenCustomer and NationalGoldenCustomer; the latter would instead be prevented from rematching GoldenCustomer, but would be allowed to match SeniorGoldenCustomer patterns. It is not necessary, instead, to modify the GoldenCustomer proxy since it is already covered by at least one other more specific trait.
The second method, up to the usr, is to mark traits as @PropertyReactive. Property reactivity is trait-enabled and takes into account the trait field mappings, so to block unnecessary propagations.
11.3.1. Cascading traits
WARNING : This feature is extremely experimental and subject to changes
Normally, a hard field must be exposed with its original type by all traits donned by an object, to prevent situations such as
declare Person
@Traitable
name : String
id : String
end
declare trait Customer
id : String
end
declare trait Patient
id : long // Person can't don Patient, or an exception will be thrown
endShould a Person don both Customer and Patient, the type of the hard field id would be ambiguous. However, consider the following example, where GoldenCustomers refer their best friends so that they become Customers as well:
declare Person
@Traitable( logical=true )
bestFriend : Person
end
declare trait Customer end
declare trait GoldenCustomer extends Customer
refers : Customer @Alias( "bestFriend" )
endAside from the @Alias, a Person-as-GoldenCustomer’s best friend might be compatible with the requirements of the trait GoldenCustomer, provided that they are some kind of Customer themselves. Marking a Person as "logically traitable" - i.e. adding the annotation @Traitable( logical = true ) - will instruct the engine to try and preserve the logical consistency rather than throwing an exception due to a hard field with different type declarations (Person vs Customer). The following operations would then work:
Person p1 = new Person();
Person p2 = new Person();
p1.setBestFriend( p2 );
...
Customer c2 = don( p2, Customer.class );
...
GoldenCustomer gc1 = don( p1, GoldenCustomer.class );
...
p1.getBestFriend(); // returns p2
gc1.getRefers(); // returns c2, a Customer proxy wrapping p2Notice that, by the time p1 becomes GoldenCustomer, p2 must have already become a Customer themselves, otherwise a runtime exception will be thrown since the very definition of GoldenCustomer would have been violated.
In some cases, however, one might want to infer, rather than verify, that p2 is a Customer by virtue that p1 is a GoldenCustomer. This modality can be enabled by marking Customer as "logical", using the annotation @org.drools.core.factmodel.traits.Trait( logical = true ). In this case, should p2 not be a Customer by the time that p1 becomes a GoldenCustomer, it will be automatically don the trait Customer to preserve the logical integrity of the system.
Notice that the annotation on the core class enables the dynamic type management for its fields, whereas the annotation on the traits determines whether they will be enforced as integrity constraints or cascaded dynamically.
import org.drools.factmodel.traits.*;
declare trait Customer
@Trait( logical = true )
end11.4. Rule Units
|
This feature is experimental |
Rule units represent a declarative approach to partition a rule set into smaller units, binding different data sources
to those units, and orchestrate the execution of the individual unit. A rule unit is an aggregate of data sources, global variables,
and rules. You can define a rule unit by implementing the RuleUnit marker interface as shown in the following example:
package org.mypackage.myunit;
public static class AdultUnit implements RuleUnit {
private int adultAge;
private DataSource<Person> persons;
public AdultUnit( ) { }
public AdultUnit( DataSource<Person> persons, int age ) {
this.persons = persons;
this.age = age;
}
// A DataSource of Persons for this RuleUnit
public DataSource<Person> getPersons() {
return persons;
}
// A global variable valid in this RuleUnit
public int getAdultAge() {
return adultAge;
}
// --- life cycle methods
@Override
public void onStart() {
System.out.println("AdultUnit started.");
}
@Override
public void onEnd() {
System.out.println("AdultUnit ended.");
}
}Here, persons is a source of facts of type Person. It represents that part of the working memory, which is related to that specific
entry-point used when the rule unit is evaluated. adultAge is a global variable accessible from all the rules
belonging to this rule unit. The last two methods are part of the rule unit life cycle and are invoked by the engine.
The lifecycle of a RuleUnit can be monitored overriding the following methods:
| Method | Invoked when |
|---|---|
onStart() |
the rule engine starts evaluating the unit |
onEnd() |
the evaluation of this unit terminates |
onSuspend() |
the execution of unit is suspended (only for runUntilHalt) |
onResume() |
the execution of unit is resumed (only for runUntilHalt) |
onYield(RuleUnit other) |
the consequence of rule in a given rule unit triggers the execution of a different unit |
All these methods have an empty default implemention inside the RuleUnit interface, so their implementation is optional.
At this point, it is possible to add one or more rules to this rule unit. By default all the rules in a drl file are automatically
associated to a rule unit following a naming convention of the name of drl file itself: if the drl file is in the same package
and has the same name of a class implementing the RuleUnit interface all the rules in that drl file will implicitly belong
to that unit. For example, all the rules in the drl file named AdultUnit.drl in package org.mypackage.myunit will be automatically
part of the rule unit org.mypackage.myunit.AdultUnit.
You can avoid using this naming convention and explictly declare the unit to which the rules in a drl file belongs
by using the new unit keyword. The unit declaration must always immediately follow the package declaration and contain
the name of the class (in that package) to which the rules of the drl file are part of. For example,
package org.mypackage.myunit
unit AdultUnit
rule Adult when
$p : Person(age >= adultAge) from persons
then
System.out.println($p.getName() + " is adult and greater than " + adultAge);
end|
It is not allowed to mix rules with and without a rule unit in the same KieBase. |
Additionally, you can rewrite the same pattern in a more convenient way using the oopath notation introduced in drools 6 as shown below:
package org.mypackage.myunit
unit AdultUnit
rule Adult when
$p : /persons[age >= adultAge]
then
System.out.println($p.getName() + " is adult and greater than " + adultAge);
endHere, the persons matched by the left hand side of the rule is retrieved from the DataSource contained in the RuleUnit class with
the same name. The adultAge variable is used in both the left and right hand side of the rule in the same way as a global is
defined at drl level. In other words the persons DataSource acts as a specific entry-point, feeding the working memory.
The easiest way to create a DataSource is using a fixed set of data, as shown below:
DataSource<Person> persons = DataSource.create( new Person( "Mario", 42 ),
new Person( "Marilena", 44 ),
new Person( "Sofia", 4 ) );To execute one or more rule units defined in a given KieBase, create a new RuleUnitExecutor and
bind it to the KieBase itself. For example,
KieBase kbase = kieContainer.getKieBase();
RuleUnitExecutor executor = RuleUnitExecutor.create().bind( kbase );At this point, create the AdultUnit by passing the persons DataSource to it and running it on the RuleUnitExecutor.
RuleUnit adultUnit = new AdultUnit(persons, 18);
executor.run( adultUnit );This produces the following output:
org.mypackage.myunit.AdultUnit started.
Marilena is adult and greater than 18
Mario is adult and greater than 18
org.mypackage.myunit.AdultUnit ended.Instead of explicitly creating the rule unit instance, it is more convenient to pass to the executor the rule unit class that you want to run and let the executor create an instance of it. You can then set the DataSources and other variables before running it. In order to do so, ensure that you have previously registered those variables on the executor itself, so that the following code produces exactly the same result as the former one:
executor.bindVariable( "persons", persons );
.bindVariable( "adultAge", 18 );
executor.run( AdultUnit.class );The name passed to the RuleUnitExecutor.bindVariable() method is used at runtime to bind said variable to the field of the
RuleUnit class having the same name. For instance in the former example the RuleUnitExecutor injects into the new rule unit
the data source formerly bound to the "persons" name and the value 18 bound to the String "adultAge" to the fields with the
corresponding names inside the AdultUnit class. It is possible to override this default and explictly define a logical
binding name for each field of the rule unit class using the @UnitVar annotation. For example, the field binding in the
following class can be redefined with alternative names:
package org.mypackage.myunit;
public static class AdultUnit implements RuleUnit {
@UnitVar("minAge")
private int adultAge = 18;
@UnitVar("data")
private DataSource<Person> persons;
}You can then bind the variables to the executor using those alternative names and run the unit:
executor.bindVariable( "data", persons );
.bindVariable( "minAge", 18 );
executor.run( AdultUnit.class );A rule unit can be executed in passive mode as shown above (corresponding to invoking fireAllRules on a whole session)
or in active mode using the runUntilHalt that is equivalent to the session fireUntilHalt. As for the fireUntilHalt,
the runUntilHalt is blocking and therefore has to be issued on a separated thread. For example,
new Thread( () -> executor.runUntilHalt( adultUnit ) ).start();11.4.1. Data sources
A DataSource is a source of the data processed by a given rule unit. A rule unit can have zero or more data sources and
to each DataSource declared inside a rule unit corresponds a different entry-point into the rule unit executor. A DataSource
can be shared by different units, but in this case there will be many different entry-points, one for each unit, through which
the same objects will be inserted.
In other terms the DataSource represents the entry-point of the rule unit, so it is possible to insert a new fact into it:
Person mario = new Person( "Mario", 42 );
FactHandle marioFh = persons.insert( mario );Modify the fact, optionally specifying the set of properties that have been modified in order to leverage property reactivity:
mario.setAge( 43 );
persons.update( marioFh, mario, "age" );or delete it
persons.delete( marioFh );11.4.2. Imperatively running and declaratively guarding a RuleUnit
As anticipated, you can define multiple rule units in the same knowledge base and these units can work in a coordinated way by invoking or guarding the execution of each other. To demonstrate this let’s suppose having the following 2 drl files each of them containing a rule belonging to a distinct rule unit.
package org.mypackage.myunit
unit AdultUnit
rule Adult when
Person(age >= 18, $name : name) from persons
then
System.out.println($name + " is adult");
endpackage org.mypackage.myunit
unit NotAdultUnit
rule NotAdult when
$p : Person(age < 18, $name : name) from persons
then
System.out.println($name + " is NOT adult");
modify($p) { setAge(18); }
drools.run( AdultUnit.class );
endAlso suppose to have a RuleUnitExecutor created from the KieBase built out of these rules and a DataSource of Persons
bound to it.
RuleUnitExecutor executor = RuleUnitExecutor.create().bind( kbase );
DataSource<Person> persons = executor.newDataSource( "persons",
new Person( "Mario", 42 ),
new Person( "Marilena", 44 ),
new Person( "Sofia", 4 ) );Note that in this case we are creating the DataSource directly out of the RuleUnitExecutor and binding it to the
"persons" variable in a single statement.
At this point trying to execute the NotAdultUnit unit we obtain the following output:
Sofia is NOT adult
Mario is adult
Marilena is adult
Sofia is adultIn fact the NotAdult rule finds a match when evaluating the person "Sofia" who has an age lower than 18. Then it modifies
her age to 18 and with the statement drools.run( AdultUnit.class ) triggers the execution of the other unit which has a
rule that now can fire for all the 3 persons in the DataSource. This means that the drools.run() statement inside a
consequence is the way to imperatively interrupt the execution of a rule unit and cede the control to a different rule unit.
Conversely the drools.guard() statement allows to declaratively schedule the execution of another rule unit when the
condition in the LHS of the rule containing that statement is met. More precisely, using this mechanism a rule in a given
rule unit acts as a guard for a different unit. This means that, when the rule engine produces at least one match for the LHS
of the guarding rule, the guarded RuleUnit is considered active. Of course a RuleUnit can have more than one guarding rule.
Let’s see how this works with another practical example. Suppose of having a simple BoxOffice class
public class BoxOffice {
private boolean open;
public BoxOffice( boolean open ) {
this.open = open;
}
public boolean isOpen() {
return open;
}
public void setOpen( boolean open ) {
this.open = open;
}
}and a BoxOfficeUnit with a data source of box offices.
public class BoxOfficeUnit implements RuleUnit {
private DataSource<BoxOffice> boxOffices;
public DataSource<BoxOffice> getBoxOffices() {
return boxOffices;
}
}We introduce now the requirement to keep selling tickets for the event as long as there is at least one opened box office.
To achieve this let’s define a second unit with a DataSource of person and a second one of tickets.
public class TicketIssuerUnit implements RuleUnit {
private DataSource<Person> persons;
private DataSource<AdultTicket> tickets;
private List<String> results;
public TicketIssuerUnit() { }
public TicketIssuerUnit( DataSource<Person> persons, DataSource<AdultTicket> tickets ) {
this.persons = persons;
this.tickets = tickets;
}
public DataSource<Person> getPersons() {
return persons;
}
public DataSource<AdultTicket> getTickets() {
return tickets;
}
public List<String> getResults() {
return results;
}
}Then we can define a first rule in the BoxOfficeUnit that guards for this second unit.
package org.mypackage.myunit;
unit BoxOfficeUnit;
rule BoxOfficeIsOpen when
$box: /boxOffices[ open ]
then
drools.guard( TicketIssuerUnit.class );
endIn this way we achieved what we have anticipated: by running the BoxOfficeUnit at some point it will also evaluates the rules in the TicketIssuerUnit defined as
package org.mypackage.myunit;
unit TicketIssuerUnit;
rule IssueAdultTicket when
$p: /persons[ age >= 18 ]
then
tickets.insert(new AdultTicket($p));
end
rule RegisterAdultTicket when
$t: /tickets
then
results.add( $t.getPerson().getName() );
endthat is guarded by the BoxOfficeIsOpen rule, until there will exist at least a set of facts satisfying the LHS patterns of that rule. In other terms the existence of at least one open box office will keep the guarding rule and in turn its guarded unit active as it is evident in the following use case.
DataSource<Person> persons = executor.newDataSource( "persons" );
DataSource<BoxOffice> boxOffices = executor.newDataSource( "boxOffices" );
DataSource<AdultTicket> tickets = executor.newDataSource( "tickets" );
List<String> list = new ArrayList<>();
executor.bindVariable( "results", list );
// two open box offices
BoxOffice office1 = new BoxOffice(true);
FactHandle officeFH1 = boxOffices.insert( office1 );
BoxOffice office2 = new BoxOffice(true);
FactHandle officeFH2 = boxOffices.insert( office2 );
persons.insert(new Person("Mario", 40));
// fire BoxOfficeIsOpen -> run TicketIssuerUnit -> fire RegisterAdultTicket
executor.run(BoxOfficeUnit.class);
assertEquals( 1, list.size() );
assertEquals( "Mario", list.get(0) );
list.clear();
persons.insert(new Person("Matteo", 30));
executor.run(BoxOfficeUnit.class); // fire RegisterAdultTicket
assertEquals( 1, list.size() );
assertEquals( "Matteo", list.get(0) );
list.clear();
// close one box office, the other is still open
office1.setOpen(false);
boxOffices.update(officeFH1, office1);
persons.insert(new Person("Mark", 35));
executor.run(BoxOfficeUnit.class);
assertEquals( 1, list.size() );
assertEquals( "Mark", list.get(0) );
list.clear();
// all box offices, are now closed
office2.setOpen(false);
boxOffices.update(officeFH2, office2); // guarding rule no longer true
persons.insert(new Person("Edson", 35));
executor.run(BoxOfficeUnit.class); // no fire
assertEquals( 0, list.size() );11.4.3. RuleUnit identity
Since a rule can guard multiple rule units and at the same time a unit can be guarded and then activated by multiple rules,
it is necessary to clearly define what is the identity of a given unit. By the default the identity of a unit is simply the
rule unit class. This is encoded in the getUnitIdentity() default method of the RuleUnit interface
default Identity getUnitIdentity() {
return new Identity( getClass() );
}and implies that each unit is threated as a singleton by the RuleUnitExecutor. To demonstrate this let’s suppose of
having a simple RuleUnit class with only a DataSource accepting any kind of object
public class Unit0 implements RuleUnit {
private DataSource<Object> input;
public DataSource<Object> getInput() {
return input;
}
}together with a rule belonging to this unit that guards another unit using 2 different conditions.
package org.mypackage.myunit
unit Unit0
rule GuardAgeCheck when
$i: /input#Integer
$s: /input#String
then
drools.guard( new AgeCheckUnit($i) );
drools.guard( new AgeCheckUnit($s.length()) );
endThis second RuleUnit is intended to check the age of a set of persons. Then it has a DataSource of the persons to check,
a minAge variable against which doing this check and a list were accumulating the results
public class AgeCheckUnit implements RuleUnit {
private final int minAge;
private DataSource<Person> persons;
private List<String> results;
public AgeCheckUnit( int minAge ) {
this.minAge = minAge;
}
public DataSource<Person> getPersons() {
return persons;
}
public int getMinAge() {
return minAge;
}
public List<String> getResults() {
return results;
}
}while the corresponding rule actually performing the check of the persons in the DataSource is the following:
package org.mypackage.myunit
unit AgeCheckUnit
rule CheckAge when
$p : /persons{ age > minAge }
then
results.add($p.getName() + ">" + minAge);
endAt this point we can create a RuleUnitExecutor, bind it to the knowledge base containing these 2 units and also create
the 2 DataSources to feed the same units.
RuleUnitExecutor executor = RuleUnitExecutor.create().bind( kbase );
DataSource<Object> input = executor.newDataSource( "input" );
DataSource<Person> persons = executor.newDataSource( "persons",
new Person( "Mario", 42 ),
new Person( "Sofia", 4 ) );
List<String> results = new ArrayList<>();
executor.bindVariable( "results", results );We are now ready to insert some objects into the input data source and execute the Unit0.
ds.insert("test");
ds.insert(3);
ds.insert(4);
executor.run(Unit0.class);As outcome of this execution the results list will contain the following:
[Sofia>3, Mario>3]As anticipated the rule unit named AgeCheckUnit is seen as a singleton and then executed only once, this time with minAge
equals to 3 (but this is not deterministic). Both the String "test" and the Integer 4 inserted into the input data source
could also trigger a second execution with minAge set to 4, but this is not happening because another unit with the same
identity has been already evaluated. To fix this problem it is enough to override the getUnitIdentity() method in the
AgeCheckUnit class to also include the variable minAge in its identity.
public class AgeCheckUnit implements RuleUnit {
...
@Override
public Identity getUnitIdentity() {
return new Identity(getClass(), minAge);
}
}Having done so, the units with minAge 3 and 4 are considered two different units and then both evaluated, so trying to rerun the former example the result list will now contain
[Mario>4, Sofia>3, Mario>3]Drools Integration
Integration Documentation
12. Drools Commands
12.1. API
XML marshalling/unmarshalling of the Drools Commands requires the use of special classes, which are going to be described in the following sections.
The following urls show sample script examples for jaxb, xstream and json marshalling using:
12.1.1. XStream
To use the XStream commands marshaller you need to use the DroolsHelperProvider to obtain an XStream instance. We need to use this because it has the commands converters registered.
-
Marshalling
BatchExecutionHelperProviderImpl.newXStreamMarshaller().toXML(command); -
Unmarshalling
BatchExecutionHelperProviderImpl.newXStreamMarshaller().fromXML(xml)
12.1.2. JSON
JSON API to marshalling/unmarshalling is similar to XStream API:
-
Marshalling
BatchExecutionHelper.newJSonMarshaller().toXML(command); -
Unmarshalling
BatchExecutionHelper.newJSonMarshaller().fromXML(xml)
12.1.3. JAXB
There are two options for using JAXB, you can define your model in an XSD file or you can have a POJO model. In both cases you have to declare your model inside JAXBContext, and in order to do that you need to use Drools Helper classes. Once you have the JAXBContext you need to create the Unmarshaller/Marshaller as needed.
12.1.3.1. Using an XSD file to define the model
With your model defined in a XSD file you need to have a KnowledgeBase that has your XSD model added as a resource.
To do this, the XSD file must be added as a XSD ResourceType into the KnowledgeBuilder. Finally you can create the JAXBContext using the KnowledgeBase created with the KnowledgeBuilder
Options xjcOpts = new Options();
xjcOpts.setSchemaLanguage(Language.XMLSCHEMA);
JaxbConfiguration jaxbConfiguration = KnowledgeBuilderFactory.newJaxbConfiguration( xjcOpts, "xsd" );
kbuilder.add(ResourceFactory.newClassPathResource("person.xsd", getClass()), ResourceType.XSD, jaxbConfiguration);
KnowledgeBase kbase = kbuilder.newKnowledgeBase();
List<String> classesName = new ArrayList<String>();
classesName.add("org.drools.compiler.test.Person");
JAXBContext jaxbContext = KnowledgeBuilderHelper.newJAXBContext(classesName.toArray(new String[classesName.size()]), kbase);12.1.3.2. Using a POJO model
In this case you need to use DroolsJaxbHelperProviderImpl to create the JAXBContext. This class has two parameters:
-
classNames: A List with the canonical name of the classes that you want to use in the marshalling/unmarshalling process.
-
properties: JAXB custom properties
List<String> classNames = new ArrayList<String>();
classNames.add("org.drools.compiler.test.Person");
JAXBContext jaxbContext = DroolsJaxbHelperProviderImpl.createDroolsJaxbContext(classNames, null);
Marshaller marshaller = jaxbContext.createMarshaller();12.2. Commands supported
Currently, the following commands are supported:
-
BatchExecutionCommand
-
InsertObjectCommand
-
RetractCommand
-
ModifyCommand
-
GetObjectCommand
-
InsertElementsCommand
-
FireAllRulesCommand
-
StartProcessCommand
-
SignalEventCommand
-
CompleteWorkItemCommand
-
AbortWorkItemCommand
-
QueryCommand
-
SetGlobalCommand
-
GetGlobalCommand
-
GetObjectsCommand
|
In the next snippets code we are going to use a POJO org.drools.compiler.test.Person that has two fields
|
|
In the next examples, to marshall the commands we have used the next snippet codes:
|
12.2.1. BatchExecutionCommand
-
Description: The command that contains a list of commands, which will be sent and executed.
-
Attributes
Table 13. BatchExecutionCommand attributes Name Description required lookup
Sets the knowledge session id on which the commands are going to be executed
true
commands
List of commands to be executed
false
-
Command creation
BatchExecutionCommand command = new BatchExecutionCommand(); command.setLookup("ksession1"); InsertObjectCommand insertObjectCommand = new InsertObjectCommand(new Person("john", 25)); FireAllRulesCommand fireAllRulesCommand = new FireAllRulesCommand(); command.getCommands().add(insertObjectCommand); command.getCommands().add(fireAllRulesCommand); -
XML output
-
XStream
<batch-execution lookup="ksession1"> <insert> <org.drools.compiler.test.Person> <name>john</name> <age>25</age> </org.drools.compiler.test.Person> </insert> <fire-all-rules/> </batch-execution> -
JSON
{"batch-execution":{"lookup":"ksession1","commands":[{"insert":{"object":{"org.drools.compiler.test.Person":{"name":"john","age":25}}}},{"fire-all-rules":""}]}} -
JAXB
<?xml version="1.0" encoding="UTF-8" standalone="yes"?> <batch-execution lookup="ksession1"> <insert> <object xsi:type="person" xmlns:xsi="http://www.w3.org/2001/XMLSchema-instance"> <age>25</age> <name>john</name> </object> </insert> <fire-all-rules max="-1"/> </batch-execution>
-
12.2.2. InsertObjectCommand
-
Description: Insert an object in the knowledge session.
-
Attributes
Table 14. InsertObjectCommand attributes Name Description required object
The object to be inserted
true
outIdentifier
Id to identify the FactHandle created in the object insertion and added to the execution results
false
returnObject
Boolean to establish if the object must be returned in the execution results. Default value: true
false
entryPoint
Entrypoint for the insertion
false
-
Command creation
List<Command> cmds = ArrayList<Command>(); Command insertObjectCommand = CommandFactory.newInsert(new Person("john", 25), "john", false, null); cmds.add( insertObjectCommand ); BatchExecutionCommand command = CommandFactory.createBatchExecution(cmds, "ksession1" ); -
XML output
-
XStream
<batch-execution lookup="ksession1"> <insert out-identifier="john" entry-point="my stream" return-object="false"> <org.drools.compiler.test.Person> <name>john</name> <age>25</age> </org.drools.compiler.test.Person> </insert> </batch-execution> -
JSON
{"batch-execution":{"lookup":"ksession1","commands":{"insert":{"entry-point":"my stream", "out-identifier":"john","return-object":false,"object":{"org.drools.compiler.test.Person":{"name":"john","age":25}}}}}} -
JAXB
<?xml version="1.0" encoding="UTF-8" standalone="yes"?> <batch-execution lookup="ksession1"> <insert out-identifier="john" entry-point="my stream" > <object xsi:type="person" xmlns:xsi="http://www.w3.org/2001/XMLSchema-instance"> <age>25</age> <name>john</name> </object> </insert> </batch-execution>
-
12.2.3. RetractCommand
-
Description: Retract an object from the knowledge session.
-
Attributes
Table 15. RetractCommand attributes Name Description required handle
The FactHandle associated to the object to be retracted
true
-
Command creation: we have two options, with the same output result:
-
Create the Fact Handle from a string
BatchExecutionCommand command = new BatchExecutionCommand(); command.setLookup("ksession1"); RetractCommand retractCommand = new RetractCommand(); retractCommand.setFactHandleFromString("123:234:345:456:567"); command.getCommands().add(retractCommand); -
Set the Fact Handle that you received when the object was inserted
BatchExecutionCommand command = new BatchExecutionCommand(); command.setLookup("ksession1"); RetractCommand retractCommand = new RetractCommand(factHandle); command.getCommands().add(retractCommand);
-
-
XML output
-
XStream
<batch-execution lookup="ksession1"> <retract fact-handle="0:234:345:456:567"/> </batch-execution> -
JSON
{"batch-execution":{"lookup":"ksession1","commands":{"retract":{"fact-handle":"0:234:345:456:567"}}}} -
JAXB
<?xml version="1.0" encoding="UTF-8" standalone="yes"?> <batch-execution lookup="ksession1"> <retract fact-handle="0:234:345:456:567"/> </batch-execution>
-
12.2.4. ModifyCommand
-
Description: Allows you to modify a previously inserted object in the knowledge session.
-
Attributes
Table 16. ModifyCommand attributes Name Description required handle
The FactHandle associated to the object to be retracted
true
setters
List of setters object’s modifications
true
-
Command creation
BatchExecutionCommand command = new BatchExecutionCommand(); command.setLookup("ksession1"); ModifyCommand modifyCommand = new ModifyCommand(); modifyCommand.setFactHandleFromString("123:234:345:456:567"); List<Setter> setters = new ArrayList<Setter>(); setters.add(new SetterImpl("age", "30")); modifyCommand.setSetters(setters); command.getCommands().add(modifyCommand); -
XML output
-
XStream
<batch-execution lookup="ksession1"> <modify fact-handle="0:234:345:456:567"> <set accessor="age" value="30"/> </modify> </batch-execution> -
JSON
{"batch-execution":{"lookup":"ksession1","commands":{"modify":{"fact-handle":"0:234:345:456:567","setters":{"accessor":"age","value":30}}}}} -
JAXB
<?xml version="1.0" encoding="UTF-8" standalone="yes"?> <batch-execution lookup="ksession1"> <modify fact-handle="0:234:345:456:567"> <set value="30" accessor="age"/> </modify> </batch-execution>
-
12.2.5. GetObjectCommand
-
Description: Used to get an object from a knowledge session
-
Attributes
Table 17. GetObjectCommand attributes Name Description required factHandle
The FactHandle associated to the object to be retracted
true
outIdentifier
Id to identify the FactHandle created in the object insertion and added to the execution results
false
-
Command creation
BatchExecutionCommand command = new BatchExecutionCommand(); command.setLookup("ksession1"); GetObjectCommand getObjectCommand = new GetObjectCommand(); getObjectCommand.setFactHandleFromString("123:234:345:456:567"); getObjectCommand.setOutIdentifier("john"); command.getCommands().add(getObjectCommand); -
XML output
-
XStream
<batch-execution lookup="ksession1"> <get-object fact-handle="0:234:345:456:567" out-identifier="john"/> </batch-execution> -
JSON
{"batch-execution":{"lookup":"ksession1","commands":{"get-object":{"fact-handle":"0:234:345:456:567","out-identifier":"john"}}}} -
JAXB
<?xml version="1.0" encoding="UTF-8" standalone="yes"?> <batch-execution lookup="ksession1"> <get-object out-identifier="john" fact-handle="0:234:345:456:567"/> </batch-execution>
-
12.2.6. InsertElementsCommand
-
Description: Used to insert a list of objects.
-
Attributes
Table 18. InsertElementsCommand attributes Name Description required objects
The list of objects to be inserted on the knowledge session
true
outIdentifier
Id to identify the FactHandle created in the object insertion and added to the execution results
false
returnObject
Boolean to establish if the object must be returned in the execution results. Default value: true
false
entryPoint
Entrypoint for the insertion
false
-
Command creation
List<Command> cmds = ArrayList<Command>(); List<Object> objects = new ArrayList<Object>(); objects.add(new Person("john", 25)); objects.add(new Person("sarah", 35)); Command insertElementsCommand = CommandFactory.newInsertElements( objects ); cmds.add( insertElementsCommand ); BatchExecutionCommand command = CommandFactory.createBatchExecution(cmds, "ksession1" ); -
XML output
-
XStream
<batch-execution lookup="ksession1"> <insert-elements> <org.drools.compiler.test.Person> <name>john</name> <age>25</age> </org.drools.compiler.test.Person> <org.drools.compiler.test.Person> <name>sarah</name> <age>35</age> </org.drools.compiler.test.Person> </insert-elements> </batch-execution> -
JSON
{"batch-execution":{"lookup":"ksession1","commands":{"insert-elements":{"objects":[{"containedObject":{"@class":"org.drools.compiler.test.Person","name":"john","age":25}},{"containedObject":{"@class":"Person","name":"sarah","age":35}}]}}}} -
JAXB
<?xml version="1.0" encoding="UTF-8" standalone="yes"?> <batch-execution lookup="ksession1"> <insert-elements return-objects="true"> <list> <element xsi:type="person" xmlns:xsi="http://www.w3.org/2001/XMLSchema-instance"> <age>25</age> <name>john</name> </element> <element xsi:type="person" xmlns:xsi="http://www.w3.org/2001/XMLSchema-instance"> <age>35</age> <name>sarah</name> </element> <list> </insert-elements> </batch-execution>
-
12.2.7. FireAllRulesCommand
-
Description: Allow execution of the rules activations created.
-
Attributes
Table 19. FireAllRulesCommand attributes Name Description required max
The max number of rules activations to be executed. default is -1 and will not put any restriction on execution
false
outIdentifier
Add the number of rules activations fired on the execution results
false
agendaFilter
Allow the rules execution using an Agenda Filter
false
-
Command creation
BatchExecutionCommand command = new BatchExecutionCommand(); command.setLookup("ksession1"); FireAllRulesCommand fireAllRulesCommand = new FireAllRulesCommand(); fireAllRulesCommand.setMax(10); fireAllRulesCommand.setOutIdentifier("firedActivations"); command.getCommands().add(fireAllRulesCommand); -
XML output
-
XStream
<batch-execution lookup="ksession1"> <fire-all-rules max="10" out-identifier="firedActivations"/> </batch-execution> -
JSON
{"batch-execution":{"lookup":"ksession1","commands":{"fire-all-rules":{"max":10,"out-identifier":"firedActivations"}}}} -
JAXB
<?xml version="1.0" encoding="UTF-8" standalone="yes"?> <batch-execution lookup="ksession1"> <fire-all-rules out-identifier="firedActivations" max="10"/> </batch-execution>
-
12.2.8. StartProcessCommand
-
Description: Allows you to start a process using the ID. Also you can pass parameters and initial data to be inserted.
-
Attributes
Table 20. StartProcessCommand attributes Name Description required processId
The ID of the process to be started
true
parameters
A Map<String, Object> to pass parameters in the process startup
false
data
A list of objects to be inserted in the knowledge session before the process startup
false
-
Command creation
BatchExecutionCommand command = new BatchExecutionCommand(); command.setLookup("ksession1"); StartProcessCommand startProcessCommand = new StartProcessCommand(); startProcessCommand.setProcessId("org.drools.task.processOne"); command.getCommands().add(startProcessCommand); -
XML output
-
XStream
<batch-execution lookup="ksession1"> <start-process processId="org.drools.task.processOne"/> </batch-execution> -
JSON
{"batch-execution":{"lookup":"ksession1","commands":{"start-process":{"process-id":"org.drools.task.processOne"}}}} -
JAXB
<?xml version="1.0" encoding="UTF-8" standalone="yes"?> <batch-execution lookup="ksession1"> <start-process processId="org.drools.task.processOne"> <parameter/> </start-process> </batch-execution>
-
12.2.9. SignalEventCommand
-
Description: Send a signal event.
-
Attributes
Table 21. SignalEventCommand attributes Name Description required event-type
true
processInstanceId
false
event
false
-
Command creation
BatchExecutionCommand command = new BatchExecutionCommand(); command.setLookup("ksession1"); SignalEventCommand signalEventCommand = new SignalEventCommand(); signalEventCommand.setProcessInstanceId(1001); signalEventCommand.setEventType("start"); signalEventCommand.setEvent(new Person("john", 25)); command.getCommands().add(signalEventCommand); -
XML output
-
XStream
<batch-execution lookup="ksession1"> <signal-event process-instance-id="1001" event-type="start"> <org.drools.pipeline.camel.Person> <name>john</name> <age>25</age> </org.drools.pipeline.camel.Person> </signal-event> </batch-execution> -
JSON
{"batch-execution":{"lookup":"ksession1","commands":{"signal-event":{"process-instance-id":1001,"@event-type":"start","event-type":"start","object":{"org.drools.pipeline.camel.Person":{"name":"john","age":25}}}}}} -
JAXB
<?xml version="1.0" encoding="UTF-8" standalone="yes"?> <batch-execution lookup="ksession1"> <signal-event event-type="start" process-instance-id="1001"> <event xsi:type="person" xmlns:xsi="http://www.w3.org/2001/XMLSchema-instance"> <age>25</age> <name>john</name> </event> </signal-event> </batch-execution>
-
12.2.10. CompleteWorkItemCommand
-
Description: Allows you to complete a WorkItem.
-
Attributes
Table 22. CompleteWorkItemCommand attributes Name Description required workItemId
The ID of the WorkItem to be completed
true
results
false
-
Command creation
BatchExecutionCommand command = new BatchExecutionCommand(); command.setLookup("ksession1"); CompleteWorkItemCommand completeWorkItemCommand = new CompleteWorkItemCommand(); completeWorkItemCommand.setWorkItemId(1001); command.getCommands().add(completeWorkItemCommand); -
XML output
-
XStream
<batch-execution lookup="ksession1"> <complete-work-item id="1001"/> </batch-execution> -
JSON
{"batch-execution":{"lookup":"ksession1","commands":{"complete-work-item":{"id":1001}}}} -
JAXB
<?xml version="1.0" encoding="UTF-8" standalone="yes"?> <batch-execution lookup="ksession1"> <complete-work-item id="1001"/> </batch-execution>
-
12.2.11. AbortWorkItemCommand
-
Description: Allows you abort an WorkItem. The same as session.getWorkItemManager().abortWorkItem(workItemId)
-
Attributes
Table 23. AbortWorkItemCommand attributes Name Description required workItemId
The ID of the WorkItem to be completed
true
-
Command creation
BatchExecutionCommand command = new BatchExecutionCommand(); command.setLookup("ksession1"); AbortWorkItemCommand abortWorkItemCommand = new AbortWorkItemCommand(); abortWorkItemCommand.setWorkItemId(1001); command.getCommands().add(abortWorkItemCommand); -
XML output
-
XStream
<batch-execution lookup="ksession1"> <abort-work-item id="1001"/> </batch-execution> -
JSON
{"batch-execution":{"lookup":"ksession1","commands":{"abort-work-item":{"id":1001}}}} -
JAXB
<?xml version="1.0" encoding="UTF-8" standalone="yes"?> <batch-execution lookup="ksession1"> <abort-work-item id="1001"/> </batch-execution>
-
12.2.12. QueryCommand
-
Description: Executes a query defined in knowledge base.
-
Attributes
Table 24. QueryCommand attributes Name Description required name
The query name
true
outIdentifier
The identifier of the query results. The query results are going to be added in the execution results with this identifier
false
arguments
A list of objects to be passed as a query parameter
false
-
Command creation
BatchExecutionCommand command = new BatchExecutionCommand(); command.setLookup("ksession1"); QueryCommand queryCommand = new QueryCommand(); queryCommand.setName("persons"); queryCommand.setOutIdentifier("persons"); command.getCommands().add(queryCommand); -
XML output
-
XStream
<batch-execution lookup="ksession1"> <query out-identifier="persons" name="persons"/> </batch-execution> -
JSON
{"batch-execution":{"lookup":"ksession1","commands":{"query":{"out-identifier":"persons","name":"persons"}}}} -
JAXB
<?xml version="1.0" encoding="UTF-8" standalone="yes"?> <batch-execution lookup="ksession1"> <query name="persons" out-identifier="persons"/> </batch-execution>
-
12.2.13. SetGlobalCommand
-
Description: Allows you to set a global.
-
Attributes
Table 25. SetGlobalCommand attributes Name Description required identifier
The identifier of the global defined in the knowledge base
true
object
The object to be set into the global
false
out
A boolean to add, or not, the set global result into the execution results
false
outIdentifier
The identifier of the global execution result
false
-
Command creation
BatchExecutionCommand command = new BatchExecutionCommand(); command.setLookup("ksession1"); SetGlobalCommand setGlobalCommand = new SetGlobalCommand(); setGlobalCommand.setIdentifier("helper"); setGlobalCommand.setObject(new Person("kyle", 30)); setGlobalCommand.setOut(true); setGlobalCommand.setOutIdentifier("output"); command.getCommands().add(setGlobalCommand); -
XML output
-
XStream
<batch-execution lookup="ksession1"> <set-global identifier="helper" out-identifier="output"> <org.drools.compiler.test.Person> <name>kyle</name> <age>30</age> </org.drools.compiler.test.Person> </set-global> </batch-execution> -
JSON
{"batch-execution":{"lookup":"ksession1","commands":{"set-global":{"identifier":"helper","out-identifier":"output","object":{"org.drools.compiler.test.Person":{"name":"kyle","age":30}}}}}} -
JAXB
<?xml version="1.0" encoding="UTF-8" standalone="yes"?> <batch-execution lookup="ksession1"> <set-global out="true" out-identifier="output" identifier="helper"> <object xsi:type="person" xmlns:xsi="http://www.w3.org/2001/XMLSchema-instance"> <age>30</age> <name>kyle</name> </object> </set-global> </batch-execution>
-
12.2.14. GetGlobalCommand
-
Description: Allows you to get a global previously defined.
-
Attributes
Table 26. GetGlobalCommand attributes Name Description required identifier
The identifier of the global defined in the knowledge base
true
outIdentifier
The identifier to be used in the execution results
false
-
Command creation
BatchExecutionCommand command = new BatchExecutionCommand(); command.setLookup("ksession1"); GetGlobalCommand getGlobalCommand = new GetGlobalCommand(); getGlobalCommand.setIdentifier("helper"); getGlobalCommand.setOutIdentifier("helperOutput"); command.getCommands().add(getGlobalCommand); -
XML output
-
XStream
<batch-execution lookup="ksession1"> <get-global identifier="helper" out-identifier="helperOutput"/> </batch-execution> -
JSON
{"batch-execution":{"lookup":"ksession1","commands":{"get-global":{"identifier":"helper","out-identifier":"helperOutput"}}}} -
JAXB
<?xml version="1.0" encoding="UTF-8" standalone="yes"?> <batch-execution lookup="ksession1"> <get-global out-identifier="helperOutput" identifier="helper"/> </batch-execution>
-
12.2.15. GetObjectsCommand
-
Description: Returns all the objects from the current session as a Collection.
-
Attributes
Table 27. GetObjectsCommand attributes Name Description required objectFilter
An ObjectFilter to filter the objects returned from the current session
false
outIdentifier
The identifier to be used in the execution results
false
-
Command creation
BatchExecutionCommand command = new BatchExecutionCommand(); command.setLookup("ksession1"); GetObjectsCommand getObjectsCommand = new GetObjectsCommand(); getObjectsCommand.setOutIdentifier("objects"); command.getCommands().add(getObjectsCommand); -
XML output
-
XStream
<batch-execution lookup="ksession1"> <get-objects out-identifier="objects"/> </batch-execution> -
JSON
{"batch-execution":{"lookup":"ksession1","commands":{"get-objects":{"out-identifier":"objects"}}}} -
JAXB
<?xml version="1.0" encoding="UTF-8" standalone="yes"?> <batch-execution lookup="ksession1"> <get-objects out-identifier="objects"/> </batch-execution>
-
13. CDI
13.1. Introduction
CDI, Contexts and Dependency Injection, is Java specification that provides declarative controls and strucutres to an application. KIE can use it to automatically instantiate and bind things, without the need to use the programmatic API.
13.2. Annotations
@KContainer, @KBase and @KSession all support an optional 'name' attribute. CDI typically does "getOrCreate" when it injects, all injections receive the same instance for the same set of annotations. the 'name' annotation forces a unique instance for each name, although all instance for that name will be identity equals.
13.2.1. @KReleaseId
Used to bind an instance to a specific version of a KieModule. If kie-ci is on the classpath this will resolve dependencies automatically, downloading from remote repositories.
13.2.2. @KContainer
@KContainer is optional as it can be detected and added by the use of @Inject and variable type inferrence.
@Inject
private KieContainer kContainer;@Inject
@KReleaseId(groupId = "jar1", artifactId = "art1", version = "1.1")
private KieContainer kContainer;@Inject
@KContainer(name = "kc1")
@KReleaseId(groupId = "jar1", artifactId = "art1", version = "1.1")
private KieContainer kContainer;13.2.3. @KBase
@KBase is optional as it can be detected and added by the use of @Inject and variable type inference.
The default argument, if given, maps to the value attribute and specifies the name of the KieBase from the kmodule.xml file.
@Inject
private KieBase kbase;@Inject
@KReleaseId( groupId = "jar1", artifactId = "art1", version = "1.0")
private KieBase kbase;@Inject
@KBase("kbase1")
@KReleaseId( groupId = "jar1", artifactId = "art1", version = "1.0")
private KieBase kbase1v10;
@Inject
@KBase("kbase1")
@KReleaseId( groupId = "jar1", artifactId = "art1", version = "1.1")
private KieBase kbase1v10;@Inject
@KSession(value="kbase1", name="kb1")
@KReleaseId( groupId = "jar1", artifactId = "art1", version = "1.0")
private KieBase kbase1kb1;
@Inject
@KSession(value="kbase1", name="kb2")
@KReleaseId( groupId = "jar1", artifactId = "art1", version = "1.0")
private KieBase kbase1kb2;13.2.4. @KSession for KieSession
@KSession is optional as it can be detected and added by the use of @Inject and variable type inference.
The default argument, if given, maps to the value attribute and specifies the name of the KieSession from the kmodule.xml file
@Inject
private KieSession ksession;@Inject
@KReleaseId( groupId = "jar1", artifactId = "art1", version = "1.0")
private KieSession ksession;@Inject
@KSession("ksession1")
@KReleaseId( groupId = "jar1", artifactId = "art1", version = "1.0")
private KieSession ksessionv10;
@Inject
@KSession("ksession1")
@KReleaseId( groupId = "jar1", artifactId = "art1", version = "1.1")
private KieSession ksessionv11;@Inject
@KSession(value="ksession1", name="ks1")
@KReleaseId( groupId = "jar1", artifactId = "art1", version = "1.0")
private KieSession ksession1ks1
@Inject
@KSession(value="ksession1", name="ks2")
@KReleaseId( groupId = "jar1", artifactId = "art1", version = "1.0")
private KieSession ksession1ks213.2.5. @KSession for StatelessKieSession
@KSession is optional as it can be detected and added by the use of @Inject and variable type inference.
The default argument, if given, maps to the value attribute and specifies the name of the KieSession from the kmodule.xml file.
@Inject
private StatelessKieSession ksession;@Inject
@KReleaseId( groupId = "jar1", artifactId = "art1", version = "1.0")
private StatelessKieSession ksession;@Inject
@KSession("ksession1")
@KReleaseId( groupId = "jar1", rtifactId = "art1", version = "1.0")
private StatelessKieSession ksessionv10;
@Inject
@KSession("ksession1")
@KReleaseId( groupId = "jar1", rtifactId = "art1", version = "1.1")
private StatelessKieSession ksessionv11;@Inject
@KSession(value="ksession1", name="ks1")
@KReleaseId( groupId = "jar1", artifactId = "art1", version = "1.0")
private StatelessKieSession ksession1ks1
@Inject
@KSession(value="ksession1", name="ks2")
@KReleaseId( groupId = "jar1", artifactId = "art1", version = "1.0")
private StatelessKieSession ksession1ks213.3. API Example Comparison
CDI can inject instances into fields, or even pass them as arguments. In this example field injection is used.
@Inject
@KSession("ksession1")
KieSession kSession;
public void go(PrintStream out) {
kSession.setGlobal("out", out);
kSession.insert(new Message("Dave", "Hello, HAL. Do you read me, HAL?"));
kSession.fireAllRules();
}This is less code and more declarative than the API approach.
public void go(PrintStream out) {
KieServices ks = KieServices.Factory.get();
KieContainer kContainer = ks.getKieClasspathContainer();
KieSession kSession = kContainer.newKieSession("ksession1");
kSession.setGlobal("out", out);
kSession.insert(new Message("Dave", "Hello, HAL. Do you read me, HAL?"));
kSession.fireAllRules();
}14. Integration with Spring
14.1. Important Changes for Drools 6.0
Drools Spring integration has undergone a complete makeover inline with the changes for Drools 6.0. The following are some of the major changes
-
The recommended prefix for the Drools Spring has changed from 'drools:' to 'kie:'
-
New Top Level Tags in 6.0
-
kie:kmodule
-
kie:import (from version 6.2)
-
kie:releaseId (from version 6.2)
-
-
The following tags are no longer valid as top level tags.
-
kie:kbase - A child of the kie:kmodule tag.
-
kie:ksession - A child of the kie:kbase tag.
-
-
Removed Tags from previous versions Drools 5.x
-
drools:resources
-
drools:resource
-
drools:grid
-
drools:grid-node
-
14.2. Integration with Drools Expert
In this section we will explain the kie namespace.
14.2.1. KieModule
The <kie:kmodule> defines a collection of KieBase and associated KieSession’s. The kmodule tag has one MANDATORY parameter 'id'.
| Attribute | Description | Required |
|---|---|---|
id |
Bean’s id is the name to be referenced from other beans. Standard Spring ID semantics apply. |
Yes |
A kmodule tag can contain only the following tags as children.
-
kie:kbase
Refer to the documentation of kmodule.xml in the Drools Expert documentation for detailed explanation of the need for kmodule.
14.2.2. KieBase
14.2.2.1. <kie:kbase>'s parameters as attributes:
| Attribute | Description | Required |
|---|---|---|
name |
Name of the KieBase |
Yes |
packages |
Comma separated list of resource packages to be included in this kbase |
No |
includes |
kbase names to be included. All resources from the corresponding kbase are included in this kbase. |
No |
default |
Boolean (TRUE/FALSE). Default kbase, if not provided, it is assumed to be FALSE |
No |
scope |
prototype | singleton. If not provided assumed to be singleton (default) |
No |
eventProcessingMode |
Event Processing Mode. Valid options are STREAM, CLOUD |
No |
equalsBehavior |
Valid options are IDENTITY, EQUALITY |
No |
declarativeAgenda |
Valid options are enabled, disabled, true, false |
No |
14.2.2.3. <kie:kbase>'s definition example
A kmodule can contain multiple (1..n) kbase elements.
<kie:kmodule id="sample_module">
<kie:kbase name="kbase1" packages="org.drools.spring.sample">
...
</kie:kbase>
</kie:kmodule>
<bean id="kiePostProcessor"
class="org.kie.spring.KModuleBeanFactoryPostProcessor"/>14.2.2.4. Spring Bean Scope (for KieBase and KieSession)
When defining a KieBase or a KieSession, you have the option of declaring a scope for that bean. For example, To force Spring to produce a new bean instance each time one is needed, you should declare the bean’s scope attribute to be 'prototype'. Similar way if you want Spring to return the same bean instance each time one is needed, you should declare the bean’s scope attribute to be 'singleton'.
14.2.3. IMPORTANT NOTE
For proper initialization of the kmodule objects (kbase/ksession), it is mandatory for a bean of type org.kie.spring.KModuleBeanFactoryPostProcessor or org.kie.spring.annotations.KModuleAnnotationPostProcessor be defined.
<bean id="kiePostProcessor"
class="org.kie.spring.KModuleBeanFactoryPostProcessor"/><bean id="kiePostProcessor"
class="org.kie.spring.annotations.KModuleAnnotationPostProcessor"/>|
Without the org.kie.spring.KModuleBeanFactoryPostProcessor or org.kie.spring.annotations.KModuleAnnotationPostProcessor bean definition, the kie-spring integration will fail to work. |
14.2.4. KieSessions
<kie:ksession> element defines KieSessions. The same tag is used to define both Stateful (org.kie.api.runtime.KieSession) and Stateless (org.kie.api.runtime.StatelessKieSession) sessions.
14.2.4.1. <kie:ksession>'s parameters as attributes:
| Attribute | Description | Required |
|---|---|---|
name |
ksession’s name. |
Yes |
type |
is the session stateful or stateless?. If this attribute is empty or missing, the session is assumed to be of type Stateful. |
No |
default |
Is this the default session? |
no |
scope |
prototype | singleton. If not provided assumed to be singleton (default) |
no |
clockType |
REALTIME or PSEUDO |
no |
listeners-ref |
Specifies the reference to the event listeners group (see 'Defining a Group of listeners' section below). |
no |
<kie:kmodule id="sample-kmodule">
<kie:kbase name="drl_kiesample3" packages="drl_kiesample3">
<kie:ksession name="ksession1" type="stateless"/>
<kie:ksession name="ksession2"/>
</kie:kbase>
</kie:kmodule>
<bean id="kiePostProcessor"
class="org.kie.spring.KModuleBeanFactoryPostProcessor"/>14.2.4.2. Spring Bean Scope (for KieBase and KieSession)
When defining a KieBase or a KieSession, you have the option of declaring a scope for that bean. For example, To force Spring to produce a new bean instance each time one is needed, you should declare the bean’s scope attribute to be 'prototype'. Similar way if you want Spring to return the same bean instance each time one is needed, you should declare the bean’s scope attribute to be 'singleton'.
14.2.5. Kie:ReleaseId
14.2.5.1. <kie:releaseId>'s parameters as attributes:
| Attribute | Description | Required |
|---|---|---|
id |
Bean’s id is the name to be referenced from other beans. Standard Spring ID semantics apply. |
Yes |
groupId |
groupId from Maven GAV |
Yes |
artifactId |
artifactId from Maven GAV |
Yes |
version |
version from Maven GAV |
Yes |
<kie:releaseId id="beanId" groupId="org.kie.spring"
artifactId="named-artifactId" version="1.0.0-SNAPSHOT"/>14.2.6. Kie:Import
Starting with version 6.2, kie-spring allows for importing of kie objects from kjars found on the classpath. Two modes of importing the kie objects are currently supported.
| Attribute | Description | Required |
|---|---|---|
releaseId |
Reference to a Bean ID. Standard Spring ID semantics apply. |
No |
enableScanner |
Enable Scanner. This attribute is used only if 'releaseId' is specified. |
No |
scannerInterval |
Scanning Interval in milli seconds. This attribute is used only if 'releaseId' is specified. |
No |
14.2.6.1. Global Import
The import tag will force the automatic scan of all the jars on the classpath, initialize the Kie Objects (Kbase/KSessions) and import these objects into the spring context.
<kie:import />14.2.6.2. Specific Import - ReleaseId
Using the releaseId-ref attribute on the import tag will initialize the specific Kie Objects (Kbase/KSessions) and import these objects into the spring context.
<kie:import releaseId-ref="namedKieSession"/>
<kie:releaseId id="namedKieSession" groupId="org.drools"
artifactId="named-kiesession" version="7.11.0.Final"/>Kie Scanning feature can be enabled for KieBase’s imported with a specific releaseId. This feature is currently not available for global imports.
<kie:import releaseId-ref="namedKieSession"
enableScanner="true" scannerInterval="1000"/>
<kie:releaseId id="namedKieSession" groupId="org.drools"
artifactId="named-kiesession" version="7.11.0.Final"/>If the scanner is defined and enabled, an implicit KieScanner object is created and inserted into the spring context. It can be retrived from the spring context.
// the implicit name would be releaseId#scanner
KieScanner releaseIdScanner = context.getBean("namedKieSession#scanner", KieScanner.class);
releaseIdScanner.scanNow();|
kie-ci must be available on the classpath for the releaseId importing feature to work. |
14.2.7. Annotations
@KContainer, @KBase and @KSession all support an optional 'name' attribute. Spring typically does "get" when it injects, all injections receive the same instance for the same set of annotations. the 'name' annotation forces a unique instance for each name, although all instance for that name will be identity equals.
14.2.7.1. @KReleaseId
Used to bind an instance to a specific version of a KieModule. If kie-ci is on the classpath this will resolve dependencies automatically, downloading from remote repositories.
14.2.7.2. @KContainer
@KContainer
private KieContainer kContainer;@KContainer
@KReleaseId(groupId = "jar1", artifactId = "art1", version = "1.1")
private KieContainer kContainer;@KContainer(name = "kc1")
@KReleaseId(groupId = "jar1", artifactId = "art1", version = "1.1")
private KieContainer kContainer;14.2.7.3. @KBase
The default argument, if given, maps to the value attribute and specifies the name of the KieBase from the spring xml file.
@KBase
private KieBase kbase;@KBase
@KReleaseId( groupId = "jar1", artifactId = "art1", version = "1.0")
private KieBase kbase;@KBase("kbase1")
@KReleaseId( groupId = "jar1", artifactId = "art1", version = "1.0")
private KieBase kbase1v10;
@KBase("kbase1")
@KReleaseId( groupId = "jar1", artifactId = "art1", version = "1.1")
private KieBase kbase1v11;@KSession("ksession1")
@KReleaseId( groupId = "jar1", artifactId = "art1", version = "1.0")
private KieSession ksession11kb2;
@KSession("ksession1")
@KReleaseId( groupId = "jar1", artifactId = "art1", version = "1.1")
private KieSession ksession11kb2;14.2.7.4. @KSession for KieSession
The default argument, if given, maps to the value attribute and specifies the name of the KieSession from the kmodule.xml or spring xml file
@KSession
private KieSession ksession;@KSession
@KReleaseId( groupId = "jar1", artifactId = "art1", version = "1.0")
private KieSession ksession;@KSession("ksession1")
@KReleaseId( groupId = "jar1", artifactId = "art1", version = "1.0")
private KieSession ksessionv10;
@KSession("ksession1")
@KReleaseId( groupId = "jar1", artifactId = "art1", version = "1.1")
private KieSession ksessionv11;@KSession("ksession1")
@KReleaseId( groupId = "jar1", artifactId = "art1", version = "1.0")
private KieSession ksession1ks1
@KSession("ksession1")
@KReleaseId( groupId = "jar1", artifactId = "art1", version = "1.0")
private KieSession ksession1ks214.2.7.5. @KSession for StatelessKieSession
The default argument, if given, maps to the value attribute and specifies the name of the KieSession from the kmodule.xml or spring xml file.
@KSession
private StatelessKieSession ksession;@KSession
@KReleaseId( groupId = "jar1", artifactId = "art1", version = "1.0")
private StatelessKieSession ksession;@KSession("ksession1")
@KReleaseId( groupId = "jar1", rtifactId = "art1", version = "1.0")
private StatelessKieSession ksessionv10;
@KSession("ksession1")
@KReleaseId( groupId = "jar1", rtifactId = "art1", version = "1.1")
private StatelessKieSession ksessionv11;@KSession(value="ksession1", name="ks1")
@KReleaseId( groupId = "jar1", artifactId = "art1", version = "1.0")
private StatelessKieSession ksession1ks1
@KSession(value="ksession1", name="ks2")
@KReleaseId( groupId = "jar1", artifactId = "art1", version = "1.0")
private StatelessKieSession ksession1ks214.2.7.6. IMPORTANT NOTE
When annotations are used, For proper initialization of the kmodule objects (kbase/ksession), it is mandatory for either a bean of type org.kie.spring.annotations.KModuleAnnotationPostProcessor be defined
<bean id="kiePostProcessor"
class="org.kie.spring.annotations.KModuleAnnotationPostProcessor"/><context:component-scan base-package="org.kie.spring.annotations"/>|
The post processor is different when annotations are used. |
14.2.8. Event Listeners
Drools supports adding 3 types of listeners to KieSessions - AgendaListener, WorkingMemoryListener, ProcessEventListener
The kie-spring module allows you to configure these listeners to KieSessions using XML tags. These tags have identical names as the actual listener interfaces i.e., <kie:agendaEventListener….>, <kie:ruleRuntimeEventListener….> and <kie:processEventListener….>.
kie-spring provides features to define the listeners as standalone (individual) listeners and also to define them as a group.
14.2.8.2. Attributes:
| Attribute | Required | Description |
|---|---|---|
ref |
No |
A reference to another declared bean. |
<bean id="mock-agenda-listener" class="mocks.MockAgendaEventListener"/>
<bean id="mock-rr-listener" class="mocks.MockRuleRuntimeEventListener"/>
<bean id="mock-process-listener" class="mocks.MockProcessEventListener"/>
<kie:kmodule id="listeners_kmodule">
<kie:kbase name="drl_kiesample" packages="drl_kiesample">
<kie:ksession name="ksession2">
<kie:agendaEventListener ref="mock-agenda-listener"/>
<kie:processEventListener ref="mock-process-listener"/>
<kie:ruleRuntimeEventListener ref="mock-rr-listener"/>
</kie:ksession>
</kie:kbase>
</kie:kmodule>
<bean id="kiePostProcessor"
class="org.kie.spring.KModuleBeanFactoryPostProcessor"/>14.2.8.3. Nested Elements:
-
bean
-
class = String
-
name = String (optional)
-
<kie:kmodule id="listeners_module">
<kie:kbase name="drl_kiesample" packages="drl_kiesample">
<kie:ksession name="ksession1">
<kie:agendaEventListener>
<bean class="mocks.MockAgendaEventListener"/>
</kie:agendaEventListener>
</kie:ksession>
</kie:kbase>
</kie:kmodule>
<bean id="kiePostProcessor"
class="org.kie.spring.KModuleBeanFactoryPostProcessor"/>14.2.8.4. Empty Tag : Declaration with no 'ref' and without a nestedbean
When a listener is defined without a reference to a implementing bean and does not contain a nested bean, <drools:ruleRuntimeEventListener/> the underlying implementation adds the Debug version of the listener defined in the API.
The debug listeners print the corresponding Event toString message to _System.err. _
<bean id="mock-agenda-listener" class="mocks.MockAgendaEventListener"/>
<bean id="mock-rr-listener" class="mocks.MockRuleRuntimeEventListener"/>
<bean id="mock-process-listener" class="mocks.MockProcessEventListener"/>
<kie:kmodule id="listeners_module">
<kie:kbase name="drl_kiesample" packages="drl_kiesample">
<kie:ksession name="ksession2">
<kie:agendaEventListener />
<kie:processEventListener />
<kie:ruleRuntimeEventListener />
</kie:ksession>
</kie:kbase>
</kie:kmodule>
<bean id="kiePostProcessor"
class="org.kie.spring.KModuleBeanFactoryPostProcessor"/>14.2.8.5. Mix and Match of different declaration styles
The drools-spring module allows you to mix and match the different declarative styles within the same KieSession. The below sample provides more clarity.
<bean id="mock-agenda-listener" class="mocks.MockAgendaEventListener"/>
<bean id="mock-rr-listener" class="mocks.MockRuleRuntimeEventListener"/>
<bean id="mock-process-listener" class="mocks.MockProcessEventListener"/>
<kie:kmodule id="listeners_module">
<kie:kbase name="drl_kiesample" packages="drl_kiesample">
<kie:ksession name="ksession1">
<kie:agendaEventListener>
<bean class="org.kie.spring.mocks.MockAgendaEventListener"/>
</kie:agendaEventListener>
</kie:ksession>
<kie:ksession name="ksession2">
<kie:agendaEventListener ref="mock-agenda-listener"/>
<kie:processEventListener ref="mock-process-listener"/>
<kie:ruleRuntimeEventListener ref="mock-rr-listener"/>
</kie:ksession>
</kie:kbase>
</kie:kmodule>
<bean id="kiePostProcessor"
class="org.kie.spring.KModuleBeanFactoryPostProcessor"/>14.2.8.6. Defining multiple listeners of the same type
It is also valid to define multiple beans of the same event listener types for a KieSession.
<bean id="mock-agenda-listener" class="mocks.MockAgendaEventListener"/>
<kie:kmodule id="listeners_module">
<kie:kbase name="drl_kiesample" packages="drl_kiesample">
<kie:ksession name="ksession1">
<kie:agendaEventListener ref="mock-agenda-listener"/>
<kie:agendaEventListener>
<bean class="org.kie.spring.mocks.MockAgendaEventListener"/>
</kie:agendaEventListener>
</kie:ksession>
</kie:kbase>
</kie:kmodule>
<bean id="kiePostProcessor"
class="org.kie.spring.KModuleBeanFactoryPostProcessor"/>14.2.8.7. Defining a Group of listeners:
drools-spring allows for grouping of listeners. This is particularly useful when you define a set of listeners and want to attach them to multiple sessions. The grouping feature is also very useful, when we define a set of listeners for 'testing' and then want to switch them for 'production' use.
14.2.8.8. Attributes:
| Attribute | Required | Description |
|---|---|---|
ID |
yes |
Unique identifier |
14.2.8.9. Nested Elements:
-
kie:agendaEventListener…
-
kie:ruleRuntimeEventListener…
-
kie:processEventListener…
|
The above mentioned child elements can be declared in any order. Only one declaration of each type is allowed in a group. |
14.2.8.10. Example:
<bean id="mock-agenda-listener" class="mocks.MockAgendaEventListener"/>
<bean id="mock-rr-listener" class="mocks.MockRuleRuntimeEventListener"/>
<bean id="mock-process-listener" class="mocks.MockProcessEventListener"/>
<kie:kmodule id="listeners_module">
<kie:kbase name="drl_kiesample" packages="drl_kiesample">
<kie:ksession name="statelessWithGroupedListeners" type="stateless"
listeners-ref="debugListeners"/>
</kie:kbase>
</kie:kmodule>
<kie:eventListeners id="debugListeners">
<kie:agendaEventListener ref="mock-agenda-listener"/>
<kie:processEventListener ref="mock-process-listener"/>
<kie:ruleRuntimeEventListener ref="mock-rr-listener"/>
</kie:eventListeners>
<bean id="kiePostProcessor"
class="org.kie.spring.KModuleBeanFactoryPostProcessor"/>14.2.9. Loggers
Drools supports adding 2 types of loggers to KieSessions - ConsoleLogger, FileLogger.
The kie-spring module allows you to configure these loggers to KieSessions using XML tags. These tags have identical names as the actual logger interfaces i.e., <kie:consoleLogger….> and <kie:fileLogger….>.
14.2.9.1. Defining a console logger:
A console logger can be attached to a KieSession by using the <kie:consoleLogger/> tag. This tag has no attributes and must be present directly under a <kie:ksession….> element.
<kie:kmodule id="loggers_module">
<kie:kbase name="drl_kiesample" packages="drl_kiesample">
<kie:ksession name="ConsoleLogger-statefulSession" type="stateful">
<kie:consoleLogger/>
</kie:ksession>
</kie:kbase>
</kie:kmodule>
<bean id="kiePostProcessor"
class="org.kie.spring.KModuleBeanFactoryPostProcessor"/>14.2.9.2. Defining a file logger:
A file logger can be attached to a KieSession by using the <kie:fileLogger/> tag. This tag has the following attributes and must be present directly under a <kie:ksession….> element.
| Attribute | Required | Description |
|---|---|---|
ID |
yes |
Unique identifier |
file |
yes |
Path to the actual file on the disk |
threaded |
no |
Defaults to false. Valid values are 'true’or 'false' |
interval |
no |
Integer. Specifies the interval for flushing the contents from memory to the disk. |
<kie:kmodule id="loggers_module">
<kie:kbase name="drl_kiesample" packages="drl_kiesample">
<kie:ksession name="ConsoleLogger-statefulSession" type="stateful">
<kie:fileLogger id="fl_logger" file="#{ systemProperties['java.io.tmpdir'] }/log1"/>
<kie:fileLogger id="tfl_logger" file="#{ systemProperties['java.io.tmpdir'] }/log2"
threaded="true" interval="5"/>
</kie:ksession>
</kie:kbase>
</kie:kmodule>
<bean id="kiePostProcessor"
class="org.kie.spring.KModuleBeanFactoryPostProcessor"/>14.2.9.3. Closing a FileLogger
To prevent leaks, it is advised to close the _<kie:fileLogger …> _ programmatically.
LoggerAdaptor adaptor = (LoggerAdaptor) context.getBean("fl_logger");
adaptor.close();14.2.10. Defining Batch Commands
A <kie:batch> element can be used to define a set of batch commands for a given ksession.This tag has no attributes and must be present directly under a <kie:ksession….> element. The commands supported are
-
insert-object
-
ref = String (optional)
-
Anonymous bean
-
-
set-global
-
identifier = String (required)
-
reg = String (optional)
-
Anonymous bean
-
-
fire-all-rules
-
max : n
-
-
fire-until-halt
-
start-process
-
parameter
-
identifier = String (required)
-
ref = String (optional)
-
Anonymous bean
-
-
-
signal-event
-
ref = String (optional)
-
event-type = String (required)
-
process-instance-id =n (optional)
-
<kie:kmodule id="batch_commands_module">
<kie:kbase name="drl_kiesample" packages="drl_kiesample">
<kie:ksession name="ksessionForCommands" type="stateful">
<kie:batch>
<kie:insert-object ref="person2"/>
<kie:set-global identifier="persons" ref="personsList"/>
<kie:fire-all-rules max="10"/>
</kie:batch>
</kie:ksession>
</kie:kbase>
</kie:kmodule>
<bean id="kiePostProcessor"
class="org.kie.spring.KModuleBeanFactoryPostProcessor"/>14.2.11. Persistence
-
jpa-persistence
-
transaction-manager
-
ref = String
-
-
entity-manager-factory
-
ref = String
-
-
<kie:kstore id="kstore" /> <!-- provides KnowledgeStoreService implementation -->
<bean id="myEmf"
class="org.springframework.orm.jpa.LocalContainerEntityManagerFactoryBean">
<property name="dataSource" ref="ds" />
<property name="persistenceUnitName"
value="org.drools.persistence.jpa.local" />
</bean>
<bean id="txManager" class="org.springframework.orm.jpa.JpaTransactionManager">
<property name="entityManagerFactory" ref="myEmf" />
</bean>
<kie:kmodule id="persistence_module">
<kie:kbase name="drl_kiesample" packages="drl_kiesample">
<kie:ksession name="jpaSingleSessionCommandService">
<kie:configuration>
<kie:jpa-persistence>
<kie:transaction-manager ref="txManager"/>
<kie:entity-manager-factory ref="myEmf"/>
</kie:jpa-persistence>
</kie:configuration>
</kie:ksession>
</kie:kbase>
</kie:kmodule>
<bean id="kiePostProcessor"
class="org.kie.spring.KModuleBeanFactoryPostProcessor"/>14.2.12. Leveraging Other Spring Features
This section provides details on leveraging other standard spring features when integrating with Drools Expert.
14.2.12.1. Using Spring Expressions (Spel)
<kie:kmodule id="batch_commands_module">
<kie:kbase name="drl_kiesample" packages="#{packageRepository.packages}">
<kie:ksession name="ksessionForCommands" type="stateful"/>
</kie:kbase>
</kie:kmodule>
<bean id="kiePostProcessor"
class="org.kie.spring.KModuleBeanFactoryPostProcessor"/>
<bean id="packageRepository" class="sample.package.class.PackageRepo">
<property name="packages" value="drl_kiesample3">
</bean><kie:kmodule id="loggers_module">
<kie:kbase name="drl_kiesample" packages="drl_kiesample">
<kie:ksession name="ConsoleLogger-statefulSession" type="stateful">
<kie:fileLogger id="fl" file="#{ systemProperties['java.io.tmpdir'] }/log1"/>
<kie:fileLogger id="tfl" file="#{ systemProperties['java.io.tmpdir'] }/log2"
threaded="true" interval="5"/>
</kie:ksession>
</kie:kbase>
</kie:kmodule>
<bean id="kiePostProcessor"
class="org.kie.spring.KModuleBeanFactoryPostProcessor"/>14.2.12.2. Using Spring Profiles
Spring 3.1 introduces a new profile attribute to the beans element of the spring-beans schema. This attribute acts as a switch when enabling and disabling profiles in different environments. One potential use of this attribute can be to have the same kbase defined with debug loggers in 'dev' environment and without loggers in 'prod' environment.
The below code snippet illustrates the concept of 'profiles'.
<beans xmlns="http://www.springframework.org/schema/beans"
xmlns:xsi="http://www.w3.org/2001/XMLSchema-instance"
xmlns:kie="http://drools.org/schema/kie-spring"
xsi:schemaLocation="http://www.springframework.org/schema/beans
http://www.springframework.org/schema/beans/spring-beans-4.0.xsd
http://drools.org/schema/kie-spring http://drools.org/schema/kie-spring.xsd">
<beans profile="development">
<kie:kmodule id="test-kmodule">
<kie:kbase name="drl_kiesample" packages="drl_kiesample">
<kie:ksession name="ksession1" type="stateless">
<kie:consoleLogger />
</kie:ksession>
</kie:kbase>
</kie:kmodule>
...
</beans>
<beans profile="production">
<kie:kmodule id="test-kmodule">
<kie:kbase name="drl_kiesample" packages="drl_kiesample">
<kie:ksession name="ksession1" type="stateless"/>
</kie:kbase>
</kie:kmodule>
...
</beans>
</beans>As shown above, the Spring XML contains the definition of the profiles. While loading the ApplicationContext you have to tell Spring which profile you’re loading.
There are several ways of selecting your profile and the most useful is by using the "spring.profiles.active" system property.
System.setProperty("spring.profiles.active", "development");
ApplicationContext ctx = new ClassPathXmlApplicationContext("beans.xml");Obviously, it is not a good practice to hard code things as shown above and the recommended practice is to keep the system properties definitions independent of the application.
-Dspring.profiles.active="development"The profiles can also be loaded and enabled programmtically
...
GenericXmlApplicationContext ctx = new GenericXmlApplicationContext("beans.xml");
ConfigurableEnvironment env = ctx.getEnvironment();
env.setActiveProfiles("development");
ctx.refresh();
...14.3. Integration with jBPM Human Task
This chapter describes the infrastructure used when configuring a human task server with Spring as well as a little bit about the infrastructure used when doing this.
14.3.1. How to configure Spring with jBPM Human task
The jBPM human task server can be configured to use Spring persistence. [_kie_spring_human_task_example] is an example of this which uses local transactions and Spring’s thread-safe EntityManager proxy.
The following diagram shows the dependency graph used in [_kie_spring_human_task_example] .
A TaskService instance is dependent on two other bean types: a drools SystemEventListener bean as well as a TaskSessionSpringFactoryImpl bean.
The TaskSessionSpringFactoryImpl bean is howerver not injected into the TaskService bean because this would cause a circular dependency.
To solve this problem, when the TaskService bean is injected into the TaskSessionSpringFactoryImpl bean, the setter method used secretly injects the TaskSessionSpringFactoryImpl instance back into the TaskService bean and initializes the TaskService bean as well.
The TaskSessionSpringFactoryImpl bean is responsible for creating all the internal instances in human task that deal with transactions and persistence context management.
Besides a TaskService instance, this bean also requires a transaction manager and a persistence context to be injected.
Specifically, it requires an instance of a HumanTaskSpringTransactionManager bean (as a transaction manager) and an instance of a SharedEntityManagerBean bean (as a persistence context instance).
We also use some of the standard Spring beans in order to configure persistence: there’s a bean to hold the EntityManagerFactory instance as well as the SharedEntityManagerBean instance.
The SharedEntityManagerBean provides a shared, thread-safe proxy for the actual EntityManager.
The HumanTaskSpringTransactionManager bean serves as a wrapper around the Spring transaction manager, in this case the JpaTransactionManager.
An instance of a JpaTransactionManager bean is also instantiated because of this.
<?xml version="1.0" encoding="UTF-8"?>
<beans xmlns="http://www.springframework.org/schema/beans"
xmlns:xsi="http://www.w3.org/2001/XMLSchema-instance"
xmlns:jbpm="http://drools.org/schema/drools-spring"
xsi:schemaLocation="http://www.springframework.org/schema/beans http://www.springframework.org/schema/beans/spring-beans-3.0.xsd
http://drools.org/schema/drools-spring org/drools/container/spring/drools-spring-1.2.0.xsd">
<!-- persistence & transactions-->
<bean id="htEmf" class="org.springframework.orm.jpa.LocalContainerEntityManagerFactoryBean">
<property name="persistenceUnitName" value="org.jbpm.task" />
</bean>
<bean id="htEm" class="org.springframework.orm.jpa.support.SharedEntityManagerBean">
<property name="entityManagerFactory" ref="htEmf"/>
</bean>
<bean id="jpaTxMgr" class="org.springframework.orm.jpa.JpaTransactionManager">
<property name="entityManagerFactory" ref="htEmf" />
<!-- this must be true if using the SharedEntityManagerBean, and false otherwise -->
<property name="nestedTransactionAllowed" value="true"/>
</bean>
<bean id="htTxMgr" class="org.drools.container.spring.beans.persistence.HumanTaskSpringTransactionManager">
<constructor-arg ref="jpaTxMgr" />
</bean>
<!-- human-task beans -->
<bean id="systemEventListener" class="org.drools.SystemEventListenerFactory" factory-method="getSystemEventListener" />
<bean id="taskService" class="org.jbpm.task.service.TaskService" >
<property name="systemEventListener" ref="systemEventListener" />
</bean>
<bean id="springTaskSessionFactory" class="org.jbpm.task.service.persistence.TaskSessionSpringFactoryImpl"
init-method="initialize" depends-on="taskService" >
<!-- if using the SharedEntityManagerBean, make sure to enable nested transactions -->
<property name="entityManager" ref="htEm" />
<property name="transactionManager" ref="htTxMgr" />
<property name="useJTA" value="false" />
<property name="taskService" ref="taskService" />
</bean>
</beans>When using the SharedEntityManagerBean instance, it’s important to configure the Spring transaction manager to use nested transactions.
This is because the SharedEntityManagerBean is a transactional persistence context and will close the persistence context after every operation.
However, the human task server needs to be able to access (persisted) entities after operations.
Nested transactions allow us to still have access to entities that otherwise would have been detached and are no longer accessible, especially when using an ORM framework that uses lazy-initialization of entities.
Also, while the TaskSessionSpringFactoryImpl bean takes an “useJTA”
parameter, at the moment, JTA transactions with Spring have not yet been fully tested.
15. Integration with Aries Blueprint
15.1. Integration with Drools Expert
In this section we will explain the kie namespace.
15.1.1. KieModule
The <kie:kmodule> defines a collection of KieBase and associated KieSession’s. The kmodule tag has one MANDATORY parameter 'id'.
| Attribute | Description | Required |
|---|---|---|
id |
Bean’s id is the name to be referenced from other beans. Standard Blueprint ID semantics applies. |
Yes |
A kmodule tag can contain only the following tags as children.
-
kie:kbase
Refer to the documentation of kmodule.xml in the Drools Expert documentation for detailed explanation of the need for kmodule.
15.1.2. KieBase
15.1.2.1. <kie:kbase>'s parameters as attributes:
| Attribute | Description | Required |
|---|---|---|
name |
Name of the KieBase |
Yes |
packages |
Comma separated list of resource packages to be included in this kbase |
No |
includes |
kbase names to be included. All resources from the corresponding kbase are included in this kbase. |
No |
default |
Boolean (TRUE/FALSE). Default kbase, if not provided, it is assumed to be FALSE |
No |
scope |
prototype | singleton. If not provided assumed to be singleton (default) |
No |
eventProcessingMode |
Event Processing Mode. Valid options are STREAM, CLOUD |
No |
equalsBehavior |
Valid options are IDENTITY, EQUALITY |
No |
15.1.2.3. <kie:kbase>'s definition example
A kmodule can contain multiple (1..n) kbase elements.
<kie:kmodule id="sample_module">
<kie:kbase name="kbase1" packages="org.drools.blueprint.sample">
...
</kie:kbase>
</kie:kmodule>15.1.2.4. Blueprint Bean Scope (for KieBase and KieSession)
When defining a KieBase or a KieSession, you have the option of declaring a scope for that bean. For example, To force Blueprint to produce a new bean instance each time one is needed, you should declare the bean’s scope attribute to be 'prototype'. Similar way if you want Blueprint to return the same bean instance each time one is needed, you should declare the bean’s scope attribute to be 'singleton'.
15.1.3. KieSessions
<kie:ksession> element defines KieSessions. The same tag is used to define both Stateful (org.kie.api.runtime.KieSession) and Stateless (org.kie.api.runtime.StatelessKieSession) sessions.
15.1.3.1. <kie:ksession>'s parameters as attributes:
| Attribute | Description | Required |
|---|---|---|
name |
ksession’s name. |
Yes |
type |
is the session stateful or stateless?. If this attribute is empty or missing, the session is assumed to be of type Stateful. |
No |
default |
Is this the default session? |
No |
scope |
prototype | singleton. If not provided assumed to be singleton (default) |
No |
clockType |
REALTIME or PSEUDO |
No |
listeners-ref |
Specifies the reference to the event listeners group (see 'Defining a Group of listeners' section below). |
No |
<kie:kmodule id="sample-kmodule">
<kie:kbase name="drl_kiesample3" packages="drl_kiesample3">
<kie:ksession name="ksession1" type="stateless"/>
<kie:ksession name="ksession2"/>
</kie:kbase>
</kie:kmodule>15.1.4. Kie:ReleaseId
15.1.4.1. <kie:releaseId>'s parameters as attributes:
| Attribute | Description | Required |
|---|---|---|
id |
Bean’s id is the name to be referenced from other beans. Standard Blueprint ID semantics applies. |
Yes |
groupId |
groupId from Maven GAV |
Yes |
artifactId |
artifactId from Maven GAV |
Yes |
version |
version from Maven GAV |
Yes |
<kie:releaseId id="beanId" groupId="org.kie.blueprint"
artifactId="named-artifactId" version="1.0.0-SNAPSHOT"/>15.1.5. Kie:Import
Starting with version 6.5, kie-aries-blueprint allows for importing of kie objects from kjars found on the classpath. Two modes of importing the kie objects are currently supported.
| Attribute | Description | Required |
|---|---|---|
releaseId |
Reference to a Bean ID. Standard Blueprint ID semantics applies. |
No |
enableScanner |
Enable Scanner. This attribute is used only if 'releaseId' is specified. |
No |
scannerInterval |
Scanning Interval in milli seconds. This attribute is used only if 'releaseId' is specified. |
No |
15.1.5.1. Global Import
The import tag will force the automatic scan of all the jars on the classpath, initialize the Kie Objects (Kbase/KSessions) and import these objects into the blueprint context.
<kie:import />15.1.5.2. Specific Import - ReleaseId
Using the releaseId-ref attribute on the import tag will initialize the specific Kie Objects (Kbase/KSessions) and import these objects into the blueprint context.
<kie:import releaseId-ref="namedKieSession"/>
<kie:releaseId id="namedKieSession" groupId="org.drools"
artifactId="named-kiesession" version="7.11.0.Final"/>Kie Scanning feature can be enabled for KieBase’s imported with a specific releaseId. This feature is currently not available for global imports.
<kie:import releaseId-ref="namedKieSession"
enableScanner="true" scannerInterval="1000"/>
<kie:releaseId id="namedKieSession" groupId="org.drools"
artifactId="named-kiesession" version="7.11.0.Final"/>If the scanner is defined and enabled, an implicit KieScanner object is created and inserted into the blueprint container. It can be programmatically retrived from the blueprint container using the -scanner suffix.
// the implicit name would be releaseId-scanner
KieScanner releaseIdScanner = (KieScanner)container.getComponentInstance("namedKieSession-scanner");
releaseIdScanner.scanNow();|
kie-ci must be available on the classpath for the releaseId importing feature to work. |
15.1.6. Event Listeners
Drools supports adding 3 types of listeners to KieSessions - AgendaListener, WorkingMemoryListener, ProcessEventListener
The kie-aries-blueprint module allows you to configure these listeners to KieSessions using XML tags. These tags have identical names as the actual listener interfaces i.e., <kie:agendaEventListener….>, <kie:ruleRuntimeEventListener….> and <kie:processEventListener….>.
kie-aries-blueprint provides features to define the listeners as standalone (individual) listeners and also to define them as a group.
15.1.6.2. Attributes:
| Attribute | Required | Description |
|---|---|---|
ref |
No |
A reference to another declared bean. |
<bean id="mock-agenda-listener" class="mocks.MockAgendaEventListener"/>
<bean id="mock-rr-listener" class="mocks.MockRuleRuntimeEventListener"/>
<bean id="mock-process-listener" class="mocks.MockProcessEventListener"/>
<kie:kmodule id="listeners_kmodule">
<kie:kbase name="drl_kiesample" packages="drl_kiesample">
<kie:ksession name="ksession2">
<kie:agendaEventListener ref="mock-agenda-listener"/>
<kie:processEventListener ref="mock-process-listener"/>
<kie:ruleRuntimeEventListener ref="mock-rr-listener"/>
</kie:ksession>
</kie:kbase>
</kie:kmodule>15.1.6.3. Defining multiple listeners of the same type
It is also valid to define multiple beans of the same event listener types for a KieSession.
<bean id="mock-agenda-listener1" class="mocks.MockAgendaEventListener"/>
<bean id="mock-agenda-listener2" class="mocks.MockAgendaEventListener"/>
<kie:kmodule id="listeners_module">
<kie:kbase name="drl_kiesample" packages="drl_kiesample">
<kie:ksession name="ksession1">
<kie:agendaEventListener ref="mock-agenda-listener1"/>
<kie:agendaEventListener ref="mock-agenda-listener2"/>
</kie:ksession>
</kie:kbase>
</kie:kmodule>15.1.6.4. Defining a Group of listeners:
kie-aries-blueprinty allows for grouping of listeners. This is particularly useful when you define a set of listeners and want to attach them to multiple sessions. The grouping feature is also very useful, when we define a set of listeners for 'testing' and then want to switch them for 'production' use.
15.1.6.5. Attributes:
| Attribute | Required | Description |
|---|---|---|
ID |
yes |
Unique identifier |
15.1.6.6. Nested Elements:
-
kie:agendaEventListener…
-
kie:ruleRuntimeEventListener…
-
kie:processEventListener…
|
The above mentioned child elements can be declared in any order. Only one declaration of each type is allowed in a group. |
15.1.6.7. Example:
<bean id="mock-agenda-listener" class="mocks.MockAgendaEventListener"/>
<bean id="mock-rr-listener" class="mocks.MockRuleRuntimeEventListener"/>
<bean id="mock-process-listener" class="mocks.MockProcessEventListener"/>
<kie:kmodule id="listeners_module">
<kie:kbase name="drl_kiesample" packages="drl_kiesample">
<kie:ksession name="statelessWithGroupedListeners" type="stateless"
listeners-ref="debugListeners"/>
</kie:kbase>
</kie:kmodule>
<kie:eventListeners id="debugListeners">
<kie:agendaEventListener ref="mock-agenda-listener"/>
<kie:processEventListener ref="mock-process-listener"/>
<kie:ruleRuntimeEventListener ref="mock-rr-listener"/>
</kie:eventListeners>15.1.7. Loggers
Drools supports adding 2 types of loggers to KieSessions - ConsoleLogger, FileLogger.
The kie-aries-blueprint module allows you to configure these loggers to KieSessions using XML tags. These tags have identical names as the actual logger interfaces i.e., <kie:consoleLogger….> and <kie:fileLogger….>.
15.1.7.1. Defining a console logger:
A console logger can be attached to a KieSession by using the <kie:consoleLogger/> tag. This tag has no attributes and must be present directly under a <kie:ksession….> element.
<kie:kmodule id="loggers_module">
<kie:kbase name="drl_kiesample" packages="drl_kiesample">
<kie:ksession name="ConsoleLogger-statefulSession" type="stateful">
<kie:consoleLogger/>
</kie:ksession>
</kie:kbase>
</kie:kmodule>15.1.7.2. Defining a file logger:
A file logger can be attached to a KieSession by using the <kie:fileLogger/> tag. This tag has the following attributes and must be present directly under a <kie:ksession….> element.
| Attribute | Required | Description |
|---|---|---|
ID |
yes |
Unique identifier |
file |
yes |
Path to the actual file on the disk |
threaded |
no |
Defaults to false. Valid values are 'true’or 'false' |
interval |
no |
Integer. Specifies the interval for flushing the contents from memory to the disk. |
<kie:kmodule id="loggers_module">
<kie:kbase name="drl_kiesample" packages="drl_kiesample">
<kie:ksession name="ConsoleLogger-statefulSession" type="stateful">
<kie:fileLogger id="fl_logger" file="#{ systemProperties['java.io.tmpdir'] }/log1"/>
<kie:fileLogger id="tfl_logger" file="#{ systemProperties['java.io.tmpdir'] }/log2"
threaded="true" interval="5"/>
</kie:ksession>
</kie:kbase>
</kie:kmodule>15.1.7.3. Closing a FileLogger
To prevent leaks, it is advised to close the <kie:fileLogger …> programmatically.
LoggerAdaptor adaptor = (LoggerAdaptor) container.getComponentInstance("fl_logger");
adaptor.close();15.1.8. Defining Batch Commands
A <kie:batch> element can be used to define a set of batch commands for a given ksession.This tag has no attributes and must be present directly under a <kie:ksession….> element. The commands supported are
-
insert-object
-
ref = String (optional)
-
Anonymous bean
-
-
set-global
-
identifier = String (required)
-
reg = String (optional)
-
Anonymous bean
-
-
fire-all-rules
-
max : n
-
-
fire-until-halt
-
start-process
-
parameter
-
identifier = String (required)
-
ref = String (optional)
-
Anonymous bean
-
-
-
signal-event
-
ref = String (optional)
-
event-type = String (required)
-
process-instance-id =n (optional)
-
<kie:kmodule id="batch_commands_module">
<kie:kbase name="drl_kiesample" packages="drl_kiesample">
<kie:ksession name="ksessionForCommands" type="stateful">
<kie:batch>
<kie:insert-object ref="person2"/>
<kie:set-global identifier="persons" ref="personsList"/>
<kie:fire-all-rules max="10"/>
</kie:batch>
</kie:ksession>
</kie:kbase>
</kie:kmodule>16. Android Integration
16.1. Integration with Drools Expert
Drools Android integration comes in two flavors, with or without the drools-compiler dependency. Without the drools-compiler dependency the knowledge bases are pre-serialized at buildtime using the kie-maven-plugin. They can be then deserialized using the API, or directly injected using Roboguice. When using the drools-compiler dependency there are two options: (1) standard KieContainer API or (2) CDI-like injection with Roboguice.
16.1.1. Pre-serialized Rules
It is possible to use Drools without the drools-compiler dependency, which results in a smaller apk, by pre-serializing the compiled knowledge bases during build-time and then de-serializing them at runtime.
16.1.1.1. Maven Configuration
The KieBase must be serialized during build time using kie-maven-plugin.
<dependencyManagement>
<dependencies>
<dependency>
<groupId>org.drools</groupId>
<artifactId>drools-bom</artifactId>
<version>7.11.0.Final</version>
<type>pom</type>
<scope>import</scope>
</dependencies>
</dependencyManagement>
<dependencies>
<dependency>
<groupId>org.drools</groupId>
<artifactId>drools-android</artifactId>
<exclusions>
<exclusion>
<groupId>org.slf4j</groupId>
<artifactId>slf4j-api</artifactId>
</exclusions>
</dependency>
<dependency>
<groupId>org.drools</groupId>
<artifactId>drools-core</artifactId>
</dependency>
</dependencies>
<build>
<plugins>
<plugin>
<groupId>org.kie</groupId>
<artifactId>kie-maven-plugin</artifactId>
<version>7.11.0.Final</version>
<configuration>
<kiebases>
<kiebase>HelloKB</kiebase>
</kiebases>
<resDirectory>${basedir}/src/main/res/raw</resDirectory>
</configuration>
<executions>
<execution>
<id>touch</id>
<goals>
<goal>touch</goal>
</goals>
<phase>initialize</phase>
</execution>
<execution>
<id>compile-kbase</id>
<goals>
<goal>build</goal>
</goals>
<phase>compile</phase>
</execution>
<execution>
<id>serialize</id>
<goals>
<goal>serialize</goal>
</goals>
<phase>compile</phase>
</execution>
</executions>
</plugin>
</plugins>
</build>16.1.1.2. Loading the KieBase
The KieBase must be de-serialized before creating the sessions.
private class LoadKieBaseTask extends AsyncTask<InputStream, Void, KieBase> {
@Override
protected KieBase doInBackground(InputStream... params) {
try {
logger.debug("Loading knowledge base");
final KnowledgeBase kbase = KnowledgeBaseFactory.newKnowledgeBase();
kbase.addKnowledgePackages((List<KnowledgePackage>) DroolsStreamUtils.streamIn(params[0]));
return kbase;
}catch(Exception e) {
logger.error("Drools exception", e);
return null;
}
}
}16.1.2. KieContainer API with drools-compiler dependency
With the drools-compiler dependency standard KieContainer API can be used. This comes at a cost of a larger apk. To avoid the 65K limit, multidex (or proguard) can be used.
16.1.2.1. Maven Configuration with drools-compiler and multidex
The kie-maven-plugin must be configured to build the kiebase. Multidex must be used to allow for the increased dependencies. There are also some settings for merging various Drools XML files within the apk.
<dependencyManagement>
<dependencies>
<dependency>
<groupId>org.drools</groupId>
<artifactId>drools-bom</artifactId>
<version>7.11.0.Final</version>
<type>pom</type>
<scope>import</scope>
</dependencies>
</dependencyManagement>
<dependencies>
<dependency>
<groupId>org.drools</groupId>
<artifactId>drools-android</artifactId>
<exclusions>
<exclusion>
<groupId>org.slf4j</groupId>
<artifactId>slf4j-api</artifactId>
</exclusion>
</exclusions>
</dependency>
<dependency>
<groupId>org.drools</groupId>
<artifactId>drools-compiler</artifactId>
<exclusions>
<exclusion>
<groupId>org.slf4j</groupId>
<artifactId>slf4j-api</artifactId>
</exclusion>
<exclusion>
<groupId>xmlpull</groupId>
<artifactId>xmlpull</artifactId>
</exclusion>
<exclusion>
<groupId>xpp3</groupId>
<artifactId>xpp3_min</artifactId>
</exclusion>
<exclusion>
<groupId>org.slf4j</groupId>
<artifactId>slf4j-api</artifactId>
</exclusion>
<exclusion>
<groupId>org.eclipse.jdt.core.compiler</groupId>
<artifactId>ecj</artifactId>
</exclusion>
</exclusions>
</dependency>
</dependencies>
<build>
<plugins>
<plugin>
<groupId>org.kie</groupId>
<artifactId>kie-maven-plugin</artifactId>
<version>7.11.0.Final</version>
<executions>
<execution>
<id>compile-kbase</id>
<goals>
<goal>build</goal>
</goals>
<phase>compile</phase>
</execution>
</executions>
</plugin>
<plugin>
<groupId>com.simpligility.maven.plugins</groupId>
<artifactId>android-maven-plugin</artifactId>
<version>4.2.1</version>
<extensions>true</extensions>
<configuration>
<sdk>
<platform>21</platform>
</sdk>
<dex>
<coreLibrary>true</coreLibrary>
<jvmArguments><jvmArgument>-Xmx2048m</jvmArgument></jvmArguments>
<multiDex>true</multiDex>
<mainDexList>maindex.txt</mainDexList>
</dex>
<extractDuplicates>true</extractDuplicates>
<apk>
<metaInf>
<includes>
<include>services/**</include>
<include>kmodule.*</include>
<include>HelloKB/**</include>
<include>drools**</include>
<include>maven/${project.groupId}/${project.artifactId}/**</include>
</includes>
</metaInf>
</apk>
</configuration>
</plugin>
</plugins>
</build>16.2. Integration with Roboguice
16.2.1. Pre-serialized Rules with Roboguice
With Roboguice pre-serialized knowledge bases can be injected using the @KBase annotation.
16.2.1.1. Annotations
@KBase supports an optional 'name' attribute. CDI typically does "getOrCreate" when it injects, all injections receive the same instance for the same set of annotations. the 'name' annotation forces a unique instance for each name, although all instances for that name will be identity equals.
16.2.1.2. @KBase
The default argument maps to the value attribute and specifies the name of the KieBase from the kmodule.xml file.
@KBase("kbase1")
private KieBase kbase;16.2.1.3. AndroidManifest.xml configuration
The Roboguice module needs to be specified in the manifest.
<application
android:largeHeap="true"
android:allowBackup="true"
android:icon="@drawable/ic_launcher"
android:label="@string/app_name"
android:theme="@style/AppTheme">
<meta-data
android:name="roboguice.modules"
android:value="org.drools.android.roboguice.DroolsModule"/>
<activity
android:label="@string/app_name"
android:name="org.drools.examples.android.SplashActivity">
<intent-filter>
<action android:name="android.intent.action.MAIN"/>
<category android:name="android.intent.category.LAUNCHER"/>
</intent-filter>
</activity>
</application>16.2.2. KieContainer with drools-compiler dependency and Roboguice
With Roboguice and drools-compiler almost the full CDI syntax can be used to inject KieContainers, KieBases, and KieSessions.
16.2.2.1. Annotations
@KContainer, @KBase and @KSession all support an optional 'name' attribute. CDI typically does "getOrCreate" when it injects, all injections receive the same instance for the same set of annotations. the 'name' annotation forces a unique instance for each name, although all instance for that name will be identity equals.
16.2.2.2. @KContainer
@Inject
private KieContainer kContainer;16.2.2.3. @KBase
The default argument, if given, maps to the value attribute and specifies the name of the KieBase from the kmodule.xml file.
@Inject
private KieBase kbase;@Inject
@KBase("kbase1")
private KieBase kbase;16.2.2.4. @KSession for KieSession
@KSession is optional as it can be detected and added by the use of @Inject and variable type inference.
The default argument, if given, maps to the value attribute and specifies the name of the KieSession from the kmodule.xml file
@Inject
private KieSession ksession;@Inject
@KSession("ksession1")
private KieSession ksession;16.2.2.5. @KSession for StatelessKieSession
@KSession is optional as it can be detected and added by the use of @Inject and variable type inference.
The default argument, if given, maps to the value attribute and specifies the name of the KieSession from the kmodule.xml file.
@Inject
private StatelessKieSession ksession;@Inject
@KSession("ksession1")
private StatelessKieSession ksession;16.2.2.6. AndroidManifest.xml configuration
The Roboguice module needs to be specified in the manifest.
<application
android:largeHeap="true"
android:allowBackup="true"
android:icon="@drawable/ic_launcher"
android:label="@string/app_name"
android:theme="@style/AppTheme">
<meta-data
android:name="roboguice.modules"
android:value="org.drools.android.roboguice.DroolsContainerModule"/>
<activity
android:label="@string/app_name"
android:name="org.drools.examples.android.SplashActivity">
<intent-filter>
<action android:name="android.intent.action.MAIN"/>
<category android:name="android.intent.category.LAUNCHER"/>
</intent-filter>
</activity>
</application>17. Apache Camel Integration
17.1. Camel
Camel provides a light weight bus framework for getting information into and out of Drools.
Drools introduces two elements to make easy integration.
-
Drools Policy
Augments any JAXB or XStream data loaders. For JAXB it adds drools related paths ot the contextpath, for XStream it adds custom converters and aliases for Drools classes. It also handles setting the ClassLoader to the targeted ksession.
-
Drools Endpoint
Executes the payload against the specified drools session
Drools can be configured like any normal camel component, but notice the policy that wraps the drools related segments. This will route all payloads to ksession1
<bean id="kiePolicy" class="org.kie.camel.component.KiePolicy" />
<camelContext id="camel" xmlns="http://camel.apache.org/schema/spring">
<route>
<from uri="cxfrs://bean://rsServer"/>
<policy ref="kiePolicy">
<unmarshal ref="xstream" />
<to uri="kie:ksession1" />
<marshal ref="xstream" />
</policy>
</route>
</camelContext>It is possible to not specify the session in the drools endpoint uri, and instead "multiplex" based on an attribute or header. In this example the policy will check either the header field "DroolsLookup" for the named session to execute and if that isn’t specified it’ll check the "lookup" attribute on the incoming payload.
<bean id="kiePolicy" class="org.kie.camel.component.KiePolicy" />
<camelContext id="camel" xmlns="http://camel.apache.org/schema/spring">
<route>
<from uri="cxfrs://bean://rsServer"/>
<policy ref="kiePolicy">
<unmarshal ref="xstream" />
<to uri="kie:dynamic" />
<marshal ref="xstream" />
</policy>
</route>
</camelContext>public class MyTest extends CamelSpringTestSupport {
@Override
protected AbstractXmlApplicationContext createApplicationContext() {
return new ClassPathXmlApplicationContext("org/drools/camel/component/CxfRsSpring.xml");
}
public void test1() throws Exception {
String cmd = "";
cmd += "<batch-execution lookup=\"ksession1\">\n";
cmd += " <insert out-identifier=\"salaboy\">\n";
cmd += " <org.drools.pipeline.camel.Person>\n";
cmd += " <name>salaboy</name>\n";
cmd += " </org.drools.pipeline.camel.Person>\n";
cmd += " </insert>\n";
cmd += " <fire-all-rules/>\n";
cmd += "</batch-execution>\n";
Object object = this.context.createProducerTemplate().requestBody("direct://client", cmd);
System.out.println( object );
}
}The following urls show sample script examples for jaxb, xstream and json marshalling using:
18. Drools Camel Server
18.1. Introduction
The drools camel server (drools-camel-server) module is a war which you can deploy to execute KnowledgeBases remotely for any sort of client application. This is not limited to JVM application clients, but any technology that can use HTTP, through a REST interface. This version of the execution server supports stateless and stateful sessions in a native way.
18.2. Deployment
Drools Camel Server is a war file, which can be deployed in a application server (such as JBoss AS). As the service is stateless, it is possible to have have as many of these services deployed as you need to serve the client load. Deploy on JBoss AS 4.x / Tomcat 6.x works out-of-the-box, instead some external dependencies must be added and the configuration must be changed to be deployed in JBoss AS 5
18.3. Configuration
Inside the war file you will find a few XML configuration files.
-
beans.xml
-
Skeleton XML that imports knowledge-services.xml and camel-server.xml
-
-
camel-server.xml
-
Configures CXF endpoints with Camel Routes
-
Came Routes pipeline messages to various configured knowledge services
-
-
knowledge-services.xml
-
Various Knowledge Bases and Sessions
-
-
camel-client.xml
-
Sample camel client showing how to send and receive a message
-
Used by "out of the box" test.jsp
-
18.3.1. REST/Camel Services configuration
The next step is configure the services that are going to be exposed through drools-server. You can modify this configuration in camel-server.xml file.
<?xml version="1.0" encoding="UTF-8"?>
<beans xmlns="http://www.springframework.org/schema/beans"
xmlns:xsi="http://www.w3.org/2001/XMLSchema-instance"
xmlns:cxf="http://camel.apache.org/schema/cxf"
xmlns:jaxrs="http://cxf.apache.org/jaxrs"
xsi:schemaLocation="
http://www.springframework.org/schema/beans http://www.springframework.org/schema/beans/spring-beans-2.5.xsd
http://camel.apache.org/schema/cxf http://camel.apache.org/schema/cxf/camel-cxf.xsd
http://cxf.apache.org/jaxrs http://cxf.apache.org/schemas/jaxrs.xsd
http://camel.apache.org/schema/spring http://camel.apache.org/schema/spring/camel-spring.xsd">
<import resource="classpath:META-INF/cxf/cxf.xml" />
<import resource="classpath:META-INF/cxf/cxf-extension-jaxrs-binding.xml"/>
<import resource="classpath:META-INF/cxf/cxf-servlet.xml" />
<!--
! If you are running on JBoss you will need to copy a camel-jboss.jar into the lib and set this ClassLoader configuration
! http://camel.apache.org/camel-jboss.html
! <bean id="jbossResolver" class="org.apache.camel.jboss.JBossPackageScanClassResolver"/>
-->
<!--
! Define the server end point.
! Copy and paste this element, changing id and the address, to expose services on different urls.
! Different Camel routes can handle different end point paths.
-->
<cxf:rsServer id="rsServer"
address="/rest"
serviceClass="org.kie.jax.rs.CommandExecutorImpl">
<cxf:providers>
<bean class="org.kie.jax.rs.CommandMessageBodyReader"/>
</cxf:providers>
</cxf:rsServer>
<cxf:cxfEndpoint id="soapServer"
address="/soap"
serviceName="ns:CommandExecutor"
endpointName="ns:CommandExecutorPort"
wsdlURL="soap.wsdl"
xmlns:ns="http://soap.jax.drools.org/" >
<cxf:properties>
<entry key="dataFormat" value="MESSAGE"/>
<entry key="defaultOperationName" value="execute"/>
</cxf:properties>
</cxf:cxfEndpoint>
<!-- Leave this, as it's needed to make Camel "drools" aware -->
<bean id="kiePolicy" class="org.kie.camel.component.KiePolicy" />
<camelContext id="camel" xmlns="http://camel.apache.org/schema/spring">
<!--
! Routes incoming messages from end point id="rsServer".
! Example route unmarshals the messages with xstream and executes against ksession1.
! Copy and paste this element, changing marshallers and the 'to' uri, to target different sessions, as needed.
!-->
<route>
<from uri="cxfrs://bean://rsServer"/>
<policy ref="kiePolicy">
<unmarshal ref="xstream" />
<to uri="kie:ksession1" />
<marshal ref="xstream" />
</policy>
</route>
<route>
<from uri="cxf://bean://soapServer"/>
<policy ref="kiePolicy">
<unmarshal ref="xstream" />
<to uri="kie:ksession1" />
<marshal ref="xstream" />
</policy>
</route>
</camelContext>
</beans>18.3.1.1. RESTful service endpoint creation
In the next XML snippet code we are creating a RESTful (JAX-RS) endpoint bound to /kservice/rest address and using org.drools.jax.rs.CommandExecutorImpl as the service implementer. This class is only used to instantiate the service endpoint because all the internal implementation is managed by Camel, and you can see in the source file that the exposed execute service must be never called.
Also a JAX-RS Provider is provided to determine if the message transported can be processed in this service endpoint.
<cxf:rsServer id="rsServer"
address="/rest"
serviceClass="org.kie.jax.rs.CommandExecutorImpl">
<cxf:providers>
<bean class="org.kie.jax.rs.CommandMessageBodyReader"/>
</cxf:providers>
</cxf:rsServer>Ideally this configuration doesn’t need to be modified, at least the Service Class and the JAX-RS Provider, but you can add more endpoints associated to different addresses to use them in other Camel Routes.
After all this initial configuration, you can start config your own Knowledge Services.
18.3.1.2. Camel Kie Policy & Context creation
KiePolicy is used to add Drools support in Camel, basically what it does is to add interceptors into the camel route to create Camel Processors on the fly and modify the internal navigation route. If you want to have SOAP support you need to create your custom Drools Policy, but it’s going to be added in the next release.
But you don’t need to know more internal details, only instantiate this bean:
<bean id="kiePolicy" class="org.kie.camel.component.KiePolicy" />The next is create the camel route that will have the responsibility to execute the commands sent through JAX-RS. Basically we create a route definition associated with the JAX-RS definition as the data input, the camel policy to be used and inside the “execution route” or ProcessorDefinitions. As you can see, we set XStream as the marshaller/unmarshaller and the drools execution route definition
<camelContext id="camel" xmlns="http://camel.apache.org/schema/spring">
<route>
<from uri="cxfrs://bean://rsServer"/>
<policy ref="kiePolicy">
<unmarshal ref="xstream" />
<to uri="kie:ksession1" />
<marshal ref="xstream" />
</policy>
</route>
<route>
<from uri="cxf://bean://soapServer"/>
<policy ref="kiePolicy">
<unmarshal ref="xstream" />
<to uri="kie:ksession1" />
<marshal ref="xstream" />
</policy>
</route>
</camelContext>The drools endpoint creation has the next arguments
<to uri="kie:{1}/{2}" />-
Execution Node identifier that is registered in the CamelContext
-
Knowledge Session identifier that was registered in the Execution Node with identifier {1}
Both parameters are configured in knowledge-services.xml file.
18.3.1.3. Knowledge Services configuration
The next step is create the Knowledge Sessions that you are going to use.
<beans xmlns="http://www.springframework.org/schema/beans"
xmlns:xsi="http://www.w3.org/2001/XMLSchema-instance"
xmlns:kie="http://drools.org/schema/kie-spring"
xsi:schemaLocation="http://www.springframework.org/schema/beans http://www.springframework.org/schema/beans/spring-beans-3.0.xsd
http://drools.org/schema/kie-spring http://drools.org/schema/kie-spring.xsd">
<kie:kmodule id="drools-camel-server">
<kie:kbase name="kbase1" packages="org.drools.server">
<kie:ksession name="ksession1" type="stateless"/>
</kie:kbase>
</kie:kmodule>
<bean id="kiePostProcessor"
class="org.kie.spring.KModuleBeanFactoryPostProcessor"/>
</beans>The execution-node is a context or registered kbases and ksessions, here kbase1 and ksession1 are planed in the node1 context. The kbase itself consists of two knowledge definitions, a DRL and an XSD. The Spring documentation contains a lot more information on configuring these knowledge services.
18.3.1.4. Test
With drools-server war unzipped you should be able to see a test.jsp and run it. This example just executes a simple "echo" type application. It sends a message to the rule server that pre-appends the word "echo" to the front and sends it back. By default the message is "Hello World", different messages can be passed using the url parameter msg - test.jsp?msg="My Custom Message".
Under the hood the jsp invokes the Test.java class, this then calls out to Camel which is where the meet happens. The camel-client.xml defines the client with just a few lines of XML:
<!-- Leave this, as it's needed to make Camel "drools" aware -->
<bean id="kiePolicy" class="org.kie.camel.component.KiePolicy" />
<camelContext id="camel" xmlns="http://camel.apache.org/schema/spring">
<route>
<from uri="direct://kservice/rest"/>
<policy ref="kiePolicy">
<to uri="cxfrs://http://localhost:8080/drools-server/kservice/rest"/>
</policy>
</route>
<route>
<from uri="direct://kservice/soap"/>
<policy ref="kiePolicy">
<to uri="cxfrs://http://localhost:8080/drools-server/kservice/soap"/>
</policy>
</route>
</camelContext>"direct://kservice" is just a named hook, allowing Java to grab a reference and push data into it.
In this example the data is already in XML, so we don’t need to add any DataFormats to do the marshalling.
The KiePolicy adds some smarts to the route and you’ll see it used on the server side too.
If JAXB or XStream were used, it would inject custom paths and converters, it can also set the ClassLoader too on the server side, on the client side it automatically unwraps the Response object.
The rule itself can be found here: test.drl. Notice the type Message is declared part of the DRL and is thus not present on the Classpath.
declare Message
text : String
end
rule "echo" dialect "mvel"
when
$m : Message();
then
$m.text = "echo:" + $m.text;
end19. JMX monitoring with RHQ/JON
19.1. Introduction
The Drools engine supports runtime monitoring through JMX standard MBeans. These MBeans expose configuration and metrics data, from live knowledge bases and sessions, to internal details like rule execution times. Any JMX compatible console can be used to access that data. This chapter details how to use RHQ/JON to do it, but similar steps can be used for any other console.
19.1.1. Enabling JMX monitoring in a Drools application
To enable JMX monitoring in a Drools application, it is necessary to enable remote monitoring in the JVM. There are several tutorials on how to do that in the internet, but we recommend that you check the documentation of your specific JVM. Using the Oracle/Sun JVM, it can be as simple as running the engine with a few command line system properties.
For instance, to enable remote monitoring on port 19988 with disabled authentication (should be only used for tests/demos, as in production authentication should be enabled), just run the application with the following command line parameters:
-Dcom.sun.management.jmxremote.port=19988 -Dcom.sun.management.jmxremote.ssl=false -Dcom.sun.management.jmxremote.authenticate=falseThe second step is to enable the Drools MBeans. As any Drools configuration, that can be done by setting a system property, or adding the property to a configuration file, or using the API.
To enable it in the command line, use:
-Dkie.mbeans=enabledTo enable id using the API, use:
KieBaseConfiguration conf = ...
conf.setOption( MBeansOption.ENABLED );19.1.2. Installing and running the RHQ/JON plugin
The following sequence of steps can be used to configure JON to monitor a Drools application:
-
Download the JON server and agent.
-
Download Drools plugin included in the "Drools and jBPM tools" bundle (https://www.jboss.org/drools/downloads.html).
-
Install server, agent, and the plugin.
-
Check that the server is running, agent is running and plugin is installed.
-
Execute the drools application [see details in the previous section].
-
On the agent console, type "discovery" command for the agent to find the drools application, which it will find on port 19988.
-
On JON console, click on auto-discovery queue.
-
Select the JMX Server process that is showing there, running on port 19988.
-
Click import.
-
Click on Resources→servers.
-
Click on the JMX Server.
-
Under JMXServer on the left hand side, you have Drools Service.
Drools Workbench
The Drools workbench is built with the UberFire framework and uses the Guvnor plugin. Drools provides an additional rich set of plugins for rule authoring metaphors.
20. Workbench (General)
20.1. Installation
20.1.1. War installation
Use the war from the workbench distribution zip that corresponds to your application server.
The differences between these war files are mainly superficial.
For example, some JARs might be excluded if the application server already supplies them.
-
eap7: tailored for Red Hat JBoss Enterprise Application Platform 7 -
tomcat8: tailored for Apache Tomcat 8Apache Tomcat requires additional configuration to correctly install the Workbench. Please consult the
README.mdin thewarfor the most up to date procedure. -
wildfly11: tailored for Wildfly 11
20.1.2. Workbench data
The workbench stores its data, by default in the directory $WORKING_DIRECTORY/.niogit, for example wildfly-11.0.0.Final/bin/.niogit, but it can be overridden with the system property-Dorg.uberfire.nio.git.dir.
|
In production, make sure to back up the workbench data directory. |
20.1.3. System properties
Here’s a list of all system properties:
-
org.appformer.m2repo.url: Location of the for the default Maven repository the workbench uses when looking for dependencies. Usually this points to the Maven repository inside the Workbench for examplehttp://localhost:8080/kie-wb/maven2. Please set this before starting up the Workbench. Default: File path to the inner m2 repository. -
org.uberfire.nio.git.dir: Location of the directory.niogit. Default: working directory -
org.uberfire.nio.git.dirname: Name of the git directory. Default:.niogit -
org.uberfire.nio.git.daemon.enabled: Enables/disables git daemon. Default:true -
org.uberfire.nio.git.daemon.host: If git daemon enabled, uses this property as local host identifier. Default:localhost -
org.uberfire.nio.git.daemon.port: If git daemon enabled, uses this property as port number. Default:9418 -
org.uberfire.nio.git.ssh.enabled: Enables/disables ssh daemon. Default:true -
org.uberfire.nio.git.ssh.host: If ssh daemon enabled, uses this property as local host identifier. Default:localhost -
org.uberfire.nio.git.ssh.port: If ssh daemon enabled, uses this property as port number. Default:8001 -
org.uberfire.nio.git.ssh.cert.dir: Location of the directory.securitywhere local certificates will be stored. Default: working directory -
org.uberfire.nio.git.ssh.passphrase: Passphrase to access your Operating Systems public keystore when cloninggitrepositories withscpstyle URLs; e.g.git@github.com:user/repository.git. -
org.uberfire.nio.git.ssh.algorithm: Algorithm used by SSH. Default:DSAIf you plan to use RSA or any algorithm other than DSA, make sure you setup properly your Application Server to use Bouncy Castle JCE library.
-
org.uberfire.metadata.index.dir: Place where Lucene.indexfolder will be stored. Default: working directory -
org.uberfire.ldap.regex.role_mapper: Regex pattern used to map LDAP principal names to application role name. Note that the variablerolemust be part of the pattern as it is substited by the application role name when matching a principal value to role name. Default: Not used. -
org.uberfire.sys.repo.monitor.disabled: Disable configuration monitor (do not disable unless you know what you’re doing). Default:false -
org.uberfire.secure.key: Secret password used by password encryption. Default:org.uberfire.admin -
org.uberfire.secure.alg: Crypto algorithm used by password encryption. Default:PBEWithMD5AndDES -
org.uberfire.domain: security-domain name used by uberfire. Default:ApplicationRealm -
org.guvnor.m2repo.dir: Place where Maven repository folder will be stored. Default: working-directory/repositories/kie -
org.guvnor.project.gav.check.disabled: Disable GAV checks. Default:false -
org.kie.demo: Enables external clone of a demo application from GitHub. -
org.kie.build.disable-project-explorer: Disable automatic build of selected Project in Project Explorer. Default:false -
org.kie.verification.disable-dtable-realtime-verification: Disables the realtime validation and verification of decision tables. Default:false -
org.kie.workbench.controller: URL for connecting with a Kie Server Controller, for example:ws://localhost:8080/kie-server-controller/websocket/controller.
Only Web Socket protocol is supported for connecting with a remote Kie Server Controller. When specifying this proporty, the Workbench will automatically disable all the features related to running the embbeded controller.
-
org.kie.workbench.controller.user: User name for connecting with a Kie Server Controller. Default:kieserver -
org.kie.workbench.controller.pwd: Password for connecting with a Kie Server Controller. Default:kieserver1! -
org.kie.workbench.controller.token: Token string for connecting with a Kie Server Controller.
Please refer to Using token based authentication for more details about how to use token based authentication.
-
kie.keystore.keyStoreURL: URL to a keystore which should be used for connecting with a remote Kie Server Controller. -
kie.keystore.keyStorePwd: Password to a keystore. -
kie.keystore.key.ctrl.alias: Alias of the key where password is stored. -
kie.keystore.key.ctrl.pwd: Password of an alias with stored password.
Please refer to Securing password using key store for more details about how to use a key store for securing your passwords.
To change one of these system properties in a WildFly or JBoss EAP cluster:
-
Edit the file
$JBOSS_HOME/domain/configuration/host.xml. -
Locate the XML elements
serverthat belong to themain-server-groupand add a system property, for example:<system-properties> <property name="org.uberfire.nio.git.dir" value="..." boot-time="false"/> ... </system-properties>
20.1.4. Trouble shooting
20.1.4.1. Loading.. does not disappear and Workbench fails to show
There have been reports that Firewalls in between the server and the browser can interfere with Server Sent Events (SSE) used by the Workbench.
The issue results in the "Loading…" spinner remaining visible and the Workbench failing to materialize.
The workaround is to disable the Workbench’s use of Server Sent Events by adding file /WEB-INF/classes/ErraiService.properties to the exploded WAR containing the value errai.bus.enable_sse_support=false.
Re-package the WAR and re-deploy.
Some Users have also reported disabling Server Sent Events does not resolve the issue. The solution found to work is to configure the JVM to use a different Entropy Gathering Device on Linux for SecureRandom. This can be configured by setting System Property java.security.egd to file:/dev/./urandom. See this Stack Overflow post for details.
Please note however this affects the JVM’s random number generation and may present other challenges where strong cryptography is required. Configure with caution.
20.1.4.2. Not able to clone KIE Workbench Git repository using ssh protocol.
Git clients using ssh to interact with the Git server that is bundled with Workbench are authenticated and authorized to perform git commands by the security API that is part of the Uberfire backend server. When using an LDAP security realm, some git clients were not being authorized as expected. This was due to the fact that for non-web clients such as Git via ssh, the principal (i.e., user or group) name assigned to a user by the application server’s user registry is the more complex DN associated to that principal by LDAP. The logic of the Uberfire backend server looked for on exact match of roles allowed with the principal name returned and therefore failed.
It is now possible to control the role-principal matching via the system property
org.uberfire.ldap.regex.role_mapperwhich takes as its value a Regex pattern to be applied when matching LDAP principal to role names. The pattern must contain the literal word variable 'role'. During authorization the variable is replaced by each of the allow application roles. If the pattern is matched the role is added to the user.
For instance, if the DN for the admin group in LDAP is
DN: cn=admin,ou=groups,dc=example,dc=comand its intended role is admin, then setting org.uberfire.ldap.regex.role_mapper with value
cn[\\ ]*=[\\ ]*rolewill find a match on role 'admin'.
20.2. Quick Start
These steps help you get started with minimum of effort.
They should not be a substitute for reading the documentation in full.
20.2.1. Importing examples
If the Workbench is empty you are shown an empty Space page. Clicking "Try Samples" button below will show the examples that are available.
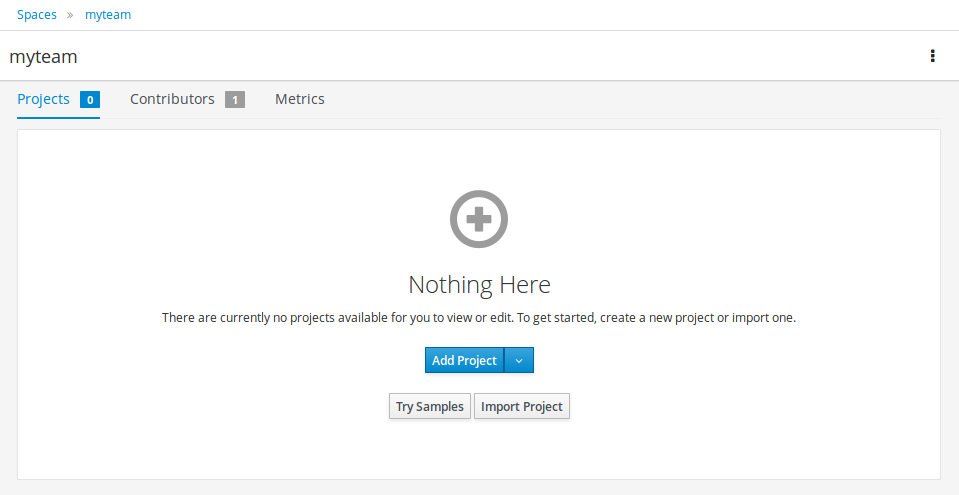
Once "Try Samples" page opens, you can select one or more examples and click "Ok".
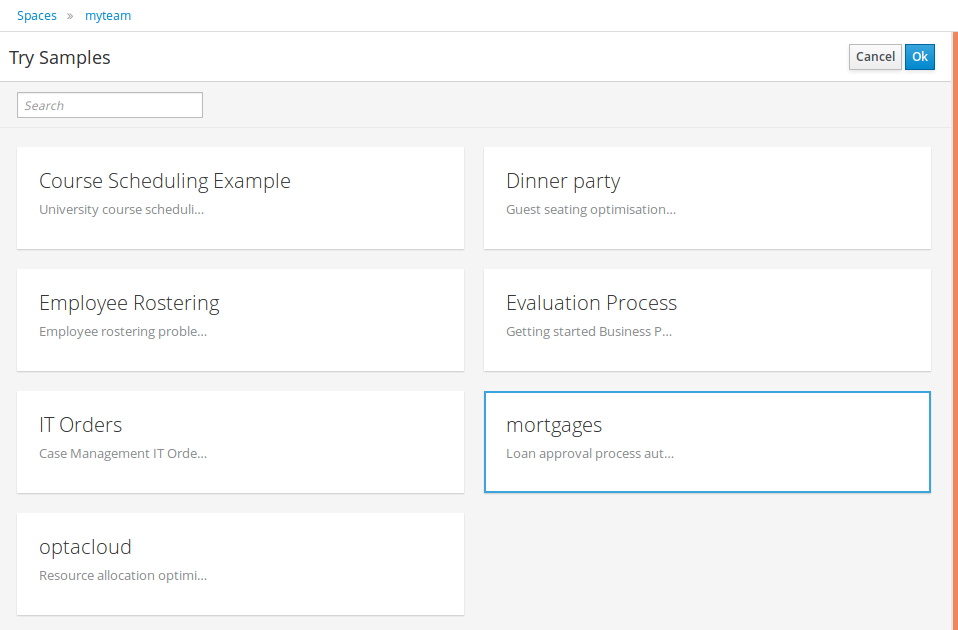
If the Workbench already contains Projects the examples can be imported with the "Try Samples" button found from the menu.

20.2.2. Add Project
Alternatively, to importing an example, a new empty project can be created from the Space page with "Add Project".
Give the Project a name and optional description.
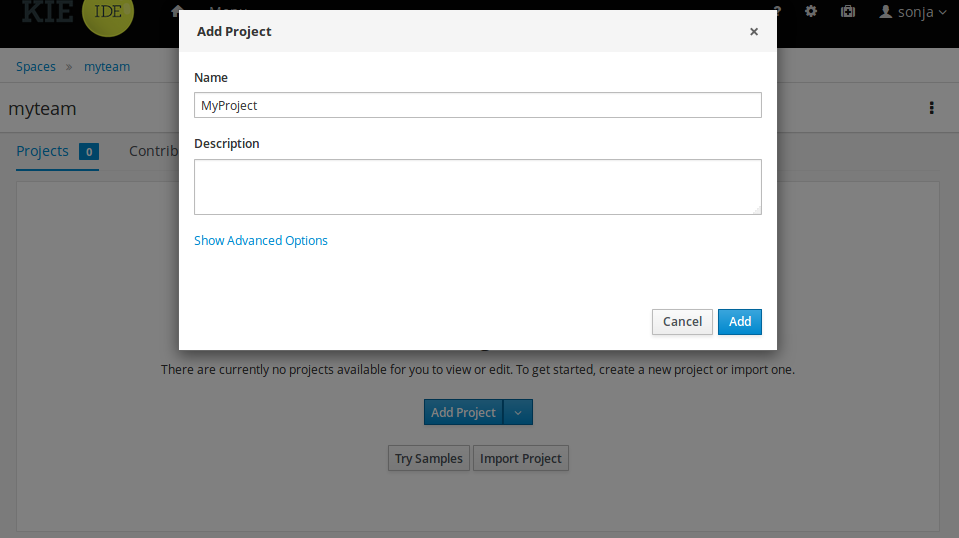
20.2.3. Define Data Model
After a Project has been created you need to define Types to be used by your rules.
Select "Data Object" from the "Create New Asset" menu.
|
You can also use types contained in existing JARs. Please consult the full documentation for details. |
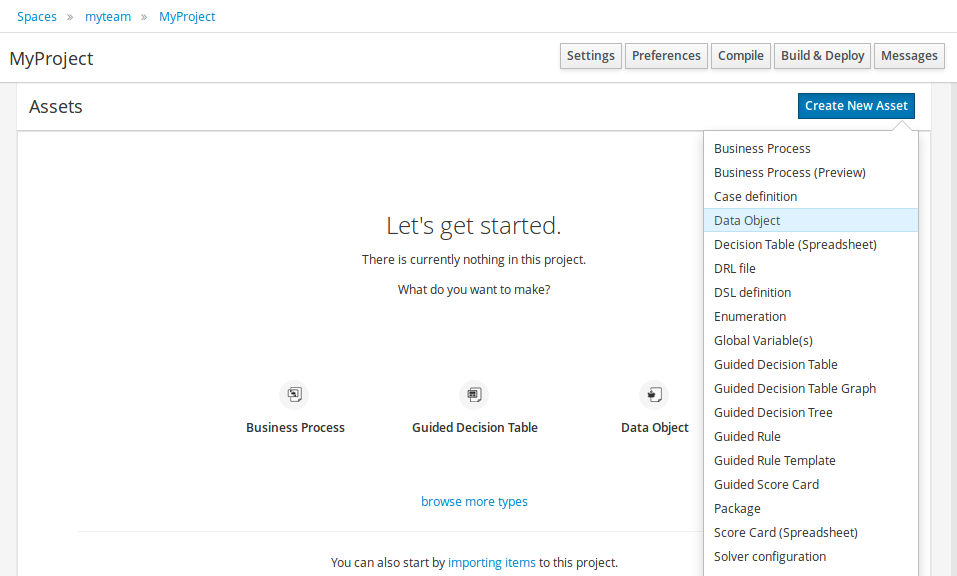
Set the name and select a package for the new type.
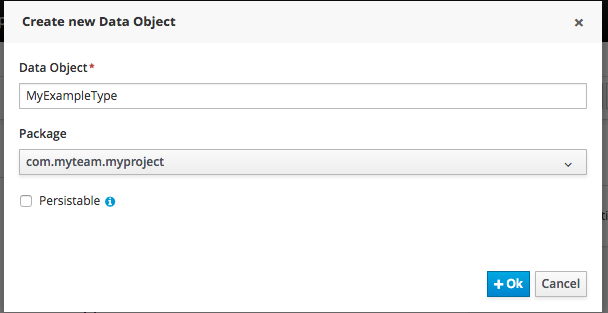
Click "+ add field" button and set a field name and type and click on "Create" to create a field for the type.
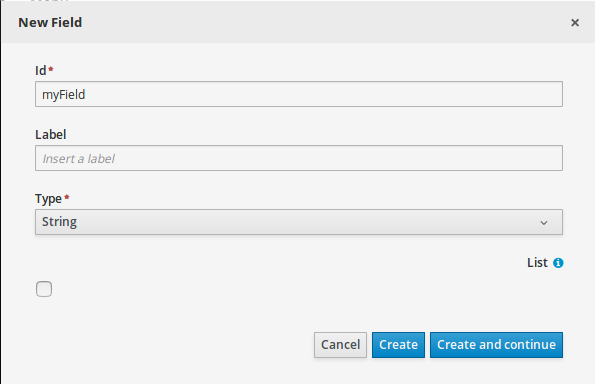
Click "Save" to update the model.

20.2.4. Define Rule
Select "DRL file" (for example) from the "Create New Asset" menu.
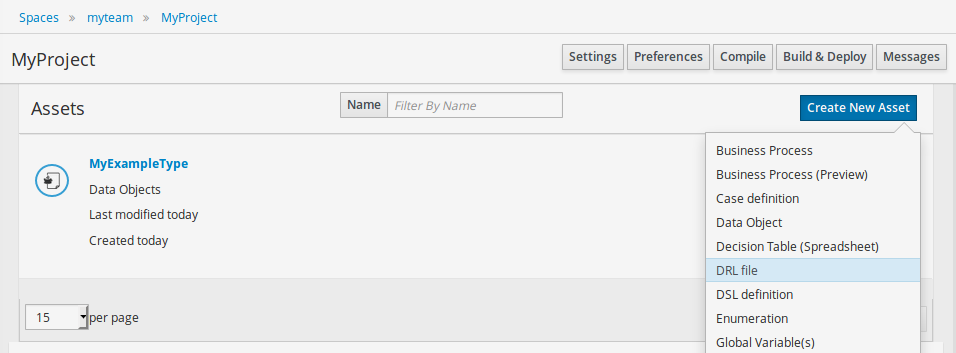
Enter a file name for the new rule.
|
Make sure you select the same package as the rule had. It is possible to have rules and data models in different packages, but let’s keep things simple for demo purposes. |
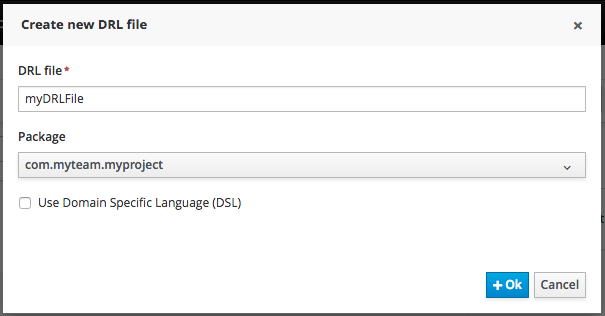
Enter a definition for the rule.
The definition process differs from asset type to asset type.
The full documentation has details about the different editors.
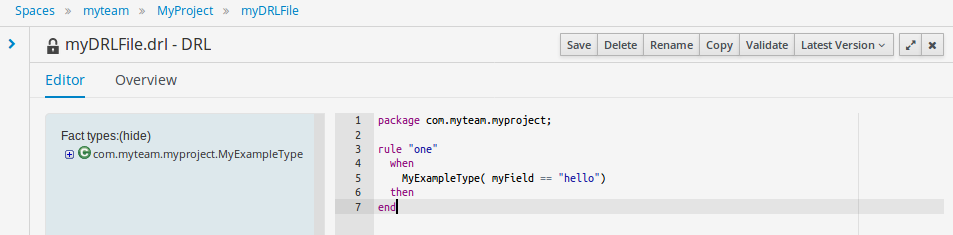
Once the rule has been defined it will need to be saved in the same way we saved the model.
20.2.5. Build and Deploy
Once rules have been defined within a project; the project can be built and deployed to the Workbench’s Maven Artifact Repository.
To build a project select the "Build & Deploy" from the Project Authoring.
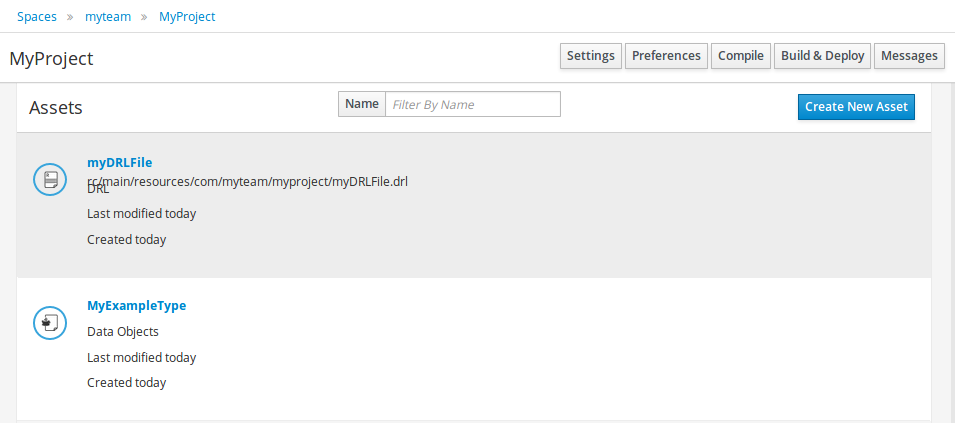
Click "Build & Deploy" to build the project and deploy it to the Workbench’s Maven Artifact Repository.
When you select Build & Deploy the workbench will deploy to any repositories defined in the Dependency Management section of the pom in your workbench project. You can edit the pom.xml file associated with your workbench project under the Repository View of the project explorer. Details on dependency management in maven can be found here : http://maven.apache.org/guides/introduction/introduction-to-dependency-mechanism.html
If there are errors during the build process they will be reported in the "Messages" panel.
Now the project has been built and deployed; it can be referenced from your own projects as any other Maven Artifact.
The full documentation contains details about integrating projects with your own applications.
20.3. Configuration
20.3.1. Basic user management
The workbench authenticates its users against the application server’s authentication and authorization (JAAS).
On JBoss EAP and WildFly, add a user with the script $JBOSS_HOME/bin/add-user.sh (or .bat):
$ ./add-user.sh
// Type: Application User
// Realm: empty (defaults to ApplicationRealm)
// Role: adminThere is no need to restart the application server.
20.3.2. Roles
The Workbench uses the following roles:
-
admin
-
analyst
-
developer
-
manager
-
user
20.3.2.1. Admin
Administrates the BPMS system.
-
Manages users
-
Manages VFS Repositories
-
Has full access to make any changes necessary
20.3.2.2. Developer
Developer can do almost everything admin can do, except clone repositories.
-
Manages rules, models, process flows, forms and dashboards
-
Manages the asset repository
-
Can create, build and deploy projects
-
Can use the JBDS connection to view processes
20.3.2.3. Analyst
Analyst is a weaker version of developer and does not have access to the asset repository or the ability to deploy projects.
20.3.2.4. Business user
Daily user of the system to take actions on business tasks that are required for the processes to continue forward. Works primarily with the task lists.
-
Does process management
-
Handles tasks and dashboards
20.3.2.5. Manager/Viewer-only User
Viewer of the system that is interested in statistics around the business processes and their performance, business indicators, and other reporting of the system and people who interact with the system.
-
Only has access to dashboards
20.4. Introduction
20.4.1. Log in and log out
Create a user with the role admin and log in with those credentials.
After successfully logging in, the account username is displayed at the top right. Click on it to review the roles of the current account.
20.4.2. Home screen
After logging in, the home screen shows. The actual content of the home screen depends on the workbench variant (Drools, jBPM, …).
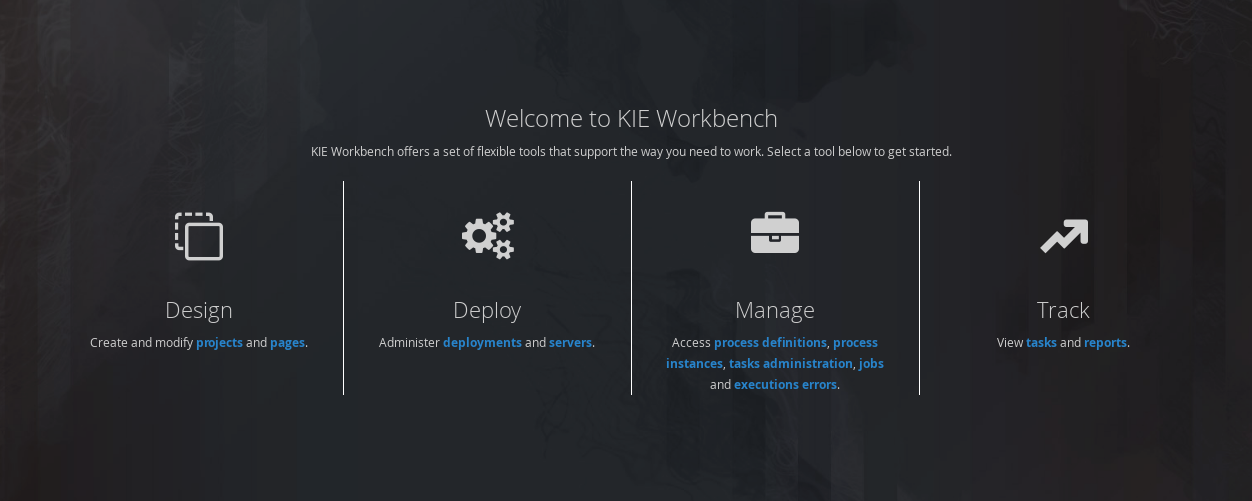
20.4.3. Workbench overview
A workbench is structured with Spaces and Projects:
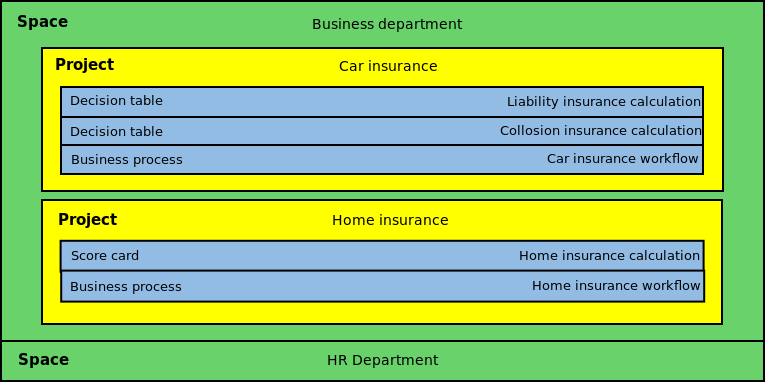
20.4.3.1. Space
Spaces are useful to model departments and divisions.
A Space can hold multiple Projects.
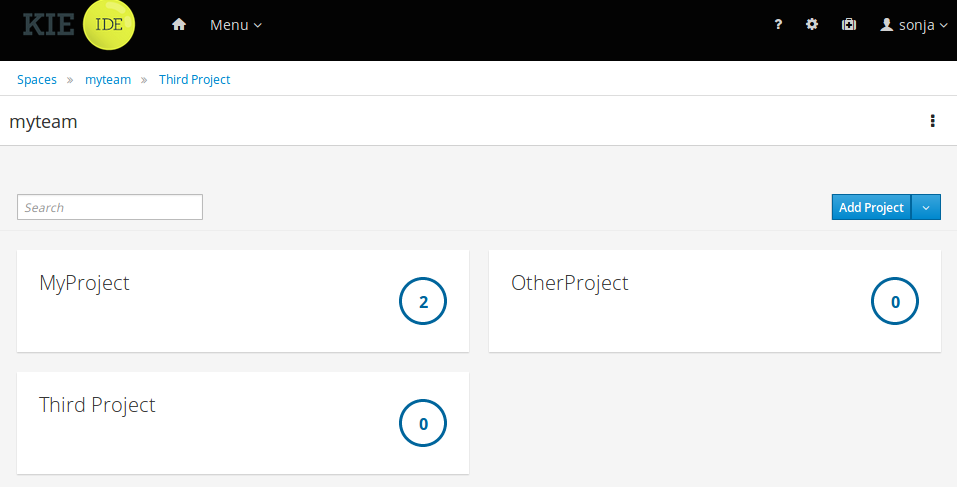
20.4.3.2. Project
Projects are the place where assets are stored and each project belongs to a single Space.
Projects are in fact a Virtual File System based storage, that by default uses GIT as backend. Such setup allows workbench to work with multiple backends and, in the same time, take full advantage of backend specifics features like in GIT case versioning, branching and even external access.
A new Project can be created from scratch or cloned from an existing repository.
One of the biggest advantage of using GIT as backend is the ability to clone a repository from external and use your preferred tools to edit and build your assets.
|
Never clone your repositories directly from .niogit directory. |
20.4.4. Workbench user interface concepts
The Workbench is comprised of different logical entities:
-
Part
A Part is a screen or editor with which the user can interact to perform operations.
Example Parts are "Project Explorer", "Project Editor", "Guided Rule Editor" etc.
-
Page
A perspective is a logical grouping of related Panels and Parts. A perspective is usually named as page, since it is a term far more familiar to end users whereas a perspective is more developer oriented. Notice however, the Workbench supports both developer created pages and those created by end users from the page builder (aka Content Management) tooling but, generally speaking, page is used to refer both.
The user can switch between pages by clicking on one of the top-level menu items; such as "Home", "Authoring", "Deploy" etc.
20.5. Changing the layout
20.5.1. Resizing
Move the mouse pointer over the panel splitter (a grey horizontal or vertical line in between panels).
The cursor will by changing indicate it is positioned correctly over the splitter. Press and hold the left mouse button and drag the splitter to the required position; then release the left mouse button.
20.6. Authoring (General)
20.6.1. Artifact Repository
Projects often need external artifacts in their classpath in order to build, for example a domain model JARs. The artifact repository holds those artifacts.
The Artifact Repository is a full blown Maven repository. It follows the semantics of a Maven remote repository: all snapshots are timestamped. But it is often stored on the local hard drive.
By default the artifact repository is stored under $WORKING_DIRECTORY/repositories/kie, but it can be overridden with the system property-Dorg.guvnor.m2repo.dir.
There is only 1 Maven repository per installation.
The Artifact Repository screen shows a list of the artifacts in the Maven repository:
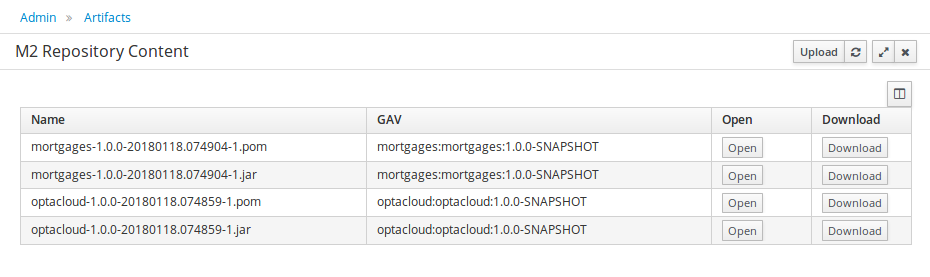
To add a new artifact to that Maven repository, either:
-
Use the upload button and select a JAR. If the JAR contains a POM file under
META-INF/maven(which every JAR build by Maven has), no further information is needed. Otherwise, a groupId, artifactId and version need be given too.
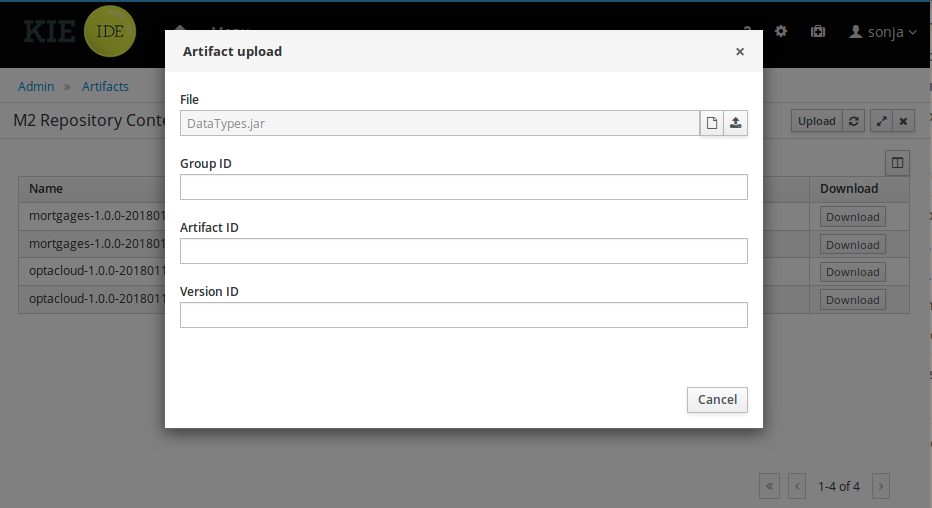
-
Using Maven,
mvn deployto that Maven repository. Refresh the list to make it show up.
|
This remote Maven repository is relatively simple. It does not support proxying, mirroring, … like Nexus or Archiva. |
20.6.2. Asset Editor
The Asset Editor is the principle component of the workbench User-Interface. It consists of two main views Editor and Overview.
-
The views
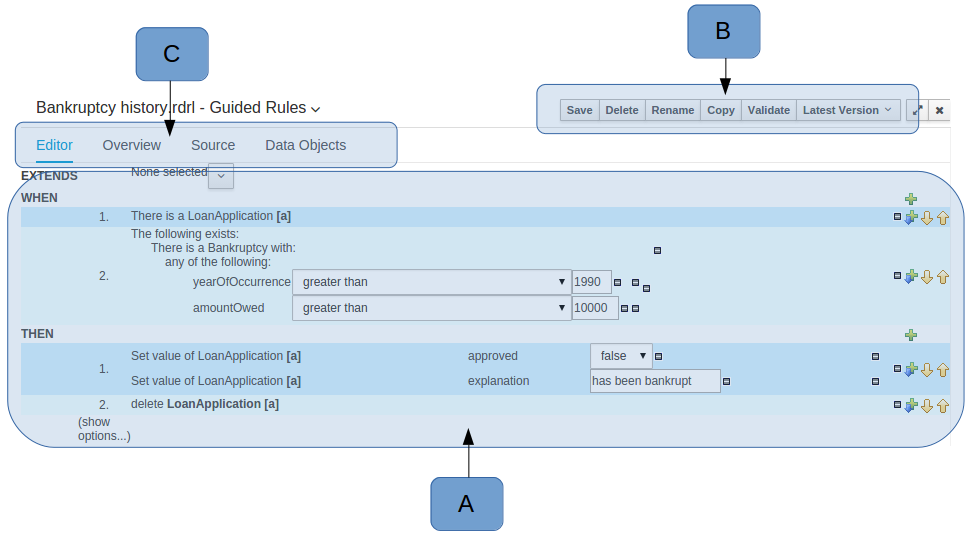 Figure 212. The Asset Editor - Editor tab
-
A : The editing area - exactly what form the editor takes depends on the Asset type. An asset can only be edited by one user at a time to avoid conflicts. When a user begins to edit an asset, a lock will automatically be acquired. This is indicated by a lock symbol appearing on the asset title bar as well as in the project explorer view (see Project Explorer for details). If a user starts editing an already locked asset a pop-up notification will appear to inform the user that the asset can’t currently be edited, as it is being worked on by another user. Changes will be prevented until the editing user saves or closes the asset, or logs out of the workbench. Session timeouts will also cause locks to be released. Every user further has the option to force a lock release, if required (see the Metadata section below).
-
B : This menu bar contains various actions for the Asset; such as Save, Rename, Copy etc. Note that saving, renaming and deleting are deactivated if the asset is locked by a different user.
-
C : Different views for asset content or asset information.
-
Editor shows the main editor for the asset
-
Overview contains the metadata and conversation views for this editor. Explained in more detail below.
-
Source shows the asset in plain DRL. Note: This tab is only visible if the asset content can be generated into DRL.
-
Data Objects contains the model available for authoring. By default only Data Objects that reside within the same package as the asset are available for authoring. Data Objects outside of this package can be imported to become available for authoring the asset.
-
 Figure 213. The Asset Editor - Data Objects tab
 -
-
Overview
-
A : General information about the asset and the asset’s description.
"Type:" The format name of the type of Asset.
"Description:" Description for the asset.
"Used in projects:" Names the projects where this rule is used.
"Last Modified:" Who made the last change and when.
"Created on:" Who created the asset and when.
-
B : Version history for the asset. Selecting a version loads the selected version into this editor.
-
C : Meta data (from the "Dublin Core" standard)
-
D : Comments regarding the development of the Asset can be recorded here.
-
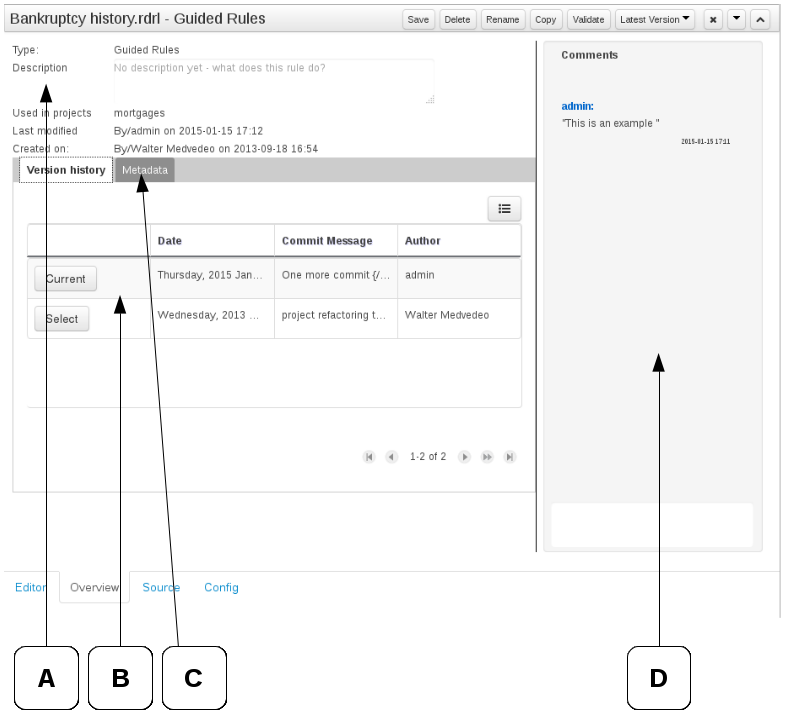
-
Metadata
-
A : Meta data:-
"Tags:" A tagging system for grouping the assets.
"Note:" A comment made when the Asset was last updated (i.e. why a change was made)
"URI:" URI to the asset inside the Git repository.
"Subject/Type/External link/Source" : Other miscellaneous meta data for the Asset.
"Lock status" : Shows the lock status of the asset and, if locked, allows to force unlocking the asset.
-
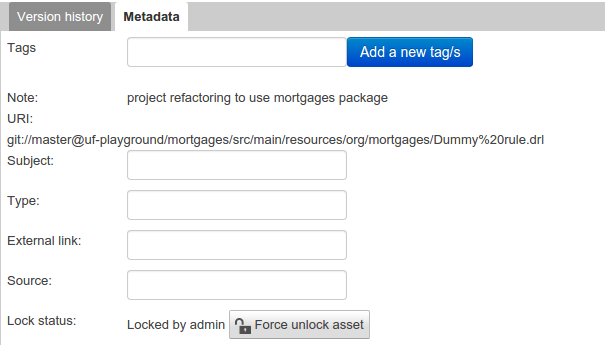
-
Locking
The Workbench supports pessimistic locking of assets. When one User starts editing an asset it is locked to change by other Users. The lock is held until a period of inactivity lapses, the Editor is closed or the application stopped and restarted. Locks can also be forcibly removed on the MetaData section of the Overview tab.
A "padlock" icon is shown in the Editor’s title bar and beside the asset in the Project Explorer when an asset is locked.
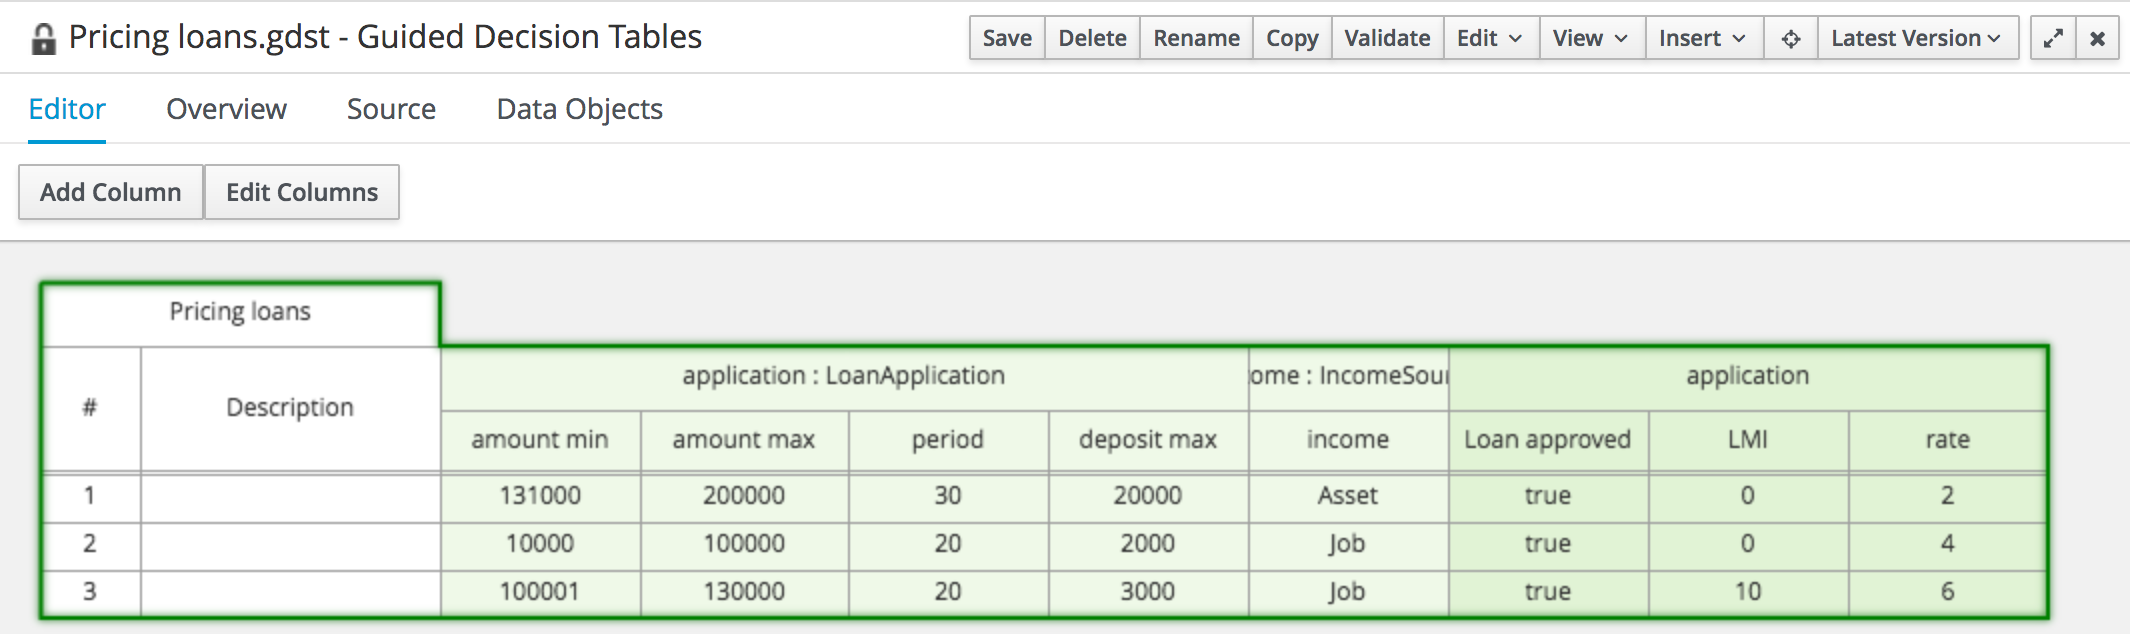 Figure 216. The Asset Editor - Locked assets cannot be edited by other users
20.6.3. Tags Editor
Tags allow assets to be labelled with any number of tags that you define. These tags can be used to filter assets on the Project Explorer enabling "Tag filtering".
20.6.3.1. Creating Tags
To create tags you simply have to write them on the Tags input and press the "Add new Tag/s" button. The Tag Editor allows creating tags one by one or writing more than one separated with a white space.
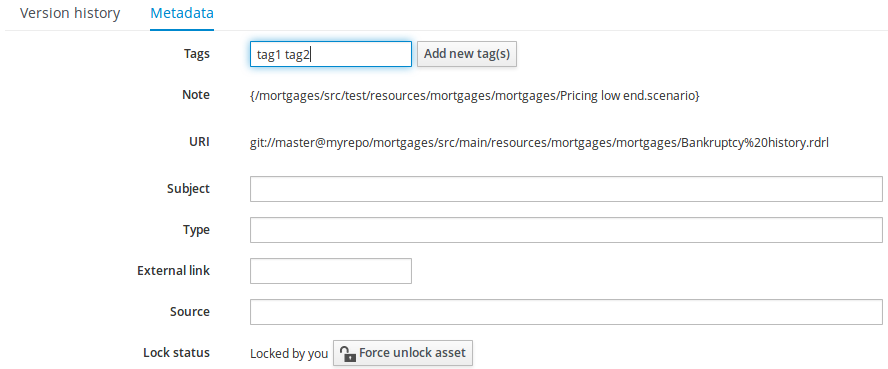
Once you created new Tags they will appear over the Editor allowing you to remove them by pressing on them if you want.
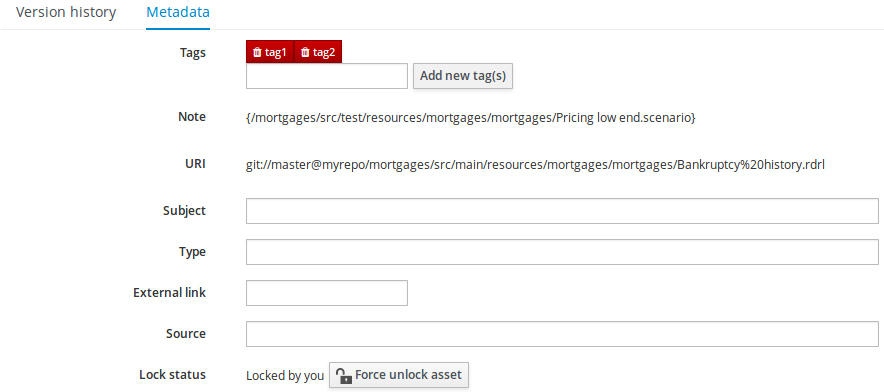
20.6.4. Project Explorer
The Project Explorer provides the ability to browse files inside the current Project. The Project Explorer can be accessed from the left side when an Asset Editor is open.
20.6.4.1. Initial view
If a file is currently being edited by another user, a lock symbol will be displayed in front of the file name. The symbol is blue in case the lock is owned by the currently authenticated user, otherwise black. Moving the mouse pointer over the lock symbol will display a tooltip providing the name of the user who is currently editing the file (and therefore owning the lock). To learn more about locking see Asset Editor for details.
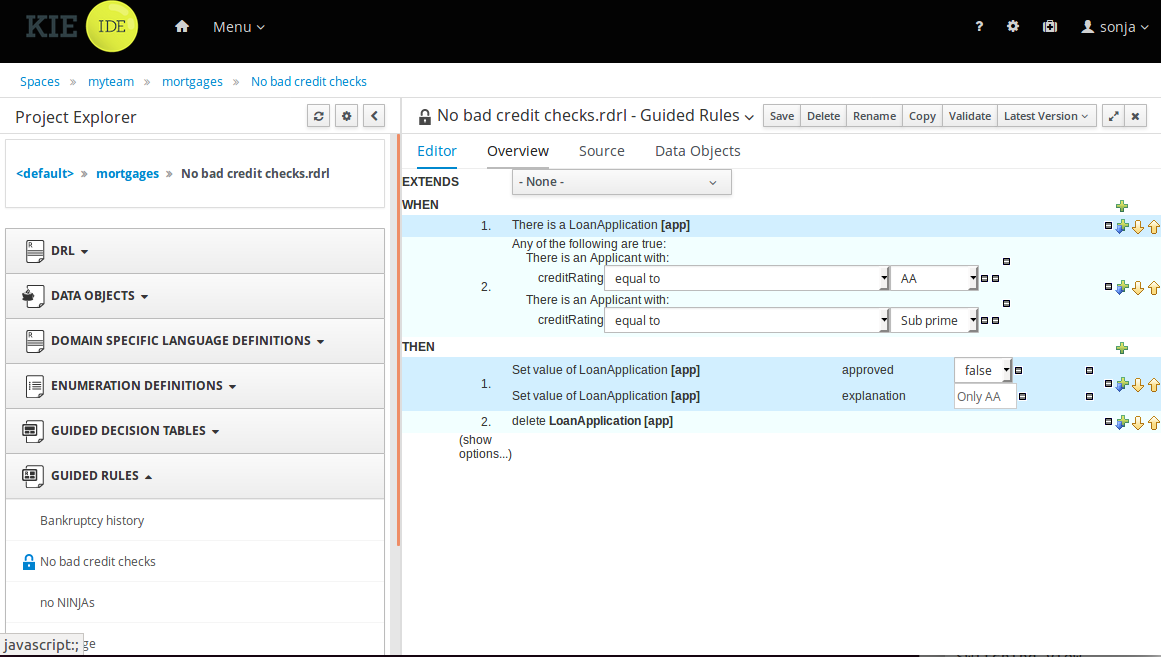
20.6.4.2. Different views
Project Explorer supports multiple views.
-
Project View
A simplified view of the underlying project structure. Certain system files are hidden from view.
-
Repository View
A complete view of the underlying project structure including all files; either user-defined or system generated.
Views can be selected by clicking on the icon within the Project Explorer, as shown below.
Both Project and Repository Views can be further refined by selecting either "Show as Folders" or "Show as Links".
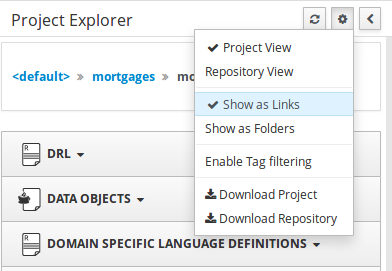
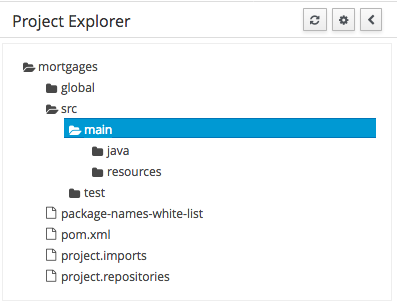
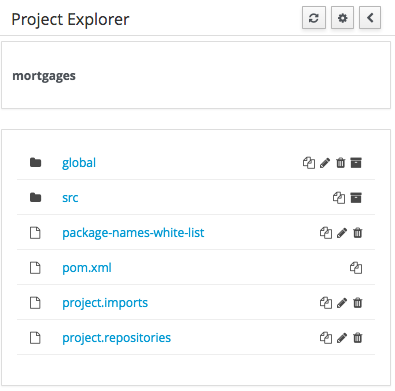
20.6.4.3. Download Project or Repository
Download Download and Download Repository make it possible to download the project or repository as a zip file.
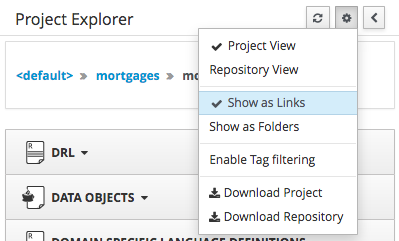
20.6.4.4. Filtering by Tag
To make easy view the elements on packages that contain a lot of assets, is possible to enabling the Tag filter, whichs allows you to filter the assets by their tags.
To see how to add tags to an asset look at: Tags Editor
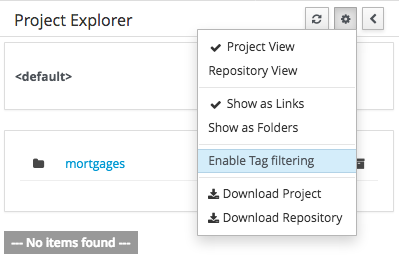

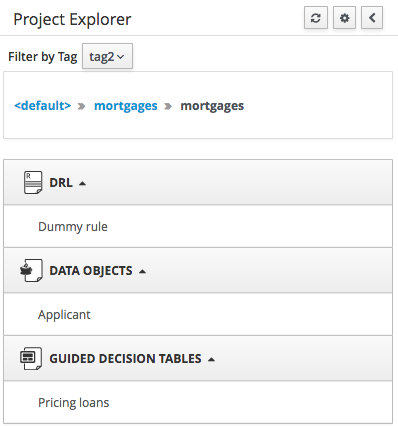
20.6.4.5. Copy, Rename, Delete and Download Actions
Copy, rename and delete actions are available on Links mode, for packages in of Project View and for files and directories in Repository View. Download action is available for directories. Download option downloads the selected the selected directory as a zip file.
-
A : Copy
-
B : Rename
-
C : Delete
-
D : Download
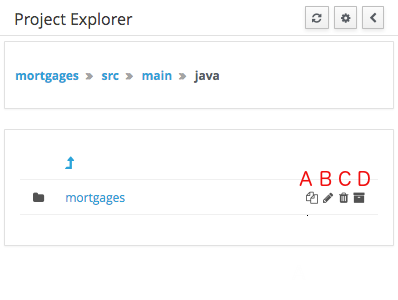
|
Workbench roadmap includes a refactoring and an impact analyses tools, but currenctly doesn’t have it. Until both tools are provided make sure that your changes (copy/rename/delete) on packages, files or directories doesn’t have a major impact on your project. In cases that your change had an unexcepcted impact, Workbench allows you to restore your repository using the Repository editor. |
|
Files locked by other users as well as directories that contain such files cannot be renamed or deleted until the corresponding locks are released. If that is the case the rename and delete symbols will be deactivated. To learn more about locking see Asset Editor for details. 
|
20.6.5. Project Editor
The Project Editor screen can be accessed from Project Explorer. Project Editor shows the settings for the currently active project.
Unlike most of the workbench editors, project editor edits more than one file. Showing everything that is needed for configuring the KIE project in one place.
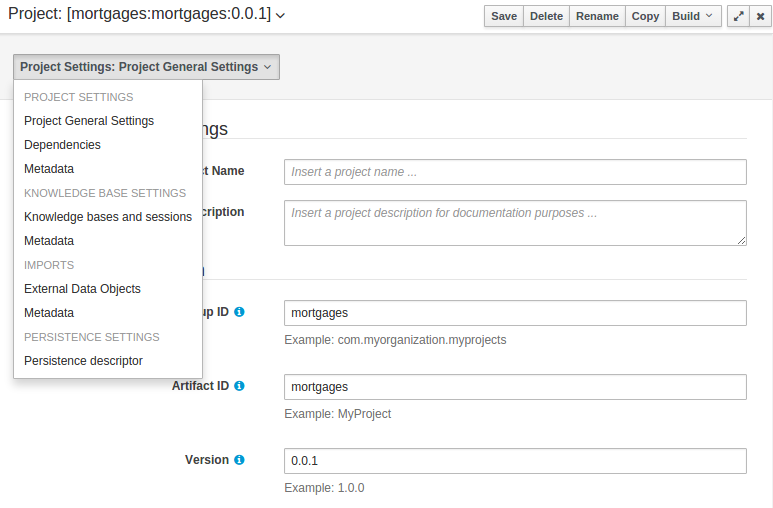
20.6.5.1. Build & Deploy
Build & Depoy builds the current project and deploys the KJAR into the workbench internal Maven repository.
20.6.5.2. Project Settings
Project Settings edits the pom.xml file used by Maven.
Project General Settings
General settings provide tools for project name and GAV-data (Group, Artifact, Version). GAV values are used as identifiers to differentiate projects and versions of the same project.
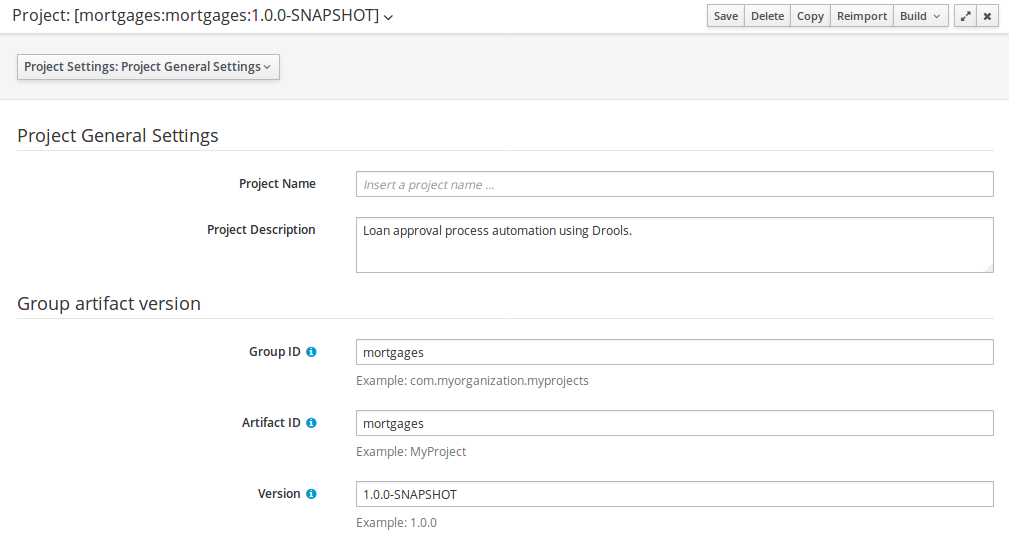
Dependencies
The project may have any number of either internal or external dependencies. Dependency is a project that has been built and deployed to a Maven repository. Internal dependencies are projects build and deployed in the same workbench as the project. External dependencies are retrieved from repositories outside of the current workbench. Each dependency uses the GAV-values to specify the project name and version that is used by the project.
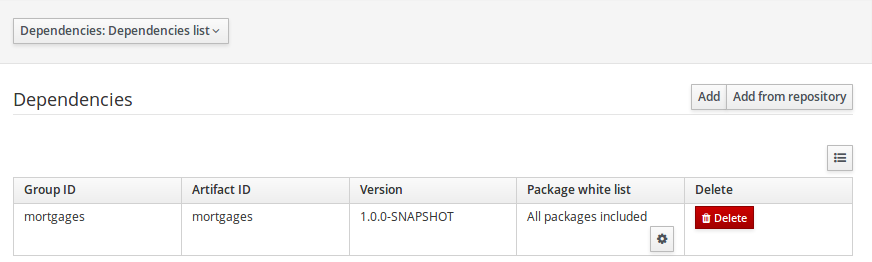
Classes and declared types in white listed packages show up as Data Objects that can be imported in assets. The full list is stored in package-name-white-list file that is stored in each project root.
Package white list has three modes:
-
All packages included: Every package defined in this jar is white listed.
-
Packages not included: None of the packages listed in this jar are white listed.
-
Some packages included: Only part of the packages in the jar are white listed.
Metadata
Metadata for the pom.xml file.
20.6.5.3. Knowledge Base Settings
Knowledge Base Settings edits the kmodule.xml file used by Drools.
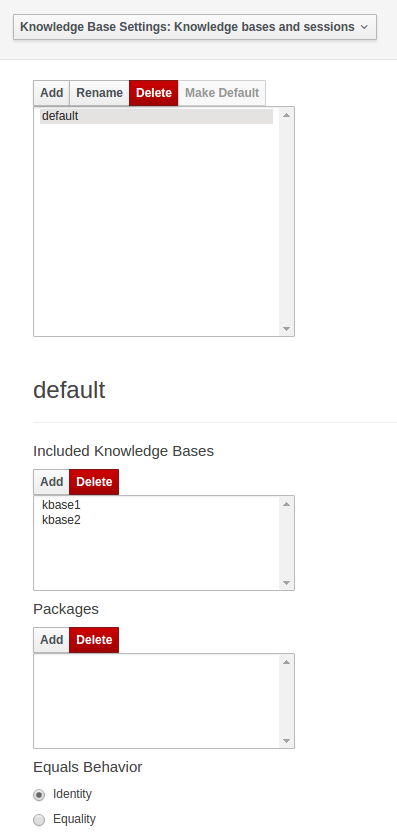
|
For more information about the Knowledge Base properties, check the Drools Expert documentation for kmodule.xml. |
Knowledge bases and sessions
Knowledge bases and sessions lists the knowledge bases and the knowledge sessions specified for the project.
Lists all the knowledge bases by name. Only one knowledge base can be set as default.
Knowledge base can include other knowledge bases. The models, rules and any other content in the included knowledge base will be visible and usable by the currently selected knowledge base.
Rules and models are stored in packages. The packages property specifies what packages are included into this knowledge base.
Equals behavior is explained in the Drools Expert part of the documentation.
Event processing mode is explained in the Drools Fusion part of the documentation.
The table lists all the knowledge sessions in the selected knowledge base. There can be only one default of each type. The types are stateless and stateful. Clicking the pen-icon opens a popup that shows more properties for the knowledge session.
Metadata
Metadata for the kmodule.xml
20.6.5.4. Imports
Settings edits the project.imports file used by the workbench editors.
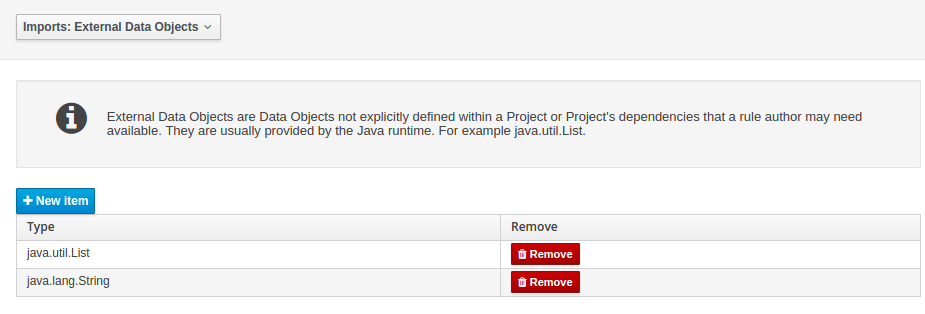
External Data Objects
Data Objects provided by the Java Runtime environment may need to be registered to be available to rule authoring where such Data Objects are not implicitly available as part of an existing Data Object defined within the Workbench or a Project dependency.
For example an Author may want to define a rule that checks for java.util.ArrayList in Working Memory.
If a domain Data Object has a field of type java.util.ArrayList there is no need create a registraton.
Metadata
Metadata for the project.imports file.
20.6.5.5. Duplicate GAV detection
When performing any of the following operations a check is now made against all Maven Repositories, resolved for the Project, for whether the Project’s GroupId, ArtifactId and Version pre-exist.
If a clash is found the operation is prevented; although this can be overridden by Users with the admin role.
|
The feature can be disabled by setting the System Property |
Resolved repositories are those discovered in:-
-
The Project’s
POMsection (or any parent<repositories>POM). -
The Project’s
POMsection.<distributionManagement> -
Maven’s global
settings.xmlconfiguration file.
Affected operations:-
-
Creation of new Managed Repositories.
-
Saving a Project defintion with the Project Editor.
-
Adding new Modules to a Managed Multi-Module Repository.
-
Saving the
pom.xmlfile. -
Build & installing a Project with the Project Editor.
-
Build & deploying a Project with the Project Editor.
-
Asset Management operations building, installing or deloying Projects.
-
RESToperations creating, installing or deploying Projects.
Users with the Admin role can override the list of Repositories checked using the "Repositories" settings in the Project Editor.
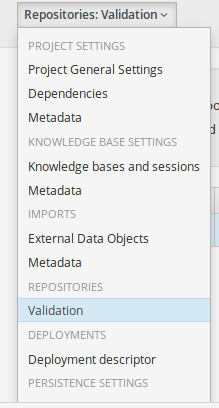
20.6.6. Validation
The Workbench provides a common and consistent service for users to understand whether files authored within the environment are valid.
20.6.6.1. Problem Panel
The Problems Panel shows real-time validation results of assets within a Project.
When a Project is selected from the Project Explorer the Problems Panel will refresh with validation results of the chosen Project.
When files are created, saved or deleted the Problems Panel content will update to show either new validation errors, or remove existing if a file was deleted.
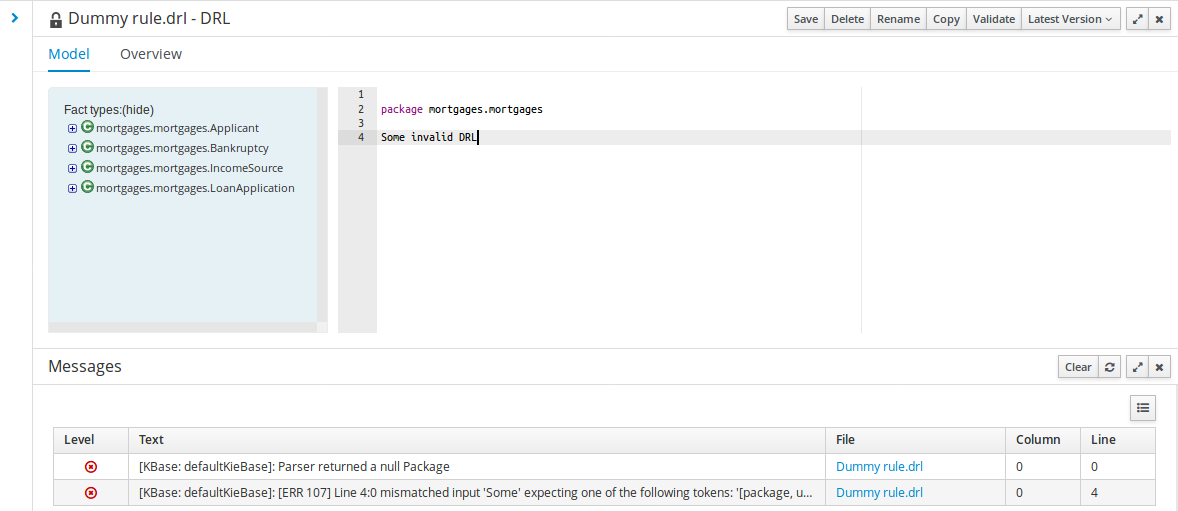
20.6.6.2. On demand validation
It is not always desirable to save a file in order to determine whether it is in a valid state.
All of the file editors provide the ability to validate the content before it is saved.
Clicking on the 'Validate' button shows validation errors, if any.
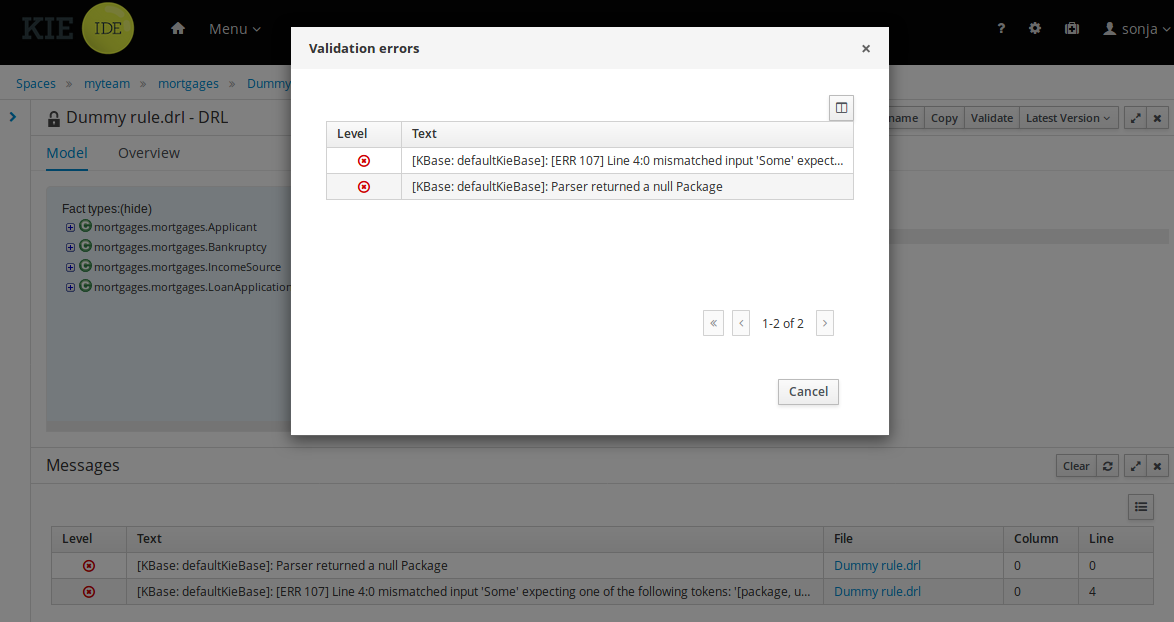
20.6.7. Data Modeller
20.6.7.1. First steps to create a data model
By default, a data model is always constrained to the context of a project. For the purpose of this tutorial, we will assume that a correctly configured project already exists and the authoring page is open.
To start the creation of a data model inside a project, take the following steps:
-
From the home panel, select the Desing page and select the given project.
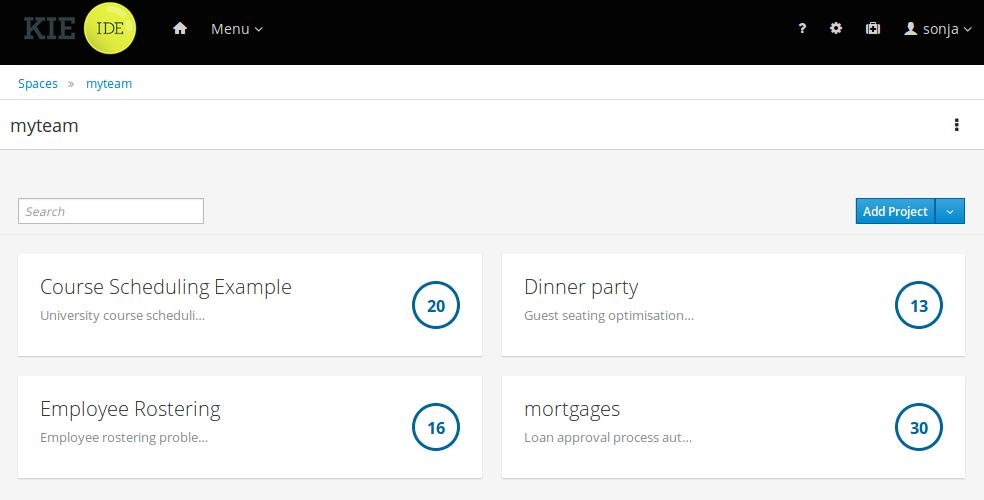 Figure 237. Go to authoring page and select a project
 -
Open the Data Modeller tool by clicking on a Data Object file, or using the "Create New Asset → Data Object" menu option. Set Data Object name to "PurchaseOrder" and click Ok.
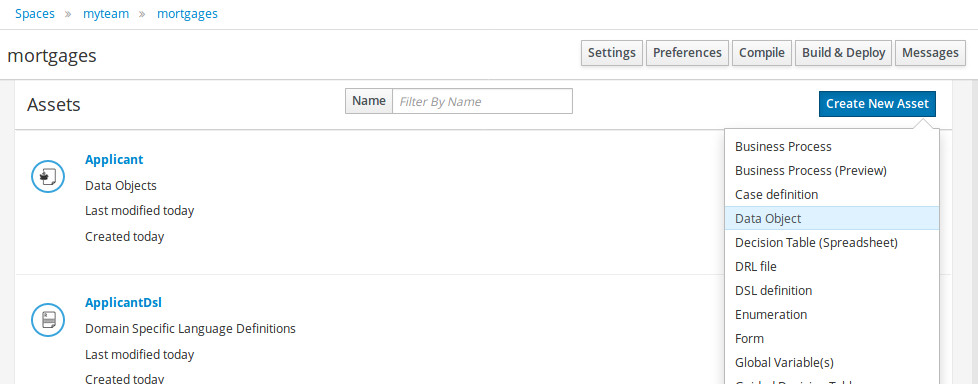 Figure 238. Click on a Data Object
This will start up the Data Modeller tool, which has the following general aspect:
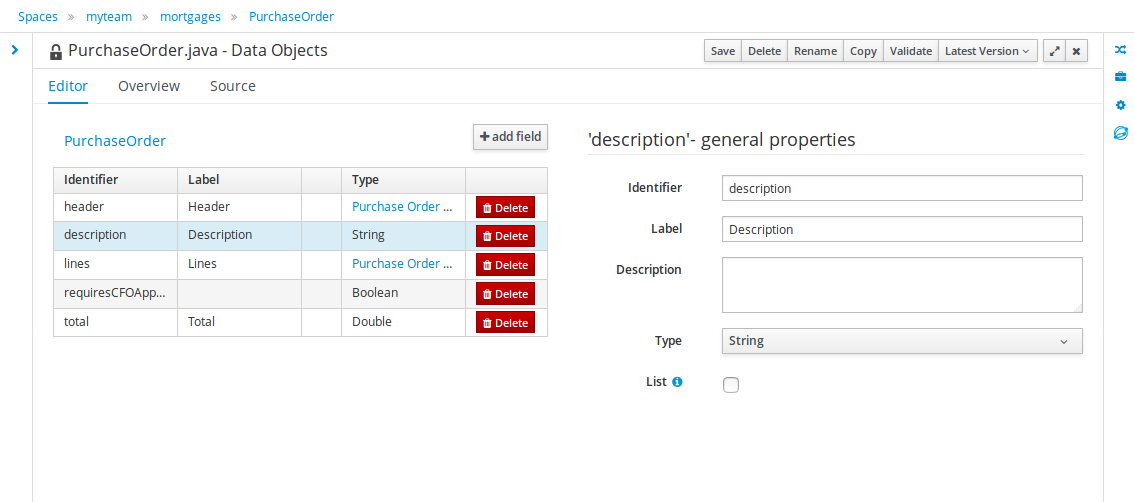
The "Editor" tab is divided into the following sections:
-
The new field section is dedicated to the creation of new fields, and is opened when the "add field" button is pressed.
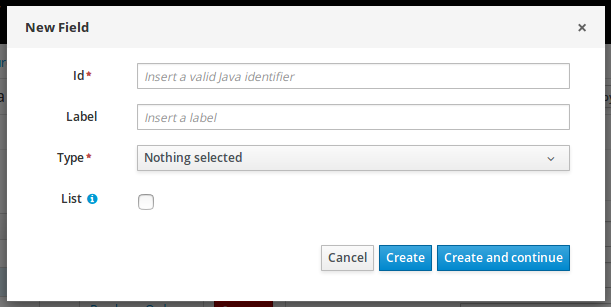 Figure 240. New field creation
 -
The Data Object’s "field browser" section displays a list with the data object fields.
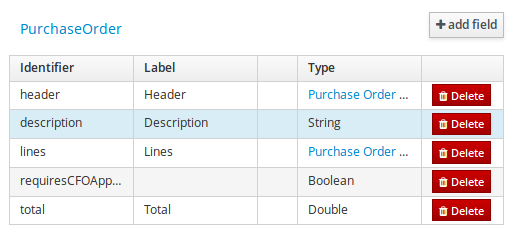 Figure 241. The Data Object’s field browser
 -
The "Data Object / Field general properties" section. This is the rightmost section of the Data Modeller editor and visualizes the "Data Object" or "Field" general properties, depending on user selection.
Data Object general properties can be selected by clicking on the Data Object Selector.
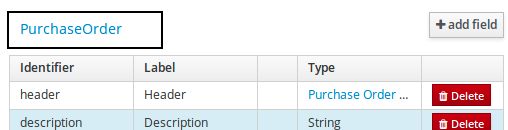 Figure 242. Data Object selector
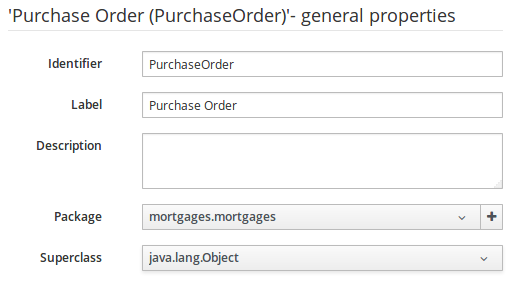 Figure 243. Data Object general properties
Field general properties can be selected by clicking on a field.
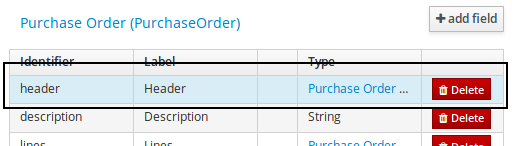
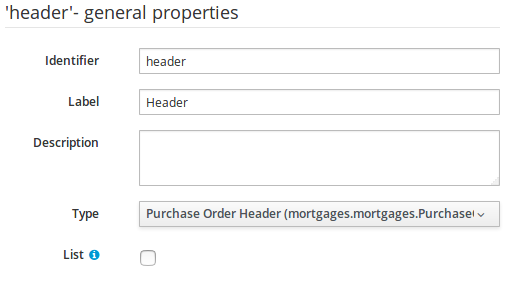
-
On workbench’s right side a new "Tool Bar" is provided that enables the selection of different context sensitive tool windows that will let the user do domain specific configurations. Currently four tool windows are provided for the following domains "Drools & jBPM", "OptaPlanner", "Persistence" and "Advanced" configurations.
 Figure 246. Data modeller Tool Bar
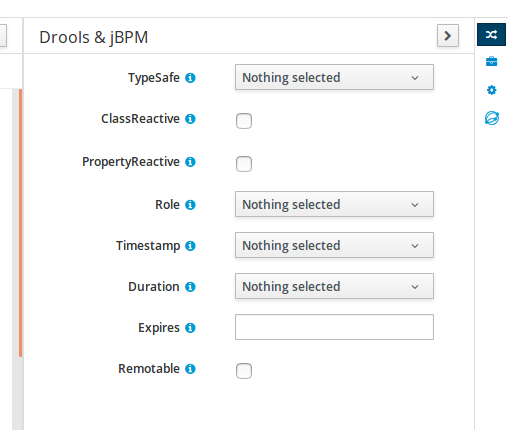 Figure 247. Drools & jBPM tool window
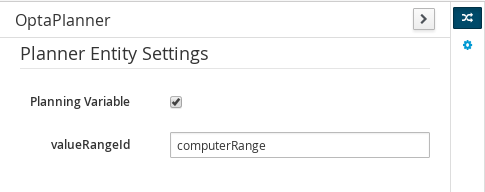 Figure 248. OptaPlanner tool window
To see and use the OptaPlanner tool window, the user needs to have the role
plannermgmt.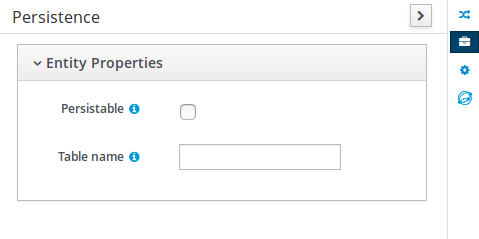 Figure 249. Persistence tool window
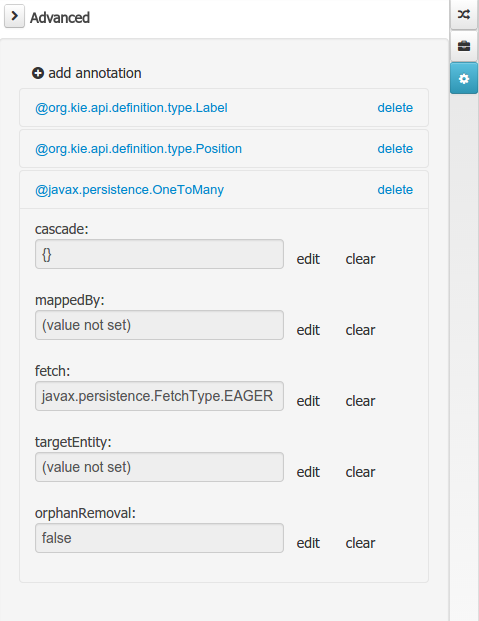 Figure 250. Advanced tool window
The "Source" tab shows an editor that allows the visualization and modification of the generated java code.
-
Round trip between the "Editor" and "Source" tabs is possible, and also source code preservation is provided. It means that not matter where the Java code was generated (e.g. Eclipse, Data modeller), the data modeller will only update the necessary code blocks to maintain the model updated.
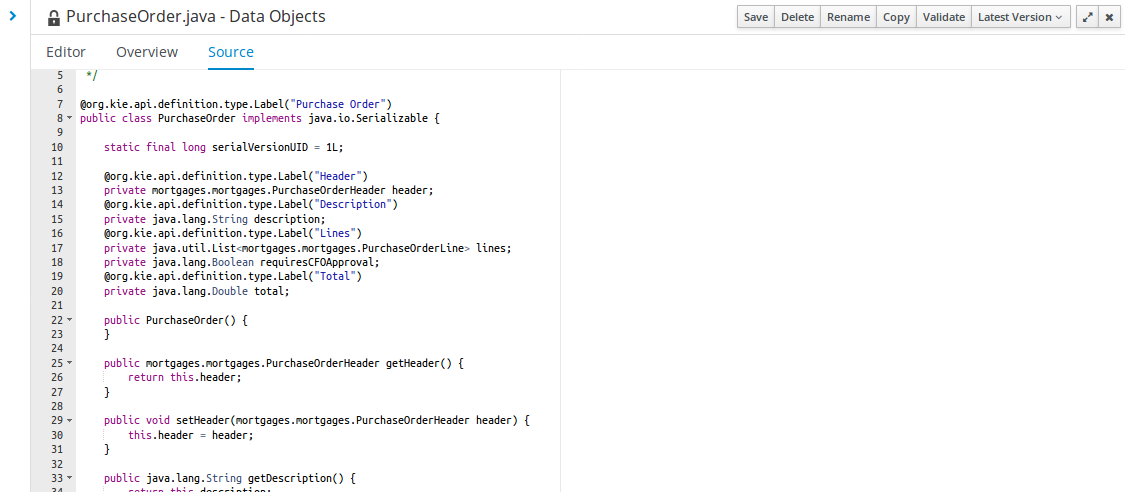 Figure 251. Source editor
The "Overview" tab shows the standard metadata and version information as the other workbench editors.
20.6.7.2. Data Objects
A data model consists of data objects which are a logical representation of some real-world data. Such data objects have a fixed set of modeller (or application-owned) properties, such as its internal identifier, a label, description, package etc. Besides those, a data object also has a variable set of user-defined fields, which are an abstraction of a real-world property of the type of data that this logical data object represents.
Creating a data object can be achieved using the workbench "New Item - Data Object" menu option.
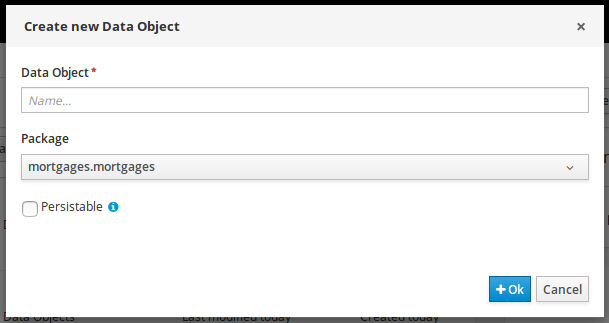
Both resource name and location are mandatory parameters. When the "Ok" button is pressed a new Java file will be created and a new editor instance will be opened for the file edition. The optional "Persistable" attribute will add by default configurations on the data object in order to make it a JPA entity. Use this option if your jBPM project needs to store data object’s information in a data base.
20.6.7.3. Properties & relationships
Once the data object has been created, it now has to be completed by adding user-defined properties to its definition. This can be achieved by pressing the "add field" button. The "New Field" dialog will be opened and the new field can be created by pressing the "Create" button. The "Create and continue" button will also add the new field to the Data Object, but won’t close the dialog. In this way multiple fields can be created avoiding the popup opening multiple times. The following fields can (or must) be filled out:
-
The field’s internal identifier (mandatory). The value of this field must be unique per data object, i.e. if the proposed identifier already exists within current data object, an error message will be displayed.
-
A label (optional): as with the data object definition, the user can define a user-friendly label for the data object field which is about to be created. This has no further implications on how fields from objects of this data object will be treated. If a label is defined, then this is how the field will be displayed throughout the data modeller tool.
-
A field type (mandatory): each data object field needs to be assigned with a type.
This type can be either of the following:
-
A 'primitive java object' type: these include most of the object equivalents of the standard Java primitive types, such as Boolean, Short, Float, etc, as well as String, Date, BigDecimal and BigInteger.
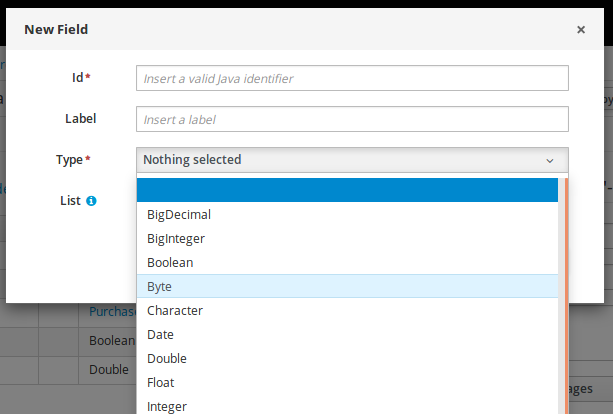 Figure 253. Primitive object field types
 -
A 'data object' type: any user defined data object automatically becomes a candidate to be defined as a field type of another data object, thus enabling the creation of relationships between them. A data object field can be created either in 'single' or in 'multiple' form, the latter implying that the field will be defined as a collection of this type, which will be indicated by selecting "List" checkbox.
-

-
A 'primitive java' type: these include java primitive types byte, short, int, long, float, double, char and boolean.
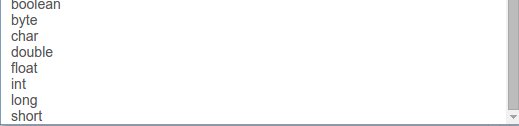
When finished introducing the initial information for a new field, clicking the 'Create' button will add the newly created field to the end of the data object’s fields table below:
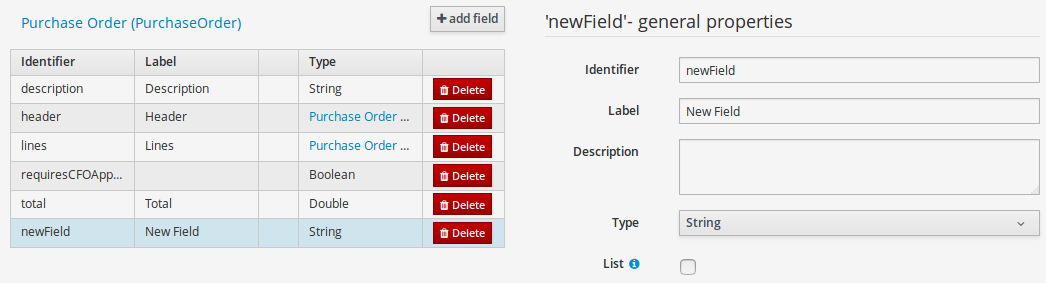
The new field will also automatically be selected in the data object’s field list, and its properties will be shown in the Field general properties editor. Additionally the field properties will be loaded in the different tool windows, in this way the field will be ready for edition in whatever selected tool window.
At any time, any field (without restrictions) can be deleted from a data object definition by clicking on the corresponding 'x' icon in the data object’s fields table.
20.6.7.4. Additional options
As stated before, both Data Objects as well as Fields require some of their initial properties to be set upon creation. Additionally there are three domains of properties that can be configured for a given Data Object. A domain is basically a set of properties related to a given business area. Current available domains are, "Drools & jJBPM", "Persistence" and the "Advanced" domain. To work on a given domain the user should select the corresponding "Tool window" (see below) on the right side toolbar. Every tool window usually provides two editors, the "Data Object" level editor and the "Field" level editor, that will be shown depending on the last selected item, the Data Object or the Field.
Drools & jBPM domain
The Drools & jBPM domain editors manages the set of Data Object or Field properties related to drools applications.
The Drools & jBPM object editor manages the object level drools properties
-
TypeSafe: this property allows to enable/disable the type safe behaviour for current type. By default all type declarations are compiled with type safety enabled. (See Drools for more information on this matter).
-
ClassReactive: this property allows to mark this type to be treated as "Class Reactive" by the Drools engine. (See Drools for more information on this matter).
-
PropertyReactive: this property allows to mark this type to be treated as "Property Reactive" by the Drools engine. (See Drools for more information on this matter).
-
Role: this property allows to configure how the Drools engine should handle instances of this type: either as regular facts or as events. By default all types are handled as a regular fact, so for the time being the only value that can be set is "Event" to declare that this type should be handled as an event. (See Drools Fusion for more information on this matter).
-
Timestamp: this property allows to configure the "timestamp" for an event, by selecting one of his attributes. If set the engine will use the timestamp from the given attribute instead of reading it from the Session Clock. If not, the engine will automatically assign a timestamp to the event. (See Drools Fusion for more information on this matter).
-
Duration: this property allows to configure the "duration" for an event, by selecting one of his attributes. If set the engine will use the duration from the given attribute instead of using the default event duration = 0. (See Drools Fusion for more information on this matter).
-
Expires: this property allows to configure the "time offset" for an event expiration. If set, this value must be a temporal interval in the form: [d][#h][#m][#s][[ms]] Where [ ] means an optional parameter and # means a numeric value. e.g.: 1d2h, means one day and two hours. (See Drools Fusion for more information on this matter).
-
Remotable: If checked this property makes the Data Object available to be used with jBPM remote services as REST, JMS and WS. (See jBPM for more information on this matter).
The Drools & jBPM object editor manages the field level drools properties
-
Equals: checking this property for a Data Object field implies that it will be taken into account, at the code generation level, for the creation of both the equals() and hashCode() methods in the generated Java class. We will explain this in more detail in the following section.
-
Position: this field requires a zero or positive integer. When set, this field will be interpreted by the Drools engine as a positional argument (see the section below and also the Drools documentation for more information on this subject).
Persistence domain
The Persistence domain editors manages the set of Data Object or Field properties related to persistence.
Persistence domain object editor manages the object level persistence properties
-
Persistable: this property allows to configure current Data Object as persistable.
-
Table name: this property allows to set a user defined database table name for current Data Object.
The persistence domain field editor manages the field level persistence properties and is divided in three sections.
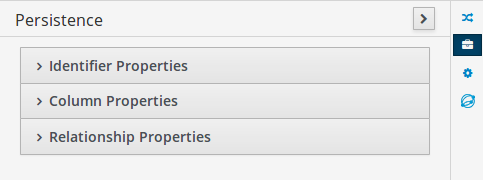
A persistable Data Object should have one and only one field defined as the Data Object identifier. The identifier is typically a unique number that distinguishes a given Data Object instance from all other instances of the same class.
-
Is Identifier: marks current field as the Data Object identifier. A persistable Data Object should have one and only one field marked as identifier, and it should be a base java type, like String, Integer, Long, etc. A field that references a Data Object, or is a multiple field can not be marked as identifier. And also composite identifiers are not supported in this version. When a persistable Data Object is created an identifier field is created by default with the properly initializations, it’s strongly recommended to use this identifier.
-
Generation Strategy: the generation strategy establishes how the identifier values will be automatically generated when the Data Object instances are created and stored in a database. (e.g. by the forms associated to jBPM processes human tasks.) When the by default Identifier field is created, the generation strategy will be also automatically set and it’s strongly recommended to use this configuration.
-
Sequence Generator: the generator represents the seed for the values that will be used by the Generation Strategy. When the by default Identifier field is created the Sequence Generator will be also automatically generated and properly configured to be used by the Generation Strategy.
The column properties section enables the customization of some properties of the database column that will store the field value.
-
Column name: optional value that sets the database column name for the given field.
-
Unique: When checked the unique property establishes that current field value should be a unique key when stored in the database. (if not set the default value is false)
-
Nullable: When checked establishes that current field value can be null when stored in a database. (if not set the default value is true)
-
Insertable: When checked establishes that column will be included in SQL INSERT statements generated by the persistence provider. (if not set the default value is true)
-
Updatable: When checked establishes that the column will be included SQL UPDATE statements generated by the persistence provider. (if not set the default value is true)
When the field’s type is a Data Object type, or a list of a Data Object type a relationship type should be set in order to let the persistence provider to manage the relation. Fortunately this relation type is automatically set when such kind of fields are added to an already marked as persistable Data Object. The relationship type is set by the following popup.

-
Relationship type: sets the type of relation from one of the following options:
One to one: typically used for 1:1 relations where "A is related to one instance of B", and B exists only when A exists. e.g. PurchaseOrder → PurchaseOrderHeader (a PurchaseOrderHeader exists only if the PurchaseOrder exists)
One to many: typically used for 1:N relations where "A is related to N instances of B", and the related instances of B exists only when A exists. e.g. PurchaseOrder → PurchaseOrderLine (a PurchaseOrderLine exists only if the PurchaseOrder exists)
Many to one: typically used for 1:1 relations where "A is related to one instance of B", and B can exist even without A. e.g. PurchaseOrder → Client (a Client can exist in the database even without an associated PurchaseOrder)
Many to many: typically used for N:N relations where "A can be related to N instances of B, and B can be related to M instances of A at the same time", and both B an A instances can exits in the database independently of the related instances. e.g. Course → Student. (Course can be related to N Students, and a given Student can attend to M courses)
When a field of type "Data Object" is added to a given persistable Data Object, the "Many to One" relationship type is generated by default.
And when a field of type "list of Data Object" is added to a given persistable Data Object , the "One to Many" relationship is generated by default.
-
Cascade mode: Defines the set of cascadable operations that are propagated to the associated entity. The value cascade=ALL is equivalent to cascade={PERSIST, MERGE, REMOVE, REFRESH}. e.g. when A → B, and cascade "PERSIST or ALL" is set, if A is saved, then B will be also saved.
The by default cascade mode created by the data modeller is "ALL" and it’s strongly recommended to use this mode when Data Objects are being used by jBPM processes and forms.
-
Fetch mode: Defines how related data will be fetched from database at reading time.
EAGER: related data will be read at the same time. e.g. If A → B, when A is read from database B will be read at the same time.
LAZY: reading of related data will be delayed usually to the moment they are required. e.g. If PurchaseOrder → PurchaseOrderLine the lines reading will be postponed until a method "getLines()" is invoked on a PurchaseOrder instance.
The default fetch mode created by the data modeller is "EAGER" and it’s strongly recommended to use this mode when Data Objects are being used by jBPM processes and forms.
-
Optional: establishes if the right side member of a relationship can be null.
-
Mapped by: used for reverse relations.
Advanced domain
The advanced domain enables the configuration of whatever parameter set by the other domains as well as the adding of arbitrary parameters. As it will be shown in the code generation section every "Data Object / Field" parameter is represented by a java annotation. The advanced mode enables the configuration of this annotations.
The advanced domain editor has the same shape for both Data Object and Field.
The following operations are available
-
delete: enables the deletion of a given Data Object or Field annotation.
-
clear: clears a given annotation parameter value.
-
edit: enables the edition of a given annotation parameter value.
-
add annotation: The add annotation button will start a wizard that will let the addition of whatever java annotation available in the project dependencies.
Add annotation wizard step #1: the first step of the wizard requires the entering of a fully qualified class name of an annotation, and by pressing the "search" button the annotation definition will be loaded into the wizard. Additionally when the annotation definition is loaded, different wizard steps will be created in order to enable the completion of the different annotation parameters. Required parameters will be marked with "*".
 Figure 263. Annotation definition loaded into the wizard.
Whenever it’s possible the wizard will provide a suitable editor for the given parameters.
 Figure 264. Automatically generated enum values editor for an Enumeration annotation parameter.
A generic parameter editor will be provided when it’s not possible to calculate a customized editor
 Figure 265. Generic annotation parameter editor
When all required parameters has been entered and validated, the finish button will be enabled and the wizard can be completed by adding the annotation to the given Data Object or Field.
20.6.7.5. Generate data model code.
The data model in itself is merely a visual tool that allows the user to define high-level data structures, for them to interact with the Drools Engine on the one hand, and the jBPM platform on the other. In order for this to become possible, these high-level visual structures have to be transformed into low-level artifacts that can effectively be consumed by these platforms. These artifacts are Java POJOs (Plain Old Java Objects), and they are generated every time the data model is saved, by pressing the "Save" button in the top Data Modeller Menu. Additionally when the user round trip between the "Editor" and "Source" tab, the code is auto generated to maintain the consistency with the Editor view and vice versa.

The resulting code is generated according to the following transformation rules:
-
The data object’s identifier property will become the Java class’s name. It therefore needs to be a valid Java identifier.
-
The data object’s package property becomes the Java class’s package declaration.
-
The data object’s superclass property (if present) becomes the Java class’s extension declaration.
-
The data object’s label and description properties will translate into the Java annotations "@org.kie.api.definition.type.Label" and "@org.kie.api.definition.type.Description", respectively. These annotations are merely a way of preserving the associated information, and as yet are not processed any further.
-
The data object’s role property (if present) will be translated into the "@org.kie.api.definition.type.Role" Java annotation, that IS interpreted by the application platform, in the sense that it marks this Java class as a Drools Event Fact-Type.
-
The data object’s type safe property (if present) will be translated into the "@org.kie.api.definition.type.TypeSafe Java annotation. (see Drools)
-
The data object’s class reactive property (if present) will be translated into the "@org.kie.api.definition.type.ClassReactive Java annotation. (see Drools)
-
The data object’s property reactive property (if present) will be translated into the "@org.kie.api.definition.type.PropertyReactive Java annotation. (see Drools)
-
The data object’s timestamp property (if present) will be translated into the "@org.kie.api.definition.type.Timestamp Java annotation. (see Drools)
-
The data object’s duration property (if present) will be translated into the "@org.kie.api.definition.type.Duration Java annotation. (see Drools)
-
The data object’s expires property (if present) will be translated into the "@org.kie.api.definition.type.Expires Java annotation. (see Drools)
-
The data object’s remotable property (if present) will be translated into the "@org.kie.api.remote.Remotable Java annotation. (see jBPM)
A standard Java default (or no parameter) constructor is generated, as well as a full parameter constructor, i.e. a constructor that accepts as parameters a value for each of the data object’s user-defined fields.
The data object’s user-defined fields are translated into Java class fields, each one of them with its own getter and setter method, according to the following transformation rules:
-
The data object field’s identifier will become the Java field identifier. It therefore needs to be a valid Java identifier.
-
The data object field’s type is directly translated into the Java class’s field type. In case the field was declared to be multiple (i.e. 'List'), then the generated field is of the "java.util.List" type.
-
The equals property: when it is set for a specific field, then this class property will be annotated with the "@org.kie.api.definition.type.Key" annotation, which is interpreted by the Drools Engine, and it will 'participate' in the generated equals() method, which overwrites the equals() method of the Object class. The latter implies that if the field is a 'primitive' type, the equals method will simply compares its value with the value of the corresponding field in another instance of the class. If the field is a sub-entity or a collection type, then the equals method will make a method-call to the equals method of the corresponding data object’s Java class, or of the java.util.List standard Java class, respectively.
If the equals property is checked for ANY of the data object’s user defined fields, then this also implies that in addition to the default generated constructors another constructor is generated, accepting as parameters all of the fields that were marked with Equals. Furthermore, generation of the equals() method also implies that also the Object class’s hashCode() method is overwritten, in such a manner that it will call the hashCode() methods of the corresponding Java class types (be it 'primitive' or user-defined types) for all the fields that were marked with Equals in the Data Model.
-
The position property: this field property is automatically set for all user-defined fields, starting from 0, and incrementing by 1 for each subsequent new field. However the user can freely changes the position among the fields. At code generation time this property is translated into the "@org.kie.api.definition.type.Position" annotation, which can be interpreted by the Drools Engine. Also, the established property order determines the order of the constructor parameters in the generated Java class.
As an example, the generated Java class code for the Purchase Order data object, corresponding to its definition as shown in the following figure purchase_example.jpg is visualized in the figure at the bottom of this chapter. Note that the two of the data object’s fields, namely 'header' and 'lines' were marked with Equals, and have been assigned with the positions 2 and 1, respectively).
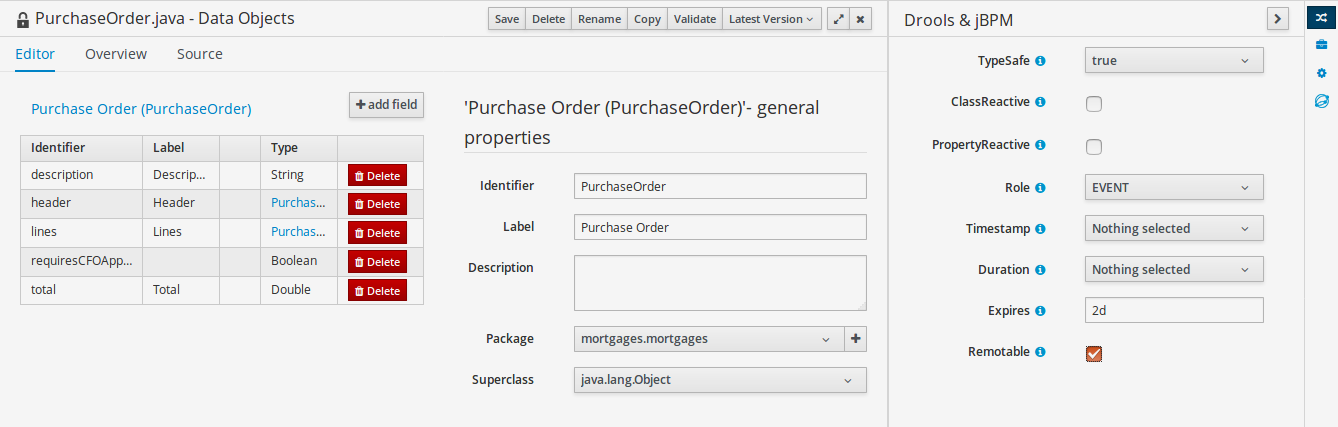
package org.jbpm.examples.purchases;
/**
* This class was automatically generated by the data modeler tool.
*/
@org.kie.api.definition.type.Label("Purchase Order")
@org.kie.api.definition.type.TypeSafe(true)
@org.kie.api.definition.type.Role(org.kie.api.definition.type.Role.Type.EVENT)
@org.kie.api.definition.type.Expires("2d")
@org.kie.api.remote.Remotable
public class PurchaseOrder implements java.io.Serializable
{
static final long serialVersionUID = 1L;
@org.kie.api.definition.type.Label("Total")
@org.kie.api.definition.type.Position(3)
private java.lang.Double total;
@org.kie.api.definition.type.Label("Description")
@org.kie.api.definition.type.Position(0)
private java.lang.String description;
@org.kie.api.definition.type.Label("Lines")
@org.kie.api.definition.type.Position(2)
@org.kie.api.definition.type.Key
private java.util.List<org.jbpm.examples.purchases.PurchaseOrderLine> lines;
@org.kie.api.definition.type.Label("Header")
@org.kie.api.definition.type.Position(1)
@org.kie.api.definition.type.Key
private org.jbpm.examples.purchases.PurchaseOrderHeader header;
@org.kie.api.definition.type.Position(4)
private java.lang.Boolean requiresCFOApproval;
public PurchaseOrder()
{
}
public java.lang.Double getTotal()
{
return this.total;
}
public void setTotal(java.lang.Double total)
{
this.total = total;
}
public java.lang.String getDescription()
{
return this.description;
}
public void setDescription(java.lang.String description)
{
this.description = description;
}
public java.util.List<org.jbpm.examples.purchases.PurchaseOrderLine> getLines()
{
return this.lines;
}
public void setLines(java.util.List<org.jbpm.examples.purchases.PurchaseOrderLine> lines)
{
this.lines = lines;
}
public org.jbpm.examples.purchases.PurchaseOrderHeader getHeader()
{
return this.header;
}
public void setHeader(org.jbpm.examples.purchases.PurchaseOrderHeader header)
{
this.header = header;
}
public java.lang.Boolean getRequiresCFOApproval()
{
return this.requiresCFOApproval;
}
public void setRequiresCFOApproval(java.lang.Boolean requiresCFOApproval)
{
this.requiresCFOApproval = requiresCFOApproval;
}
public PurchaseOrder(java.lang.Double total, java.lang.String description,
java.util.List<org.jbpm.examples.purchases.PurchaseOrderLine> lines,
org.jbpm.examples.purchases.PurchaseOrderHeader header,
java.lang.Boolean requiresCFOApproval)
{
this.total = total;
this.description = description;
this.lines = lines;
this.header = header;
this.requiresCFOApproval = requiresCFOApproval;
}
public PurchaseOrder(java.lang.String description,
org.jbpm.examples.purchases.PurchaseOrderHeader header,
java.util.List<org.jbpm.examples.purchases.PurchaseOrderLine> lines,
java.lang.Double total, java.lang.Boolean requiresCFOApproval)
{
this.description = description;
this.header = header;
this.lines = lines;
this.total = total;
this.requiresCFOApproval = requiresCFOApproval;
}
public PurchaseOrder(
java.util.List<org.jbpm.examples.purchases.PurchaseOrderLine> lines,
org.jbpm.examples.purchases.PurchaseOrderHeader header)
{
this.lines = lines;
this.header = header;
}
@Override
public boolean equals(Object o)
{
if (this == o)
return true;
if (o == null || getClass() != o.getClass())
return false;
org.jbpm.examples.purchases.PurchaseOrder that = (org.jbpm.examples.purchases.PurchaseOrder) o;
if (lines != null ? !lines.equals(that.lines) : that.lines != null)
return false;
if (header != null ? !header.equals(that.header) : that.header != null)
return false;
return true;
}
@Override
public int hashCode()
{
int result = 17;
result = 31 * result + (lines != null ? lines.hashCode() : 0);
result = 31 * result + (header != null ? header.hashCode() : 0);
return result;
}
}20.6.7.6. Using external models
Using an external model means the ability to use a set for already defined POJOs in current project context. In order to make those POJOs available a dependency to the given JAR should be added. Once the dependency has been added the external POJOs can be referenced from current project data model.
There are two ways to add a dependency to an external JAR file:
-
Dependency to a JAR file already installed in current local M2 repository (typically associated the the user home).
-
Dependency to a JAR file installed in current KIE Workbench/Drools Workbench "Guvnor M2 repository". (internal to the application)
Dependency to a JAR file in local M2 repository
To add a dependency to a JAR file in local M2 repository follow this steps.
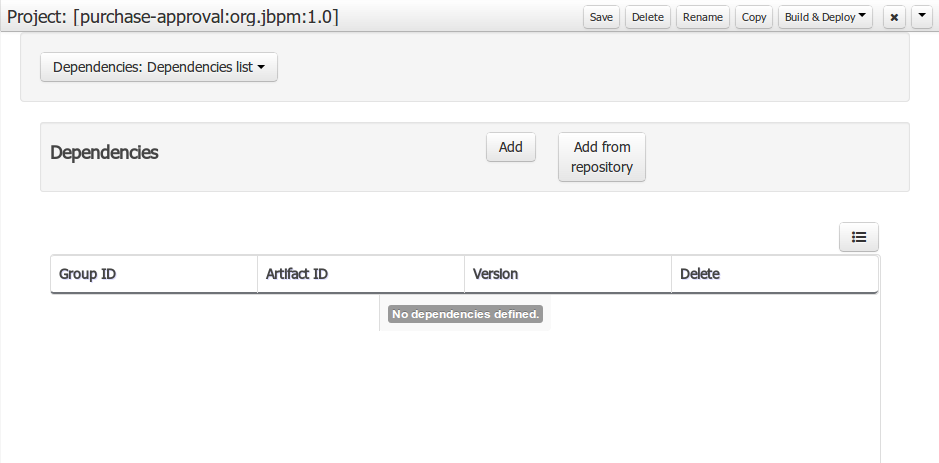
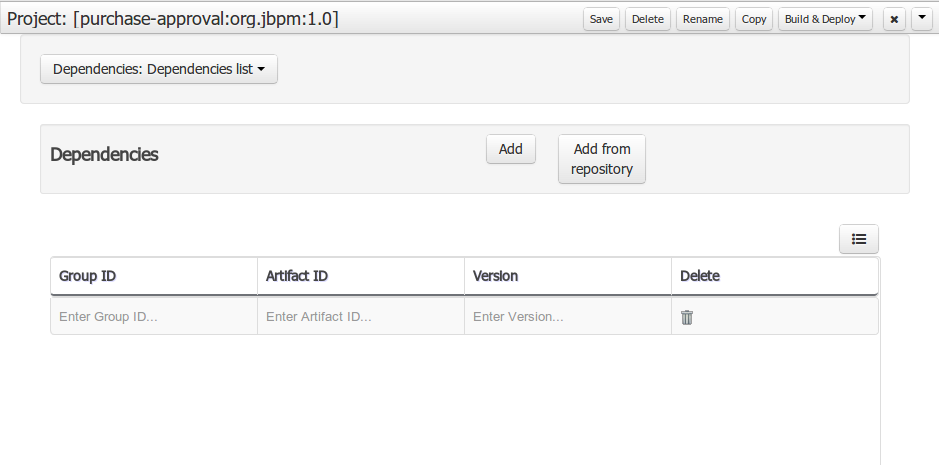
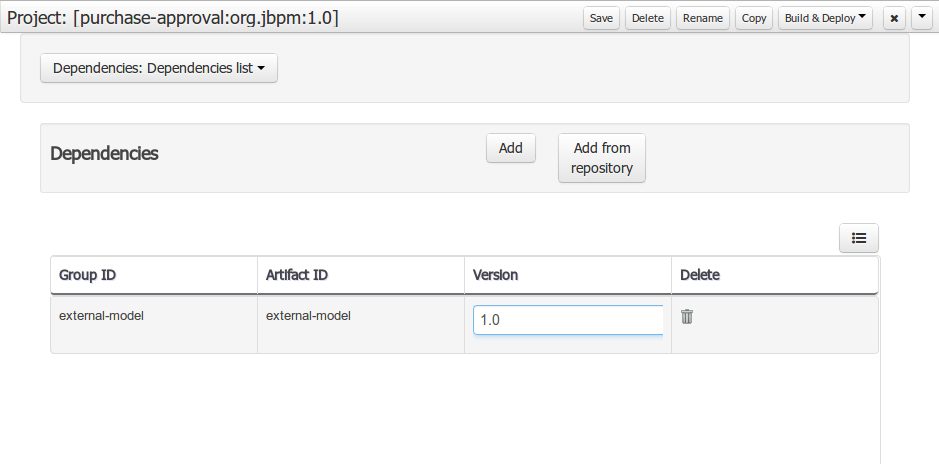
When project is saved the POJOs defined in the external file will be available.
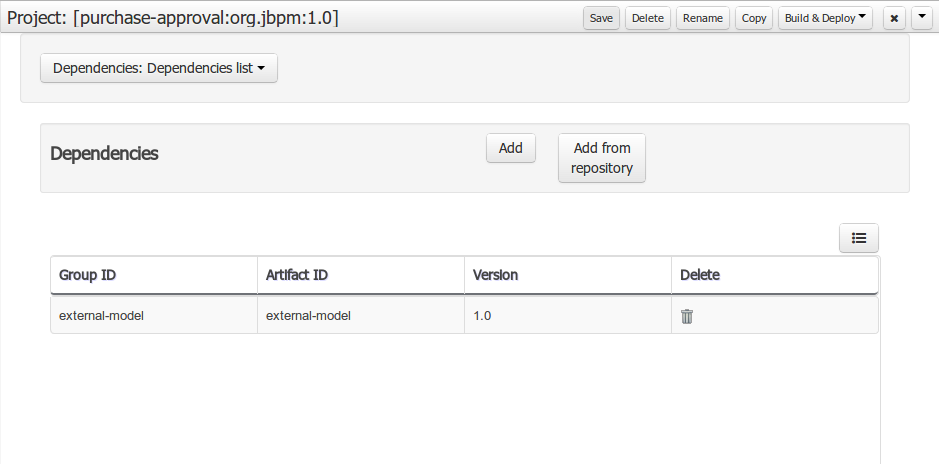
Dependency to a JAR file in current "Guvnor M2 repository".
To add a dependency to a JAR file in current "Guvnor M2 repository" follow this steps.
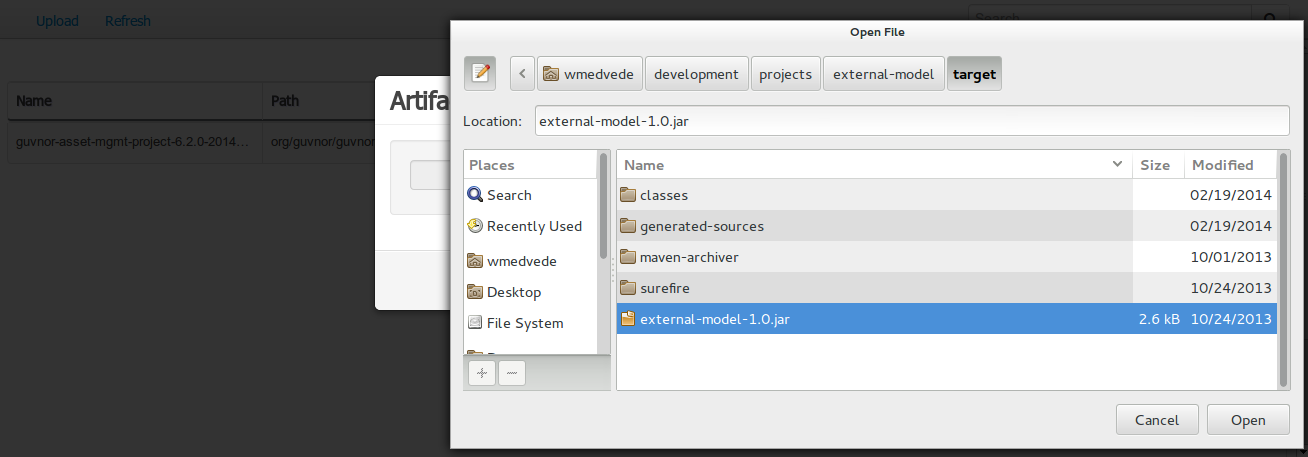
Once the file has been loaded it will be displayed in the repository files list.

If the uploaded file is not a valid Maven JAR (don’t have a pom.xml file) the system will prompt the user in order to provide a GAV for the file to be installed.
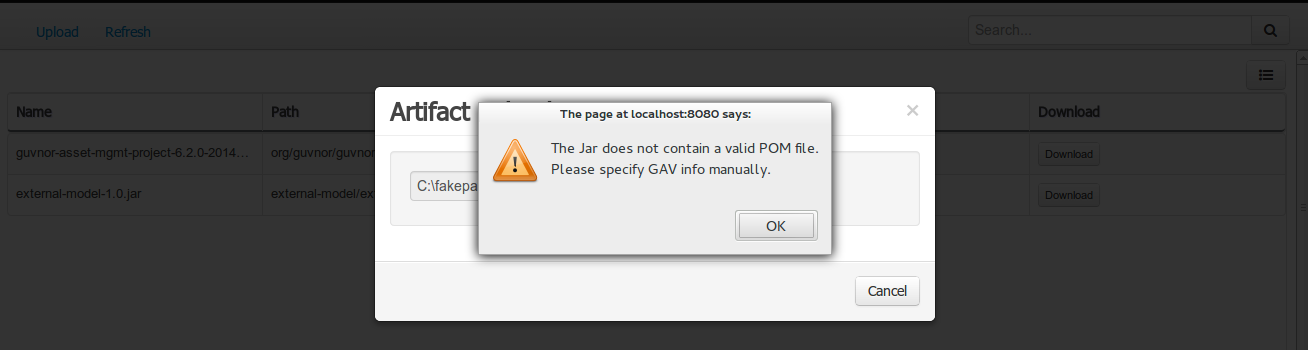
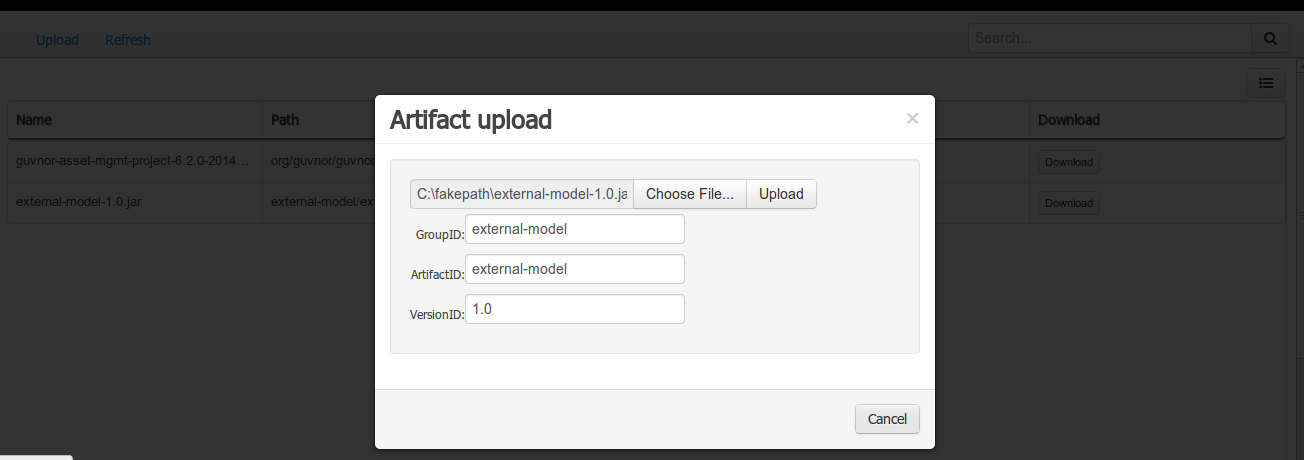
Open the project editor (see bellow) and click on the "Add from repository" button to open the JAR selector to see all the installed JAR files in current "Guvnor M2 repository". When the desired file is selected the project should be saved in order to make the new dependency available.
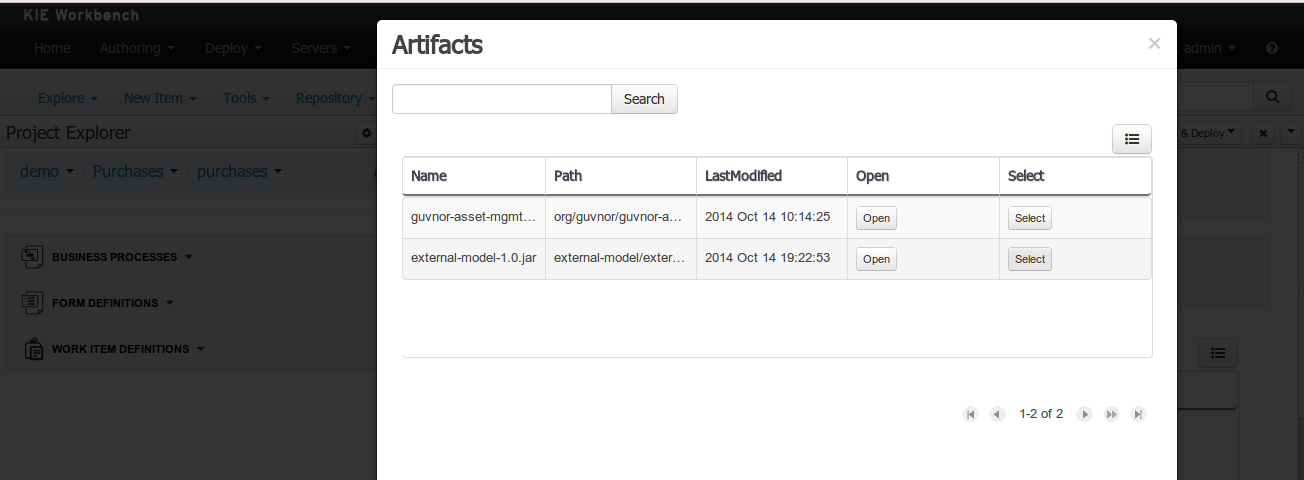
Using the external objects
When a dependency to an external JAR has been set, the external POJOs can be used in the context of current project data model in the following ways:
-
External POJOs can be extended by current model data objects.
-
External POJOs can be used as field types for current model data objects.
The following screenshot shows how external objects are prefixed with the string " -ext- " in order to be quickly identified.
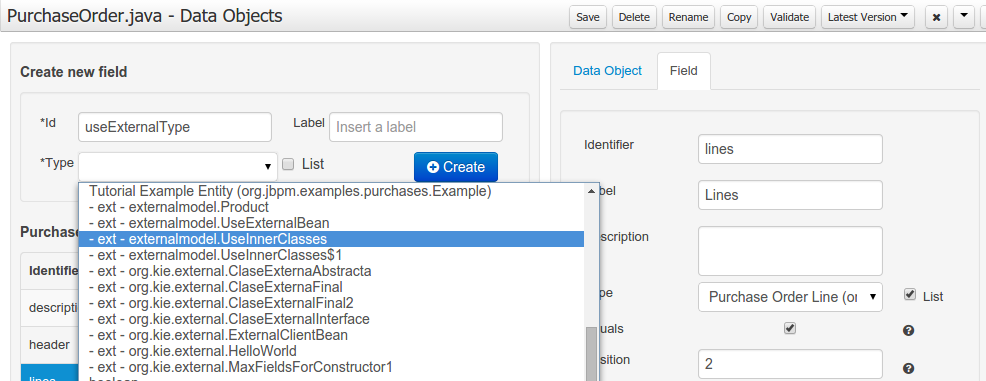
20.6.7.7. Roundtrip and concurrency
Current version implements roundtrip and code preservation between Data modeller and Java source code. No matter where the Java code was generated (e.g. Eclipse, Data modeller), the data modeller will only create/delete/update the necessary code elements to maintain the model updated, i.e, fields, getter/setters, constructors, equals method and hashCode method. Also whatever Type or Field annotation not managed by the Data Modeler will be preserved when the Java sources are updated by the Data modeller.
Aside from code preservation, like in the other workbench editors, concurrent modification scenarios are still possible. Common scenarios are when two different users are updating the model for the same project, e.g. using the data modeller or executing a 'git push command' that modifies project sources.
From an application context’s perspective, we can basically identify two different main scenarios:
No changes have been undertaken through the application
In this scenario the application user has basically just been navigating through the data model, without making any changes to it. Meanwhile, another user modifies the data model externally.
In this case, no immediate warning is issued to the application user. However, as soon as the user tries to make any kind of change, such as add or remove data objects or properties, or change any of the existing ones, the following pop-up will be shown:
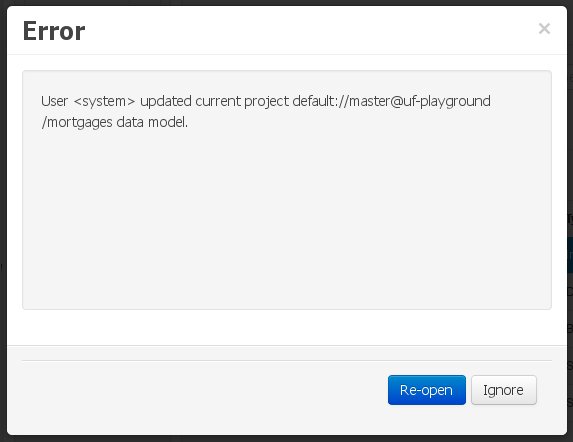
The user can choose to either:
-
Re-open the data model, thus loading any external changes, and then perform the modification he was about to undertake, or
-
Ignore any external changes, and go ahead with the modification to the model. In this case, when trying to persist these changes, another pop-up warning will be shown:
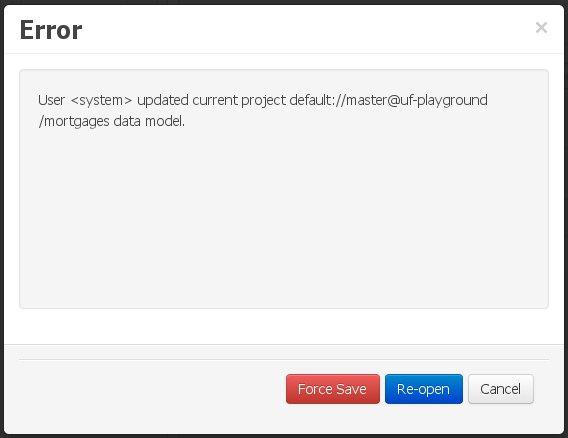 Figure 281. Force save / re-open
The "Force Save" option will effectively overwrite any external changes, while "Re-open" will discard any local changes and reload the model.
"Force Save" overwrites any external changes!
Changes have been undertaken through the application
The application user has made changes to the data model. Meanwhile, another user simultaneously modifies the data model from outside the application context.
In this alternative scenario, immediately after the external user commits his changes to the asset repository (or e.g. saves the model with the data modeller in a different session), a warning is issued to the application user:
As with the previous scenario, the user can choose to either:
-
Re-open the data model, thus losing any modifications that where made through the application, or
-
Ignore any external changes, and continue working on the model.
One of the following possibilities can now occur: ** The user tries to persist the changes he made to the model by clicking the "Save" button in the data modeller top level menu. This leads to the following warning message:
+
Figure 283. Force save / re-openThe "Force Save" option will effectively overwrite any external changes, while "Re-open" will discard any local changes and reload the model.
20.6.8. Data Sets
A data set is basically a set of columns populated with some rows, a matrix of data composed of timestamps, texts and numbers. A data set can be stored in different systems: a database, an excel file, in memory or in a lot of other different systems. On the other hand, a data set definition tells the workbench modules how such data can be accessed, read and parsed.
Notice, it’s very important to make crystal clear the difference between a data set and its definition since the workbench does not take care of storing any data, it just provides an standard way to define access to those data sets regardless where the data is stored.
Let’s take for instance the data stored in a remote database. A valid data set could be, for example, an entire database table or the result of an SQL query. In both cases, the database will return a bunch of columns and rows. Now, imagine we want to get access to such data to feed some charts in a new workbench page. First thing is to create and register a data set definition in order to indicate the following:
-
where the data set is stored,
-
how can be accessed, read and parsed and
-
what columns contains and of which type.
This chapter introduces the available workbench tools for registering and handling data set definitions and how this definitions can be consumed in other workbench modules like, for instance, the Page Editor.
|
For simplicity sake we will be using the term data set to refer to the actual data set definitions as Data set and Data set definition can be considered synonyms under the data set authoring context. |
20.6.8.1. Data Set Authoring Page
Everything related to the authoring of data sets can be found under the Data Set Authoring page which is accessible from the following top level menu entry: Extensions>Data Sets, as shown in the following screenshot.

The center panel, shows a welcome screen, whilst the left panel contains the Data Set Explorer listing all the data sets available
|
This page is only intended to Administrator users, since defining data sets can be considered a low level task. |
20.6.8.2. Data Set Explorer
The Data Set Explorer list the data sets present in the system. Every time the user clicks on the data set it shows a brief summary alongside the following information:
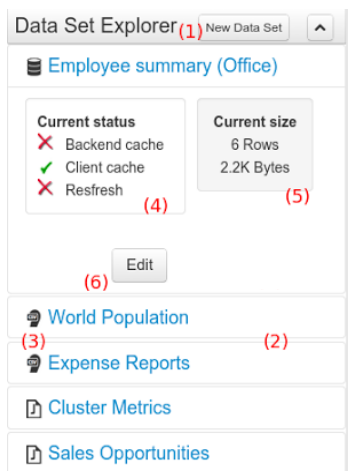
-
(1) A button for creating a new Data set
-
(2) The list of currently available Data sets
-
(3) An icon that represents the Data set’s provider type (Bean, SQL, CSV, etc)
-
(4) Details of current cache and refresh policy status
-
(5) Details of current size on backend (unit as rows) and current size on client side (unit in bytes)
-
(6) The button for editing the Data set. Once clicked the Data set editor screen is opened on the center panel
The next sections explains how to create, edit and fine tune data set definitions.
20.6.8.3. Data Set Creation
Clicking on the New Data Set button opens a new screen from which the user is able to create a new data set definition in three steps:
-
Provider type selection
Specify the kind of the remote storage system (BEAN, SQL, CSV, ElasticSearch)
-
Provider configuration
Specify the attributes for being able to look up data from the remote system. The configuration varies depending on the data provider type selected.
-
Data set columns & filter
Live data preview, column types and initial filter configuration.
Step 1: Provider type selection
Allows the user’s specify the type of data provider of the data set being created.
This screen lists all the current available data provider types and helper popovers with descriptions. Each data provider is represented with a descriptive image:
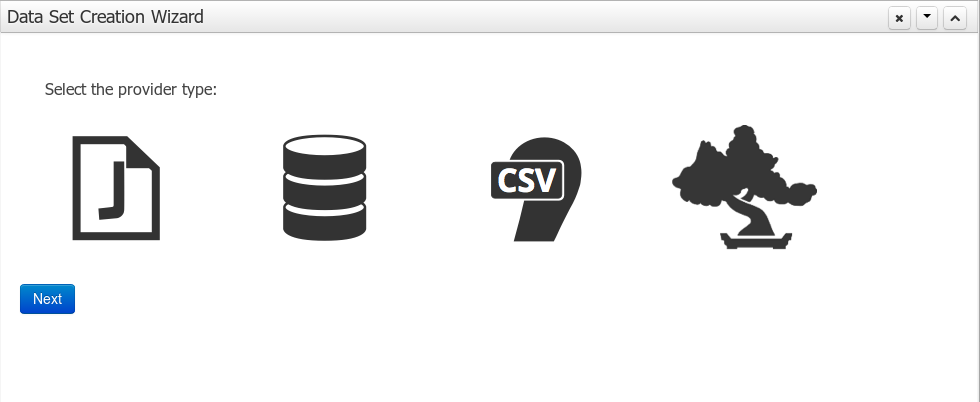
Four types are currently supported:
-
Bean (Java class) - To generate a data set directly from Java
-
SQL - For getting data from any ANSI-SQL compliant database
-
CSV - To upload the contents of a remote or local CSV file
-
Elastic Search - To query and get documents stored on Elastic Search nodes as data sets
Once a type is selected, click on Next button to continue with the next workflow step.
Step 2: Configuration
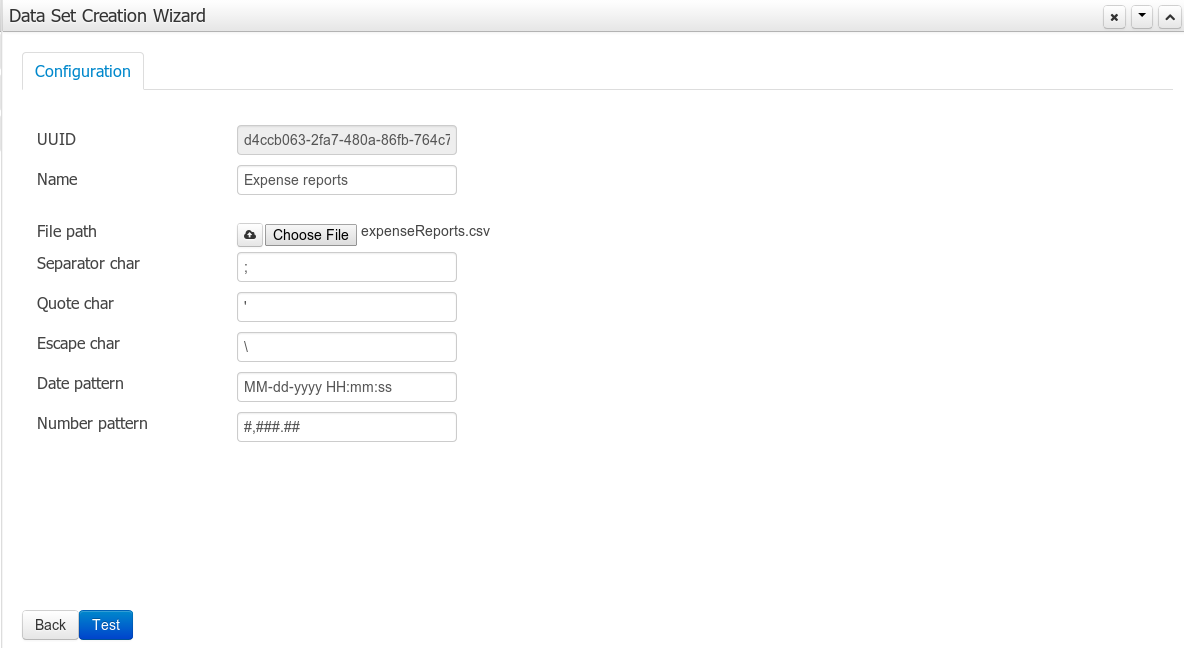
The provider type selected in the previous step will determine which configuration settings the system asks for.
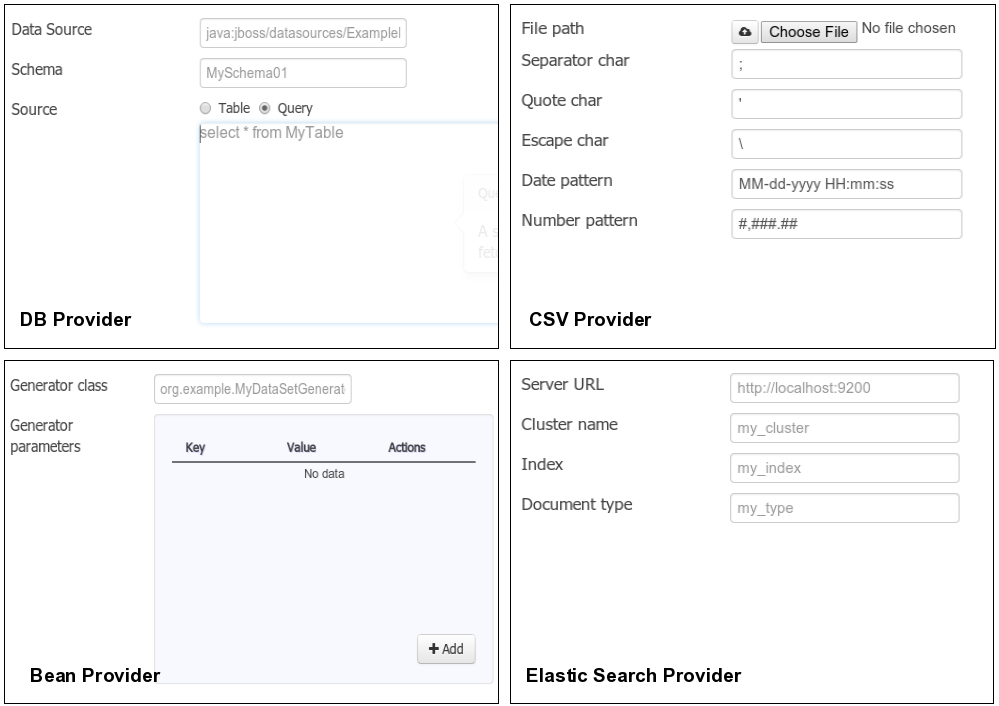
|
The UUID attribute is a read only field as it’s generated by the system. It’s only intended for usage in API calls or specific operations. |
Step 3: Data set columns and preview
After clicking on the Test button (see previous step), the system executes a data set lookup test call in order to check if the remote system is up and the data is available. If everything goes ok the user will see the following screen:
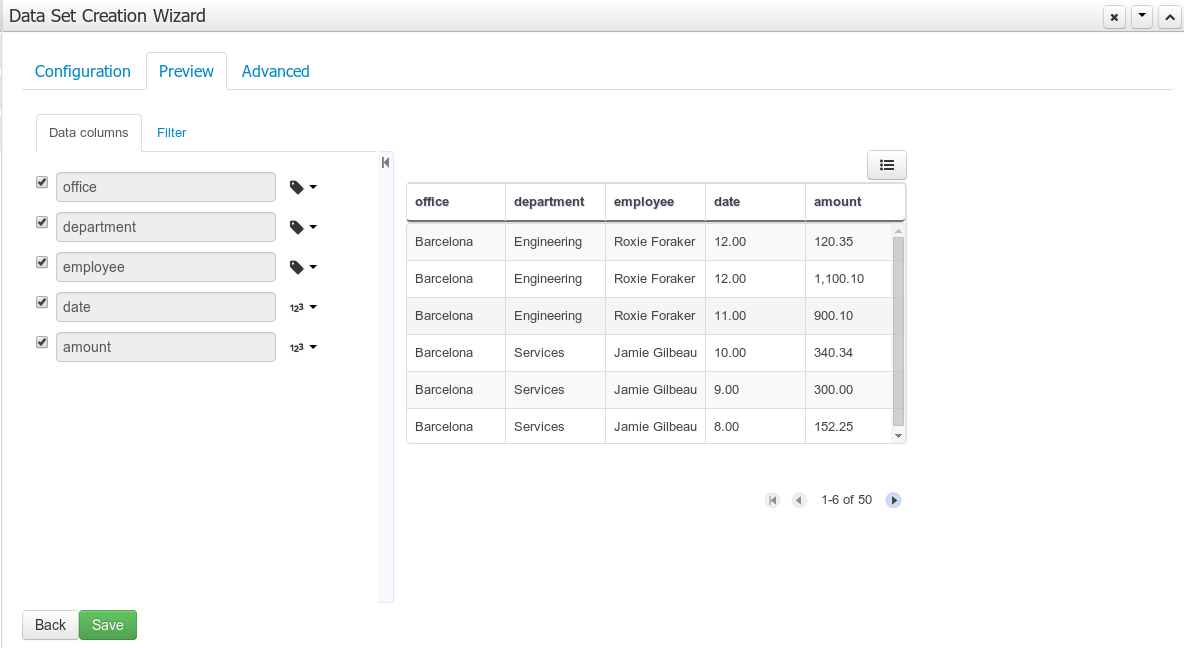
This screen shows a live data preview along with the columns the user wants to be part of the resulting data set. The user can also navigate through the data and apply some changes to the data set structure. Once finished, we can click on the Save button in order to register the new data set definition.
We can also change the configuration settings at any time just by going back to the configuration tab. We can repeat the Configuration>Test>Preview cycle as may times as needed until we consider it’s ready to be saved.
Columns
In the Columns tab area the user can select what columns are part of the resulting data set definition.
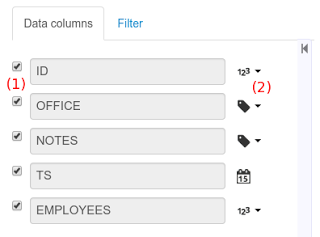
-
(1) To add or remove columns. Select only those columns you want to be part of the resulting data set
-
(2) Use the drop down image selector to change the column type
A data set may only contain columns of any of the following 4 types:
-
Label - For text values supporting group operations (similar to the SQL "group by" operator) which means you can perform data lookup calls and get one row per distinct value.
-
Text - For text values NOT supporting group operations. Typically for modeling large text columns such as abstracts, descriptions and the like.
-
Number - For numeric values. It does support aggregation functions on data lookup calls: sum, min, max, average, count, disctinct.
-
Date - For date or timestamp values. It does support time based group operations by different time intervals: minute, hour, day, month, year, …
No matter which remote system you want to retrieve data from, the resulting data set will always return a set of columns of one of the four types above. There exists, by default, a mapping between the remote system column types and the data set types. The user is able to modify the type for some columns, depending on the data provider and the column type of the remote system. The system supports the following changes to column types:
-
Label <> Text - Useful when we want to enable/disable the categorization (grouping) for the target column. For instance, imagine a database table called "document" containing a large text column called "abstract". As we do not want the system to treat such column as a "label" we might change its column type to "text". Doing so, we are optimizing the way the system handles the data set and
-
Number <> Label - Useful when we want to treat numeric columns as labels. This can be used for instance to indicate that a given numeric column is not a numeric value that can be used in aggregation functions. Despite its values are stored as numbers we want to handle the column as a "label". One example of such columns are: an item’s code, an appraisal id., …
|
BEAN data sets do not support changing column types as it’s up to the developer to decide which are the concrete types for each column. |
Filter
A data set definition may define a filter. The goal of the filter is to leave out rows the user does not consider necessary. The filter feature works on any data provider type and it lets the user to apply filter operations on any of the data set columns available.
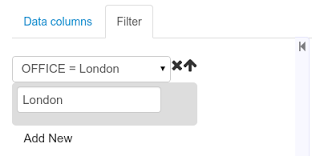
While adding or removing filter conditions and operations, the preview table on central area is updated with live data that reflects the current filter status.
There exists two strategies for filtering data sets and it’s also important to note that choosing between the two have important implications. Imagine a dashboard with some charts feeding from a expense reports data set where such data set is built on top of an SQL table. Imagine also we only want to retrieve the expense reports from the "London" office. You may define a data set containing the filter "office=London" and then having several charts feeding from such data set. This is the recommended approach. Another option is to define a data set with no initial filter and then let the individual charts to specify their own filter. It’s up to the user to decide on the best approach.
Depending on the case it might be better to define the filter at a data set level for reusing across other modules. The decision may also have impact on the performance since a filtered cached data set will have far better performance than a lot of individual non-cached data set lookup requests. (See the next section for more information about caching data sets).
|
Notice, for SQL data sets, the user can use both the filter feature introduced or, alternatively, just add custom filter criteria to the SQL sentence. Although, the first approach is more appropriated for non technical users since they might not have the required SQL language skills. |
20.6.8.4. Data set editor
To edit an existing data set definition go the data set explorer, expand the desired data set definition and click on the Edit button. This will cause a new editor panel to be opened and placed on the center of the screen, as shown in the next screenshot:
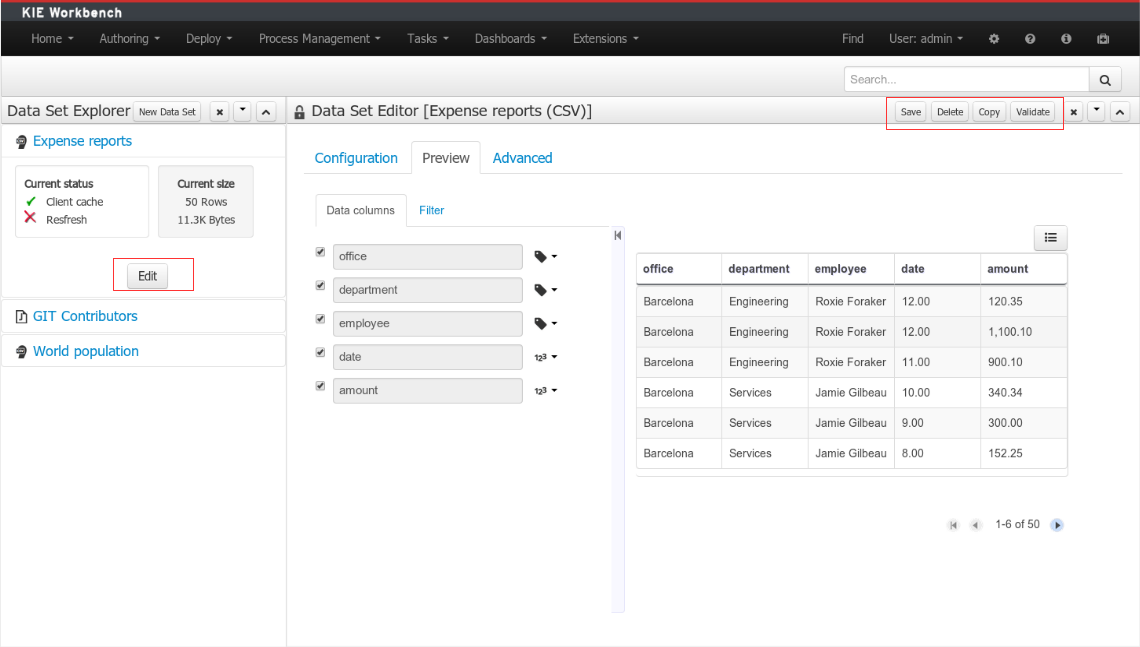

-
Save - To validate the current changes and store the data set definition.
-
Delete - To remove permanently from storage the data set definition. Any client module referencing the data set may be affected.
-
Validate - To check that all the required parameters exists and are correct, as well as to validate the data set can be retrieved with no issues.
-
Copy - To create a brand new definition as a copy of the current one.
|
Data set definitions are stored in the underlying GIT repository as JSON files. Any action performed is registered in the repository logs so it is possible to audit the change log later on. |
20.6.8.5. Advanced settings
In the Advanced settings tab area the user can specify caching and refresh settings. Those are very important for making the most of the system capabilities thus improving the performance and having better application responsive levels.
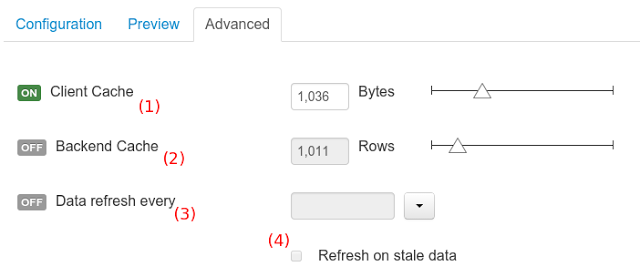
-
(1) To enable or disable the client cache and specify the maximum size (bytes).
-
(2) To enable or disable the backend cache and specify the maximum cache size (number of rows).
-
(3) To enable or disable automatic refresh for the Data set and the refresh period.
-
(4) To enable or disable the refresh on stale data setting.
Let’s dig into more details about the meaning of these settings.
20.6.8.6. Caching
The system provides caching mechanisms out-of-the-box for holding data sets and performing data operations using in-memory strategies. The use of these features brings a lot of advantages, like reducing the network traffic, remote system payload, processing times etc. On the other hand, it’s up to the user to fine tune properly the caching settings to avoid hitting performance issues.
Two cache levels are supported:
-
Client level
-
Backend level
The following diagram shows how caching is involved in any data set operation:
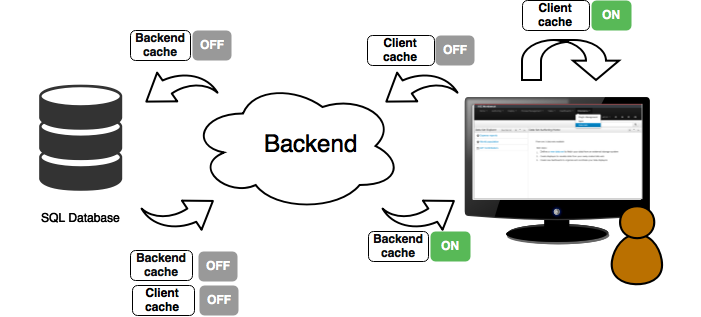
Any data look up call produces a resulting data set, so the use of the caching techniques determines where the data lookup calls are executed and where the resulting data set is located.
Client cache
If ON then the data set involved in a look up operation is pushed into the web browser so that all the components that feed from this data set do not need to perform any requests to the backend since data set operations are resolved at a client side:
-
The data set is stored in the web browser’s memory
-
The client components feed from the data set stored in the browser
-
Data set operations (grouping, aggregations, filters and sort) are processed within the web browser, by means of a Javascript data set operation engine.
If you know beforehand that your data set will remain small, you can enable the client cache. It will reduce the number of backend requests, including the requests to the storage system. On the other hand, if you consider that your data set will be quite big, disable the client cache so as to not hitting with browser issues such as slow performance or intermittent hangs.
Backend cache
Its goal is to provide a caching mechanism for data sets on backend side.
This feature allows to reduce the number of requests to the remote storage system , by holding the data set in memory and performing group, filter and sort operations using the in-memory engine.
It’s useful for data sets that do not change very often and their size can be considered acceptable to be held and processed in memory. It can be also helpful on low latency connectivity issues with the remote storage. On the other hand, if your data set is going to be updated frequently, it’s better to disable the backend cache and perform the requests to the remote storage on each look up request, so the storage system is in charge of resolving the data set lookup request.
|
BEAN and CSV data providers relies by default on the backend cache, as in both cases the data set must be always loaded into memory in order to resolve any data lookup operation using the in-memory engine. This is the reason why the backend settings are not visible in the Advanced settings tab. |
20.6.8.7. Refresh
The refresh feature allows for the invalidation of any cached data when certain conditions are meet.
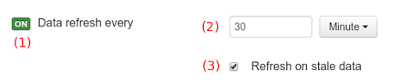
-
(1) To enable or disable the refresh feature.
-
(2) To specify the refresh interval.
-
(3) To enable or disable data set invalidation when the data is outdated.
The data set refresh policy is tightly related to data set caching, detailed in previous section. This invalidation mechanism determines the cache life-cycle.
Depending on the nature of the data there exist three main use cases:
-
Source data changes predictable - Imagine a database being updated every night. In that case, the suggested configuration is to use a "refresh interval = 1 day" and disable "refresh on stale data". That way, the system will always invalidate the cached data set every day. This is the right configuration when we know in advance that the data is going to change.
-
Source data changes unpredictable - On the other hand, if we do not know whether the database is updated every day, the suggested configuration is to use a "refresh interval = 1 day" and enable "refresh on stale data". If so the system, before invalidating any data, will check for modifications. On data modifications, the system will invalidate the current stale data set so that the cache is populated with fresh data on the next data set lookup call.
-
Real time scenarios - In real time scenarios caching makes no sense as data is going to be updated constantly. In this kind of scenarios the data sent to the client has to be constantly updated, so rather than enabling the refresh settings (remember this settings affect the caching, and caching is not enabled) it’s up to the clients consuming the data set to decide when to refresh. When the client is a dashboard then it’s just a matter of modifying the refresh settings in the Displayer Editor configuration screen and set a proper refresh period, "refresh interval = 1 second" for example.
20.6.9. Data Source Management
The data source management system provides the ability of defining data sources for accessing external databases. This data sources can be later used by other workbench components like the Data Sets.
20.6.9.1. Database Drivers
To be able to communicate with the target database a data source will need a database driver to access it. This is why the system additionally provides the ability of defining database drivers for the data sources operation. A database driver is basically a JDBC compliant driver. We will see them in the next topics.
20.6.9.2. Data Source Authoring Page
Everything related to the authoring of data sources and drivers can be found under the Data Source Authoring page accessible from the following top level menu entry: Extensions>Data Sources, as shown in the following screenshot.
|
This page is only intended for Administrator users, since defining data sources can be considered a low level task. |
20.6.9.3. Data Source Explorer
The Data Source Explorer lists the data sources and drivers currently defined in the system, at the same time it provides the required actions for managing them.
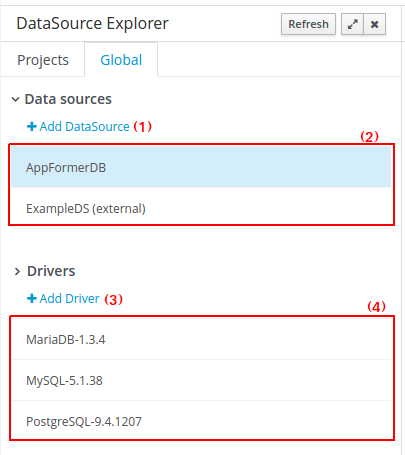
-
(1) Action link for creating a new data source
-
(2) List of currently available data sources
-
(3) Action link for creating a new driver
-
(4) List of currently available drivers
20.6.9.4. New Data Source Wizard
Clicking on the New Data Source action link opens the New Data Source Wizard:
The following required parameters define a data source:
-
Name: A unique name for the data source definition.
-
Connection URL: A JDBC database connection url compliant with the selected driver type. This is an example of a connection url for a PostgreSQL database: jdbc:postgresql://localhost:5432/appformer.
-
User: A user name in the target database.
-
Password: The corresponding user password.
-
Driver: Selects the JDBC driver to be used for connecting to the target database. Note that the connection url format may vary depending on the driver, and different database vendors typically provides different drivers.
-
Test connection: Once clicked, the system will show a dialog similar to the one below showing the connection test status.
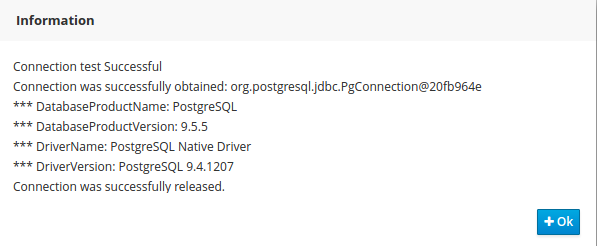
|
While not required, it’s recommended to use the test connection button to check the correctness of the data source parameters prior to finishing the data source creation. |
20.6.9.5. Data Source Editor
The Data Source Editor is opened by clicking on a data source item in the Data Source Explorer.
The following screenshot shows the Data Source Editor opened for the data source of the example above.
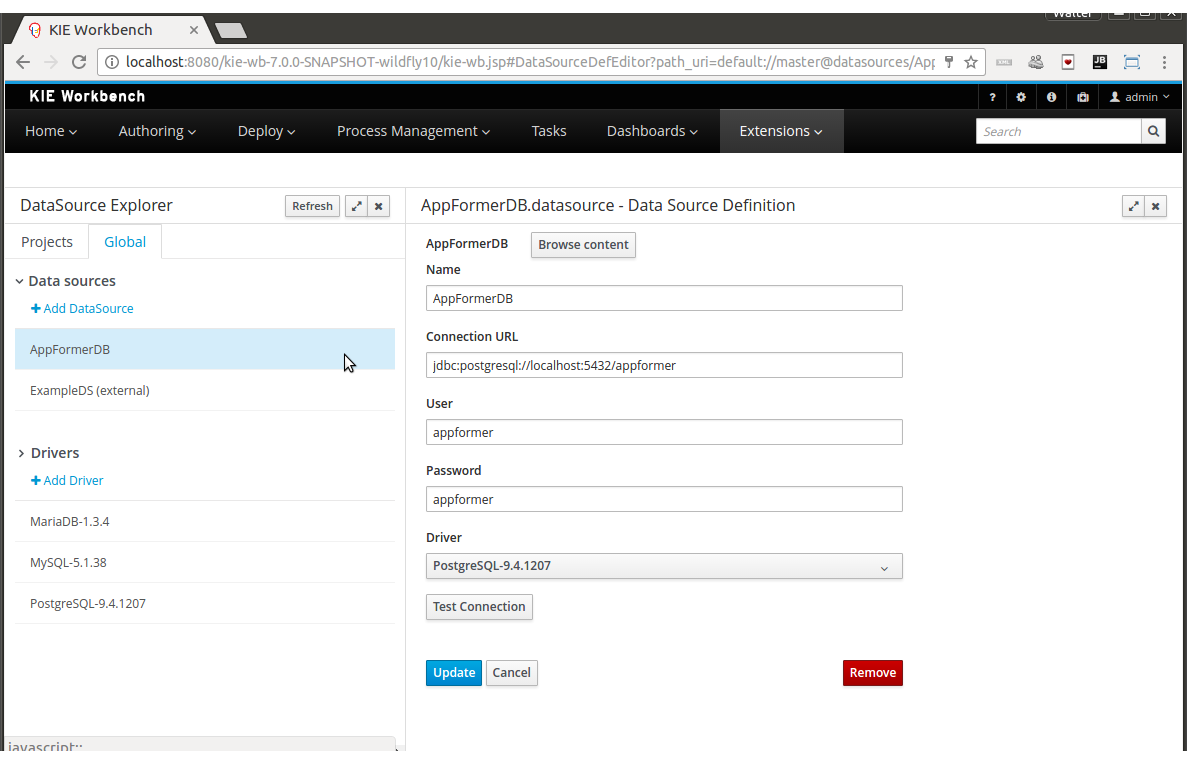
-
Main Panel: The main panel basically lets you modify the data source configuration parameters.
-
Test connection: Tests the connection.
|
It’s a recommended practice to test the connection prior saving a modified data source. |
20.6.9.6. Data Source Content Browser
The data source content browser is opened by clicking on the Browse Content button, and enables the navigation through the database structure pointed by the data source. The navigation is performed in three levels, Schemas level, Current schema level and Current table level.
-
Schemas level: lists all the database schemas accessible by current data source. Which schemas are listed depends on the database access rights granted to the user which was used in the connection configuration. Similarly for the following item.
-
Current schema level: shows all the database tables for the selected schema.
-
Current table level: shows the table content for the selected table.
The following screenshots show the information shown at each level, for a user that realized the following navigation steps. Selects the "public" schema → Selects the "country" table.
Schema Selection:
Clicking on the Open button opens the Current schema level for the selected schema.
Table Selection:
Clicking on the Open button opens the Current table level for the selected table.
Table information:
The rows for the selected table are shown at this level.
20.6.9.7. External Data Sources
External data sources are typically not defined in current workbench, instead they exist in current container and for some containers like Wildfly 11 or the JBoss EAP 7 servers they can still be listed in read only mode. In this cases only the Data Source Content Browser is enabled.
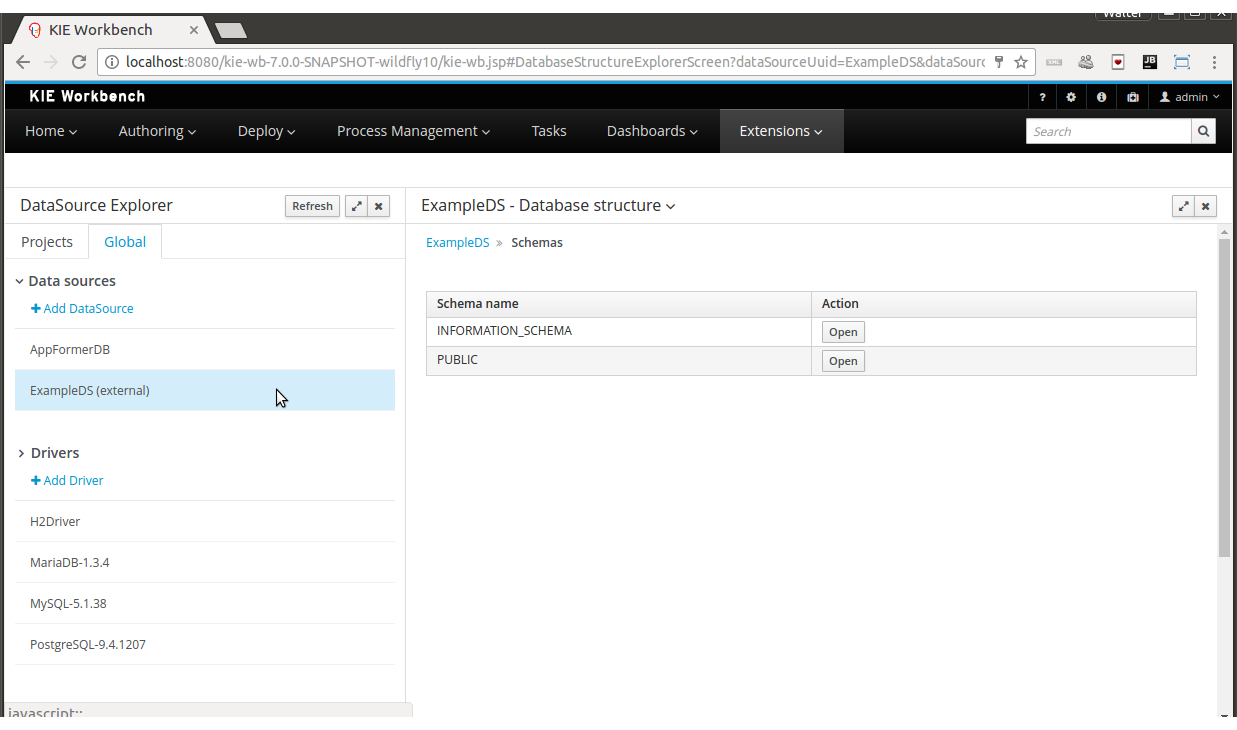
20.6.9.8. New Driver Wizard
Clicking on the New Driver action link opens the New Driver Wizard:
The following required parameters define a Driver:
-
Name: A unique name for the driver definition.
-
Driver Class Name: The java fully qualified name for the class that implements the JDBC driver contract.
-
Group Id: The maven group id for the artifact that contains the JDBC driver implementation.
-
Artifact Id: The maven artifact id for the artifact that contains the JDBC driver implementation.
-
Version: The maven version for the artifact that contains the JDBC driver implementation.
|
Some commercial database drivers (like Oracle) are not available in the maven central repository. You can use those by first uploading them via Artifact Repository page and then continue with the driver configuration as for the drivers available in the maven central repository. |
20.6.9.9. Driver Editor
The Driver Editor is opened by clicking on a driver item in the Data Source Explorer.
The following screenshot shows the Driver Editor opened for the driver of the example above.
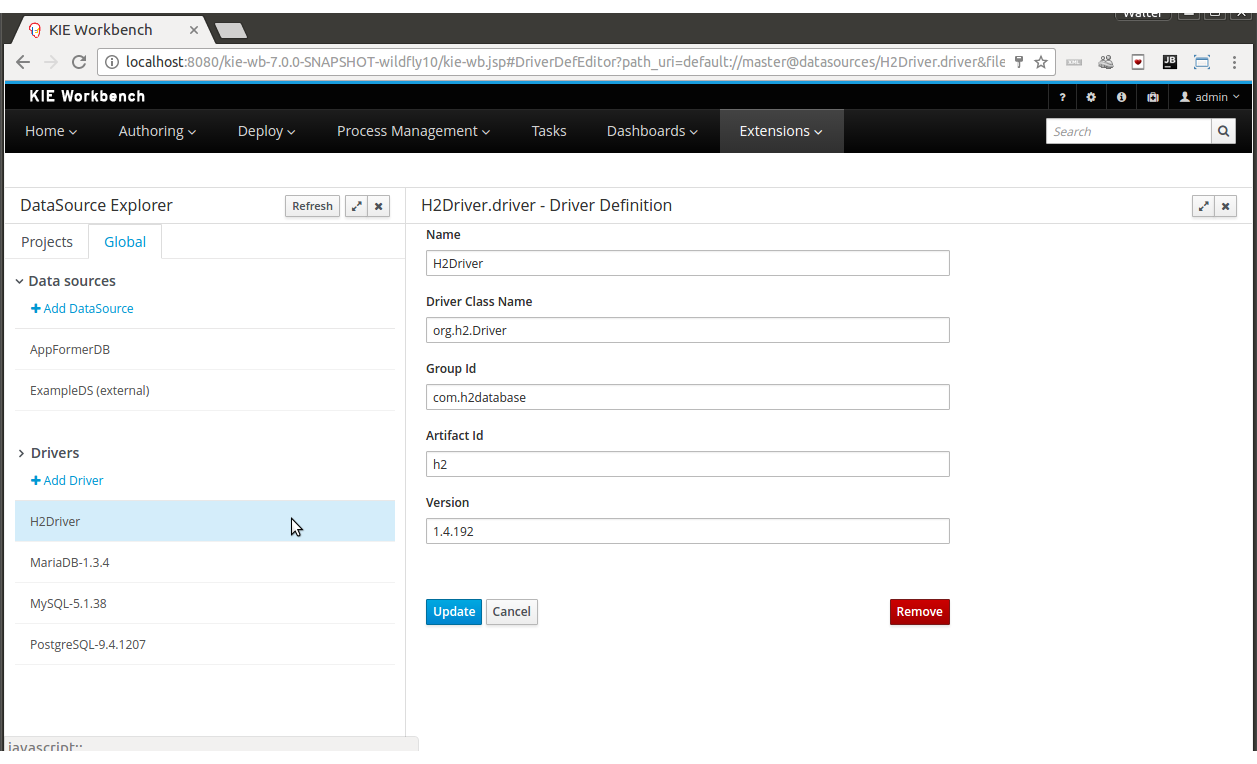
-
Main Panel: The main panel basically lets you modify the driver configuration parameters. See New Driver Wizard.
20.6.9.10. By Default Drivers
The system is shipped with a set of by default configured drivers for the most common used open source databases. And they are aligned with the latest database versions supported by the Wildfly 11 and the JBoss EAP 7 servers.
|
The by default drivers initialization can be disabled by setting the datasource.management.disableDefaultDrivers configuration property to true. It can be set by configuring the proper value in the datasource-management.properties file, or by passing the system property -Ddatasource.management.disableDefaultDrivers=true to the JVM. For more information see Advanced Settings. |
20.6.9.11. Advanced Settings
The data source management system advanced settings can be found in the datasource-management.properties file in the WEB-INF/classes directory of the given Workbench distribution file.
The data source management system has the ability of working with two different internal implementations for the data sources and drivers. An implementation based on the Wildfly/EAP native data sources and drivers, and a container independent implementation. Wildfly/EAP Workbench distributions are configured by default for using the native Wildlfy/EAP containers implementations, and Tomcat8 distributions are configured for using the container independent implementations. This latter implementation can also be used for Wildfly/EAP containers.
The valid combinations are:
WildflyDataSourceProvider + WildflyDriverProvider
or
DBCPDataSourceProvider + DBCPDriverProvider
The datasource.management.wildfly.xxxxx properties are only suited for the WildflyXXXProviders.
20.6.9.12. Advanced Settings for Workbench Wildlfy/EAP distributions
| Property name | By default value | Description |
|---|---|---|
datasource.management.DataSourceProvider |
WildflyDataSourceProvider |
see Advanced Settings. |
datasource.management.DriverProvider |
WildflyDriverProvider |
see Advanced Settings. |
datasource.management.disableDefaultDrivers |
false |
Set to true for disabling the by default database drivers initialization. |
datasource.management.wildfly.host |
localhost |
Name or ip address used for the Wildlfy server management interface binding. |
datasource.management.wildfly.port |
9990 |
Port used for the Wildlfy server management interface binding. |
datasource.management.wildfly.admin |
Administration user for connecting to the Wildfly server running current Workbench. In general it’s not necessary to set this value but might be needed in cases when the Wildlfy management interface is bound to an address different than localhost. |
|
datasource.management.wildfly.password |
Administration user password for connecting to the Wildfly server running current Workbench. In general it’s not necessary to set this value but might be needed in cases when the Wildlfy management interface is bound to an address different than localhost. |
|
datasource.management.wildfly.realm |
ManagementRealm |
Realm for the administration user authentication. |
datasource.management.wildfly.profile |
The profile name used for starting the Wildfly domain, e.g. default, full, full-ha, etc. This value must only by set when the Workbench is running in clustering mode and the hosting Wildfly servers are configured by using domains. Do not set if the Wildlfy servers are running as standalone servers. |
|
datasource.management.wildfly.serverGroup |
The server group to which current Wildfly server instance belongs, e.g. primary-server-group, etc. This value must only by set when the Workbench is running in clustering mode and the hosting Wildfly servers are configured by using domains. Do not set if the Wildlfy servers are running as standalone servers. |
|
datasource.management.DefChangeHandler |
This value must only by set when the Workbench is running in clustering mode. If the hosting Wildfly servers are configured by using domains the following value must be used DomainModeChangeHandler and the the following value StandaloneModeChangeHandler must be used in cases when the hosting Wildlfy servers are running as standalone servers. Clustering installations that uses the DBCPXXXProviders must be configured for using the the StandaloneModeChangeHandler. |
|
The properties above can also be set by passing system properties to the JVM using the Java standard mechanism. e.g. -Ddatasource.management.wildfly.port=1234. Values configured by using this mechanism will override the values configured in the datasource-management.properties file. |
20.6.9.13. Advanced Settings for Tomcat distributions
| Property name | By default value | Description |
|---|---|---|
datasource.management.DataSourceProvider |
DBCPDataSourceProvider |
This is the only option available for Tomcat 8 distributions, see Advanced Settings. |
datasource.management.DriverProvider |
DBCPDriverProvider |
This is the only option available for Tomcat 8 distributions, see Advanced Settings. |
datasource.management.disableDefaultDrivers |
false |
Set to true for disabling the by default database drivers initialization. |
datasource.management.DefChangeHandler |
This value must only by set when the Workbench is running in clustering mode. Tomcat distributions only support the StandaloneModeChangeHandler value. |
|
The properties above can also be set by passing system properties to the JVM using the Java standard mechanism. e.g. -Ddatasource.management.wildfly.port=1234. Values configured by using this mechanism will override the values configured in the datasource-management.properties file. |
20.7. Security management
This section describes how administrator users can manage the application’s users, groups and permissions using an intuitive and friendly user interface in order to configure who can access the different resources and features available.
20.7.1. Basic concepts
20.7.1.1. Introduction to the workbench’s users, groups and roles
The workbench’s security domain defines three kind of entities: user, group and role.
The security entities are being registered in the domain by consuming some realm. The realm can be either the application server’s one (Wildfly, EAP, Tomcat) or any other of the supported types, for example, using some Keycloak remote server that performs handles the target realm.
On the other hand, it’s important to notice that each realm provides, or potentially provides, its own capabilities, semantics or structure on the security domain. These kind of differences on the security domain results on inconsistencies between different environments when moving into the workbench’s security domain. This way there exist some conventions which are important to understand - how security entities are being declared and how the platform behaves behind that complexity,
The way the workbench integrates the security entities from an external realm corresponds to:
-
User
A user, rather than attributes and some any other kind of metadata, which can be different across domains, represents the same kind entity in any of the supported security environments (Wildfly, EAP, Tomcat, Keybloak, etc), so the entity results in a user on the workbench as well
-
Role / Group
Both role and group are security entities, but rather than a user, the semantics, the behaviors or the structure in the domain is not usually common across environments. As an example consider that exist domains which do not support both, or domains were the semantics for group or role differs. As it results domain specific, the way the application behaves and figures out if an entity should be considered a group or a role, it’s by checking the application’s Role Registry. This way an entity will be considered an role in case it’s identifier is present in the application’s Role Registry, otherwise the entity will be considered as a group.
|
The Role Registry is an application’s component that provides the set of roles in the workbench’s security domain. It’s being populated by consuming the entities (role-name) declared in the security-constraints section on the application’s deployment descriptor (web.xml). See source file org.uberfire.ext.security.server.RolesRegistry. |
|
It means that depending on the concrete environment’s configuration, some entity can be as a role, on the security environment consumed by the workbench, but it results a group in the workbench’s security domain, or vice versa. It depends on the entity’s identifier by checking it it is present in the Role Registry. |
|
A User can be assigned to multiple roles and groups, but it is mandatory to have at least, a single role assignment for being considered valid in the workbench’s security domain. It does not mean, for instance, that the user is able login, or able to consume remote services, because it depends on the concrete role/s assigned and how the roles and permissions are defined the application. |
20.7.1.2. Permissions
A permission is basically something the user can do within the application. Usually, an action related to a specific resource. For instance:
-
View a page
-
Save a project
-
View a repository
-
Delete a dashboard
A permission can be granted or denied and it can be global or resource specific. For instance:
-
Global: “Create new pages”
-
Specific: “View the home page”
As you can see, a permission is a resource + action pair. In the concrete case of a page we have: read, update, delete and create as the available actions. That means that there are four possible permissions that could be granted for pages.
Permissions do not necessarily need to be tied to a resource. Sometimes it is also neccessary to protect access to specific features, like for instance "generate a sales report". That means, permissions can be used not only to protect access to resources but also to custom features within the application.
20.7.1.3. Authorization policy
The set of permissions assigned to every role and/or group is called the authorization (or security) policy. Every application contains a single security policy which is used every time the system checks a permission.
The authorization policy file is stored in a file called WEB-INF/classes/security-policy.properties under the application’s WAR structure.
| If no policy is defined then the authorization management features are disabled and the application behaves as if all the resources & features were granted by default. |
Here is an example of a security policy file:
# Role "admin"
role.admin.permission.perspective.read=true
role.admin.permission.perspective.read.Dashboard=false
# Role "user"
role.user.permission.perspective.read=false
role.user.permission.perspective.read.Home=true
role.user.permission.perspective.read.Dashboard=trueEvery entry defines a single permission which is assigned to a role/group. On application start up, the policy file is loaded and stored into memory.
20.7.1.4. Security provider
A security environment is usually provided by the use of a realm. Realms are used to restrict access to the different application’s resources. So realms contains the information about the users, groups, roles, permissions and any other related information.
In most typical scenarios the application’s security is delegated to the container’s security mechanism, which consumes a given realm at same time. It’s important to consider that there exist several realm implementations, for example Wildfly provides a realm based on the application-users.properties/application-roles.properties files, Tomcat provides a realm based on the tomcat-users.xml file, etc. So there is no single security realm to rely on, it can be different in each installation.
Due to the potential different security environments that have to be supported, the security module provides a well defined API with some default built-in security providers. A security provider is the formal name given to a concrete user and group management service implementation for a given realm.
The user & group management features available will depend on the security provider configured. If the built-in providers do not fit with the application’s security realm, it is easy to build and register your own provider.
20.7.2. Installation and setup
At the time of this writing, the application provides two pre-installed security providers:
-
Wildfly 11 / EAP 7 distribution - Both distributions use the Wildfly security provider configured for the use of the default realm files application-users.properties and application-roles.properties
-
Tomcat distribution - It uses the Tomcat security provider configured for the use of the default realm file tomcat-users.xml
Please read each provider’s documentation in order to apply the concrete settings for the target deployment environment.
On the other hand, when either using a custom security provider or using one of the availables, consider the following installation options:
-
Enable the security management feature on an existing WAR distribution
-
Setup and installation in an existing or new project
NOTE: If no security provider is installed, there will be no available user interface for managing the security realm. Once a security provider is installed and setup, the user and group management features are automatically enabled in the security management UI (see the Usage section below).
20.7.2.1. Enabling user & group management
Given an existing WAR distribution, follow these steps in order to install and enable the user & group management features:
-
Ensure the following libraries are present on WEB-INF/lib:
-
WEB-INF/lib/uberfire-security-management-api-?.jar
-
WEB-INF/lib/uberfire-security-management-backend-?.jar
-
-
Copy the the security provider library to WEB-INF/lib:
-
Eg: WEB-INF/lib/uberfire-security-management-wildfly-?.jar
-
If the provider requires additional libraries, copy them as well (read each provider’s documentation for more information).
-
-
Replace the whole content of the WEB-INF/classes/security-management.properties file, or if not present, create it. The settings present on this file depend on the concrete implementation used. Please read each provider’s documentation for more information.
-
If deploying on Wildfly or EAP, check if the WEB-INF/jboss-deployment-structure.xml requires any update (read each provider’s documentation for more information).
20.7.2.2. Disabling user & group management
The user & groups management features can be disabled, and thus no services or user interface will be available, by means of either:
-
Uninstalling the security provider from the application
When no concrete security provider is installed, the user and group management features will be disabled and no services or user interface will be displayed to the user. This is the case for instance, in Weblogic and Websphere installations as there is no a security provider implementation available at the time of this writing.
-
Removing or commenting the security management configuration file
Removing or commenting all the lines in the configuration file located at WEB-INF/classes/security-management.properties is another way to disable the user and group management features.
20.7.2.3. Upgrading an existing installation
In versions prior to 7, the only way to grant access to resources like Organizational Units, Repositories or Projects was to indicate which roles were able to access a given instance. Those roles were stored in GIT as part of the instance persistent status. The CLI was the tool used to add/remove roles:
-
remove-role-repo: remove role(s) from repository
-
add-role-org-unit: add role(s) to organizational unit
-
remove-role-org-unit: remove role(s) from organizational unit
-
add-role-project: add role(s) to project
-
remove-role-project: remove role(s) from project
As of version 7, the authorization policy is based on permissions. That means is no longer required to keep a list of roles per resource instance. What is required is to define proper permission entries into the active authorization policy using the security management UI (see the Usage section below).
The commands above are no longer required so they have been removed. Basically, what those commands did is to set what roles were able to read a specific item.
In order to guarantee backward compatibility with versions prior to 7, an automatic migration tool is bundled within the application, which converts the list of roles assigned to any organizational unit, repository or project into read permission entries of the security policy.
This tool is executed when the application start ups for the first time, during the security policy deployment. So existing customers, do not have to worry about it, as they will keep their security settings.
20.7.3. Usage
The Security Management page is available under the Home section in the top menu bar.
The next screenshot shows how this new page looks:
This page supports:
-
List all the roles, groups and users available
-
Create & delete users and groups
-
Edit users, assign roles or groups, and change user properties
-
Edit both roles & groups security settings, which include:
-
The home page a user will be directed to after login
-
The permissions granted or denied to the different workbench resources and features available
-
All of the above together provides a complete users and groups management subsystem as well as a permission configuration UI for protecting access to specific resources or features.
The next sections provide a deep insight into all these features.
| The user and group management related features can be entirely disabled. See the previous section Disabling user & group management. If that’s the case then both the Groups and _Users tabs will remain hidden from the user. |
20.7.3.1. User management
By selecting the Users tab in the left sidebar, the application shows all the users present by default on the application’s security realm:
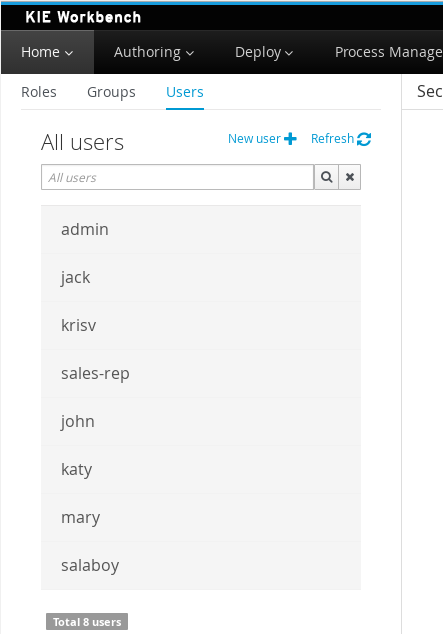
-
Searching for users
In addition to listing all the users, search is also allowed:
+ When specifying the search pattern in the search box the users listed will be reduced to only those that matches the search pattern.
+
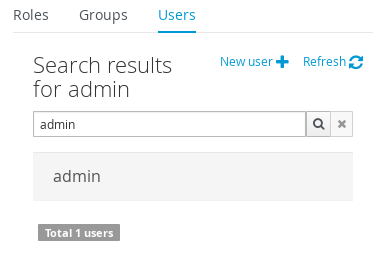
+ Search patterns depend on the concrete security provider being used by the application. Please read each provider’s documentation for more information.
-
Creating new users
By clicking on the "New user +" anchor, a form is displayed on the screen’s right.
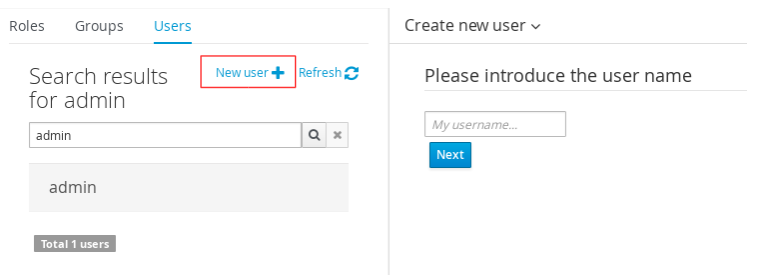
This is a wizard like interface where the application asks for the new user name, a password as well as what roles/groups to assign.
-
Editing a user
After clicking on a user in the left sidebar, the user editor is opened on the screen’s right.
For instance, the details screen for the admin user when using the Wildfly security provider looks like the following screenshot:
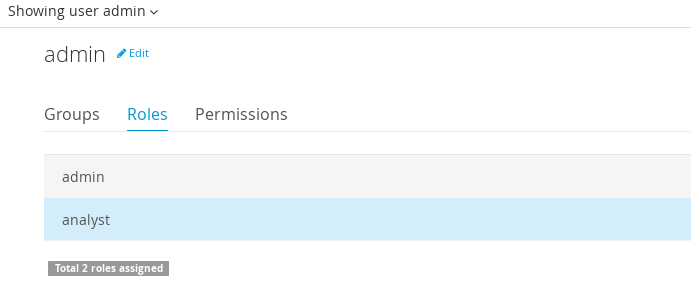
Same screen but when using the Keycloak security provider looks as:
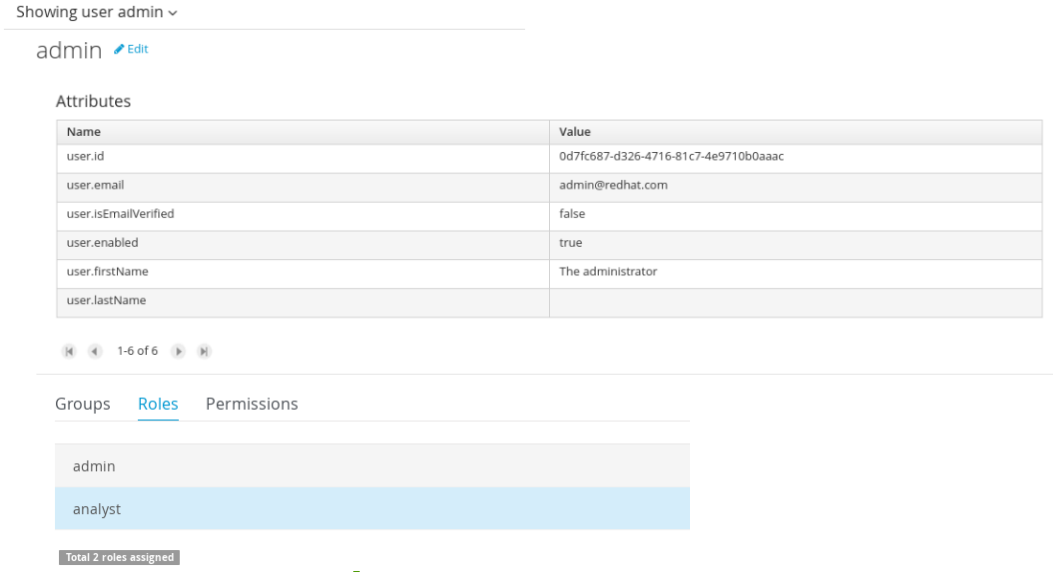
Note that when using the Keycloak provider, a new user attributes section is displayed, but it’s not present when using the Wildfly provider. This is due to the fact that the information and actions available always depend on each provider’s capabilities as explained in the Security provider capabilities section below.
Next is the type of information handled in the user’s details screen:
-
The user name
-
The user’s attributes
-
The assigned groups
-
The assigned roles
-
The permissions granted or denied
In order to update or delete an existing user, click on the Edit button present near to the username in the user editor screen:
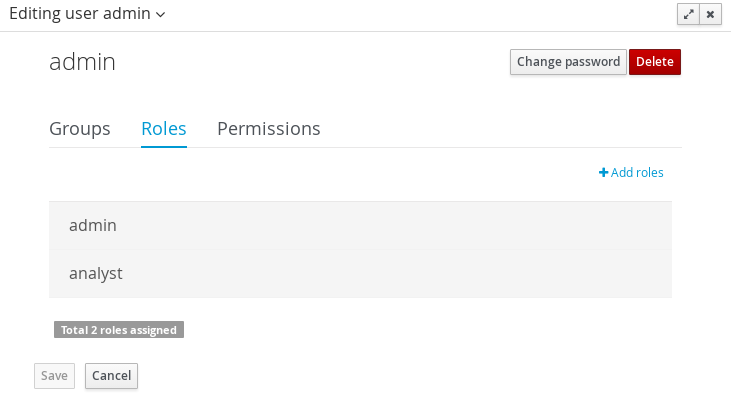
Once the editor is in edit mode, different operations can be done (provided the security provider supports them):
For instance, to modify the set of roles and groups assigned to the user or to change the user’s password as well.
-
Permissions summary
The Permissions tab shows a summary of all the permissions assigned to this particular user. This is a very helpful view as it allows administrator users to verify if a target user has the right permission levels according to the security settings of its roles and groups.
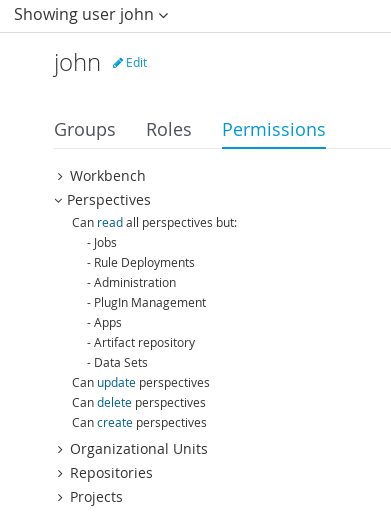
Further details about how to assign permissions to roles and groups are in the Security Settings Editor section below.
-
Updating the user’s attributes
User attributes can added or deleted using the actions available in the attributes table:
-
Updating assigned groups
From the Groups tab, a group selection popup is presented when clicking on the Add to groups button:
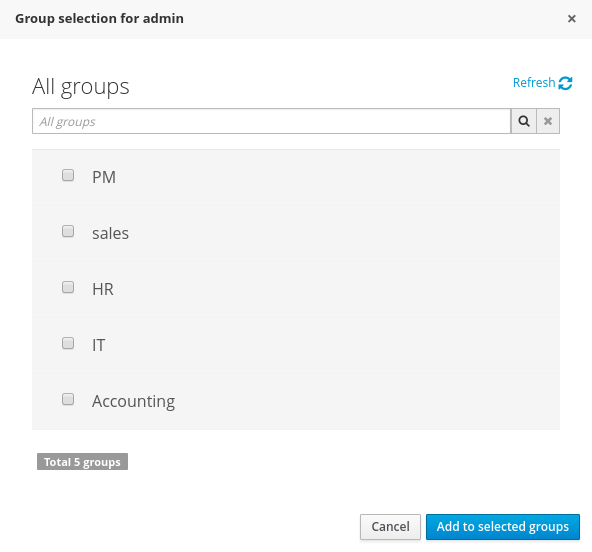
This popup screen allows the user to search and select or deselect the groups assigned to the user.
-
Updating assigned roles
From the Roles tab, a role selection popup is presented when clicking on Add to roles button:
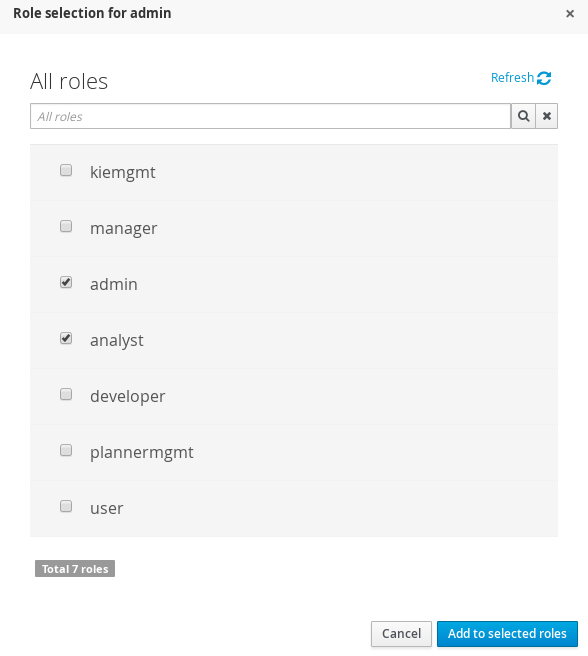
This popup screen allows the user to search and select or deselect the roles assigned to the user.
-
Changing the user’s password
A change password popup screen is presented when clicking on the Change password button:
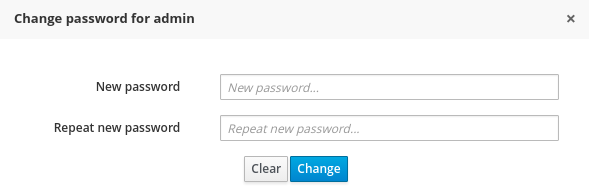
-
Deleting users
The user currently being edited can be deleted from the realm by clicking on the Delete button.
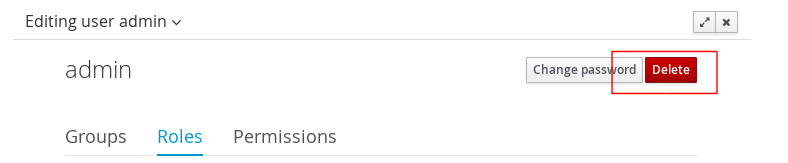
Security provider capabilities
Each security realm can provide support for different operations. For example consider the use of a Wildfly’s realm based on properties files. The contents for the applications-users.properties is like:
admin=207b6e0cc556d7084b5e2db7d822555c
salaboy=d4af256e7007fea2e581d539e05edd1b
maciej=3c8609f5e0c908a8c361ca633ed23844
kris=0bfd0f47d4817f2557c91cbab38bb92d
katy=fd37b5d0b82ce027bfad677a54fbccee
john=afda4373c6021f3f5841cd6c0a027244
jack=984ba30e11dda7b9ed86ba7b73d01481
director=6b7f87a92b62bedd0a5a94c98bd83e21
user=c5568adea472163dfc00c19c6348a665
guest=b5d048a237bfd2874b6928e1f37ee15e
kiewb=78541b7b451d8012223f29ba5141bcc2
kieserver=16c6511893651c9b4b57e0c027a96075Notice that it’s based on key-value pairs where the key is the username, and the value is the hashed value for the user’s password. So a user is just represented by a key and its username, it does not have a name nor an address or any other meta information.
On the other hand, consider the use of a realm provided by a Keycloak server. The user information is composed by more meta-data, such as the surname, address, etc, as in the following image:
So the different services and client side components from the User and Group Management API are based on capabilities. Capabilities are used to expose or restrict the available functionality provided by the different services and client side components. Examples of capabilities are:
-
Create a user
-
Update a user
-
Delete a user
-
Update user’s attributes
-
Create a group
-
Update a group
-
Assign groups to a user
-
Assign roles to a user
Each security provider must specify a set of capabilities supported. From the previous examples, it is noted that the Wildfly security provider does not support the attributes management capability - the user is only composed by the user name. On the other hand the Keycloak provider does support this capability.
The different views and user interface components rely on the capabilities supported by each provider, so if a capability is not supported by the provider in use, the UI does not provide the views for the management of that capability. As an example, consider that a concrete provider does not support deleting users - the delete user button on the user interface will be not available.
Please take a look at the concrete service provider documentation to check all the supported capabilities for each one, the default ones can be found here.
20.7.3.2. Group management
By selecting the Groups tab in the left sidebar, the application shows all the groups present by default on the application’s security realm:
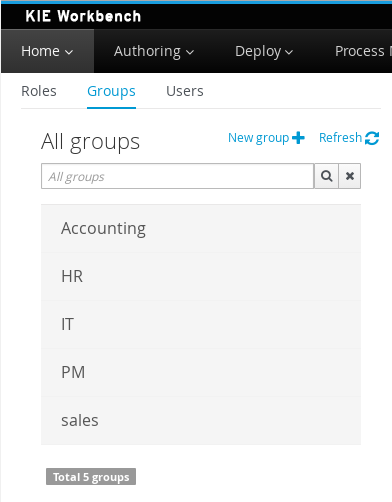
-
Searching for groups
In addition to listing all the groups, search is also allowed:
+ When specifying the search pattern in the search box the groups listed will be reduced to only those that matches the search pattern.
+
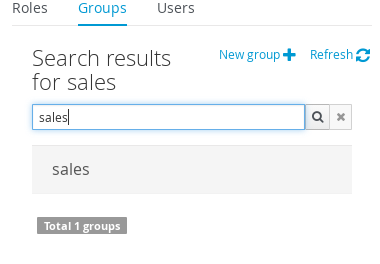
+ Search patterns depend on the concrete security provider being used by the application. Please read each provider’s documentation for more information.
-
Creating new groups
By clicking on the "New group +" anchor, a new screen will be presented on the center panel to perform a new group creation.
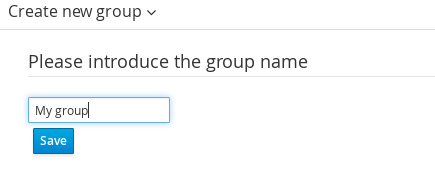
After typing a name anc clicking Save, the next step is to assign users to it:
+
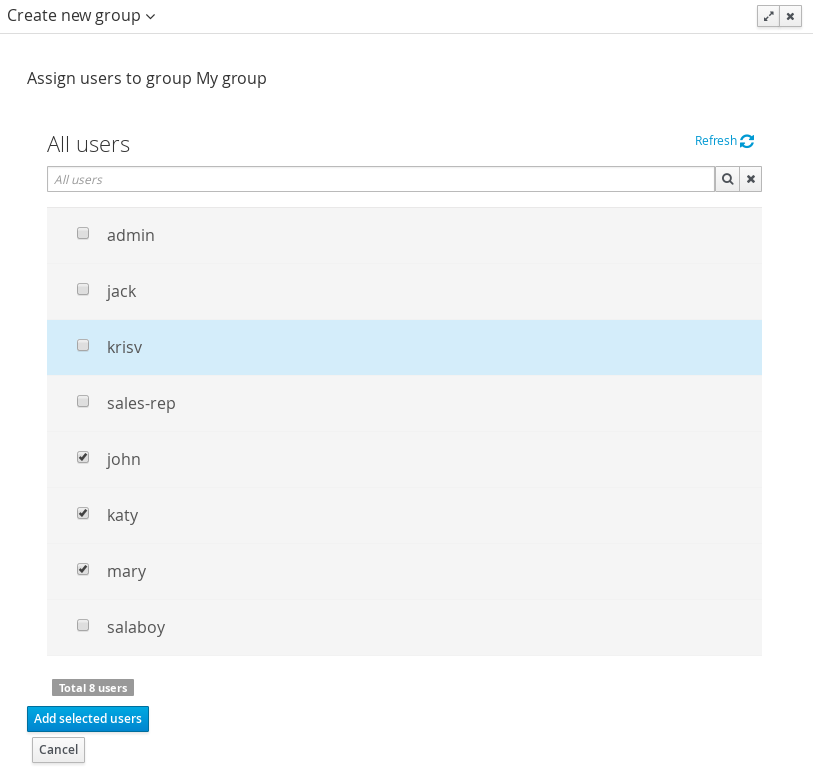
+ Clicking on the "Add selected users" button finishes the group creation.
-
Modifying a group
After clicking on a group in the left sidebar, the security settings editor for the selected group instance is opened on the screen’s right. Further details at the Security Settings Editor section.
-
Deleting groups
To delete an existing group just click on the Delete button.
20.7.3.3. Role management
By selecting the Roles tab in the left sidebar, the application shows all the application roles:
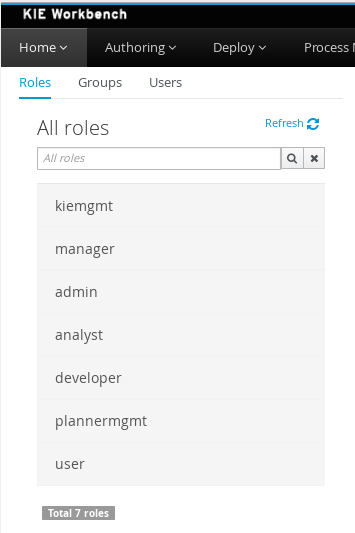
Unlike users and groups, roles can not be created nor deleted as they come from the application’s web.xml descriptor. After clicking on a role in the left sidebar, the role editor is opened on the screen’s right, which is exactly the same security settings editor used for groups. Further details at the Security Settings Editor section.
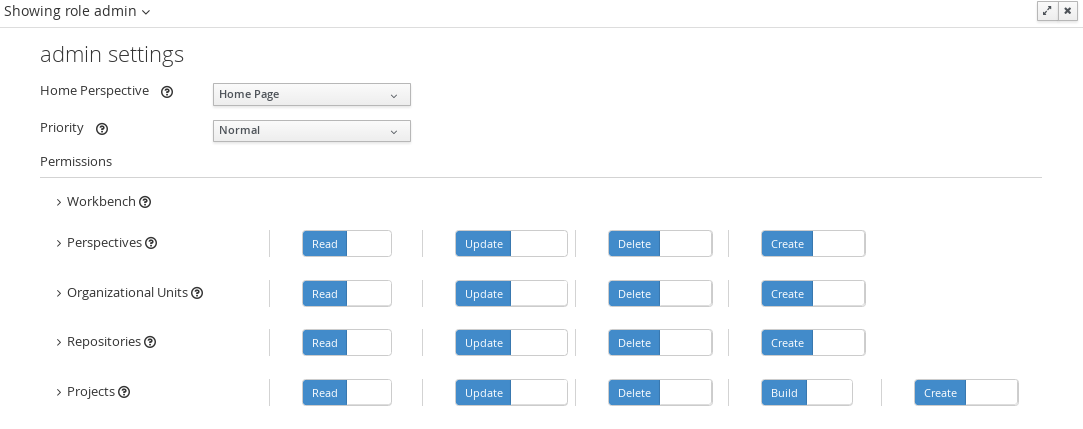
That means both role and group based permissions can be defined. The main diference between roles and group are:
-
Roles are an application defined resource. They are defined as <security-role> entries in the application’s web.xml descriptor.
-
Groups are dynamic and can be defined at runtime. The installed security provider determines where groups instances are stored.
They can be used together without any trouble. Groups are recommended though as they are a more flexible than roles.
-
Searching for roles
In addition to listing all the roles, search is also allowed:
+ When specifying the search pattern in the search box the roles listed will be reduced to only those that matches the search pattern.
+
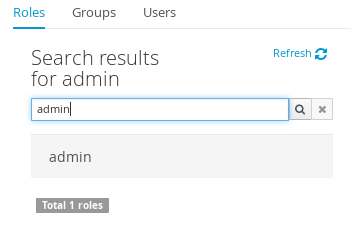
+ Search patterns depend on the concrete security provider being used by the application. Please read each provider’s documentation for more information.
20.7.4. Security Settings Editor
This editor is used to set several security settings for both roles and groups.
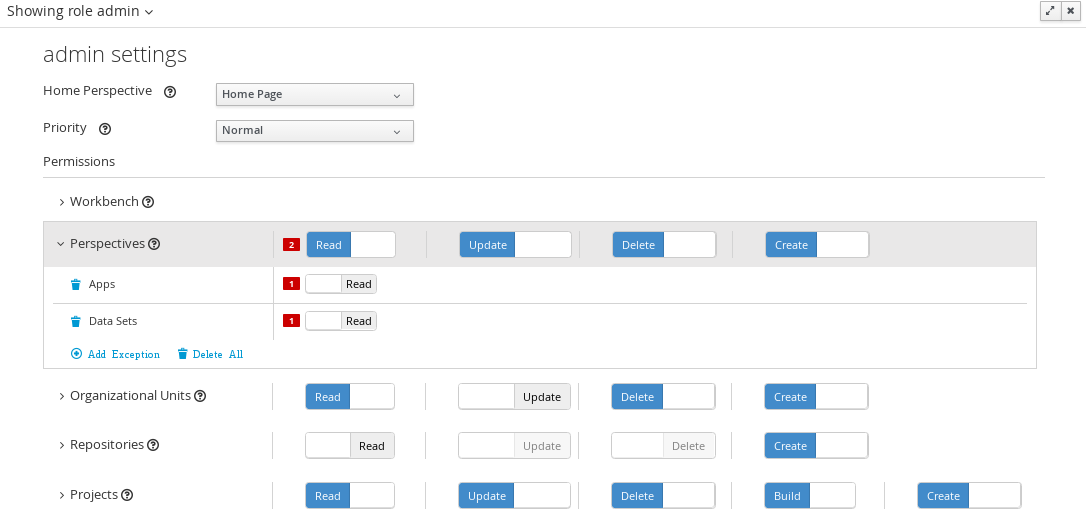
+
20.7.4.1. Home page
This is the page where the user is directed after login. This makes it possible to have different home pages for different users, since users can be assigned to different roles or groups.
20.7.4.2. Priority
It is used to determine what settings (home page, permissions, …) have precedence for those users with more that one role or group assigned.
Without this setting, it won’t be possible to determine what role/group should take precedence. For instance, an administrative role has higher priority than a non-administrative one. For users with both administrative and non-administrative roles granted, administrative privileges will always win, provided the administrative role’s priority is greater than the other.
20.7.4.3. Permissions
Currently, the workbench support the following permission categories.
-
Workbench: General workbench permissions, not tied to any specific resource type.
-
Pages: If access to a page is denied then it will not be shown in any of application menus. Update, Delete and Create permissions change the behaviour of the page management plugin editor.
-
Organizational Units: Sets who can Create, Update or Delete organizational units from the Organizational Unit section at the Administration page. Sets also what organizational units are visible in the Project Explorer at the Project Authoring page.
-
Repositories: Sets who can Create, Update or Delete repositories from the Repositories section at the Administration page. Sets also what repositories are visible in the Project Explorer at the Project Authoring page.
-
Projects: In the Project Authoring page, sets who can Create, Update, Delete or Build projects from the Project Editor screen as well as what projects are visible in the Project Explorer.
For pages, organizational units, repositories and projects it is possible to define global permissions and add single instance exceptions afterwards. For instance, Read access can be granted to all the pages and deny access just to an individual page. This is called the grant all deny a few strategy.

The opposite, deny all grant a few strategy is also supported:

| In the example above, the Update and Delete permissions are disabled as it does not makes sense to define such permissions if the user is not even able to read pages. |
20.7.5. Security Policy Storage
The security policy is stored under the workbench’s VFS. Most concrete, in a GIT repo called “security”. The ACL table is stored in a file called “security-policy.properties” under the “authz” directory. Next is an example of the entries this file contains:
role.admin.home=HomePage
role.admin.priority=0
role.admin.permission.perspective.read=true
role.admin.permission.perspective.create=true
role.admin.permission.perspective.delete=true
role.admin.permission.perspective.update=trueEvery time the ACL is modified from the security settings UI the changes are stored into the GIT repo.
Initially, when the application is deployed for the first time there is no security policy stored in GIT. However, the application might need to set-up a default policy with the different access profiles for each of the application roles.
In order to support default policies the system allows for declaring a security policy as part of the webapp’s content. This can be done just by placing a security-policy.properties file under the webapp’s resource classpath (the WEB-INF/classes directory inside the WAR archive is a valid one). On app start-up the following steps are executed:
-
Check if an active policy is already stored in GIT
-
If not, then check if a policy has been defined under the webapp’s classpath
-
If found, such policy is stored under GIT
The above is an auto-deploy mechanism which is used in the workbench to set-up its default security policy.
One slight variation of the deployment process is the ability to split the “security-policy.properties” file into small pieces so that it is possible, for example, to define one file per role. The split files must start by the “security-module-” prefix, for instance: “security-module-admin.properties”. The deployment mechanism will read and deploy both the "security-policy.properties" and all the optional “security-module-?.properties” found on the classpath.
Notice, despite using the split approach, the “security-policy.properties” must always be present as it is used as a marker file by the security subsystem in order to locate the other policy files. This split mechanism allows for a better organization of the whole security policy.
20.8. Embedding Workbench in Your Application
Apart from the individual perspectives (such as the Library or Content Management), the Workbench provides a number of editors used for designing and managing assets in different formats. Within the Workbench, each asset type has a corresponding editor.
The Workbench provides the possibility to embed the perspectives and editors in the user’s application using the standalone mode. Without actually switching to the Workbench, it is possible to display perspectives and edit various assets, such as rules, processes, or decision tables, in separate applications.
To embed a part of the Workbench in an application, the Workbench must be deployed and running on a web server or an application server. Then, in your application, include an HTML inline frame with the proper HTTP query parameters as described in the following table.
| Parameter | Values | Description |
|---|---|---|
|
none |
This parameter must be included in each URL of a perspective or an editor that will be used in the standalone mode. |
|
|
Used for specifying the perspective to be displayed. |
|
|
Displays the breadcrumbs at the top of the page that can be used for navigating to the lists of spaces and projects within the Library. This parameter can be used only if |
|
|
Specifies the path to the asset to be opened in a corresponding editor. The path must be specified in the format |
| URL | Description |
|---|---|
http://localhost:8080/business-central/kie-wb.jsp?standalone&perspective=LibraryPerspective |
Opens the Library where it is possible to select a project to be managed. |
Opens the Library with the list of projects. The |
|
Opens the editor of the specified asset. |
|
http://localhost:8080/business-central/kie-wb.jsp?standalone&perspective=ContentManagerPerspective |
Opens the Content Management perspective, where it is possible to create and manage custom pages. |
http://localhost:8080/business-central/kie-wb.jsp?standalone&perspective=MyCustomPage |
Opens the specified custom page that has been created before using the Content Management perspective. The value of the |
20.9. Execution Server Management UI
The Execution Server Management UI allows users create and modify Server Templates and Containers, it also allows users manage Remote Servers. This screen is available via Deploy → Rule Deployments menu.

|
The management UI is only available for KIE Managed Servers. |
20.9.1. Server Templates
Server templates are used to define a common configuration that can be used for multiple server, thus the name: Template.
Server Templates can be created directly from the management UI or it’s automatically create when a server connects to controller and there isn’t a template definition for that remote server. Server templates may have one or more capabilities, such capabilities can’t be modified, if you need modify the capabilities you’ll have to create a new template. Here is the list of current capabilities:
-
Rule (Drools)
-
Process (jBPM)
-
Planning (Optaplanner)
|
For Planner capability it’s mandatory to enable Rule’s capability too. |
In order to create a new Server Template you have to click at New Server Template button and follow the wizard. It’s also possible to create a container during Wizard, but for now let’s limit to just the template.
Once created you’ll get the new Template listed on the left hand side, with the new Server Template highlighted. On the right hand side you get the 2nd level navigation that lists Containers and Remote Servers that are related to selected Server Template.
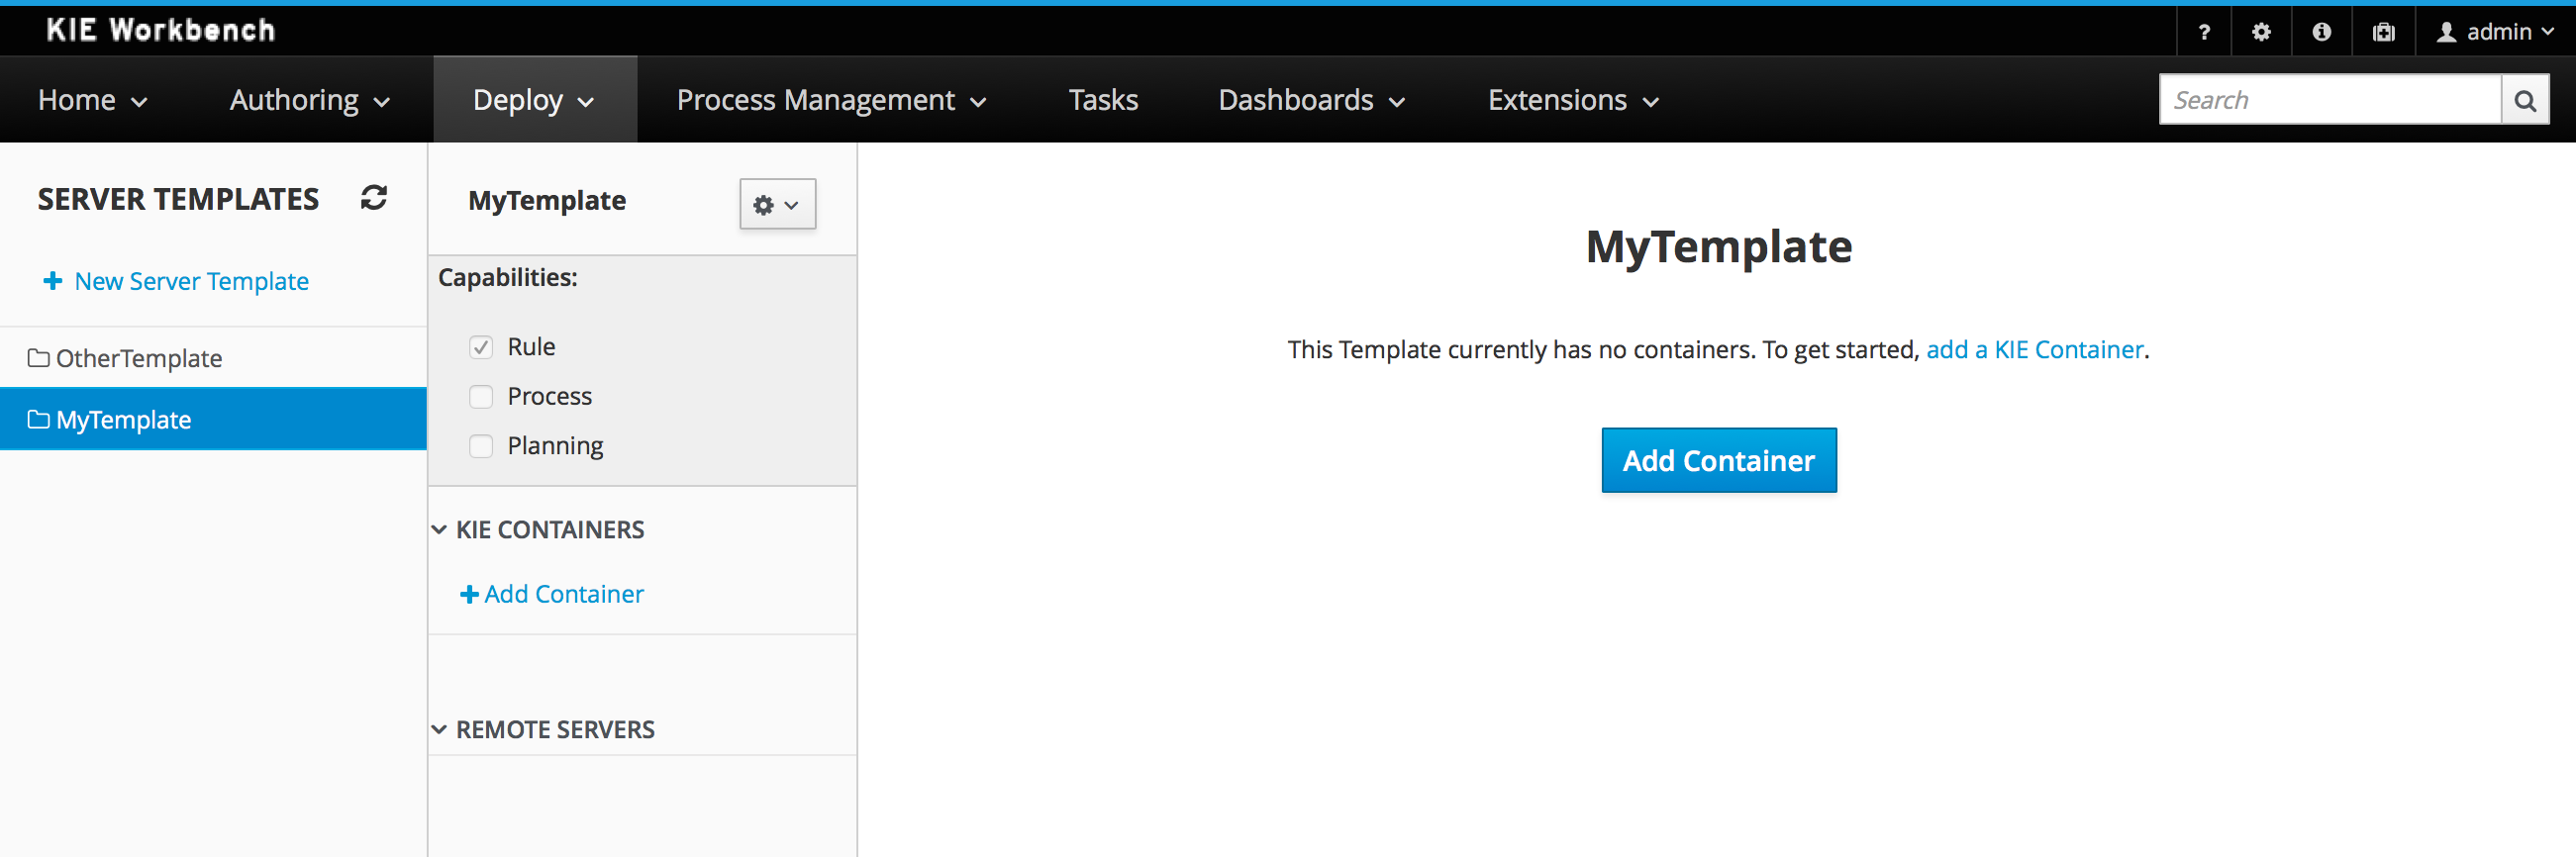
On top of the navigation is also possible to delete the current Server Template or create a copy of it.
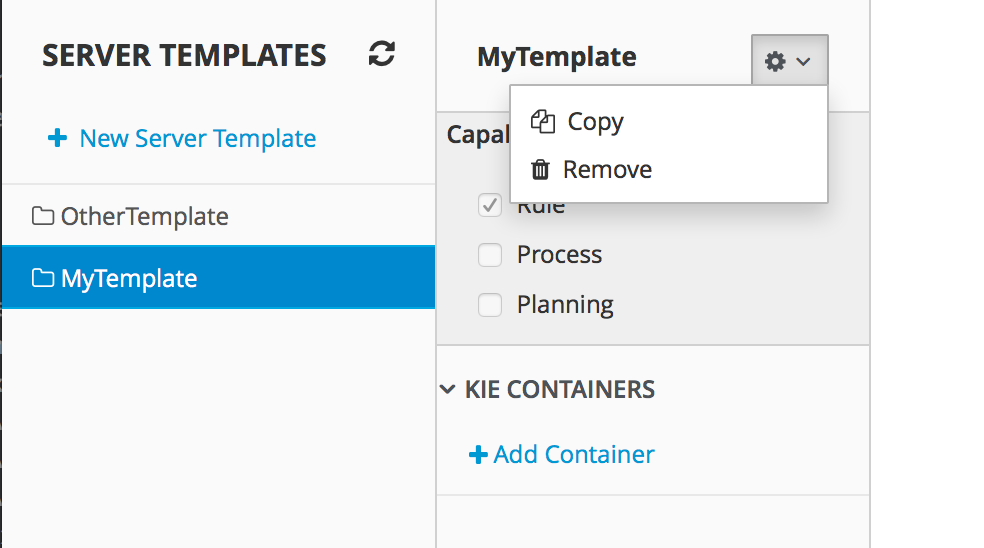
20.9.2. Container
A Container is a KIE Container configuration of the Server Template. Click the Add Container button to create a new container for the current Server Template.
The search area can help users find an specific KJARs that they are looking for.
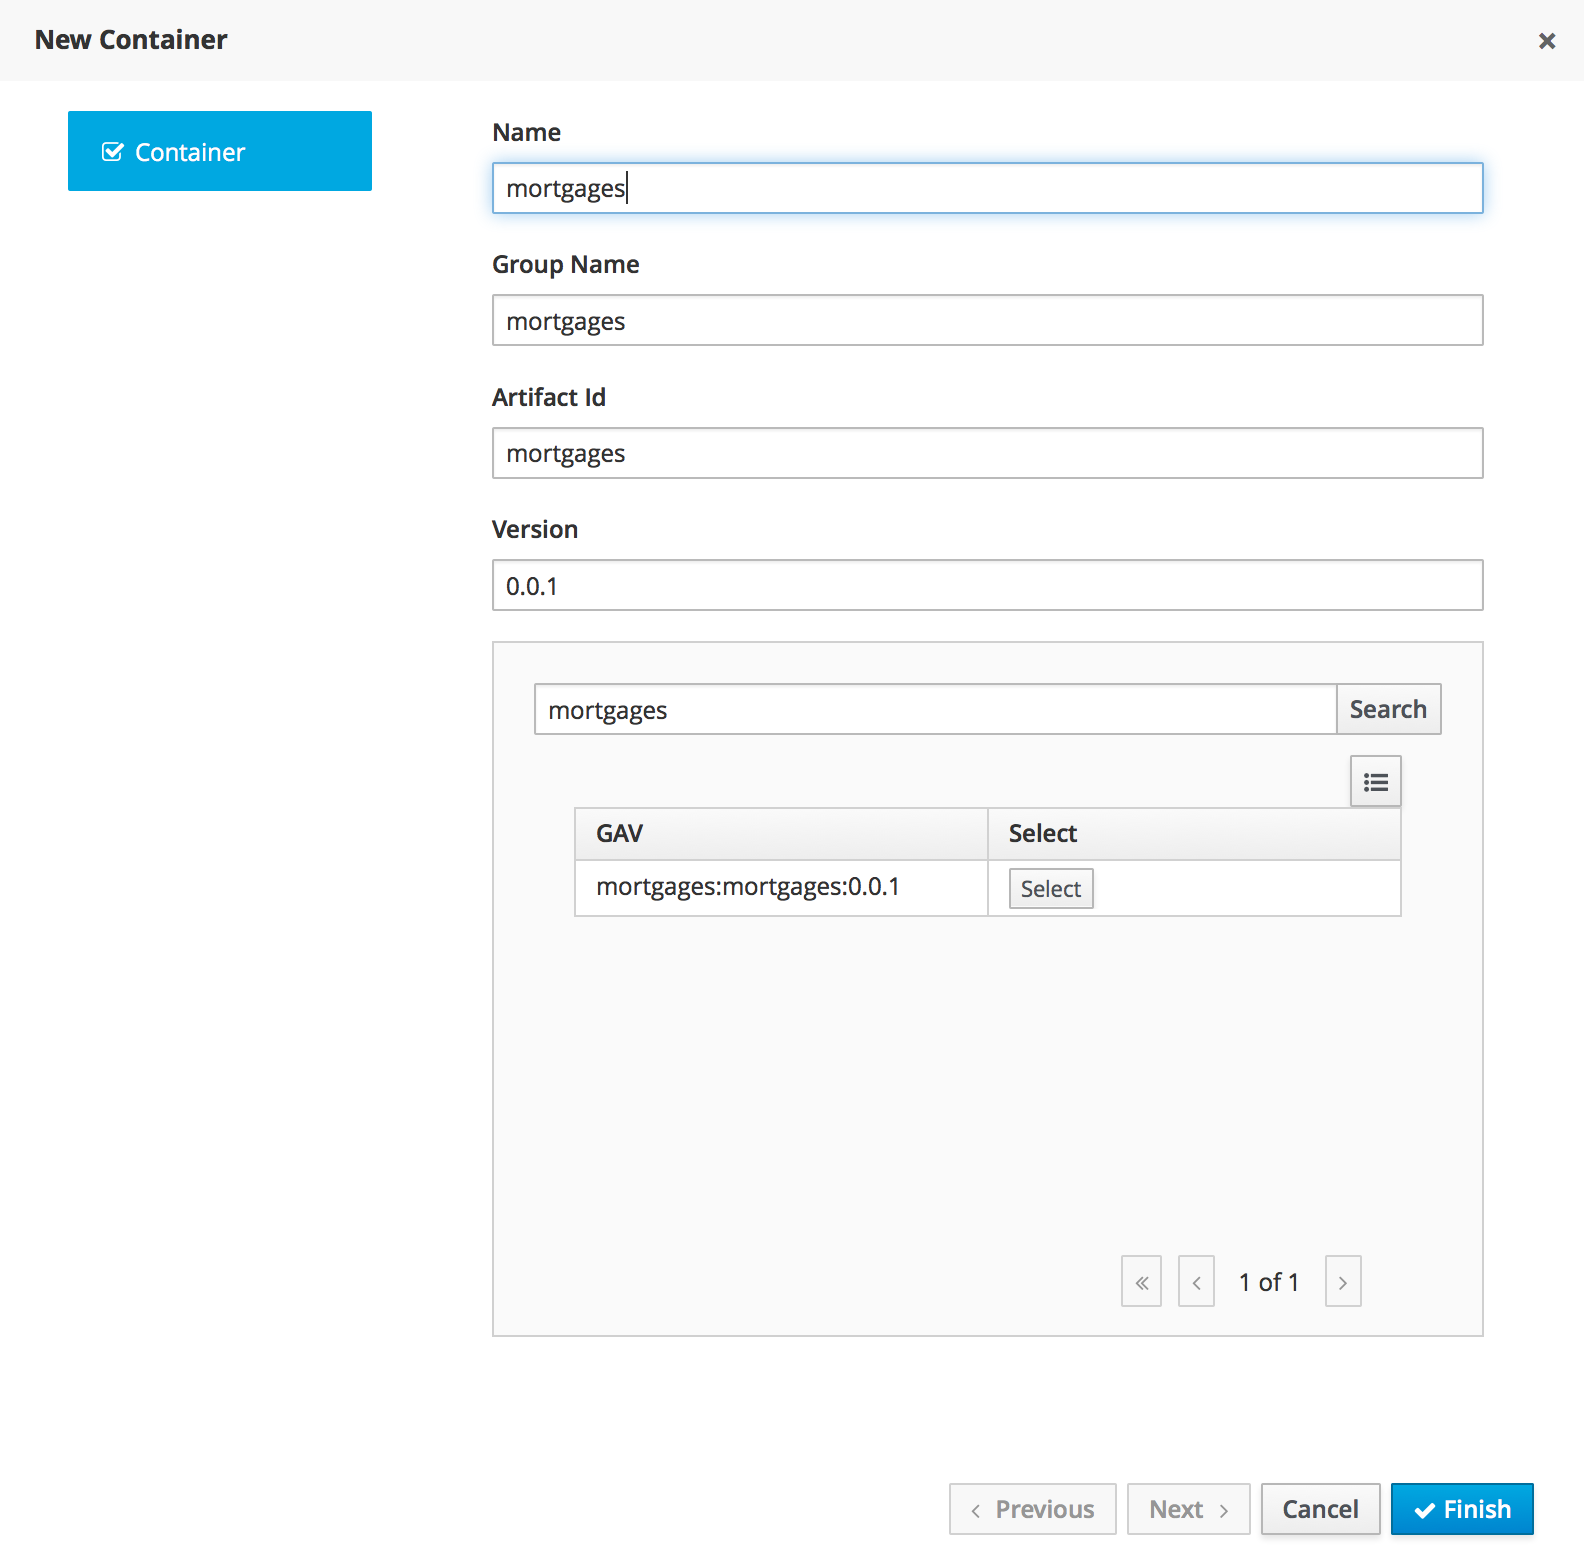
For Server Templates that have Process capabilities enabled, the Wizard has a 2nd optional step where users can configure some process related behaviors.
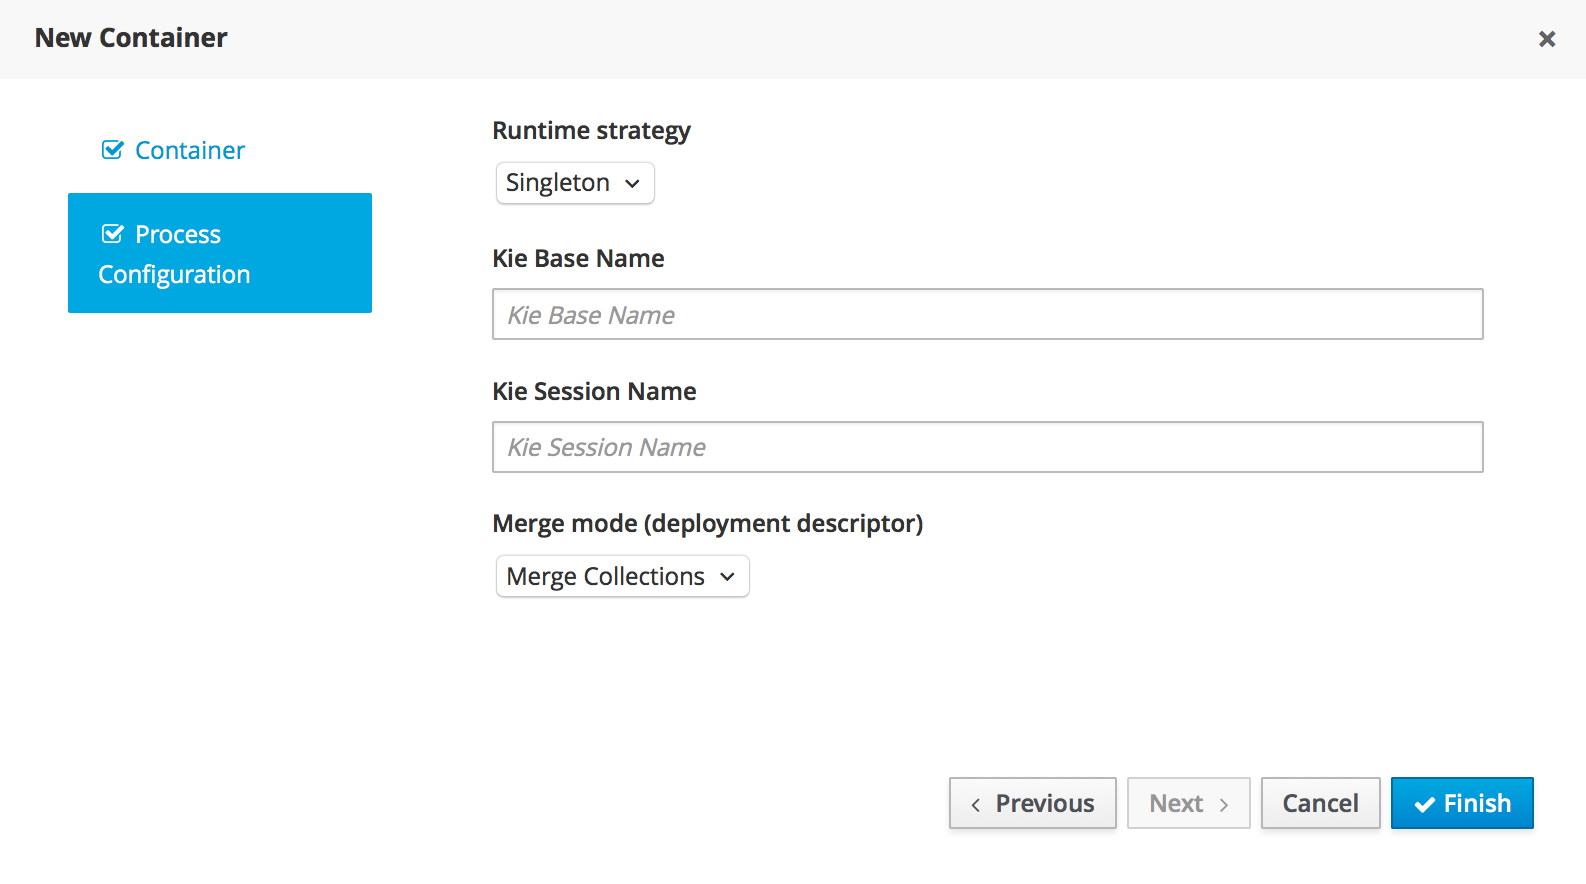
Kie Base Name determines which Kie Base of the deployed artifact will be used.
Kie Session Name determines which Kie Session of the selected Kie Base will be used.
|
Please notice that configurations on this tab takes effect only if the deployed project contains some business processeses. It is not enough if the server template has the extension for processes enabled. |
Once created the new Container will be displayed on the containers list just above the list of remote servers. Just after created a container is by default Stopped which is the only state that allows users to remove it.
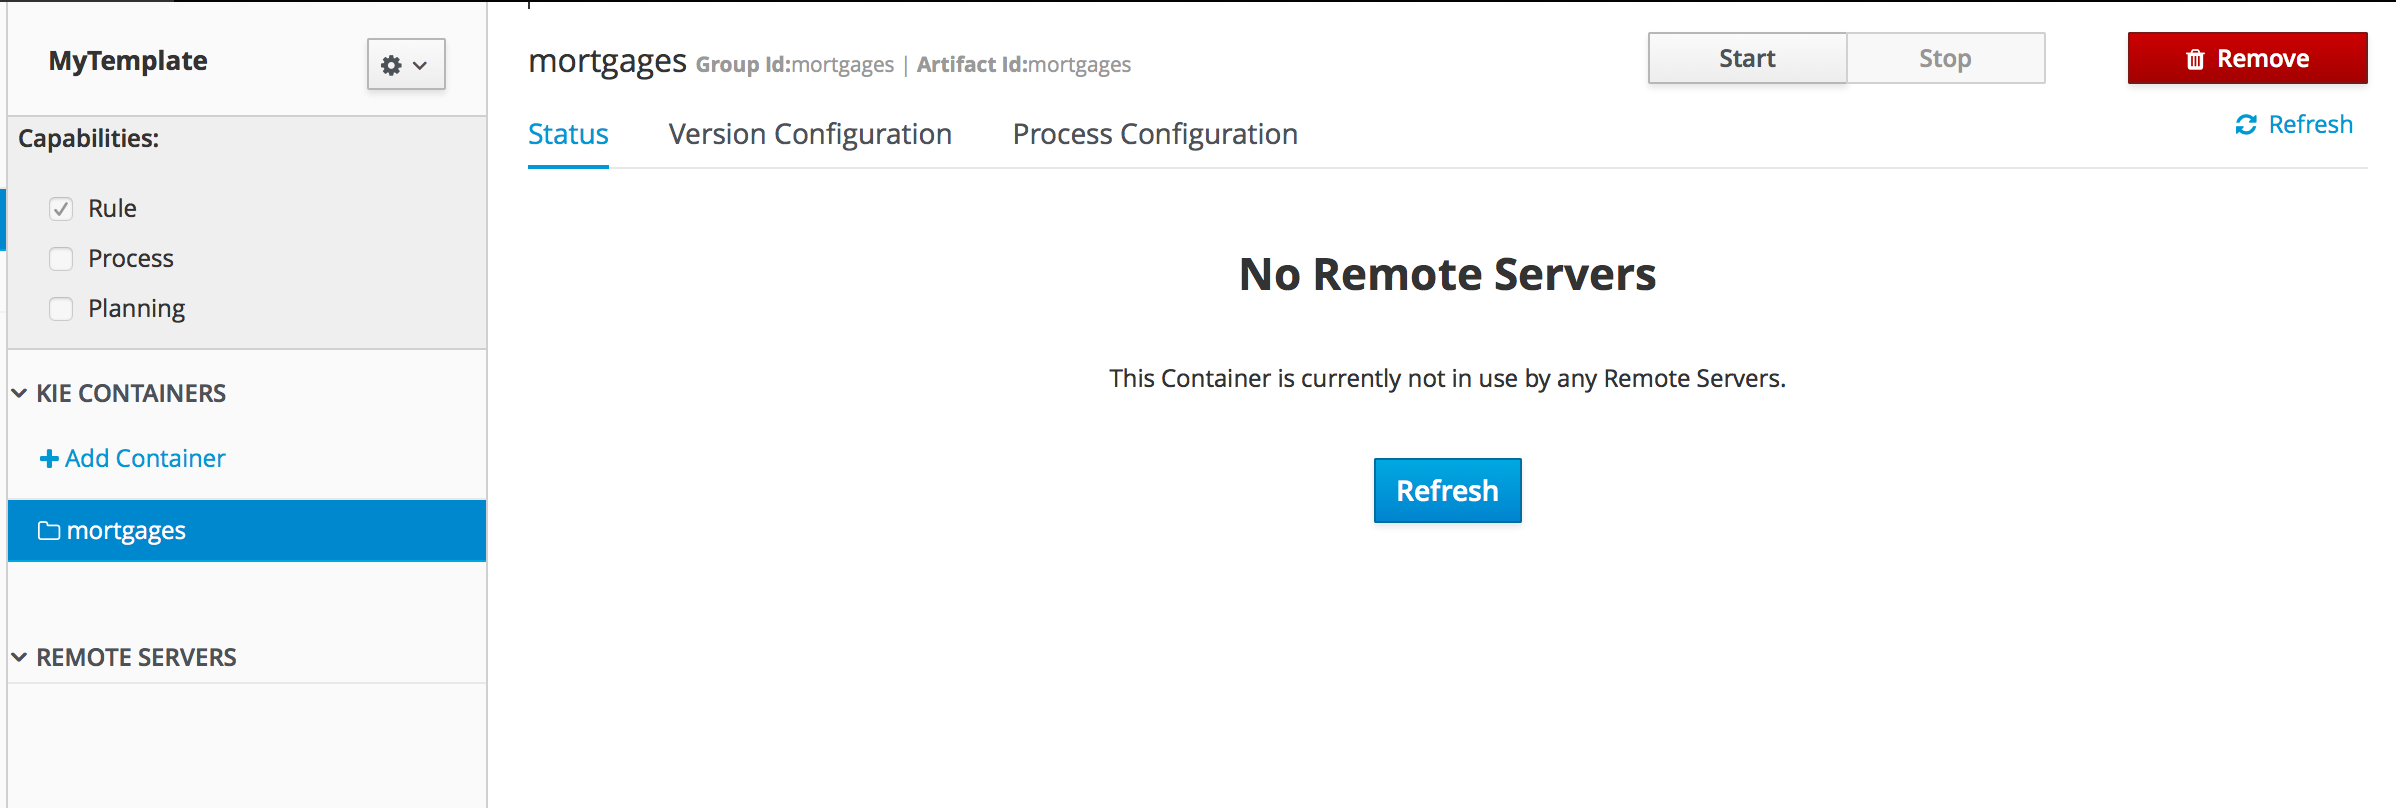
A Container has the following tabs available for management and/or configuration:
-
Status
-
Version Configuration
-
Process Configuration
Status tab lists all the Remote Servers that are running the active Container. Each Remote Server is rendered as a Card, which displays to users status and endpoint.
|
Only started Containers are deployed to remote servers. |
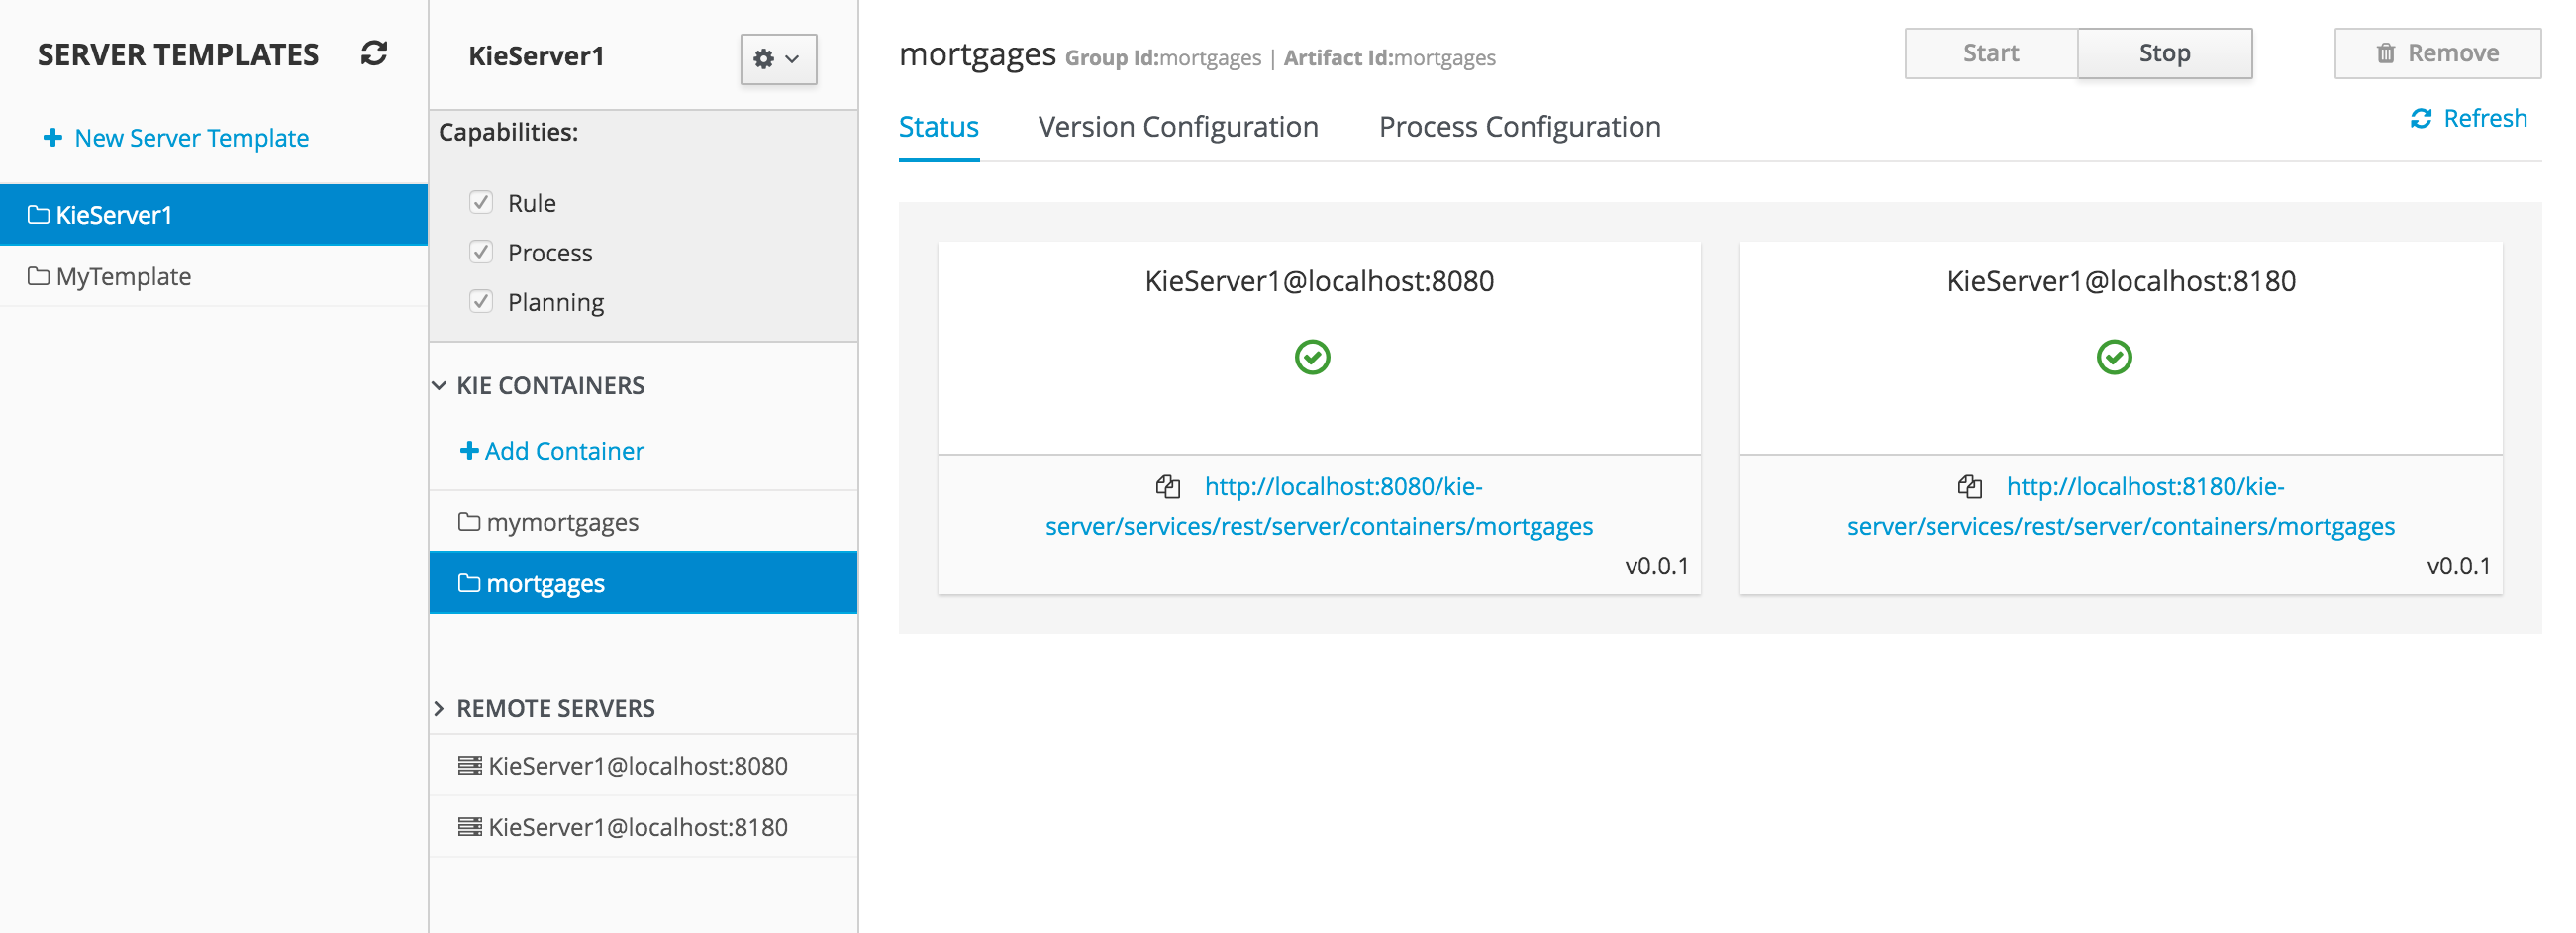
For containers that do not have process capability the Version Configuration tab allows users to change the current version of the Container. Users can upgrade manually to a specific version using the "Upgrade" button or enable/disable the Scanner. It’s also possible to execute a Scan Now operation that will scan for new versions only once.
To redeploy SNAPSHOT kjars with your latest changes all existing containers with that version must first be removed. Executing 'build and deploy' will then create a container with the latest SNAPSHOT kjar. However, this is not possible for release versions. Following maven release convensions if the GAV of a kjar is anthing but SNAPSHOT, the GAV will need to be updated to the newer release version and deployed to its own container. The new release version can also be used to upgrade an existing container as describe previously provided the container does not have process capability.

Process Configuration is the same form that is displayed during New Container Wizard for Template Servers that have Process Capability. If Template Server doesn’t have such capability, the action buttons will be disabled.
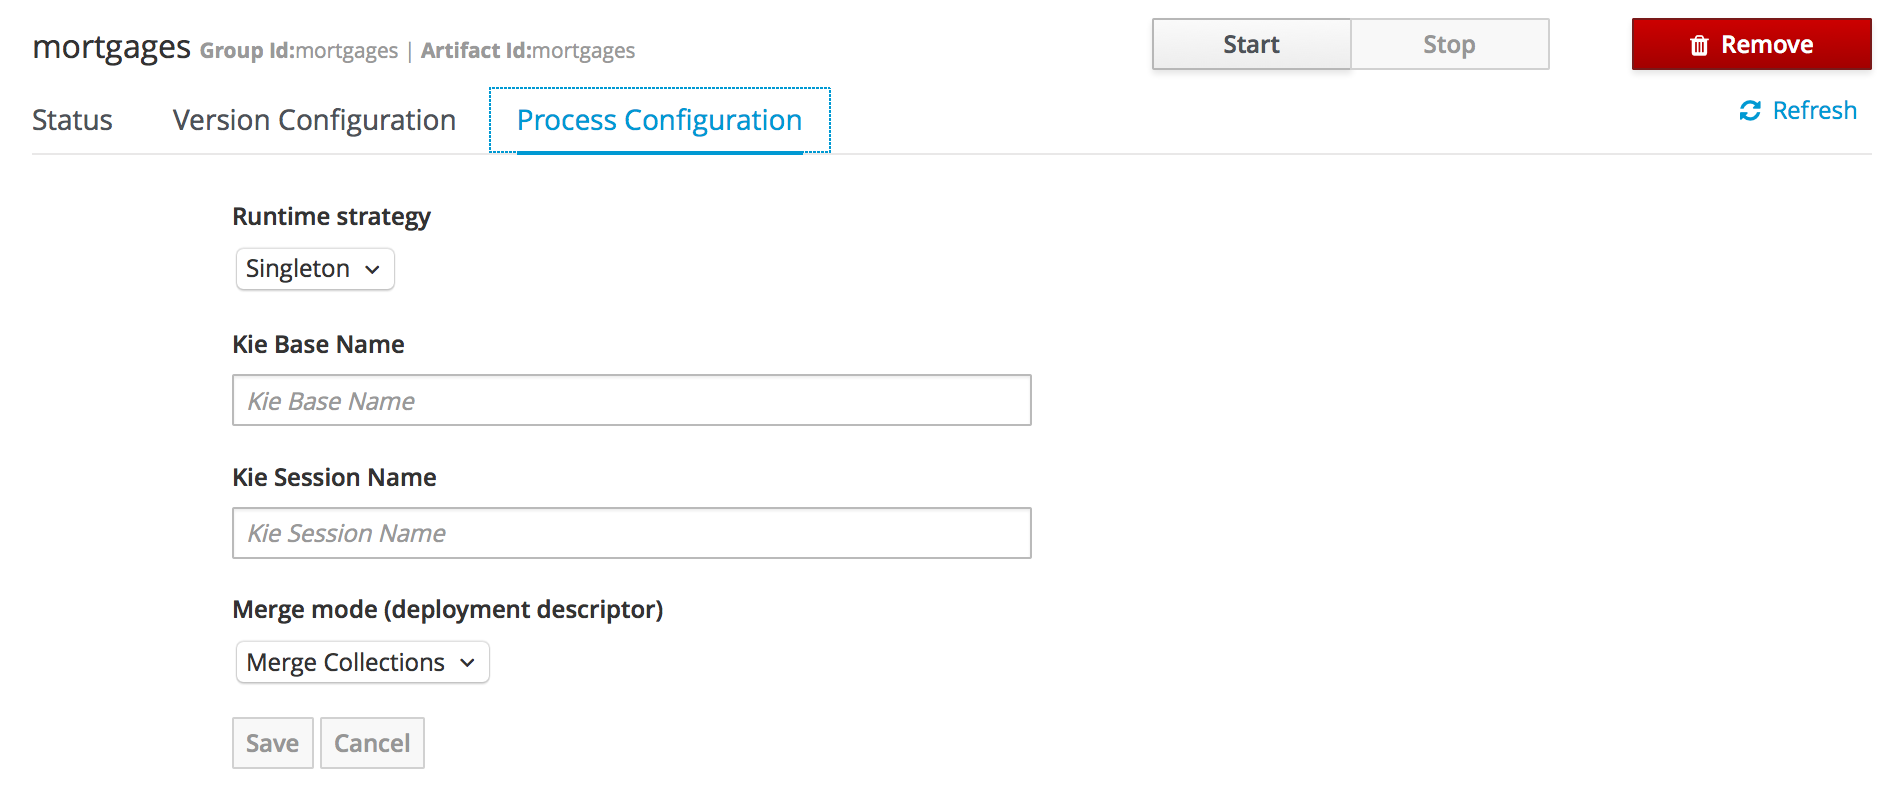
20.9.3. Remote Server
Remote Server is a Managed KIE Server instance running that has a controller configured.
|
By default Workbench comes with a Controller embedded. |
The list of Remote Servers are displayed just under the list of Containers. Once selected the screens reveals the Remote Server details and a list of cards, each card represents a running Container.
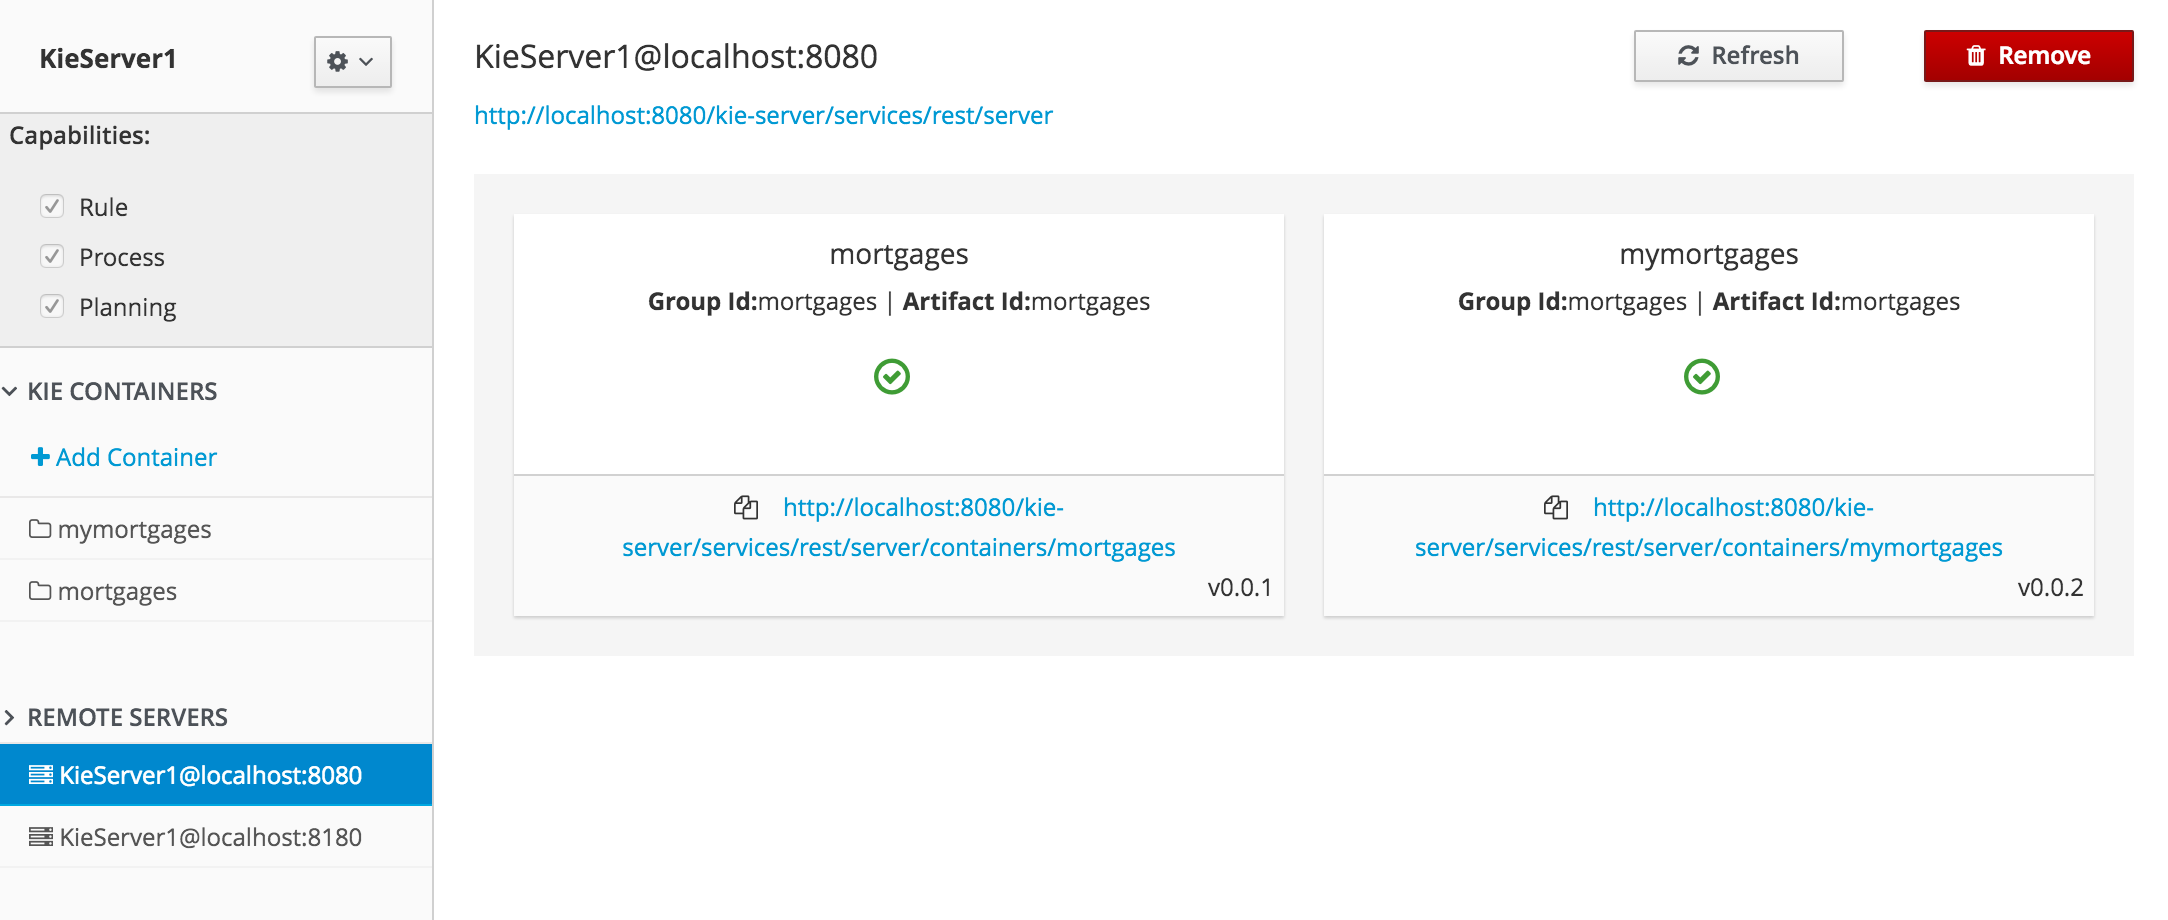
21. Authoring Rule Assets
21.1. Creating a package
Configuring packages is generally something that is done once, and by someone with some experience with rules/models. Generally speaking, very few people will need to configure packages, and once they are setup, they can be copied over and over if needed. Package configuration is most definitely a technical task that requires the appropriate expertise.
All assets live in "packages" in Drools Workbench - a package is like a folder (it also serves as a "namespace"). A home folder for rule assets to live in. Rules in particular need to know what the fact model is, what the namespace is etc.
So while rules (and assets in general) can appear in any number of categories, they only live in one package. If you think of Drools Workbench as a file system, then each package is a folder, and the assets live in that folder - as one big happy list of files.
To create an empty package select "Package" from the "Create New Asset" menu.
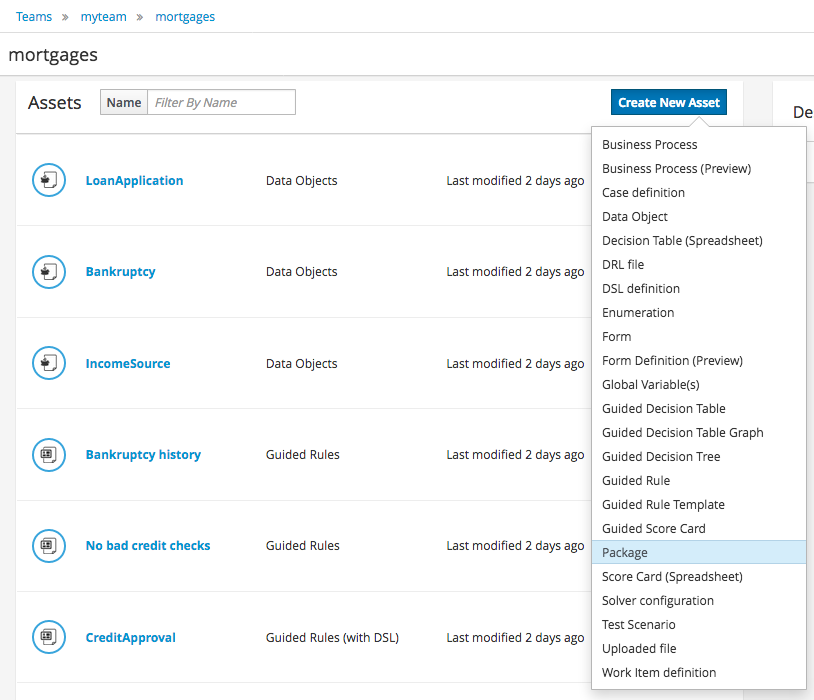
21.1.1. Empty package
An empty package can be created by simply specifying a name.
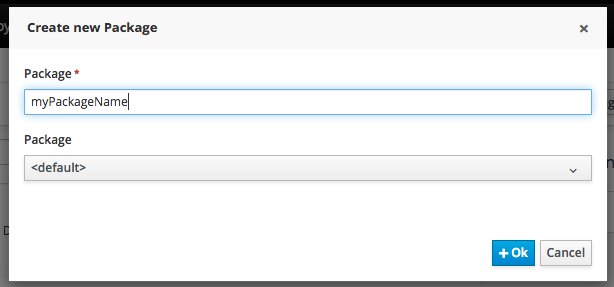
Once the Package has been created it will appear in the Project Explorer.
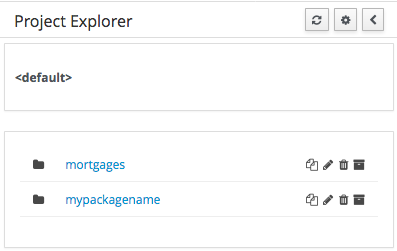
21.1.2. Copy, Rename and Delete Packages
As already mentioned on Project Explorer section, users can copy, rename or delete a package directly from Project Explorer.
21.2. Business rules with the guided editor
Guided Rules are authored with a UI to control and prompt user input based on knowledge of the object model.
This can also be augmented with DSL sentences.
21.2.1. Parts of the Guided Rule Editor
The Guided Rule Editor is composed of three main sections.
The following diagram shows the editor in action. The following descriptions apply to the lettered boxes in the diagram:
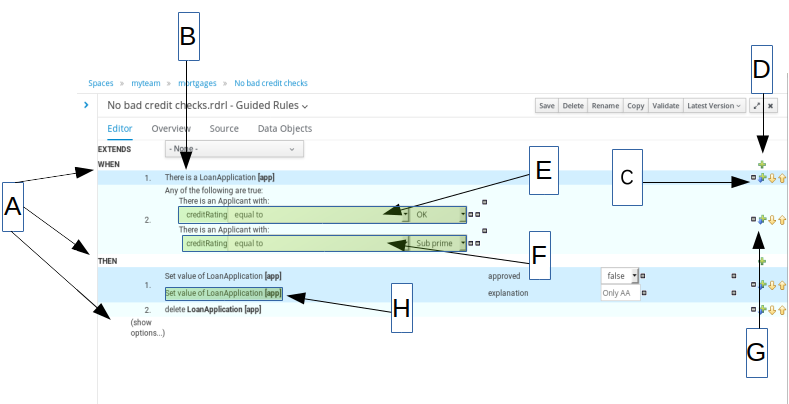
A : The different parts of a rule:
-
The "WHEN" part, or conditions, of the rule.
-
The "THEN" action part of the rule.
-
Optional attributes that may effect the operation of the rule.
21.2.2. The "WHEN" (left-hand side) of a Rule
B : This shows a pattern which is declaring that the rule is looking for a "LoanApplication" fact (the fields are listed below, in this case none). Another pattern, "Applicant", is listed below "LoanApplication". Fields "creditRating" and "applicationDate" are listed. Clicking on the fact name ("LoanApplication") will pop-up a list of options to add to the fact declaration:
-
Add more fields (e.g. their "location").
-
Assign a variable name to the fact (which you can use later on if needs be)
-
Add "multiple field" constraints - i.e. constraints that span across fields (e.g. age > 42 or risk > 2).
C : The "minus" icon ("[-]") indicates you can remove something. In this case it would remove the whole "LoanApplication" fact declaration. Depending upon the placement of the icon different components of the rule declaration can be removed, for example a Fact Pattern, Field Constraint, other Conditional Element ("exists", "not exists", "from" etc) or an Action.
D : The "plus" icon ("+") allows you to add more patterns to the condition or the action part of the rule, or more attributes. In all cases, a popup option box is provided. For the "WHEN" part of the rule, you can choose from a list of Conditional Elements to add:
-
A Constraint on a Fact: it will give you a list of facts.
-
"The following does not exist": the fact plus constraints must not exist.
-
"The following exists": at least one match should exist (but there only needs to be one - it will not trigger for each match).
-
"Any of the following are true": any of the patterns can match (you then add patterns to these higher level patterns).
-
"From": this will insert a new From Conditional Element to the rule.
-
"From Accumulate": this will insert a new Accumulate Conditional Element to the rule.
-
"From Collect": this will insert a new Collect Conditional Element to the rule.
-
"From Entry-point": this allows you to define an Entry Point for the pattern.
-
"Free Form DRL": this will let you insert a free chunk of DRL.
If you just put a fact (like is shown above) then all the patterns are combined together so they are all true ("and").
E : This shows the constraint for the "creditRating" field. Looking from left to right you find:
-
The field name: "creditRating". Clicking on it you can assign a variable name to it, or access nested properties of it.
-
A list of constraint operations ("equal to" being selected): The content of this list changes depending on the field’s data type.
-
The value field: It could be one of the following:
-
A literal value: depending on the field’s data type different components will be displayed:
-
String → Textbox
-
Any numerical value → Textbox restricting entry to values valid for the numerical sub-type (e.g. a byte can hold values from -128 to 127). BigDecimal and BigInteger data-types are also supported. Please ensure the appropriate Class has been imported in the Package configuration. The import will be added automatically if a POJO model has been uploaded that exposes an accessor or mutator for a BigDecimal or BigInteger field. BigDecimal values are automatically suffixed with "B" indicating to the underlying Engine that the literal value should be interpreted as a BigDecimal. BigIntegers are suffixed with "I". The user does not need to enter the suffix.
-
Date → Calendar
-
Enumeration → Listbox
-
Boolean → Checkbox
-
-
A "formula": this is an expression which is calculated (this is for advanced users only)
-
An Expression - this will let you use an Expression Builder to build up a full mvel expression. (At the moment only basic expressions are supported)
-
F : This shows the constraint for the "applicationDate" field. Looking from left to right you find:
-
The field name: "applicationDate".
-
A list of constraint operations: "after" being selected.
-
A "clock" icon. Since the "applicationDate" is a Date data-type the list of available operators includes those relating to Complex Event Processing (CEP). When a CEP operator is used this additional icon is displayed to allow you to enter additional CEP operator parameters. Clicking the "clock" will cycle the available combinations of CEP operator parameters.
|
Complex Event Processing operators are also available when the Fact has been declared as an event. Refer to the "Fact Model" chapter of this user-guide for details on how to add annotations to your Fact model. Events have access to the full range of CEP operators; Date field-types are restricted to "after", "before" and "coincides". |
|
Facts annotated as Events can also have CEP sliding windows defined. |
21.2.2.1. Adding Patterns
When clicking on the + button of the WHEN section, a new popup will appear letting you to add a new Pattern to the Rule. The popup will looks similar to the image below. In this popup you could select the type of Pattern to add by selecting one of the list items. In the list you will have an entry for each defined Fact Type, in addition to the already mentioned Conditional Elements like "exists", "doesn’t exist", "from", "collect", "accumulate", "from entry-point" and "free form DRL". Once you have selected one of this elements, you can add a new Pattern by clicking on the "Ok" button. The new pattern will be added at the bottom of the rule’s left hand side. If you want to choose a different position, you can use the combobox placed at the top of the popup.
You can also open this popup by clicking in the [+] button from a Pattern’s action toolbar. If that is the case, the pop-up that appears wouldn’t constraint the position combobox, because the new Pattern will be added just after the Pattern where you clicked.
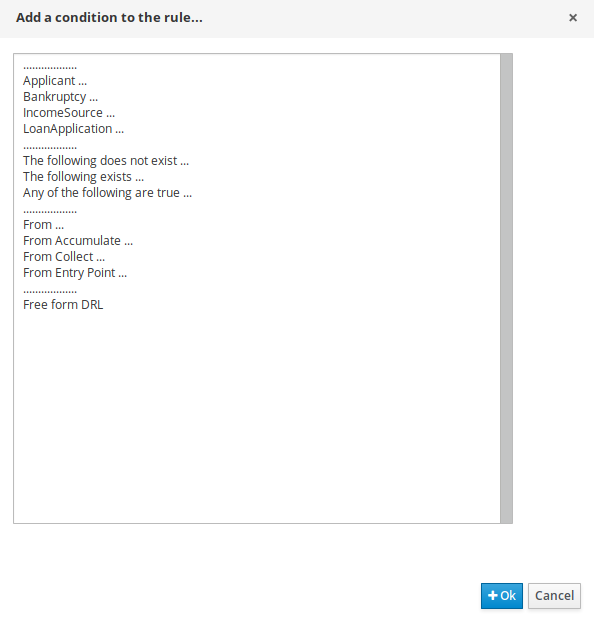
21.2.2.2. Adding constraints
The below dialog is what you will get when you want to add constraints to a fact. In the top half are the simple options: you can either add a field constraint straight away (a list of fields of the applicable fact will be shown), or you can add a "Multiple field constraint" using AND or OR operands. In the bottom half of the window you have the Advanced options: you can add a formula (which resolves to True or False - this is like in the example above: "… salary > (2500 * 4.1)". You can also assign a Variable name to the fact (which means you can then access that variable on the action part of the rule, to set a value etc).
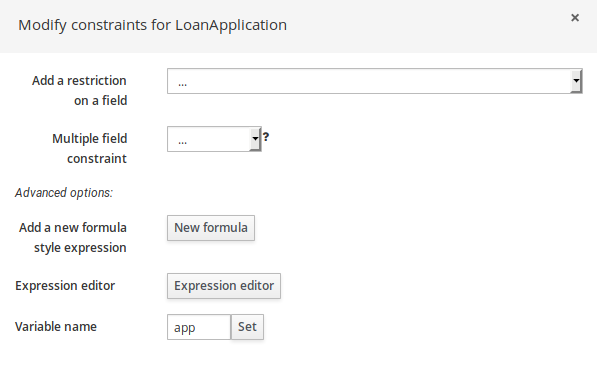
21.2.3. The "THEN" (right-hand side) of a Rule
H : This shows an "action" of the rule, the Right Hand Side of a rule consists in a list of actions. In this case, we are updating the "explanation" field of the "LoanApplication" fact. There are quite a few other types of actions you can use:
-
Insert a completely new Fact and optionally set a field on the Fact.
The value field can be one of the following:
-
A literal value: depending on the field’s data type different components will be displayed:
-
String → Textbox
-
Any numerical value → Textbox restricting entry to values valid for the numerical sub-type (e.g. a byte can hold values from -128 to 127). BigDecimal and BigInteger data-types are also supported. Please ensure the appropriate Class has been imported in the Package configuration. The import will be added automatically if a POJO model has been uploaded that exposes an accessor or mutator for a BigDecimal or BigInteger field. BigDecimal values are automatically suffixed with "B" indicating to the underlying Engine that the literal value should be interpreted as a BigDecimal. BigIntegers are suffixed with "I". The user does not need to enter the suffix.
-
Date → Calendar
-
Enumeration → Listbox
-
Boolean → Checkbox
-
-
A variable bound to a Fact or Field in the left-hand side. The data-type of the field being set must match the data-type of the variable.
-
A "formula": this is an expression which is calculated (this is for advanced users only)
-
-
Logically insert a completely new Fact (see "Truth Maintenance" in the Expert documentation) and optionally set a field on the Fact.
-
A literal value: depending on the field’s data type different components will be displayed:
The value field can be one of the following:
-
A literal value: depending on the field’s data type different components will be displayed:
-
String → Textbox
-
Any numerical value → Textbox restricting entry to values valid for the numerical sub-type (e.g. a byte can hold values from -128 to 127). BigDecimal and BigInteger data-types are also supported. Please ensure the appropriate Class has been imported in the Package configuration. The import will be added automatically if a POJO model has been uploaded that exposes an accessor or mutator for a BigDecimal or BigInteger field. BigDecimal values are automatically suffixed with "B" indicating to the underlying Engine that the literal value should be interpreted as a BigDecimal. BigIntegers are suffixed with "I". The user does not need to enter the suffix.
-
Date → Calendar
-
Enumeration → Listbox
-
Boolean → Checkbox
-
-
A variable bound to a Fact or Field in the left-hand side. The data-type of the field being set must match the data-type of the variable.
-
A "formula": this is an expression which is calculated (this is for advanced users only)
-
-
A variable bound to a Fact or Field in the left-hand side. The data-type of the field being set must match the data-type of the variable.
-
A "formula": this is an expression which is calculated (this is for advanced users only)
-
-
Modify a field of an existing fact (which tells the engine the fact has changed).
The value field can be one of the following:
-
A literal value: depending on the field’s data type different components will be displayed:
-
String → Textbox
-
Any numerical value → Textbox restricting entry to values valid for the numerical sub-type (e.g. a byte can hold values from -128 to 127). BigDecimal and BigInteger data-types are also supported. Please ensure the appropriate Class has been imported in the Package configuration. The import will be added automatically if a POJO model has been uploaded that exposes an accessor or mutator for a BigDecimal or BigInteger field. BigDecimal values are automatically suffixed with "B" indicating to the underlying Engine that the literal value should be interpreted as a BigDecimal. BigIntegers are suffixed with "I". The user does not need to enter the suffix.
-
Date → Calendar
-
Enumeration → Listbox
-
Boolean → Checkbox
-
-
A variable bound to a Fact or Field in the left-hand side. The data-type of the field being set must match the data-type of the variable.
-
A "formula": this is an expression which is calculated (this is for advanced users only)
-
-
Set a field on a fact (in which case the engine doesn’t know about the change - normally because you are setting a result).
The value field can be one of the following:
-
A literal value: depending on the field’s data type different components will be displayed:
-
String → Textbox
-
Any numerical value → Textbox restricting entry to values valid for the numerical sub-type (e.g. a byte can hold values from -128 to 127). BigDecimal and BigInteger data-types are also supported. Please ensure the appropriate Class has been imported in the Package configuration. The import will be added automatically if a POJO model has been uploaded that exposes an accessor or mutator for a BigDecimal or BigInteger field. BigDecimal values are automatically suffixed with "B" indicating to the underlying Engine that the literal value should be interpreted as a BigDecimal. BigIntegers are suffixed with "I". The user does not need to enter the suffix.
-
Date → Calendar
-
Enumeration → Listbox
-
Boolean → Checkbox
-
-
A variable bound to a Fact or Field in the left-hand side. The data-type of the field being set must match the data-type of the variable.
-
A "formula": this is an expression which is calculated (this is for advanced users only)
-
-
Delete a fact from the Engine’s Working Memory.
-
Add Facts to existing global lists.
-
Call a method on a variable.
-
Write a chunk of free form code.
21.2.4. Optional attributes
The attributes section of a rule provides the means to define metadata and attributes (such as "salience", "no-loop" etc).
Click on the "+" icon to add a new metadata or attribute definition. Each defined will appear listed in this section.
Click on the "-" icon beside each metadata or attribute to remove it.
21.2.4.1. Salience
Each rule has a salience value which is an integer value that defaults to zero. The salience value represents the priority of the rule with higher salience values representing higher priority. Salience values can be positive or negative.
21.2.5. Pattern/Action toolbar
G : Next to each Pattern or Action you will find a toolbar containing 3 buttons.
The first "+" icon lets you insert a new Pattern/Action at an arbitrary location. The other "+" icons allow you to insert a new Pattern/Action below that you have selected.
The remaining arrow icons allow you to move the current Pattern/Action up or down.
21.2.6. User driven drop down lists
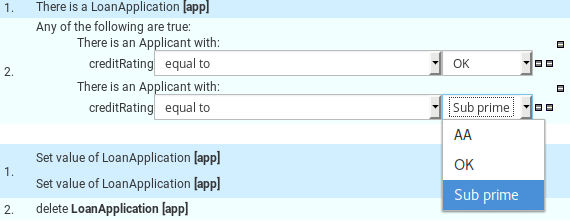
Note that is it possible to limit field values to items in a pre-configured list. This list is either defined by a Java enumeration or configured as part of the package (using a data enumeration to provide values for the drop down list). These values can be a fixed list, or (for example) loaded from a database. This is useful for codes, and other fields where there are set values. It is also possible to have what is displayed on screen, in a drop down, be different to the value (or code) used in a rule. See the section on data enumerations for how these are configured.
It is possible to define a list of values for one field that are dependent upon the value of one or more other fields, on the same Fact (e.g. a list of "Cities" depending on the selected "Country region"). Please refer to the section on "Enumerations" for more information.
21.2.7. Augmenting with DSL sentences
If the package the rule is part of has a DSL configuration, when when you add conditions or actions, then it will provide a list of "DSL Sentences" which you can choose from - when you choose one, it will add a row to the rule - where the DSL specifies values come from a user, then a edit box (text) will be shown (so it ends up looking a bit like a form). This is optional, and there is another DSL editor. Please note that the DSL capabilities in this editor are slightly less then the full set of DSL features (basically you can do [when] and [then] sections of the DSL only - which is no different to drools 3 in effect).
The following diagram shows the DSL sentences in action in the guided editor:
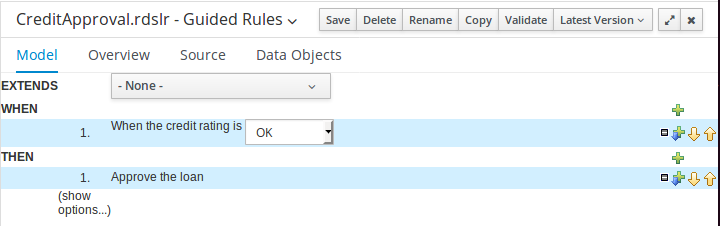
21.2.8. A more complex example:
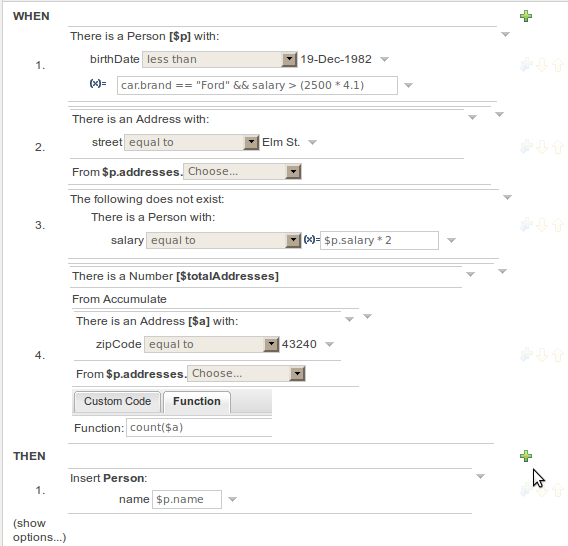
In the above example, you can see how to use a mixture of Conditional Elements, literal values, and formulas. The rule has 4 "top level" Patterns and 1 Action. The "top level" Patterns are:
-
A Fact Pattern on Person. This Pattern contains two field constraints: one for birthDate field and the other one is a formula. Note that the value of the birthDate restriction is selected from a calendar. Another thing to note is that you can make calculations and use nested fields in the formula restriction (i.e. car.brand). Finally, we are setting a variable name ($p) to the Person Fact Type. You can then use this variable in other Patterns.
The generated DRL from this Pattern will be:
$p : Person( birthDate < "19-Dec-1982" , eval( car.brand == "Ford" && salary > (2500 * 4.1) )) -
A From Pattern. This condition will create a match for every Address whose street name is "Elm St." from the Person’s list of addresses. The left side of the from is a regular Fact Pattern and the right side is an Expression Builder that let us inspect variable’s fields.
The generated DRL from this Pattern will be:
Address( street == "Elm St." ) from $p.addresses -
A "Not Exist" Conditional Element. This condition will match when its content doesn’t create a match. In this case, its content is a regular Fact Pattern (on Person). In this Fact Pattern you can see how variables ($p) could be used inside a formula value.
The generated DRL from this Pattern will be:
not Person( salary == ( $p.salary * 2 ) ) -
A "From Accumulate" Conditional Element. This is maybe one of the most complex Patterns you can use. It consist in a Left Pattern (It must be a Fact Pattern. In this case is a Number Pattern. The Number is named $totalAddresses), a Source Pattern (Which could be a Fact Pattern, From, Collect or Accumulate conditional elements. In this case is an Address Pattern Restriction with a field restriction in its zip field) and a Formula Section where you can use any built-in or custom Accumulate Function (in this example a count() function is used). Basically, this Conditional Element will count the addresses having a zip code of 43240 from the Person’s list of addresses.
The generated DRL from this Pattern will be: `$totalAddresses : Number() from accumulate ($a : Address( zipCode == " 43240") from $p.addresses, count($a)) `
21.3. Templates of assets/rules
The guided rule editor is great when you need to define a single rule, however if you need to define multiple rules following the same structure but with different values in field constraints or action sections a "Rule Template" is a valuable asset. Rule templates allow the user to define a rule structure with place-holders for values that are to be interpolated from a table of data. Literal values, formulae and expressions can also continue to be used.
Rule Templates can often be used as an alternative for Decision Tables in Drools Workbench.
21.3.1. Creating a rule template
To create a template for a rule simply select the "Guided Rule Template" from the "New Item" menu.
21.3.2. Define the template
Once a rule template has been created the editor is displayed. The editor takes the form of the standard guided editor explained in more detail under the "Rule Authoring" section. As the rule is constructed you are given the ability to insert "Template Keys" as place-holders within your field constraints and action sections. Literal values, formulae and expressions can continue to be used as in the standard guided editor.

The following screenshot illustrates a simple rule that has been defined with a "Template Key" for the applicants' maximum age, minimum age and credit rating. The template keys have been defined as "$max_age", "$min_age" and "$cr" respectively.
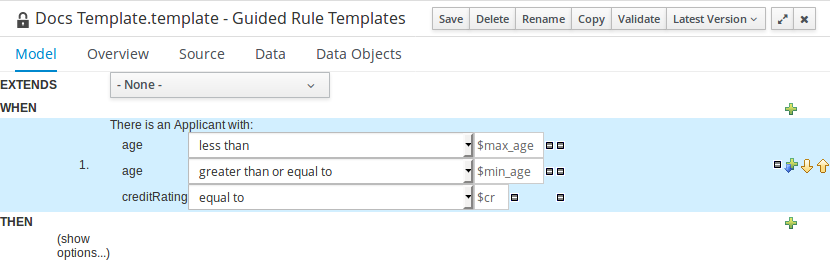
21.3.3. Defining the template data
When you have completed the definition of your rule template you need to enter the data that will be used to interpolate the "Template Key" place-holders. Drools Workbench provides the facility to enter data in a flexible grid within the guided editor screen. The data entry section is located on the Data tab within the editor.
The rule template data grid is very flexible; with different pop-up editors for the underlying fields' data-types. Columns can be resized and sorted; and cells can be merged and grouped to facilitate rapid data entry.
One row of data interpolates the "Template Key" place-holders for a single rule; thus one row becomes one rule.
|
If any cells for a row are left blank a rule for the applicable row is not generated. |
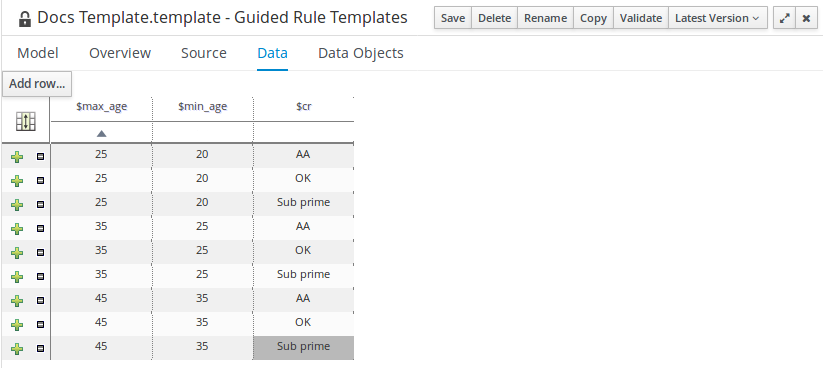
21.3.3.1. Cell merging
The icon in the top left of the grid toggles cell merging on and off. When cells are merged those in the same column with identical values are merged into a single cell. This simplifies changing the value of multiple cells that shared the same original value. When cells are merged they also gain an icon in the top-left of the cell that allows rows spanning the merged cell to be grouped.
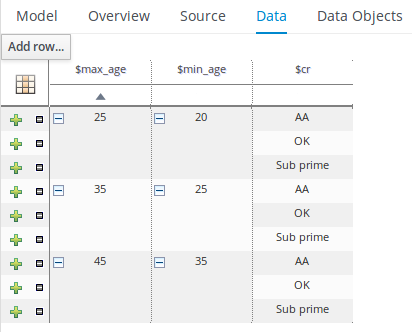
21.3.3.2. Cell grouping
Cells that have been merged can be further collapsed into a single row. Clicking the [+\-] icon in the top left of a merged cell collapses the corresponding rows into a single entry. Cells in other columns spanning the collapsed rows that have identical values are shown unchanged. Cells in other columns spanning the collapsed rows that have different values are highlighted and the first value displayed.
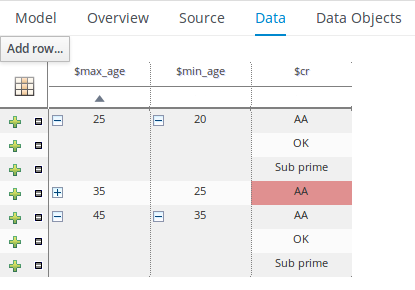
When the value of a grouped cell is altered all cells that have been collapsed also have their values updated.
21.3.4. Generated DRL
Whilst not necessary, rule authors can view the DRL that will be generated for a "Rule Template" and associated data. This feature and its operation is no different to that for other assets. Select the "Source" tab from the bottom of the editor screen. The DRL for all rules will be displayed.
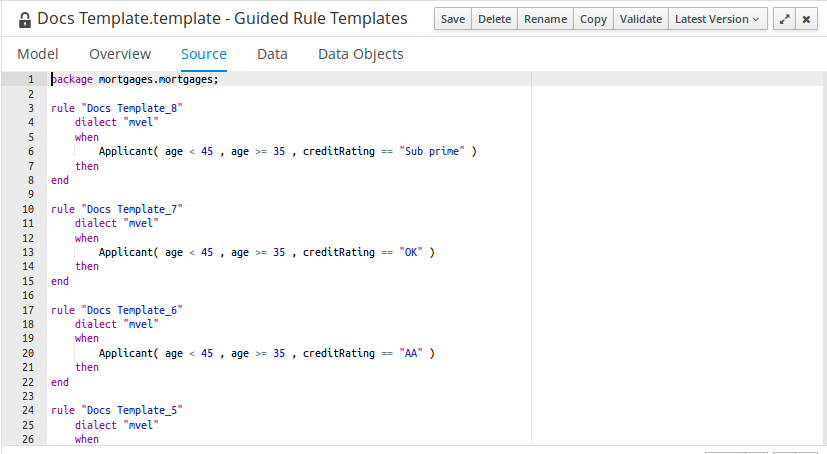
21.4. Guided Decision Tables
The Guided Decision Table editor supports authoring decision tables. Rule attributes, meta-data, conditions and actions can be defined in a tabular format thus facilitating rapid entry of large sets of related rules. Web-based decision table rules are compiled into DRL like all other rule assets.
Data Objects available in the project, either manually created with the Data Object Editor or present in dependencies added to the Project, can be used in column definitions.
21.4.1. Types of decision table
There are broadly two different types of decision table, both of which are supported in the Workbench:-
-
Extended Entry
-
Limited Entry
21.4.1.1. Extended Entry
An Extended Entry decision table is one for which the column definitions, or stubs, specify Pattern, Field and operator but not value. The values, or states, are themselves held in the body of the decision table. It is normal, but not essential, for the range of possible values to be restricted by limiting entry to values from a list. The Workbench supports use of Java enumerations, Workbench enumerations or decision table "optional value lists" to restrict value entry.

21.4.1.2. Limited Entry
A Limited Entry decision table is one for which the column definitions specify a value in addition to Pattern, Field and operator. The decision table states, held in the body of the table, are boolean where a positive value (a checked tick-box) has the effect of meaning the column should apply, or be matched. A negative value (a cleared tick-box) means the column does not apply.
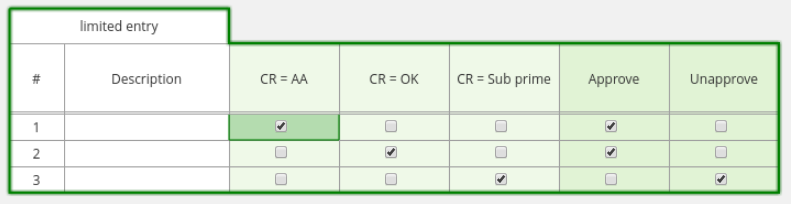
21.4.1.3. Navigation
The editor can be "panned" by pressing the left-mouse button and dragging. Tables can also be repositioned by left-clicking on the table title and dragging. Double-clicking the table title locks the table in the editor preventing repositioning; however content overflowing the visible bounds of the editor can be scrolled into view by panning the editor.
Cells can be selected in a variety of ways:-
-
Firstly individual cells can be double-clicked and an in-cell editor corresponding to the underlying data-type will appear. Groups of cells in the same column can be selected by clicking in the first cell and then clicking the extent of the required range with the shift key pressed.
-
Secondly the keyboard cursor keys can be used to navigate around the table. Pressing the enter key will pop-up the corresponding editor. Ranges can be selected by pressing the shift key whilst extending the range with the cursor keys.
Columns can be resized by hovering over the corresponding divider in the table body. The mouse pointer will change and then the column width dragged either narrower or wider.
Columns can be moved by hovering over the corresponding header in the table header. The mouse pointer will change to indicate the operation is possible and then the column can be dragged to a new permissible position. Constraints on individual fields can be repositioned within their parent pattern. Blocks of columns for a single pattern can be repositioned by dragging the pattern header.
Menus
The principle menu bar contains items to perform the following actions:
-
Save
Saves changes made in the Editor.
-
Delete
Delete the table entirely.
-
Rename
Rename the table.
-
Copy
Copy the file.
-
Validate
Validate the rules generated from the table.
-
Edit
Cut, copy, paste, delete cells selected within the table.
-
View
Adjust the "zoom" level of the view and toggle between merged state. The Audit Log can also be viewed.
-
Insert
Insert rows or columns.
-
Radar
The Radar shows a "mini-view" of the editor. Tables and the region visible in the Editor are simply represented by rectangles. The User can drag the visble region rectangle to reposition the Editor’s visible range.

-
Version history
Shows the different versions of the table.
Pressing the right mouse button whilst over the table shows a context menu. The context menu differs depending on whether the mouse pointer is hovering over a cell or the first, row number, column. The options available in each however is consistent offering the User the ability to cut, copy, insert or delete items.
21.4.1.4. Cell merging
The View→Merged menu entry toggles cell merging on and off. When cells are merged those in the same column with identical values are merged into a single cell. This simplifies changing the value of multiple cells that shared the same original value. When cells are merged they also gain an icon in the top-left of the cell that allows rows spanning the merged cell to be grouped.

21.4.1.5. Cell grouping
Cells that have been merged can be further collapsed into a single row. Clicking the triangular icon in the top right of a merged cell collapses the corresponding rows into a single entry. Cells in other columns spanning the collapsed rows that have identical values are shown unchanged. Cells in other columns spanning the collapsed rows that have different values are highlighted and the first value displayed.

When the value of a grouped cell is altered all cells that have been collapsed also have their values updated.
21.4.2. Defining a web based decision table
21.4.2.1. Defining the table
A table can either be defined using a Wizard that walks the User through creation of columns or manually. The Wizard only supports simple column definitions; should the User need more sophisticated column definitions these need to be added manually after initial creation.
When a new empty decision table has been created the User needs to define columns for Facts, their constraints and corresponding actions. Tables always have two columns created automatically and cannot be deleted: a column for the row/rule number and a column in which a description of the rule can be provided.
21.4.2.2. Defining the table using the Wizard
A Wizard can be used to assist with defining the decision table columns.
The wizard can be chosen when first electing to create a new rule. The wizard provides a number of pages to define the table:-
-
Summary
-
Add Fact Patterns
-
Add Constraints
-
Add Actions to update facts
-
Add Actions to insert facts
-
Columns to expand
Selecting the wizard
The "New Wizard" dialog shows a "Use wizard" checkbox.
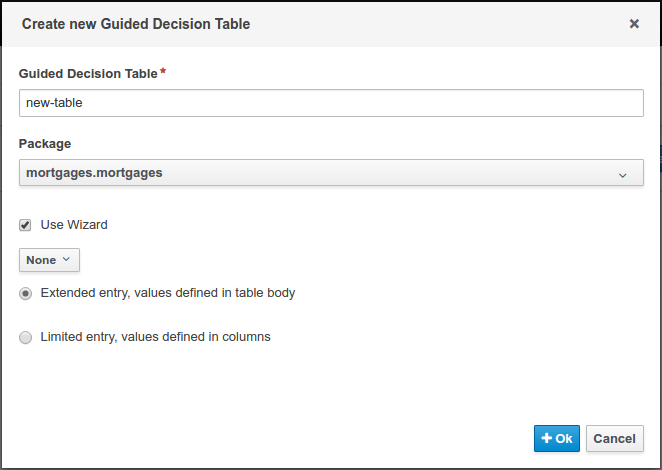
Summary page
The summary page shows a few basic details about the decision table and allows the asset name to be changed.
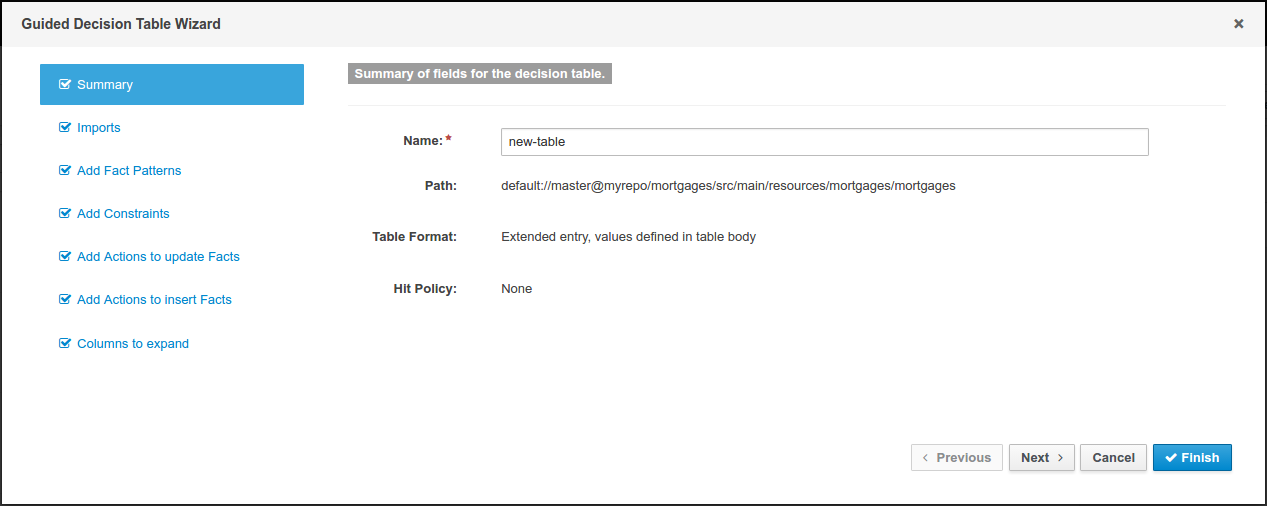
Add Fact Patterns page
This page allows Fact types to be defined that will form the "When" columns of the rules. Fact types that are available in the model will be shown in the left-hand listbox. Select a Fact type and use the ">>" button to add it to the list of chosen facts on the right-hand listbox.
Removal is a similar process: the Fact that is no longer required can be selected in the right-hand listbox and the "<<" button used to remove it. All Fact types need to be bound to a variable.
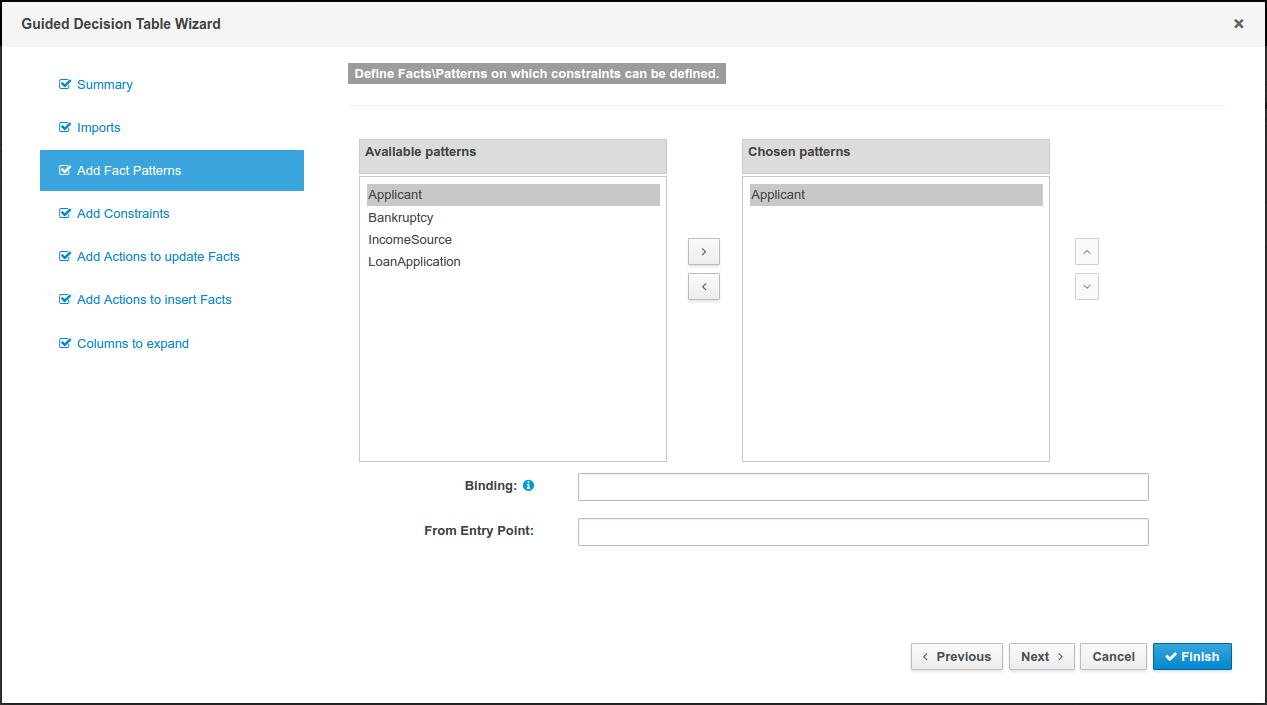
Add Constraints page
This page allows field constraints on the Fact types the User has chosen to use in the decision table to be defined.
Fact types chosen on the previous Wizard page are listed in the right-hand listbox. Selecting a Fact type by clicking on it will result in a list of available fields being shown in the middle listbox together with an option to create a predicate that do not require a specific field.
Fields can be added to the pattern’s constraints by clicking on the field and then the ">>" button. Fields can be removed from the pattern definition by clicking on the Condition in the right-hand listbox and then the "<<" button.
All fields need to have a column header and operator.
Incomplete fields will be highlighted and a warning message displayed. The User will be unable to finish the definition until all warnings have been resolved.
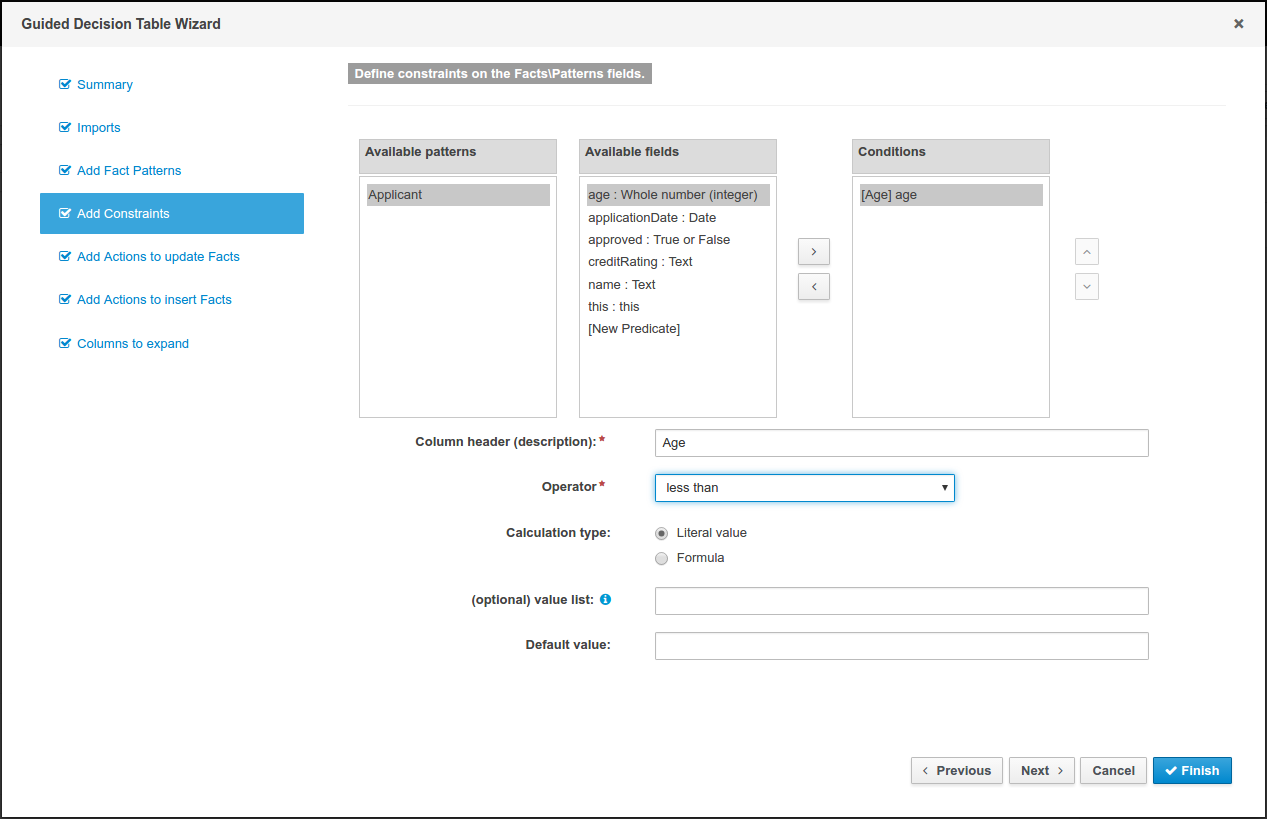
Add Actions to update facts page
Fact types that have been defined can be updated in the consequence, or action, part of a rule. This page allows such actions to be defined.
Fact types added to the decision table definition are listed in the left-hand listbox. Selecting a Fact type by clicking on it will result in a list of available fields being shown in the middle listbox.
Fields that need to be updated by the rule can be added by selecting an available field and pressing the ">>" button. Fields can be removed similarly by clicking on a chosen field and then the "<<" button.
All actions require a column header.
Any incomplete actions will be highlighted and a warning message displayed. The User will be unable to finish the definition until all warnings have been resolved.
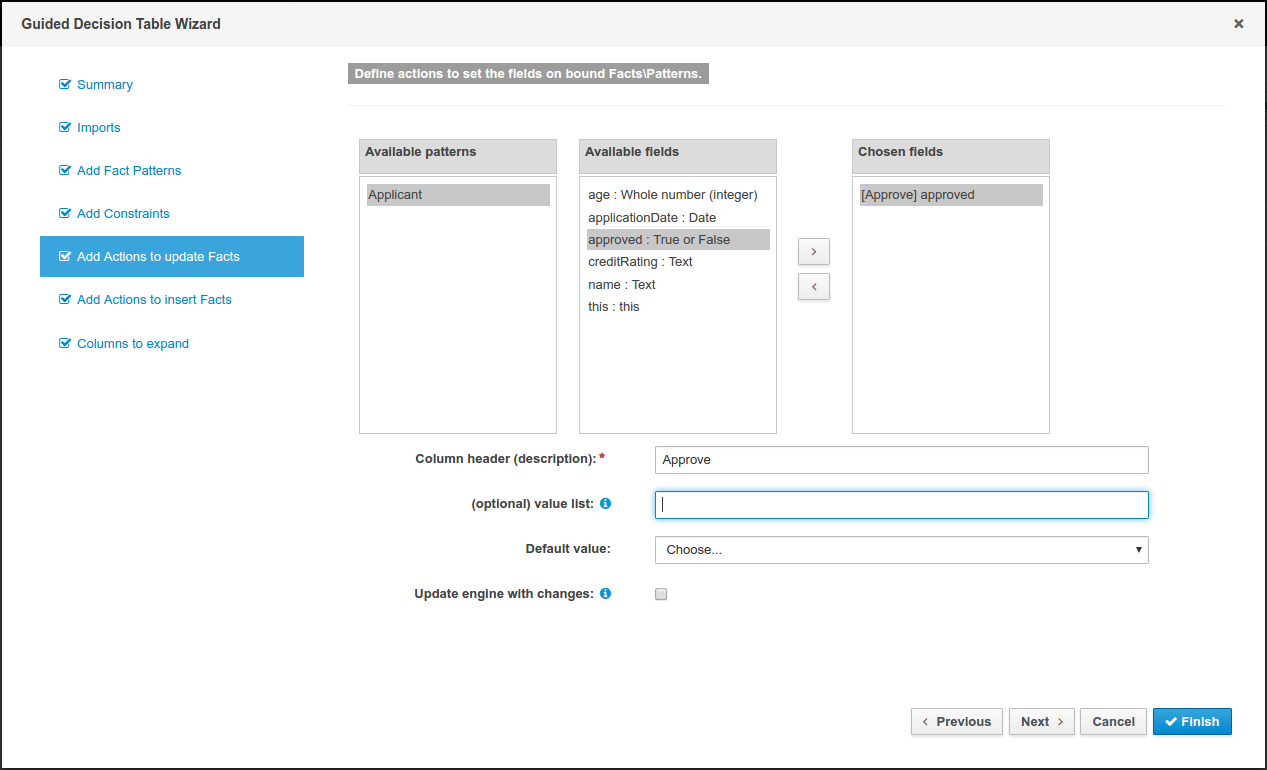
Add Actions to insert facts page
Actions can also be defined to insert new Facts into the Rule Engine.
A list of Fact types available in the model are listed in the left-hand listbox. Select those the User wishes to include in the decision table definition by clicking on them and pressing the “>>” button between the left most listbox and that titled "Chosen patterns".
Removal is a similar process whereby a chosen pattern can be selected and removed by pressing the “<<” button.
Selection of a chosen pattern presents the user with a list of available fields. Fields that need to have values set by the action can be added by selecting them and pressing the “>>” button between the "Available fields" and "Chosen fields" listbox.
Removal is a similar process as already described.
New Facts need to be bound to a variable and have a column heading specified.
Incomplete Facts and\or fields will be highlighted and a warning message displayed. The User will be unable to finish the definition until all warnings have been resolved.
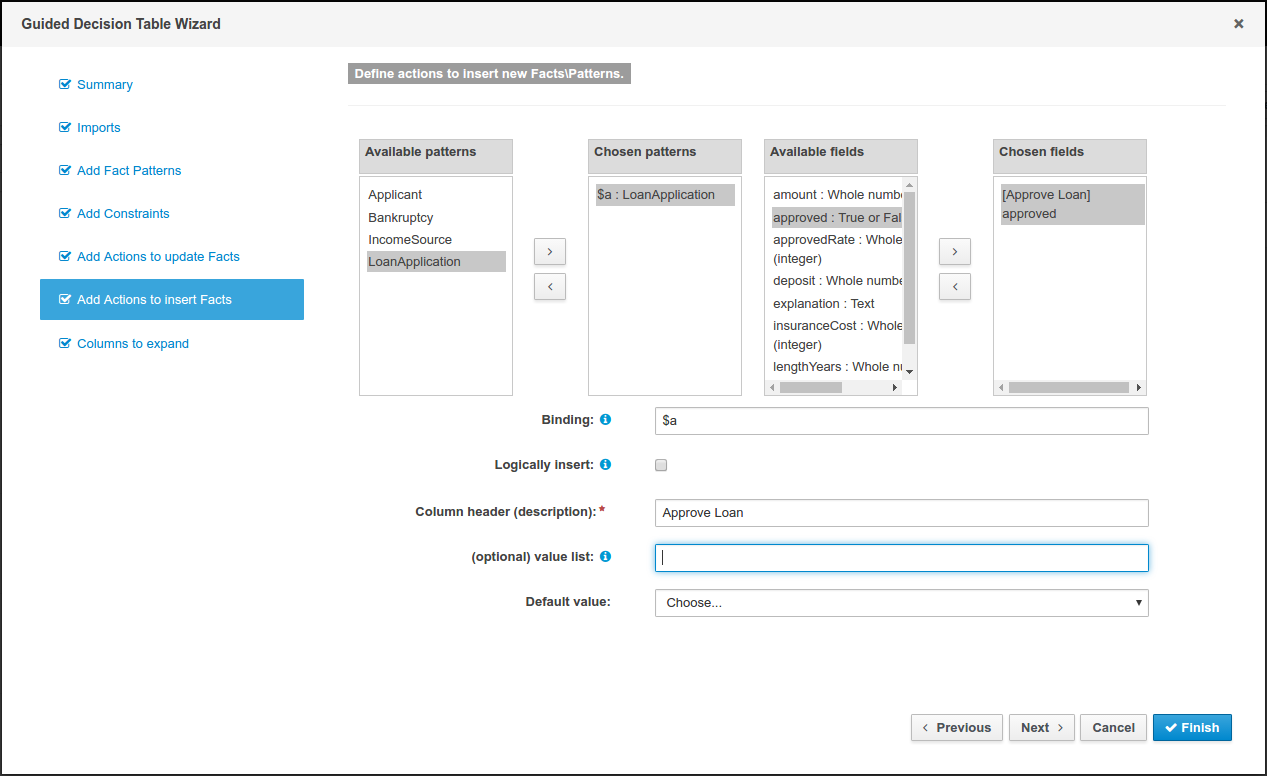
Columns to expand page
This page controls how the decision table, based upon Conditions defined on the prior pages, will be created.
Condition columns defined with an optional list of permitted values can be used to create rows in the decision table. Where a number of Condition columns have been defined with lists of permitted values the resulting table will contain a row for every combination of values; i.e. the decision table will be in expanded form.
By default all Condition columns defined with value lists will be included in the expansion however the User is able to select a sub-set of columns if so required. This can be accomplished by unticking the "Fully expand" checkbox and adding columns to the right-hand listbox.
If no expansion is required untick the "Fully expand" checkbox and ensure zero columns are added to the right-hand listbox.

21.4.2.3. Adding columns manually
When choosing to create a table without the aid of the Wizard an empty table is first presented to the User. To add a column click on the "Add column" button to launch the "New column wizard".
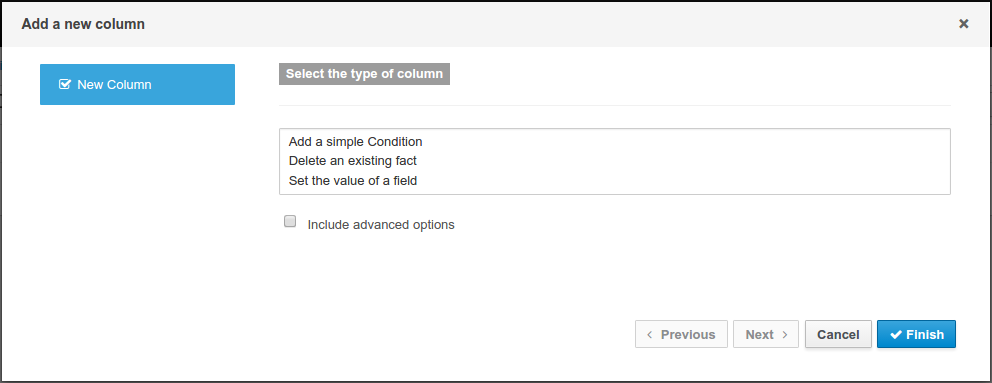
Simple column types
By default the "New column wizard" only shows the following simple types:-
-
Add a simple Condition
-
Delete an existing fact
-
Set the value of a field
Conditions represent constraints on Fact Patterns defined in the left-hand side, or "when" portion, of a rule. To define a condition column the User must first select or define a Fact Pattern bound to a model class.
The user can choose to negate the pattern.
Once this has been completed the User can define field constraints.
If two or more columns are defined using the same fact pattern binding the field constraints become composite field constraints on the same pattern.
If the User define multiple bindings for a single model class each binding becomes a separate model class in the left-hand side of the rule.
When the User edits or creates a new column, they will be given a choice of the type of constraint:-
-
Literal : The value in the cell will be compared with the field using the operator.
-
Formula: The expression in the cell will be evaluated and then compared with the field.
-
Predicate : No field is needed, the expression will be evaluated to true or false.
Condition columns defined with literal values that use either the equality (==) or inequality (!=) operators can take advantage of a special decision table cell value of "otherwise". This special value allows a rule to be defined that matches on all values not explicitly defined in all other rules defined in the table. This is best illustrated with an example:-
when
Cheese( name not in ("Cheddar", "Edam", "Brie") )
...
then
...
endwhen
Cheese( name in ("Cheddar", "Edam", "Brie") )
...
then
...
endAn Action to delete a bound Fact.
An Action to set the value of a field on previously bound fact or on a new instance of a fact. The User has the option to notify the Rule Engine of the modified values which could lead to other rules being re-activated.
The User can choose to have the new Fact "logically inserted" meaning it will be automatically deleted should the conditions leading to the action being invoked cease to be true.
Please refer to the Drools Expert documentation for details on Truth Maintenance and Logical insertions.
Advanced column types
Clicking on "Include advanced options" adds the following additional "advanced" column types for more advanced use cases:-
-
Add a Condition BRL fragment
-
Add a new Attribute column
-
Add a new Metadata column
-
Add an Action BRL fragment
-
Execute a Work Item
-
Set the value of a field with a Work Item parameter
A construct that allows a BRL fragment to be used in the left-hand side of a rule. A BRL fragment is authored using the Guided Rule Editor and hence all features available in that editor can be used to define a decision table column; such as "from", "collect" and "accumulate" etc.
When using the embedded Guided Rule Editor field values defined as "Template Keys" will form columns in the decision table.
Facts and Fact’s fields bound in the BRL fragment can be referenced by the simpler column types and vice-versa.
In the following example two Template Keys have been defined and hence two columns appear in the decision table.
|
The User can use "Free Form DRL" to define Condition columns too.
If the User needs a place-holder for a variable in the DRL the User can use the Drools Templates syntax of |
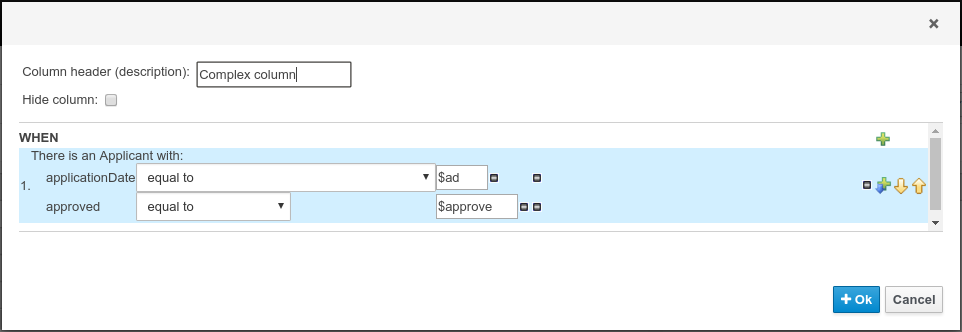
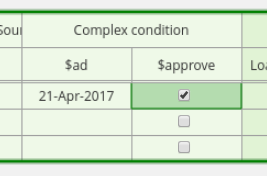
Zero or more attribute columns representing any of the DRL rule attributes (e.g. salience, timer, enabled etc) can be added. An additional pseudo attribute is provide in the guided decision table editor to "negate" a rule. Use of this attribute allows complete rules to be negated. For example the following simple rule can be negated as also shown.
when
$c : Cheese( name == "Cheddar" )
then
...
endwhen
not Cheese( name == "Cheddar" )
then
...
endZero or more meta-data columns can be defined, each represents the normal meta-data annotation on DRL rules.
A construct that allows a BRL fragment to be used in the right-hand side of a rule. A BRL fragment is authored using the Guided Rule Editor and hence all features available in that editor can be used to define a decision table column. When using the embedded Guided Rule Editor field values defined as "Template Keys" will form columns in the decision table. Facts bound in the BRL fragment can be referenced by the simpler column types and vice-versa.
|
The user can use "Free Form DRL" to define Action columns too.
If the User needs a place-holder for a variable in the DRL they can use the Drools Templates syntax of |
In the following example two Template Keys have been defined and hence two columns appear in the decision table.
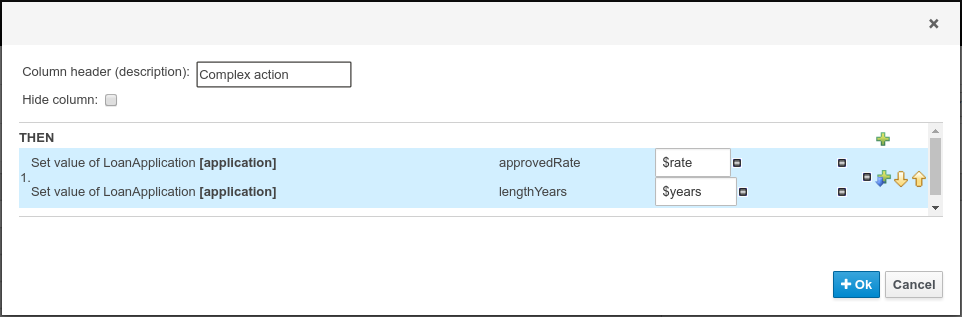
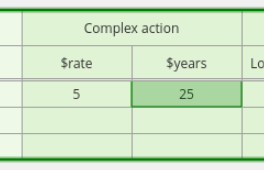
An Action invoking a jBPM Work Item Handler setting its input parameters to bound Facts\Facts fields values.
An Action setting the value of an existing Fact’s or new Fact’s field to that of a jBPM Work Item Handler’s result parameter.
|
Creation and editing of column definitions can be disabled for users by revoking permission "Edit Guided Decision Table columns". These users will still be able to modify the Decision Table data however they will be unable to change the Decision Table’s structure avoiding situations when they could accidentally break its functionality. See Security management to check how to disable it in the general workbench permissions section. |
21.4.2.4. Editing columns
To edit a column click on the "Edit columns" button to show existing column definitions. Clicking on "Edit" launches a window to edit the column definition. Clicking on "Delete" removes the column from the table.
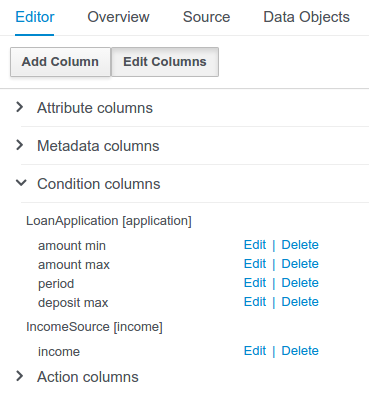
|
The definition of a column can also be found by hovering the mouse pointer over the column. A popup will appear showing a hint of the definition. It is considered a hint as all conditions have a dummy value interpolated. 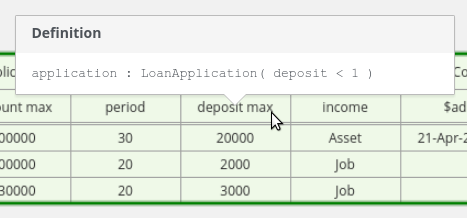
Figure 356. Column definition hint
|
21.4.3. Hit Policy
The hit policies decision table can use are similar to what the DMN specification has. Hit policies declare priorities between the rule rows and how many rules in the table can fire. All the hit policies can be replicated with setting the correct activation-group and salience values for each row, infact this is what the DRL underneath does.
The hit policy can only be set when the decision table is first created.
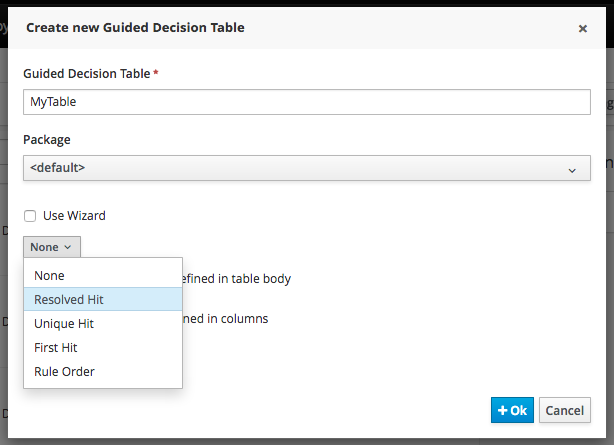
Once the table is viewed in the editor. The hit policy that is being used can be seen in the top left corner of the table.
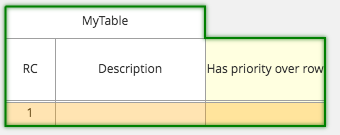
-
U = Unique Hit With unique hit policy each row has to be unique meaning there can be no overlap. There can never be a situation where two rows can fire, if there is the Verification feature warns about this on development time.
-
F = First Hit First hit fires only one row, the one that is satisfied first from top to bottom.
-
RC = Resolved Hit Similar to First Hit, but you can for example give row 10 priority over row 5. This means you can keep the order of the rows you want for visual readability, but specify priority exceptions.
-
R = Rule Order Multiple rows can fire and Verification does not report about conflicts between the rows since they are expected to happen.
-
# = None This is the normal hit mode. Old decision tables will use this by default, but since 7.0 uses PHREAK the row order now matters. There is no migration tooling needed for the old tables. Multiple rows can fire. Verification warns about rows that conflict.
21.4.4. Audit Log
An audit log has been added to the web-guided Decision Table editor to track additions, deletions and modifications.
By default the audit log is not configured to record any events, however, users can easily select the events in which they are interested.
The audit log is persisted whenever the asset is checked in.
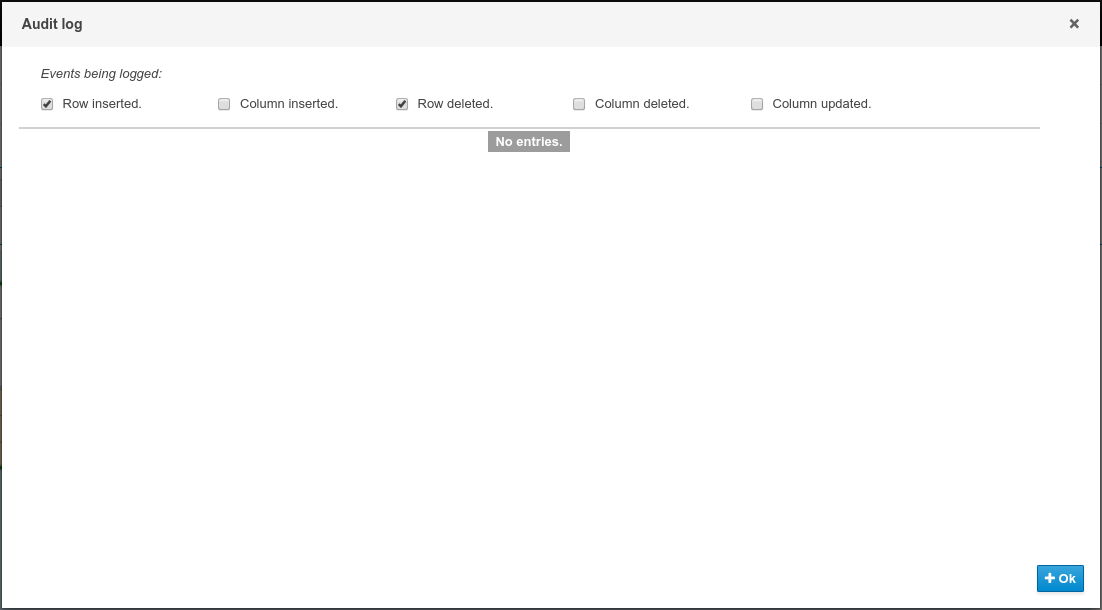
Once the capture of events has been enabled all susbsequent operations are recorded. Users are able to perform the following:-
-
Record an explanatory note beside each event.
-
Delete an event from the log. Event details remain in the underlying repository.
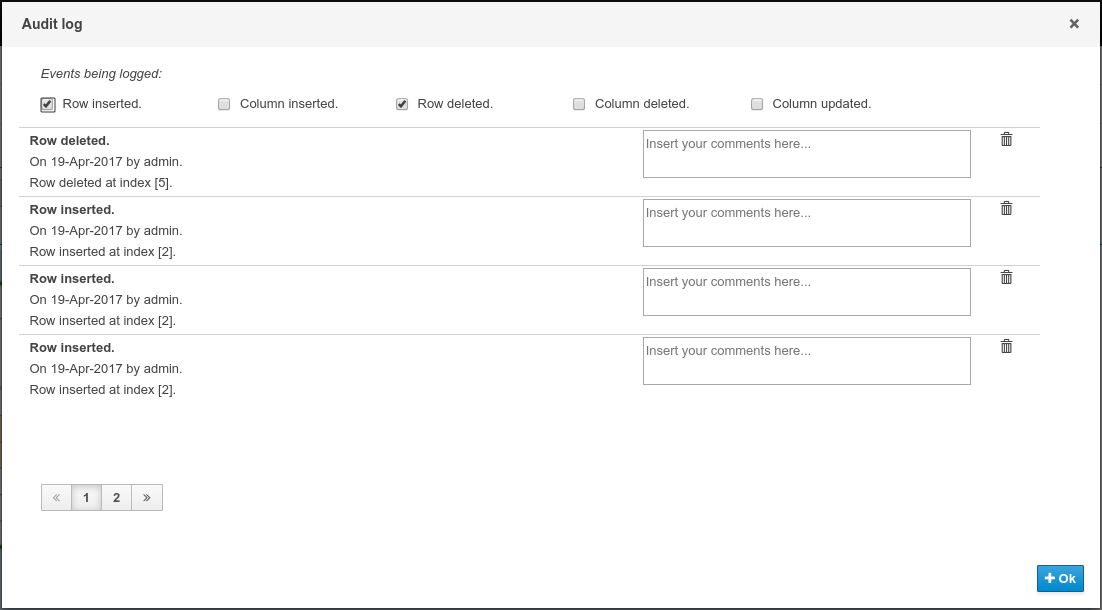
21.4.5. Real Time Validation and Verification
Decision tables are validated after each cell change. If any issues are found the results will be shown in the column on the right side of the table. Validation and verification covers the following issues:
21.4.5.1. Redundancy
Redundancy exists between two rows when both rows execute the same actions when given the same set of facts.
Redundancy might not be a problem if the redundant rules are setting a value on an existing fact, this just sets the value twice. Problems occur when the two rules increase a counter or add more facts into the working memory, since this causes unwanted side effects. In both cases the other row is not needed.
21.4.5.2. Subsumption
Subsumption exists when one row executes the same action as another row when given the same set of facts. The rows are not redundant since the another row is more complicated and it can fire with a set of facts that do not fire the subsumptant row.
The problems with subsumption are similar to the case with redundancy.
21.4.5.3. Conflicts
Conflicts can exist either on a single row or between rows.
A single row conflict prevents the row actions from ever being executed.
Conflict between two rows exists when the conditions of two rules are met with a same set of facts, but the actions set fact fields to different values. The conditions can be redundant or just subsumptant. Conflicts are a problem because it is impossible to know what action is made last. Conditions might set a loan to both approbed and rejected. The end result may be different on each time the rules are ran and with each rule engine software version.
21.4.5.4. Missing Columns
In some cases, usually by accident, the user can delete all the condition or action columns. When the conditions are removed all the actions are executed and when the actions columns are missing the rows do nothing.
21.4.5.5. Range Checks
Range checks help you to make more complete Decision Tables. They check if the table contains constraints against all the possible values a field can have. Once the table is complete any given set of facts will have an action.
21.5. Guided Decision Table Graphs
Whilst it is possible to author single Guided Decision Tables it is also possible to author a graph of related tables where an action of one may provide a potential match for a condition of another. In this scenario the tables are said to be related.
21.5.1. Editor
The editor itself preserves all the features of the Guided Decision Table Editor merely adding the ability to visualise multiple tables and their relationships in a single view. Selecting a single table leads to the column definitions panel, Source and Data Objects tabs being updated to reflect the selected table. Validation & Verification reporting is also updated to reflect the selected table. The Overview tab maintains state of the graph as a whole.
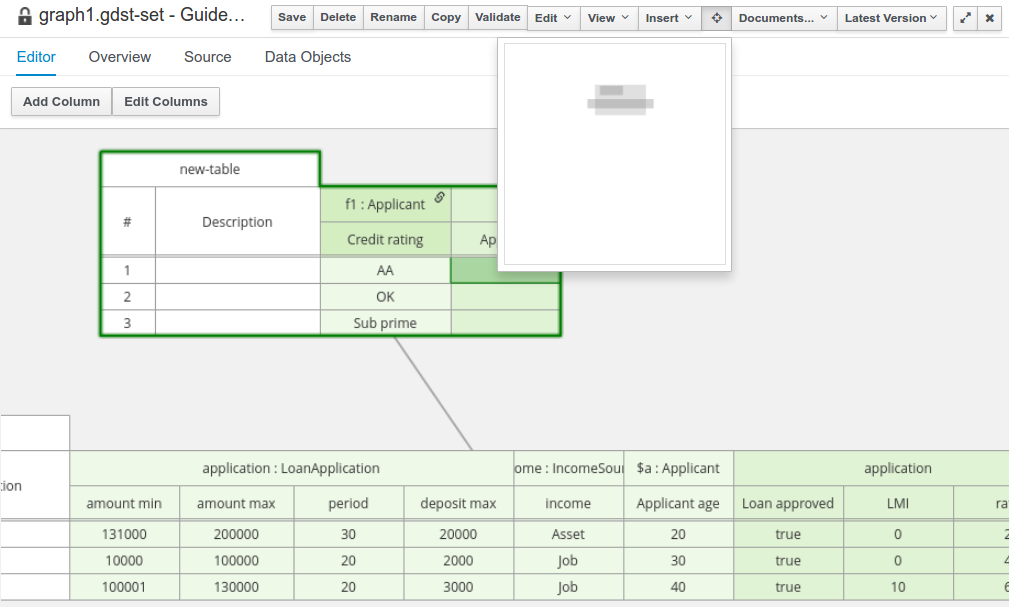
21.5.2. Creating a new graph
When a new "Guided Decision Table Graph" is first created the target package is scanned for existing single Guided Decision Tables. Those found are checked for relationships and, if any exist, added automatically to the new graph.
21.5.3. Adding new tables to the graph
Tables can be added to the graph by clicking on the "Documents…" menu entry. This reveals a tool panel that lists the tables already part of the graph. The same panel gives the User the ability to either add a new table or open an existing table.
21.5.3.1. Adding new tables
Clicking on "New…" launches the New Guided Decision Table Wizard. On completion of the Wizard the new table will be added to the graph and any relationships automatically added.
21.5.3.2. Adding existing tables
Clicking on "Open…" reveals a file selector wherefrom one or more existing Guided Decision Tables can be selected and added to the graph. If no additional Guided Decision Tables are found a message is shown to the User.
21.5.4. Removing tables
Tables can be removed from the graph by opening the "Documents…" panel and clicking on the "X" icon beside the table. Tables removed from the graph are not deleted from the Project and can continue to be edited by the Gudied Decision Table Editor.
21.6. Guided Decision Trees
The Workbench supports authoring of simple Decision Trees.
|
The editor does not support nested Data Objects at present. It is therefore advised to only use Guided Decision Trees with flat Data Object models. |
21.6.1. The initial editor layout
When a new Guided Decision Tree is created the editor is initially blank.
The left-hand side is a palette of available Data Objects, their fields and Actions.
The right-hand side is the area where you can drag and drop Data Objects, their fields or Actions to build a tree.
The editor will show a connector between the node being dragged and applicable children to which it can be attached. When the drag is complete the new node will be attached to the applicable child. Root nodes will not have a connector shown when being dragged to an empty tree. Completing the drag positions the root node in the centre of the editor.
There are various restrictions when composing a tree:-
-
A tree must have a Data Object at the root.
-
A tree can only have one root.
-
Data Objects can have either other Data Objects, field constraints or Actions as children.
The field constraints must be on fields of the same Data Object as the parent node.
-
Field constraints can have either other field constraints or Actions as children.
The field constraints must be on fields of the same Data Object as the parent node.
-
Actions can only have other Actions as children.
Expanding the palette reveals Tree Nodes for the Data Object and its fields.
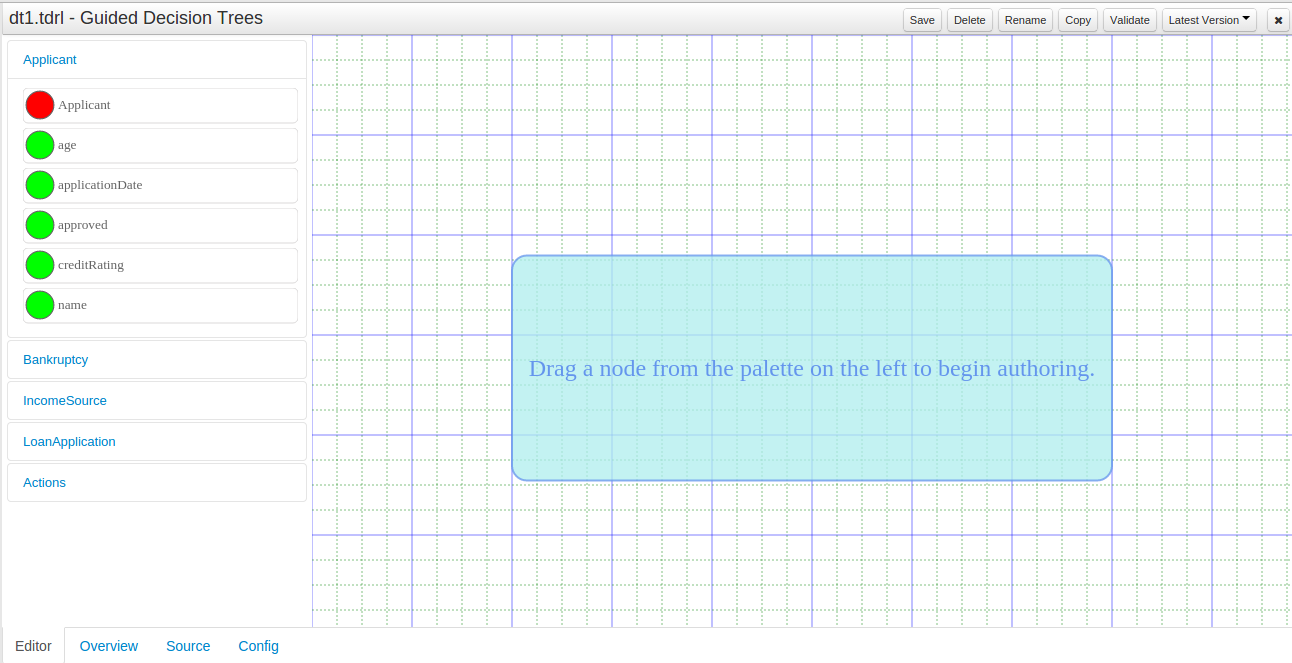
21.6.2. First steps
Drag a Data Object on to the tree authoring area.
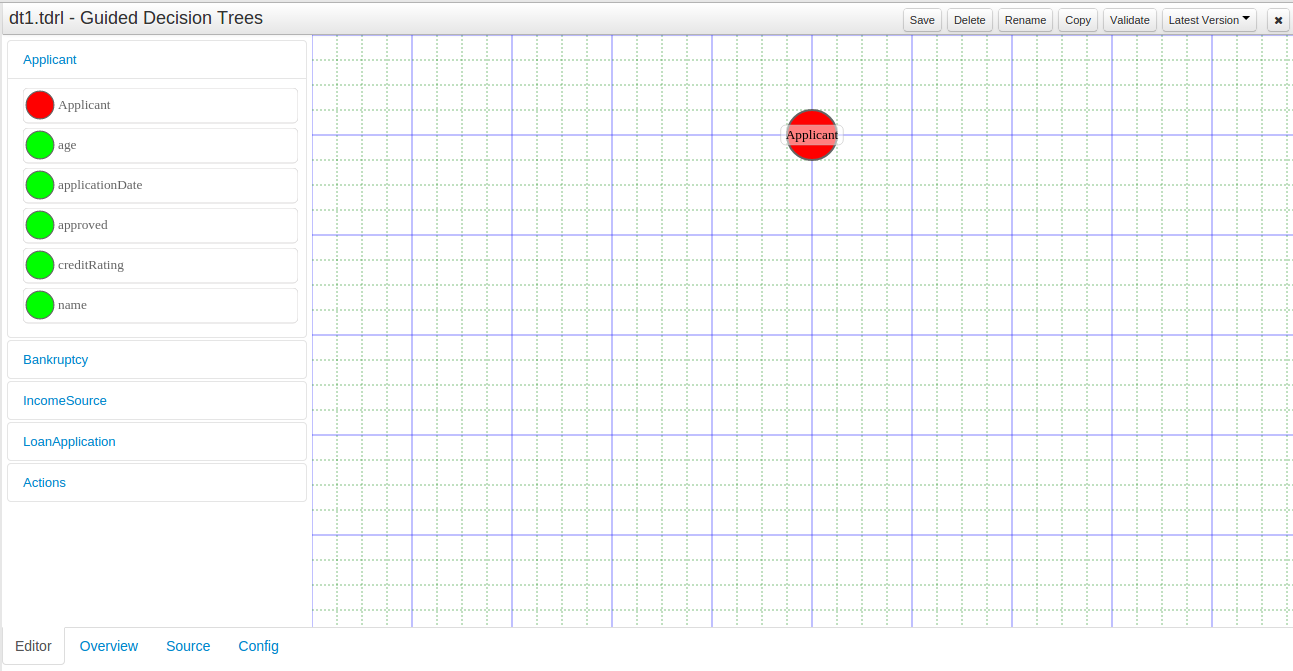
Clicking on a node selects it.
Icons to manipulate the node appear when the node is selected.
The icons are:
-
Delete
Deleting a node will also delete all children.
-
Edit
Collapsed nodes cannot be edited as they contain numerous children.
-
Collapse
21.6.3. Editing Data Object nodes
Selecting a Data Object node and clicking the edit icon shows a popup to manage the node.
The popup shows the Data Object type and allows it to be bound to a variable. Bound Data Objects can be modified or retracted by Actions.
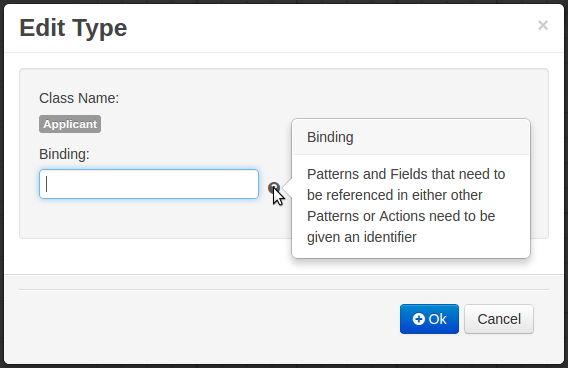
21.6.4. Editing Field Constraint nodes
Selecting a Field Constraint node and clicking the edit icon shows a popup to manage the node.
The popup shows the Data Object type and field and allows the field to be bound to a variable. An operator, applicable to the Data Model field’s data-type, can be selected and a corresponding value entered.
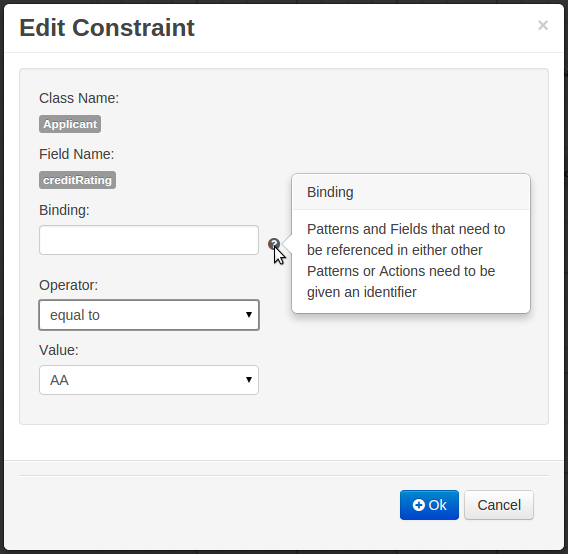
21.6.5. Editing Action nodes
Selecting an Insert Action node and clicking the edit icon shows a popup to manage the node.
The popup allows selection of the Data Object to be inserted and whether it’s insertion is "logical". Please refer to Drools documentation regarding Truth Maintenance for more information. Fields for the new Data Object can have values set.
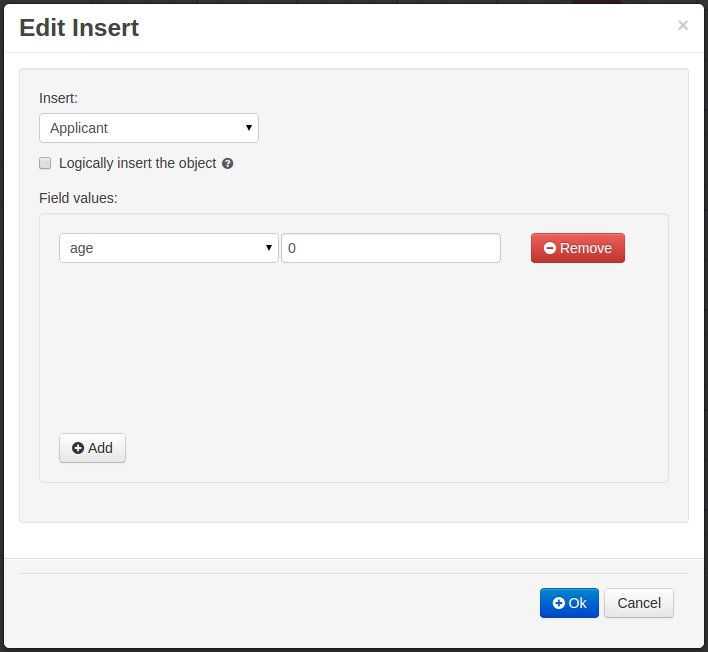
Selecting an Insert Retract node and clicking the edit icon shows a popup to manage the node.
The popup allows any Data Object bound in the path from the selected node to the root node to be selected for retraction.
Selecting an Insert Update node and clicking the edit icon shows a popup to manage the node.
The popup allows any Data Object bound in the path from the selected node to the root node to be modified. Fields for the modified Data Object can have values set.
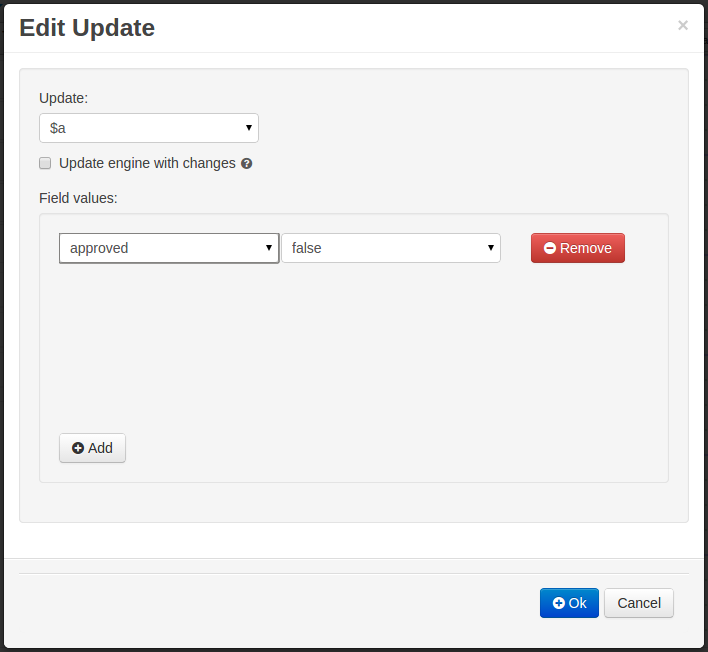
21.6.6. Managing the tree
Even simple trees can grow in size and become difficult to maintain.
It is therefore possible to collapse parts of the tree, giving more space in the user interface to maintain different parts of the tree.
If a node has children, when selected, it will have an icon to collapse the children. Clicking this icon will collapse children.
A collapsed node can equally be expanded by selecting it and clicking on the exapnd icon. A collapsed node cannot be edited as it contains numerous children. Deleting a collapsed node deletes all children too.
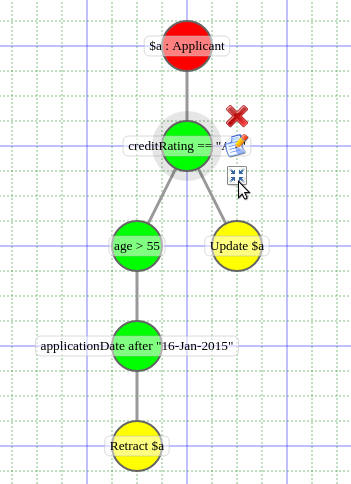
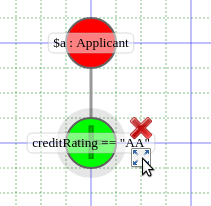
21.7. Spreadsheet decision tables
Multiple rules can be stored in a spreadsheet. Each row in the spreadsheet is a rule, and each column is either a condition, an action, or an option. The Drools Expert section of this document discusses spreadsheet decision tables in more detail.
To use a spreadsheet, you upload an XLS or XLSX file. To create a new decision table: launch the new "Decision Table (Spreadsheet)" wizard, you will get an option to upload one.
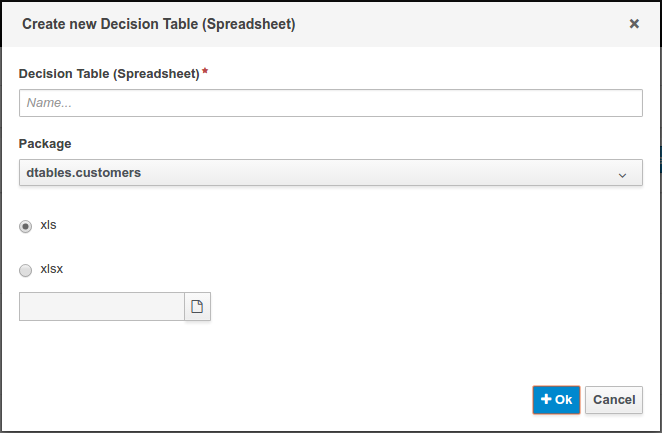
21.7.1. Convert to Guided Decision Table
XLS Decision Tables can be converted to Guided Decision Tables by clicking on the "Convert" menu item in the XLS Decision Table Editor. One or more files will be created depending on the content of the XLS file. Results of the conversion are reported to the User.
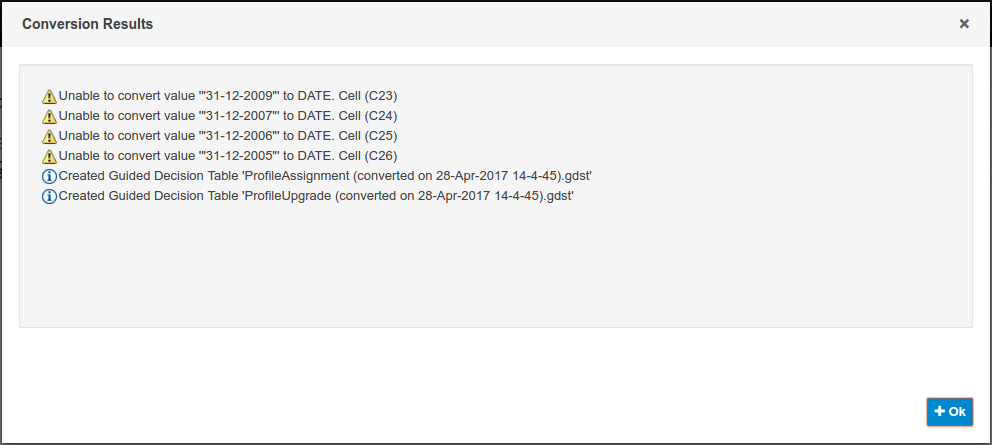
|
The format of |
21.8. Scorecards
A scorecard is a graphical representation of a formula used to calculate an overall score. A scorecard can be used to predict the likelihood or probability of a certain outcome. Drools now supports additive scorecards. An additive scorecard calculates an overall score by adding all partial scores assigned to individual rule conditions.
Additionally, Drools Scorecards will allows for reason codes to be set, which help in identifying the specific rules (buckets) that have contributed to the overall score. Drools Scorecards will be based on the PMML 4.1 Standard.
The New Item menu now allows for creation of scorecard assets.
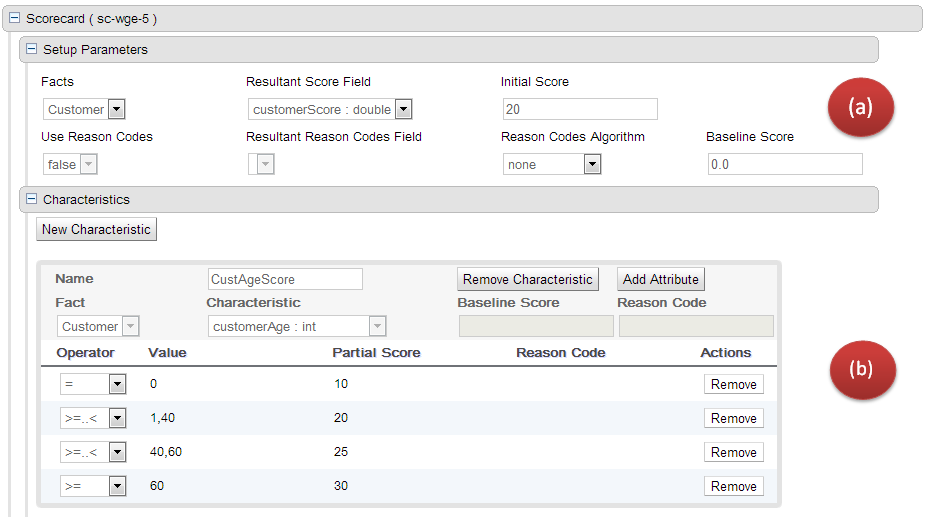
The above image shows a scorecard with one characteristic. Each scorecard consists of two sections (a) Setup Parameters (b) Characteristic Section
21.8.1. (a) Setup Parameters
The setup section consits of parameters that define the overall behaviour of this scorecard.
-
Facts: This dropdown shows a list of facts that are visible for this asset.
-
Resultant Score Field: Shows a list of fields from the selected fact. Only fields of type 'double' are shown. If this dropdown is empty double check your fact model. The final calculated score will be stored in this field.
-
Initial Score: Numeric Text Field to capture the initial score. The generated rules will initialize the 'Resultant Score Field' with this score and then is added to the overall score whenever partial scores are summed up.
-
Use Reason Codes: Boolean indicator to compute reason codes along with the final score. Selecting Yes/No in this field will enable/disable the 'Resultant Reason Codes Field', 'Reason Code Algorithm' and the 'Baseline Score' field.
-
Resultant Reason Codes Field: Shows a list of fields from the selected fact. Only fields of type 'java.util.List' are shown. This collection will hold the reason codes selected by this scorecard.
-
Reason Code Algorithm: May be "none", "pointsAbove" or "pointsBelow", describing how reason codes shall be ranked, relative to the baseline score of each Characteristic, or as set at the top-level scorecard.
-
Baseline Score: A single value to use as the baseline comparison score for all characteristics, when determining reason code ranking. Alternatively, unique baseline scores may be set for each individual Characteristic as shown below. This value is required only when UseReasonCodes is "true" and baselineScore is not given for each Characteristic.
|
If UseReasonCodes is "true", then BaselineScore must be defined at the Scorecard level or for each Characteristic, and ReasonCode must be provided for each Characteristic or for each of its input Attributes. If UseReasonCodes is "false", then baselineScore and reasonCode are not required. |
21.8.2. (b) Characteristics
On Clicking the 'New Characteristic' button, a new empty characteristic editor is added to the scorecard. Defines the point allocation strategy for each scorecard characteristic (numeric or categorical). Each scorecard characteristic is assigned a single partial score which is used to compute the overall score. The overall score is simply the sum of all partial scores. Partial scores are assumed to be continuous values of type "double".
21.8.2.1. Creating Characterstics
Every scorecard must have at least one characteristic

-
Name: Descriptive name for this characteristic. For informational reasons only.
-
Remove Charteristic: Will remove this characteristic from the scorecard after a confirmation dialog is shown.
-
Add Attribute: Will add a line entry for an attribute (bin).
-
Fact: Select the class which will be evaluated for calculating the partial score.
-
Characteristic: Shows the list of fields from the selected Fact. Only fields of type "String", "int", "double", "boolean" are shown.
-
Baseline Score: Sets the characteristic’s baseline score against which to compare the actual partial score when determining the ranking of reason codes. This value is required when useReasonCodes attribute is "true" and baselineScore is not defined in element Scorecard. Whenever baselineScore is defined for a Characteristic, it takes precedence over the baselineScore value defined in element Scorecard.
-
Reason Code: Contains the characteristic’s reason code, usually associated with an adverse decision.
21.8.2.2. Creating Attributes
On Clicking the 'New Attribute' button, a new empty attribute editor. In scorecard models, all the elements defining the Attributes for a particular Characteristic must all reference a single field.

-
Operator: The condition upon which the mapping between input attribute and partial score takes place. The operator dropdown will show different values depending on the datatype of the selected Field.
-
DataType Strings: "=", "in".
-
DataType Integers: "=", ">", "<", ">=", "⇐", ">..<", ">=..<", ">=..⇐", ">..⇐".
-
DataType Boolean: "true", "false".
Refer to the next sub-section (values) for more details.
-
-
Value: Basis the operator selected the value specified can either be a single value or a set of values separated by comma (","). The value field is disabled for operator type boolean.
Table 44. Operators / Values Data Type
Operator
Value
Remarks
String
=
Single Value
will look for an exact match
String
in
Comma Separated Values (a,b,c,…)
The operator 'in' indicates an evaluation to TRUE if the field value is contained in the comma separated list of values
Boolean
is true
N/A
Value Field is uneditable (readonly)
Boolean
is false
N/A
Value Field is uneditable (readonly)
Numeric
=
Single Value
Equals Operator
Numeric
>
Single Value
Greator Than Operator
Numeric
<
Single Value
Less Than Operator
Numeric
>=
Single Value
Greater than or equal To
Numeric
<=
Single Value
Less than or equal To
Numeric
>..<
Comma Separated Values (a,b)
(Greater than Value 'a') and (less than value 'b')
Numeric
>=..<
Comma Separated Values (a,b)
(Greater than or equal to Value 'a') and (less than value 'b')
Numeric
>=..<=
Comma Separated Values (a,b)
(Greater than or equal to Value 'a') and (less than or equal to value 'b')
Numeric
>..<=
Comma Separated Values (a,b)
(Greater than Value 'a') and (less than or equal to value 'b')
-
Partial Score: Defines the score points awarded to the Attribute.
-
Reason Code: Defines the attribute’s reason code. If the reasonCode attribute is used in this level, it takes precedence over the ReasonCode associated with the Characteristic element.
-
Actions: Delete this attribute. Prompts the user for confirmation.
|
If Use Reason Codes is "true", then Baseline Score must be defined at the Scorecard level or for each Characteristic, and Reason Code must be provided for each Characteristic or for each of its input Attributes. If Use Reason Codes is "false", then BaselineScore and ReasonCode are not required. |
21.9. Test Scenario
Test Scenarios are used to validate that rules and knowledge base work as expected. When the knowledge base evolves, Test Scenarios guard against regression.
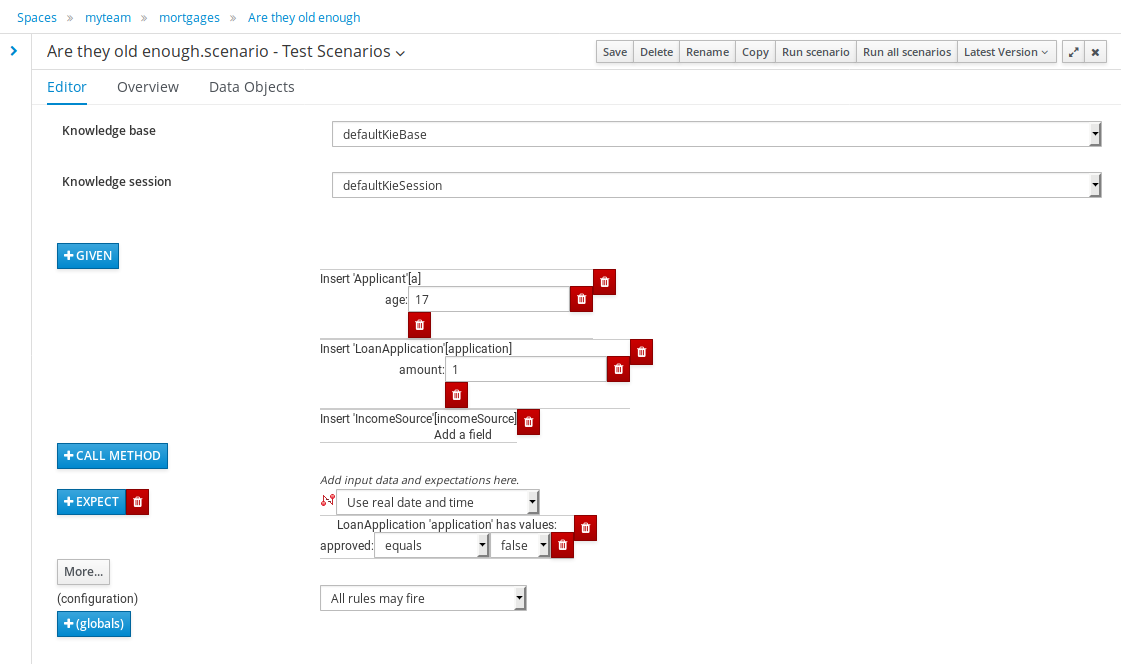
Given section lists the facts needed for the behaviour. Expect section lists the expected changes and actions done by the behaviour. Given facts are passed for the Test Scenario before execution. During the rule execution, changes in the knowledge base are recorded. After the execution ends the recorded actions, existing facts in the knowledge base and knowledge base output is compared against the expectations.
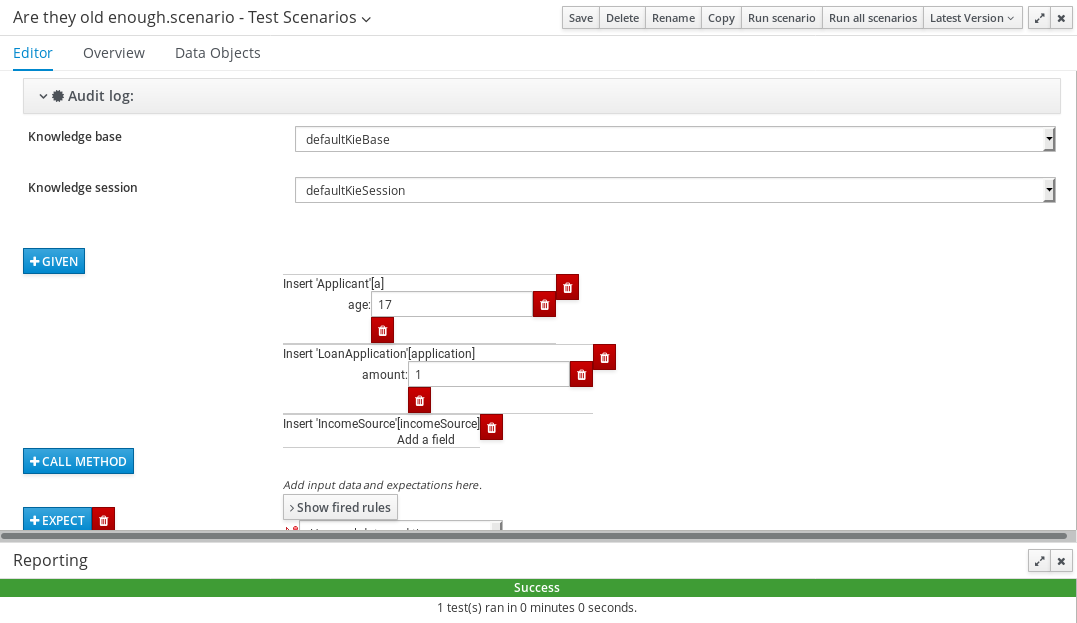
21.9.1. Knowledge Session Selector

Knowledge session selector is used to select the session that the rules are ran against. The knowledge session needs to be stateful and use the pseudo clock when simulated time is used. Knowledge sessions are defined in the Project Editor, in the Knowledge bases and Sessions section.
21.9.2. Given Section
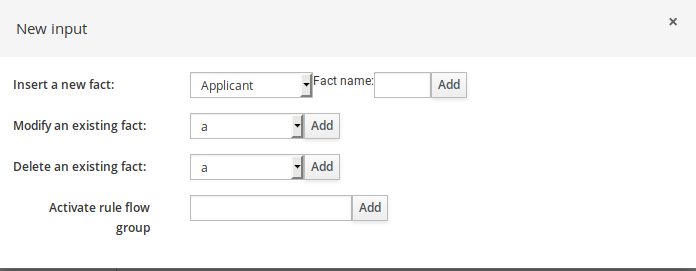
-
Insert a new fact - Adds a new fact that will be inserted into the knowledge base before execution.
-
Modify an existing fact - Allows editing a fact between knowledge base executions.
-
Delete an existing fact - Allows removing facts between executions.
-
Activate rule flow group - Allows rules from a rule flow group to be tested, by activating the group in advance.
21.9.3. Expect Section
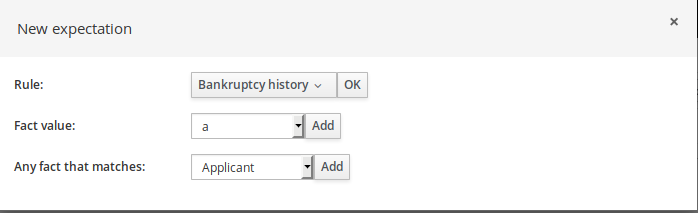
-
Rule - Validate that a certain rule fired.
-
Fact value - Validate fact values for a fact created in the Given section.
-
Any fact that matches - Validate that there is at least one fact in the knowledge base with the specified field values.
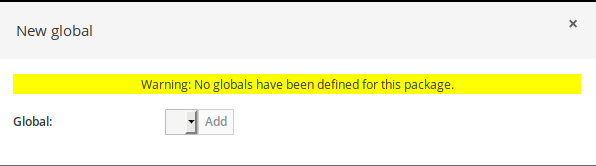
21.9.5. New Input Section
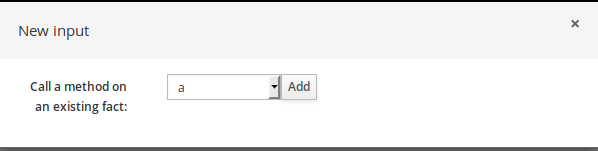
-
Call method on an existing fact - Call a method from a fact in the beginning of the rule execution.
21.10. DSL editor
The DSL editor allows DSL Sentences to be authored. The reader should take time to explore DSL features in the Drools Expert documentation; as the syntax in Drools Workbench’s DSL Editor is identical. The normal syntax is extended to provide "hints" to control how the DSL variable is rendered and validated within the user-interface.
The following "hints" are supported:-
-
{<varName>:<regular expression>}
This will render a text field in place of the DSL variable when the DSL Sentence is used in the guided editor. The content of the text field will be validated against the regular expression.
-
{<varName>:ENUM:<factType.fieldName>}
This will render an enumeration in place of the DSL variable when the DSL Sentence is used in the guided editor. <factType.fieldName> binds the enumeration to the model Fact and Field enumeration definition. This could be either a "Drools Workbench enumeration" (i.e. defined within the Workbench) or a Java enumeration (i.e. defined in a model POJO JAR file).
-
{<varName>:DATE:<dateFormat>}
This will render a Date selector in place of the DSL variable when the DSL Sentence is used in the guided editor.
-
{<varName>:BOOLEAN:<[checked | unchecked]>}
This will render a dropdown selector in place of the DSL variable, providing boolean choices, when the DSL Sentence is used in the guided editor.
-
{<varName>:CF:<factType.fieldName>}
This will render a button that will allow you to set the value of this variable using a Custom Form. In order to use this feature, a Working-Set containing a Custom Form Configuration for factType.fieldName must be active. If there is no such Working-Set, a simple text box is used (just like a regular variable).
For more information, please read more about Working-Sets and Custom Form Configurations.

21.11. Data enumerations (drop down list configurations)
Data enumerations are an optional asset type that technical folk can configure to provide drop down lists for the guided editor. These are stored and edited just like any other asset, and apply to the package that they belong to.
The contents of an enum config are a mapping of Fact.field to a list of values to be used in a drop down.
The strings are either a value to be shown in a drop down, or a mapping from the code value (what ends up used in the rule) and a display value.

If you wish to use a mapping between value used in the rule and the value shown in the UI you need to separate the code value and display value with an equals sign. For example:
'Person.gender' : ['M=Male','F=Female']In this example F will be used in the rules but Female shown in the UI.
Drop down lists can also depend on other field values.
Lets imagine a simple fact model, we have a class called Vehicle, which has 2 fields: engineType and fuelType.
We want to have a choice for the engineType of "Petrol" or "Diesel". Now, obviously the choice type for fuel must be dependent on the engine type (so for Petrol we have ULP and PULP, and for Diesel we have BIO and NORMAL). We can express this dependency in an enumeration as:
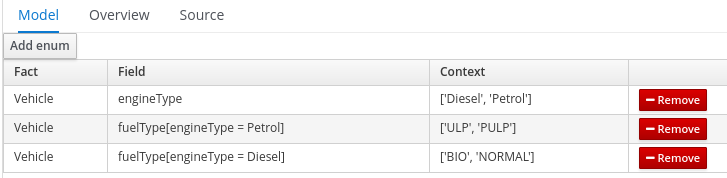
This shows how it is possible to make the choices dependent on other field values. Note that once you pick the engineType, the choice list for the fuelType will be determined.
|
Choices are not dependent across rule conditions and actions. If the rule condition checks engine type then the guided editor will not offer dependent fuel types in the rule actions. |
21.11.1. Advanced enumeration concepts
There are a few other advanced things you can do with data enumerations.
21.11.1.1. External data-sources
Instead of defining a static list you can retrieve the list from an external data-source by using a helper class.
The helper class must be on the Project’s classpath; by adding a JAR containng the class as a project dependency.
The helper class must be instantiable and have a non-static method that returns a java.util.List.
Population of the list is implementation specific.
For example:
'Person.age' : (new org.yourco.DataHelper()).getListOfAges()In some other cases you may want to load the enumeration data entirely from an external data source (such as a relational database). To do this, you can implement a class that returns a Map<String, List<String>>.
The key of the map is the Fact.field and the value is a java.util.List<String> of values to be used.
public class SampleDataSource2 {
public Map<String>, List<String> loadData() {
Map data = new HashMap();
List d = new ArrayList();
d.add("value1");
d.add("value2");
data.put("Fact.field", d);
return data;
}
}The enumeration definition would simply be as follows (with no reference to fact or field names):
=(new SampleDataSource2()).loadData()The = operator informs the workbench to load all enumeration data from the helper class.
|
The helper methods will be statically evaluated when the enumeration definition is requested for use in an editor. |
21.11.1.2. Dynamic lookup
All of the above cases retrieve the list of values by statically evaluating the enumeration definition when enumerations are required by an editor.
It is also possible to load dependent enumeration definitions dynamically from a helper class by enclosing the call to the helper class within quotation marks. For example:
'Country.region[countryCode]' : '(new org.yourco.DataHelper()).getListOfRegions("@{countryCode}")'21.12. DRL file
DRL files are stored as text - they can be managed in Drools Workbench. A DRL file can contain one or several globals, rules, functions, enumerations, type declarations or anything that is supported by the DRL language. Normally you would use the IDE to edit raw DRL files, since it has all the advanced tooling and content assistance and debugging. However, there are times when a rule may have to deal with something fairly technical in a package in Drools Workbench. In any typical package of rules, you generally have a need for some "technical rules" - you can mix and match all the rule types together of course.
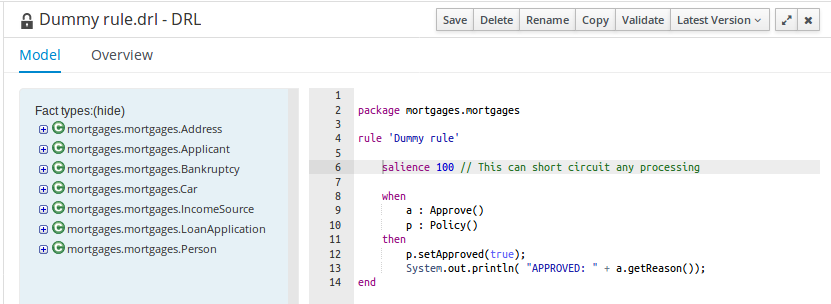
22. Workbench Integration
22.1. REST
REST API calls to Knowledge Store allow you to manage the Knowledge Store content and manipulate the static data in the repositories of the Knowledge Store. The calls are asynchronous, that is, they continue their execution as a job after a call was performed. The job ID is returned by every call to allow (after the REST API call was performed) to request the job status and verify whether the job finished successfully. Parameters of these calls are provided in the form of JSON entities.
When using Java code to interface with the REST API, the classes used in POST operations or otherwise returned by various operations can be found in the (org.uberfire:)uberfire-rest-client JAR.
All of the classes mentioned below can be found in the org.guvnor.rest.client package in that JAR.
22.1.1. Job calls
Every Knowledge Store REST call returns its job ID after it was sent. This is necessary as the calls are asynchronous and you need to be able to reference the job to check its status as it goes through its lifecycle. During its lifecycle, a job can have the following statuses:
-
ACCEPTED: the job was accepted and is being processed -
BAD_REQUEST: the request was not accepted as it contained incorrect content -
RESOURCE_NOT_EXIST: the requested resource (path) does not exist -
DUPLICATE_RESOURCE: the resource already exists -
SERVER_ERROR: an error on the server occurred -
SUCCESS: the job finished successfully -
FAIL: the job failed -
DENIED: the job was denied -
GONE: the job ID could not be foundA job can be GONE in the following cases: The job was explicitly removed The job finished and has been deleted from the status cache (the job is removed from status cache after the cache has reached its maximum capacity) ** The job never existed
The following job calls are provided:
- [GET]
/jobs/{jobID} -
Returns the job status
- [DELETE]
/jobs/{jobID} -
Removes the job: If the job is not yet being processed, this will remove the job from the job queue. However, this will not cancel or stop an ongoing job
22.1.2. Project calls
Project calls to the Knowledge Store allow you to manage Workspace projects.
The following project calls are provided:
- [GET]
/projects -
Gets information about all the projects in the Knowledge Store.
- [GET]
/spaces/{spaceName}/projects/{projectName} -
Gets information about the project.
- [POST]
/spaces/{spaceName}/projects/{projectName} -
Creates a new project in given space.
- [DELETE]
/spaces/{spaceName}/projects/{projectName} -
Removes the project from the Knowledge Store.
- [GET]
/spaces/{spaceName}/projects -
Gets information about all projects in the space
- [POST]
/spaces/{spaceName}/git/clone -
Clones a project into the space from provided git address.
- [DELETE]
/spaces/{spaceName}/projects/{projectName} -
Deletes the project from the space.
22.1.3. Space calls
Space calls to the Knowledge Store allow you to manage spaces.
The following spaces calls are provided:
- [GET]
/spaces -
Gets all spaces.
- [GET]
/spaces/{spaceName} -
Gets a single space.
- [POST]
/spaces -
Creates a space described by
SpaceJSON entity. - [DELETE]
/spaces/{spaceName} -
Deletes the space.
22.1.4. Maven calls
Maven calls to a project in the Knowledge Store allow you compile, test, install, and deploy projects.
The following maven calls are provided:
- [POST]
/spaces/{spaceName}/projects/{projectName}/maven/compile -
Compiles the project (equivalent to
mvn compile) - [POST]
/spaces/{spaceName}/projects/{projectName}/maven/test -
Tests the project (equivalent to
mvn test) - [POST]
/spaces/{spaceName}/projects/{projectName}/maven/install -
Installs the project (equivalent to
mvn install) - [POST]
/spaces/{spaceName}/projects/{projectName}/maven/deploy -
Deploys the project (equivalent to
mvn deploy)
22.1.5. REST summary
The URL templates in the table below are relative the following URL:
-
http://{server}:{port}/kie-wb/rest
22.1.6. Embedded Kie Server Controller calls
When running the Workbench with the embedded Kie Server Controller mode, a series of endpoints related to managing all aspects of Kie Server Templates, Kie Server instances and Containers are also available. See Controller REST API for more details. A Java client API is also available for interacting with these endpoints.
22.2. Keycloak SSO integration
Single Sign On (SSO) and related token exchange mechanisms are becoming the most common scenario for the authentication and authorization in different environments on the web, specially when moving into the cloud.
This section talks about the integration of Keycloak with jBPM or Drools applications in order to use all the features provided on Keycloak. Keycloak is an integrated SSO and IDM for browser applications and RESTful web services. Lean more about it in the Keycloak’s home page.
The result of the integration with Keycloak has lots of advantages such as:
-
Provide an integrated SSO and IDM environment for different clients, including jBPM and Drools workbenches
-
Social logins - use your Facebook, Google, LinkedIn, etc accounts
-
User session management
-
And much more…
Next sections cover the following integration points with Keycloak:
-
Workbench authentication through a Keycloak server
It basically consists of securing both web client and remote service clients through the Keycloak SSO. So either web interface or remote service consumers (whether a user or a service) will authenticate into trough KC.
-
Execution server authentication through a Keycloak server
Consists of securing the remote services provided by the execution server (as it does not provide web interface). Any remote service consumer (whether a user or a service) will authenticate trough KC.
-
Consuming remote services
This section describes how a third party clients can consume the remote service endpoints provided by both Workbench and Execution Server, such as the REST API or remote file system services.
-
Keycloakd and the Workbench’s security administration area
22.2.1. Scenario
Consider the following diagram as the environment for this document’s example:
Keycloak is a standalone process that provides remote authentication, authorization and administration services that can be potentially consumed by one or more jBPM applications over the network.
Consider these main steps for building this environment:
-
Install and set up a Keycloak server
-
Create and set up a Realm for this example - Configure realm’s clients, users and roles
-
Install and set up the SSO client adapter & jBPM application
Note: The resulting environment and the different configurations for this document are based on the jBPM (KIE) Workbench, but same ones can also be applied for the KIE Drools Workbench as well.
22.2.2. Install and set up a Keycloak server
Keycloak provides an extensive documentation and several articles about the installation on different environments. This section describes the minimal set up for being able to build the integrated environment for the example. Please refer to the Keycloak documentation if you need more information.
Here are the steps for a minimal Keycloak installation and set up:
-
Download latest version of Keycloak from the Downloads section. This example is based on Keycloak 1.9.0.Final
-
Unzip the downloaded distribution of Keycloak into a folder, let’s refer it as
$KC_HOME -
Run the KC server - This example is based on running both Keycloak and jBPM on same host. In order to avoid port conflicts you can use a port offset for the Keycloak’s server as:
$KC_HOME/bin/standalone.sh -Djboss.socket.binding.port-offset=100 -
Create a Keycloak’s administration 'admin' user by navigating to http://localhost:8180/auth/
The Keycloak administration console will be available at http://localhost:8180/auth/admin/.
22.2.3. Create and set up the demo realm
Security realms are used to restrict the access for the different application’s resources.
Once the Keycloak server is running next step is about creating a realm. This realm will provide the different users, roles, sessions, etc for the jBPM application/s.
Keycloak provides several examples for the realm creation and management, from the official examples to different articles with more examples.
Follow these steps in order to create the demo realm used later in this document:
-
Go to the Keycloak administration console and click on Add realm button. Give it the name demo.
-
Go to the Clients section (from the main admin console menu) and create a new client for the demo realm:
-
Client ID: kie
-
Client protocol: openid-connect
-
Acces type: confidential
-
Root URL: http://localhost:8080
-
Base URL: /kie-wb-x.y.z.Final
-
Redirect URIs: /kie-wb-x.y.z.Final/*
-
The resulting kie client settings screen:
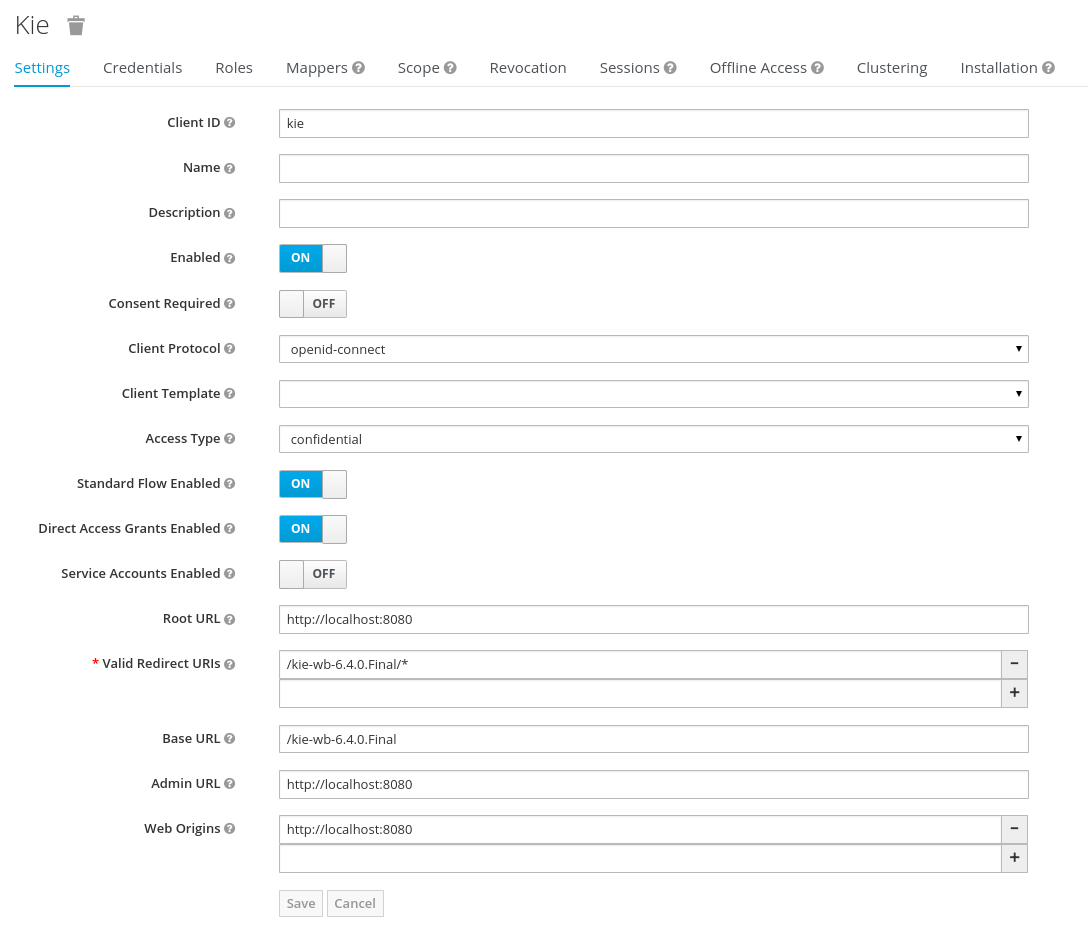
|
As you can see in the above settings it’s being considered the value kie-wb-x.y.z.Final for the application’s context path. If your jBPM application will be deployed on a different context path, host or port, just use your concrete settings here. |
Last step for being able to use the demo realm from the jBPM workbench is create the application’s user and roles:
-
Go to the Roles section and create the roles admin, kiemgmt and rest-all
-
Go to the Users section and create the admin user. Set the password with value password in the credentials tab, unset the temporary switch.
-
In the Users section navigate to the Role Mappings tab and assign the admin, kiemgmt and rest-all roles to the admin user
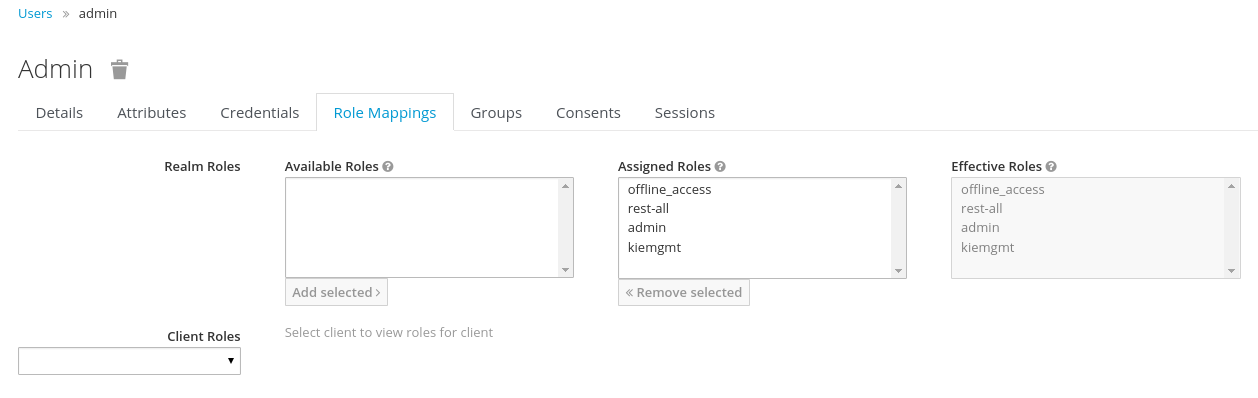
At this point a Keycloak server is running on the host, set up with a minimal configuration set. Let’s move to the jBPM workbench set up.
22.2.4. Install and set up jBPM Workbench
For this tutorial let’s use a Wildfly as the application server for the jBPM workbench, as the jBPM installer does by default.
Let’s assume, after running the jBPM installer, the $JBPM_HOME as the root path for the Wildfly server where the application has been deployed.
22.2.4.1. Install the KC adapter
In order to use the Keycloak’s authentication and authorization modules from the jBPM application, the Keycloak JBoss EAP/Wildfly Adapter must be installed on our server at $JBPM_HOME. Keycloak provides multiple adapters for different containers out of the box, if you are using another container or need to use another adapter, please take a look at the Securing Applications section from the Keycloak docs. Here are the steps to install and set up the adapter for Wildfly 11/10/9:
-
Download the adapter from Keycloak Client Adapter for Wildfly 11/10/9
-
Execute the following commands on your shell:
cd $JBPM_HOME unzip keycloak-wildfly-adapter-dist-3.4.3.Final.zip // Install the KC client adapter cd $JBPM_HOME/bin ./standalone.sh -c standalone-full.xml // set up the KC client adapter. // ** Once server is up, open a new command line terminal and run: cd $JBPM_HOME/bin ./jboss-cli.sh -c --file=adapter-install.cli
22.2.4.2. Configure the KC adapter
Once installed the KC adapter into Wildfly, next step is to configure the adapter in order to specify different settings such as the location for the authentication server, the realm to use and so on.
Keycloak provides two ways of configuring the adapter:
-
Per WAR configuration
-
Via Keycloak subsystem
In this example let’s use the second option, use the Keycloak subsystem, so our WAR is free from this kind of settings. If you want to use the per WAR approach, please take a look Required Per WAR Configuration.
Edit the configuration file $JBPM_HOME/standalone/configuration/standalone-full.xml and locate the subsystem configuration section. Add the following content:
<subsystem xmlns="urn:jboss:domain:keycloak:1.1">
<secure-deployment name="kie-wb-x.y.z.Final.war">
<realm>demo</realm>
<realm-public-key>MIIBIjANBgkqhkiG9w0BAQEFAAOCA...</realm-public-key>
<auth-server-url>http://localhost:8180/auth</auth-server-url>
<ssl-required>external</ssl-required>
<resource>kie</resource>
<enable-basic-auth>true</enable-basic-auth>
<credential name="secret">925f9190-a7c1-4cfd-8a3c-004f9c73dae6</credential>
<principal-attribute>preferred_username</principal-attribute>
</secure-deployment>
</subsystem>If you have imported the example json files from this document in step 2, you can just use same configuration as above by using your concrete deployment name. Otherwise please use your values for these configurations:
-
Name for the secure deployment - Use your concrete application’s WAR file name
-
Realm - Is the realm that the applications will use, in our example, the demo realm created the previous step.
-
Realm Public Key - Provide here the public key for the demo realm. It’s not mandatory, if it’s not specified, it will be retrieved from the server. Otherwise, you can find it in the Keycloak admin console → Realm settings (for demo realm) → Keys
-
Authentication server URL - The URL for the Keycloak’s authentication server
-
Resource - The name for the client created on step 2. In our example, use the value kie.
-
Enable basic auth - For this example let’s enable Basic authentication mechanism as well, so clients can use both Token (Bearer) and Basic approaches to perform the requests.
-
Credential - Use the password value for the kie client. You can find it in the Keycloak admin console → Clients → kie → Credentials tab → Copy the value for the secret.
For this example you have to take care about using your concrete values for secure-deployment name, realm-public-key and credential password.
|
Ensure the following tag is NOT present in the Widfly/EAP profile’s configuration file (eg: standalone.xml): It’s enabled by default in some server versions. If present, it must be removed/disabled in order to allow Keycloak to properly handle the clients. |
22.2.4.3. Run the environment
At this point a Keycloak server is up and running on the host, and the KC adapter is installed and configured for the jBPM application server. You can run the application using:
$JBPM_HOME/bin/standalone.sh -c standalone-full.xmlYou can navigate into the application once the server is up at:
http://localhost:8080/kie-wb-x.y.z.Final
Use your Keycloak’s admin user credentials to login: admin/password.
22.2.5. Securing workbench remote services via Keycloak
Both jBPM and Drools workbenches provide different remote service endpoints that can be consumed by third party clients using the remote API.
In order to authenticate those services thorough Keycloak the BasicAuthSecurityFilter must be disabled, apply those modifications for the the WEB-INF/web.xml file (app deployment descriptor) from jBPM’s WAR file:
-
Remove the following filter from the deployment descriptor:
<filter> <filter-name>HTTP Basic Auth Filter</filter-name> <filter-class>org.uberfire.ext.security.server.BasicAuthSecurityFilter</filter-class> <init-param> <param-name>realmName</param-name> <param-value>KIE Workbench Realm</param-value> </init-param> </filter> <filter-mapping> <filter-name>HTTP Basic Auth Filter</filter-name> <url-pattern>/rest/*</url-pattern> <url-pattern>/maven2/*</url-pattern> <url-pattern>/ws/*</url-pattern> </filter-mapping> -
Constraint the remote services URL patterns as:
<security-constraint> <web-resource-collection> <web-resource-name>remote-services</web-resource-name> <url-pattern>/rest/*</url-pattern> <url-pattern>/maven2/*</url-pattern> <url-pattern>/ws/*</url-pattern> </web-resource-collection> <auth-constraint> <role-name>rest-all</role-name> </auth-constraint> </security-constraint>
|
The user that consumes the remote services must be member of role rest-all. As on described previous steps, the admin user in this example it’s already a member of the rest-all role. |
22.2.6. Securing workbench’s file system services via Keycloak
In order to consume other remote services such as the file system ones (e.g. remote GIT), a specific Keycloak login module must be used for the application’s security domain in the $JBPM_HOME/standalone/configuration/standalone-full.xml file. By default the workbench uses the other security domain, so the resulting configuration on the $JBPM_HOME/standalone/configuration/standalone-full.xml should be such as:
<security-domain name="other" cache-type="default">
<authentication>
<login-module code="org.keycloak.adapters.jaas.DirectAccessGrantsLoginModule" flag="required">
<!-- Parameter value can be a file system absolute path or a classpath (e.g. "classpath:/some-path/kie-git.json")-->
<module-option name="keycloak-config-file" value="$JBPM_HOME/kie-git.json"/>
</login-module>
</authentication>
</security-domain>Note that:
-
The login modules on the other security domain in the $JBPM_HOME/standalone/configuration/standalone-full.xml file must be REPLACED by the above given one.
-
Replace $JBPM_HOME/kie-git.json by the path (on file system) or the classpath (e.g. classpath:/some-path/kie-git.json) for the json configuration file used for the remote services client. Please continue reading in order to create this Keycloak client and how to obtain this json file.
At this point, remote services that use JAAS for the authentication process, such as the file system ones (e.g. GIT), are secured by Keycloak using the client specified in the above json configuration file. So let’s create this client on Keycloak and generate the required JSON file:
-
Navigate to the KC administration console and create a new client for the demo realm using kie-git as name.
-
Enable Direct Access Grants Enabled option
-
Disable Standard Flow Enabled option
-
Use a confidential access type for this client. See below image as example:
-
Go to the Installation tab in same kie-git client configuration screen and export using the Keycloak OIDC JSON type.
-
Finally copy this generated JSON file into an accessible directory on the server’s file system or add it in the application’s classpath. Use this path value as the keycloak-config-file argument for the above configuration of the org.keycloak.adapters.jaas.DirectAccessGrantsLoginModule login module.
-
More information about Keycloak JAAS Login modules can be found Keycloak JAAS plugin.
At this point, the internal Git repositories can be cloned by all users authenticated via the Keycloak server:
# Command example:
git clone ssh://admin@localhost:8001/system22.2.7. Execution server
The KIE Execution Server provides a REST API that can be consumed for any third party clients. This this section is about how to integration the KIE Execution Server with the Keycloak SSO in order to delegate the third party clients identity management to the SSO server.
Consider the above environment running, so consider having:
-
A Keycloak server running and listening on http://localhost:8180/auth
-
A realm named demo with a client named kie for the jBPM Workbench
-
A jBPM Workbench running at http://localhost:8080/kie-wb-x.y.z.Final
Follow these steps in order to add an execution server into this environment:
-
Create the client for the execution server on Keycloak
-
Install set up and the Execution server (with the KC client adapter)
22.2.7.1. Create the execution server’s client on Keycloak
As per each execution server is going to be deployed, you have to create a new client on the demo realm in Keycloak:
-
Go to the KC admin console → Clients → New client
-
Name: kie-execution-server
-
Root URL: http://localhost:8280/
-
Client protocol: openid-connect
-
Access type: confidential (or public if you want so, but not recommended for production environments)
-
Valid redirect URIs: /kie-server-x.y.z.Final/*
-
Base URL: /kie-server-x.y.z.Final
In this example the admin user already created on previous steps is the one used for the client requests. So ensure that the admin user is member of the role kie-server in order to use the execution server’s remote services. If the role does not exist, create it.
Note: This example considers that the execution server will be configured to run using a port offset of 200, so the HTTP port will be available at localhost:8280.
22.2.7.2. Install and set up the KC adapter on the execution server
At this point, a client named kie-execution-server is ready on the KC server to use from the execution server.
Let’s install, set up and deploy the execution server:
-
Install another Wildfly server to use for the execution server and the KC client adapter as well. You can follow above instructions for the Workbench or follow the securing applications guide
-
Edit the standalone-full.xml file from the Wildfly server’s configuration path and configure the KC subsystem adapter as:
<secure-deployment name="kie-server-x.y.z.Final.war"> <realm>demo</realm> <realm-public-key>MIGfMA0GCSqGSIb...</realm-public-key> <auth-server-url>http://localhost:8180/auth</auth-server-url> <ssl-required>external</ssl-required> <resource>kie-execution-server</resource> <enable-basic-auth>true</enable-basic-auth> <credential name="secret">e92ec68d-6177-4239-be05-28ef2f3460ff</credential> <principal-attribute>preferred_username</principal-attribute> </secure-deployment>
Consider your concrete environment settings if different from this example:
-
Secure deployment name → use the name of the execution server war file being deployed
-
Public key → Use the demo realm public key or leave it blank, the server will provide one if so
-
Resource → This time, instead of the kie client used in the WB configuration, use the kie-execution-server client
-
Enable basic auth → Up to you. You can enable Basic auth for third party service consumers
-
Credential → Use the secret key for the kie-execution-server client. You can find it in the Credentialstab of the KC admin console
22.2.7.3. Deploy and run the execution server
Just deploy the execution server in Wildfly using any of the available mechanisms. Run the execution server using this command:
$EXEC_SERVER_HOME/bin/standalone.sh -c standalone-full.xml -Djboss.socket.binding.port-offset=200 -Dorg.kie.server.id=<ID> -Dorg.kie.server.user=<USER> -Dorg.kie.server.pwd=<PWD> -Dorg.kie.server.location=<LOCATION_URL> -Dorg.kie.server.controller=<CONTROLLER_URL> -Dorg.kie.server.controller.user=<CONTROLLER_USER> -Dorg.kie.server.controller.pwd=<CONTOLLER_PASSWORD>Example:
$EXEC_SERVER_HOME/bin/standalone.sh -c standalone-full.xml -Djboss.socket.binding.port-offset=200 -Dorg.kie.server.id=kieserver1 -Dorg.kie.server.user=admin -Dorg.kie.server.pwd=password -Dorg.kie.server.location=http://localhost:8280/kie-server-x.y.z.Final/services/rest/server -Dorg.kie.server.controller=http://localhost:8080/kie-wb-x.y.z.Final/rest/controller -Dorg.kie.server.controller.user=admin -Dorg.kie.server.controller.pwd=password|
The users that will consume the execution server remote service endpoints must have the role kie-server assigned. So create and assign this role in the KC admin console for the users that will consume the execution server remote services. |
Once up, you can check the server status as (considered using Basic authentication for this request, see next Consuming remote services for more information):
curl http://admin:password@localhost:8280/kie-server-x.y.z.Final/services/rest/server/22.2.8. Consuming remote services
In order to use the different remote services provided by the Workbench or by an Execution Server, your client must be authenticated on the KC server and have a valid token to perform the requests.
Remember that in order to use the remote services, the authenticated user must have assigned:
-
The role rest-all for using the WB remote services
-
The role kie-server for using the Execution Server remote services
Please ensure necessary roles are created and assigned to the users that will consume the remote services on the Keycloak admin console.
You have two options to consume the different remove service endpoints:
-
Using basic authentication, if the application’s client supports it
-
Using Bearer (token) based authentication
22.2.8.1. Using basic authentication
If the KC client adapter configuration has the Basic authentication enabled, as proposed in this guide for both WB (step 3.2) and Execution Server, you can avoid the token grant/refresh calls and just call the services as the following examples.
Example for a WB remote repositories endpoint:
curl http://admin:password@localhost:8080/kie-wb-x.y.z.Final/rest/repositoriesExample to check the status for the Execution Server:
curl http://admin:password@localhost:8280/kie-server-x.y.z.Final/services/rest/server/22.2.8.2. Using token based authentication
First step is to create a new client on Keycloak that allows the third party remote service clients to obtain a token. It can be done as:
-
Go to the KC admin console and create a new client using this configuration:
-
Client id: kie-remote
-
Client protocol: openid-connect
-
Access type: public
-
Valid redirect URIs: http://localhost/
-
-
As we are going to manually obtain a token and invoke the service let’s increase the lifespan of tokens slightly. In production access tokens should have a relatively low timeout, ideally less than 5 minutes:
-
Go to the KC admin console
-
Click on your Realm Settings
-
Click on Tokens tab
-
Change the value for Access Token Lifespan to 15 minutes. That should give us plenty of time to obtain a token and invoke the service before it expires.
-
Once a public client for our remote clients has been created, you can now obtain the token by performing an HTTP request to the KC server’s tokens endpoint. Here is an example for command line:
RESULT=`curl --data "grant_type=password&client_id=kie-remote&username=admin&passwordpassword=<the_client_secret>" http://localhost:8180/auth/realms/demo/protocol/openid-connect/token`TOKEN=`echo $RESULT | sed 's/.*access_token":"//g' | sed 's/".*//g'`At this point, if you echo the $TOKEN it will output the token string obtained from the KC server, that can be now used to authorize further calls to the remote endpoints. For exmple, if you want to check the internal jBPM repositories:
curl -H "Authorization: bearer $TOKEN" http://localhost:8080/kie-wb-x.y.z.Final/rest/repositories22.2.9. Keycloak and the workbench’s security administration area
The jBPM workbench provides an administration area which provides user, group and role management features (see Security management).
By default the application’s security management system points to the application’s server realm. For instance, in case of using the packaged distribution for Wildfly, it points to the Wildfly’s ApplicationRealm (properties based). It means the entities from the realm presented in the administration area are not the ones from the Keycloak realm that the application is using. There exist the following options in order to change this default behavior:
-
Disable the user system administration
-
Use the built-in Keycloak security management provider instead of the default one
In order to customize an existing jBPM application (WAR file) for using the Keycloak security management provider please follow the next steps:
-
Add the artifact keycloak-core-x.y.z.Final.jar into WEB-INF/lib
-
Add the artifact keycloak-common-x.y.z.Final.jar into WEB-INF/lib
-
Remove the actual jar artifact for any security management provider in use from WEB-INF/lib (eg: remove WEB-INF/lib/uberfire-security-management-wdilfly-x.y.Z.jar)
-
Replace the content for WEB-INF/classes/security-management.properties by:
org.uberfire.ext.security.management.api.userManagementServices=KCAdapterUserManagementService org.uberfire.ext.security.management.keycloak.authServer=<authz_server_url> # eg: org.uberfire.ext.security.management.keycloak.authServer=http://localhost:8180/auth
-
Update the /META-INF/jboss-deployment-structure.xml in order to include/exclude the following modules:
<deployment>
<dependencies>
...
<module name="org.jboss.resteasy.resteasy-jackson-provider" services="import"/>
...
</dependencies>
<exclusions>
...
<module name="org.jboss.resteasy.resteasy-jackson2-provider"/>
...
</exclusions>
</deployment>
|
The jar artifacts required in the steps above can be either downloaded from JBoss Nexus or either build from sources. |
Once applying the above changes, the security administration area uses the access token present in the user’s session in order to authorize and manage the specific Keycloak realm data.
|
In order to be able to manage Keycloak realms remotely, please ensure the user has the realm-management client role assigned |
23. Workbench High Availability
23.1. VFS clustering
The VFS repositories (usually git repositories) stores all the assets (such as rules, decision tables, process definitions, forms, etc). If that VFS resides on each local server, then it must be kept in sync between all servers of a cluster.
Use Apache Zookeeper and Apache Helix to accomplish this. Zookeeper glues all the parts together. Helix is the cluster management component that registers all cluster details (nodes, resources and the cluster itself). Uberfire (on top of which Workbench is build) uses those 2 components to provide VFS clustering.
To create a VFS cluster:
-
Download Apache Zookeeper and Apache Helix.
-
Install both:
-
Unzip Zookeeper into a directory (
$ZOOKEEPER_HOME). -
In
$ZOOKEEPER_HOME, copyzoo_sample.conftozoo.conf -
Edit
zoo.conf. Adjust the settings if needed. Usually only these 2 properties are relevant:# the directory where the snapshot is stored. dataDir=/tmp/zookeeper # the port at which the clients will connect clientPort=2181 -
Unzip Helix into a directory (
$HELIX_HOME).
-
-
Configure the cluster in Zookeeper:
-
Go to its
bindirectory:$ cd $ZOOKEEPER_HOME/bin -
Start the Zookeeper server:
$ sudo ./zkServer.sh startIf the server fails to start, verify that the
dataDir(as specified inzoo.conf) is accessible. -
To review Zookeeper’s activities, open
zookeeper.out:$ cat $ZOOKEEPER_HOME/bin/zookeeper.out
-
-
Configure the cluster in Helix:
-
Go to its
bindirectory:$ cd $HELIX_HOME/bin -
Create the cluster:
$ ./helix-admin.sh --zkSvr localhost:2181 --addCluster kie-clusterThe
zkSvrvalue must match the used Zookeeper server. The cluster name (kie-cluster) can be changed as needed. -
Add nodes to the cluster:
# Node 1 $ ./helix-admin.sh --zkSvr localhost:2181 --addNode kie-cluster nodeOne:12345 # Node 2 $ ./helix-admin.sh --zkSvr localhost:2181 --addNode kie-cluster nodeTwo:12346 ...Usually the number of nodes a in cluster equal the number of application servers in the cluster. The node names (
nodeOne:12345, …) can be changed as needed.nodeOne:12345is the unique identifier of the node, which will be referenced later on when configuring application servers. It is not a host and port number, but instead it is used to uniquely identify the logical node. -
Add resources to the cluster:
$ ./helix-admin.sh --zkSvr localhost:2181 --addResource kie-cluster vfs-repo 1 LeaderStandby AUTO_REBALANCEThe resource name (
vfs-repo) can be changed as needed. -
Rebalance the cluster to initialize it:
$ ./helix-admin.sh --zkSvr localhost:2181 --rebalance kie-cluster vfs-repo 2 -
Start the Helix controller to manage the cluster:
$ ./run-helix-controller.sh --zkSvr localhost:2181 --cluster kie-cluster 2>&1 > /tmp/controller.log &
-
-
Configure the security domain correctly on the application server. For example on WildFly and JBoss EAP:
-
Edit the file
$JBOSS_HOME/domain/configuration/domain.xml.For simplicity sake, presume we use the default domain configuration which uses the profile
fullthat defines two server nodes as part ofmain-server-group. -
Locate the profile
fulland add a new security domain by copying the other security domain already defined there by default:<security-domain name="kie-ide" cache-type="default"> <authentication> <login-module code="Remoting" flag="optional"> <module-option name="password-stacking" value="useFirstPass"/> </login-module> <login-module code="RealmDirect" flag="required"> <module-option name="password-stacking" value="useFirstPass"/> </login-module> </authentication> </security-domain>The security-domain name is a magic value.
-
-
Configure the system properties for the cluster on the application server. For example on WildFly and JBoss EAP:
-
Edit the file
$JBOSS_HOME/domain/configuration/host.xml. -
Locate the XML elements
serverthat belong to themain-server-groupand add the necessary system property.For example for nodeOne:
<system-properties> <property name="jboss.node.name" value="nodeOne" boot-time="false"/> <property name="org.uberfire.nio.git.dir" value="/tmp/kie/nodeone" boot-time="false"/> <property name="org.uberfire.metadata.index.dir" value="/tmp/kie/nodeone" boot-time="false"/> <property name="org.uberfire.cluster.id" value="kie-cluster" boot-time="false"/> <property name="org.uberfire.cluster.zk" value="localhost:2181" boot-time="false"/> <property name="org.uberfire.cluster.local.id" value="nodeOne_12345" boot-time="false"/> <property name="org.uberfire.cluster.vfs.lock" value="vfs-repo" boot-time="false"/> <!-- If you're running both nodes on the same machine: --> <property name="org.uberfire.nio.git.daemon.port" value="9418" boot-time="false"/> </system-properties>And for nodeTwo:
<system-properties> <property name="jboss.node.name" value="nodeTwo" boot-time="false"/> <property name="org.uberfire.nio.git.dir" value="/tmp/kie/nodetwo" boot-time="false"/> <property name="org.uberfire.metadata.index.dir" value="/tmp/kie/nodetwo" boot-time="false"/> <property name="org.uberfire.cluster.id" value="kie-cluster" boot-time="false"/> <property name="org.uberfire.cluster.zk" value="localhost:2181" boot-time="false"/> <property name="org.uberfire.cluster.local.id" value="nodeTwo_12346" boot-time="false"/> <property name="org.uberfire.cluster.vfs.lock" value="vfs-repo" boot-time="false"/> <!-- If you're running both nodes on the same machine: --> <property name="org.uberfire.nio.git.daemon.port" value="9419" boot-time="false"/> </system-properties>Make sure the cluster, node and resource names match those configured in Helix.
-
23.2. jBPM clustering
In addition to the information above, jBPM clustering requires additional configuration. See this blog post to configure the database etc correctly.
KIE Server
The KIE Server is a standalone execution server for rules.
24. KIE Execution Server
24.1. Overview
The Kie Server is a modular, standalone server component that can be used to instantiate and execute rules and processes. It exposes this functionality via REST, JMS and Java interfaces to client application. It also provides seamless integration with the Kie Workbench.
At its core, the Kie Server is a configurable web application packaged as a WAR file. Distributions are availables for pure web containers (like Tomcat) and for JEE 6 and JEE 7 containers.
Most capabilities on the Kie Server are configurable, and based on the concepts of extensions. Each extension can be enabled/disabled independently, allowing the user to configure the server to its need.
The current version of the Kie Server ships with two default extensions:
-
BRM: provides support for the execution of Business Rules using the Drools rules engine.
-
BPM: provides support for the execution of Business Processes using the jBPM process engine. It supports:
-
process execution
-
task execution
-
assynchronous job execution
-
Both extensions enabled by default, but can be disabled by setting the corresponding property (see configuration chapter for details).
This server was designed to have a low footprint, with minimal memory consumption, and therefore, to be easily deployable on a cloud environment. Each instance of this server can open and instantiate multiple Kie Containers which allows you to execute multiple services in parallel.
24.1.1. Glossary
-
Kie Server: execution server purely focusing on providing runtime environment for both rules and processes. These capabilities are provided by Kie Server Extensions. More capabilities can be added by further extensions (e.g. customer could add his own extensions in case of missing functionality that will then use infrastructure of the KIE Server). A Kie Server instance is a standalone Kie Server executing on a given application server/web container. A Kie Server instantiates and provides support for multiple Kie Containers.
-
Kie Server Extension: a "plugin" for the Kie Server that adds capabilities to the server. The Kie Server ships with two default kie server extensions: BRM and BPM.
-
Kie Container: an in-memory instantiation of a kjar, allowing for the instantiation and usage of its assets (domain models, processes, rules, etc). A Kie Server exposes Kie Containers through a standard API over transport protocols like REST and JMS.
-
Controller: a server-backed REST endpoint that will be responsible for managing KIE Server instances. Such end point must provide following capabilities:
-
respond to connect requests
-
sync all registered containers on the corresponding Kie Server ID
-
respond to disconnect requests
-
-
Kie Server state: currently known state of given Kie Server instance. This is a local storage (by default in file) that maintains the following information:
-
list of registered controllers
-
list of known containers
-
kie server configuration
The server state is persisted upon receival of events like: Kie Container created, Kie Container is disposed, controller accepts registration of Kie Server instance, etc.
-
-
Kie Server ID: an arbitrary assigned identifier to which configurations are assigned. At boot, each Kie Server Instance is assigned an ID, and that ID is matched to a configuration on the controller. The Kie Server Instance fetches and uses that configuration to setup itself.
24.2. Installing the KIE Server
The KIE Server is distributed as a web application archive (WAR) file. The WAR file comes in three different packagings:
-
webc - WAR for ordinary Web (Servlet) containers like Tomcat
-
ee6 - WAR for JavaEE 6 containers like JBoss EAP 6.x
-
ee7 - WAR for JavaEE 7 containers like WildFly 11.x
To install the KIE Execution Server and verify it is running, complete the following steps:
-
Deploy the WAR file into your web container.
-
Create a user with the role of
kie-serveron the container. -
Test that you can access the execution engine by navigating to the endpoint in a browser window:
http://SERVER:PORT/CONTEXT/services/rest/server/. -
When prompted for username/password, type in the username and password that you created in step 2.
-
Once authenticated, you will see an XML response in the form of engine status, similar to this:
Example 225. Sample handshaking server response<response type="SUCCESS" msg="KIE Server info"> <kie-server-info> <version>7.11.0.Final</version> </kie-server-info> </response>
24.2.1. Bootstrap switches
The Kie Server accepts a number of bootstrap switches (system properties) to configure the behaviour of the server. The following is a table of all the supported switches.
| Property | Value | Description | Required |
|---|---|---|---|
org.drools.server.ext.disabled |
boolean (default is "false") |
If true, disables the BRM support (i.e. rules support). |
No |
org.jbpm.server.ext.disabled |
boolean (default is "false") |
If true, disables the BPM support (i.e. processes support) |
No |
org.jbpm.ui.server.ext.disabled |
boolean (default is "false") |
If true, disables the BPM UI support (i.e. processes image support) |
No |
org.optaplanner.server.ext.disabled |
boolean (default is "false") |
If true, disables the BRP support (i.e. planner support) |
No |
org.kie.executor.disabled |
boolean (default is "false") |
If true, disables the BPM job executor support |
No |
org.kie.server.id |
string |
An arbitrary ID to be assigned to this server. If a remote controller is configured, this is the ID under which the server will connect to the controller to fetch the kie container configurations. |
No. If not provided, an ID is automatically generated. |
org.kie.server.user |
string (default is "kieserver") |
User name used to connect with the kieserver from the controller, required when running in managed mode |
No |
org.kie.server.pwd |
string (default is "kieserver1!") |
Password used to connect with the kieserver from the controller, required when running in managed mode |
No |
org.kie.server.controller |
comma separated list of urls |
List of urls to controller REST endpoint. E.g.:
|
Yes when using a controller |
org.kie.server.controller.user |
string (default is "kieserver") |
Username used to connect to the controller REST api |
Yes when using a controller |
org.kie.server.controller.pwd |
string (default is "kieserver1!") |
Password used to connect to the controller REST api |
Yes when using a controller |
org.kie.server.location |
URL location of kie server instance |
The URL used by the controller to call back on this server. E.g.:
|
Yes when using a controller |
org.kie.server.domain |
string |
JAAS LoginContext domain that shall be used to authenticate users when using JMS |
No |
org.kie.server.bypass.auth.user |
boolean (default is "false") |
Allows to bypass the authenticated user for task related operations e.g. queries |
No |
org.kie.server.repo |
valid file system path (default is ".") |
Location on local file system where kie server state files will be stored |
No |
org.kie.server.persistence.ds |
string |
Datasource JNDI name |
Yes when BPM support enabled |
org.kie.server.persistence.tm |
string |
Transaction manager platform for Hibernate properties set |
Yes when BPM support enabled |
org.kie.server.persistence.dialect |
string |
Hibernate dialect to be used |
Yes when BPM support enabled |
org.jbpm.ht.callback |
string |
One of supported callbacks for Task Service (default jaas) |
No |
org.jbpm.ht.custom.callback |
string |
Custom implementation of UserGroupCallback in case org.jbpm.ht.callback was set to ‘custom’ |
No |
kie.maven.settings.custom |
valid file system path |
Location of custom settings.xml for maven configuration |
No |
org.kie.executor.interval |
integer (default is 3) |
Number of time units between polls by executor |
No |
org.kie.executor.pool.size |
integer (default is 1) |
Number of threads in the pool for async work |
No |
org.kie.executor.retry.count |
integer (default is 3) |
Number of retries to handle errors |
No |
org.kie.executor.timeunit |
TimeUnit (default is "SECONDS") |
TimeUnit representing interval |
No |
org.kie.executor.disabled |
boolean (default is "false") |
Disables executor completely |
No |
kie.server.jms.queues.response |
string (default is "queue/KIE.SERVER.RESPONSE") |
JNDI name of response queue for JMS |
No |
org.kie.server.controller.connect |
long (default is 10000) |
Waiting time in milliseconds between repeated attempts to connect kie server to controller when kie server starts up |
No |
org.drools.server.filter.classes |
boolean (default is "false") |
If true, accept only classes which are annotated with @org.kie.api.remote.Remotable or @javax.xml.bind.annotation.XmlRootElement as extra JAXB classes |
No |
|
If you are running both KIE Server and KIE Workbench you must configure KIE Server to use a different Data Source to KIE Workbench using the org.kie.server.persistence.ds property. KIE Workbench uses a jBPM Executor Service that can conflict with KIE Server if they share the same Data Source. |
24.2.2. Installation details for different containers
24.2.2.1. Tomcat 7.x/8.x
-
Download and unzip the Tomcat distribution. Let’s call the root of the distribution
TOMCAT_HOME. This directory is named after the Tomcat version, so for exampleapache-tomcat-7.0.55. -
Download kie-server- -webc.war and place it into
TOMCAT_HOME/webapps. -
Configure user(s) and role(s). Make sure that file
TOMCAT_HOME/conf/tomcat-users.xmlcontains the following username and role definition. You can of course choose different username and password, just make sure that the user has rolekie-server:Example 226. Username and role definition for Tomcat<role rolename="kie-server"/> <user username="serveruser" password="my.s3cr3t.pass" roles="kie-server"/> -
Start the server by running
TOMCAT_HOME/bin/startup.[sh|bat]. You can check out the Tomcat logs inTOMCAT_HOME/logsto see if the application deployed successfully. Please read the table above for the bootstrap switches that can be used to properly configure the instance. For instance:./startup.sh -Dorg.kie.server.id=first-kie-server -Dorg.kie.server.location=http://localhost:8080/kie-server/services/rest/server -
Verify the server is running. Go to
http://SERVER:PORT/CONTEXT/services/rest/server/and type the specified username and password. You should see simple XML message with basic information about the server.
|
You can not leverage the JMS interface when running with Tomcat, or any other Web container. The Web container version of the WAR contains only the REST interface. |
24.2.2.2. WildFly 11.x
-
Download and unzip the WildFly distribution. Let’s call the root of the distribution
WILDFLY_HOME. This directory is named after the WildFly version, so for examplewildfly-11.0.0.Final. -
Download kie-server- -ee7.war and place it into
WILDFLY_HOME/standalone/deployments. -
Configure user(s) and role(s). Execute the following command
WILDFLY_HOME/bin/add-user.[sh|bat] -a -u 'kieserver' -p 'kieserver1!' -ro 'kie-server'. You can of course choose different username and password, just make sure that the user has rolekie-server. -
Start the server by running
WILDFLY_HOME/bin/standalone.[sh|bat] -c standalone-full.xml <bootstrap_switches>. You can check out the standard output or WildFly logs inWILDFLY_HOME/standalone/logsto see if the application deployed successfully. Please read the table above for the bootstrap switches that can be used to properly configure the instance. For instance:./standalone.sh --server-config=standalone-full.xml -Djboss.socket.binding.port-offset=150 -Dorg.kie.server.id=first-kie-server -Dorg.kie.server.location=http://localhost:8230/kie-server/services/rest/server -
Verify the server is running. Go to
http://SERVER:PORT/CONTEXT/services/rest/server/and type the specified username and password. You should see simple XML message with basic information about the server.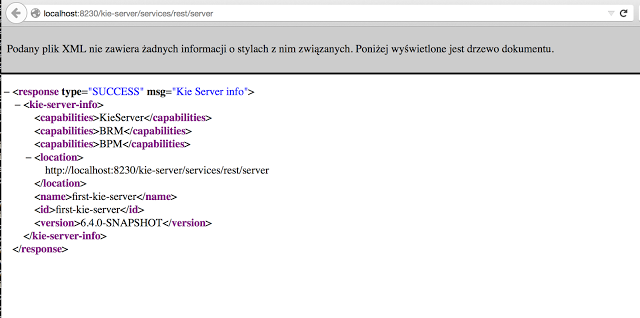
24.3. Kie Server setup
|
Server setup and registration changed significantly from versions 6.2 and before. The following applies only to version 6.3 and forward. |
24.3.1. Managed Kie Server
A managed instance is one that requires a controller to be available to properly startup the Kie Server instance.
A Controller is a component responsible for keeping and managing a Kie Server Configuration in centralized way. Each controller can manager multiple configurations at once and there can be multiple controllers in the environment. Managed KIE Servers can be configured with a list of controllers but will connect to only one at a time.
|
It’s important to mention that even though there can be multiple controllers they should be kept in sync to make sure that regardless which one of them is contacted by KIE Server instance it will provide same set of configuration. |
At startup, if a Kie Server is configured with a list of controllers, it will try succesivelly to connect to each of them until a connection is successfully stablished with one of them. If for any reason a connection can’t be stablished, the server will not start, even if there is local storage available with configuration. This happens by design in order to ensure consistency. For instance, if the Kie Server was down and the configuration has changed, this restriction guarantees that it will run with up to date configuration or not at all.
|
In order to run the Kie Server in standalone mode, without connecting to any controllers, please see "Unmanaged Kie Server". |
The configuration sets, among other things:
-
kie containers to be deployed and started
-
configuration items - currently this is a place holder for further enhancements that will allow remotely configure KIE Execution Server components - timers, persistence, etc
The Controller, besides providing configuration management, is also responsible for overall management of Kie Servers. It provides a REST api that is divided into two parts:
-
the controller itself that is exposed to interact with KIE Execution Server instances
-
an administration API that allows to remotely manage Kie Server instances:
-
add/remove servers
-
add/remove containers to/from the servers
-
start/stop containers on servers
-
The controller deals only with the Kie Server configuration or definition to put it differently. It does not handle any runtime components of KIE Execution Server instances. They are always considered remote to controller. The controller is responsible for persisting the configuration to preserve restarts of the controller itself. It should manage the synchronization as well in case multiple controllers are configured to keep all definitions up to date on all instances of the controller.
By default controller is shipped with Kie Workbench and provides a fully featured management interface (both REST api and UI). It uses underlying git repository as persistent store and thus when GIT repositories are clustered (using Apache Zookeeper and Apache Helix) it will cover the controllers synchronization as well.

The diagram above illustrates the single controller (workbench) setup with multiple Kie Server instances managed by it.
The diagram bellow illustrates the clustered setup where there are multiple instances of controller synchronized over Zookeeper.
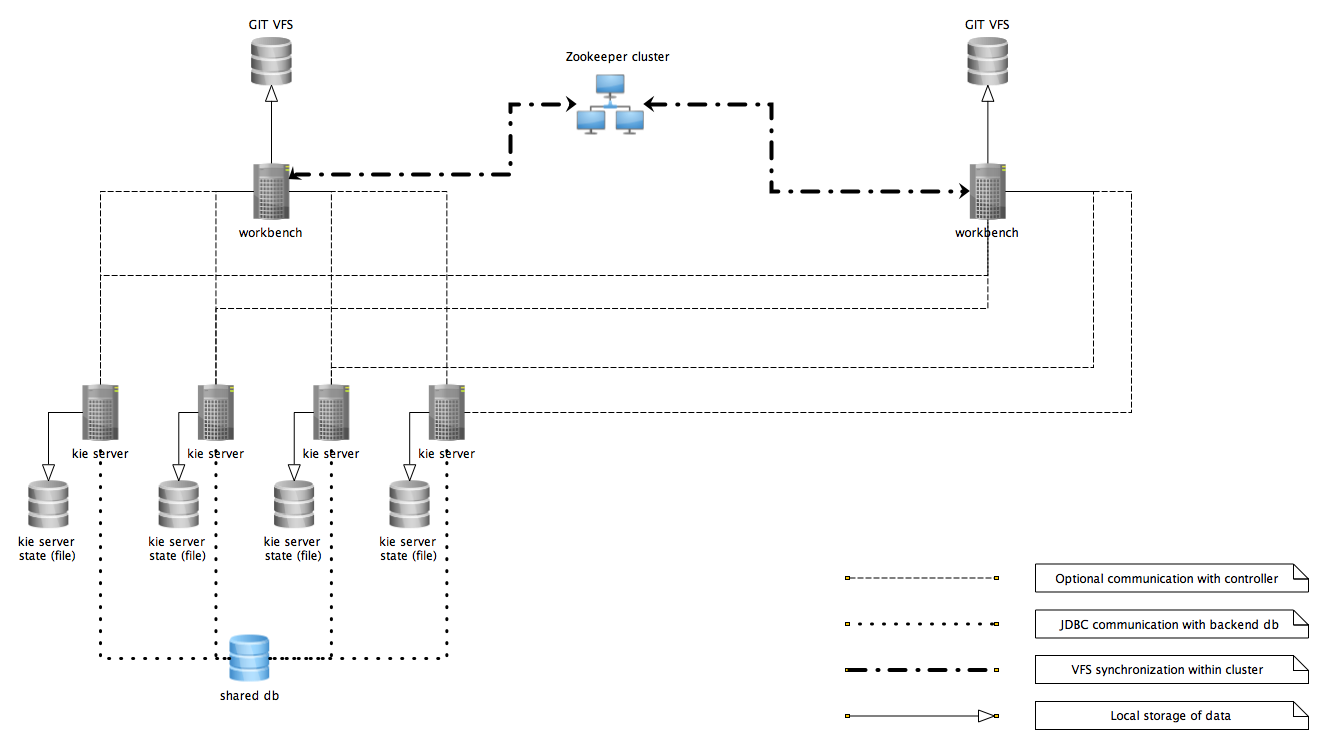
In the above diagram we can see that the Kie Server instances are capable of connecting to any controllers, but they will connect to only one. Each instance will attempt to connect to controller as long as it can reach one. Once connection is established with one of the controllers it will skip the others.
24.3.1.1. Working with managed servers
There are two approaches that users can take when working with managed KIE Server instances:
-
Configuration first: with this approach, a user will start working with the controller (either UI or REST api) and create and configure Kie Server definitions. That consists basically of an identification for the server definition (id and name + optionally version for improved readability) and the configuration for the Kie Containers to run on the server.
-
Registration first: with this approach, the Kie Server instances are started first and auto register themselves on controller. The user then can configure the Kie Containers. This option simply skips the registration step done in the first approach and populates it with server id, name and version directly upon auto registration. There are no other differences between the two approaches.
24.3.2. Unmanaged KIE Execution Server
An unmanaged Kie Server is in turn just a standalone instance, and thus must be configured individually using REST/JMS api from the Kie Server itself. There is no controller involved. The configuration is automatically persisted by the server into a file and that is used as the internal server state, in case of restarts.
The configuration is updated during the following operations:
-
deploy Kie Container
-
undeploy Kie Container
-
start Kie Container
-
stop Kie Container
|
If the Kie Server is restarted, it will try to restablish the same state that was persisted before shutdown. That means that Kie Containers that were running, will be started, but the ones that were stopped/disposed before, will not. |
In most use cases, the Kie Server should be executed in managed mode as that provides some benefits, like a web user interface (if using the workbench as a controller) and some facilities for clustering.
24.4. Creating a Kie Container
Once your Execution Server is registered, you can start adding Kie Containers to it.
Kie Containers are self contained environments that have been provisioned to hold instances of your packaged and deployed rule instances.
-
Start by clicking the \+ icon next to the Execution Server where you want to deploy your Container. This will bring up the New Container screen.
-
If you know the Group Name, Artifact Id and Version (GAV) of your deployed package, then you can enter those details and click the Ok button to select that instance (and provide a name for the Container);
-
If you don’t know these values, you can search KIE Workbench for all packages that can be deployed. Click the Search button without entering any value in the search field (you can narrow your search by entering any term that you know exists in the package that you want to deploy).
INSERT SCREENSHOT HERE
The figure above shows that there are three deployable packages available to be used as containers on the Execution Server. Select the one that you want by clicking the Select button. This will auto-populate the GAV and you can then click the Ok button to use this deployable as the new Container.
-
Enter a name for this Container at the top and then press the Ok button.
The Container name must be unique inside each execution server and must not contain any spaces.
|
Just below the GAV row, you will see an uneditable row that shows you the URL for your Container against which you will be able to execute REST commands. |
24.5. Managing Containers
Containers within the Execution Server can be started, stopped and updated from within KIE Workbench.
24.5.1. Starting a Container
Once registered, a Container is in the 'Stopped' mode. It can be started by first selecting it and then clicking the Start button. You can also select multiple Containers and start them all at the same time.
Once the Container is in the 'Running' mode, a green arrow appears next to it. If there are any errors starting the Container(s), red icons appear next to Containers and the Execution Server that they are deployed on.
You should check the logs of both the Execution Server and the current Business Central to see what the errors are before redeploying the Containers (and possibly the Execution Server).
24.5.2. Stopping and Deleting a Container
Similar to starting a Container, select the Container(s) that you want to stop (or delete) and click the Stop button (which replaces the Start button for that Container once it has entered the 'Running' mode) or the Delete button.
24.5.3. Updating a Container
You can update deployed KieContainers without restarting the Execution Server.
This is useful in cases where the Business Rules change, creating new versions of packages to be provisioned.
You can have multiple versions of the same package provisioned and deployed, each to a different KieContainer.
To update deployments in a KieContainer dynamically, click on the icon next to the Container.
This will open up the Container Info screen.
An example of this screen is shown here:
|
INSERT SCREENSHOT HERE |
The Container Info screen is a useful tool because it not only allows you to see the endpoint for this KieContainer, but it also allows you to either manually or automatically refresh the provision if an update is available.
The update can be manual or automatic:
Manual Update: To manually update a KieContainer, enter the new Version number in the Version box and click on the Update button.
You can of course, update the Group Id or the Artifact Id , if these have changed as well.
Once updated, the Execution server updates the container and shows you the resolved GAV attributes at the bottom of the screen in the Resolved Release Id section.
Automatic Update: If you want a deployed Container to always have the latest version of your deployment without manually editing it, you will need to set the Version property to the value of LATEST and start a Scanner.
This will ensure that the deployed provision always contains the latest version.
The Scanner can be started just once on demand by clicking the Scan Now button or you can start it in the background with scans happening at a specified interval (in milliseconds).You can also set this value to LATEST when you are first creating this deployment.
The Resolved Release
Id in this case will show you the actual, latest version number.
24.6. Kie Server REST API
The Execution Server supports the following commands via the REST API.
Please note the following before using these commands:
-
The base URL for these will remain as the endpoint defined earlier (for example:
http://SERVER:PORT/CONTEXT/services/rest/server/) -
All requests require basic HTTP Authentication for the role kie-server as indicated earlier.
24.6.1. [GET] /
Returns the Execution Server information
<response type="SUCCESS" msg="KIE Server info">
<kie-server-info>
<version>6.2.0.redhat-1</version>
</kie-server-info>
</response>24.6.2. [POST] /config
Using POST HTTP method, you can execute various commands on the Execution Server. E.g: create-container, list-containers, dispose-container and call-container.
-
CreateContainerCommand
-
GetServerInfoCommand
-
ListContainersCommand
-
CallContainerCommand
-
DisposeContainerCommand
-
GetContainerInfoCommand
-
GetScannerInfoCommand
-
UpdateScannerCommand
-
UpdateReleaseIdCommand
The commands itself can be found in the org.kie.server.api.commands package.
24.6.3. [GET] /containers
Returns a list of containers that have been created on this Execution Server.
<response type="SUCCESS" msg="List of created containers">
<kie-containers>
<kie-container container-id="MyProjectContainer" status="STARTED">
<release-id>
<artifact-id>Project1</artifact-id>
<group-id>com.redhat</group-id>
<version>1.0</version>
</release-id>
<resolved-release-id>
<artifact-id>Project1</artifact-id>
<group-id>com.redhat</group-id>
<version>1.0</version>
</resolved-release-id>
</kie-container>
</kie-containers>
</response>The endpoint supports also filtering based on ReleaseId and container status. Examples:
-
/containers?groupId=org.example- returns only containers with the specified groupId -
/containers?groupId=org.example&artifactId=project1&version=1.0.0.Final- returns only containers with the specifiedReleaseId -
/containers?status=started,failed- returns containers which are either started or failed
24.6.4. [GET] /containers/{id}
Returns the status and information about a particular container.
For example, executing http://SERVER:PORT/CONTEXT/services/rest/server/containers/MyProjectContainer could return the following example container info.
<response type="SUCCESS" msg="Info for container MyProjectContainer">
<kie-container container-id="MyProjectContainer" status="STARTED">
<release-id>
<artifact-id>Project1</artifact-id>
<group-id>com.redhat</group-id>
<version>1.0</version>
</release-id>
<resolved-release-id>
<artifact-id>Project1</artifact-id>
<group-id>com.redhat</group-id>
<version>1.0</version>
</resolved-release-id>
</kie-container>
</response>24.6.5. [PUT] /containers/{id}
Allows you to create a new Container in the Execution Server.
For example, to create a Container with the id of MyRESTContainer the complete endpoint will be: http://SERVER:PORT/CONTEXT/services/rest/server/containers/MyRESTContainer.
An example of request is:
<kie-container container-id="MyRESTContainer">
<release-id>
<artifact-id>Project1</artifact-id>
<group-id>com.redhat</group-id>
<version>1.0</version>
</release-id>
</kie-container>And the response from the server, if successful, would be be:
<response type="SUCCESS" msg="Container MyRESTContainer successfully deployed with module com.redhat:Project1:1.0">
<kie-container container-id="MyProjectContainer" status="STARTED">
<release-id>
<artifact-id>Project1</artifact-id>
<group-id>com.redhat</group-id>
<version>1.0</version>
</release-id>
<resolved-release-id>
<artifact-id>Project1</artifact-id>
<group-id>com.redhat</group-id>
<version>1.0</version>
</resolved-release-id>
</kie-container>
</response>24.6.6. [DELETE] /containers/{id}
Disposes the Container specified by the id.
For example, executing http://SERVER:PORT/CONTEXT/services/rest/server/containers/MyProjectContainer using the DELETE HTTP method will return the following server response:
<response type="SUCCESS" msg="Container MyProjectContainer successfully disposed."/>24.6.7. [POST] /containers/instances/{id}
Executes operations and commands against the specified Container.
You can send commands to this Container in the body of the POST request.
For example, to fire all rules for Container with id MyRESTContainer (http://SERVER:PORT/CONTEXT/services/rest/server/containers/instances/MyRESTContainer), you would send the fire-all-rules command to it as shown below (in the body of the POST request):
<fire-all-rules/>Following is the list of supported commands:
-
AgendaGroupSetFocusCommand
-
ClearActivationGroupCommand
-
ClearAgendaCommand
-
ClearAgendaGroupCommand
-
ClearRuleFlowGroupCommand
-
DeleteCommand
-
InsertObjectCommand
-
ModifyCommand
-
GetObjectCommand
-
InsertElementsCommand
-
FireAllRulesCommand
-
QueryCommand
-
SetGlobalCommand
-
GetGlobalCommand
-
GetObjectsCommand
-
BatchExecutionCommand
These commands can be found in the org.drools.core.command.runtime package.
24.6.8. [GET] /containers/{id}/release-id
Returns the full release id for the Container specified by the id.
<response type="SUCCESS" msg="ReleaseId for container MyProjectContainer">
<release-id>
<artifact-id>Project1</artifact-id>
<group-id>com.redhat</group-id>
<version>1.0</version>
</release-id>
</response>24.6.9. [POST] /containers/{id}/release-id
Allows you to update the release id of the container deployment. Send the new complete release id to the Server.
<release-id>
<artifact-id>Project1</artifact-id>
<group-id>com.redhat</group-id>
<version>1.1</version>
</release-id>The Server will respond with a success or error message, similar to the one below:
<response type="SUCCESS" msg="Release id successfully updated.">
<release-id>
<artifact-id>Project1</artifact-id>
<group-id>com.redhat</group-id>
<version>1.0</version>
</release-id>
</response>24.6.10. [GET] /containers/{id}/scanner
Returns information about the scanner for this Container’s automatic updates.
<response type="SUCCESS" msg="Scanner info successfully retrieved">
<kie-scanner status="DISPOSED"/>
</response>24.6.11. [POST] /containers/{id}/scanner
Allows you to start or stop a scanner that controls polling for updated Container deployments.
To start the scanner, send a request similar to: http://SERVER:PORT/CONTEXT/services/rest/server/containers/{container-id}/scanner with the following POST data.
<kie-scanner status="STARTED" poll-interval="2000"/>The poll-interval attribute is in milliseconds. The response from the server will be similar to:
<response type="SUCCESS" msg="Kie scanner successfully created.">
<kie-scanner status="STARTED"/>
</response>To stop the Scanner, replace the status with DISPOSED and remove the poll-interval attribute.
24.7. OptaPlanner REST API
The Kie Server supports the following Planner REST APIs. All these APIs are also available through JMS and the Java client API. Please also note:
-
The base URL for these will remain as the endpoint defined earlier (for example
http://SERVER:PORT/CONTEXT/services/rest/server/). -
All requests require basic HTTP Authentication for the role kie-server as indicated earlier.
-
To get a specific marshalling format, add the HTTP headers
Content-Typeand optionalX-KIE-ContentTypein the HTTP request. For example:Content-Type: application/xml X-KIE-ContentType: xstream
|
|
The requests and responses in the example below assume that a Kie Container is built using the optacloud example of Planner Workbench, by calling a PUT on /services/rest/server/containers/optacloud-kiecontainer-1 with this content:
<kie-container container-id="optacloud-kiecontainer-1">
<release-id>
<group-id>opta</group-id>
<artifact-id>optacloud</artifact-id>
<version>1.0.0</version>
</release-id>
</kie-container>24.7.1. [GET] /containers
Returns the list of created containers.
<response type="SUCCESS" msg="List of created containers">
<result class="kie-containers">
<kie-container>
<container-id>optacloud-kiecontainer-1</container-id>
<release-id>
<group-id>optacloud</group-id>
<artifact-id>optacloud</artifact-id>
<version>1.0.0</version>
</release-id>
<resolved-release-id>
<group-id>optacloud</group-id>
<artifact-id>optacloud</artifact-id>
<version>1.0.0</version>
</resolved-release-id>
<status>STARTED</status>
<scanner>
<status>DISPOSED</status>
</scanner>
</kie-container>
</result>
</response>24.7.2. [PUT] /containers/{containerId}/solvers/{solverId}
Creates a new solver with the given {solverId} in the container {containerId}.
The request’s body is a marshalled SolverInstance entity that must specify the solver configuration file.
The following is an example of the request and the corresponding response.
<solver-instance>
<solver-config-file>optacloud/optacloud/cloudSolverConfig.solver.xml</solver-config-file>
</solver-instance><solver-instance>
<container-id>optacloud-kiecontainer-1</container-id>
<solver-id>solver1</solver-id>
<solver-config-file>optacloud/optacloud/cloudSolverConfig.solver.xml</solver-config-file>
<status>NOT_SOLVING</status>
<score />
</solver-instance>24.7.3. [GET] /containers/{containerId}/solvers
Returns the list of solvers created in the container.
<org.kie.server.api.model.instance.SolverInstanceList>
<solvers>
<solver-instance>
<container-id>optacloud-kiecontainer-1</container-id>
<solver-id>solver2</solver-id>
<solver-config-file>optacloud/optacloud/cloudSolverConfig2.solver.xml</solver-config-file>
<status>NOT_SOLVING</status>
<score />
</solver-instance>
<solver-instance>
<container-id>optacloud-kiecontainer-1</container-id>
<solver-id>solver1</solver-id>
<solver-config-file>optacloud/optacloud/cloudSolverConfig.solver.xml</solver-config-file>
<status>NOT_SOLVING</status>
<score />
</solver-instance>
</solvers>
</org.kie.server.api.model.instance.SolverInstanceList>24.7.4. [GET] /containers/{containerId}/solvers/{solverId}
Returns the current state of the solver {solverId} in container {containerId}.
<solver-instance>
<container-id>optacloud-kiecontainer-1</container-id>
<solver-id>solver1</solver-id>
<solver-config-file>optacloud/optacloud/cloudSolverConfig.solver.xml</solver-config-file>
<status>NOT_SOLVING</status>
<score />
</solver-instance>24.7.5. [POST] /containers/{containerId}/solvers/{solverId}/state/solving
Starts the solver {solverId} in container {containerId} if it is not executing yet.
The request’s body is a marshalled PlanningSolution to be optimized.
The following is an example to solve the OptaCloud problem with 2 computers and 6 processes. The solver runs asynchronously. Send a request to the bestsolution URL to get the best solution.
<optacloud.optacloud.CloudSolution id="1">
<computerList id="2">
<optacloud.optacloud.Computer id="3">
<cpuPower>24</cpuPower>
<memory>96</memory>
<networkBandwidth>16</networkBandwidth>
<cost>4800</cost>
</optacloud.optacloud.Computer>
<optacloud.optacloud.Computer id="4">
<cpuPower>6</cpuPower>
<memory>4</memory>
<networkBandwidth>6</networkBandwidth>
<cost>660</cost>
</optacloud.optacloud.Computer>
</computerList>
<processList id="5">
<optacloud.optacloud.Process id="6">
<requiredCpuPower>1</requiredCpuPower>
<requiredMemory>1</requiredMemory>
<requiredNetworkBandwidth>1</requiredNetworkBandwidth>
</optacloud.optacloud.Process>
<optacloud.optacloud.Process id="7">
<requiredCpuPower>3</requiredCpuPower>
<requiredMemory>6</requiredMemory>
<requiredNetworkBandwidth>1</requiredNetworkBandwidth>
</optacloud.optacloud.Process>
<optacloud.optacloud.Process id="8">
<requiredCpuPower>1</requiredCpuPower>
<requiredMemory>1</requiredMemory>
<requiredNetworkBandwidth>3</requiredNetworkBandwidth>
</optacloud.optacloud.Process>
<optacloud.optacloud.Process id="9">
<requiredCpuPower>1</requiredCpuPower>
<requiredMemory>2</requiredMemory>
<requiredNetworkBandwidth>11</requiredNetworkBandwidth>
</optacloud.optacloud.Process>
<optacloud.optacloud.Process id="10">
<requiredCpuPower>1</requiredCpuPower>
<requiredMemory>1</requiredMemory>
<requiredNetworkBandwidth>1</requiredNetworkBandwidth>
</optacloud.optacloud.Process>
<optacloud.optacloud.Process id="11">
<requiredCpuPower>1</requiredCpuPower>
<requiredMemory>1</requiredMemory>
<requiredNetworkBandwidth>5</requiredNetworkBandwidth>
</optacloud.optacloud.Process>
</processList>
</optacloud.optacloud.CloudSolution><?xml version="1.0" encoding="UTF-8" standalone="yes" ?>
<cloudSolution>
<computerList>
<cost>4800</cost>
<cpuPower>24</cpuPower>
<memory>96</memory>
<networkBandwidth>16</networkBandwidth>
</computerList>
<computerList>
<cost>660</cost>
<cpuPower>6</cpuPower>
<memory>4</memory>
<networkBandwidth>6</networkBandwidth>
</computerList>
<processList>
<requiredCpuPower>1</requiredCpuPower>
<requiredMemory>1</requiredMemory>
<requiredNetworkBandwidth>1</requiredNetworkBandwidth>
</processList>
<processList>
<requiredCpuPower>3</requiredCpuPower>
<requiredMemory>6</requiredMemory>
<requiredNetworkBandwidth>1</requiredNetworkBandwidth>
</processList>
<processList>
<requiredCpuPower>1</requiredCpuPower>
<requiredMemory>1</requiredMemory>
<requiredNetworkBandwidth>3</requiredNetworkBandwidth>
</processList>
<processList>
<requiredCpuPower>1</requiredCpuPower>
<requiredMemory>2</requiredMemory>
<requiredNetworkBandwidth>11</requiredNetworkBandwidth>
</processList>
<processList>
<requiredCpuPower>1</requiredCpuPower>
<requiredMemory>1</requiredMemory>
<requiredNetworkBandwidth>1</requiredNetworkBandwidth>
</processList>
<processList>
<requiredCpuPower>1</requiredCpuPower>
<requiredMemory>1</requiredMemory>
<requiredNetworkBandwidth>5</requiredNetworkBandwidth>
</processList>
</cloudSolution>{
"optacloud.optacloud.CloudSolution": {
"computerList": [
{
"cpuPower": 24,
"memory": 96,
"networkBandwidth": 16,
"cost": 4800
},
{
"cpuPower": 6,
"memory": 4,
"networkBandwidth": 6,
"cost": 660
}
],
"processList": [
{
"requiredCpuPower": 1,
"requiredMemory": 1,
"requiredNetworkBandwidth": 1
},
{
"requiredCpuPower": 3,
"requiredMemory": 6,
"requiredNetworkBandwidth": 1
},
{
"requiredCpuPower": 1,
"requiredMemory": 1,
"requiredNetworkBandwidth": 3
},
{
"requiredCpuPower": 1,
"requiredMemory": 2,
"requiredNetworkBandwidth": 11
},
{
"requiredCpuPower": 1,
"requiredMemory": 1,
"requiredNetworkBandwidth": 1
},
{
"requiredCpuPower": 1,
"requiredMemory": 1,
"requiredNetworkBandwidth": 5
}
]
}
}24.7.6. [POST] /containers/{containerId}/solvers/{solverId}/state/terminating-early
Requests the solver to terminate early, if it is running. This does not delete the solver, the best solution can still be retrieved.
24.7.7. [GET] /containers/{containerId}/solvers/{solverId}/bestsolution
Returns the best solution found at the time the request is made.
If the solver has not terminated yet (so the status field is still SOLVING), it will return the best solution found up to then, but later calls can return a better solution.
<solver-instance>
<container-id>optacloud-kiecontainer-1</container-id>
<solver-id>solver1</solver-id>
<solver-config-file>optacloud/optacloud/cloudSolverConfig.solver.xml</solver-config-file>
<status>NOT_SOLVING</status>
<score scoreClass="org.optaplanner.core.api.score.buildin.hardsoft.HardSoftScore">0hard/-5460soft</score>
<best-solution class="optacloud.optacloud.CloudSolution">
<computerList>
<optacloud.optacloud.Computer>
<cpuPower>24</cpuPower>
<memory>96</memory>
<networkBandwidth>16</networkBandwidth>
<cost>4800</cost>
</optacloud.optacloud.Computer>
<optacloud.optacloud.Computer>
<cpuPower>6</cpuPower>
<memory>4</memory>
<networkBandwidth>6</networkBandwidth>
<cost>660</cost>
</optacloud.optacloud.Computer>
</computerList>
<processList>
<optacloud.optacloud.Process>
<requiredCpuPower>1</requiredCpuPower>
<requiredMemory>1</requiredMemory>
<requiredNetworkBandwidth>1</requiredNetworkBandwidth>
<computer reference="../../../computerList/optacloud.optacloud.Computer[2]"/>
</optacloud.optacloud.Process>
<optacloud.optacloud.Process>
<requiredCpuPower>3</requiredCpuPower>
<requiredMemory>6</requiredMemory>
<requiredNetworkBandwidth>1</requiredNetworkBandwidth>
<computer reference="../../../computerList/optacloud.optacloud.Computer"/>
</optacloud.optacloud.Process>
<optacloud.optacloud.Process>
<requiredCpuPower>1</requiredCpuPower>
<requiredMemory>1</requiredMemory>
<requiredNetworkBandwidth>3</requiredNetworkBandwidth>
<computer reference="../../../computerList/optacloud.optacloud.Computer"/>
</optacloud.optacloud.Process>
<optacloud.optacloud.Process>
<requiredCpuPower>1</requiredCpuPower>
<requiredMemory>2</requiredMemory>
<requiredNetworkBandwidth>11</requiredNetworkBandwidth>
<computer reference="../../../computerList/optacloud.optacloud.Computer"/>
</optacloud.optacloud.Process>
<optacloud.optacloud.Process>
<requiredCpuPower>1</requiredCpuPower>
<requiredMemory>1</requiredMemory>
<requiredNetworkBandwidth>1</requiredNetworkBandwidth>
<computer reference="../../../computerList/optacloud.optacloud.Computer"/>
</optacloud.optacloud.Process>
<optacloud.optacloud.Process>
<requiredCpuPower>1</requiredCpuPower>
<requiredMemory>1</requiredMemory>
<requiredNetworkBandwidth>5</requiredNetworkBandwidth>
<computer reference="../../../computerList/optacloud.optacloud.Computer[2]"/>
</optacloud.optacloud.Process>
</processList>
<score>0hard/-5460soft</score>
</best-solution>
</solver-instance>24.7.8. [POST] /containers/{containerId}/solvers/{solverId}/problemfactchanges
Real-time planning feature. Submits one or multiple ProblemFactChanges to update the dataset the solver currently optimizes.
24.7.9. [GET] /containers/{containerId}/solvers/{solverId}/problemfactchanges/processed
Real-time planning feature. Returns true if the solver processed all ProblemFactChanges that had been submitted. Returns false otherwise.
24.7.10. [DELETE] /containers/{containerId}/solvers/{solverId}
Disposes the solver {solverId} in container {containerId}.
If it has not terminated yet, it terminates it first.
24.8. Controller REST API
When you have Managed Kie Server setup, you need to manage Kie Servers and Containers via a Controller. Generally, it’s done by workbench UI but you may also use Controller REST API.
-
The controller base URL is provided by kie-wb war deployment, which would be the same as org.kie.server.controller property. (for example:
http://localhost:8080/kie-wb/rest/controller) -
All requests require basic HTTP Authentication for the role kie-server as indicated earlier.
24.8.1. [GET] /management/servers
Returns a list of Kie Server templates
<?xml version="1.0" encoding="UTF-8" standalone="yes"?>
<server-template-list>
<server-template>
<server-id>demo</server-id>
<server-name>demo</server-name>
<container-specs>
<container-id>hr</container-id>
<container-name>hr</container-name>
<server-template-key>
<server-id>demo</server-id>
</server-template-key>
<release-id>
<artifact-id>HR</artifact-id>
<group-id>org.jbpm</group-id>
<version>1.0</version>
</release-id>
<configs>
<entry>
<key>RULE</key>
<value xsi:type="ruleConfig" xmlns:xsi="http://www.w3.org/2001/XMLSchema-instance">
<scanner-status>STOPPED</scanner-status>
</value>
</entry>
<entry>
<key>PROCESS</key>
<value xsi:type="processConfig" xmlns:xsi="http://www.w3.org/2001/XMLSchema-instance">
<strategy>Singleton</strategy>
<kie-base-name></kie-base-name>
<kie-session-name></kie-session-name>
<merge-mode>Merge Collections</merge-mode>
</value>
</entry>
</configs>
<status>STARTED</status>
</container-specs>
<configs/>
<server-instances>
<server-instance-id>demo@localhost:8230</server-instance-id>
<server-name>demo@localhost:8230</server-name>
<server-template-id>demo</server-template-id>
<server-url>http://localhost:8230/kie-server/services/rest/server</server-url>
</server-instances>
<capabilities>RULE</capabilities>
<capabilities>PROCESS</capabilities>
<capabilities>PLANNING</capabilities>
</server-template>
</server-template-list>24.8.2. [GET] /management/server/{id}
Returns a Kie Server template
<?xml version="1.0" encoding="UTF-8" standalone="yes"?>
<server-template-details>
<server-id>product-demo</server-id>
<server-name>product-demo</server-name>
<container-specs>
<container-id>hr</container-id>
<container-name>hr</container-name>
<server-template-key>
<server-id>demo</server-id>
</server-template-key>
<release-id>
<artifact-id>HR</artifact-id>
<group-id>org.jbpm</group-id>
<version>1.0</version>
</release-id>
<configs>
<entry>
<key>RULE</key>
<value xsi:type="ruleConfig" xmlns:xsi="http://www.w3.org/2001/XMLSchema-instance">
<scanner-status>STOPPED</scanner-status>
</value>
</entry>
<entry>
<key>PROCESS</key>
<value xsi:type="processConfig" xmlns:xsi="http://www.w3.org/2001/XMLSchema-instance">
<strategy>Singleton</strategy>
<kie-base-name></kie-base-name>
<kie-session-name></kie-session-name>
<merge-mode>Merge Collections</merge-mode>
</value>
</entry>
</configs>
<status>STARTED</status>
</container-specs>
<configs/>
<server-instances>
<server-instance-id>demo@localhost:8230</server-instance-id>
<server-name>demo@localhost:8230</server-name>
<server-template-id>demo</server-template-id>
<server-url>http://localhost:8230/kie-server/services/rest/server</server-url>
</server-instances>
<capabilities>RULE</capabilities>
<capabilities>PROCESS</capabilities>
<capabilities>PLANNING</capabilities>
</server-template-details>24.8.3. [PUT] /management/server/{id}
Creates a new Kie Server template with the specified id
<?xml version="1.0" encoding="UTF-8" standalone="yes"?>
<server-template-details>
<server-id>test-demo</server-id>
<server-name>test-demo</server-name>
<configs/>
<capabilities>RULE</capabilities>
<capabilities>PROCESS</capabilities>
<capabilities>PLANNING</capabilities>
</server-template-details>24.8.4. [DELETE] /management/server/{id}
Deletes a Kie Server template with the specified id
24.8.5. [GET] /management/server/{id}/containers
Returns all containers on given server
<?xml version="1.0" encoding="UTF-8" standalone="yes"?>
<container-spec-list>
<container-spec>
<container-id>hr</container-id>
<container-name>hr</container-name>
<server-template-key>
<server-id>demo</server-id>
</server-template-key>
<release-id>
<artifact-id>HR</artifact-id>
<group-id>org.jbpm</group-id>
<version>1.0</version>
</release-id>
<configs>
<entry>
<key>RULE</key>
<value xsi:type="ruleConfig" xmlns:xsi="http://www.w3.org/2001/XMLSchema-instance">
<scanner-status>STOPPED</scanner-status>
</value>
</entry>
<entry>
<key>PROCESS</key>
<value xsi:type="processConfig" xmlns:xsi="http://www.w3.org/2001/XMLSchema-instance">
<strategy>Singleton</strategy>
<kie-base-name></kie-base-name>
<kie-session-name></kie-session-name>
<merge-mode>Merge Collections</merge-mode>
</value>
</entry>
</configs>
<status>STARTED</status>
</container-spec>
</container-spec-list>24.8.6. [GET] /management/server/{id}/containers/{containerId}
Returns the Container information including its release id and configuration
<?xml version="1.0" encoding="UTF-8" standalone="yes"?>
<container-spec-details>
<container-id>hr</container-id>
<container-name>hr</container-name>
<server-template-key>
<server-id>demo</server-id>
</server-template-key>
<release-id>
<artifact-id>HR</artifact-id>
<group-id>org.jbpm</group-id>
<version>1.0</version>
</release-id>
<configs>
<entry>
<key>PROCESS</key>
<value xsi:type="processConfig" xmlns:xsi="http://www.w3.org/2001/XMLSchema-instance">
<strategy>Singleton</strategy>
<kie-base-name></kie-base-name>
<kie-session-name></kie-session-name>
<merge-mode>Merge Collections</merge-mode>
</value>
</entry>
<entry>
<key>RULE</key>
<value xsi:type="ruleConfig" xmlns:xsi="http://www.w3.org/2001/XMLSchema-instance">
<scanner-status>STOPPED</scanner-status>
</value>
</entry>
</configs>
<status>STARTED</status>
</container-spec-details>24.8.7. [PUT] /management/server/{id}/containers/{containerId}
Creates a new Container with the specified containerId and the given release id and optionally configuration
<?xml version="1.0" encoding="UTF-8" standalone="yes"?>
<container-spec-details>
<container-id>hr</container-id>
<container-name>hr</container-name>
<server-template-key>
<server-id>demo</server-id>
</server-template-key>
<release-id>
<artifact-id>HR</artifact-id>
<group-id>org.jbpm</group-id>
<version>1.0</version>
</release-id>
<configs>
<entry>
<key>PROCESS</key>
<value xsi:type="processConfig" xmlns:xsi="http://www.w3.org/2001/XMLSchema-instance">
<strategy>Singleton</strategy>
<kie-base-name></kie-base-name>
<kie-session-name></kie-session-name>
<merge-mode>Merge Collections</merge-mode>
</value>
</entry>
<entry>
<key>RULE</key>
<value xsi:type="ruleConfig" xmlns:xsi="http://www.w3.org/2001/XMLSchema-instance">
<scanner-status>STOPPED</scanner-status>
</value>
</entry>
</configs>
<status>STARTED</status>
</container-spec-details24.8.8. [DELETE] /management/server/{id}/containers/{containerId}
Disposes a Container with the specified containerId
24.8.9. [POST] /management/server/{id}/containers/{containerId}/status/started
Starts the Container. No request body required
24.8.10. [POST] /management/server/{id}/containers/{containerId}/status/stopped
Stops the Container. No request body required
24.9. Kie Server Java Client API
The Kie Server has a great Java API to wrap REST or JMS requests to be sent to the server. In this section we will explore some of the possibilities of this API.
24.9.1. Maven Configuration
if you are a Maven user, make sure you have at least the following dependencies in the project’s pom.xml
<dependency>
<groupId>org.kie.server</groupId>
<artifactId>kie-server-client</artifactId>
<version>${kie.api.version}</version>
</dependency>
<!-- Logging -->
<dependency>
<groupId>ch.qos.logback</groupId>
<artifactId>logback-classic</artifactId>
<version>1.1.2</version>
</dependency>
<!-- Drools Commands -->
<dependency>
<groupId>org.drools</groupId>
<artifactId>drools-compiler</artifactId>
<scope>runtime</scope>
<version>${kie.api.version}</version>
</dependency>The version kie.api.version depends on the Kie Server version you are using. For jBPM 6.3, for example, you can use 6.3.1-SNAPSHOT.
24.9.2. Client Configuration
The client requires a configuration object where you set most of the server communication aspects, such as the protocol (REST and JMS) credentials and the payload format (XStream, JAXB and JSON are the supported formats at the moment). The first thing to do is create your configuration then create the KieServicesClient object, the entry point for starting the server communication.
See the source below where we use a REST client configuration:
import org.kie.server.api.marshalling.MarshallingFormat;
import org.kie.server.client.KieServicesClient;
import org.kie.server.client.KieServicesConfiguration;
import org.kie.server.client.KieServicesFactory;
public class DecisionServerTest {
private static final String URL = "http://localhost:8080/kie-server/services/rest/server";
private static final String USER = "kieserver";
private static final String PASSWORD = "kieserver1!";
private static final MarshallingFormat FORMAT = MarshallingFormat.JSON;
private KieServicesConfiguration conf;
private KieServicesClient kieServicesClient;
public void initialize() {
conf = KieServicesFactory.newRestConfiguration(URL, USER, PASSWORD);
conf.setMarshallingFormat(FORMAT);
kieServicesClient = KieServicesFactory.newKieServicesClient(conf);
}24.9.2.1. JMS interaction patterns
In version 6.5 KIE Server Client JMS integration has been enhanced with possibility to use various interaction patterns. Currently available are:
-
request reply (which is the default) - that makes the JMS integration synchronous - it blocks client until it gets the response back - not suited for JMS transactional use case
-
fire and forget - makes the integration one way only, suitable for notification like integration with kie server - makes perfect fit for transactional JMS delivery - deliver message to kie server only if transaction that ckie server client was invoked in was committed successfully
-
async with callback - allows to not block a client after sending message to kie server and receive response asynchronously - can be integrated with transactional JMS delivery
Response handlers can be either set globally - when KieServicesConfiguration is created or it can be changed on runtime on individual client instances (like RuleServiceClient, ProcessServicesClient, etc)
While 'fire and forget' and 'request reply' patterns do not require any additional configuration 'async with callback' does. And the main thing is actually the callback. KIE Server CLient comes with one out of the box - BlockingResponseCallback that provides basic support backed by blocking queue internally. Size of the queue is confgurable and thus allow receiving multiple messages, though intention of this callback is that it will only receive one message at a time - so it’s like one message (request) and then one response per client interaction.
| Kie Server Client when switching response handler is not thread safe, meaning change of the handler will affect all threads using same client instance. So in case of dynamic changes of the handler it’s recommended to use separate client instances. A good approach is to maintain set of clients that use dedicated response handler and then use these clients dependeing on which handler is required. |
Example:
client 1 will use fire and forget while client 2 will use request reply. So client 1 can be used to start processes and client 2 can be used to query for user tasks.
Users can provide their own callbacks by implementing org.kie.server.client.jms.ResponseCallback interface.
Configuration
Global JMS configuration
----
InitialContext context = ...;
Queue requestQueue = (Queue) context.lookup("jms/queue/KIE.SERVER.REQUEST"));
Queue responseQueue = (Queue) context.lookup("jms/queue/KIE.SERVER.RESPONSE");
ConnectionFactory connectionFactory = (ConnectionFactory) context.lookup("jms/RemoteConnectionFactory");
KieServicesConfiguration jmsConfiguration = KieServicesFactory.newJMSConfiguration( connectionFactory, requestQueue, responseQueue, "user", "password");
// here you set response handler globally
jmsConfiguration.setResponseHandler(new FireAndForgetResponseHandler());
----Alternatively, might be actually more common, is to set the handler on individual clients before they are used
Per client configuration
----
ProcessServiceClient processClient = client.getServicesClient(ProcessServicesClient.class);
// change response handler for processClient others are not affected
processClient.setResponseHandler(new FireAndForgetResponseHandler());
---24.9.3. Server Response
All the service responses are represented by the object org.kie.server.api.model.ServiceResponse<T> where T is the type of the payload.
It has the following attributes:
String msg: The response message;
org.kie.server.api.model.ServiceResponse.ResponseType type: the response type enum, which can be SUCCESS or FAILURE;
T result: The actual payload of the response, the requested object.
Notice that this is the same object returned if you are using REST or JMS, in another words it is agnostic to protocol.
24.9.4. Server Capabilities
Decision Server initially only supported rules execution, starting in version 6.3 it started supporting business process execution.
To know what exactly your server support, you can list the server capabilities by accessing the object org.kie.server.api.model.KieServerInfo**using the client:
public void listCapabilities() {
KieServerInfo serverInfo = kieServicesClient.getServerInfo().getResult();
System.out.print("Server capabilities:");
for(String capability: serverInfo.getCapabilities()) {
System.out.print(" " + capability);
}
System.out.println();
}If the server supports rules and process, the following should be printed when you run the code above:
Server capabilities: BRM KieServer BPM
24.9.5. Kie Containers
If you want to publish a kjar to receive requests, you must publish it in a container.
The container is represented in the client by the object org.kie.server.api.model.KieContainerResource, and a list of resources is org.kie.server.api.model.KieContainerResourceList.
Here’s an example of how to print a list of containers:
public void listContainers() {
KieContainerResourceList containersList = kieServicesClient.listContainers().getResult();
List<KieContainerResource> kieContainers = containersList.getContainers();
System.out.println("Available containers: ");
for (KieContainerResource container : kieContainers) {
System.out.println("\t" + container.getContainerId() + " (" + container.getReleaseId() + ")");
}
}It is also possible to list the containers based on specific ReleaseId (and its individual parts) or status:
public void listContainersWithFilter() {
// the following filter will match only containers with ReleaseId "org.example:contatner:1.0.0.Final" and status FAILED
KieContainerResourceFilter filter = new KieContainerResourceFilter.Builder()
.releaseId("org.example", "container", "1.0.0.Final")
.status(KieContainerStatus.FAILED)
.build();
KieContainerResourceList containersList = kieServicesClient.listContainers(filter).getResult();
List<KieContainerResource> kieContainers = containersList.getContainers();
System.out.println("Available containers: ");
for (KieContainerResource container : kieContainers) {
System.out.println("\t" + container.getContainerId() + " (" + container.getReleaseId() + ")");
}
}24.9.6. Managing Containers
You can use the client to dispose and create containers. If you dispose a containers, a ServiceResponse will be returned with Void payload(no payload) and if you create it, the KieContainerResource object itself will be returned in the response. Sample code:
public void disposeAndCreateContainer() {
System.out.println("== Disposing and creating containers ==");
List<KieContainerResource> kieContainers = kieServicesClient.listContainers().getResult().getContainers();
if (kieContainers.size() == 0) {
System.out.println("No containers available...");
return;
}
KieContainerResource container = kieContainers.get(0);
String containerId = container.getContainerId();
ServiceResponse<Void> responseDispose = kieServicesClient.disposeContainer(containerId);
if (responseDispose.getType() == ResponseType.FAILURE) {
System.out.println("Error disposing " + containerId + ". Message: ");
System.out.println(responseDispose.getMsg());
return;
}
System.out.println("Success Disposing container " + containerId);
System.out.println("Trying to recreate the container...");
ServiceResponse<KieContainerResource> createResponse = kieServicesClient.createContainer(containerId, container);
if(createResponse.getType() == ResponseType.FAILURE) {
System.out.println("Error creating " + containerId + ". Message: ");
System.out.println(responseDispose.getMsg());
return;
}
System.out.println("Container recreated with success!");
}24.9.7. Available Clients for the Decision Server
The KieServicesClient is also the entry point for others clients to perform specific operations, such as send BRMS commands and manage processes.
Currently from the KieServicesClient you can have access to the following services available in org.kie.server.client package:
-
JobServicesClient: This client allows you to schedule, cancel, requeue and get job requests;
-
ProcessServicesClient: Allows you to start, signal abort process; complete and abort work items among other capabilities;
-
QueryServicesClient: The powerful query client allows you to query process, process nodes and process variables;
-
RuleServicesClient: The simple, but powerful rules client can be used to send commands to the server to perform rules related operations(insert objects in the working memory, fire rules, get globals…);
-
UserTaskServicesClient: Finally, the user tasks clients allows you to perform all operations with an user tasks(start, claim, cancel, etc) and query tasks by certain fields(process instances id, user, etc).
For further information about these interfaces check github: https://github.com/kiegroup/droolsjbpm-integration/tree/master/kie-server-parent/kie-server-remote/kie-server-client/src/main/java/org/kie/server/client
You can have access to any of these clients using the method getServicesClient in the KieServicesClient class.
For example: RuleServicesClient rulesClient = kieServicesClient.getServicesClient(RuleServicesClient.class);
24.9.8. Sending commands to the server
To build commands to the server you must use the class org.kie.api.command.KieCommands, that can be created using org.kie.api.KieServices.get().getCommands().
The command to be send must be a BatchExecutionCommand or a single command(if a single command is sent, the server wraps it into a BatchExecutionCommand):
public void executeCommands() {
System.out.println("== Sending commands to the server ==");
RuleServicesClient rulesClient = kieServicesClient.getServicesClient(RuleServicesClient.class);
KieCommands commandsFactory = KieServices.Factory.get().getCommands();
Command<?> insert = commandsFactory.newInsert("Some String OBJ");
Command<?> fireAllRules = commandsFactory.newFireAllRules();
Command<?> batchCommand = commandsFactory.newBatchExecution(Arrays.asList(insert, fireAllRules));
ServiceResponse<String> executeResponse = rulesClient.executeCommands("hello", batchCommand);
if(executeResponse.getType() == ResponseType.SUCCESS) {
System.out.println("Commands executed with success! Response: ");
System.out.println(executeResponse.getResult());
}
else {
System.out.println("Error executing rules. Message: ");
System.out.println(executeResponse.getMsg());
}
}The result in this case is a String with the command execution result. In our case it will print the following:
== Sending commands to the server ==
Commands executed with success! Response:
{
"results" : [ ],
"facts" : [ ]
}\* You must add org.drools:drools-compiler dependency to have this part working
During creation of BatchExecutionCommand, an optional lookup argument can be specified, that determines where the comand will run. Lookup argument can be one of the following:
-
Kie Session Name defined in deployment descriptor
-
Kie Container Id
-
Kie Container Id followed by Process Instance Id (Process Instance runtime strategy have to be used on the container)
The last two options need active jBPM extension on the Kie Container.
In the third case, the usage of lookup argument looks like:
Command<?> batchCommand = commandsFactory.newBatchExecution(Arrays.asList(insert, fireAllRules), "demo-container#1");24.9.9. Listing available business processes
To list process definitions we use the QueryClient. The methods of the QueryClient usually uses pagination, which means that besides the query you are making, you must also provide the current page and the number of results per page. In the code below the query for process definitions from the given container starts on page 0 and list 1000 results, in another words, the 1000 first results.
public void listProcesses() {
System.out.println("== Listing Business Processes ==");
QueryServicesClient queryClient = kieServicesClient.getServicesClient(QueryServicesClient.class);
List<ProcessDefinition> findProcessesByContainerId = queryClient.findProcessesByContainerId("rewards", 0, 1000);
for (ProcessDefinition def : findProcessesByContainerId) {
System.out.println(def.getName() + " - " + def.getId() + " v" + def.getVersion());
}
}24.10. Securing password using key store
KIE server is using for some communication (e.g. REST api) basic authentication with passwords. From the security perspective it is not safe to store such passwords in clear text form on the disc. For this purpose a mechanism was developed to store passwords in a key store and then use it in the application.
24.10.1. Simple usecase
User wants to secure his password for communicating via REST client. He creates new keystore where he will put his password, he will setup sytem variables with the info to the keystore and KIE will automatically load the keystore and will use the password for securing the communication.
24.10.2. Implementation and business logic
Current implementation is using key store if it is defined. If not, the funcionality is falling back to old behavior using config parameters.
24.10.3. System requirements
To use a key store we need to create it first. As JKS is not supporting symetric keys we have to create JCEKS key store. Moreover, password can be stored in a key store only for Java 8 and above. For generating a key store you can use standard tool KeyTool which is part of JDK instalation.
24.10.4. Initialization of a key store
For keystore initialization we recommend to use keytool. Syntax is the following:
$ keytool -importpassword -keystore _keystore_url_ -keypass _alias_key_password_ -alias _password_alias_ -storepass _keystore_password_ -storetype JCEKS-
alias - alias name of the entry to process
-
keypass - key password
-
keystore - keystore name
-
storepass - keystore password
-
storetype - keystore type
After running this command user will be asked for entering the password which he wants to store.
24.10.5. System parameters for loading key store
-
kie.keystore.keyStoreURL - URL to a keystore which should be used
-
kie.keystore.keyStorePwd - password to a keystore
-
kie.keystore.key.server.alias - alias of the key for REST services where password is stored
-
kie.keystore.key.server.pwd - password of an alias for REST services with stored password
-
kie.keystore.key.ctrl.alias - alias of the key for default REST controller where password is stored
-
kie.keystore.key.ctrl.pwd - password of an alias for default REST controller with stored password
24.10.6. Example
-
create user and password in application server (it has to have kie-server role)
${EAP_HOME}/add-user.sh -a -e -u kieserver -p "kiePassword1!" -g kie-server
-
use key tool to create keystore with password in it
$ keytool -importpassword -keystore /home/kie/keystores/droolsServer.jceks -keypass keypwd -alias droolsKey -storepass serverpwd -storetype JCEKS
Enter the password to be stored:
Re-enter password:
$ keytool -importpassword -keystore /home/kie/keystores/droolsServer.jceks -keypass keypwd -alias restKey -storepass serverpwd -storetype JCEKS
Enter the password to be stored:
Re-enter password:-
set following system properties on application server that will let the kie server/controller to read password from keystore
<system-properties>
<property name="kie.keystore.keyStoreURL" value="droolsServer.jceks"/>
<property name="kie.keystore.keyStorePwd" value="serverpwd"/>
<property name="kie.keystore.key.server.alias" value="restKey"/>
<property name="kie.keystore.key.server.pwd" value="keypwd"/>
<property name="kie.keystore.key.ctrl.alias" value="droolsKey"/>
<property name="kie.keystore.key.ctrl.pwd" value="keypwd"/>
</system-properties>
-
start server to verify configuration
24.11. Kie Server Controller Client API
The Kie Server Controller offers a Java API to wrap REST or Web Socket requests to be sent to the server. In this section we will explore some of the capabilities of this API.
24.11.1. Maven Configuration
if you are a Maven user, you must have the following dependencies in the project’s pom.xml
<dependency>
<groupId>org.kie.server</groupId>
<artifactId>kie-server-controller-client</artifactId>
<version>${kie.api.version}</version>
</dependency>
<!-- REST Client -->
<dependency>
<groupId>org.jboss.resteasy</groupId>
<artifactId>resteasy-client</artifactId>
<version>3.0.19.Final</version>
</dependency>
<!-- Web Socket Client -->
<dependency>
<groupId>io.undertow</groupId>
<artifactId>undertow-websockets-jsr</artifactId>
<version>1.4.21.Final</version>
</dependency>
<!-- Logging -->
<dependency>
<groupId>ch.qos.logback</groupId>
<artifactId>logback-classic</artifactId>
<version>1.1.2</version>
</dependency>The version kie.api.version depends on the Kie Server Controller version you are using. For jBPM 7.6, for example, you can use 7.6.0.Final.
24.11.2. Client Configuration
The first thing to do is to create your KieServerControllerClient object, the entry point for starting the server communication,
using the provided factory methods available in KieServerControllerClientFactory where you set most of the server communication
aspects, such as the protocol (REST or Web Socket), credentials, and the payload format (currently, JAXB and JSON are the only supported
formats for the REST protocol).
See the examples below to get started:
24.11.2.1. Kie Server Controller Endpoints
-
REST: /rest/controller
-
Web Socket: /websocket/controller
import org.kie.server.controller.api.model.spec.ServerTemplateList;
import org.kie.server.controller.client.KieServerControllerClient;
import org.kie.server.controller.client.KieServerControllerClientFactory;
public class ListServerTemplatesExample {
private static final String URL = "http://localhost:8080/kie-server-controller/rest/controller";
private static final String USER = "kieserver";
private static final String PASSWORD = "kieserver1!";
public static void main(String[] args) {
KieServerControllerClient client = KieServerControllerClientFactory.newRestClient(URL,
USER,
PASSWORD);
final ServerTemplateList serverTemplateList = client.listServerTemplates();
System.out.println(String.format("Found %s server template(s) at controller url: %s",
serverTemplateList.getServerTemplates().length,
URL));
}
}import org.kie.server.controller.api.model.spec.ServerTemplateList;
import org.kie.server.controller.client.KieServerControllerClient;
import org.kie.server.controller.client.KieServerControllerClientFactory;
public class ListServerTemplatesExample {
private static final String URL = "ws://localhost:8080/kie-server-controller/websocket/controller";
private static final String USER = "kieserver";
private static final String PASSWORD = "kieserver1!";
public static void main(String[] args) {
KieServerControllerClient client = KieServerControllerClientFactory.newWebSocketClient(URL,
USER,
PASSWORD);
final ServerTemplateList serverTemplateList = client.listServerTemplates();
System.out.println(String.format("Found %s server template(s) at controller url: %s",
serverTemplateList.getServerTemplates().length,
URL));
}
}24.11.2.2. Protocol specific settings
REST
When using the REST protocol, the Kie Server Controller Client allows that you specify your own javax.ws.rs.core.Configuration.
This can be useful for fine tuning the underlying REST client API. As an example, you can tweak the connection time out according to your needs.
import java.util.concurrent.TimeUnit;
import javax.ws.rs.core.Configuration;
import org.jboss.resteasy.client.jaxrs.ResteasyClientBuilder;
import org.kie.server.api.marshalling.MarshallingFormat;
import org.kie.server.controller.api.model.spec.ServerTemplateList;
import org.kie.server.controller.client.KieServerControllerClient;
import org.kie.server.controller.client.KieServerControllerClientFactory;
public class RESTTimeoutExample {
private static final String URL = "http://localhost:8080/kie-server-controller/rest/controller";
private static final String USER = "kieserver";
private static final String PASSWORD = "kieserver1!";
public static void main(String[] args) {
final Configuration configuration =
new ResteasyClientBuilder()
.establishConnectionTimeout(10,
TimeUnit.SECONDS)
.socketTimeout(60,
TimeUnit.SECONDS)
.getConfiguration();
KieServerControllerClient client = KieServerControllerClientFactory.newRestClient(URL,
USER,
PASSWORD,
MarshallingFormat.JSON,
configuration);
final ServerTemplateList serverTemplateList = client.listServerTemplates();
System.out.println(String.format("Found %s server template(s) at controller url: %s",
serverTemplateList.getServerTemplates().length,
URL));
}
}Web Socket
When connecting via Web Socket protocol, the Kie Server Controller Client allows you to receive events notification based on changes that happen in the particular Kie Server Controller that the client API is connected to. For instance, you can receive a notification about a Kie Sever instance that got connected to the controller.
import org.kie.server.controller.api.model.events.*;
import org.kie.server.controller.api.model.spec.ServerTemplateList;
import org.kie.server.controller.client.KieServerControllerClient;
import org.kie.server.controller.client.KieServerControllerClientFactory;
import org.kie.server.controller.client.event.EventHandler;
public class WebSocketEventsExample {
private static final String URL = "ws://localhost:8080/kie-server-controller/websocket/controller";
private static final String USER = "kieserver";
private static final String PASSWORD = "kieserver1!";
public static void main(String[] args) {
KieServerControllerClient client = KieServerControllerClientFactory.newWebSocketClient(URL,
USER,
PASSWORD,
new TestEventHandler());
final ServerTemplateList serverTemplateList = client.listServerTemplates();
System.out.println(String.format("Found %s server template(s) at controller url: %s",
serverTemplateList.getServerTemplates().length,
URL));
try {
Thread.sleep(60 * 1000);
} catch (Exception e) {
e.printStackTrace();
}
}
static class TestEventHandler implements EventHandler {
@Override
public void onServerInstanceConnected(ServerInstanceConnected serverInstanceConnected) {
System.out.println("serverInstanceConnected = " + serverInstanceConnected);
}
@Override
public void onServerInstanceDeleted(ServerInstanceDeleted serverInstanceDeleted) {
System.out.println("serverInstanceDeleted = " + serverInstanceDeleted);
}
@Override
public void onServerInstanceDisconnected(ServerInstanceDisconnected serverInstanceDisconnected) {
System.out.println("serverInstanceDisconnected = " + serverInstanceDisconnected);
}
@Override
public void onServerTemplateDeleted(ServerTemplateDeleted serverTemplateDeleted) {
System.out.println("serverTemplateDeleted = " + serverTemplateDeleted);
}
@Override
public void onServerTemplateUpdated(ServerTemplateUpdated serverTemplateUpdated) {
System.out.println("serverTemplateUpdated = " + serverTemplateUpdated);
}
@Override
public void onServerInstanceUpdated(ServerInstanceUpdated serverInstanceUpdated) {
System.out.println("serverInstanceUpdated = " + serverInstanceUpdated);
}
@Override
public void onContainerSpecUpdated(ContainerSpecUpdated containerSpecUpdated) {
System.out.println("onContainerSpecUpdated = " + containerSpecUpdated);
}
}
}24.11.3. Setting up a Kie Server Controller
Below is a demonstration of additional capabilities of this API. You can follow this guide to get started with an empty Kie Server Controller instance. This example illustrates how to create a Server Template using some basic configuration as well as setting up a single container. It also shows how to start and stop the specific container and remove the newly created Server Template.
import java.util.Arrays;
import java.util.HashMap;
import java.util.Map;
import org.kie.server.api.model.KieContainerStatus;
import org.kie.server.api.model.KieScannerStatus;
import org.kie.server.api.model.ReleaseId;
import org.kie.server.controller.api.model.spec.*;
import org.kie.server.controller.client.KieServerControllerClient;
import org.kie.server.controller.client.KieServerControllerClientFactory;
public class WebSocketSetupControllerExample {
private static final String URL = "ws://localhost:8080/kie-server-controller/websocket/controller";
private static final String USER = "kieserver";
private static final String PASSWORD = "kieserver1!";
private static KieServerControllerClient client;
public static void main(String[] args) {
KieServerControllerClient client = KieServerControllerClientFactory.newWebSocketClient(URL,
USER,
PASSWORD);
ServerTemplate serverTemplate = createServerTemplate();
ContainerSpec container = createContainer(serverTemplate);
client.startContainer(container);
client.stopContainer(container);
client.deleteServerTemplate(serverTemplate.getId());
}
protected static ServerTemplate createServerTemplate() {
ServerTemplate serverTemplate = new ServerTemplate();
serverTemplate.setId("example-client-id");
serverTemplate.setName("example-client-name");
serverTemplate.setCapabilities(Arrays.asList(Capability.PROCESS.name(),
Capability.RULE.name(),
Capability.PLANNING.name()));
client.saveServerTemplate(serverTemplate);
return serverTemplate;
}
protected static ContainerSpec createContainer(ServerTemplate serverTemplate){
Map<Capability, ContainerConfig> containerConfigMap = new HashMap();
ProcessConfig processConfig = new ProcessConfig("PER_PROCESS_INSTANCE", "kieBase", "kieSession", "MERGE_COLLECTION");
containerConfigMap.put(Capability.PROCESS, processConfig);
RuleConfig ruleConfig = new RuleConfig(500l, KieScannerStatus.SCANNING);
containerConfigMap.put(Capability.RULE, ruleConfig);
ReleaseId releaseId = new ReleaseId("org.kie.server.testing", "stateless-session-kjar", "1.0.0-SNAPSHOT");
ContainerSpec containerSpec = new ContainerSpec("example-container-id", "example-client-name", serverTemplate, releaseId, KieContainerStatus.STOPPED, containerConfigMap);
client.saveContainerSpec(serverTemplate.getId(), containerSpec);
return containerSpec;
}
}Drools Examples
Examples to help you learn Drools
25. Examples
25.1. Getting the Examples
Make sure the Drools Eclipse plugin is installed, which needs the Graphical Editing Framework (GEF) dependency installed first. Then download and extract the drools-examples zip file, which includes an already created Eclipse project. Import that project into a new Eclipse workspace. The rules all have example classes that execute the rules. If you want to try the examples in another project (or another IDE) then you will need to set up the dependencies by hand, of course. Many, but not all of the examples are documented below, enjoy!
Some examples require Java 1.6 to run.
25.2. Hello World
Name: Hello World Main class: org.drools.examples.helloworld.HelloWorldExample Module: drools-examples Type: Java application Rules file: HelloWorld.drl Objective: demonstrate basic rules in use
The "Hello World" example shows a simple application using rules, written both using the MVEL and the Java dialects.
This example demonstrates how to create and use a KieSession.
Also, audit logging and debug outputs are shown, which is omitted from other examples as it’s all very similar.
The following code snippet shows how the session is created with only 3 lines of code.
KieServices ks = KieServices.Factory.get(); (1)
KieContainer kc = ks.getKieClasspathContainer(); (2)
KieSession ksession = kc.newKieSession("HelloWorldKS"); (3)| 1 | Obtains the KieServices factory. This is the main interface applications use to interact with the engine. |
| 2 | Creates a KieContainer from the project classpath. This will look for a /META-INF/kmodule.xml file to configure and instantiate the KieModule into the KieContainer. |
| 3 | Creates a session based on the named "HelloWorldKS" session configuration. |
Drools has an event model that exposes much of what’s happening internally.
Two default debug listeners are supplied, DebugAgendaEventListener and DebugWorkingMemoryEventListener which print out debug event information to the System.err stream displayed in the Console window.
Adding listeners to a Session is trivial, as shown in the next snippet.
The KieRuntimeLogger provides execution auditing, the result of which can be viewed in a graphical viewer.
The logger is actually a specialised implementation built on the Agenda and RuleRuntime listeners.
When the engine has finished executing, logger.close() must be called.
Most of the examples use the Audit logging features of Drools to record execution flow for later inspection.
// The application can also setup listeners
ksession.addEventListener( new DebugAgendaEventListener() );
ksession.addEventListener( new DebugRuleRuntimeEventListener() );
// To setup a file based audit logger, uncomment the next line
// KieRuntimeLogger logger = ks.getLoggers().newFileLogger( ksession, "./helloworld" );
// To setup a ThreadedFileLogger, so that the audit view reflects events whilst debugging,
// uncomment the next line
// KieRuntimeLogger logger = ks.getLoggers().newThreadedFileLogger( ksession, "./helloworld", 1000 );The single class used in this example is very simple.
It has two fields: the message, which is a String and the status which can be one of the two integers HELLO or GOODBYE.
public static class Message {
public static final int HELLO = 0;
public static final int GOODBYE = 1;
private String message;
private int status;
...
}A single Message object is created with the message text "Hello World" and the status HELLO and then inserted into the engine, at which point fireAllRules() is executed.
// The application can insert facts into the session
final Message message = new Message();
message.setMessage( "Hello World" );
message.setStatus( Message.HELLO );
ksession.insert( message );
// and fire the rules
ksession.fireAllRules();To execute the example as a Java application:
-
Open the class
org.drools.examples.helloworld.HelloWorldExamplein your Eclipse IDE -
Right-click the class and select "Run as…" and then "Java application"
If we put a breakpoint on the fireAllRules() method and select the ksession variable, we can see that the "Hello World" rule is already activate on the Agenda.
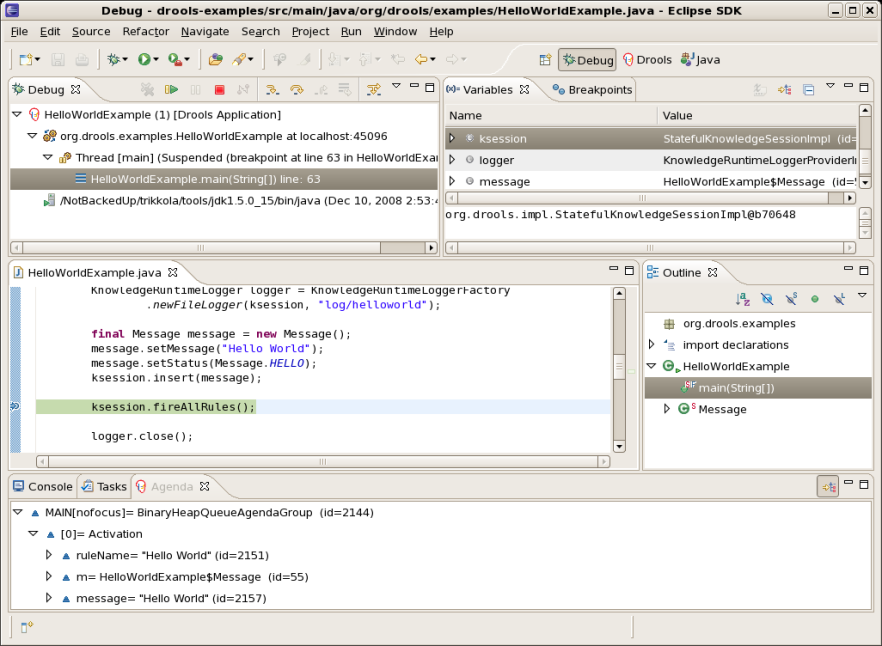
The application print outs go to to System.out while the debug listener print outs go to System.err.
Hello World
Goodbye cruel world==>[ActivationCreated(0): rule=Hello World;
tuple=[fid:1:1:org.drools.examples.helloworld.HelloWorldExample$Message@17cec96]]
[ObjectInserted: handle=[fid:1:1:org.drools.examples.helloworld.HelloWorldExample$Message@17cec96];
object=org.drools.examples.helloworld.HelloWorldExample$Message@17cec96]
[BeforeActivationFired: rule=Hello World;
tuple=[fid:1:1:org.drools.examples.helloworld.HelloWorldExample$Message@17cec96]]
==>[ActivationCreated(4): rule=Good Bye;
tuple=[fid:1:2:org.drools.examples.helloworld.HelloWorldExample$Message@17cec96]]
[ObjectUpdated: handle=[fid:1:2:org.drools.examples.helloworld.HelloWorldExample$Message@17cec96];
old_object=org.drools.examples.helloworld.HelloWorldExample$Message@17cec96;
new_object=org.drools.examples.helloworld.HelloWorldExample$Message@17cec96]
[AfterActivationFired(0): rule=Hello World]
[BeforeActivationFired: rule=Good Bye;
tuple=[fid:1:2:org.drools.examples.helloworld.HelloWorldExample$Message@17cec96]]
[AfterActivationFired(4): rule=Good Bye]The actual rules are inside the file src/main/resources/org/drools/examples/helloworld/HelloWorld.drl :
rule "Hello World"
dialect "mvel"
when
m : Message( status == Message.HELLO, message : message )
then
System.out.println( message );
modify ( m ) { message = "Goodbye cruel world",
status = Message.GOODBYE };
endThe LHS (after when) section of the rule states that it will be activated for each Message object inserted into the Rule Runtime whose status is Message.HELLO.
Besides that, two variable bindings are created: the variable message is bound to the message attribute and the variable m is bound to the matched Message object itself.
The RHS (after then) or consequence part of the rule is written using the MVEL expression language, as declared by the rule’s attribute dialect.
After printing the content of the bound variable message to System.out, the rule changes the values of the message and status attributes of the Message object bound to m.
This is done using MVEL’s modify statement, which allows you to apply a block of assignments in one statement, with the engine being automatically notified of the changes at the end of the block.
It is possible to set a breakpoint into the DRL, on the modify call, and inspect the Agenda view again during the execution of the rule’s consequence.
This time we start the execution via "Debug As" and "Drools application" and not by running a "Java application":
-
Open the class
org.drools.examples.HelloWorldin your Eclipse IDE. -
Right-click the class and select "Debug as…" and then "Drools application".
Now we can see that the other rule "Good Bye", which uses the Java dialect, is activated and placed on the Agenda.
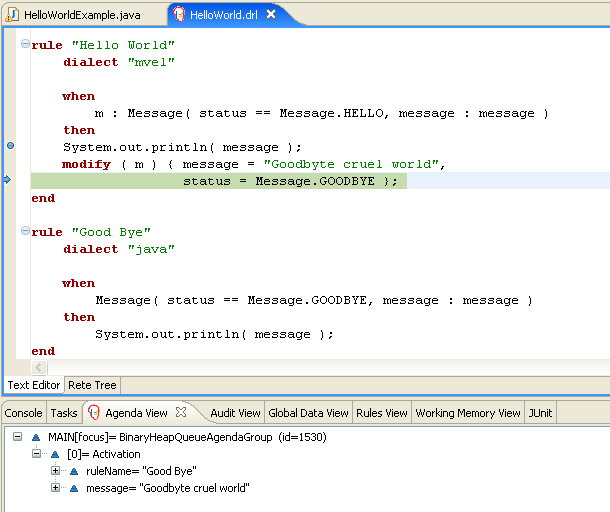
The "Good Bye" rule, which specifies the "java" dialect, is similar to the "Hello World" rule except that it matches Message objects whose status is Message.GOODBYE.
rule "Good Bye"
dialect "java"
when
Message( status == Message.GOODBYE, message : message )
then
System.out.println( message );
endThe Java code that instantiates the KieRuntimeLogger creates an audit log file that can be loaded into the Audit view.
The Audit view is used in many of the examples to demonstrate the example execution flow.
In the view screen shot below we can see that the object is inserted, which creates an activation for the "Hello World" rule; the activation is then executed which updates the Message object causing the "Good Bye" rule to activate; finally the "Good Bye" rule also executes.
Selecting an event in the Audit view highlights the origin event in green; therefore the "Activation created" event is highlighted in green as the origin of the "Activation executed" event.
25.3. State Example
This example is implemented in two different versions to demonstrate different ways of implementing the same basic behavior: forward chaining, i.e., the ability the engine has to evaluate, activate and fire rules in sequence, based on changes on the facts in the Working Memory.
25.3.1. Understanding the State Example
Name: State Example Main class: org.drools.examples.state.StateExampleUsingSalience Module: drools-examples Type: Java application Rules file: StateExampleUsingSalience.drl Objective: Demonstrates basic rule use and Conflict Resolution for rule firing priority.
Each State class has fields for its name and its current state (see the class org.drools.examples.state.State). The two possible states for each objects are:
-
NOTRUN -
FINISHED
public class State {
public static final int NOTRUN = 0;
public static final int FINISHED = 1;
private final PropertyChangeSupport changes =
new PropertyChangeSupport( this );
private String name;
private int state;
... setters and getters go here...
}Ignoring the PropertyChangeSupport, which will be explained later, we see the creation of four State objects named A, B, C and D.
Initially their states are set to NOTRUN, which is default for the used constructor.
Each instance is asserted in turn into the Session and then fireAllRules() is called.
final State a = new State( "A" );
final State b = new State( "B" );
final State c = new State( "C" );
final State d = new State( "D" );
ksession.insert( a );
ksession.insert( b );
ksession.insert( c );
ksession.insert( d );
ksession.fireAllRules();
ksession.dispose(); // Stateful rule session must always be disposed when finishedTo execute the application:
-
Open the class
org.drools.examples.state.StateExampleUsingSaliencein your Eclipse IDE. -
Right-click the class and select "Run as…" and then "Java application"
You will see the following output in the Eclipse console window:
A finished
B finished
C finished
D finishedThere are four rules in total.
First, the Bootstrap rule fires, setting A to state FINISHED, which then causes B to change its state to FINISHED.
C and D are both dependent on B, causing a conflict which is resolved by the salience values.
Let’s look at the way this was executed.
The best way to understand what is happening is to use the Audit Logging feature to graphically see the results of each operation. To view the Audit log generated by a run of this example:
-
If the Audit View is not visible, click on "Window" and then select "Show View", then "Other…" and "Drools" and finally "Audit View".
-
In the "Audit View" click the "Open Log" button and select the file "<drools-examples-dir>/log/state.log".
After that, the "Audit view" will look like the following screenshot:
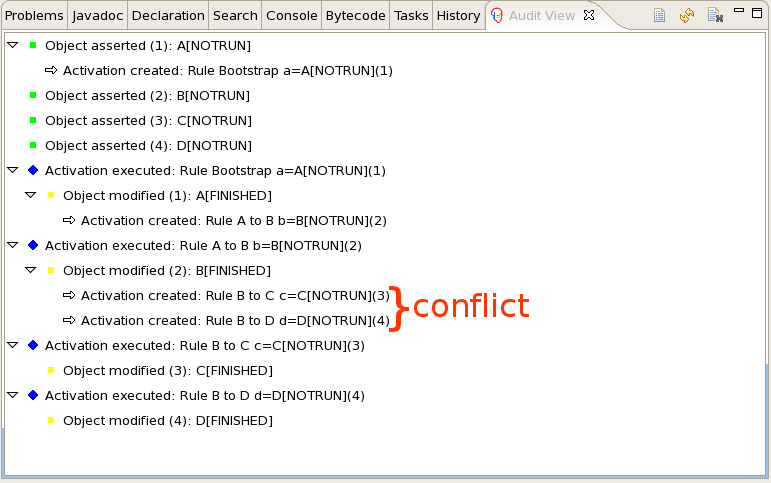
Reading the log in the "Audit View", top to bottom, we see every action and the corresponding changes in the Working Memory.
This way we observe that the assertion of the State object A in the state NOTRUN activates the Bootstrap rule, while the assertions of the other State objects have no immediate effect.
rule Bootstrap
when
a : State(name == "A", state == State.NOTRUN )
then
System.out.println(a.getName() + " finished" );
a.setState( State.FINISHED );
endThe execution of rule Bootstrap changes the state of A to FINISHED, which, in turn, activates rule "A to B".
rule "A to B"
when
State(name == "A", state == State.FINISHED )
b : State(name == "B", state == State.NOTRUN )
then
System.out.println(b.getName() + " finished" );
b.setState( State.FINISHED );
endThe execution of rule "A to B" changes the state of B to FINISHED, which activates both, rules "B to C" and "B to D", placing their Activations onto the Agenda.
From this moment on, both rules may fire and, therefore, they are said to be "in conflict". The conflict resolution strategy allows the engine’s Agenda to decide which rule to fire.
As rule "B to C" has the higher salience value (10 versus the default salience value of 0), it fires first, modifying object C to state FINISHED.
The Audit view shown above reflects the modification of the State object in the rule "A to B", which results in two activations being in conflict.
The Agenda view can also be used to investigate the state of the Agenda, with debug points being placed in the rules themselves and the Agenda view opened.
The screen shot below shows the breakpoint in the rule "A to B" and the state of the Agenda with the two conflicting rules.
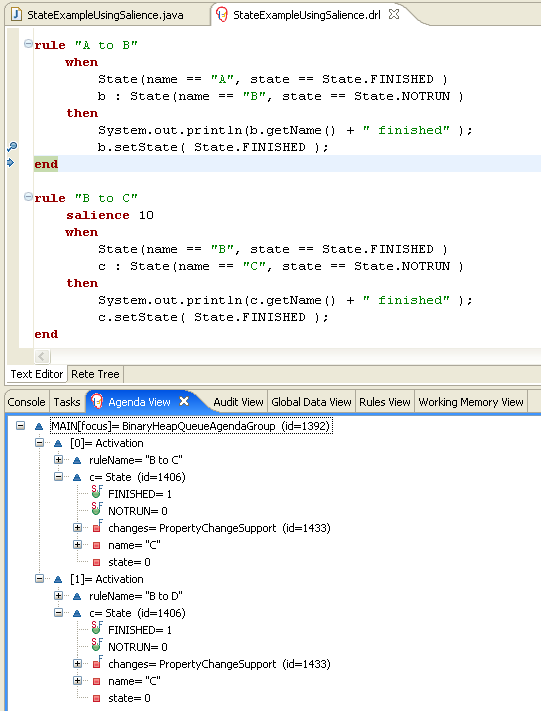
rule "B to C"
salience 10
when
State(name == "B", state == State.FINISHED )
c : State(name == "C", state == State.NOTRUN )
then
System.out.println(c.getName() + " finished" );
c.setState( State.FINISHED );
endRule "B to D" fires last, modifying object D to state FINISHED.
rule "B to D"
when
State(name == "B", state == State.FINISHED )
d : State(name == "D", state == State.NOTRUN )
then
System.out.println(d.getName() + " finished" );
d.setState( State.FINISHED );
endThere are no more rules to execute and so the engine stops.
Another notable concept in this example is the use of dynamic facts, based on PropertyChangeListener objects.
As described in the documentation, in order for the engine to see and react to changes of fact properties, the application must tell the engine that changes occurred.
This can be done explicitly in the rules by using the modify statement, or implicitly by letting the engine know that the facts implement PropertyChangeSupport as defined by the JavaBeans
specification.
This example demonstrates how to use PropertyChangeSupport to avoid the need for explicit modify statements in the rules.
To make use of this feature, ensure that your facts implement PropertyChangeSupport, the same way the class org.drools.example.State does, and use the following code in the rules file to configure the engine to listen for property changes on those facts:
declare type State
@propertyChangeSupport
endWhen using PropertyChangeListener objects, each setter must implement a little extra code for the notification.
Here is the setter for state in the class org.drools.examples:
public void setState(final int newState) {
int oldState = this.state;
this.state = newState;
this.changes.firePropertyChange( "state",
oldState,
newState );
}There are another class in this example: StateExampleUsingAgendaGroup.
It executes from A to B to C to D, as just shown, but StateExampleUsingAgendaGroup uses agenda-groups to control the rule conflict and which one fires first.
Agenda groups are a way to partition the Agenda into groups and to control which groups can execute.
By default, all rules are in the agenda group "MAIN". The "agenda-group" attribute lets you specify a different agenda group for the rule.
Initially, a Working Memory has its focus on the Agenda group "MAIN". A group’s rules will only fire when the group receives the focus.
This can be achieved either ny using the method by setFocus() or the rule attribute auto-focus.
"auto-focus" means that the rule automatically sets the focus to its agenda group when the rule is matched and activated.
It is this "auto-focus" that enables rule "B to C" to fire before "B to D".
rule "B to C"
agenda-group "B to C"
auto-focus true
when
State(name == "B", state == State.FINISHED )
c : State(name == "C", state == State.NOTRUN )
then
System.out.println(c.getName() + " finished" );
c.setState( State.FINISHED );
kcontext.getKnowledgeRuntime().getAgenda().getAgendaGroup( "B to D" ).setFocus();
endThe rule "B to C" calls setFocus() on the agenda group "B to D", allowing its active rules to fire, which allows the rule "B to D" to fire.
rule "B to D"
agenda-group "B to D"
when
State(name == "B", state == State.FINISHED )
d : State(name == "D", state == State.NOTRUN )
then
System.out.println(d.getName() + " finished" );
d.setState( State.FINISHED );
end25.4. Fibonacci Example
Name: Fibonacci Main class: org.drools.examples.fibonacci.FibonacciExample Module: drools-examples Type: Java application Rules file: Fibonacci.drl Objective: Demonstrates Recursion, the CE not and cross product matching
The Fibonacci Numbers (see http://en.wikipedia.org/wiki/Fibonacci_number) discovered by Leonardo of Pisa (see http://en.wikipedia.org/wiki/Fibonacci) is a sequence that starts with 0 and 1. The next Fibonacci number is obtained by adding the two preceding Fibonacci numbers. The Fibonacci sequence begins with 0, 1, 1, 2, 3, 5, 8, 13, 21, 34, 55, 89, 144, 233, 377, 610, 987, 1597, 2584, 4181, 6765, 10946,… The Fibonacci Example demonstrates recursion and conflict resolution with salience values.
The single fact class Fibonacci is used in this example.
It has two fields, sequence and value.
The sequence field is used to indicate the position of the object in the Fibonacci number sequence.
The value field shows the value of that Fibonacci object for that sequence position, using -1 to indicate a value that still needs to be computed.
public static class Fibonacci {
private int sequence;
private long value;
public Fibonacci( final int sequence ) {
this.sequence = sequence;
this.value = -1;
}
... setters and getters go here...
}Execute the example:
-
Open the class
org.drools.examples.fibonacci.FibonacciExamplein your Eclipse IDE. -
Right-click the class and select "Run as…" and then "Java application"
Eclipse shows the following output in its console window (with "…snip…" indicating lines that were removed to save space):
recurse for 50
recurse for 49
recurse for 48
recurse for 47
...snip...
recurse for 5
recurse for 4
recurse for 3
recurse for 2
1 == 1
2 == 1
3 == 2
4 == 3
5 == 5
6 == 8
...snip...
47 == 2971215073
48 == 4807526976
49 == 7778742049
50 == 12586269025To kick this off from Java we only insert a single Fibonacci object, with a sequence field of 50.
A recursive rule is then used to insert the other 49 Fibonacci objects.
This example doesn’t use PropertyChangeSupport.
It uses the MVEL dialect, which means we can use the modify keyword, which allows a block setter action which also notifies the engine of changes.
ksession.insert( new Fibonacci( 50 ) );
ksession.fireAllRules();The rule Recurse is very simple.
It matches each asserted Fibonacci object with a value of -1, creating and asserting a new Fibonacci object with a sequence of one less than the currently matched object.
Each time a Fibonacci object is added while the one with a sequence field equal to 1 does not exist, the rule re-matches and fires again.
The not conditional element is used to stop the rule’s matching once we have all 50 Fibonacci objects in memory.
The rule also has a salience value, because we need to have all 50 Fibonacci objects asserted before we execute the Bootstrap rule.
rule Recurse
salience 10
when
f : Fibonacci ( value == -1 )
not ( Fibonacci ( sequence == 1 ) )
then
insert( new Fibonacci( f.sequence - 1 ) );
System.out.println( "recurse for " + f.sequence );
endThe Audit view shows the original assertion of the Fibonacci object with a sequence field of 50, done from Java code.
From there on, the Audit view shows the continual recursion of the rule, where each asserted Fibonacci object causes the Recurse rule to become activated and to fire again.

When a Fibonacci object with a sequence field of 2 is asserted the "Bootstrap" rule is matched and activated along with the "Recurse" rule.
Note the multi-restriction on field sequence, testing for equality with 1 or 2.
rule Bootstrap
when
f : Fibonacci( sequence == 1 || == 2, value == -1 ) // multi-restriction
then
modify ( f ){ value = 1 };
System.out.println( f.sequence + " == " + f.value );
endAt this point the Agenda looks as shown below. However, the "Bootstrap" rule does not fire because the "Recurse" rule has a higher salience.
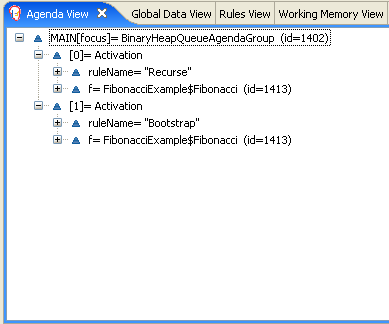
When a Fibonacci object with a sequence of 1 is asserted the Bootstrap rule is matched again, causing two activations for this rule.
Note that the "Recurse" rule does not match and activate because the not conditional element stops the rule’s matching as soon as a Fibonacci object with a sequence of 1 exists.
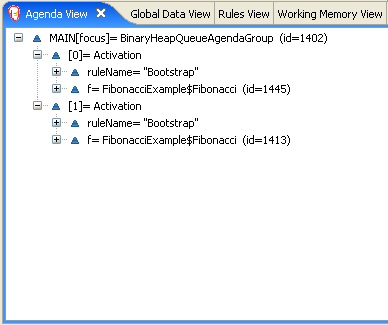
Once we have two Fibonacci objects with values not equal to -1 the "Calculate" rule is able to match.
It was the "Bootstrap" rule that set the objects with sequence 1 and 2 to values of 1.
At this point we have 50 Fibonacci objects in the Working Memory.
Now we need to select a suitable triple to calculate each of their values in turn.
Using three Fibonacci patterns in a rule without field constraints to confine the possible cross products would result in 50x49x48 possible combinations, leading to about 125,000 possible rule firings, most of them incorrect.
The "Calculate" rule uses field constraints to correctly constraint the thee Fibonacci patterns in the correct order; this technique is called cross product matching.
The first pattern finds any Fibonacci with a value != -1 and binds both the pattern and the field.
The second Fibonacci does this, too, but it adds an additional field constraint to ensure that its sequence is greater by one than the Fibonacci bound to f1.
When this rule fires for the first time, we know that only sequences 1 and 2 have values of 1, and the two constraints ensure that f1 references sequence 1 and f2 references sequence 2.
The final pattern finds the Fibonacci with a value equal to -1 and with a sequence one greater than f2.
At this point, we have three Fibonacci objects correctly selected from the available cross products, and we can calculate the value for the third Fibonacci object that’s bound to f3.
rule Calculate
when
// Bind f1 and s1
f1 : Fibonacci( s1 : sequence, value != -1 )
// Bind f2 and v2; refer to bound variable s1
f2 : Fibonacci( sequence == (s1 + 1), v2 : value != -1 )
// Bind f3 and s3; alternative reference of f2.sequence
f3 : Fibonacci( s3 : sequence == (f2.sequence + 1 ), value == -1 )
then
// Note the various referencing techniques.
modify ( f3 ) { value = f1.value + v2 };
System.out.println( s3 + " == " + f3.value );
endThe modify statement updated the value of the Fibonacci object bound to f3.
This means we now have another new Fibonacci object with a value not equal to -1, which allows the "Calculate" rule to rematch and calculate the next Fibonacci number.
The Audit view below shows how the firing of the last "Bootstrap" modifies the Fibonacci object, enabling the "Calculate" rule to match, which then modifies another Fibonacci object allowing the "Calculate" rule to match again.
This continues till the value is set for all Fibonacci objects.
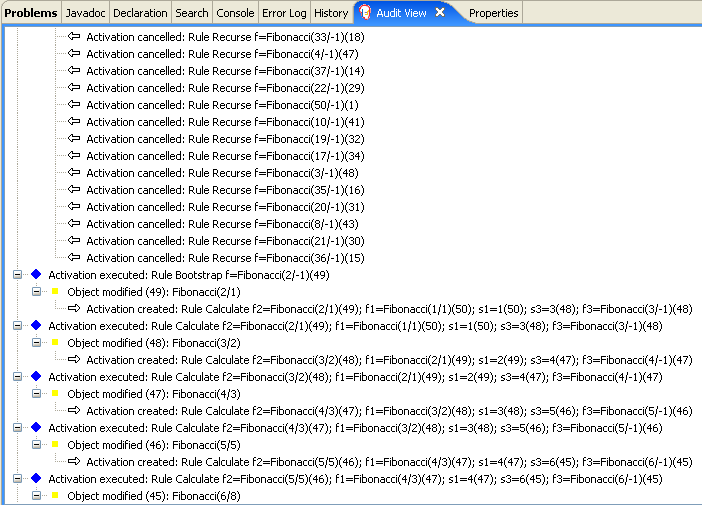
25.5. Banking Tutorial
Name: BankingTutorial Main class: org.drools.examples.banking.BankingExamplesApp.java Module: drools-examples Type: Java application Rules file: org.drools.examples.banking.*.drl Objective: Demonstrate pattern matching, basic sorting and calculation rules.
This tutorial demonstrates the process of developing a complete personal banking application to handle credits and debits on multiple accounts. It uses a set of design patterns that have been created for the process.
The class RuleRunner is a simple harness to execute one or more DRL files against a set of data.
It compiles the Packages and creates the Knowledge Base for each execution, allowing us to easily execute each scenario and inspect the outputs.
In reality this is not a good solution for a production system, where the Knowledge Base should be built just once and cached, but for the purposes of this tutorial it shall suffice.
public class RuleRunner {
public RuleRunner() {
}
public void runRules(String[] rules,
Object[] facts) throws Exception {
KnowledgeBase kbase = KnowledgeBaseFactory.newKnowledgeBase();
KnowledgeBuilder kbuilder = KnowledgeBuilderFactory.newKnowledgeBuilder();
for ( int i = 0; i < rules.length; i++ ) {
String ruleFile = rules[i];
System.out.println( "Loading file: " + ruleFile );
kbuilder.add( ResourceFactory.newClassPathResource( ruleFile,
RuleRunner.class ),
ResourceType.DRL );
}
Collection<KnowledgePackage> pkgs = kbuilder.getKnowledgePackages();
kbase.addKnowledgePackages( pkgs );
StatefulKnowledgeSession ksession = kbase.newStatefulKnowledgeSession();
for ( int i = 0; i < facts.length; i++ ) {
Object fact = facts[i];
System.out.println( "Inserting fact: " + fact );
ksession.insert( fact );
}
ksession.fireAllRules();
}
}The first of our sample Java classes loads and executes a single DRL file, Example.drl , but without inserting any data.
public class Example1 {
public static void main(String[] args) throws Exception {
new RuleRunner().runRules( new String[] { "Example1.drl" },
new Object[0] );
}
}The first simple rule to execute has a single eval condition that will always be true, so that this rule will match and fire, once, after the start.
rule "Rule 01"
when
eval( 1==1 )
then
System.out.println( "Rule 01 Works" );
endThe output for the rule is below, showing that the rule matches and executes the single print statement.
Loading file: Example1.drl
Rule 01 WorksThe next step is to assert some simple facts and print them out.
public class Example2 {
public static void main(String[] args) throws Exception {
Number[] numbers = new Number[] {wrap(3), wrap(1), wrap(4), wrap(1), wrap(5)};
new RuleRunner().runRules( new String[] { "Example2.drl" },
numbers );
}
private static Integer wrap( int i ) {
return new Integer(i);
}
}This doesn’t use any specific facts but instead asserts a set of java.lang.Integer objects.
This is not considered "best practice" as a number is not a useful fact, but we use it here to demonstrate basic techniques before more complexity is added.
Now we will create a simple rule to print out these numbers.
rule "Rule 02"
when
Number( $intValue : intValue )
then
System.out.println( "Number found with value: " + $intValue );
endOnce again, this rule does nothing special.
It identifies any facts that are Number objects and prints out the values.
Notice the use of the abstract class Number: we inserted Integer objects but we now look for any kind of number.
The pattern matching engine is able to match interfaces and superclasses of asserted objects.
The output shows the DRL being loaded, the facts inserted and then the matched and fired rules. We can see that each inserted number is matched and fired and thus printed.
Loading file: Example2.drl
Inserting fact: 3
Inserting fact: 1
Inserting fact: 4
Inserting fact: 1
Inserting fact: 5
Number found with value: 5
Number found with value: 1
Number found with value: 4
Number found with value: 1
Number found with value: 3There are certainly many better ways to sort numbers than using rules, but since we will need to apply some cashflows in date order when we start looking at banking rules we’ll develop simple rule based sorting technique.
public class Example3 {
public static void main(String[] args) throws Exception {
Number[] numbers = new Number[] {wrap(3), wrap(1), wrap(4), wrap(1), wrap(5)};
new RuleRunner().runRules( new String[] { "Example3.drl" },
numbers );
}
private static Integer wrap(int i) {
return new Integer(i);
}
}Again we insert our Integer objects, but this time the rule is slightly different:
rule "Rule 03"
when
$number : Number( )
not Number( intValue < $number.intValue )
then
System.out.println("Number found with value: " + $number.intValue() );
retract( $number );
endThe first line of the rule identifies a Number and extracts the value.
The second line ensures that there does not exist a smaller number than the one found by the first pattern.
We might expect to match only one number - the smallest in the set.
However, the retraction of the number after it has been printed means that the smallest number has been removed, revealing the next smallest number, and so on.
The resulting output shows that the numbers are now sorted numerically.
Loading file: Example3.drl
Inserting fact: 3
Inserting fact: 1
Inserting fact: 4
Inserting fact: 1
Inserting fact: 5
Number found with value: 1
Number found with value: 1
Number found with value: 3
Number found with value: 4
Number found with value: 5We are ready to start moving towards our personal accounting rules.
The first step is to create a Cashflow object.
public class Cashflow {
private Date date;
private double amount;
public Cashflow() {
}
public Cashflow(Date date, double amount) {
this.date = date;
this.amount = amount;
}
public Date getDate() {
return date;
}
public void setDate(Date date) {
this.date = date;
}
public double getAmount() {
return amount;
}
public void setAmount(double amount) {
this.amount = amount;
}
public String toString() {
return "Cashflow[date=" + date + ",amount=" + amount + "]";
}
}Class Cashflow has two simple attributes, a date and an amount.
(Note that using the type double for monetary units is generally not a good idea because floating point numbers cannot represent most numbers accurately.) There is also an overloaded constructor to set the values, and a method toString to print a cashflow.
The Java code of Example4.java
inserts five Cashflow objects, with varying dates and amounts.
public class Example4 {
public static void main(String[] args) throws Exception {
Object[] cashflows = {
new Cashflow(new SimpleDate("01/01/2007"), 300.00),
new Cashflow(new SimpleDate("05/01/2007"), 100.00),
new Cashflow(new SimpleDate("11/01/2007"), 500.00),
new Cashflow(new SimpleDate("07/01/2007"), 800.00),
new Cashflow(new SimpleDate("02/01/2007"), 400.00),
};
new RuleRunner().runRules( new String[] { "Example4.drl" },
cashflows );
}
}The convenience class SimpleDate extends java.util.Date, providing a constructor taking a String as input and defining a date format.
The code is listed below
public class SimpleDate extends Date {
private static final SimpleDateFormat format = new SimpleDateFormat("dd/MM/yyyy");
public SimpleDate(String datestr) throws Exception {
setTime(format.parse(datestr).getTime());
}
}Now, let’s look at Example4.drl
to see how we print the sorted Cashflow objects:
rule "Rule 04"
when
$cashflow : Cashflow( $date : date, $amount : amount )
not Cashflow( date < $date)
then
System.out.println("Cashflow: "+$date+" :: "+$amount);
retract($cashflow);
endHere, we identify a Cashflow and extract the date and the amount.
In the second line of the rule we ensure that there is no Cashflow with an earlier date than the one found.
In the consequence, we print the Cashflow that satisfies the rule and then retract it, making way for the next earliest Cashflow.
So, the output we generate is:
Loading file: Example4.drl
Inserting fact: Cashflow[date=Mon Jan 01 00:00:00 GMT 2007,amount=300.0]
Inserting fact: Cashflow[date=Fri Jan 05 00:00:00 GMT 2007,amount=100.0]
Inserting fact: Cashflow[date=Thu Jan 11 00:00:00 GMT 2007,amount=500.0]
Inserting fact: Cashflow[date=Sun Jan 07 00:00:00 GMT 2007,amount=800.0]
Inserting fact: Cashflow[date=Tue Jan 02 00:00:00 GMT 2007,amount=400.0]
Cashflow: Mon Jan 01 00:00:00 GMT 2007 :: 300.0
Cashflow: Tue Jan 02 00:00:00 GMT 2007 :: 400.0
Cashflow: Fri Jan 05 00:00:00 GMT 2007 :: 100.0
Cashflow: Sun Jan 07 00:00:00 GMT 2007 :: 800.0
Cashflow: Thu Jan 11 00:00:00 GMT 2007 :: 500.0Next, we extend our Cashflow, resulting in a TypedCashflow which can be a credit or a debit operation.
(Normally, we would just add this to the Cashflow type, but we use extension to keep the previous version of the class intact.)
public class TypedCashflow extends Cashflow {
public static final int CREDIT = 0;
public static final int DEBIT = 1;
private int type;
public TypedCashflow() {
}
public TypedCashflow(Date date, int type, double amount) {
super( date, amount );
this.type = type;
}
public int getType() {
return type;
}
public void setType(int type) {
this.type = type;
}
public String toString() {
return "TypedCashflow[date=" + getDate() +
",type=" + (type == CREDIT ? "Credit" : "Debit") +
",amount=" + getAmount() + "]";
}
}There are lots of ways to improve this code, but for the sake of the example this will do.
Now let’s create Example5, a class for running our code.
public class Example5 {
public static void main(String[] args) throws Exception {
Object[] cashflows = {
new TypedCashflow(new SimpleDate("01/01/2007"),
TypedCashflow.CREDIT, 300.00),
new TypedCashflow(new SimpleDate("05/01/2007"),
TypedCashflow.CREDIT, 100.00),
new TypedCashflow(new SimpleDate("11/01/2007"),
TypedCashflow.CREDIT, 500.00),
new TypedCashflow(new SimpleDate("07/01/2007"),
TypedCashflow.DEBIT, 800.00),
new TypedCashflow(new SimpleDate("02/01/2007"),
TypedCashflow.DEBIT, 400.00),
};
new RuleRunner().runRules( new String[] { "Example5.drl" },
cashflows );
}
}Here, we simply create a set of Cashflow objects which are either credit or debit operations.
We supply them and Example5.drl
to the RuleEngine.
Now, let’s look at a rule printing the sorted Cashflow objects.
rule "Rule 05"
when
$cashflow : TypedCashflow( $date : date,
$amount : amount,
type == TypedCashflow.CREDIT )
not TypedCashflow( date < $date,
type == TypedCashflow.CREDIT )
then
System.out.println("Credit: "+$date+" :: "+$amount);
retract($cashflow);
endHere, we identify a Cashflow fact with a type of CREDIT and extract the date and the amount.
In the second line of the rule we ensure that there is no Cashflow of the same type with an earlier date than the one found.
In the consequence, we print the cashflow satisfying the patterns and then retract it, making way for the next earliest cashflow of type CREDIT.
So, the output we generate is
Loading file: Example5.drl Inserting fact: TypedCashflow[date=Mon Jan 01 00:00:00 GMT 2007,type=Credit,amount=300.0] Inserting fact: TypedCashflow[date=Fri Jan 05 00:00:00 GMT 2007,type=Credit,amount=100.0] Inserting fact: TypedCashflow[date=Thu Jan 11 00:00:00 GMT 2007,type=Credit,amount=500.0] Inserting fact: TypedCashflow[date=Sun Jan 07 00:00:00 GMT 2007,type=Debit,amount=800.0] Inserting fact: TypedCashflow[date=Tue Jan 02 00:00:00 GMT 2007,type=Debit,amount=400.0] Credit: Mon Jan 01 00:00:00 GMT 2007 :: 300.0 Credit: Fri Jan 05 00:00:00 GMT 2007 :: 100.0 Credit: Thu Jan 11 00:00:00 GMT 2007 :: 500.0
Continuing our banking exercise, we are now going to process both credits and debits on two bank accounts, calculating the account balance.
In order to do this, we create two separate Account objects and inject them into the Cashflows objects before passing them to the Rule Engine.
The reason for this is to provide easy access to the correct account without having to resort to helper classes.
Let’s take a look at the Account class first.
This is a simple Java object with an account number and balance:
public class Account {
private long accountNo;
private double balance = 0;
public Account() {
}
public Account(long accountNo) {
this.accountNo = accountNo;
}
public long getAccountNo() {
return accountNo;
}
public void setAccountNo(long accountNo) {
this.accountNo = accountNo;
}
public double getBalance() {
return balance;
}
public void setBalance(double balance) {
this.balance = balance;
}
public String toString() {
return "Account[" + "accountNo=" + accountNo + ",balance=" + balance + "]";
}
}Now let’s extend our TypedCashflow, resulting in AllocatedCashflow, to include an Account reference.
public class AllocatedCashflow extends TypedCashflow {
private Account account;
public AllocatedCashflow() {
}
public AllocatedCashflow(Account account, Date date, int type, double amount) {
super( date, type, amount );
this.account = account;
}
public Account getAccount() {
return account;
}
public void setAccount(Account account) {
this.account = account;
}
public String toString() {
return "AllocatedCashflow[" +
"account=" + account +
",date=" + getDate() +
",type=" + (getType() == CREDIT ? "Credit" : "Debit") +
",amount=" + getAmount() + "]";
}
}The Java code of Example5.java
creates two Account objects and passes one of them into each cashflow, in the constructor call.
public class Example6 {
public static void main(String[] args) throws Exception {
Account acc1 = new Account(1);
Account acc2 = new Account(2);
Object[] cashflows = {
new AllocatedCashflow(acc1,new SimpleDate("01/01/2007"),
TypedCashflow.CREDIT, 300.00),
new AllocatedCashflow(acc1,new SimpleDate("05/02/2007"),
TypedCashflow.CREDIT, 100.00),
new AllocatedCashflow(acc2,new SimpleDate("11/03/2007"),
TypedCashflow.CREDIT, 500.00),
new AllocatedCashflow(acc1,new SimpleDate("07/02/2007"),
TypedCashflow.DEBIT, 800.00),
new AllocatedCashflow(acc2,new SimpleDate("02/03/2007"),
TypedCashflow.DEBIT, 400.00),
new AllocatedCashflow(acc1,new SimpleDate("01/04/2007"),
TypedCashflow.CREDIT, 200.00),
new AllocatedCashflow(acc1,new SimpleDate("05/04/2007"),
TypedCashflow.CREDIT, 300.00),
new AllocatedCashflow(acc2,new SimpleDate("11/05/2007"),
TypedCashflow.CREDIT, 700.00),
new AllocatedCashflow(acc1,new SimpleDate("07/05/2007"),
TypedCashflow.DEBIT, 900.00),
new AllocatedCashflow(acc2,new SimpleDate("02/05/2007"),
TypedCashflow.DEBIT, 100.00)
};
new RuleRunner().runRules( new String[] { "Example6.drl" },
cashflows );
}
}Now, let’s look at the rule in Example6.drl to see how we apply each cashflow in date order and calculate and print the balance.
rule "Rule 06 - Credit"
when
$cashflow : AllocatedCashflow( $account : account,
$date : date,
$amount : amount,
type == TypedCashflow.CREDIT )
not AllocatedCashflow( account == $account, date < $date)
then
System.out.println("Credit: " + $date + " :: " + $amount);
$account.setBalance($account.getBalance()+$amount);
System.out.println("Account: " + $account.getAccountNo() +
" - new balance: " + $account.getBalance());
retract($cashflow);
end
rule "Rule 06 - Debit"
when
$cashflow : AllocatedCashflow( $account : account,
$date : date,
$amount : amount,
type == TypedCashflow.DEBIT )
not AllocatedCashflow( account == $account, date < $date)
then
System.out.println("Debit: " + $date + " :: " + $amount);
$account.setBalance($account.getBalance() - $amount);
System.out.println("Account: " + $account.getAccountNo() +
" - new balance: " + $account.getBalance());
retract($cashflow);
endAlthough we have separate rules for credits and debits, but we do not specify a type when checking for earlier cashflows. This is so that all cashflows are applied in date order, regardless of the cashflow type. In the conditions we identify the account to work with, and in the consequences we update it with the cashflow amount.
Loading file: Example6.drl
Inserting fact: AllocatedCashflow[account=Account[accountNo=1,balance=0.0],date=Mon Jan 01 00:00:00 GMT 2007,type=Credit,amount=300.0]
Inserting fact: AllocatedCashflow[account=Account[accountNo=1,balance=0.0],date=Mon Feb 05 00:00:00 GMT 2007,type=Credit,amount=100.0]
Inserting fact: AllocatedCashflow[account=Account[accountNo=2,balance=0.0],date=Sun Mar 11 00:00:00 GMT 2007,type=Credit,amount=500.0]
Inserting fact: AllocatedCashflow[account=Account[accountNo=1,balance=0.0],date=Wed Feb 07 00:00:00 GMT 2007,type=Debit,amount=800.0]
Inserting fact: AllocatedCashflow[account=Account[accountNo=2,balance=0.0],date=Fri Mar 02 00:00:00 GMT 2007,type=Debit,amount=400.0]
Inserting fact: AllocatedCashflow[account=Account[accountNo=1,balance=0.0],date=Sun Apr 01 00:00:00 BST 2007,type=Credit,amount=200.0]
Inserting fact: AllocatedCashflow[account=Account[accountNo=1,balance=0.0],date=Thu Apr 05 00:00:00 BST 2007,type=Credit,amount=300.0]
Inserting fact: AllocatedCashflow[account=Account[accountNo=2,balance=0.0],date=Fri May 11 00:00:00 BST 2007,type=Credit,amount=700.0]
Inserting fact: AllocatedCashflow[account=Account[accountNo=1,balance=0.0],date=Mon May 07 00:00:00 BST 2007,type=Debit,amount=900.0]
Inserting fact: AllocatedCashflow[account=Account[accountNo=2,balance=0.0],date=Wed May 02 00:00:00 BST 2007,type=Debit,amount=100.0]
Debit: Fri Mar 02 00:00:00 GMT 2007 :: 400.0
Account: 2 - new balance: -400.0
Credit: Sun Mar 11 00:00:00 GMT 2007 :: 500.0
Account: 2 - new balance: 100.0
Debit: Wed May 02 00:00:00 BST 2007 :: 100.0
Account: 2 - new balance: 0.0
Credit: Fri May 11 00:00:00 BST 2007 :: 700.0
Account: 2 - new balance: 700.0
Credit: Mon Jan 01 00:00:00 GMT 2007 :: 300.0
Account: 1 - new balance: 300.0
Credit: Mon Feb 05 00:00:00 GMT 2007 :: 100.0
Account: 1 - new balance: 400.0
Debit: Wed Feb 07 00:00:00 GMT 2007 :: 800.0
Account: 1 - new balance: -400.0
Credit: Sun Apr 01 00:00:00 BST 2007 :: 200.0
Account: 1 - new balance: -200.0
Credit: Thu Apr 05 00:00:00 BST 2007 :: 300.0
Account: 1 - new balance: 100.0
Debit: Mon May 07 00:00:00 BST 2007 :: 900.0
Account: 1 - new balance: -800.025.6. Pricing Rule Decision Table Example
The Pricing Rule decision table demonstrates the use of a decision table in a spreadsheet, in Excel’s XLS format, in calculating the retail cost of an insurance policy. The purpose of the provide set of rules is to calculate a base price and a discount for a car driver applying for a specific policy. The driver’s age, history and the policy type all contribute to what the basic premium is, and an additional chunk of rules deals with refining this with a discount percentage.
Name: Example Policy Pricing
Main class: org.drools.examples.decisiontable.PricingRuleDTExample
Module: drools-examples
Type: Java application
Rules file: ExamplePolicyPricing.xls
Objective: demonstrate spreadsheet-based decision tables.25.6.1. Executing the example
Open the file PricingRuleDTExample.java and execute it as a Java application. It should produce the following output in the Console window:
Cheapest possible
BASE PRICE IS: 120
DISCOUNT IS: 20The code to execute the example follows the usual pattern. The rules are loaded, the facts inserted and a Stateless Session is created. What is different is how the rules are added.
DecisionTableConfiguration dtableconfiguration =
KnowledgeBuilderFactory.newDecisionTableConfiguration();
dtableconfiguration.setInputType( DecisionTableInputType.XLS );
KnowledgeBuilder kbuilder = KnowledgeBuilderFactory.newKnowledgeBuilder();
Resource xlsRes = ResourceFactory.newClassPathResource( "ExamplePolicyPricing.xls",
getClass() );
kbuilder.add( xlsRes,
ResourceType.DTABLE,
dtableconfiguration );Note the use of the DecisionTableConfiguration object.
Its input type is set to DecisionTableInputType.XLS.
If you use the BRMS, all this is of course taken care of for you.
There are two fact types used in this example, Driver and Policy.
Both are used with their default values.
The Driver is 30 years old, has had no prior claims and currently has a risk profile of LOW.
The Policy being applied for is COMPREHENSIVE, and it has not yet been approved.
25.6.2. The decision table
In this decision table, each row is a rule, and each column is a condition or an action.
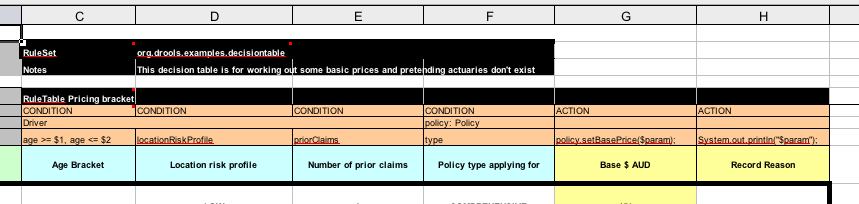
Referring to the spreadsheet show above, we have the RuleSet declaration, which provides the package name.
There are also other optional items you can have here, such as Variables for global variables, and Imports for importing classes.
In this case, the namespace of the rules is the same as the fact classes we are using, so we can omit it.
Moving further down, we can see the RuleTable declaration.
The name after this (Pricing bracket) is used as the prefix for all the generated rules.
Below that, we have "CONDITION or ACTION", indicating the purpose of the column, i.e., whether it forms part of the condition or the consequence of the rule that will be generated.
You can see that there is a driver, his data spanned across three cells, which means that the template expressions below it apply to that fact.
We observe the driver’s age range (which uses $1 and $2 with comma-separated values), locationRiskProfile, and priorClaims in the respective columns.
In the action columns, we are set the policy base price and log a message.
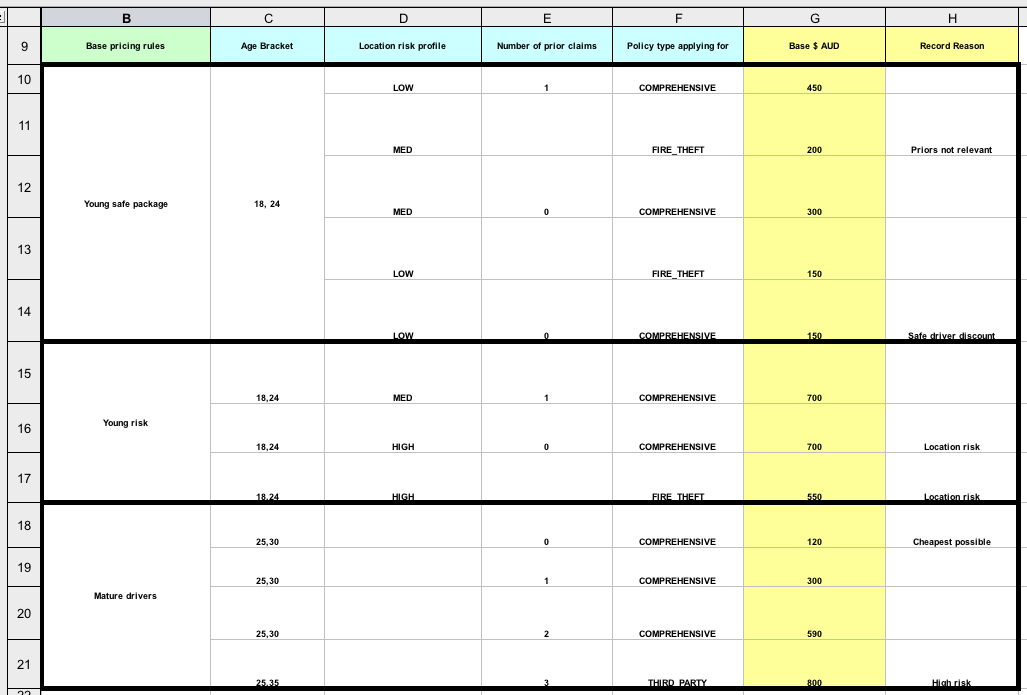
In the preceding spreadsheet section, there are broad category brackets, indicated by the comment in the leftmost column. As we know the details of our drivers and their policies, we can tell (with a bit of thought) that they should match row number 18, as they have no prior accidents, and are 30 years old. This gives us a base price of 120.
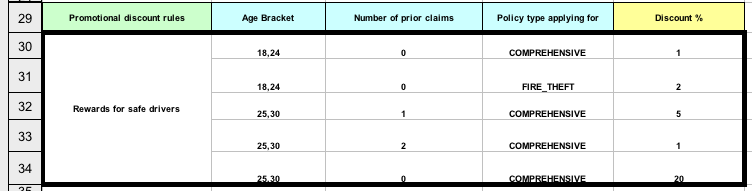
The above section contains the conditions for the discount we might grant our driver.
The discount results from the Age bracket, the number of prior claims, and the policy type.
In our case, the driver is 30, with no prior claims, and is applying for a COMPREHENSIVE policy, which means we can give a discount of 20%. Note that this is actually a separate table, but in the same worksheet, so that different templates apply.
It is important to note that decision tables generate rules. This means they aren’t simply top-down logic, but more a means to capture data resulting in rules. This is a subtle difference that confuses some people. The evaluation of the rules is not necessarily in the given order, since all the normal mechanics of the rule engine still apply.
25.7. Pet Store Example
Name: Pet Store
Main class: org.drools.examples.petstore.PetStoreExample
Module: drools-examples
Type: Java application
Rules file: PetStore.drl
Objective: Demonstrate use of Agenda Groups, Global Variables and integration with a GUI,
including callbacks from within the rulesThe Pet Store example shows how to integrate Rules with a GUI, in this case a Swing based desktop application. Within the rules file, it demonstrates how to use Agenda groups and auto-focus to control which of a set of rules is allowed to fire at any given time. It also illustrates the mixing of the Java and MVEL dialects within the rules, the use of accumulate functions and the way of calling Java functions from within the ruleset.
All of the Java code is contained in one file, PetStore.java , defining the following principal classes (in addition to several classes to handle Swing Events):
-
Petstorecontains themain()method that we will look at shortly. -
PetStoreUIis responsible for creating and displaying the Swing based GUI. It contains several smaller classes, mainly for responding to various GUI events such as mouse button clicks. -
TableModelholds the table data. Think of it as a JavaBean that extends the Swing classAbstractTableModel. -
CheckoutCallbackallows the GUI to interact with the Rules. -
Ordershowkeeps the items that we wish to buy. -
Purchasestores details of the order and the products we are buying. -
Productis a JavaBean holding details of the product available for purchase, and its price.
Much of the Java code is either plain JavaBeans or Swing-based. Only a few Swing-related points will be discussed in this section, but a good tutorial about Swing components can be found at Sun’s Swing website, in http://java.sun.com/docs/books/tutorial/uiswing/.
The pieces of Java code in Petstore.java that relate to rules and facts are shown below.
// KieServices is the factory for all KIE services
KieServices ks = KieServices.Factory.get();
// From the kie services, a container is created from the classpath
KieContainer kc = ks.getKieClasspathContainer();
// Create the stock.
Vector<Product> stock = new Vector<Product>();
stock.add( new Product( "Gold Fish", 5 ) );
stock.add( new Product( "Fish Tank", 25 ) );
stock.add( new Product( "Fish Food", 2 ) );
// A callback is responsible for populating the
// Working Memory and for firing all rules.
PetStoreUI ui = new PetStoreUI( stock,
new CheckoutCallback( kc ) );
ui.createAndShowGUI();The code shown above create a KieContainer from the classpath and based on the definitions in the kmodule.xml
file.
Unlike other examples where the facts are asserted and fired straight away, this example defers this step to later.
The way it does this is via the second last line where a PetStoreUI object is created using a constructor accepting the Vector object stock collecting our products, and an instance of the CheckoutCallback class containing the Rule Base that we have just loaded.
The Java code that fires the rules is within the CheckoutCallBack.checkout() method.
This is triggered (eventually) when the Checkout button is pressed by the user.
public String checkout(JFrame frame, List<Product> items) {
Order order = new Order();
// Iterate through list and add to cart
for ( Product p: items ) {
order.addItem( new Purchase( order, p ) );
}
// Add the JFrame to the ApplicationData to allow for user interaction
// From the container, a session is created based on
// its definition and configuration in the META-INF/kmodule.xml file
KieSession ksession = kcontainer.newKieSession("PetStoreKS");
ksession.setGlobal( "frame", frame );
ksession.setGlobal( "textArea", this.output );
ksession.insert( new Product( "Gold Fish", 5 ) );
ksession.insert( new Product( "Fish Tank", 25 ) );
ksession.insert( new Product( "Fish Food", 2 ) );
ksession.insert( new Product( "Fish Food Sample", 0 ) );
ksession.insert( order );
ksession.fireAllRules();
// Return the state of the cart
return order.toString();
}Two items get passed into this method.
One is the handle to the JFrame Swing component surrounding the output text frame, at the bottom of the GUI.
The second is a list of order items; this comes from the TableModel storing the information from the "Table" area at the top right section of the GUI.
The for loop transforms the list of order items coming from the GUI into the Order JavaBean, also contained in the file PetStore.java
.
Note that it would be possible to refer to the Swing dataset directly within the rules, but it is better coding practice to do it this way, using simple Java objects.
It means that we are not tied to Swing if we wanted to transform the sample into a Web application.
It is important to note that all state in this
example is stored in the Swing components, and that the rules are
effectively stateless. Each time the "Checkout" button is pressed, this code copies the contents of the Swing TableModel into the Session’s Working Memory.
Within this code, there are nine calls to the KieSession.
The first of these creates a new KieSession from the KieContainer.
Remember that we passed in this KieContainer when we created the CheckoutCallBack class in the main() method.
The next two calls pass in two objects that we will hold as global variables in the rules: the Swing text area and the Swing frame used for writing messages.
More inserts put information on products into the KieSession, as well as the order list.
The final call is the standard fireAllRules().
Next, we look at what this method causes to happen within the rules file.
package org.drools.examples
import org.kie.api.runtime.KieRuntime
import org.drools.examples.petstore.PetStoreExample.Order
import org.drools.examples.petstore.PetStoreExample.Purchase
import org.drools.examples.petstore.PetStoreExample.Product
import java.util.ArrayList
import javax.swing.JOptionPane;
import javax.swing.JFrame
global JFrame frame
global javax.swing.JTextArea textAreaThe first part of file PetStore.drl
contains the standard package and import statements to make various Java classes available to the rules.
New to us are the two globals frame and textArea.
They hold references to the Swing components JFrame and JTextArea components that were previously passed on by the Java code calling the setGlobal() method.
Unlike variables in rules, which expire as soon as the rule has fired, global variables retain their value for the lifetime of the Session.
The next extract from the file PetStore.drl contains two functions that are referenced by the rules that we will look at shortly.
function void doCheckout(JFrame frame, KieRuntime krt) {
Object[] options = {"Yes",
"No"};
int n = JOptionPane.showOptionDialog(frame,
"Would you like to checkout?",
"",
JOptionPane.YES_NO_OPTION,
JOptionPane.QUESTION_MESSAGE,
null,
options,
options[0]);
if (n == 0) {
krt.getAgenda().getAgendaGroup( "checkout" ).setFocus();
}
}
function boolean requireTank(JFrame frame, KieRuntime krt, Order order, Product fishTank, int total) {
Object[] options = {"Yes",
"No"};
int n = JOptionPane.showOptionDialog(frame,
"Would you like to buy a tank for your " + total + " fish?",
"Purchase Suggestion",
JOptionPane.YES_NO_OPTION,
JOptionPane.QUESTION_MESSAGE,
null,
options,
options[0]);
System.out.print( "SUGGESTION: Would you like to buy a tank for your "
+ total + " fish? - " );
if (n == 0) {
Purchase purchase = new Purchase( order, fishTank );
krt.insert( purchase );
order.addItem( purchase );
System.out.println( "Yes" );
} else {
System.out.println( "No" );
}
return true;
}Having these functions in the rules file just makes the Pet Store example more compact.
In real life you probably have the functions in a file of their own, within the same rules package, or as a static method on a standard Java class, and import them, using import function my.package.Foo.hello.
The purpose of these two functions is:
-
doCheckout()displays a dialog asking users whether they wish to checkout. If they do, focus is set to thecheckoutagenda-group, allowing rules in that group to (potentially) fire. -
requireTank()displays a dialog asking users whether they wish to buy a tank. If so, a new fish tankProductis added to the order list in Working Memory.
We’ll see the rules that call these functions later on.
The next set of examples are from the Pet Store rules themselves.
The first extract is the one that happens to fire first, partly because it has the auto-focus attribute set to true.
// Insert each item in the shopping cart into the Working Memory
// Insert each item in the shopping cart into the Working Memory
rule "Explode Cart"
agenda-group "init"
auto-focus true
salience 10
dialect "java"
when
$order : Order( grossTotal == -1 )
$item : Purchase() from $order.items
then
insert( $item );
kcontext.getKnowledgeRuntime().getAgenda().getAgendaGroup( "show items" ).setFocus();
kcontext.getKnowledgeRuntime().getAgenda().getAgendaGroup( "evaluate" ).setFocus();
endThis rule matches against all orders that do not yet have their grossTotal calculated . It loops for each purchase item in that order.
Some parts of the "Explode Cart" rule should be familiar: the rule name, the salience (suggesting the order for the rules being fired) and the dialect set to "java".
There are three new features:
-
`agenda-group
`"init"defines the name of the agenda group. In this case, there is only one rule in the group. However, neither the Java code nor a rule consequence sets the focus to this group, and therefore it relies on the next attribute for its chance to fire. -
auto-focusis called from the Java code.`trueensures that this rule, while being the only rule in the agenda group, gets a chance to fire when `fireAllRules() -
kcontext….setFocus()sets the focus to the"show items"and"evaluate"agenda groups in turn, permitting their rules to fire. In practice, we loop through all items on the order, inserting them into memory, then firing the other rules after each insert.
The next two listings show the rules within the "show items" and evaluate agenda groups.
We look at them in the order that they are called.
rule "Show Items"
agenda-group "show items"
dialect "mvel"
when
$order : Order( )
$p : Purchase( order == $order )
then
textArea.append( $p.product + "\n");
endThe "show items" agenda-group has only one rule, called "Show Items" (note the difference in case). For each purchase on the order currently in the Working Memory (or Session), it logs details to the text area at the bottom of the GUI.
The textArea variable used to do this is one of the global variables we looked at earlier.
The evaluate Agenda group also gains focus from the "Explode Cart" rule listed previously.
This Agenda group has two rules, "Free Fish Food Sample" and "Suggest Tank", shown below.
// Free Fish Food sample when we buy a Gold Fish if we haven't already bought
// Fish Food and don't already have a Fish Food Sample
rule "Free Fish Food Sample"
agenda-group "evaluate"
dialect "mvel"
when
$order : Order()
not ( $p : Product( name == "Fish Food") && Purchase( product == $p ) )
not ( $p : Product( name == "Fish Food Sample") && Purchase( product == $p ) )
exists ( $p : Product( name == "Gold Fish") && Purchase( product == $p ) )
$fishFoodSample : Product( name == "Fish Food Sample" );
then
System.out.println( "Adding free Fish Food Sample to cart" );
purchase = new Purchase($order, $fishFoodSample);
insert( purchase );
$order.addItem( purchase );
end
// Suggest a tank if we have bought more than 5 gold fish and don't already have one
rule "Suggest Tank"
agenda-group "evaluate"
dialect "java"
when
$order : Order()
not ( $p : Product( name == "Fish Tank") && Purchase( product == $p ) )
ArrayList( $total : size > 5 ) from collect( Purchase( product.name == "Gold Fish" ) )
$fishTank : Product( name == "Fish Tank" )
then
requireTank(frame, kcontext.getKieRuntime(), $order, $fishTank, $total);
endThe rule "Free Fish Food Sample" will only fire if
-
we don’t already have any fish food, and
-
we don’t already have a free fish food sample, and
-
we do have a Gold Fish in our order.
If the rule does fire, it creates a new product (Fish Food Sample), and adds it to the order in Working Memory.
The rule "Suggest Tank" will only fire if
-
we don’t already have a Fish Tank in our order, and
-
we do have more than 5 Gold Fish Products in our order.
If the rule does fire, it calls the requireTank() function that we looked at earlier (showing a Dialog to the user, and adding a Tank to the order / working memory if confirmed). When calling the requireTank() function the rule passes the global frame variable so that the function has a handle to the Swing GUI.
The next rule we look at is "do checkout".
rule "do checkout"
dialect "java"
when
then
doCheckout(frame, kcontext.getKieRuntime());
endThe rule "do checkout" has no
agenda group set and no auto-focus attribute.
As such, is is deemed part of the default (MAIN) agenda group.
This group gets focus by default when all the rules in agenda-groups that explicitly had focus set to them have run their course.
There is no LHS to the rule, so the RHS will always call the doCheckout() function.
When calling the doCheckout() function, the rule passes the global frame variable to give the function a handle to the Swing GUI.
As we saw earlier, the doCheckout() function shows a confirmation dialog to the user.
If confirmed, the function sets the focus to the checkout agenda-group, allowing the next lot of rules to fire.
rule "Gross Total"
agenda-group "checkout"
dialect "mvel"
when
$order : Order( grossTotal == -1)
Number( total : doubleValue )
from accumulate( Purchase( $price : product.price ), sum( $price ) )
then
modify( $order ) { grossTotal = total };
textArea.append( "\ngross total=" + total + "\n" );
end
rule "Apply 5% Discount"
agenda-group "checkout"
dialect "mvel"
when
$order : Order( grossTotal >= 10 && < 20 )
then
$order.discountedTotal = $order.grossTotal * 0.95;
textArea.append( "discountedTotal total=" + $order.discountedTotal + "\n" );
end
rule "Apply 10% Discount"
agenda-group "checkout"
dialect "mvel"
when
$order : Order( grossTotal >= 20 )
then
$order.discountedTotal = $order.grossTotal * 0.90;
textArea.append( "discountedTotal total=" + $order.discountedTotal + "\n" );
endThere are three rules in the checkout agenda-group:
-
If we haven’t already calculated the gross total,
Gross Totalaccumulates the product prices into a total, puts this total into the session, and displays it via the SwingJTextArea, using thetextAreaglobal variable yet again. -
If our gross total is between 10 and 20,
"Apply 5% Discount"calculates the discounted total and adds it to the session and displays it in the text area. -
If our gross total is not less than 20,
"Apply 10% Discount"calculates the discounted total and adds it to the session and displays it in the text area.
Now that we’ve run through what happens in the code, let’s have a look at what happens when we actually run the code.
The file PetStore.java
contains a main() method, so that it can be run as a standard Java application, either from the command line or via the IDE.
This assumes you have your classpath set correctly.
(See the start of the examples section for more information.)
The first screen that we see is the Pet Store Demo. It has a list of available products (top left), an empty list of selected products (top right), checkout and reset buttons (middle) and an empty system messages area (bottom).
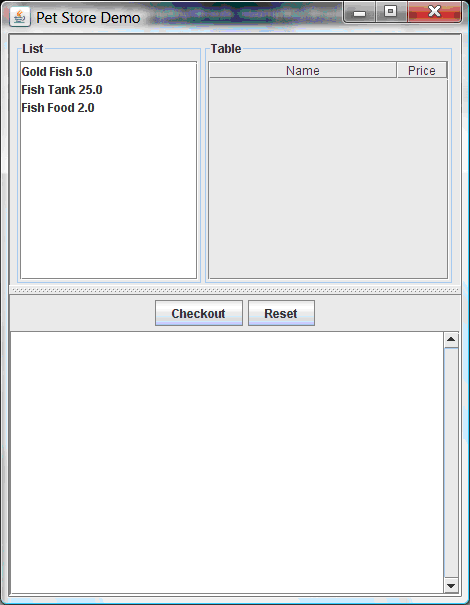
To get to this point, the following things have happened:
-
The
main()method has run and loaded the Rule Base but not yet fired the rules. So far, this is the only code in connection with rules that has been run. -
A new
PetStoreUIobject has been created and given a handle to the Rule Base, for later use. -
Various Swing components do their stuff, and the above screen is shown and waits for user input.
Clicking on various products from the list might give you a screen similar to the one below.
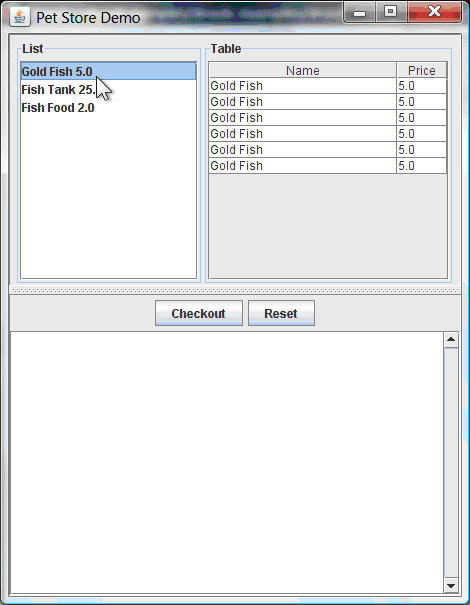
Note that no rules code has been fired here.
This is only Swing code, listening for mouse click events, and adding some selected product to the TableModel object for display in the top right hand section.
(As an aside, note that this is a classic use of the Model View Controller design pattern).
It is only when we press the "Checkout" button that we fire our business rules, in roughly the same order that we walked through the code earlier.
-
Method
CheckOutCallBack.checkout()is called (eventually) by the Swing class waiting for the click on the "Checkout" button. This inserts the data from theTableModelobject (top right hand side of the GUI), and inserts it into the Session’s Working Memory. It then fires the rules. -
The
"Explode Cart"rule is the first to fire, given that it hasauto-focusset to true. It loops through all the products in the cart, ensures that the products are in the Working Memory, and then gives the"Show Items"andEvaluationagenda groups a chance to fire. The rules in these groups add the contents of the cart to the text area (at the bottom of the window), decide whether or not to give us free fish food, and to ask us whether we want to buy a fish tank. This is shown in the figure below.
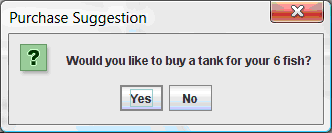
-
The Do Checkout rule is the next to fire as it (a) No other agenda group currently has focus and (b) it is part of the default (MAIN) agenda group. It always calls the doCheckout() function which displays a 'Would you like to Checkout?' Dialog Box.
-
The
doCheckout()function sets the focus to thecheckoutagenda-group, giving the rules in that group the option to fire. -
The rules in the the
checkoutagenda-group display the contents of the cart and apply the appropriate discount. -
Swing then waits for user input to either checkout more products (and to cause the rules to fire again), or to close the GUI - see the figure below.
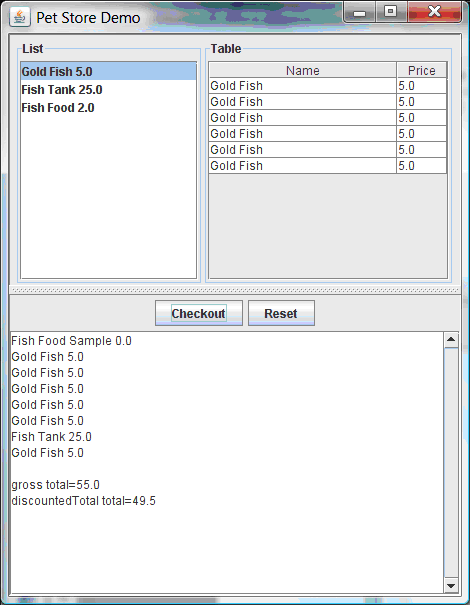
We could add more System.out calls to demonstrate this flow of events. The output, as it currently appears in the Console window, is given in the listing below.
Adding free Fish Food Sample to cart
SUGGESTION: Would you like to buy a tank for your 6 fish? - Yes25.8. Honest Politician Example
Name: Honest Politician
Main class: org.drools.examples.honestpolitician.HonestPoliticianExample
Module: drools-examples
Type: Java application
Rules file: HonestPoliticianExample.drl
Objective: Illustrate the concept of "truth maintenance" based on the logical insertion of factsThe Honest Politician example demonstrates truth maintenance with logical assertions.
The basic premise is that an object can only exist while a statement is true.
A rule’s consequence can logically insert an object with the insertLogical() method.
This means the object will only remain in the Working Memory as long as the rule that logically inserted it remains true.
When the rule is no longer true the object is automatically retracted.
In this example there is the class Politician, with a name and a boolean value for being honest.
Four politicians with honest state set to true are inserted.
public class Politician {
private String name;
private boolean honest;
...
}Politician blair = new Politician("blair", true);
Politician bush = new Politician("bush", true);
Politician chirac = new Politician("chirac", true);
Politician schroder = new Politician("schroder", true);
ksession.insert( blair );
ksession.insert( bush );
ksession.insert( chirac );
ksession.insert( schroder );
ksession.fireAllRules();The Console window output shows that, while there is at least one honest politician, democracy lives. However, as each politician is in turn corrupted by an evil corporation, so that all politicians become dishonest, democracy is dead.
Hurrah!!! Democracy Lives
I'm an evil corporation and I have corrupted schroder
I'm an evil corporation and I have corrupted chirac
I'm an evil corporation and I have corrupted bush
I'm an evil corporation and I have corrupted blair
We are all Doomed!!! Democracy is DeadAs soon as there is at least one honest politician in the Working Memory a new Hope object is logically asserted.
This object will only exist while there is at least one honest politician.
As soon as all politicians are dishonest, the Hope object will be automatically retracted.
This rule is given a salience of 10 to ensure that it fires before any other rule, as at this stage the "Hope is Dead" rule is actually true.
rule "We have an honest Politician"
salience 10
when
exists( Politician( honest == true ) )
then
insertLogical( new Hope() );
endAs soon as a Hope object exists the "Hope Lives" rule matches and fires.
It has a salience of 10 so that it takes priority over "Corrupt the Honest".
rule "Hope Lives"
salience 10
when
exists( Hope() )
then
System.out.println("Hurrah!!! Democracy Lives");
endNow that there is hope and we have, at the start, four honest politicians, we have four activations for this rule, all in conflict.
They will fire in turn, corrupting each politician so that they are no longer honest.
When all four politicians have been corrupted we have no politicians with the property honest == true.
Thus, the rule "We have an honest Politician" is no longer true and the object it logical inserted (due to the last execution of new Hope()) is automatically retracted.
rule "Corrupt the Honest"
when
politician : Politician( honest == true )
exists( Hope() )
then
System.out.println( "I'm an evil corporation and I have corrupted " + politician.getName() );
modify ( politician ) { honest = false };
endWith the Hope object being automatically retracted, via the truth maintenance system, the conditional element not applied to Hope is no longer true so that the following rule will match and fire.
rule "Hope is Dead"
when
not( Hope() )
then
System.out.println( "We are all Doomed!!! Democracy is Dead" );
endLet’s take a look at the Audit trail for this application:
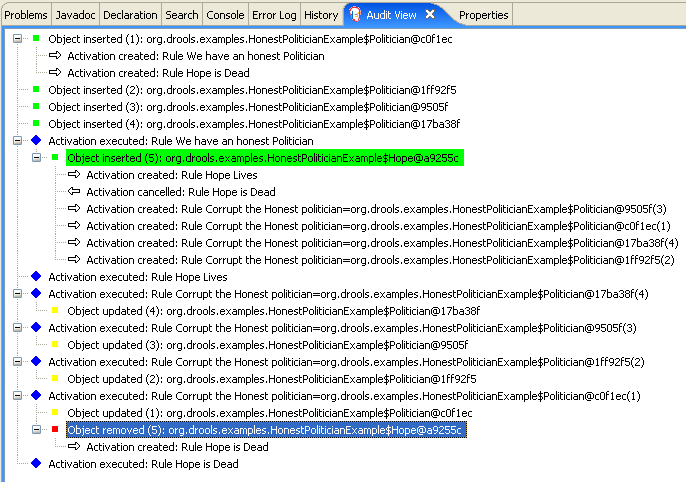
The moment we insert the first politician we have two activations.
The rule "We have an honest Politician" is activated only once for the first inserted politician because it uses an exists conditional element, which matches once for any number.
The rule "Hope is Dead" is also activated at this stage, because we have not yet inserted the Hope object.
Rule "We have an honest Politician" fires first, as it has a higher salience than "Hope is Dead", which inserts the Hope object.
(That action is highlighted green.) The insertion of the Hope object activates "Hope Lives" and de-activates "Hope is Dead"; it also activates "Corrupt the Honest" for each inserted honest politician.
Rule "Hope Lives" executes, printing "Hurrah!!! Democracy Lives". Then, for each politician, rule "Corrupt the Honest" fires, printing "I’m an evil corporation and I have corrupted X", where X is the name of the politician, and modifies the politician’s honest value to false.
When the last honest politician is corrupted, Hope is automatically retracted, by the truth maintenance system, as shown by the blue highlighted area.
The green highlighted area shows the origin of the currently selected blue highlighted area.
Once the Hope fact is retracted, "Hope is dead" activates and fires printing "We are all Doomed!!! Democracy is Dead".
25.9. Sudoku Example
Name: Sudoku
Main class: org.drools.examples.sudoku.SudokuExample
Type: Java application
Rules file: sudoku.drl, validate.drl
Objective: Demonstrates the solving of logic problems, and complex pattern matching.This example demonstrates how Drools can be used to find a solution in a large potential solution space based on a number of constraints. We use the popular puzzle of Sudoku. This example also shows how Drools can be integrated into a graphical interface and how callbacks can be used to interact with a running Drools rules engine in order to update the graphical interface based on changes in the Working Memory at runtime.
25.9.1. Sudoku Overview
Sudoku is a logic-based number placement puzzle. The objective is to fill a 9x9 grid so that each column, each row, and each of the nine 3x3 zones contains the digits from 1 to 9, once, and only once.
The puzzle setter provides a partially completed grid and the puzzle solver’s task is to complete the grid with these constraints.
The general strategy to solve the problem is to ensure that when you insert a new number it should be unique in its particular 3x3 zone, row and column.
See Wikipedia for a more detailed description.
25.9.2. Running the Example
Download and install drools-examples as described above and then execute java org.drools.examples.DroolsExamplesApp and click on "SudokuExample".
The window contains an empty grid, but the program comes with a number of grids stored internally which can be loaded and solved. Click on "File", then "Samples" and select "Simple" to load one of the examples. Note that all buttons are disabled until a grid is loaded.
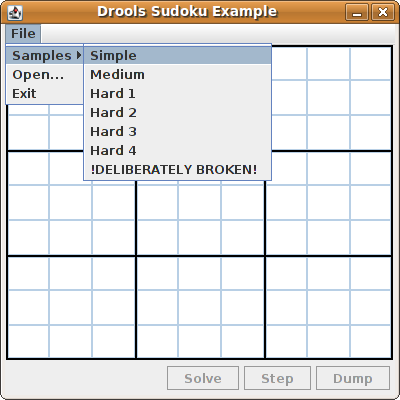
Loading the "Simple" example fills the grid according to the puzzle’s initial state.
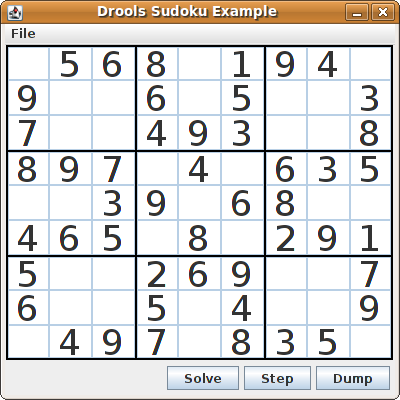
Click on the "Solve" button and the Drools-based engine will fill out the remaining values, and the buttons are inactive once more.
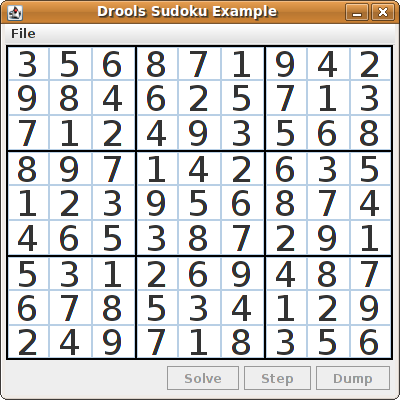
Alternatively, you may click on the "Step" button to see the next digit found by the rule set. The Console window will display detailed information about the rules which are executing to solve the step in a human readable form. Some examples of these messages are presented below.
single 8 at [0,1] column elimination due to [1,2]: remove 9 from [4,2] hidden single 9 at [1,2] row elimination due to [2,8]: remove 7 from [2,4] remove 6 from [3,8] due to naked pair at [3,2] and [3,7] hidden pair in row at [4,6] and [4,4]
Click on the "Dump" button to see the state of the grid, with cells showing either the established value or the remaining possibilitiescandidates.
Col: 0 Col: 1 Col: 2 Col: 3 Col: 4 Col: 5 Col: 6 Col: 7 Col: 8 Row 0: 2 4 7 9 2 456 4567 9 23 56 9 --- 5 --- --- 1 --- 3 67 9 --- 8 --- 4 67 Row 1: 12 7 9 --- 8 --- 1 67 9 23 6 9 --- 4 --- 23 67 1 3 67 9 3 67 9 --- 5 --- Row 2: 1 4 7 9 1 456 --- 3 --- 56 89 5 78 5678 --- 2 --- 4 67 9 1 4 67 Row 3: 1234 12345 1 45 12 5 8 --- 6 --- 2 5 78 5 78 45 7 --- 9 --- Row 4: --- 6 --- --- 7 --- 5 --- 4 --- 2 5 8 --- 9 --- 5 8 --- 1 --- --- 3 --- Row 5: --- 8 --- 12 45 1 45 9 12 5 --- 3 --- 2 5 7 567 4567 2 4 67 Row 6: 1 3 7 1 3 6 --- 2 --- 3 56 8 5 8 3 56 8 --- 4 --- 3 567 9 1 678 Row 7: --- 5 --- 1 34 6 1 4 678 3 6 8 --- 9 --- 34 6 8 1 3 678 --- 2 --- 1 678 Row 8: 34 --- 9 --- 4 6 8 --- 7 --- --- 1 --- 23456 8 3 56 8 3 56 6 8
Now, let us load a Sudoku grid that is deliberately invalid. Click on "File", "Samples" and "!DELIBERATELY BROKEN!". Note that this grid starts with some issues, for example the value 5 appears twice in the first row.

A few simple rules perform a sanity check, right after loading a grid. In this case, the following messages are printed on standard output:
cell [0,8]: 5 has a duplicate in row 0 cell [0,0]: 5 has a duplicate in row 0 cell [6,0]: 8 has a duplicate in col 0 cell [4,0]: 8 has a duplicate in col 0 Validation complete.
Nevertheless, click on the "Solve" button to apply the solving rules to this invalid grid. This will not complete; some cells remain empty.

The solving functionality has been achieved by the use of rules that implement standard solving techniques. They are based on the sets of values that are still candidates for a cell. If, for instance, such a set contains a single value, then this is the value for the cell. A little less obvious is the single occurrence of a value in one of the groups of nine cells. The rules detecting these situations insert a fact of type Setting with the solution value for some specific cell. This fact causes the elimination of this value from all other cells in any of the groups the cell belongs to. Finally, it is retracted.
Other rules merely reduce the permissible values for some cells. Rules "naked pair", "hidden pair in row", "hidden pair in column" and "hidden pair in square" merely eliminate possibilities but do not establish solutions. More sophisticated eliminations are done by "X-wings in rows", "X-wings in columns", "intersection removal row" and "intersection removal column".
25.9.3. Java Source and Rules Overview
The Java source code can be found in the /src/main/java/org/drools/examples/sudoku directory, with the two DRL files defining the rules located in the /src/main/rules/org/drools/examples/sudoku directory.
The package org.drools.examples.sudoku.swing contains a set of classes which implement a framework for Sudoku puzzles.
Note that this package does not have any dependencies on the Drools libraries. SudokuGridModel defines an interface which can be implemented to store a Sudoku puzzle as a 9x9 grid of Cell objects. SudokuGridView is a Swing component which can visualize any implementation of SudokuGridModel. SudokuGridEvent and SudokuGridListener are used to communicate state changes between the model and the view: events are fired when a cell’s value is resolved or changed.
If you are familiar with the model-view-controller patterns in other Swing components such as JTable then this pattern should be familiar. SudokuGridSamples provides a number of partially filled Sudoku puzzles for demonstration purposes.
Package org.drools.examples.sudoku.rules contains a utility class with a method for compiling DRL files.
The package org.drools.examples.sudoku contains a set of classes implementing the elementary Cell object and its various aggregations: the CellFile subtypes CellRow and CellCol as well as CellSqr, all of which are subtypes of CellGroup.
It’s interesting to note that Cell and CellGroup are subclasses of SetOfNine, which provides a property free with the type Set<Integer>.
For a Cell it represents the individual candidate set; for a CellGroup the set is the union of all candidate sets of its cells, or, simply, the set of digits that still need to be allocated.
With 81 Cell and 27 CellGroup objects and the linkage provided by the Cell properties cellRow, cellCol and cellSqr and the CellGroup property cells, a list of Cell objects, it is possible to write rules that detect the specific situations that permit the allocation of a value to a cell or the elimination of a value from some candidate set.
An object of class Setting is used for triggering the operations that accompany the allocation of a value: its removal from the candidate sets of sibling cells and associated cell groups.
Moreover, the presence of a Setting fact is used in all rules that should detect a new situation; this is to avoid reactions to inconsistent intermediary states.
An object of class Stepping is used in a low priority rule to execute an emergency halt when a "Step" does not terminate regularly.
This indicates that the puzzle cannot be solved by the program.
The class org.drools.examples.sudoku.SudokuExample implements a Java application combining the components described.
25.9.4. Sudoku Validator Rules (validate.drl)
Validation rules detect duplicate numbers in cell groups. They are combined in an agenda group which enables us to activate them, explicitly, after loading a puzzle.
The three rules "duplicate in cell…" are very similar. The first pattern locates a cell with an allocated value. The second pattern pulls in any of the three cell groups the cell belongs to. The final pattern would find a cell (other than the first one) with the same value as the first cell and in the same row, column or square, respectively.
Rule "terminate group" fires last. It prints a message and calls halt.
25.9.5. Sudoku Solving Rules (sudoku.drl)
There are three types of rules in this file: one group handles the allocation of a number to a cell, another group detects feasible allocations, and the third group eliminates values from candidate sets.
Rules "set a value", "eliminate a value from Cell" and "retract setting" depend on the presence of a Setting object.
The first rule handles the assignment to the cell and the operations for removing the value from the "free" sets of the cell’s three groups.
Also, it decrements a counter that, when zero, returns control to the Java application that has called fireUntilHalt().
The purpose of rule "eliminate a value from Cell" is to reduce the candidate lists of all cells that are related to the newly assigned cell.
Finally, when all eliminations have been made, rule "retract setting" retracts the triggering Setting fact.
There are just two rules that detect a situation where an allocation of a number to a cell is possible.
Rule "single" fires for a Cell with a candidate set containing a single number.
Rule "hidden single" fires when there is no cell with a single candidate but when there is a cell containing a candidate but this candidate is absent from all other cells in one of the three groups the cell belongs to.
Both rules create and insert a Setting fact.
Rules from the largest group of rules implement, singly or in groups of two or three, various solving techniques, as they are employed when solving Sudoku puzzles manually.
Rule "naked pair" detects identical candidate sets of size 2 in two cells of a group; these two values may be removed from all other candidate sets of that group.
A similar idea motivates the three rules "hidden pair in…"; here, the rules look for a subset of two numbers in exactly two cells of a group, with neither value occurring in any of the other cells of this group. This, then, means that all other candidates can be eliminated from the two cells harbouring the hidden pair.
A pair of rules deals with "X-wings" in rows and columns. When there are only two possible cells for a value in each of two different rows (or columns) and these candidates lie also in the same columns (or rows), then all other candidates for this value in the columns (or rows) can be eliminated. If you follow the pattern sequence in one of these rules, you will see how the conditions that are conveniently expressed by words such as "same" or "only" result in patterns with suitable constraints or prefixed with "not".
The rule pair "intersection removal…" is based on the restricted occurrence of some number within one square, either in a single row or in a single column. This means that this number must be in one of those two or three cells of the row or column; hence it can be removed from the candidate sets of all other cells of the group. The pattern establishes the restricted occurrence and then fires for each cell outside the square and within the same cell file.
These rules are sufficient for many but certainly not for all Sudoku puzzles. To solve very difficult grids, the rule set would need to be extended with more complex rules. (Ultimately, there are puzzles that cannot be solved except by trial and error.)
25.10. Number Guess
Name: Number Guess
Main class: org.drools.examples.numberguess.NumberGuessExample
Module: droolsjbpm-integration-examples (Note: this is in a different download, the droolsjbpm-integration download.)
Type: Java application
Rules file: NumberGuess.drl
Objective: Demonstrate use of Rule Flow to organise RulesThe "Number Guess" example shows the use of Rule Flow, a way of controlling the order in which rules are fired. It uses widely understood workflow diagrams for defining the order in which groups of rules will be executed.
final KnowledgeBuilder kbuilder = KnowledgeBuilderFactory.newKnowledgeBuilder();
kbuilder.add( ResourceFactory.newClassPathResource( "NumberGuess.drl",
ShoppingExample.class ),
ResourceType.DRL );
kbuilder.add( ResourceFactory.newClassPathResource( "NumberGuess.rf",
ShoppingExample.class ),
ResourceType.DRF );
final KnowledgeBase kbase = KnowledgeBaseFactory.newKnowledgeBase();
kbase.addKnowledgePackages( kbuilder.getKnowledgePackages() );The creation of the package and the loading of the rules (using the add() method) is the same as the previous examples.
There is an additional line to add the Rule Flow (NumberGuess.rf
), which provides the option of specifying different rule flows for the same Knowledge Base.
Otherwise, the Knowledge Base is created in the same manner as before.
final StatefulKnowledgeSession ksession = kbase.newStatefulKnowledgeSession();
KnowledgeRuntimeLogger logger =
KnowledgeRuntimeLoggerFactory.newFileLogger(ksession, "log/numberguess");
ksession.insert( new GameRules( 100, 5 ) );
ksession.insert( new RandomNumber() );
ksession.insert( new Game() );
ksession.startProcess( "Number Guess" );
ksession.fireAllRules();
logger.close();
ksession.dispose();Once we have a Knowledge Base, we can use it to obtain a Stateful Session.
Into our session we insert our facts, i.e., standard Java objects.
(For simplicity, in this sample, these classes are all contained within our NumberGuessExample.java
file.
Class GameRules provides the maximum range and the number of guesses allowed.
Class RandomNumber automatically generates a number between 0 and 100 and makes it available to our rules, by insertion via the getValue() method.
Class Game keeps track of the guesses we have made before, and their number.
Note that before we call the standard fireAllRules() method, we also start the process that we loaded earlier, via the startProcess() method.
We’ll learn where to obtain the parameter we pass ("Number Guess", i.e., the identifier of the rule flow) when we talk about the rule flow file and the graphical Rule Flow Editor below.
Before we finish the discussion of our Java code, we note that in some real-life application we would examine the final state of the objects.
(Here, we could retrieve the number of guesses, to add it to a high score table.) For this example we are content to ensure that the Working Memory session is cleared by calling the dispose() method.
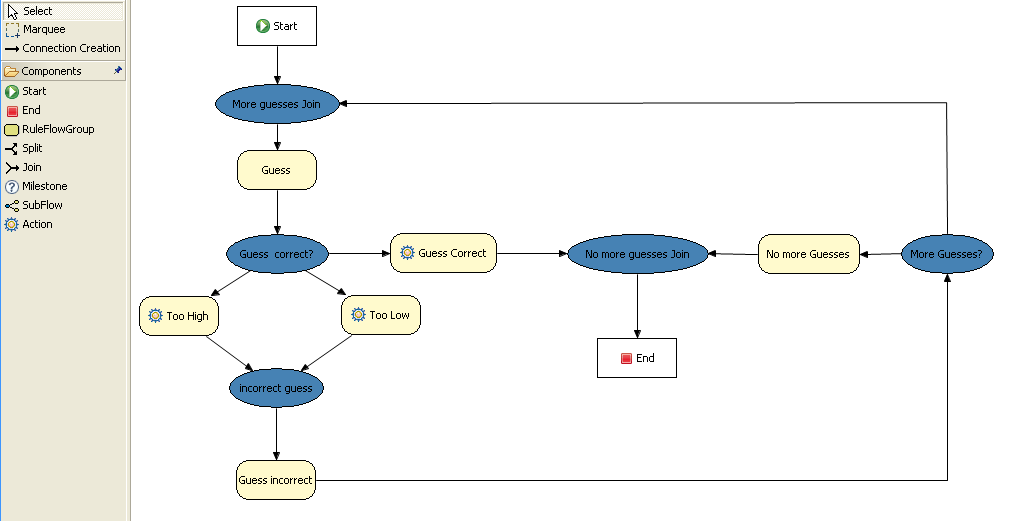
If you open the NumberGuess.rf file in the Drools IDE (provided you have the JBoss Rules extensions installed correctly in Eclipse) you should see the above diagram, similar to a standard flowchart. Its icons are similar (but not exactly the same) as in the JBoss jBPM workflow product. Should you wish to edit the diagram, a menu of available components should be available to the left of the diagram in the IDE, which is called the palette. This diagram is saved in XML, an (almost) human readable format, using XStream.
If it is not already open, ensure that the Properties View is visible in the IDE. It can be opened by clicking "Window", then "Show View" and "Other", where you can select the "Properties" view. If you do this before you select any item on the rule flow (or click on the blank space in the rule flow) you should be presented with the following set of properties.

Keep an eye on the Properties View as we progress through the example’s rule flow, as it presents valuable information.
In this case, it provides us with the identification of the Rule Flow Process that we used in our earlier code snippet, when we called session.startProcess().
In the "Number Guess" Rule Flow we encounter several node types, many of them identified by an icon.
-
The Start node (white arrow in a green circle) and the End node (red box) mark beginning and end of the rule flow.
-
A Rule Flow Group box (yellow, without an icon) represents a Rule Flow Groups defined in our rules (DRL) file that we will look at later. For example, when the flow reaches the Rule Flow Group "Too High", only those rules marked with an attribute of `ruleflow-group
`"Too High"can potentially fire. -
Action nodes (yellow, cog-shaped icon) perform standard Java method calls. Most action nodes in this example call
System.out.println(), indicating the program’s progress to the user. -
Split and Join Nodes (blue ovals, no icon) such as "Guess Correct?" and "More guesses Join" mark places where the flow of control can split, according to various conditions, and rejoin, respectively
-
Arrows indicate the flow between the various nodes.
The various nodes in combination with the rules make the Number Guess game work.
For example, the "Guess" Rule Flow Group allows only the rule "Get user Guess" to fire, because only that rule has a matching attribute of `ruleflow-group`"Guess".
rule "Get user Guess"
ruleflow-group "Guess"
no-loop
when
$r : RandomNumber()
rules : GameRules( allowed : allowedGuesses )
game : Game( guessCount < allowed )
not ( Guess() )
then
System.out.println( "You have " + ( rules.allowedGuesses - game.guessCount )
+ " out of " + rules.allowedGuesses
+ " guesses left.\nPlease enter your guess from 0 to "
+ rules.maxRange );
br = new BufferedReader( new InputStreamReader( System.in ) );
i = br.readLine();
modify ( game ) { guessCount = game.guessCount + 1 }
insert( new Guess( i ) );
endThe rest of this rule is fairly standard.
The LHS section (after when) of the rule states that it will be activated for each RandomNumber object inserted into the Working Memory where guessCount is less than allowedGuesses from the GameRules object and where the user has not guessed the correct number.
The RHS section (or consequence, after then) prints a message to the user and then awaits user input from System.in.
After obtaining this input (the readLine() method call blocks until the return key is pressed) it modifies the guess count and inserts the new guess, making both available to the Working Memory.
The rest of the rules file is fairly standard: the package declares the dialect as MVEL, and various Java classes are imported. In total, there are five rules in this file:
-
Get User Guess, the Rule we examined above.
-
A Rule to record the highest guess.
-
A Rule to record the lowest guess.
-
A Rule to inspect the guess and retract it from memory if incorrect.
-
A Rule that notifies the user that all guesses have been used up.
One point of integration between the standard Rules and the RuleFlow is via the ruleflow-group attribute on the rules, as discussed above.
A second point of integration
between the rules (.drl) file and the Rules Flow .rf files is that the Split Nodes (the blue ovals) can use values in the Working Memory (as updated by the rules) to decide which flow of action to take.
To see how this works, click on the "Guess Correct Node"; then within the Properties View, open the Constraints Editor by clicking the button at the right that appears once you click on the "Constraints" property line.
You should see something similar to the diagram below.
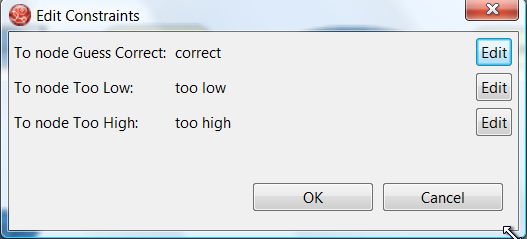
Click on the "Edit" button beside "To node Too High" and you’ll see a dialog like the one below. The values in the "Textual Editor" window follow the standard rule format for the LHS and can refer to objects in Working Memory. The consequence (RHS) is that the flow of control follows this node (i.e., "To node Too High") if the LHS expression evaluates to true.
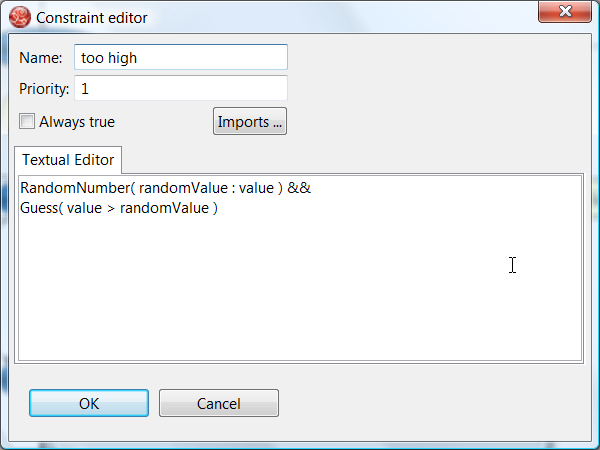
Since the file NumberGuess.java
contains a main() method, it can be run as a standard Java application, either from the command line or via the IDE.
A typical game might result in the interaction below.
The numbers in bold are typed in by the user.
You have 5 out of 5 guesses left.
Please enter your guess from 0 to 100
50
Your guess was too high
You have 4 out of 5 guesses left.
Please enter your guess from 0 to 100
25
Your guess was too low
You have 3 out of 5 guesses left.
Please enter your guess from 0 to 100
37
Your guess was too low
You have 2 out of 5 guesses left.
Please enter your guess from 0 to 100
44
Your guess was too low
You have 1 out of 5 guesses left.
Please enter your guess from 0 to 100
47
Your guess was too low
You have no more guesses
The correct guess was 48A summary of what is happening in this sample is:
-
The
main()method of NumberGuessExample.java loads a Rule Base, creates a Stateful Session and insertsGame,GameRulesandRandomNumber(containing the target number) objects into it. The method also sets the process flow we are going to use, and fires all rules. Control passes to the Rule Flow. -
File NumberGuess.rf , the Rule Flow, begins at the "Start" node.
-
Control passes (via the "More guesses" join node) to the Guess node.
-
At the Guess node, the appropriate Rule Flow Group ("Get user Guess") is enabled. In this case the Rule "Guess" (in the NumberGuess.drl file) is triggered. This rule displays a message to the user, takes the response, and puts it into Working Memory. Flow passes to the next Rule Flow Node.
-
At the next node, "Guess Correct", constraints inspect the current session and decide which path to take.
If the guess in step 4 was too high or too low, flow proceeds along a path which has an action node with normal Java code printing a suitable message and a Rule Flow Group causing a highest guess or lowest guess rule to be triggered. Flow passes from these nodes to step 6.
If the guess in step 4 was right, we proceed along the path towards the end of the Rule Flow. Before we get there, an action node with normal Java code prints a statement "you guessed correctly". There is a join node here (just before the Rule Flow end) so that our no-more-guesses path (step 7) can also terminate the Rule Flow.
-
Control passes as per the Rule Flow via a join node, a guess incorrect Rule Flow Group (triggering a rule to retract a guess from Working Memory) onto the "More guesses" decision node.
-
The "More guesses" decision node (on the right hand side of the rule flow) uses constraints, again looking at values that the rules have put into the working memory, to decide if we have more guesses and if so, goto step 3. If not, we proceed to the end of the rule flow, via a Rule Flow Group that triggers a rule stating "you have no more guesses".
-
The loop over steps 3 to 7 continues until the number is guessed correctly, or we run out of guesses.
25.11. Conway’s Game Of Life
Name: Conway's Game Of Life
Main class: org.drools.examples.conway.ConwayAgendaGroupRun
org.drools.examples.conway.ConwayRuleFlowGroupRun
Module: droolsjbpm-integration-examples (Note: this is in a different download, the droolsjbpm-integration download.)
Type: Java application
Rules file: conway-ruleflow.drl conway-agendagroup.drl
Objective: Demonstrates 'accumulate', 'collect' and 'from'Conway’s Game Of Life, described in http://en.wikipedia.org/wiki/Conway’s_Game_of_Life and in http://www.math.com/students/wonders/life/life.html, is a famous cellular automaton conceived in the early 1970’s by the mathematician John Conway. While the system is well known as "Conway’s Game Of Life", it really isn’t a game at all. Conway’s system is more like a simulation of a form of life. Don’t be intimidated. The system is terribly simple and terribly interesting. Math and Computer Science students alike have marvelled over Conway’s system for more than 30 years now. The application presented here is a Swing-based implementation of Conway’s Game of Life. The rules that govern the system are implemented as business rules using Drools. This document will explain the rules that drive the simulation and discuss the Drools parts of the implementation.
We’ll first introduce the grid view, shown below, designed for the visualisation of the game, showing the "arena" where the life simulation takes place. Initially the grid is empty, meaning that there are no live cells in the system. Each cell is either alive or dead, with live cells showing a green ball. Preselected patterns of live cells can be chosen from the "Pattern" drop-down list. Alternatively, individual cells can be doubled-clicked to toggle them between live and dead. It’s important to understand that each cell is related to its neighboring cells, which is fundamental for the game’s rules. Neighbors include not only cells to the left, right, top and bottom but also cells that are connected diagonally, so that each cell has a total of 8 neighbors. Exceptions are the four corner cells which have only three neighbors, and the cells along the four border, with five neighbors each.
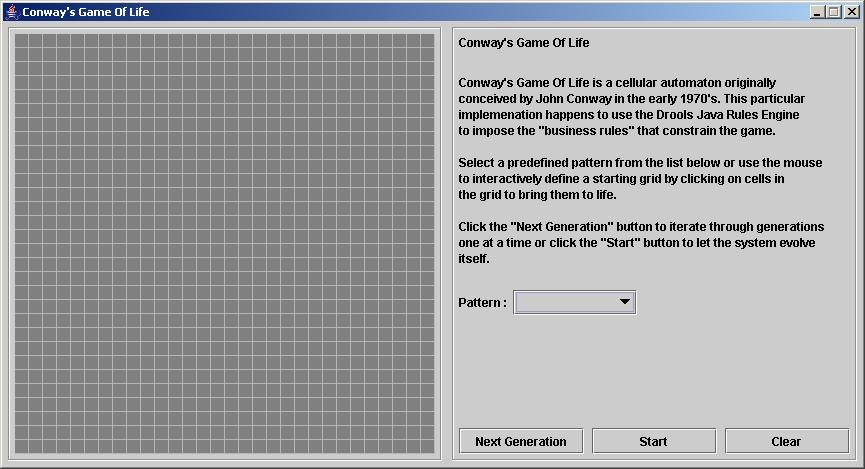
So what are the basic rules that govern this game? Its goal is to show the development of a population, generation by generation. Each generation results from the preceding one, based on the simultaneous evaluation of all cells. This is the simple set of rules that govern what the next generation will look like:
-
If a live cell has fewer than 2 live neighbors, it dies of loneliness.
-
If a live cell has more than 3 live neighbors, it dies from overcrowding.
-
If a dead cell has exactly 3 live neighbors, it comes to life.
That is all there is to it. Any cell that doesn’t meet any of those criteria is left as is for the next generation. With those simple rules in mind, go back and play with the system a little bit more and step through some generations, one at a time, and notice these rules taking their effect.
The screenshot below shows an example generation, with a number of live cells. Don’t worry about matching the exact patterns represented in the screen shot. Just get some groups of cells added to the grid. Once you have groups of live cells in the grid, or select a pre-designed pattern, click the "Next Generation" button and notice what happens. Some of the live cells are killed (the green ball disappears) and some dead cells come to life (a green ball appears). Step through several generations and see if you notice any patterns. If you click on the "Start" button, the system will evolve itself so you don’t need to click the "Next Generation" button over and over. Play with the system a little and then come back here for more details of how the application works.
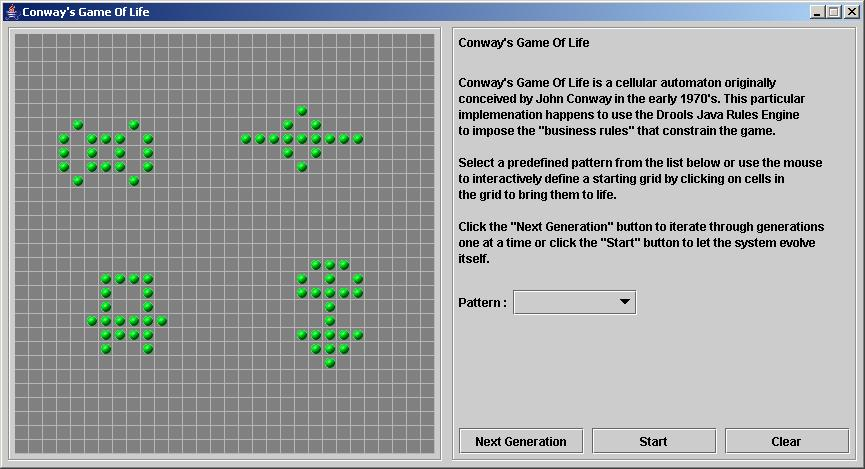
Now lets delve into the code.
As this is an advanced example we’ll assume that by now you know your way around the Drools framework and are able to connect the presented highlight, so that we’ll just focus at a high level overview.
The example has two ways to execute, one way uses Agenda Groups to manage execution flow, and the other one uses Rule Flow Groups to manage execution flow.
These two versions are implemented in ConwayAgendaGroupRun and ConwayRuleFlowGroupRun, respectively.
Here, we’ll discuss the Rule Flow version, as it’s what most people will use.
All the Cell objects are inserted into the Session and the rules in the ruleflow-group "register neighbor" are allowed to execute by the Rule Flow process.
This group of four rules creates Neighbor relations between some cell and its northeastern, northern, northwestern and western neighbors.
This relation is bidirectional, which takes care of the other four directions.
Border cells don’t need any special treatment - they simply won’t be paired with neighboring cells where there isn’t any.
By the time all activations have fired for these rules, all cells are related to all their neighboring cells.
rule "register north east"
ruleflow-group "register neighbor"
when
$cell: Cell( $row : row, $col : col )
$northEast : Cell( row == ($row - 1), col == ( $col + 1 ) )
then
insert( new Neighbor( $cell, $northEast ) );
insert( new Neighbor( $northEast, $cell ) );
end
rule "register north"
ruleflow-group "register neighbor"
when
$cell: Cell( $row : row, $col : col )
$north : Cell( row == ($row - 1), col == $col )
then
insert( new Neighbor( $cell, $north ) );
insert( new Neighbor( $north, $cell ) );
end
rule "register north west"
ruleflow-group "register neighbor"
when
$cell: Cell( $row : row, $col : col )
$northWest : Cell( row == ($row - 1), col == ( $col - 1 ) )
then
insert( new Neighbor( $cell, $northWest ) );
insert( new Neighbor( $northWest, $cell ) );
end
rule "register west"
ruleflow-group "register neighbor"
when
$cell: Cell( $row : row, $col : col )
$west : Cell( row == $row, col == ( $col - 1 ) )
then
insert( new Neighbor( $cell, $west ) );
insert( new Neighbor( $west, $cell ) );
endOnce all the cells are inserted, some Java code applies the pattern to the grid, setting certain cells to Live. Then, when the user clicks "Start" or "Next Generation", it executes the "Generation" ruleflow. This ruleflow is responsible for the management of all changes of cells in each generation cycle.
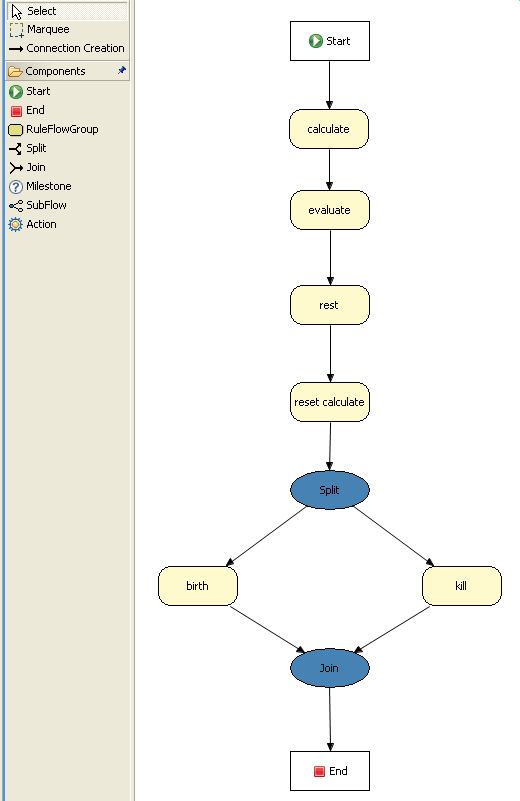
The rule flow process first enters the "evaluate" group, which means that any active rule in the group can fire.
The rules in this group apply the Game-of-Life rules discussed in the beginning of the example, determining the cells to be killed and the ones to be given life.
We use the "phase" attribute to drive the reasoning of the Cell by specific groups of rules; typically the phase is tied to a Rule Flow Group in the Rule Flow process definition.
Notice that it doesn’t actually change the state of any Cell objectss at this point; this is because it’s evaluating the grid in turn and it must complete the full evaluation until those changes can be applied.
To achieve this, it sets the cell to a "phase" which is either Phase.KILL or Phase.BIRTH, used later to control actions applied to the Cell object.
rule "Kill The Lonely"
ruleflow-group "evaluate"
no-loop
when
// A live cell has fewer than 2 live neighbors
theCell: Cell( liveNeighbors < 2, cellState == CellState.LIVE,
phase == Phase.EVALUATE )
then
modify( theCell ){
setPhase( Phase.KILL );
}
end
rule "Kill The Overcrowded"
ruleflow-group "evaluate"
no-loop
when
// A live cell has more than 3 live neighbors
theCell: Cell( liveNeighbors > 3, cellState == CellState.LIVE,
phase == Phase.EVALUATE )
then
modify( theCell ){
setPhase( Phase.KILL );
}
end
rule "Give Birth"
ruleflow-group "evaluate"
no-loop
when
// A dead cell has 3 live neighbors
theCell: Cell( liveNeighbors == 3, cellState == CellState.DEAD,
phase == Phase.EVALUATE )
then
modify( theCell ){
theCell.setPhase( Phase.BIRTH );
}
endOnce all Cell objects in the grid have been evaluated, we first clear any calculation activations that occurred from any previous data changes.
This is done via the "reset calculate" rule, which clears any activations in the "calculate" group.
We then enter a split in the rule flow which allows any activations in both the "kill" and the "birth" group to fire.
These rules are responsible for applying the state change.
rule "reset calculate"
ruleflow-group "reset calculate"
when
then
WorkingMemory wm = drools.getWorkingMemory();
wm.clearRuleFlowGroup( "calculate" );
end
rule "kill"
ruleflow-group "kill"
no-loop
when
theCell: Cell( phase == Phase.KILL )
then
modify( theCell ){
setCellState( CellState.DEAD ),
setPhase( Phase.DONE );
}
end
rule "birth"
ruleflow-group "birth"
no-loop
when
theCell: Cell( phase == Phase.BIRTH )
then
modify( theCell ){
setCellState( CellState.LIVE ),
setPhase( Phase.DONE );
}
endAt this stage, a number of Cell objects have been modified with the state changed to either LIVE or DEAD.
Now we get to see the power of the Neighbor facts defining the cell relations.
When a cell becomes live or dead, we use the Neighbor relation to iterate over all surrounding cells, increasing or decreasing the liveNeighbor count.
Any cell that has its count changed is also set to to the EVALUATE phase, to make sure it is included in the reasoning during the evaluation stage of the Rule Flow Process.
Notice that we don’t have to do any iteration ourselves; simply by applying the relations in the rules we make the rule engine do all the hard work for us, with a minimal amount of code.
Once the live count has been determined and set for all cells, the Rule Flow Process comes to and end.
If the user has initially clicked the "Start" button, the engine will restart the rule flow; otherwise the user may request another generation.
rule "Calculate Live"
ruleflow-group "calculate"
lock-on-active
when
theCell: Cell( cellState == CellState.LIVE )
Neighbor( cell == theCell, $neighbor : neighbor )
then
modify( $neighbor ){
setLiveNeighbors( $neighbor.getLiveNeighbors() + 1 ),
setPhase( Phase.EVALUATE );
}
end
rule "Calculate Dead"
ruleflow-group "calculate"
lock-on-active
when
theCell: Cell( cellState == CellState.DEAD )
Neighbor( cell == theCell, $neighbor : neighbor )
then
modify( $neighbor ){
setLiveNeighbors( $neighbor.getLiveNeighbors() - 1 ),
setPhase( Phase.EVALUATE );
}
end25.12. Invaders
A simplifed version of the Space Invaders game. Use the keys Z and K, to move left and right and M to fire a misile. The example is built up over 6 projects, each adding slightly more complexity to the last.
Name: Example Invaders
Main class: org.drools.games.invaders.Invaders1Main
Main class: org.drools.games.invaders.Invaders2Main
Main class: org.drools.games.invaders.Invaders3Main
Main class: org.drools.games.invaders.Invaders4Main
Main class: org.drools.games.invaders.Invaders5Main
Main class: org.drools.games.invaders.Invaders6Main
25.12.1. Invaders1Main
Invaders1Main creates the frame and attaches the KeyListener, feeding key events into the engine. It also sets up the main game loop which can be found in "Main.drl". The typical convention used through out the example is to have one agenda group per file, and all rules in that file in the same agenda group.
The Run fact is used to drive the repeat of the Game loop. Initially there are only one groups that is evaluated, Keys. The "keys.drl" file is shared by several examples, and illustrates rule re-use across multipel projects.
rule "init" when
then
insert( new Run() );
setFocus( "Init" );
end
rule GameLoop when
r : Run()
then
setFocus( "Keys" );
end
rule Draw when
r : Run()
then
ui.show();
modify( r ) {} // force loop
end25.12.2. Invaders2Main
Invaders2Main adds the "Draw" stage to the game loop and draws the SpaceShip
rule GameLoop when
r : Run()
then
setFocus( "Draw" );
setFocus( "Keys" );
end25.12.3. Invaders3Main
Invaders3Main adds move controls to the spaceship, notice the ship moves out of the boundaries of the screen. KeyPressed is detected and that sets a delta of dx on the ship direction. That delta is then repeated applied to the x position of the ship
rule ShipDeltaMoveLeft agenda-group "Move" when
s : Ship()
KeyPressed( keyText == "Z" )
then
modify( s ) { dx = 0 - s.speed }
end
rule ShipDeltaStopLeft agenda-group "Move" when
s : Ship()
not KeyPressed( keyText == "Z" )
then
modify( s ) { dx = 0 }
end
rule ShipMove agenda-group "Move" when
s : Ship( dx != 0 )
Run()
then
modify( s ) { x = s.x + s.dx }
end25.12.4. Invaders4Main
Invaders4Main adds boundari control to the ShipMove rule, so it doesn’t move off the screen. Notice the use of "@watch( !x )", this ensures that while the rule wil modify the x property, it will not react to changes to x, which avoids recursion issues.
rule ShipMove agenda-group "Move" when
s : Ship( dx != 0, x + dx > 0, x + dx + width < conf.windowWidth ) @watch( !x )
Run()
then
modify( s ) { x = s.x + s.dx }
end25.12.5. Invaders5Main
Invaders5Main updates the "Draw" group to draw 5 Invaders.
25.12.6. Invaders6Main
Invaders6Main adds a lot more meat. Pressing the "M" key fires a missile that travels up the screen, while moving collision between the missile and the invader is checked.
25.12.7. Invaders4Main
Invaders4Main adds boundari control to the ShipMove rule, so it doesn’t move off the screen. Notice the use of "@watch( !x )", this ensures that while the rule wil modify the x property, it will not react to changes to x, which avoids recursion issues.
rule InsertBullet agenda-group "Bullet" when
KeyPressed( keyText == "M" )
s : Ship()
not Bullet()
then
b = new Bullet();
b.x = s.x + (s.width/2) - (b.width/2);
b.y = s.y - s.height - b.height;
b.width = conf.bulletWidth;
b.height = conf.bulletHeight;
b.dy = 0 - conf.bulletSpeed;
insert( b );
end
rule BulletMove agenda-group "Bullet" when
b : Bullet( y > 0 ) @watch( !y )
Run()
then
modify( b ) { y = b.y + b.dy }
end
rule Collision agenda-group "Bullet" when
b : Bullet( ) @watch( y )
i : Invader( x < b.x, x + width > b.x, y > b.y)
Run()
then
modify( i ) { alive = false }
end25.13. Adventures with Drools
Based on the Adventure in Prolog, over at the Amzi website, http://www.amzi.com/AdventureInProlog/, we started to work on a text adventure game for Drools. They are ideal as they can start off simple and build in complexity and size over time, they also demonstrate key aspects of declarative relational programming.
Name: Example Text Adventure
Main class: org.drools.games.adventure.TextAdventureThe game allows you to play as the hero or the monster. If you click "New Window" you can open one window as the hero and another as the monster, and play them both at the same time. The game allows either character to move around rooms, pick up, drop or use things. Doors can be locked and unlocked, by using the key on teh exit room, and the hero can kill the monster by using the umbrella on the monster.
You can view the 8 minute demonstration and introduction for the example at http://downloads.jboss.org/drools/videos/text-adventures.swf. Be aware the video is now much older than the current improved example.
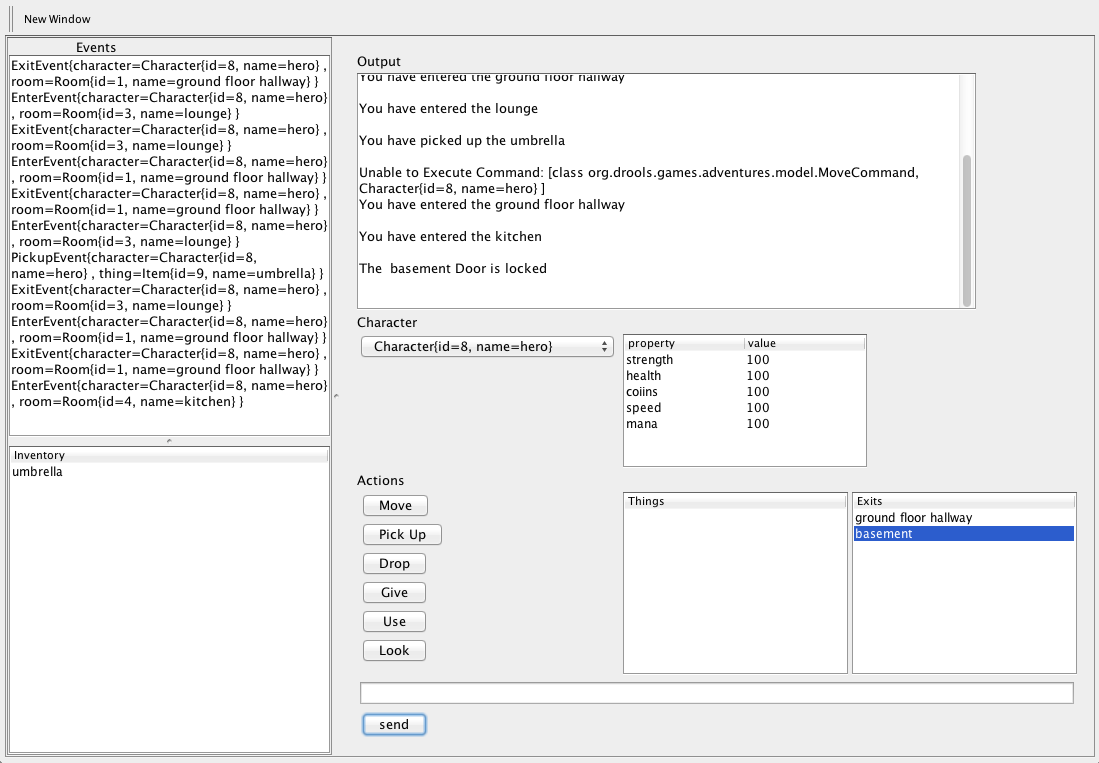
25.13.1. Using the game.
Each action follows the constructor arguments of the associated Command java class.
@PropertyReactive
public class MoveCommand extends Command {
@Position(1)
private Character character;
@Position(2)
private Room room;
public MoveCommand(Character character, Room room) {
this.character = character;
this.room = room;
}To issue a move action, select the "Move" button, then select the exit room. Notice when you press "Move" it adds the text to the white bar at the bottom. When the exit room is selected, it also is added to the white bar. Then press send and the game engine will execute the command. Internally it uses reflection to instantiate the Command and insert it into the engine. If you select incorrect arguments, such as pressing exits multiple times, the reflection will fail and you can attempt it again.
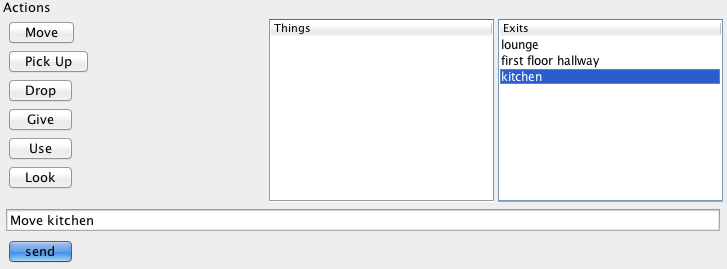
The Things list displays anything you can see in the room, not all things can be picked up. For instance you can pick up the key and the torch, but not the monster. When something is picked up it moves from the Things list to the Inventory List. The reverse is true when something is dropped.
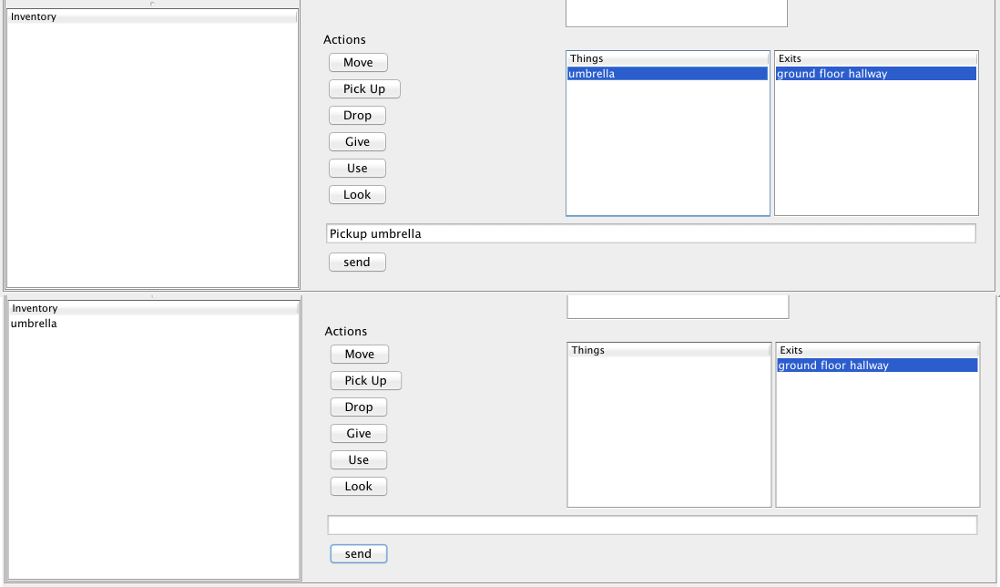
The key is in the office, move upstairs and into the office. Then pick up the key. Move back downstairs and into the kitchen. Try and walk into the basement, notice it’s locked.
Select the "Use" action, the select the key and then the basement exit. This will unlock the door and you can now walk through.
To kill the monster pick up the umbrella from the lounge and then select "Use", then select the imbrella and finally select the monster.
Don’t forget to open a "New Window" to play as the monster, although you will not be able to exit the basement until the hero has opened it with the key. The monster and the hero can also give items to each other, moving items between each playsers inventory.
25.13.2. The code
The model is written in Java classes. Each classes uses @PropertyReactive and @Position. @PropertyReactive allows control of which fields patterns react to, and @Position maps a field to a argument position allowing positional as well as named arguments for patterns.
@PropertyReactive
public class Thing {
@Position(0)
private long id;
@Position(1)
private String name;
public Thing(long id, String name) {
this.id = id;
this.name = name;
}
...
}An MVEL data file is used to populate our world, see "data.mvel". You can edit this file to add new rooms, items and characters, as well as locks for doors.
rooms = [
"basement" : new Room("basement"),
"lounge" : new Room("lounge"),
"kitchen" : new Room("kitchen"),
"ground floor hallway" : new Room("ground floor hallway"),
"bedroom" : new Room("bedroom"),
"office" : new Room("office"),
"first floor hallway" : new Room("first floor hallway")
];
doors = [
"d1" : new Door( rooms["kitchen"], rooms["basement"] ),
"d2" : new Door( rooms["ground floor hallway"], rooms["lounge"]),
"d4" : new Door( rooms["ground floor hallway"], rooms["kitchen"]),
"d5" : new Door( rooms["ground floor hallway"], rooms[ "first floor hallway"] ),
"d8" : new Door( rooms["first floor hallway"], rooms[ "bedroom"] ),
"d9" : new Door( rooms["first floor hallway"], rooms[ "office"] )
];
locations = [
"monster" : new Location( characters["monster"], rooms["basement"] ),
"hero" : new Location( characters["hero"], rooms["ground floor hallway"] ),
"umbrella" : new Location( items["umbrella"], rooms["lounge"] ),
"key1" : new Location( items["key1"], rooms["office"] )
];The game creates commands, which it inserts into the engine. These commands are then used to change the state of the world and that state is reflected back in the UI. The commands can be found in the "commands.drl" file. The following rule matches the MoveCommand and if it’s valid it will make the move happen.
rule validMove agenda-group "commands" when
mc : MoveCommand( c : character, r : room )
l : Location( thing == c, ltarget : target ) @watch( !target )
?connect( d, r, ltarget; )
then
exit = new ExitEvent( c, (Room) l.target );
enter = new EnterEvent( c, r );
modify( l ) { target = r };
insert( exit );
insert( enter );
mc.session.channels["output"].send( "You have entered the " + l.target.name + "\n" );
endIn the above rules notice the "connect" pattern, this is actually a query. In the MVEL data file doors are only described one way, we can use a query to check connections bi-directionally. The queries can be found in the "queries.drl" file.
query connect( Door $d, Room $x, Room $y )
$d := Door($id, $name, $x, $y;)
or
$d :=Door($id, $name, $y, $x;)
endThe UI has its list boxes populated by rules found in "UiView.drl", those rules in turn use queries. Here is how the "Things" list box is populated, when ever the world changes.
rule updateThings salience 5 when
session : UserSession( $char : character )
things( $char, $things; )
then
session.channels["things"].send( $things );
end
query things(Character $char, List $things)
$char := Character()
Location( $char, $room; )
$things := List() from accumulate( Location($thing, $room; thing != $char),
collectList( $thing ) )
end25.14. Pong
A Conversion for the classic game Pong. Use the keys A, Z and K, M. The ball should get faster after each bounce.
Name: Example Pong
Main class: org.drools.games.pong.PongMain
25.15. Wumpus World
Name: Example Wumpus World
Main class: org.drools.games.wumpus.WumpusWorldMainWumpus World is an AI example covered in the book "Artificial Intelligence : A Modern Approach". When the game first starts all the cells are greyed out. As you walk around they become visible. The cave has pits, a wumpus and gold. When you are next to a pit you will feel a breeze, when you are next to the wumpus you will smell a stench and see glitter when next to gold. The sensor icons are shown above the move buttons. If you walk into a pit or the wumpus, you die. A more detailed overview of Wumpus World can be found at http://www.cis.temple.edu/~giorgio/cis587/readings/wumpus.shtml. A 20 minute video showing how the game is created and works is at http://www.youtube.com/watch?v=4CvjKqUOEzM.

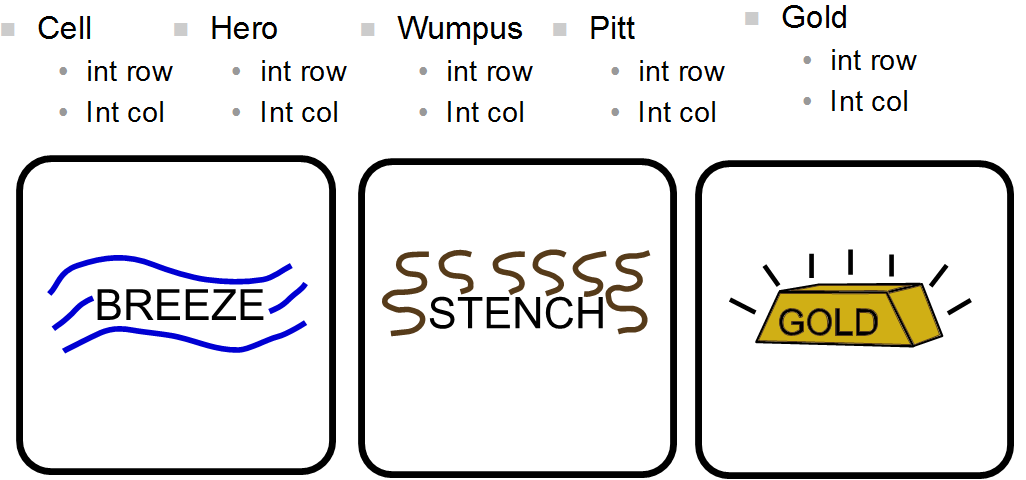
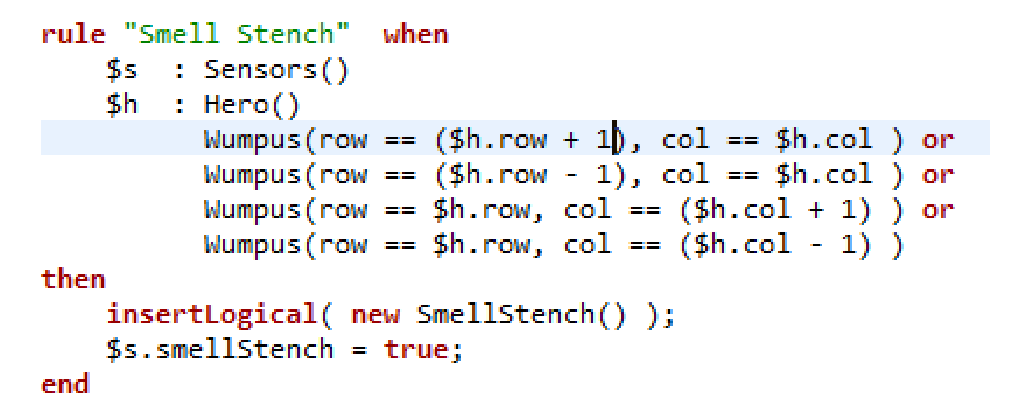
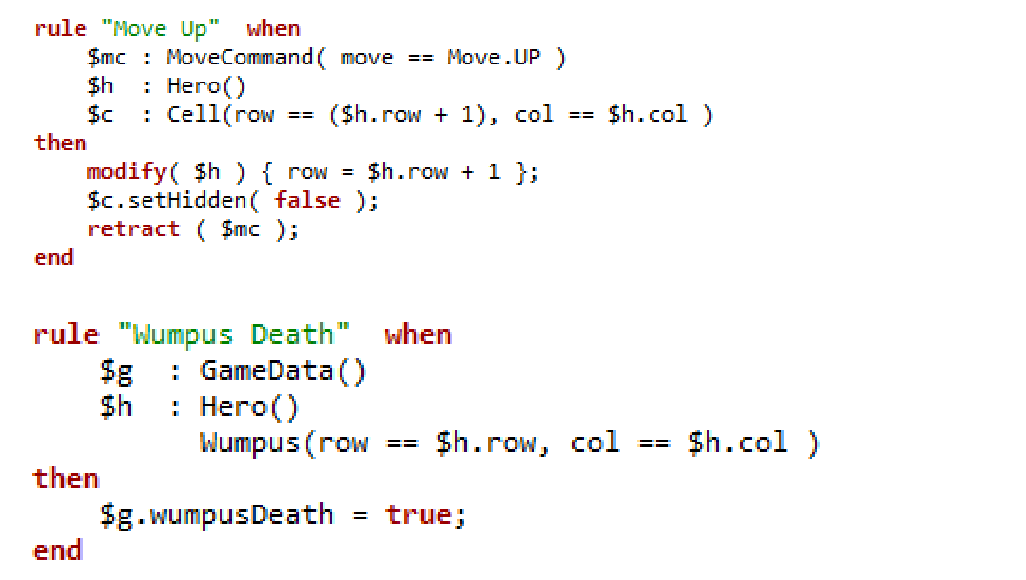
25.16. Backward-Chaining
A backward-chaining rule system is goal-driven. This means the system starts with a conclusion which the engine tries to satisfy. If it cannot do so it searches for sub-goals, that is, conclusions that will complete part of the current goal. It continues this process until either the initial conclusion is satisfied or there are no more unsatisfied sub-goals. Prolog is an example of a backward-chaining engine.
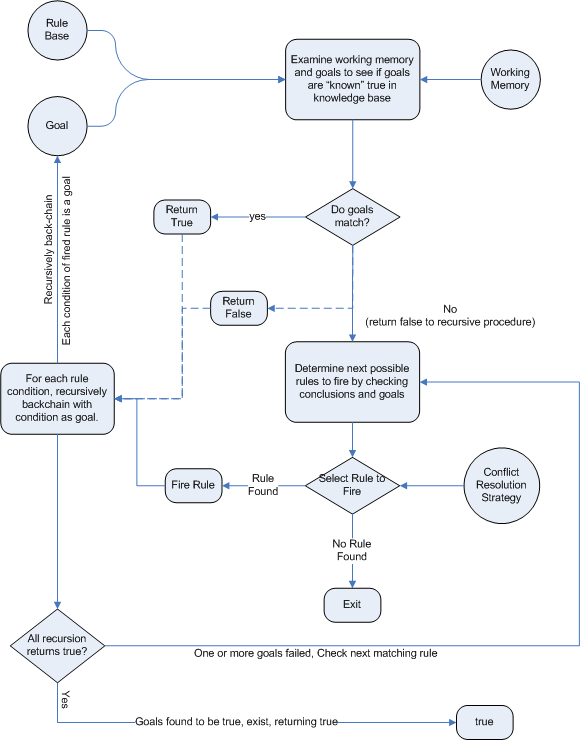
25.16.1. Backward-Chaining Systems
Backward-Chaining is a feature recently added to the JBoss Rules Engine. This process is often referred to as derivation queries, and it is not as common compared to reactive systems since JBoss Rules is primarily reactive forward chaining. That is, it responds to changes in your data. The backward-chaining added to the engine is for product-like derivations.
25.16.2. Cloning Transitive Closures
The previous chart demonstrates a House example of transitive items. A similar reasoning chart can be created by implementing the following rules:
1. First, create some java rules to develop reasoning for transitive items. It inserts each of the locations.
2. Next, create the Location class; it has the item and where it is located.
3. Type the rules for the House example as depicted below:
ksession.insert( new Location("office", "house") );
ksession.insert( new Location("kitchen", "house") );
ksession.insert( new Location("knife", "kitchen") );
ksession.insert( new Location("cheese", "kitchen") );
ksession.insert( new Location("desk", "office") );
ksession.insert( new Location("chair", "office") );
ksession.insert( new Location("computer", "desk") );
ksession.insert( new Location("drawer", "desk") );4. A transitive design is created in which the item is in its designated location such as a "desk" located in an "office."

25.16.3. Defining a Query
1. Create a query to look at the data inserted into the rules engine:
query isContainedIn( String x, String y )
Location( x, y; )
or
( Location( z, y; ) and isContainedIn( x, z; ) )
endNotice how the query is recursive and is calling "isContainedIn."
2. Create a rule to print out every string inserted into the system to see how things are implemented. The rule should resemble the following format:
rule "go" salience 10
when
$s : String( )
then
System.out.println( $s );
end3. Using Step 2 as a model, create a rule that calls upon the Step 1 query "isContainedIn."
rule "go1"
when
String( this == "go1" )
isContainedIn("office", "house"; )
then
System.out.println( "office is in the house" );
endThe "go1" rule will fire when the first string is inserted into the engine. That is, it asks if the item "office" is in the location "house." Therefore, the Step 1 query is evoked by the previous rule when the "go1" String is inserted.
4. Create the "go1," insert it into the engine, and call the fireAllRules.
ksession.insert( "go1" );
ksession.fireAllRules();
---
go1
office is in the houseThe --- line indicates the separation of the output of the engine from the firing of the "go" rule and the "go1" rule.
25.16.4. Transitive Closure Example
1. Create a Transitive Closure by implementing the following rule:
rule "go2"
when
String( this == "go2" )
isContainedIn("drawer", "house"; )
then
System.out.println( "Drawer in the House" );
end2. Recall from the Cloning Transitive Closure’s topic, there was no instance of "drawer" in "house." "drawer" was located in "desk."
3. Use the previous query for this recursive information.
query isContainedIn( String x, String y )
Location( x, y; )
or
( Location( z, y; ) and isContainedIn( x, z; ) )
end4. Create the "go2," insert it into the engine, and call the fireAllRules.
ksession.insert( "go2" );
ksession.fireAllRules();
---
go2
Drawer in the HouseWhen the rule is fired, it correctly tells you "go2" has been inserted and that the "drawer" is in the "house."
5. Check how the engine determined this outcome
-
The query has to recurse down several levels to determine this.
-
Instead of using Location( x, y; ), The query uses the value of (z, y; ) since "drawer" is not in "house."
-
The z is currently unbound which means it has no value and will return everything that is in the argument.
-
y is currently bound to "house," so z will return "office" and "kitchen."
-
Information is gathered from "office" and checks recursively if the "drawer" is in the "office." The following query line is being called for these parameters: isContainedIn (x ,z; )
There is no instance of "drawer" in "office;" therefore, it does not match. With z being unbound, it will return data that is within the "office," and it will gather that z == desk.
isContainedIn(x==drawer, z==desk)isContainedIn recurses three times. On the final recurse, an instance triggers of "drawer" in the "desk."
Location(x==drawer, y==desk)This matches on the first location and recurses back up, so we know that "drawer" is in the "desk," the "desk" is in the "office," and the "office" is in the "house;" therefore, the "drawer" is in the "house" and returns true.
25.16.5. Reactive Transitive Queries
1. Create a Reactive Transitive Query by implementing the following rule:
rule "go3"
when
String( this == "go3" )
isContainedIn("key", "office"; )
then
System.out.println( "Key in the Office" );
endReactive Transitive Queries can ask a question even if the answer can not be satisfied. Later, if it is satisfied, it will return an answer.
2. Use the same query for this reactive information.
query isContainedIn( String x, String y )
Location( x, y; )
or
( Location( z, y; ) and isContainedIn( x, z; ) )
end3. Create the "go3," insert it into the engine, and call the fireAllRules.
ksession.insert( "go3" );
ksession.fireAllRules();
---
go3The first rule that matches any String returns "go3" but nothing else is returned because there is no answer; however, while "go3" is inserted in the system, it will continuously wait until it is satisfied.
4. Insert a new location of "key" in the "drawer":
ksession.insert( new Location("key", "drawer") );
ksession.fireAllRules();
---
Key in the OfficeThis new location satisfies the transitive closure because it is monitoring the entire graph. In addition, this process now has four recursive levels in which it goes through to match and fire the rule.
25.16.6. Queries with Unbound Arguments
1. Create a Query with Unbound Arguments by implementing the following rule:
rule "go4"
when
String( this == "go4" )
isContainedIn(thing, "office"; )
then
System.out.println( "thing" + thing + "is in the Office" );
endThis rule is asking for everything in the "office," and it will tell everything in all the rows below. The unbound argument (out variable thing) in this example will return every possible value; accordingly, it is very similar to the z value used in the Reactive Transitive Query example.
2. Use the query for the unbound arguments.
query isContainedIn( String x, String y )
Location( x, y; )
or
( Location( z, y; ) and isContainedIn( x, z; ) )
end3. Create the "go4," insert it into the engine, and call the fireAllRules.
ksession.insert( "go4" );
ksession.fireAllRules();
---
go4
thing Key is in the Office
thing Computer is in the Office
thing Drawer is in the Office
thing Desk is in the Office
thing Chair is in the OfficeWhen "go4" is inserted, it returns all the previous information that is transitively below "Office."
25.16.7. Multiple Unbound Arguments
1. Create a query with Mulitple Unbound Arguments by implementing the following rule:
rule "go5"
when
String( this == "go5" )
isContainedIn(thing, location; )
then
System.out.println( "thing" + thing + "is in" + location );
endThis rule is asking for everything in the "office," and it will tell everything in all the rows below. The unbound argument (out variable thing) in this example will return every possible value; accordingly, it is very similar to the z value used in the Reactive Transitive Query example.
Both thing and location are unbound out variables, and without bound arguments, everything is called upon.
2. Use the query for multiple unbound arguments.
query isContainedIn( String x, String y )
Location( x, y; )
or
( Location( z, y; ) and isContainedIn( x, z; ) )
end3. Create the "go5," insert it into the engine, and call the fireAllRules.
ksession.insert( "go5" );
ksession.fireAllRules();
---
go5
thing Knife is in House
thing Cheese is in House
thing Key is in House
thing Computer is in House
thing Drawer is in House
thing Desk is in House
thing Chair is in House
thing Key is in Office
thing Computer is in Office
thing Drawer is in Office
thing Key is in Desk
thing Office is in House
thing Computer is in Desk
thing Knife is in Kitchen
thing Cheese is in Kitchen
thing Kitchen is in House
thing Key is in Drawer
thing Drawer is in Desk
thing Desk is in Office
thing Chair is in OfficeWhen "go5" is called, it returns everything within everything.