As the Guvnor can manage many different types of rules (and more), they are all classed as "assets". An asset is anything that can be stored as a version in the repository. This includes decision tables, models, DSLs and more. Sometimes the word "rule" will be used to really mean "asset" (i.e. the things you can do also apply to the other asset types). You can think of asset as a lot like a file in a folder. Assets are grouped together for viewing, or to make a package for deployment etc.
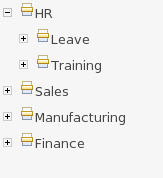
Categories allow rules (assets) to be labeled (or tagged) with any number of categories that you define. This means that you can then view a list of rules that match a specific category. Rules can belong to any number of categories. In the above diagram, you can see this can in effect create a folder/explorer like view of assets. The names can be anything you want, and are defined by the Guvnor administrator (you can also remove/add new categories - you can only remove them if they are not currently in use).
Generally categories are created with meaningful name that match the area of the business the rule applies to (if the rule applies to multiple areas, multiple categories can be attached). Categories can also be used to "tag" rules as part of their life-cycle, for example to mark as "Draft" or "For Review".
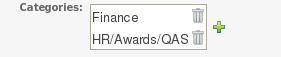
The view above shows the category editor/viewer that is seen when you open an asset. In this example you can see the asset belongs to 2 categories, with a "+" button to add additional items (use the trash can item to remove them). This means that when either category is used to show a list of assets, you will see that asset.
In the above example, the first Category "Finance" is a "top level" category. The second one: "HR/Awards/QAS" is a still a single category, but its a nested category: Categories are hierarchical. This means there is a category called "HR", which contains a category "Awards" (it will in fact have more sub-categories of course), and "Awards" has a sub-category of QAS. The screen shows this as "HR/Awards/QAS" - its very much like a folder structure you would have on your hard disk (the notable exception is of course that rules can appear in multiple places).
When you open an asset to view or edit, it will show a list of categories that it currently belongs to If you make a change (remove or add a category) you will need to save the asset - this will create a new item in the version history. Changing the categories of a rule has no effect on its execution.

The above view shows the administration screen for setting up categories (there) are no categories in the system by default. As the categories can be hierarchical you chose the "parent" category that you want to create a sub-category for. From here categories can also be removed (but only if they are not in use by any current versions of assets).
As a general rule, an asset should only belong to 1 or 2 categories at a time. Categories are critical in cases where you have large numbers of rules. The hierarchies do not need to be too deep, but should be able to see how this can help you break down rules/assets into manageable chunks. Its ok if its not clear at first, you are free to change categories as you go.
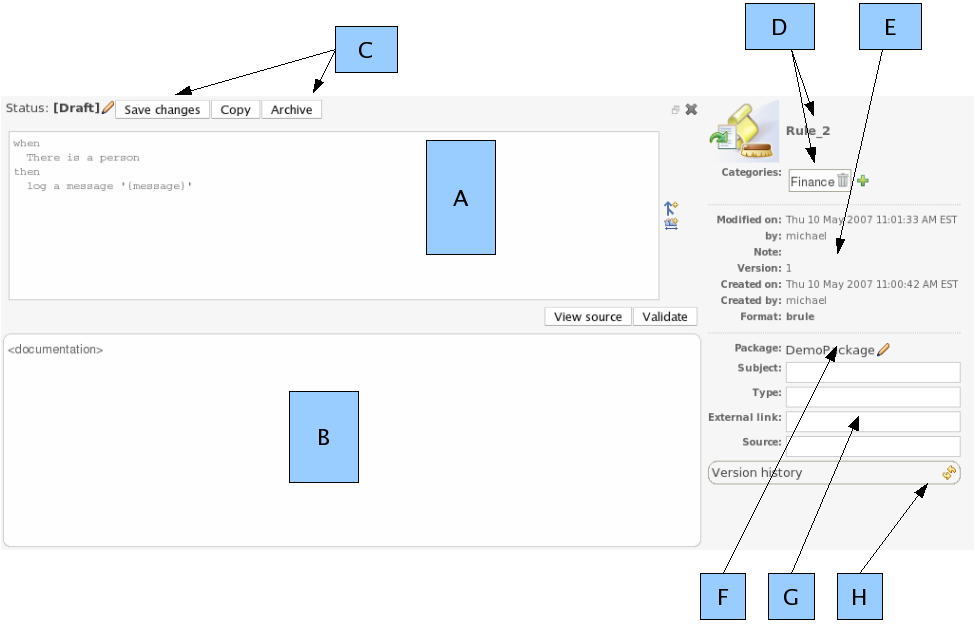
The above diagram shows the "asset editor" with some annotated areas. The asset editor is where all rule changes are made. Below is a list which describes the different parts of the editor.
A
This is where the "editor widget" lives - exactly what form the editor takes depends on the asset or rule type.
B
This is the documentation area - a free text area where descriptions of the rule can live. It is encouraged to write a plain description in the rule here before editing.
C
These are the actions - for saving, archiving, changing status etc. Archiving is the equivalent of deleting an asset.
D
This has the asset name, as well as the list of categories that the asset belongs to.
E
This section contains read-only meta data, including when changes were made, and by whom.
"Modified on:" - this is the last modified date.
"By:" - who made the last change.
"Note:" - this is the comment made when the asset was last updated (i.e. why a change was made)
"Version:" - this is a number which is incremented by 1 each time a change is checked in (saved).
"Created on:" - the date and time the asset was created.
"Created by:" - this initial author of the asset.
"Format:" - the short format name of the type of asset.
F
This shows what package the asset belong to (you can also change it from here).
G
This is some more (optional) meta data (taken from the Dublin Core meta data standard)
H
This will show the version history list when requested.
The Guvnor supports a (growing) list of formats of assets (rules). Here the key ones are described. Some of these are covered in other parts of the manual, and the detail will not be repeated here.
Guided editor style "Business rules": (also known as "BRL format"). These rules use the guided GUI which controls and prompts user input based on knowledge of the object model. This can also be augmented with DSL sentences.
IMPORTANT: to use the BRL guided editor, someone will need to have you package configured before hand.
Also note that there is a guided editor in the Eclipse plug in, most of the details in this section can also apply to it.
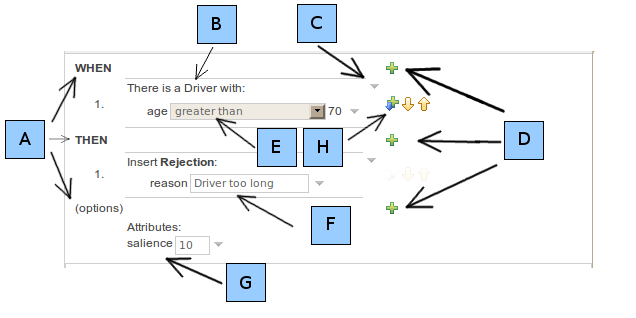
The above diagram shows the editor in action. The following description apply to the letter boxes in the diagram above:
A: The different parts of a rule. The "WHEN" part is the condition, "THEN" action, and "(options)" are optional attributes that may effect the operation of the rule.
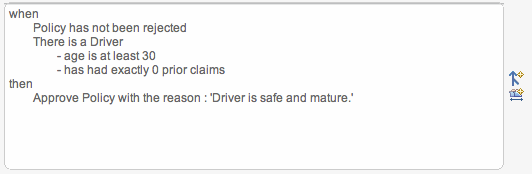
B: This shows a pattern which is declaring that the rule is looking for a "Driver" fact (the fields are listed below, in this case just "age"). Clicking in the fact name (Driver) will popup a list of options to add to the fact declaration: you can add more fields (e.g. their "location"), or you can assign a variable name to the fact (which you can use later on if needs be). As well as adding more fields to this pattern - you can add "multiple field" constraints - i.e. constraints that span across fields (e.g. age > 42 or risk > 2). The popup dialog shows the options.
C: The small triangle indicates you can remove something. In this case it would remove the whole Driver fact declaration. If its the one below, it would remove just the age constraint.
D: The "+" symbols allow you to add more patterns to the condition or the action part of the rule, or more attributes. In all cases, a popup option box is provided. For the "WHEN" part of the rule, you can choose from a list of Conditional Elements to add:
- A Constraint on a Fact: it will give you a list of facts.
- "The following does not exist": the fact+constraints must not exist.
- "The following exists": at least one match should exist (but there only needs to be one - it will not trigger for each match).
- "Any of the following are true": any of the patterns can match (you then add patterns to these higher level patterns).
- "From": this will insert a new From Conditional Element to the rule.
- "From Accumulate": this will insert a new Accumulate Conditional Element to the rule.
- "From Collect": this will insert a new Collect Conditional Element to the rule.
- "Free Form DRL": this will let you insert a free chunk of DRL.
If you just put a fact (like is shown above) then all the patterns are combined together so they are all true ("and").
E: This shows the constraint for the "age" field. Looking from left to right you find:
- The field name: Clicking on it you can assign a variable name to it, or access nested properties of it.
- A list of constraint operations: The content of this list changes depending on the field's data type.
-
The value field: It could be on of
A literal value: depending on the field's data type different components will be displayed: String or Number -> textbox, Date -> calendar, Enumeration -> combobox, Boolean -> checkbox
A "formula": this is an expression which is calculated (this is for advanced users only)
An Expression - this will let you use an Expression Builder to build up a full mvel expression. (At the moment only basic expressions are supported)
F: This shows an "action" of the rule, the Right Hand Side of a rule consists in a list of actions. In this case, we are asserting/inserting a new fact, which is a Rejection (with the "reason" field set to an explanation). There are quite a few other types of actions you can use: you can modify an existing fact (which tells the engine the fact has changed) - or you can simply set a field on a fact (in which case the engine doesn't know about the change - normally because you are setting a result). You can also retract a fact. In most cases, just like in Fact Types, you can click in the Fact name to get a list of its attributes or to bound it to a variable name. The values you enter are "literal" - in the sense that what you type is what the value is. If it needs to be a calculation, then add an "=" at the start of the value - this will be interpreted as a "formula" (for advanced users only) ! and the calculation will be performed (not unlike a spreadsheet). You can also perform a logical insert of Facts, add Facts to existing global lists, call a method on a variable or write some free form chunk of code.
G: This is where the rule options live. In this case, only salience is used which is a numeric value representing the rules "priority". This would probably be the most common option to use.
H: Pattern/Action toolbar. Next to each Pattern or Action you will find a toolbar containing 3 buttons. The first button lets you insert a new Pattern/Action below the one you selected, the other two buttons will move the current Pattern/Action up or down. The toolbars are translucent by default; they get active when you move the mouse cursor inside one of them.
Note that is it possible to limit field values to items in a pre configured list. This list is configured as part of the package (using a data enumeration to provide values for the drop down list). These values can be a fixed list, or (for example) loaded from a database. This is useful for codes, and other fields where there are set values. It is also possible to have what is displayed on screen, in a drop down, be different to the value (or code) used in a rule. See the section on data enumerations for how these are configured.
If the package the rule is part of has a DSL configuration, when when you add conditions or actions, then it will provide a list of "DSL Sentences" which you can choose from - when you choose one, it will add a row to the rule - where the DSL specifies values come from a user, then a edit box (text) will be shown (so it ends up looking a bit like a form). This is optional, and there is another DSL editor. Please note that the DSL capabilities in this editor are slightly less then the full set of DSL features (basically you can do [when] and [then] sections of the DSL only - which is no different to drools 3 in effect).
The following diagram shows the DSL sentences in action in the guided editor:
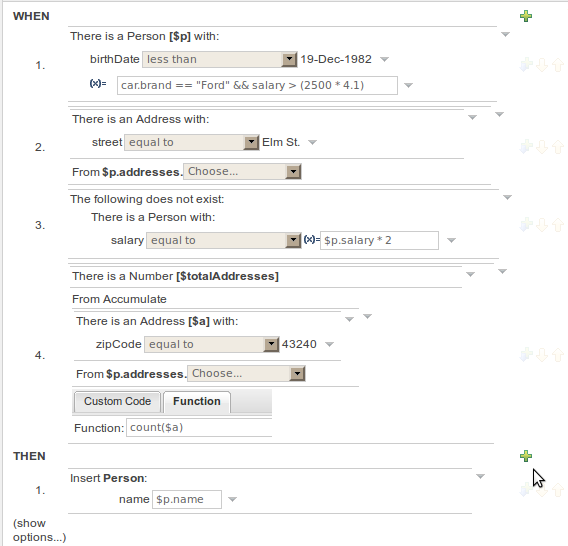
In the above example, you can see how to use a mixture of Conditional Elements, literal values, and formulas. The rule has 4 "top level" Patterns and 1 Action. The "top level" Patterns are:
A Fact Pattern on Person. This Pattern contains two field constraints: one for birthdate field and the other one is a formula. Note that the value of the birthdate restriction is selected from a calendar. Another thing to note is that you can make calculations and use nested fields in the formula restriction (i.e. car.brand). Finally, we are setting a variable name ($p) to the Person Fact Type. You can then use this variable in other Patterns.
Note
The generated DRL from this Pattern will be:
$p : Person( birthDate < "19-Dec-1982" , eval( car.brand == "Ford" && salary > (2500 * 4.1) ))
A From Pattern. This condition will create a match for every Address whose street name is "Elm St." from the Person's list of addresses. The left side of the from is a regular Fact Pattern and the right side is an Expression Builder that let us inspect variable's fields.
Note
The generated DRL from this Pattern will be:
Address( street == "Elm St." ) from
              $p.addresses
A "Not Exist" Conditional Element. This condition will match when its content doesn't create a match. In this case, its content is a regular Fact Pattern (on Person). In this Fact Pattern you can see how variables ($p) could be used inside a formula value.
Note
The generated DRL from this Pattern will be:
not
              Person( salary == ( $p.salary * 2 ) )
A "From Accumulate" Conditional Element. This is maybe one of the most complex Patterns you can use. It consist in a Left Pattern (It must be a Fact Pattern. In this case is a Number Pattern. The Number is named $totalAddresses), a Source Pattern (Which could be a Fact Pattern, From, Collect or Accumulate conditional elements. In this case is an Address Pattern Restriction with a field restriction in its zip field) and a Formula Section where you can use any built-in or custom Accumulate Function (in this example a count() function is used). Basically, this Conditional Element will count the addresses having a zip code of 43240 from the Person's list of addresses.
Note
The generated DRL from this Pattern will be:
$totalAddresses : Number() from accumulate ($a : Address(
              zipCode == " 43240") from $p.addresses, count($a))
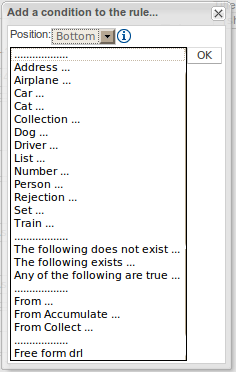
When clicking on the + button of the WHEN section, a new popup will appear letting you to add a new Pattern to the Rule. The popup will looks similar to the image above. In this popup you could select the type of Pattern to add by selecting one of the list items. In the list you will have an entry for each defined Fact Type, in addition to the already mentioned Conditional Elements like "exists", "doesn't exist", "from", "collect", "accumulate" and "free form DRL". Once you have selected one of this elements, you can add a new Pattern by clicking on the "Ok" button. The new pattern will be added at the bottom of the rule's left hand side. If you wan't to choose a different position, you can use the combobox placed at the top of the popup.
You can also open this popup by clicking in the + button from a Pattern's action toolbar. If that is the case, the popup that appears wouldn't containt the position combobox, because the new Pattern will be added just after the Pattern where you clicked.
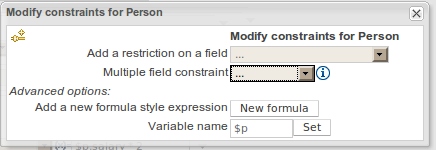
The above dialog is what you will get when you want to add constraints to the Person fact. In the top half are the simple options: you can either add a field constraint straight away (a list of fields of the Person fact will be shown), or you can add a "Multiple field constraint" using AND or OR operands. In the bottom half of the window you have the Advanced options: you can add a formula (which resolves to True or False - this is like in the example above: "... salary > (2500 * 4.1)". You can also assign a Variable name to the Person fact (which means you can then access that variable on the action part of the rule, to set a value etc).
DSL rules are textual rules, that use a language configuration asset to control how they appear.
A dsl rule is a single rule. Referring to the picture above, you can a text editor. You can use the icons to the right to provide lists of conditions and actions to choose from (or else press Control + Space at the same time to pop up a list).
Multiple rules can be stored in a spreadsheet (each row is a rule). The details of the spreadsheet are not covered in this chapter (as there is a separate chapter for them).
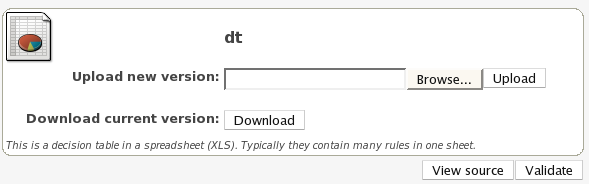
To use a spreadsheet, you upload an XLS file (and can download the current version, as per the picture above). To create a new decision table, when you launch the rule wizard, you will get an option to create one (after that point, you can upload the XLS file).
The guided decision table feature allows decision tables to be edited in place on the web. This works similar to the guided editor by introspecting what facts and fields are available to guide the creation of a decision table. Rule attributes, meta-data, conditions and actions can be defined in a tabular format thus facilitating rapid entry of large sets of related rules. Web-based decision table rules are compiled into DRL like all other rule assets.
Cells can be selected in a variety of ways:-
Firstly individual cells can be double-clicked and a pop-up editor corresponding to the underlying data-type will appear. Groups of cells in the same column can be selected by either clicking in the first and dragging the mouse pointer or clicking in the first and clicking the extent of the required range with the shift key pressed.
Secondly the keyboard cursor keys can be used to navigate around the table. Pressing the enter key will pop-up the correspondig editor. Ranges can be selected by pressing the shift key whilst extending the range with the cursor keys.
Columns can be resized by hovering over the corresponding divider in the table header. The mouse cursor will change and then the column width dragged either narrower or wider.
The guided decision table is split into two main sections:-
The upper section allows table columns to be defined representing rule attributes, meta-data, conditions and actions.
The lower section contains the actual table itself; where individual rows define seperate rules.
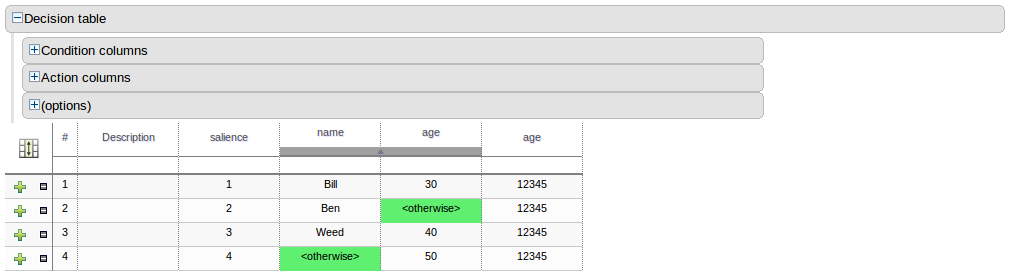
When you edit or create a new column, you will be given a choice of the type of constraint:-
Literal : The value in the cell will be compared with the field using the operator.
Formula: The expression in the cell will be evaluated and then compared with the field.
Predicate : No field is needed, the expression will be evaluated to true or false.
You can set a default value, but normally if there is no value in the cell, that constraint will not apply.
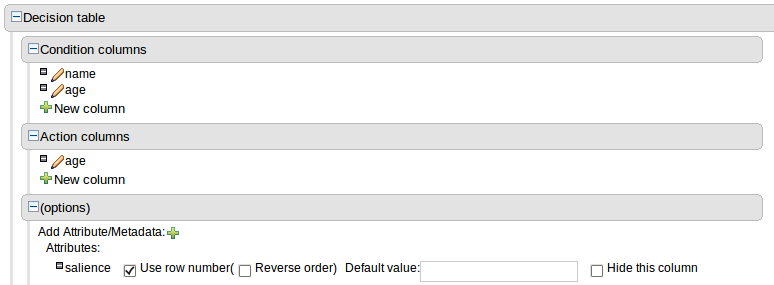
Two columns containing rule number and description are provided by default.
Zero or more attribue columns representing any of the DRL rule attributes can be added. An additional pseudo attribute is provide in the guided decision table editor to "negate" a rule. Use of this attribute allows complete rules to be negated. For example the following simple rule can be negated as also shown.
when
  $c : Cheese( name == "Cheddar" )
then
  ...
end
when
  not Cheese( name == "Cheddar" )
then
  ...
end
Zero or more meta-data columns can be defined, each represents the normal meta-data annotation on DRL rules.
Conditions represent fact patterns defined in the right-hand side, or "when" portion, of a rule. To define a condition column you must define a binding to a model class or select one that has previously been defined. You can choose to negate the pattern. Once this has been completed you can define field constraints. If two or more columns are defined using the same fact pattern binding the field constraints become composite field constraints on the same pattern. If you define multiple bindings for a single model class each binding becomes a seperate model class in the right-hand side of the rule.
Action columns can be defined to perform simple operations on bound facts within the rule engine's working memory or create new facts entirely. New facts can be inserted logically into the rule engine's working memory thus being subject to truth maintenance as usual. Please refer to the "Drools Expert" documentation for discussion on truth maintenance and logical insertions.
This section alows individual rules to be defined using the columns defined earlier.

The icon in the top left of the decision table toggles cell merging on and off. When cells are grouped those in the same column with identical values are merged into a single cell. This simplifies changing the value of multiple cells that shared the same original value. When cells are merged they also gain an icon in the top-left of the cell that allows rows spanning the merged cell to be grouped.
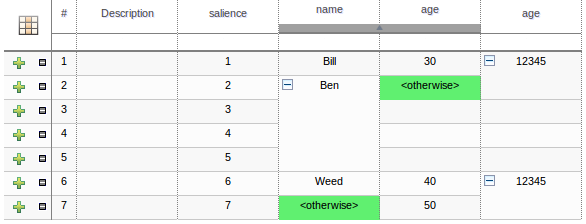
Cells that have been merged and be further collapsed into a single row. Clicking the [+\-] icon in the top left of a merged cell collapses the corresponding rows into a single entry. Cells in other columns spanning the collapsed rows that have identical values are shown unchanged. Cells in other columns spanning the collapsed rows that have different values are highlighted and the first value displayed.
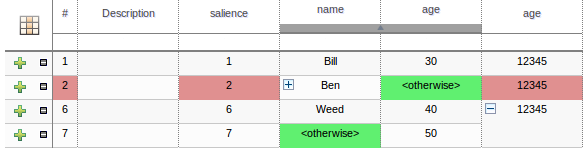
When the value of a grouped cell is altered all cells that have been collapsed also have their values updated.
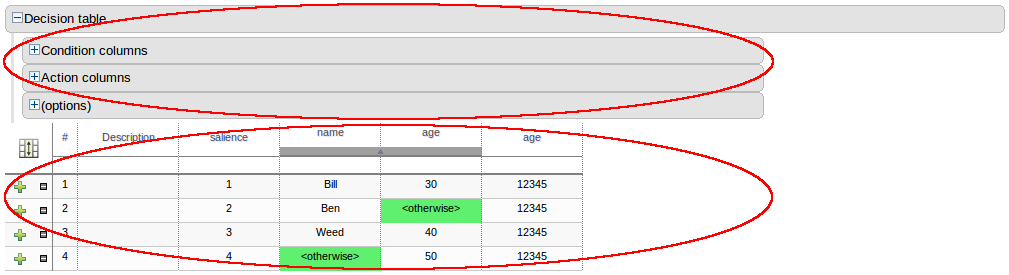
Condition columns defined with literal values that use either the equality (==) or inequality (!=) operators can take advantage of a special decision table cell value of "otherwise". This special value allows a rule to be defined that matches on all values not explicitly defined in all other rules defined in the table. This is best illustrated with an example:-
when
  Cheese( name not in ("Cheddar", "Edam", "Brie") )
  ...
then
  ...
end
when
Cheese( name in ("Cheddar", "Edam", "Brie") )
...
then
...
endRule flows: Rule flows allow you to visually describe the steps
taken - so not all rules are evaluated at once, but there is a flow of
logic. Rule flows are not covered in this chapter on the Guvnor, but you
can use the IDE to graphically draw ruleflows, and upload the
.rfm file to the Guvnor.
Similar to spreadsheets, you upload/download ruleflow files (the eclipse IDE has a graphical editor for them). The details of Rule Flows are not discussed here.
Technical (DRL) rules are stored as text - they can be managed in the Guvnor. A DRL can either be a whole chunk of rules, or an individual rule. if its an individual rule, no package statement or imports are required (in fact, you can skip the "rule" statement altogether, just use "when" and "then" to mark the condition and action sections respectively). Normally you would use the IDE to edit raw DRL files, since it has all the advanced tooling and content assistance and debugging. However, there are times when a rule may have to deal with something fairly technical in a package in Guvnor. In any typical package of rules, you generally have a need for some "technical rules" - you can mix and match all the rule types together of course.

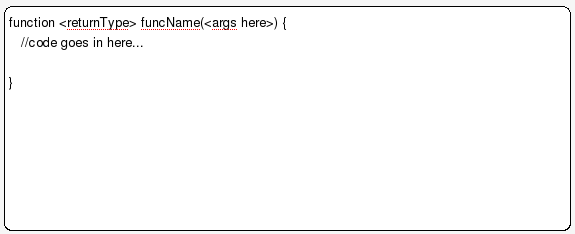
Functions are another asset type. They are NOT rules, and should only be used when necessary. The function editor is a textual editor. Functions
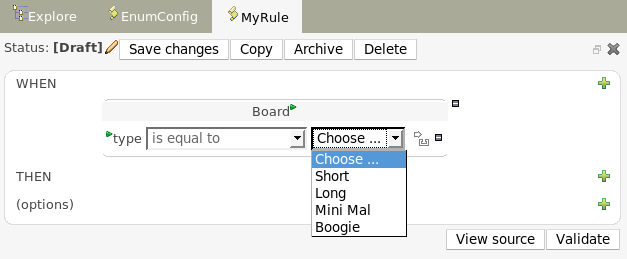
Data enumerations are an optional asset type that technical folk can configure to provide drop down lists for the guided editor. These are stored and edited just like any other asset, and apply to the package that they belong to.
The contents of an enum config are a mapping of Fact.field to a list of values to be used in a drop down. That list can either be literal, or use a utility class (which you put on the classpath) to load a list of strings. The strings are either a value to be shown on a drop down, or a mapping from the code value (what ends up used in the rule) and a display value (see the example below, using the '=').
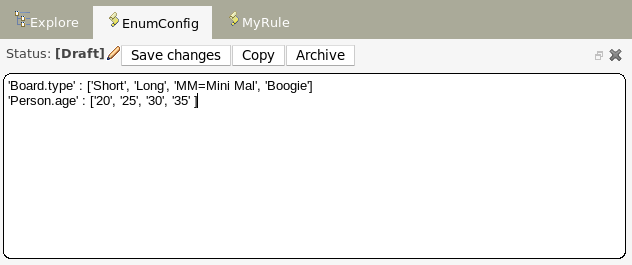
In the above diagram - the "MM" indicates a value that will be used in the rule, yet "Mini Mal" will be displayed in the GUI.
Getting data lists from external data sources: It is possible to
have the Guvnor call a piece of code which will load a list of Strings.
To do this, you will need a bit of code that returns a
java.util.List (of String's) to be on the classpath of the
Guvnor. Instead of specifying a list of values in the Guvnor itself -
the code can return the list of Strings (you can use the "=" inside the
strings if you want to use a different display value to the rule value,
as normal). For example, in the 'Person.age' line above, you could
change it to:
'Person.age' : (new com.yourco.DataHelper()).getListOfAges()
This assumes you have a class called "DataHelper" which has a method "getListOfAges()" which returns a List of strings (and is on the classpath). You can of course mix these "dynamic" enumerations with fixed lists. You could for example load from a database using JDBC. The data enumerations are loaded the first time you use the guided editor in a session. If you have any guided editor sessions open - you will need to close and then open the rule to see the change. To check the enumeration is loaded - if you go to the Package configuration screen, you can "save and validate" the package - this will check it and provide any error feedback.
There are a few other advanced things you can do with data enumerations.
Drop down lists that depend on field values: Lets imagine a simple fact model, we have a class called Vehicle, which has 2 fields: "engineType" and "fuelType". We want to have a choice for the "engineType" of "Petrol" or "Diesel". Now, obviously the choice type for fuel must be dependent on the engine type (so for Petrol we have ULP and PULP, and for Diesel we have BIO and NORMAL). We can express this dependency in an enumeration as:
'Vehicle.engineType' : ['Petrol', 'Diesel']
'Vehicle.fuelType[engineType=Petrol]' : ['ULP', 'PULP' ]
'Vehicle.fuelType[engineType=Diesel]' : ['BIO', 'NORMAL' ]
This shows how it is possible to make the choices dependent on other field values. Note that once you pick the engineType, the choice list for the fuelType will be determined.
Loading enums programmatically: In some cases, people may want to
load their enumeration data entirely from external data source (such as
a relational database). To do this, you can implement a class that
returns a Map. The key of the map is a string (which is the Fact.field
name as shown above), and the value is a java.util.List of
Strings.
public class SampleDataSource2 {


  public Map<String>, List<String> loadData() {

    Map data = new HashMap();


    List d = new ArrayList();

    d.add("value1");

    d.add("value2");

    data.put("Fact.field", d);


    return data;

 }


}
And in the enumeration in the BRMS, you put:
=(new SampleDataSource2()).loadData()
The "=" tells it to load the data by executing your code.
Mode advanced enumerations: In the above cases, the values in the lists are calculated up front. This is fine for relatively static data, or small amounts of data. Imagine a scenario where you have lists of countries, each country has a list of states, each state has a list of localities, each locality has a list of streets and so on... You can see how this is a lot of data, and it can not be loaded up. The lists should be loaded dependent on what country was selected etc...
Well the above can be addressed in the following fashion:
'Fact.field[dependentField1, dependentField2]' : '(new com.yourco.DataHelper()).getListOfAges("@{dependentField1}", "@{dependentField2}")'Similar to above, but note that we have just specified what fields are needed, and also on the right of the ":" there are quotes around the expression. This expression will then be evaluated, only when needed, substituting the values from the fields specified. This means you can use the field values from the GUI to drive a database query, and drill down into data etc. When the drop down is loaded, or the rule loaded, it will refresh the list based on the fields. 'depenentField1' and 'dependentField2' are names of fields on the 'Fact' type - these are used to calculate the list of values which will be shown in a drop down if values for the "field".
Tip: As you may have many similar rules, you can create rule templates, which are simply rules which are kept in an inactive package - you can then categories templates accordingly, and copy them as needed (choosing a live package as the target package).
Each asset (and also package) in Guvnor has a status flag set. The values of the status flag are set in the Administration section of the Guvnor. (you can add your own status names). Similar to Categories, Statuses do NOT effect the execution in any way, and are purely informational. Unlike categories, assets only have one status AT A TIME.
Using statuses is completely optional. You can use it to manage the lifecycle of assets (which you can alternatively do with categories if you like).
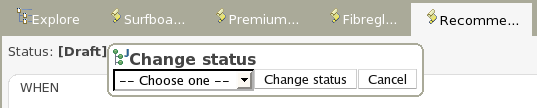
You can change the status of an individual asset (like in the diagram above). Its change takes effect immediately, no separate save is needed.

You can change the status of a whole package - this sets the status flag on the package itself, but it ALSO changes the statuses on ALL the assets that belong to this package in one hit (to be the same as what you set the package to).
Configuring packages is generally something that is done once, and by someone with some experience with rules/models. Generally speaking, very few people will need to configure packages, and once they are setup, they can be copied over and over if needed. Package configuration is most definitely a technical task that requires the appropriate expertise.
All assets live in "packages" in the Guvnor - a package is like a folder (it also serves as a "namespace"). A home folder for rule assets to live in. Rules in particular need to know what the fact model is, what the namespace is etc.
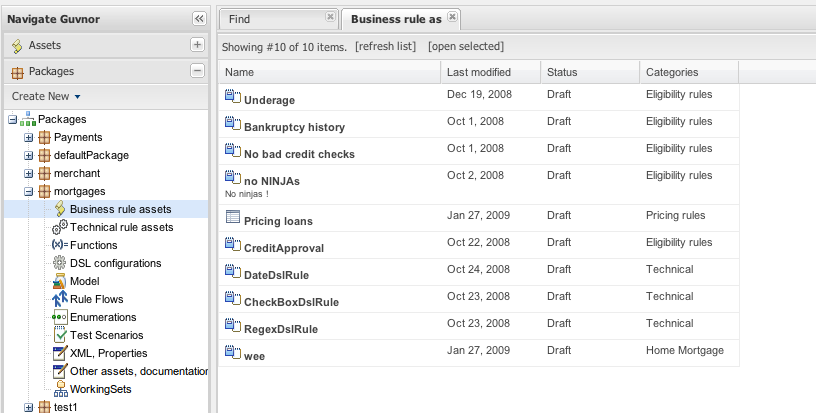
The above picture shows the package explorer. Clicking on an
asset type will show a list of matches (for packages with thousands of
rules, showing the list may take several seconds - hence the importance of
using categories to help you find your way around).
So while rules (and assets in general) can appear in any number of categories, they only live in one package. If you think of the Guvnor as a file system, then each package is a folder, and the assets live in that folder - as one big happy list of files. When you create a deployment snapshot of a package, you are effectively copying all the assets in that "folder" into another special "folder".
The package management feature allows you to see a list of packages, and then "expand" them, to show lists of each "type" of asset (there are many assets, so some of them are grouped together):
The asset types:
Business assets: this shows a list of all "business rule" types, which include decision tables, business rules etc. etc.
Technical assets: this is a list of items that would be considered technical (e.g. DRL rules, data enumerations and rule flows).
Functions: In the Guvnor you can also have functions defined (optionally of course).
DSL: Domain Specific Languages can also be stored as an asset. If they exist (generally there is only one), then they will be used in the appropriate editor GUIs.
Model: A package requires at least one model - for the rules.
WorkingSets: Working Sets let you create subsets of package's Fact Types and apply constraints to their fields.
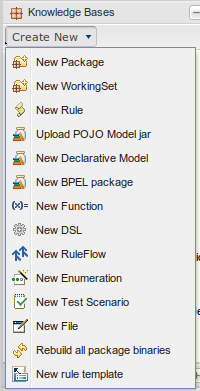
From the package explorer you can create new rules, or new assets. Some assets you can only create from the package explorer. The above picture shows the icons which launch wizards for this purpose. If you hover the mouse over them, a tooltip will tell you what they do.
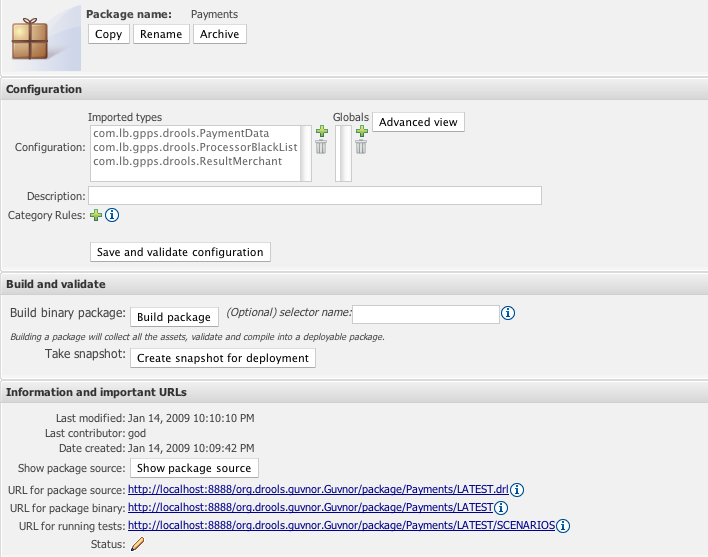
One of the most critical things you need to do is configure
packages. This is mostly importing the classes used by the rules, and
globals variables. Once you make a change, you need to save it, and that
package is then configured and ready to be built. For example, you may add
a model which has a class called com.something.Hello, you
would then add import com.something.Hello in your package
configuration and save the change.

Finally you would "build" a package. Any errors caught are then shown at this point. If the build was successful, then you will have the option to create a snapshot for deployment. You can also view the DRL that this package results in.
Warning
In cases of large numbers of rules, all these operations can take some time.
It is optional at this stage to enter the name of a "selector" - see the admin section for details on how to configure custom selectors for your system (if you need them - selectors allow you to filter down what you build into a package - if you don't know what they are for, you probably don't need to use them).
It is also possible to create a package by importing an existing
DRL file. When you choose to create a new package, you can choose an
option to upload a .drl file. The Guvnor will then
attempt to understand that DRL, break create a package for you. The
rules in it will be stored as individual assets (but still as DRL text
content). Note that to actually build the package, you will need to
upload an appropriate model (as a JAR) to validate against, as a
separate step.
Both assets and whole packages of assets are "versioned" in the Guvnor, but the mechanism is slightly different. Individual assets are saved a bit like a version of a file in a source control system. However, packages of assets are versioned "on demand" by taking a snapshot (typically which is used for deployment). The next section talks about deployment management and snapshots.
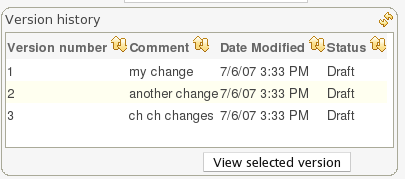
Each time you make a change to an asset, it creates a new item in the version history. This is a bit like having an unlimited undo. You can look back through the history of an individual asset like the list above, and view it (and restore it) from that point in time.
Snapshots, URLS and binary packages:
URLs are central to how built packages are provided. The Guvnor provides packages via URLs (for download and use by the Knowledge Agent). These URLs take the form of:
http://<server>/guvnor-webapp/org.drools.guvnor.Guvnor/package/<packageName>/<packageVersion>
<packageName> is the name you gave the package. <packageVersion> is either the name of a snapshot, or "LATEST" (if its LATEST, then it will be the latest built version from the main package, not a snapshot). You can use these in the agent, or you can paste them into your browser and it will download them as a file.
Refer to the section on the Knowledge Agent for details on how you can use these URLs (and binary downloads) in your application, and how rules can be updated on the fly.
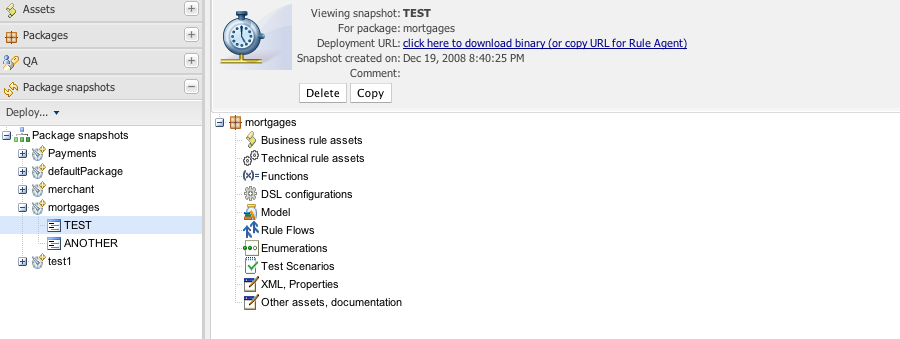
The above shows deployment snapshots view. On the left there is a list of packages. Clicking on a specific package will show you a list of snapshots for that package (if any). From there you can copy, remove or view an asset snapshot. Each snapshot is available for download or access via a URL for deployment.
The two main ways of viewing the repository are by using user-driven Categorization (tagging) as outlined above, and the package explorer view.
The category view provides a way to navigate your rules in a way that makes sense to your organization.
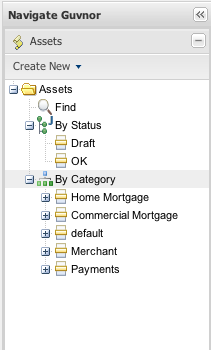
The above diagram shows categories in action. Generally under each category you should have no more then a few dozen rules, if possible.
The alternative and more technical view is to use the package explorer. This shows the rules (assets) closer to how they are actually stored in the database, and also separates rules into packages (name spaces) and their type (format, as rules can be in many different formats).
The above shows the alternate way of exploring - using packages.