- 16.1. Creating a package
- 16.2. Business rules with the guided editor
- 16.3. Templates of assets/rules
- 16.4. Guided decision tables (web based)
- 16.5. Spreadsheet decision tables
- 16.6. Scorecards
- 16.7. Test Scenario
- 16.8. Functions
- 16.9. DSL editor
- 16.10. Data enumerations (drop down list configurations)
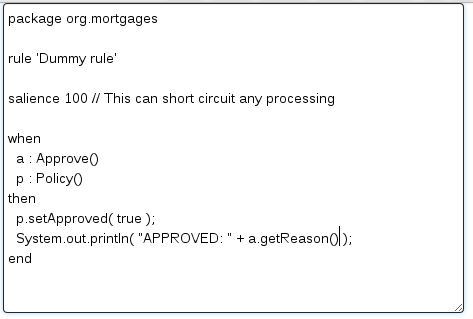
- 16.11. Technical rules (DRL)
Configuring packages is generally something that is done once, and by someone with some experience with rules/models. Generally speaking, very few people will need to configure packages, and once they are setup, they can be copied over and over if needed. Package configuration is most definitely a technical task that requires the appropriate expertise.
All assets live in "packages" in Drools Workbench - a package is like a folder (it also serves as a "namespace"). A home folder for rule assets to live in. Rules in particular need to know what the fact model is, what the namespace is etc.
So while rules (and assets in general) can appear in any number of categories, they only live in one package. If you think of Drools Workbench as a file system, then each package is a folder, and the assets live in that folder - as one big happy list of files.
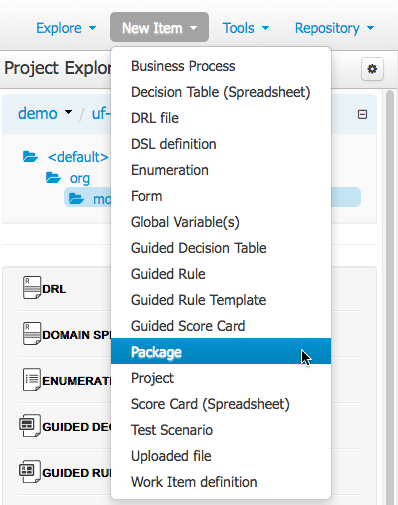
To create an empty package select "Package" from the "New item" menu.
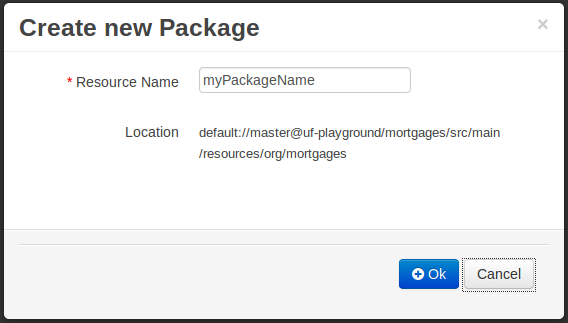
An empty package can be created by simply specifying a name.
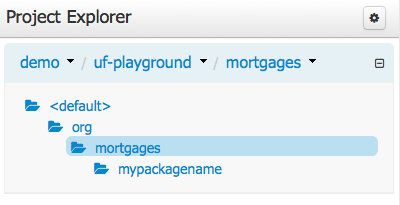
Once the Package has been created it will appear in the Project Explorer.
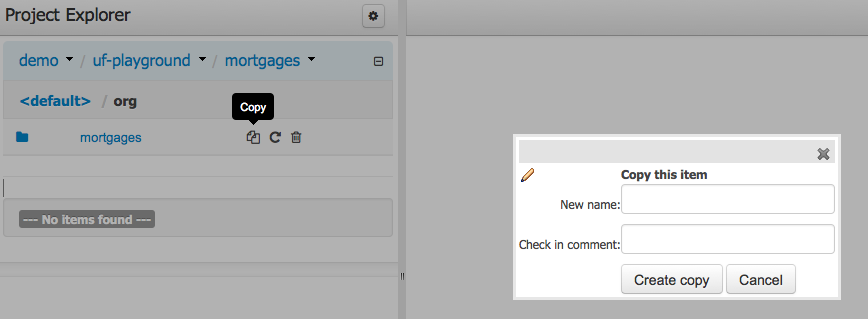
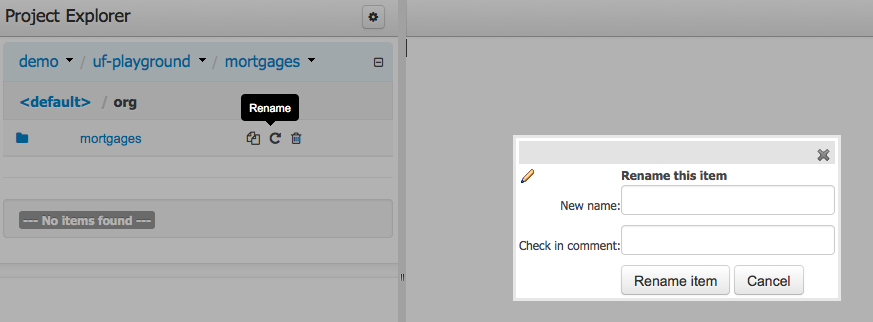
As already mentioned on Project Explorer section, users can copy, rename or delete a package directly from Project Explorer.
As you can see in the following screenshots, those operations behaves very similar to counter part actions in most workbench editors.

Guided Rules are authored with a UI to control and prompt user input based on knowledge of the object model.
This can also be augmented with DSL sentences.
The Guided Rule Editor is composed of three main sections.
The following diagram shows the editor in action. The following descriptions apply to the lettered boxes in the diagram:-
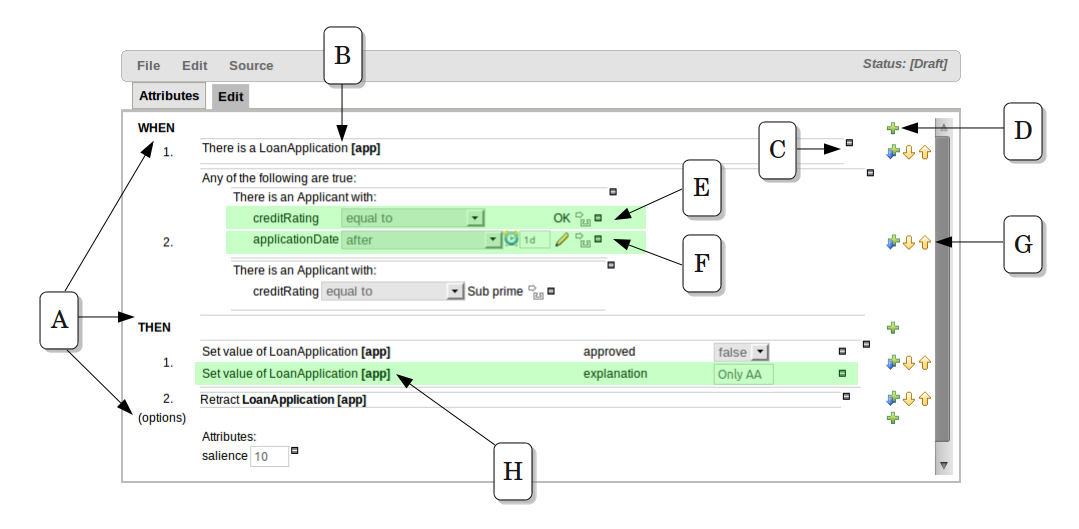
A : The different parts of a rule:-
The "WHEN" part, or conditions, of the rule.
The "THEN" action part of the rule.
Optional attributes that may effect the operation of the rule.
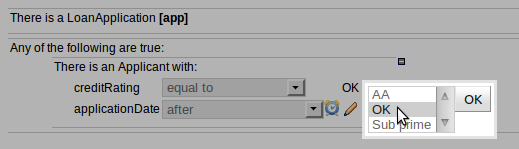
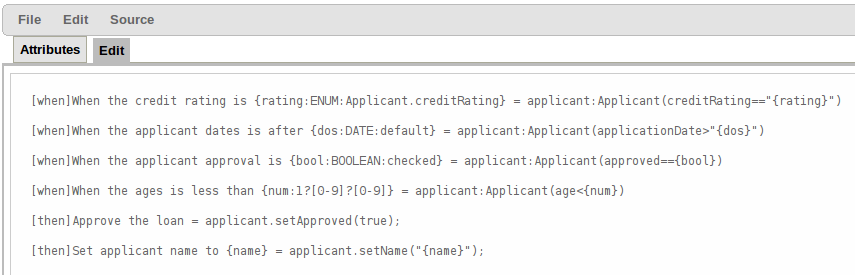
B : This shows a pattern which is declaring that the rule is looking for a "LoanApplication" fact (the fields are listed below, in this case none). Another pattern, "Applicant", is listed below "LoanApplication". Fields "creditRating" and "applicationDate" are listed. Clicking on the fact name ("LoanApplication") will pop-up a list of options to add to the fact declaration:-
Add more fields (e.g. their "location").
Assign a variable name to the fact (which you can use later on if needs be)
Add "multiple field" constraints - i.e. constraints that span across fields (e.g. age > 42 or risk > 2).
C : The "minus" icon ("[-]") indicates you can remove something. In this case it would remove the whole "LoanApplication" fact declaration. Depending upon the placement of the icon different components of the rule declaration can be removed, for example a Fact Pattern, Field Constraint, other Conditional Element ("exists", "not exists", "from" etc) or an Action.
D : The "plus" icon ("+") allows you to add more patterns to the condition or the action part of the rule, or more attributes. In all cases, a popup option box is provided. For the "WHEN" part of the rule, you can choose from a list of Conditional Elements to add:
A Constraint on a Fact: it will give you a list of facts.
"The following does not exist": the fact plus constraints must not exist.
"The following exists": at least one match should exist (but there only needs to be one - it will not trigger for each match).
"Any of the following are true": any of the patterns can match (you then add patterns to these higher level patterns).
"From": this will insert a new From Conditional Element to the rule.
"From Accumulate": this will insert a new Accumulate Conditional Element to the rule.
"From Collect": this will insert a new Collect Conditional Element to the rule.
"From Entry-point": this allows you to define an Entry Point for the pattern.
"Free Form DRL": this will let you insert a free chunk of DRL.
If you just put a fact (like is shown above) then all the patterns are combined together so they are all true ("and").
E : This shows the constraint for the "creditRating" field. Looking from left to right you find:-
The field name: "creditRating". Clicking on it you can assign a variable name to it, or access nested properties of it.
A list of constraint operations ("equal to" being selected): The content of this list changes depending on the field's data type.
The value field: It could be one of the following:-
A literal value: depending on the field's data type different components will be displayed:
String -> Textbox
Any numerical value -> Textbox restricting entry to values valid for the numerical sub-type (e.g. a byte can hold values from -128 to 127). BigDecimal and BigInteger data-types are also supported. Please ensure the appropriate Class has been imported in the Package configuration. The import will be added automatically if a POJO model has been uploaded that exposes an accessor or mutator for a BigDecimal or BigInteger field. BigDecimal values are automatically suffixed with "B" indicating to the underlying Engine that the literal value should be interpreted as a BigDecimal. BigIntegers are suffixed with "I". The user does not need to enter the suffix.
Date -> Calendar
Enumeration -> Listbox
Boolean -> Checkbox
A "formula": this is an expression which is calculated (this is for advanced users only)
An Expression - this will let you use an Expression Builder to build up a full mvel expression. (At the moment only basic expressions are supported)
F : This shows the constraint for the "applicationDate" field. Looking from left to right you find:
The field name: "applicationDate".
A list of constraint operations: "after" being selected.
A "clock" icon. Since the "applicationDate" is a Date data-type the list of available operators includes those relating to Complex Event Processing (CEP). When a CEP operator is used this additional icon is displayed to allow you to enter additional CEP operator parameters. Clicking the "clock" will cycle the available combinations of CEP operator parameters.
Note
Complex Event Processing operators are also available when the Fact has been declared as an event. Refer to the "Fact Model" chapter of this user-guide for details on how to add annotations to your Fact model. Events have access to the full range of CEP operators; Date field-types are restricted to "after", "before" and "coincides".
Note
Facts annotated as Events can also have CEP sliding windows defined.
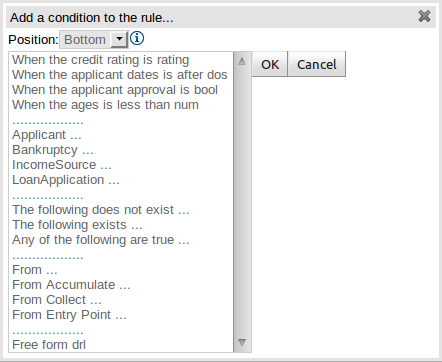
When clicking on the + button of the WHEN section, a new popup will appear letting you to add a new Pattern to the Rule. The popup will looks similar to the image below. In this popup you could select the type of Pattern to add by selecting one of the list items. In the list you will have an entry for each defined Fact Type, in addition to the already mentioned Conditional Elements like "exists", "doesn't exist", "from", "collect", "accumulate", "from entry-point" and "free form DRL". Once you have selected one of this elements, you can add a new Pattern by clicking on the "Ok" button. The new pattern will be added at the bottom of the rule's left hand side. If you want to choose a different position, you can use the combobox placed at the top of the popup.
You can also open this popup by clicking in the [+] button from a Pattern's action toolbar. If that is the case, the pop-up that appears wouldn't constraint the position combobox, because the new Pattern will be added just after the Pattern where you clicked.
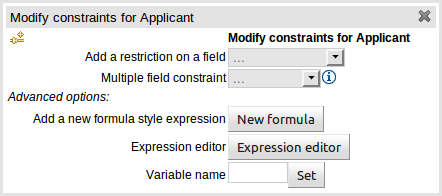
The below dialog is what you will get when you want to add constraints to a fact. In the top half are the simple options: you can either add a field constraint straight away (a list of fields of the applicable fact will be shown), or you can add a "Multiple field constraint" using AND or OR operands. In the bottom half of the window you have the Advanced options: you can add a formula (which resolves to True or False - this is like in the example above: "... salary > (2500 * 4.1)". You can also assign a Variable name to the fact (which means you can then access that variable on the action part of the rule, to set a value etc).
H : This shows an "action" of the rule, the Right Hand Side of a rule consists in a list of actions. In this case, we are updating the "explanation" field of the "LoanApplication" fact. There are quite a few other types of actions you can use:-
Insert a completely new Fact and optionally set a field on the Fact.
The value field can be one of the following:-
A literal value: depending on the field's data type different components will be displayed:
String -> Textbox
Any numerical value -> Textbox restricting entry to values valid for the numerical sub-type (e.g. a byte can hold values from -128 to 127). BigDecimal and BigInteger data-types are also supported. Please ensure the appropriate Class has been imported in the Package configuration. The import will be added automatically if a POJO model has been uploaded that exposes an accessor or mutator for a BigDecimal or BigInteger field. BigDecimal values are automatically suffixed with "B" indicating to the underlying Engine that the literal value should be interpreted as a BigDecimal. BigIntegers are suffixed with "I". The user does not need to enter the suffix.
Date -> Calendar
Enumeration -> Listbox
Boolean -> Checkbox
A variable bound to a Fact or Field in the left-hand side. The data-type of the field being set must match the data-type of the variable.
A "formula": this is an expression which is calculated (this is for advanced users only)
Logically insert a completely new Fact (see "Truth Maintenance" in the Expert documentation) and optionally set a field on the Fact.
A literal value: depending on the field's data type different components will be displayed:
The value field can be one of the following:-
A literal value: depending on the field's data type different components will be displayed:
String -> Textbox
Any numerical value -> Textbox restricting entry to values valid for the numerical sub-type (e.g. a byte can hold values from -128 to 127). BigDecimal and BigInteger data-types are also supported. Please ensure the appropriate Class has been imported in the Package configuration. The import will be added automatically if a POJO model has been uploaded that exposes an accessor or mutator for a BigDecimal or BigInteger field. BigDecimal values are automatically suffixed with "B" indicating to the underlying Engine that the literal value should be interpreted as a BigDecimal. BigIntegers are suffixed with "I". The user does not need to enter the suffix.
Date -> Calendar
Enumeration -> Listbox
Boolean -> Checkbox
A variable bound to a Fact or Field in the left-hand side. The data-type of the field being set must match the data-type of the variable.
A "formula": this is an expression which is calculated (this is for advanced users only)
A variable bound to a Fact or Field in the left-hand side. The data-type of the field being set must match the data-type of the variable.
A "formula": this is an expression which is calculated (this is for advanced users only)
Modify a field of an existing fact (which tells the engine the fact has changed).
The value field can be one of the following:-
A literal value: depending on the field's data type different components will be displayed:
String -> Textbox
Any numerical value -> Textbox restricting entry to values valid for the numerical sub-type (e.g. a byte can hold values from -128 to 127). BigDecimal and BigInteger data-types are also supported. Please ensure the appropriate Class has been imported in the Package configuration. The import will be added automatically if a POJO model has been uploaded that exposes an accessor or mutator for a BigDecimal or BigInteger field. BigDecimal values are automatically suffixed with "B" indicating to the underlying Engine that the literal value should be interpreted as a BigDecimal. BigIntegers are suffixed with "I". The user does not need to enter the suffix.
Date -> Calendar
Enumeration -> Listbox
Boolean -> Checkbox
A variable bound to a Fact or Field in the left-hand side. The data-type of the field being set must match the data-type of the variable.
A "formula": this is an expression which is calculated (this is for advanced users only)
Set a field on a fact (in which case the engine doesn't know about the change - normally because you are setting a result).
The value field can be one of the following:-
A literal value: depending on the field's data type different components will be displayed:
String -> Textbox
Any numerical value -> Textbox restricting entry to values valid for the numerical sub-type (e.g. a byte can hold values from -128 to 127). BigDecimal and BigInteger data-types are also supported. Please ensure the appropriate Class has been imported in the Package configuration. The import will be added automatically if a POJO model has been uploaded that exposes an accessor or mutator for a BigDecimal or BigInteger field. BigDecimal values are automatically suffixed with "B" indicating to the underlying Engine that the literal value should be interpreted as a BigDecimal. BigIntegers are suffixed with "I". The user does not need to enter the suffix.
Date -> Calendar
Enumeration -> Listbox
Boolean -> Checkbox
A variable bound to a Fact or Field in the left-hand side. The data-type of the field being set must match the data-type of the variable.
A "formula": this is an expression which is calculated (this is for advanced users only)
Delete a fact from the Engine's Working Memory.
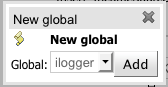
Add Facts to existing global lists.
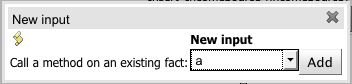
Call a method on a variable.
Write a chunk of free form code.
The attributes section of a rule provides the means to define metadata and attributes (such as "salience", "no-loop" etc).
Click on the "+" icon to add a new metadata or attribute definition. Each defined will appear listed in this section.
Click on the "-" icon beside each metadata or attribute to remove it.
G : Next to each Pattern or Action you will find a toolbar containing 3 buttons.
The first "+" icon lets you insert a new Pattern/Action at an arbitrary location. The other "+" icons allow you to insert a new Pattern/Action below that you have selected.
The remaining arrow icons allow you to move the current Pattern/Action up or down.
Note that is it possible to limit field values to items in a pre-configured list. This list is either defined by a Java enumeration or configured as part of the package (using a data enumeration to provide values for the drop down list). These values can be a fixed list, or (for example) loaded from a database. This is useful for codes, and other fields where there are set values. It is also possible to have what is displayed on screen, in a drop down, be different to the value (or code) used in a rule. See the section on data enumerations for how these are configured.
It is possible to define a list of values for one field that are dependent upon the value of one or more other fields, on the same Fact (e.g. a list of "Cities" depending on the selected "Country region"). Please refer to the section on "Enumerations" for more information.
If the package the rule is part of has a DSL configuration, when when you add conditions or actions, then it will provide a list of "DSL Sentences" which you can choose from - when you choose one, it will add a row to the rule - where the DSL specifies values come from a user, then a edit box (text) will be shown (so it ends up looking a bit like a form). This is optional, and there is another DSL editor. Please note that the DSL capabilities in this editor are slightly less then the full set of DSL features (basically you can do [when] and [then] sections of the DSL only - which is no different to drools 3 in effect).
The following diagram shows the DSL sentences in action in the guided editor:

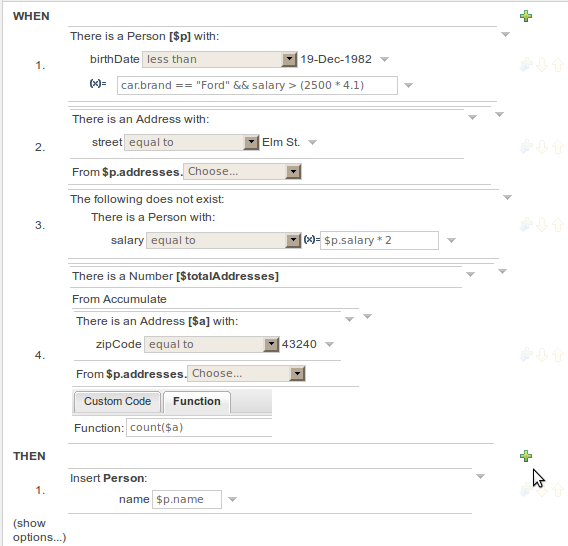
In the above example, you can see how to use a mixture of Conditional Elements, literal values, and formulas. The rule has 4 "top level" Patterns and 1 Action. The "top level" Patterns are:
A Fact Pattern on Person. This Pattern contains two field constraints: one for birthDate field and the other one is a formula. Note that the value of the birthDate restriction is selected from a calendar. Another thing to note is that you can make calculations and use nested fields in the formula restriction (i.e. car.brand). Finally, we are setting a variable name ($p) to the Person Fact Type. You can then use this variable in other Patterns.
Note
The generated DRL from this Pattern will be:
$p : Person( birthDate < "19-Dec-1982" , eval( car.brand == "Ford" && salary > (2500 * 4.1) ))
A From Pattern. This condition will create a match for every Address whose street name is "Elm St." from the Person's list of addresses. The left side of the from is a regular Fact Pattern and the right side is an Expression Builder that let us inspect variable's fields.
Note
The generated DRL from this Pattern will be:
Address( street == "Elm St." ) from
          $p.addresses
A "Not Exist" Conditional Element. This condition will match when its content doesn't create a match. In this case, its content is a regular Fact Pattern (on Person). In this Fact Pattern you can see how variables ($p) could be used inside a formula value.
Note
The generated DRL from this Pattern will be:
not Person( salary == ( $p.salary * 2 )
          )
A "From Accumulate" Conditional Element. This is maybe one of the most complex Patterns you can use. It consist in a Left Pattern (It must be a Fact Pattern. In this case is a Number Pattern. The Number is named $totalAddresses), a Source Pattern (Which could be a Fact Pattern, From, Collect or Accumulate conditional elements. In this case is an Address Pattern Restriction with a field restriction in its zip field) and a Formula Section where you can use any built-in or custom Accumulate Function (in this example a count() function is used). Basically, this Conditional Element will count the addresses having a zip code of 43240 from the Person's list of addresses.
Note
The generated DRL from this Pattern will be:
$totalAddresses : Number() from accumulate ($a :
          Address( zipCode == " 43240") from $p.addresses, count($a))
The guided rule editor is great when you need to define a single rule, however if you need to define multiple rules following the same structure but with different values in field constraints or action sections a "Rule Template" is a valuable asset. Rule templates allow the user to define a rule structure with place-holders for values that are to be interpolated from a table of data. Literal values, formulae and expressions can also continue to be used.
Rule Templates can often be used as an alternative for Decision Tables in Drools Workbench.
To create a template for a rule simply select the "Guided Rule Template" from the "New Item" menu.
Once a rule template has been created the editor is displayed. The editor takes the form of the standard guided editor explained in more detail under the "Rule Authoring" section. As the rule is constructed you are given the ability to insert "Template Keys" as place-holders within your field constraints and action sections. Literal values, formulae and expressions can continue to be used as in the standard guided editor.

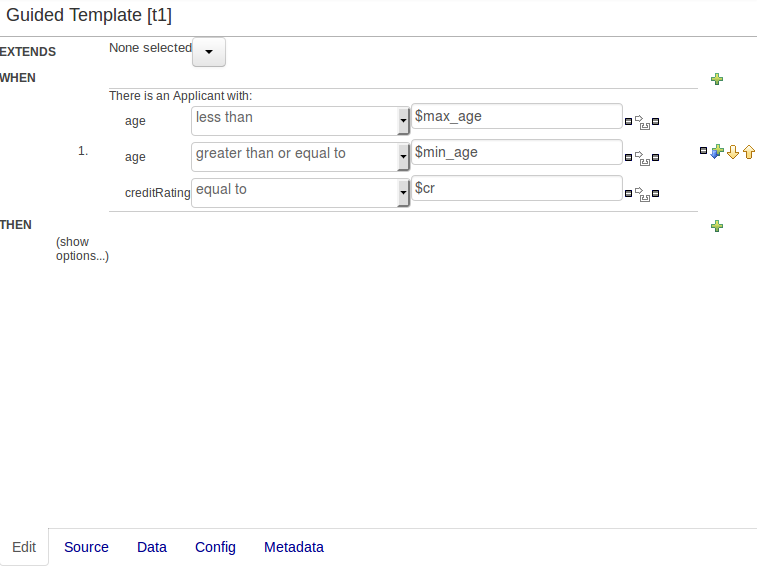
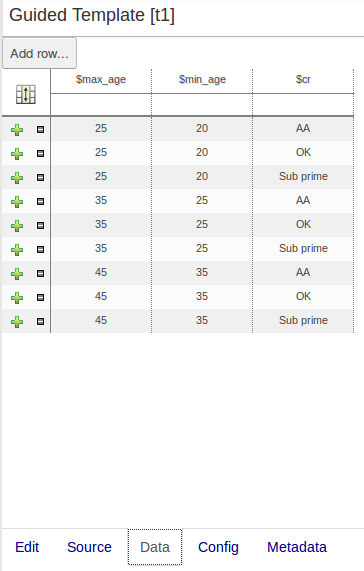
The following screenshot illustrates a simple rule that has been defined with a "Template Key" for the applicants' maximum age, minimum age and credit rating. The template keys have been defined as "$max_age", "$min_age" and "$cr" respectively.
When you have completed the definition of your rule template you need to enter the data that will be used to interpolate the "Template Key" place-holders. Drools Workbench provides the facility to enter data in a flexible grid within the guided editor screen. The data entry section is located on the Data tab within the editor.
The rule template data grid is very flexible; with different pop-up editors for the underlying fields' data-types. Columns can be resized and sorted; and cells can be merged and grouped to facilitate rapid data entry.
One row of data interpolates the "Template Key" place-holders for a single rule; thus one row becomes one rule.
Note
If any cells for a row are left blank a rule for the applicable row is not generated.
The icon in the top left of the grid toggles cell merging on and off. When cells are merged those in the same column with identical values are merged into a single cell. This simplifies changing the value of multiple cells that shared the same original value. When cells are merged they also gain an icon in the top-left of the cell that allows rows spanning the merged cell to be grouped.
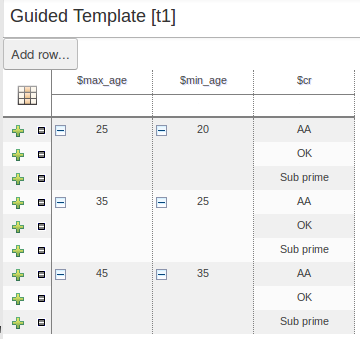
Cells that have been merged can be further collapsed into a single row. Clicking the [+\-] icon in the top left of a merged cell collapses the corresponding rows into a single entry. Cells in other columns spanning the collapsed rows that have identical values are shown unchanged. Cells in other columns spanning the collapsed rows that have different values are highlighted and the first value displayed.
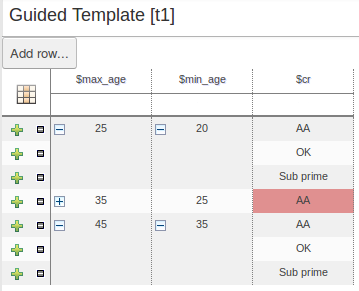
When the value of a grouped cell is altered all cells that have been collapsed also have their values updated.
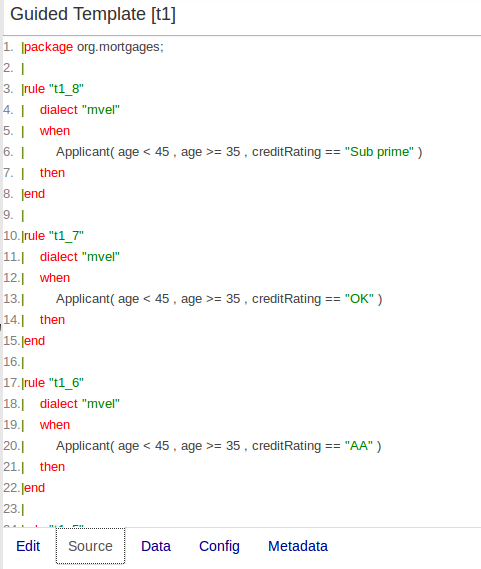
Whilst not necessary, rule authors can view the DRL that will be generated for a "Rule Template" and associated data. This feature and its operation is no different to that for other assets. Select the "Source" tab from the bottom of the editor screen. The DRL for all rules will be displayed.
The guided decision table feature allows decision tables to be edited in place on the web. This works similar to the guided editor by introspecting what facts and fields are available to guide the creation of a decision table. Rule attributes, meta-data, conditions and actions can be defined in a tabular format thus facilitating rapid entry of large sets of related rules. Web-based decision table rules are compiled into DRL like all other rule assets.
There are broadly two different types of decision table, both of which are supported in Drools Workbench:-
Extended Entry
Limited Entry
An Extended Entry decision table is one for which the column definitions, or stubs, specify Pattern, Field and operator but not value. The values, or states, are themselves held in the body of the decision table. It is normal, but not essential, for the range of possible values to be restricted by limiting entry to values from a list. Drools Workbench supports use of Java enumerations, Drools Workbench enumerations or decision table "optional value lists" to restrict value entry.
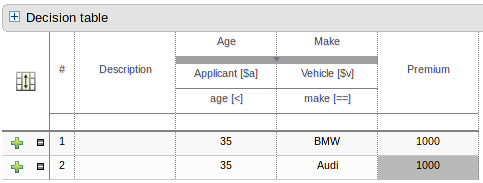
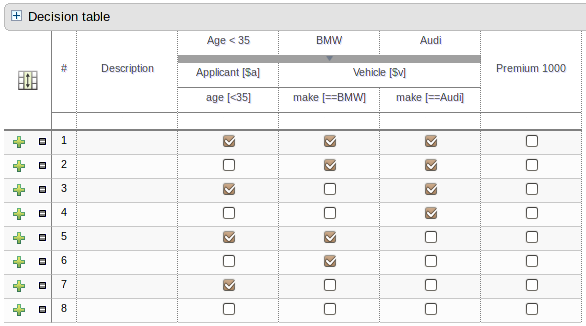
A Limited Entry decision table is one for which the column definitions specify value in addition to Pattern, Field and operator. The decision table states, held in the body of the table, are boolean where a positive value (a checked tick-box) has the effect of meaning the column should apply, or be matched. A negative value (a cleared tick-box) means the column does not apply.
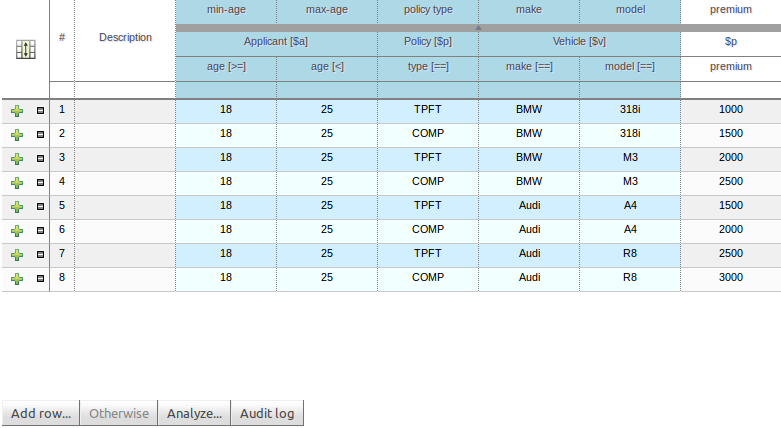
The guided decision table is split into two main sections:-
The upper section allows table columns to be defined representing rule attributes, meta-data, conditions and actions.
The lower section contains the actual table itself; where individual rows define separate rules.
Cells can be selected in a variety of ways:-
Firstly individual cells can be double-clicked and a pop-up editor corresponding to the underlying data-type will appear. Groups of cells in the same column can be selected by either clicking in the first and dragging the mouse pointer or clicking in the first and clicking the extent of the required range with the shift key pressed.
Secondly the keyboard cursor keys can be used to navigate around the table. Pressing the enter key will pop-up the corresponding editor. Ranges can be selected by pressing the shift key whilst extending the range with the cursor keys.
Columns can be resized by hovering over the corresponding divider in the table header. The mouse cursor will change and then the column width dragged either narrower or wider.
The icon in the top left of the decision table toggles cell merging on and off. When cells are merged those in the same column with identical values are merged into a single cell. This simplifies changing the value of multiple cells that shared the same original value. When cells are merged they also gain an icon in the top-left of the cell that allows rows spanning the merged cell to be grouped.
Cells that have been merged can be further collapsed into a single row. Clicking the [+\-] icon in the top left of a merged cell collapses the corresponding rows into a single entry. Cells in other columns spanning the collapsed rows that have identical values are shown unchanged. Cells in other columns spanning the collapsed rows that have different values are highlighted and the first value displayed.
When the value of a grouped cell is altered all cells that have been collapsed also have their values updated.
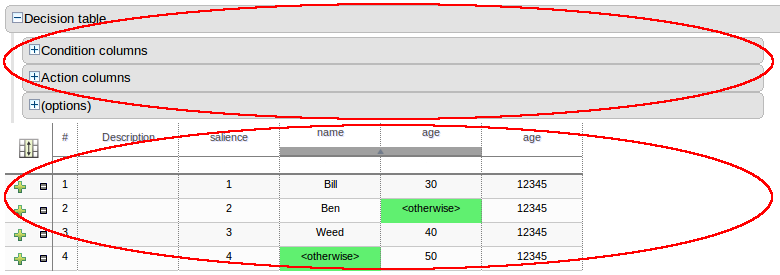
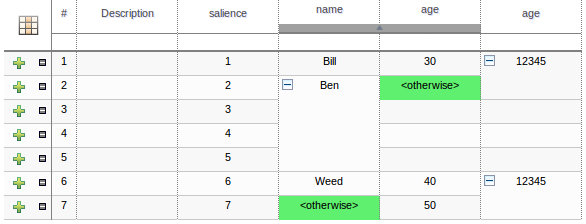
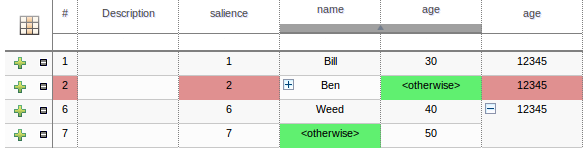
Condition columns defined with literal values that use either the equality (==) or inequality (!=) operators can take advantage of a special decision table cell value of "otherwise". This special value allows a rule to be defined that matches on all values not explicitly defined in all other rules defined in the table. This is best illustrated with an example:-
when
  Cheese( name not in ("Cheddar", "Edam", "Brie") )
  ...
then
  ...
end
when
Cheese( name in ("Cheddar", "Edam", "Brie") )
...
then
...
endWhole patterns and individual conditions can be re-arranged by dragging and dropping them in the configuration section of the screen. This allows constraints to be re-ordered to maximise performance of the resulting rules, by placing generalised constraints before more specific. Action columns can also be re-arranged by dragging and dropping them.
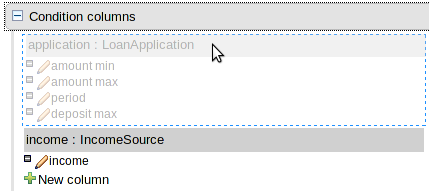

When a new empty decision table has been created you need to define columns for Facts, their constraints and corresponding actions.
Expand the "Decision table" element and you will see three further sections for "Conditions", "Actions" and "Options". Expanding either the "Conditions" or "Actions" sections reveals the "New column" icon. This can be used to add new column definitions to the corresponding section. Existing columns can be removed by clicking the "-" icon beside each column name, or edited by clicking the "pencil" icon also beside each column name. The "Options" section functions slightly differently however the principle is the same: clicking the "Add Attribute/Metadata" icon allows columns for table attributes to be defined (such as "salience", "no-loop" etc) or metadata added.
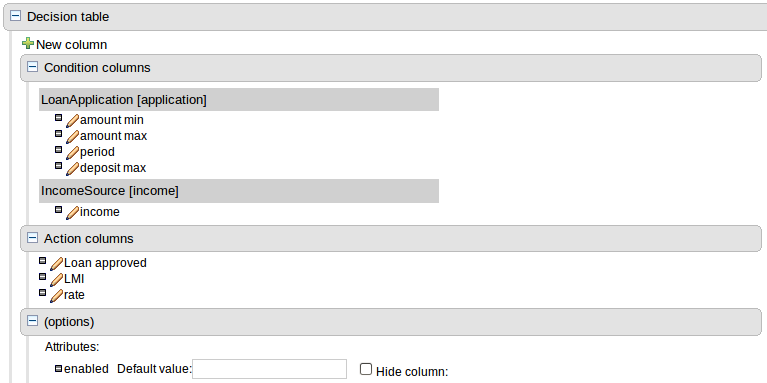
All decision table contain two utility columns containing rule number and rule description.
To add a column click on the "New column" icon.
You are presented with the following column type selection popup.
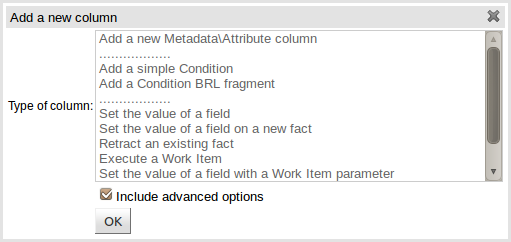
By default the column type popup only shows the following simple types:-
Add a new Metadata\Attribute column
Add a simple Condition
Set the value of a field
Set the value of a field on a new fact
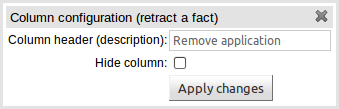
Delete an existing fact
Clicking on "Include advanced options" adds the following additional "advanced" column types for more advanced use cases:-
Add a Condition BRL fragment
Execute a Work Item
Set the value of a field with a Work Item parameter
Set the value of a field on a new Fact with a Work Item parameter
Add an Action BRL fragment
Zero or more meta-data columns can be defined, each represents the normal meta-data annotation on DRL rules.
Zero or more attribute columns representing any of the DRL rule attributes (e.g. salience, timer, enabled etc) can be added. An additional pseudo attribute is provide in the guided decision table editor to "negate" a rule. Use of this attribute allows complete rules to be negated. For example the following simple rule can be negated as also shown.
when
  $c : Cheese( name == "Cheddar" )
then
  ...
end
when
  not Cheese( name == "Cheddar" )
then
  ...
end
Conditions represent constraints on Fact Patterns defined in the left-hand side, or "when" portion, of a rule. To define a condition column you must first select or define a Fact Pattern bound to a model class. You can choose to negate the pattern. Once this has been completed you can define field constraints. If two or more columns are defined using the same fact pattern binding the field constraints become composite field constraints on the same pattern. If you define multiple bindings for a single model class each binding becomes a separate model class in the left-hand side of the rule.
When you edit or create a new column, you will be given a choice of the type of constraint:-
Literal : The value in the cell will be compared with the field using the operator.
Formula: The expression in the cell will be evaluated and then compared with the field.
Predicate : No field is needed, the expression will be evaluated to true or false.
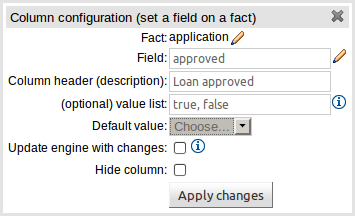
An Action to set the value of a field on previously bound fact. You have the option to notify the Rule Engine of the modified values which could lead to other rules being re-activated.
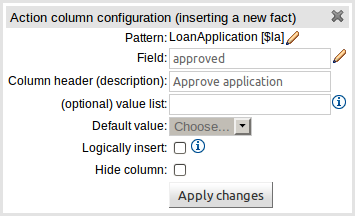
An Action to insert a new Fact into the Rule Engine Working Memory and set the a value of one of the new Facts' fields. You can choose to have the new Fact "logically inserted" meaning it will be automatically deleted should the conditions leading to the action being invoked cease to be true. Please refer to the Drools Expert documentation for details on Truth Maintenance and Logical insertions.
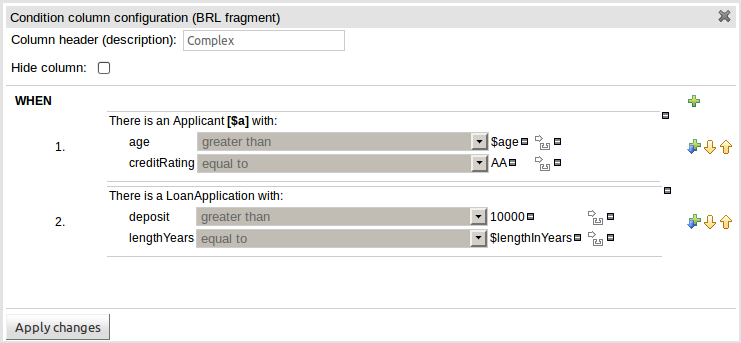
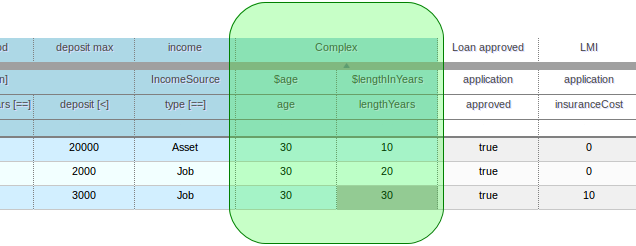
A construct that allows a BRL fragment to be used in the left-hand side of a rule. A BRL fragment is authored using the Guided Rule Editor and hence all features available in that editor can be used to define a decision table column; such as "from", "collect" and "accumulate" etc. When using the embedded Guided Rule Editor field values defined as "Template Keys" will form columns in the decision table. Facts and Fact's fields bound in the BRL fragment can be referenced by the simpler column types and vice-versa.
In the following example two Template Keys have been defined and hence two columns appear in the decision table.
An Action invoking a jBPM Work Item Handler setting its input parameters to bound Facts\Facts fields values.
An Action setting the value of a Fact's field to that of a jBPM Work Item Handler's result parameter.
An Action setting the value of a new Fact's field to that of a jBPM Work Item Handler's result parameter.
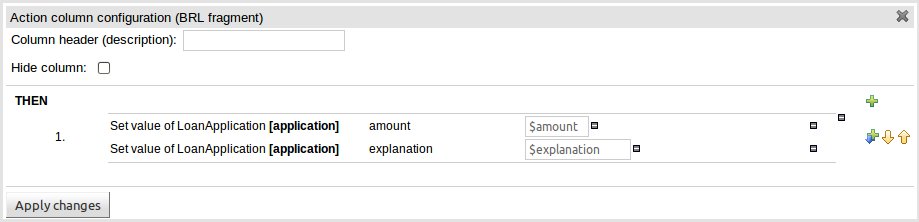
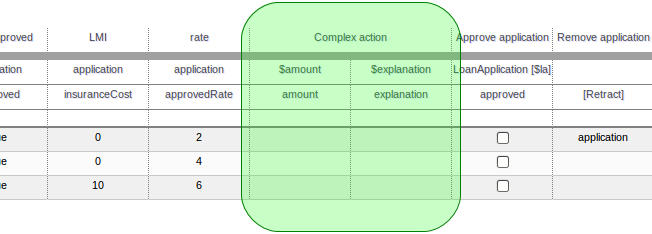
A construct that allows a BRL fragment to be used in the right-hand side of a rule. A BRL fragment is authored using the Guided Rule Editor and hence all features available in that editor can be used to define a decision table column. When using the embedded Guided Rule Editor field values defined as "Template Keys" will form columns in the decision table. Facts bound in the BRL fragment can be referenced by the simpler column types and vice-versa.
In the following example two Template Keys have been defined and hence two columns appear in the decision table.
A Wizard can also be used to assist with defining the decision table columns.
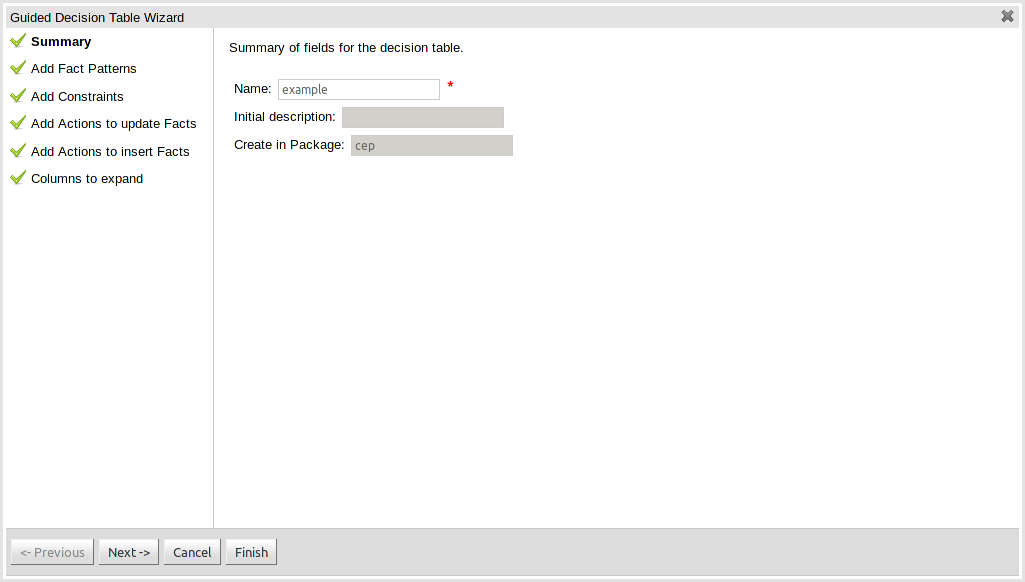
The wizard can be chosen when first electing to create a new rule. The wizard provides a number of pages to define the table:-
Summary
Add Fact Patterns
Add Constraints
Add Actions to update facts
Add Actions to insert facts
Columns to expand
The "New Wizard" dialog shows a "Use wizard" checkbox.
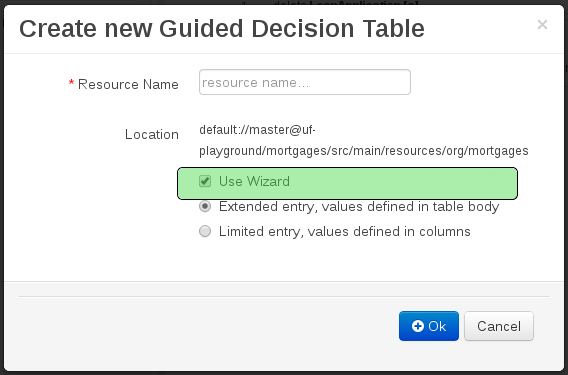
The summary page shows a few basic details about the decision table and allows the asset name to be changed.
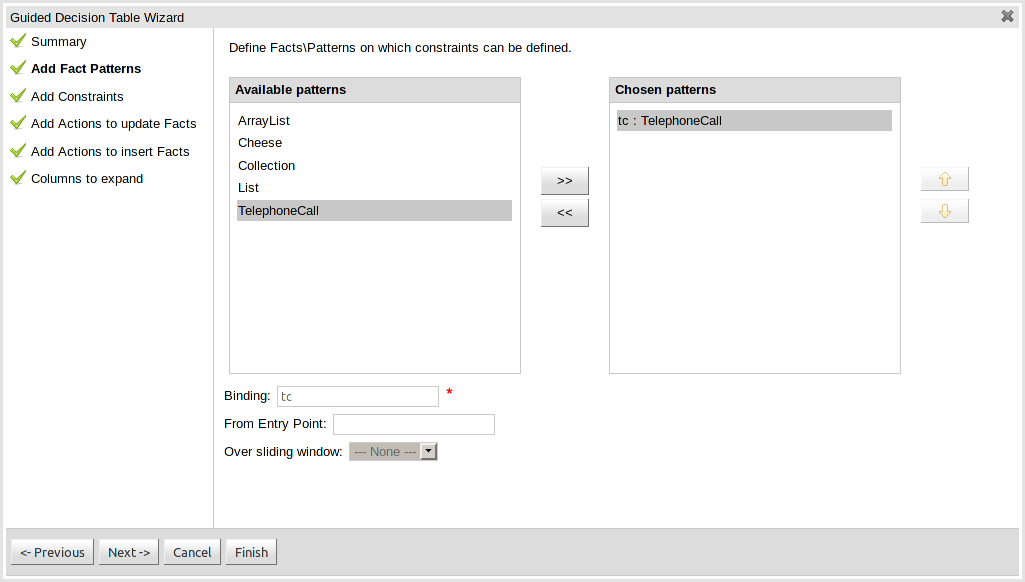
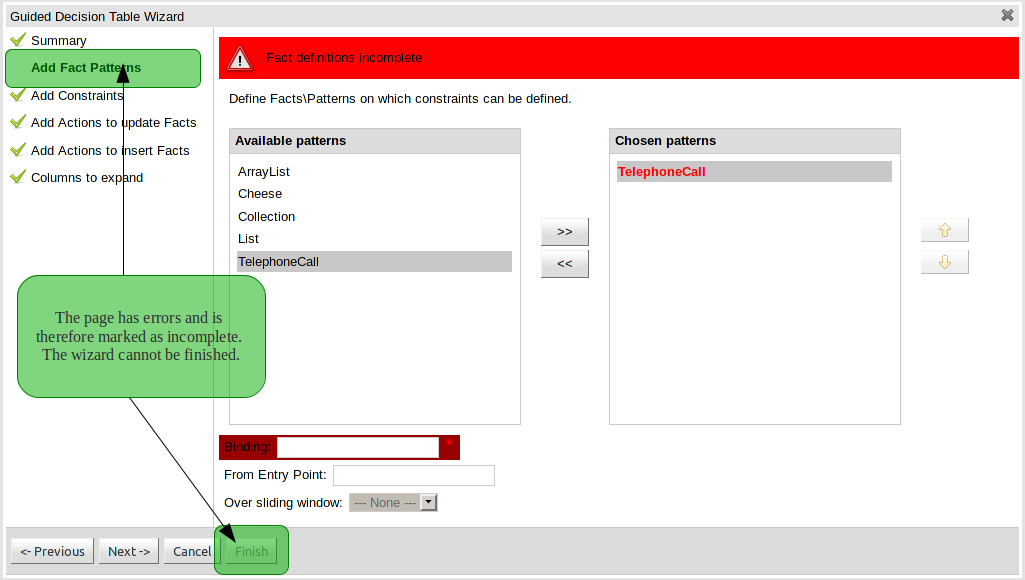
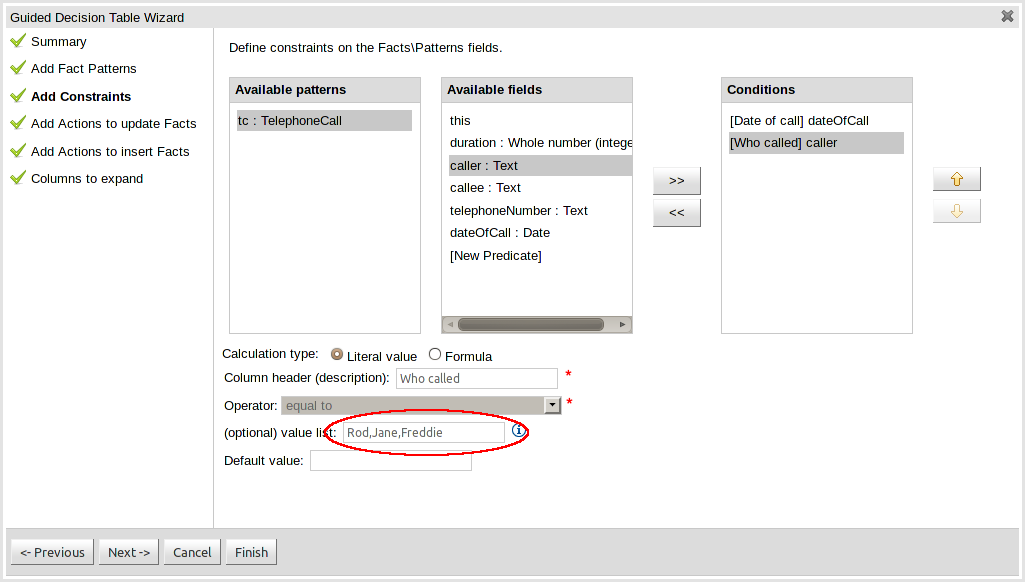
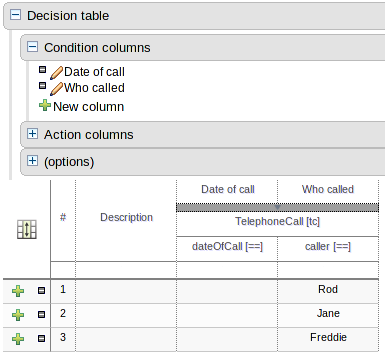
This page allows Fact types to be defined that will form the "When" columns of the rules. Fact types that are available in your model will be shown in the left-hand listbox. Select a Fact type and use the ">>" button to add it to your list of chosen facts on the right-hand listbox. Removal is a similar process: the Fact that is no longer required can be selected in the right-hand listbox and the "<<" button used to remove it. All Fact types need to be bound to a variable. Incomplete Fact types will be highlighted and a warning message displayed. You will be unable to finish your definition until all warnings have been resolved.
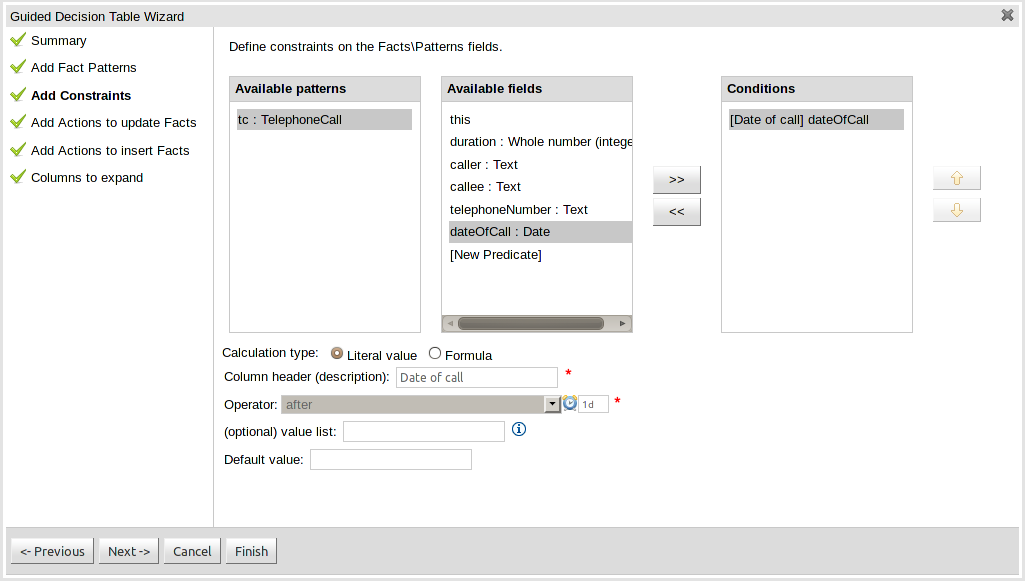
This page allows field constraints on the Fact types you have chosen to use in the decision table to be defined. Fact types chosen on the previous Wizard page are listed in the right-hand listbox. Selecting a Fact type by clicking on it will result in a list of available fields being shown in the middle listbox together with an option to create a predicate that do not require a specific field. Fields can be added to the pattern's constraints by clicking on the field and then the ">>" button. Fields can be removed from the pattern definition by clicking on the Condition in the right-hand listbox and then the "<<" button. All fields need to have a column header and operator. Incomplete fields will be highlighted and a warning message displayed. You will be unable to finish your definition until all warnings have been resolved.
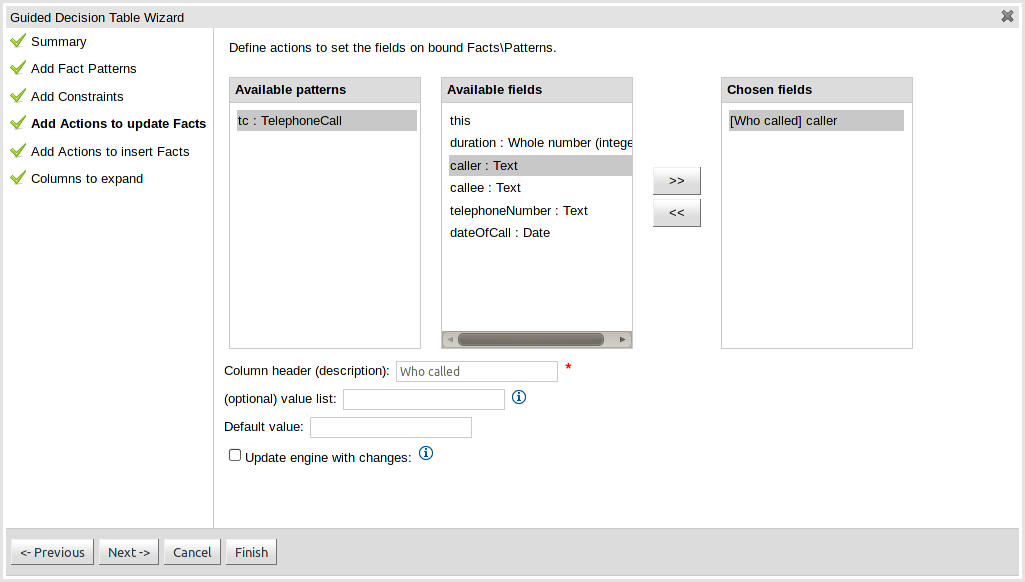
Fact types that have been defined can be updated in the consequence, or action, part of a rule. This page allows such actions to be defined. Fact types added to the decision table definition are listed in the left-hand listbox. Selecting a Fact type by clicking on it will result in a list of available fields being shown in the middle listbox. Fields that need to be updated by the rule can be added by selecting an available field and pressing the ">>" button. Fields can be removed similarly by clicking on a chosen field and then the "<<" button. All actions require a column header. Any incomplete actions will be highlighted and a warning message displayed. You will be unable to finish your definition until all warnings have been resolved.
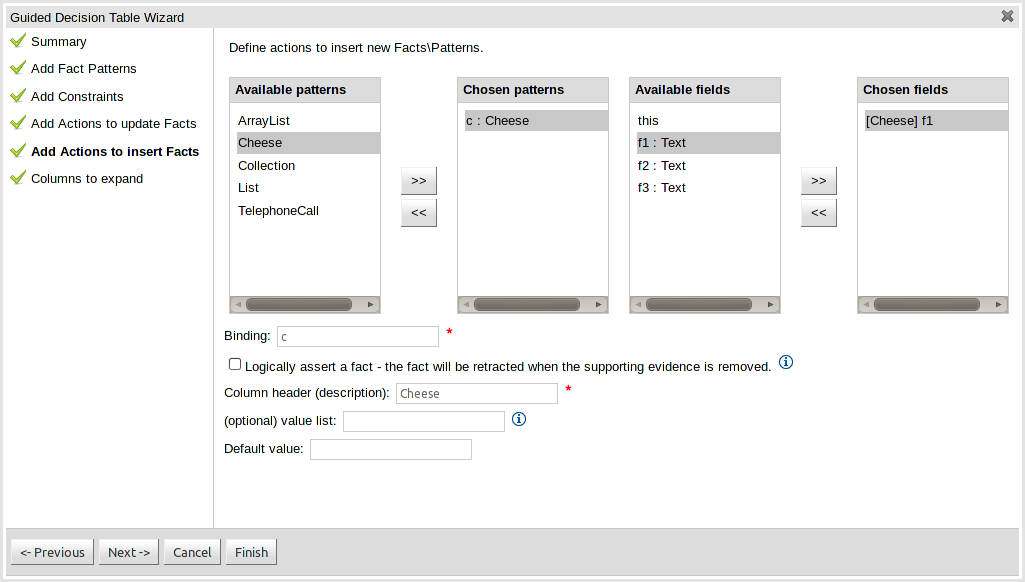
Actions can also be defined to insert new Facts into the Rule Engine. A list of Fact types available in your model are listed in the left-hand listbox. Select those you wish to include in your decision table definition by clicking on them and pressing the ">>" button between the left most listbox and that titled "Chosen patterns". Removal is a similar process whereby a chosen pattern can be selected and removed by pressing the "<<" button. Selection of a chosen pattern presents the user with a list of available fields. Fields that need to have values set by the action can be added by selecting them and pressing the ">>" button between the "Available fields" and "Chosen fields" listbox. Removal is a similar process as already described. New Facts need to be bound to a variable and have a column heading specified. Incomplete Facts and\or fields will be highlighted and a warning message displayed. You will be unable to finish your definition until all warnings have been resolved.
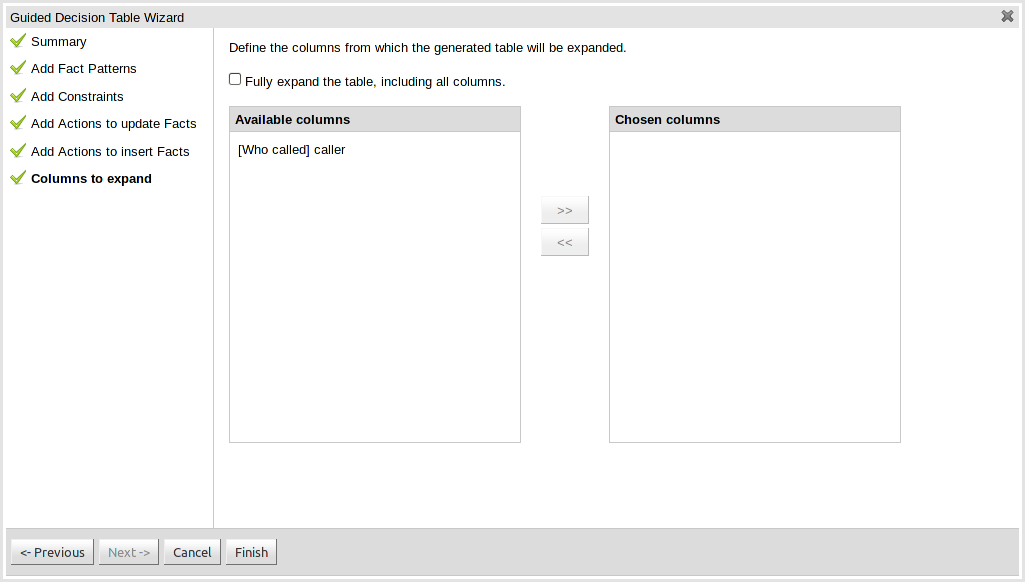
This page controls how the decision table, based upon Conditions defined on the prior pages, will be created. Condition columns defined with an optional list of permitted values can be used to create rows in the decision table. Where a number of Condition columns have been defined with lists of permitted values the resulting table will contain a row for every combination of values; i.e. the decision table will be in expanded form. By default all Condition columns defined with value lists will be included in the expansion however you are able to select a sub-set of columns if so required. This can be accomplished by unticking the "Fully expand" checkbox and adding columns to the right-hand listbox. If no expansion is required untick the "Fully expand" checkbox and ensure zero columns are added to the right-hand listbox.
This section allows individual rules to be defined using the columns defined earlier.
Rows can be appended to the end of the table by selecting the "Add Row" button. Rows can also be inserted by clicking the "+" icon beside an existing row. The "-" icon can be used to delete rows.
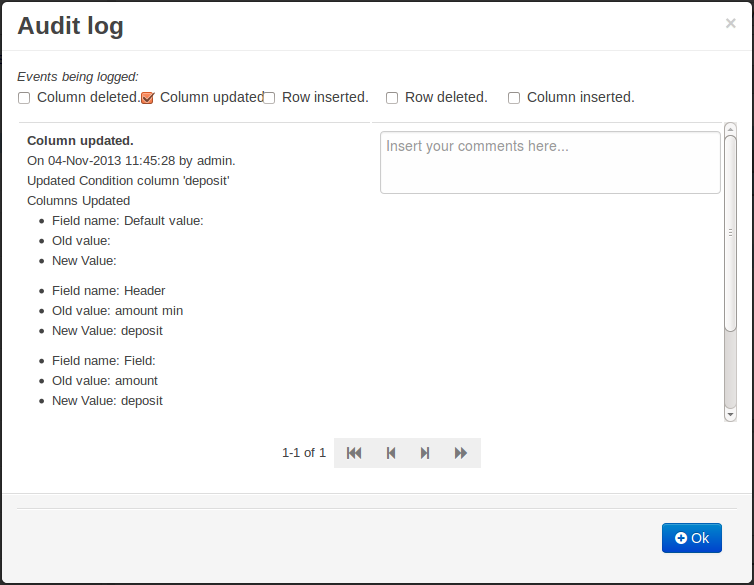
An audit log has been added to the web-guided Decision Table editor to track additions, deletions and modifications.
By default the audit log is not configured to record any events, however, users can easily select the events in which they are interested.
The audit log is persisted whenever the asset is checked in.
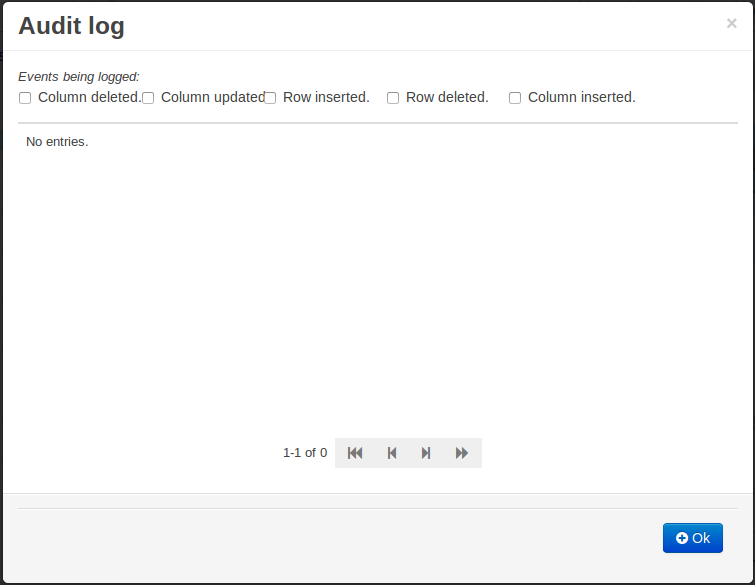
Once the capture of events has been enabled all susbsequent operations are recorded. Users are able to perform the following:-
Record an explanatory note beside each event.
Delete an event from the log. Event details remain in the underlying repository.
Multiple rules can be stored in a spreadsheet. Each row in the spreadsheet is a rule, and each column is either a condition, an action, or an option. The Drools Expert section of this document discusses spreadsheet decision tables in more detail.
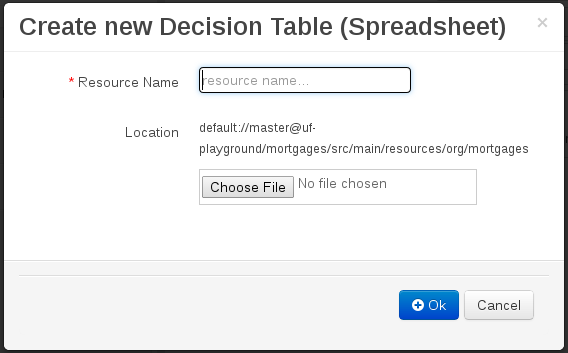
To use a spreadsheet, you upload an XLS file. To create a new decision table: launch the new "Decision Table (Spreadsheet)" wizard, you will get an option to upload one.
A scorecard is a graphical representation of a formula used to calculate an overall score. A scorecard can be used to predict the likelihood or probability of a certain outcome. Drools now supports additive scorecards. An additive scorecard calculates an overall score by adding all partial scores assigned to individual rule conditions.
Additionally, Drools Scorecards will allows for reason codes to be set, which help in identifying the specific rules (buckets) that have contributed to the overall score. Drools Scorecards will be based on the PMML 4.1 Standard.
The New Item menu now allows for creation of scorecard assets.
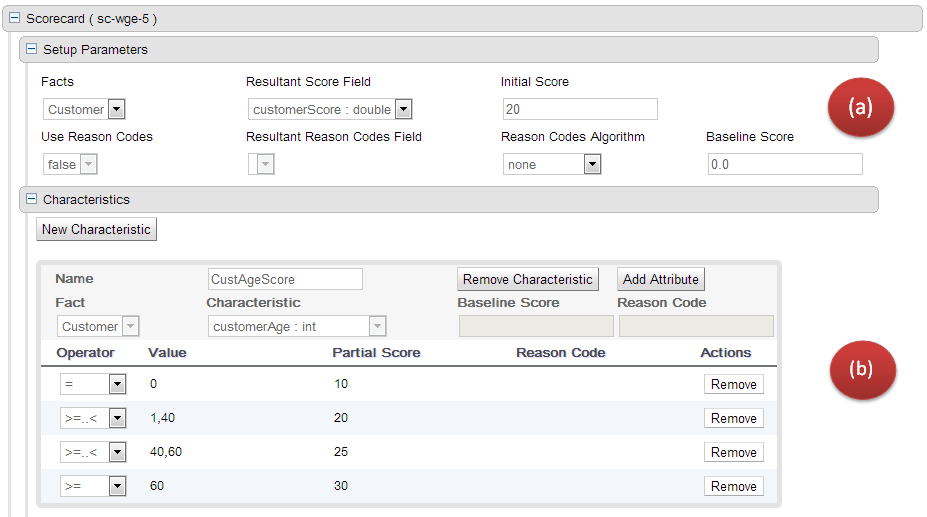
The above image shows a scorecard with one characteristic. Each scorecard consists of two sections (a) Setup Parameters (b) Characteristic Section
The setup section consits of parameters that define the overall behaviour of this scorecard.
Facts: This dropdown shows a list of facts that are visible for this asset.
Resultant Score Field: Shows a list of fields from the selected fact. Only fields of type 'double' are shown. If this dropdown is empty double check your fact model. The final calculated score will be stored in this field.
Initial Score: Numeric Text Field to capture the initial score. The generated rules will initialize the 'Resultant Score Field' with this score and then is added to the overall score whenever partial scores are summed up.
Use Reason Codes: Boolean indicator to compute reason codes along with the final score. Selecting Yes/No in this field will enable/disable the 'Resultant Reason Codes Field', 'Reason Code Algorithm' and the 'Baseline Score' field.
Resultant Reason Codes Field: Shows a list of fields from the selected fact. Only fields of type 'java.util.List' are shown. This collection will hold the reason codes selected by this scorecard.
Reason Code Algorithm: May be "none", "pointsAbove" or "pointsBelow", describing how reason codes shall be ranked, relative to the baseline score of each Characteristic, or as set at the top-level scorecard.
Baseline Score: A single value to use as the baseline comparison score for all characteristics, when determining reason code ranking. Alternatively, unique baseline scores may be set for each individual Characteristic as shown below. This value is required only when UseReasonCodes is "true" and baselineScore is not given for each Characteristic.
Note
If UseReasonCodes is "true", then BaselineScore must be defined at the Scorecard level or for each Characteristic, and ReasonCode must be provided for each Characteristic or for each of its input Attributes. If UseReasonCodes is "false", then baselineScore and reasonCode are not required.
On Clicking the 'New Characteristic' button, a new empty characteristic editor is added to the scorecard. Defines the point allocation strategy for each scorecard characteristic (numeric or categorical). Each scorecard characteristic is assigned a single partial score which is used to compute the overall score. The overall score is simply the sum of all partial scores. Partial scores are assumed to be continuous values of type "double".
Every scorecard must have at least one characteristic
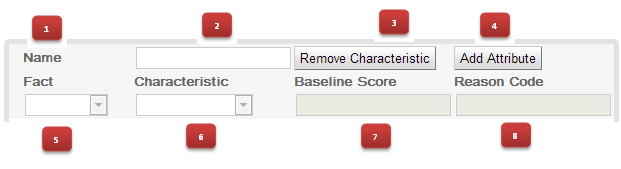
Name: Descriptive name for this characteristic. For informational reasons only.
Remove Charteristic: Will remove this characteristic from the scorecard after a confirmation dialog is shown.
Add Attribute: Will add a line entry for an attribute (bin).
Fact: Select the class which will be evaluated for calculating the partial score.
Characteristic: Shows the list of fields from the selected Fact. Only fields of type "String", "int", "double", "boolean" are shown.
Baseline Score: Sets the characteristic's baseline score against which to compare the actual partial score when determining the ranking of reason codes. This value is required when useReasonCodes attribute is "true" and baselineScore is not defined in element Scorecard. Whenever baselineScore is defined for a Characteristic, it takes precedence over the baselineScore value defined in element Scorecard.
Reason Code: Contains the characteristic's reason code, usually associated with an adverse decision.
On Clicking the 'New Attribute' button, a new empty attribute editor. In scorecard models, all the elements defining the Attributes for a particular Characteristic must all reference a single field.

Operator: The condition upon which the mapping between input attribute and partial score takes place. The operator dropdown will show different values depending on the datatype of the selected Field.
DataType Strings: "=", "in".
DataType Integers: "=", ">", "<", ">=", "<=", ">..<", ">=..<", ">=..<=", ">..<=".
DataType Boolean: "true", "false".
Refer to the next sub-section (values) for more details.
Value: Basis the operator selected the value specified can either be a single value or a set of values separated by comma (","). The value field is disabled for operator type boolean.
Table 16.1. Operators / Values Data Type Operator Value Remarks String = Single Value will look for an exact match String in Comma Separated Values (a,b,c,...) The operator 'in' indicates an evaluation to TRUE if the field value is contained in the comma separated list of values Boolean is true N/A Value Field is uneditable (readonly) Boolean is false N/A Value Field is uneditable (readonly) Numeric = Single Value Equals Operator Numeric > Single Value Greator Than Operator Numeric < Single Value Less Than Operator Numeric >= Single Value Greater than or equal To Numeric <= Single Value Less than or equal To Numeric >..< Comma Separated Values (a,b) (Greater than Value 'a') and (less than value 'b') Numeric >=..< Comma Separated Values (a,b) (Greater than or equal to Value 'a') and (less than value 'b') Numeric >=..<= Comma Separated Values (a,b) (Greater than or equal to Value 'a') and (less than or equal to value 'b') Numeric >..<= Comma Separated Values (a,b) (Greater than Value 'a') and (less than or equal to value 'b') Partial Score: Defines the score points awarded to the Attribute.
Reason Code: Defines the attribute's reason code. If the reasonCode attribute is used in this level, it takes precedence over the ReasonCode associated with the Characteristic element.
Actions: Delete this attribute. Prompts the user for confirmation.
Note
If Use Reason Codes is "true", then Baseline Score must be defined at the Scorecard level or for each Characteristic, and Reason Code must be provided for each Characteristic or for each of its input Attributes. If Use Reason Codes is "false", then BaselineScore and ReasonCode are not required.
Test Scenarios are used to validate that rules and knowledge base work as expected. When the knowledge base evolves, Test Scenarios guard against regression.
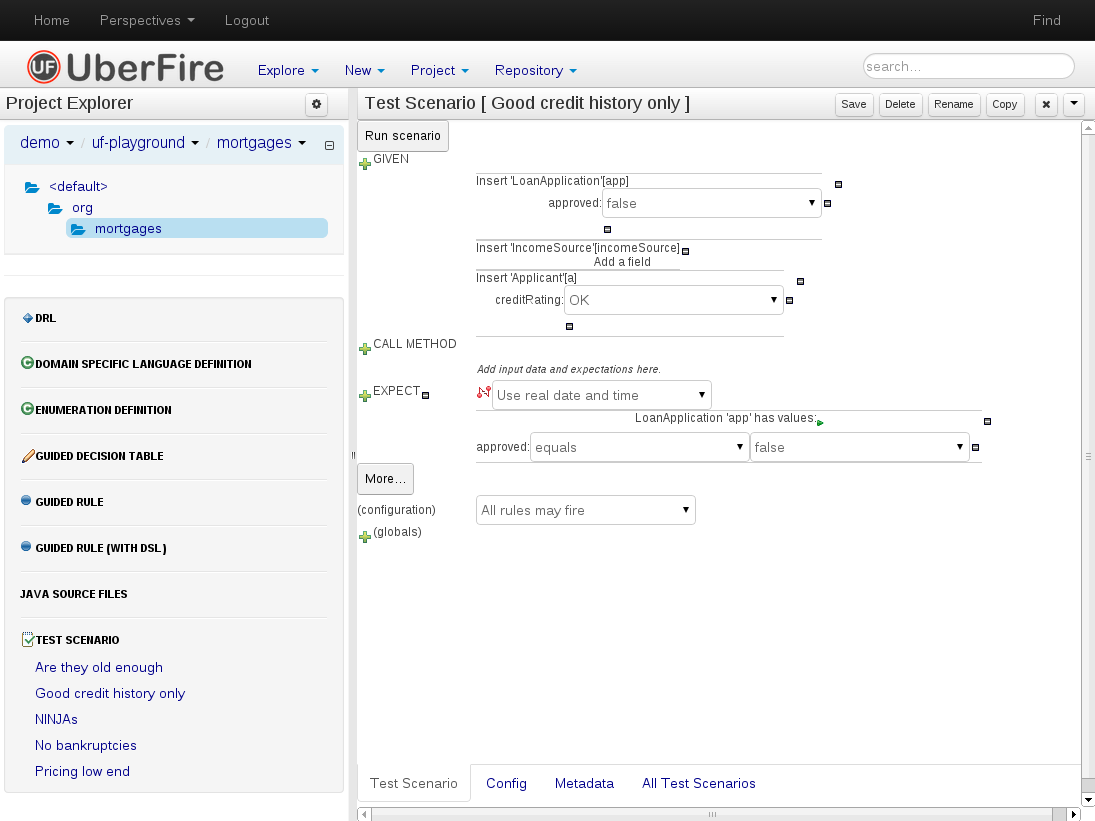
Given section lists the facts needed for the behaviour. Expect section lists the expected changes and actions done by the behaviour. Given facts are passed for the Test Scenario before execution. During the rule execution, changes in the knowledge base are recorded. After the execution ends the recorded actions, existing facts in the knowledge base and knowledge base output is compared against the expectations.
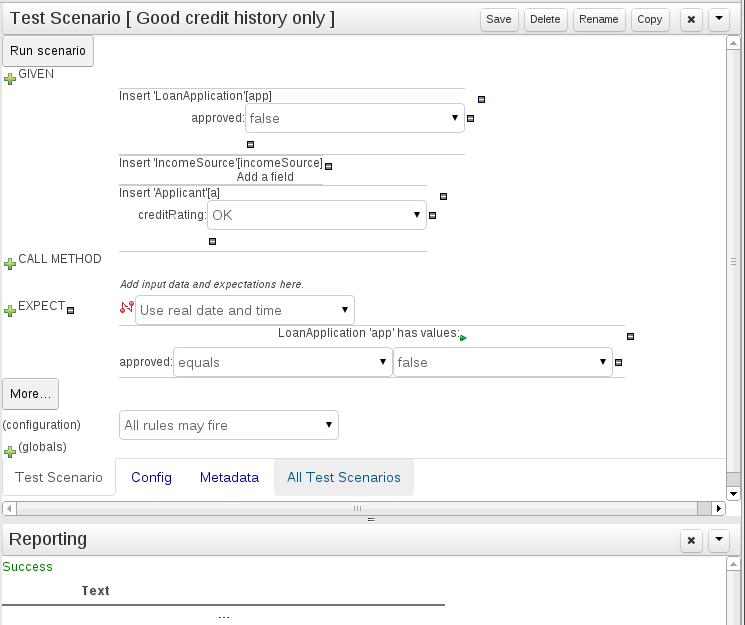
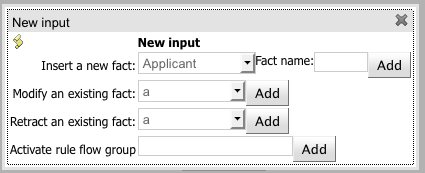
Insert a new fact - Adds a new fact that will be inserted into the knowledge base before execution.
Modify an existing fact - Allows editing a fact between knowledge base executions.
Delete an existing fact - Allows removing facts between executions.
Activate rule flow group - Allows rules from a rule flow group to be tested, by activating the group in advance.
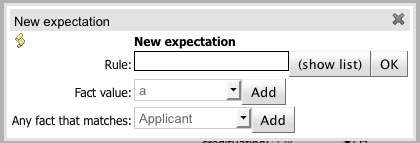
Rule - Validate that a certain rule fired.
Fact value - Validate fact values for a fact created in the Given section.
Any fact that matches - Validate that there is at least one fact in the knowledge base with the specified field values.
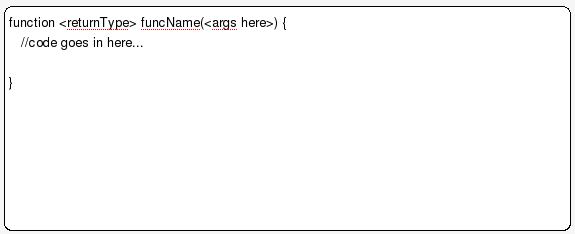
Functions are another asset type. They are NOT rules, and should only be used when necessary. The function editor is a textual editor. Functions
The DSL editor allows DSL Sentences to be authored. The reader should take time to explore DSL features in the Drools Expert documentation; as the syntax in Drools Workbench's DSL Editor is identical. The normal syntax is extended to provide "hints" to control how the DSL variable is rendered and validated within the user-interface.
The following "hints" are supported:-
{<varName>:<regular expression>}
This will render a text field in place of the DSL variable when the DSL Sentence is used in the guided editor. The content of the text field will be validated against the regular expression.
{<varName>:ENUM:<factType.fieldName>}
This will render an enumeration in place of the DSL variable when the DSL Sentence is used in the guided editor. <factType.fieldName> binds the enumeration to the model Fact and Field enumeration definition. This could be either a "Drools Workbench enumeration" (i.e. defined within the Workbench) or a Java enumeration (i.e. defined in a model POJO JAR file).
{<varName>:DATE:<dateFormat>}
This will render a Date selector in place of the DSL variable when the DSL Sentence is used in the guided editor.
{<varName>:BOOLEAN:<[checked | unchecked]>}
This will render a dropdown selector in place of the DSL variable, providing boolean choices, when the DSL Sentence is used in the guided editor.
{<varName>:CF:<factType.fieldName>}
This will render a button that will allow you to set the value of this variable using a Custom Form. In order to use this feature, a Working-Set containing a Custom Form Configuration for factType.fieldName must be active. If there is no such Working-Set, a simple text box is used (just like a regular variable).
For more information, please read more about Working-Sets and Custom Form Configurations.
Data enumerations are an optional asset type that technical folk can configure to provide drop down lists for the guided editor. These are stored and edited just like any other asset, and apply to the package that they belong to.
The contents of an enum config are a mapping of Fact.field to a list of values to be used in a drop down. That list can either be literal, or use a utility class (which you put on the classpath) to load a list of strings. The strings are either a value to be shown on a drop down, or a mapping from the code value (what ends up used in the rule) and a display value (see the example below, using the '=').
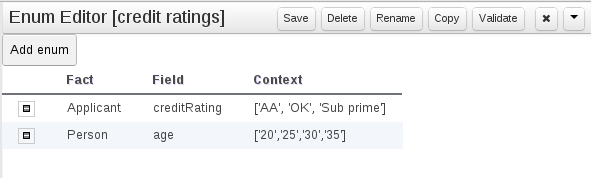
In the above diagram - the "MM" indicates a value that will be used in the rule, yet "Mini Mal" will be displayed in the GUI.
Getting data lists from external data sources: It is possible to have
Drools Workbench call a piece of code which will load a list of Strings. To do
this, you will need a bit of code that returns a java.util.List
(of String's) to be on the classpath of Drools Workbench. Instead of specifying a
list of values in Drools Workbench itself - the code can return the list of
Strings (you can use the "=" inside the strings if you want to use a
different display value to the rule value, as normal). For example, in the
'Person.age' line above, you could change it to:

This assumes you have a class called "DataHelper" which has a method "getListOfAges()" which returns a List of strings (and is on the classpath). You can of course mix these "dynamic" enumerations with fixed lists. You could for example load from a database using JDBC. The data enumerations are loaded the first time you use the guided editor in a session. If you have any guided editor sessions open - you will need to close and then open the rule to see the change.
There are a few other advanced things you can do with data enumerations.
Drop down lists that depend on field values: Lets imagine a simple fact model, we have a class called Vehicle, which has 2 fields: "engineType" and "fuelType". We want to have a choice for the "engineType" of "Petrol" or "Diesel". Now, obviously the choice type for fuel must be dependent on the engine type (so for Petrol we have ULP and PULP, and for Diesel we have BIO and NORMAL). We can express this dependency in an enumeration as:

This shows how it is possible to make the choices dependent on other field values. Note that once you pick the engineType, the choice list for the fuelType will be determined.
Loading enums programmatically: In some cases, people may want to
load their enumeration data entirely from external data source (such as a
relational database). To do this, you can implement a class that returns a
Map. The key of the map is a string (which is the Fact.field name as shown
above), and the value is a java.util.List of Strings.
public class SampleDataSource2 {


  public Map<String>, List<String> loadData() {

    Map data = new HashMap();


    List d = new ArrayList();

    d.add("value1");

    d.add("value2");

    data.put("Fact.field", d);


    return data;

 }


}
And in the enumeration in the BRMS, you put:
=(new SampleDataSource2()).loadData()
The "=" tells it to load the data by executing your code.
Mode advanced enumerations: In the above cases, the values in the lists are calculated up front. This is fine for relatively static data, or small amounts of data. Imagine a scenario where you have lists of countries, each country has a list of states, each state has a list of localities, each locality has a list of streets and so on... You can see how this is a lot of data, and it can not be loaded up. The lists should be loaded dependent on what country was selected etc...
Well the above can be addressed in the following fashion:

Similar to above, but note that we have just specified what fields are needed, and also on the right of the ":" there are quotes around the expression. This expression will then be evaluated, only when needed, substituting the values from the fields specified. This means you can use the field values from the GUI to drive a database query, and drill down into data etc. When the drop down is loaded, or the rule loaded, it will refresh the list based on the fields. 'dependentField1' and 'dependentField2' are names of fields on the 'Fact' type - these are used to calculate the list of values which will be shown in a drop down if values for the "field".
Technical (DRL) rules are stored as text - they can be managed in Drools Workbench. A DRL can either be a whole chunk of rules, or an individual rule. if its an individual rule, no package statement or imports are required (in fact, you can skip the "rule" statement altogether, just use "when" and "then" to mark the condition and action sections respectively). Normally you would use the IDE to edit raw DRL files, since it has all the advanced tooling and content assistance and debugging. However, there are times when a rule may have to deal with something fairly technical in a package in Drools Workbench. In any typical package of rules, you generally have a need for some "technical rules" - you can mix and match all the rule types together of course.