Use the war from the workbench distribution zip that corrsponds to your
application server. The differences between these war files are mainly
superficial. For example, some JARs might be excluded if the application server already
supplies them.
eap6_4: tailored for Red Hat JBoss Enterprise Application Platform 6.4tomcat7: tailored for Apache Tomcat 7Note
Apache Tomcat requires additional configuration to correctly install the Workbench. Please consult the
README.mdin thewarfor the most up to date procedure.was8: tailored for IBM WebSphere Application Server 8weblogic12: tailored for Oracle WebLogic Server 12cNote
Oracle WebLogic requires additional configuration to correctly install the Workbench. Please consult the
README.mdin thewarfor the most up to date procedure.wildfly8: tailored for Red Hat JBoss Wildfly 8
The workbench stores its data, by default in the directory
$WORKING_DIRECTORY/.niogit, for example
wildfly-8.0.0.Final/bin/.niogit, but it can be overridden with the system property
-Dorg.uberfire.nio.git.dir.
Note
In production, make sure to back up the workbench data directory.
Here's a list of all system properties:
org.uberfire.nio.git.dir: Location of the directory.niogit. Default: working directoryorg.uberfire.nio.git.daemon.enabled: Enables/disables git daemon. Default:trueorg.uberfire.nio.git.daemon.host: If git daemon enabled, uses this property as local host identifier. Default:localhostorg.uberfire.nio.git.daemon.port: If git daemon enabled, uses this property as port number. Default:9418org.uberfire.nio.git.ssh.enabled: Enables/disables ssh daemon. Default:trueorg.uberfire.nio.git.ssh.host: If ssh daemon enabled, uses this property as local host identifier. Default:localhostorg.uberfire.nio.git.ssh.port: If ssh daemon enabled, uses this property as port number. Default:8001org.uberfire.nio.git.ssh.cert.dir: Location of the directory.securitywhere local certificates will be stored. Default: working directoryorg.uberfire.nio.git.hooks: Location of the directory that contains Git hook scripts that are installed into each repository created (or cloned) in the Workbench. Default: N/Aorg.uberfire.nio.git.ssh.passphrase: Passphrase to access your Operating Systems public keystore when cloninggitrepositories withscpstyle URLs; e.g.git@github.com:user/repository.git.org.uberfire.metadata.index.dir: Place where Lucene.indexfolder will be stored. Default: working directoryorg.uberfire.cluster.id: Name of the helix cluster, for example:kie-clusterorg.uberfire.cluster.zk: Connection string to zookeeper. This is of the formhost1:port1,host2:port2,host3:port3, for example:localhost:2188org.uberfire.cluster.local.id: Unique id of the helix cluster node, note that ':' is replaced with '_', for example:node1_12345org.uberfire.cluster.vfs.lock: Name of the resource defined on helix cluster, for example:kie-vfsorg.uberfire.cluster.autostart: Delays VFS clustering until the application is fully initialized to avoid conflicts when all cluster members create local clones. Default:falseorg.uberfire.sys.repo.monitor.disabled: Disable configuration monitor (do not disable unless you know what you're doing). Default:falseorg.uberfire.secure.key: Secret password used by password encryption. Default:org.uberfire.adminorg.uberfire.secure.alg: Crypto algorithm used by password encryption. Default:PBEWithMD5AndDESorg.uberfire.domain: security-domain name used by uberfire. Default:ApplicationRealmorg.guvnor.m2repo.dir: Place where Maven repository folder will be stored. Default: working-directory/repositories/kieorg.guvnor.project.gav.check.disabled: Disable GAV checks. Default:falseorg.kie.example.repositories: Folder from where demo repositories will be cloned. The demo repositories need to have been obtained and placed in this folder. Demo repositories can be obtained from the kie-wb-6.2.0-SNAPSHOT-example-repositories.zip artifact. This System Property takes precedence over org.kie.demo and org.kie.example. Default: Not used.org.kie.demo: Enables external clone of a demo application from GitHub. This System Property takes precedence over org.kie.example. Default:trueorg.kie.example: Enables example structure composed by Repository, Organization Unit and Project. Default:falseorg.kie.build.disable-project-explorer: Disable automatic build of selected Project in Project Explorer. Default:false
To change one of these system properties in a WildFly or JBoss EAP cluster:
Edit the file
$JBOSS_HOME/domain/configuration/host.xml.Locate the XML elements
serverthat belong to themain-server-groupand add a system property, for example:<system-properties> <property name="org.uberfire.nio.git.dir" value="..." boot-time="false"/> ... </system-properties>
There have been reports that Firewalls in between the server and the browser can interfere with Server Sent Events (SSE) used by the Workbench.
The issue results in the "Loading..." spinner remaining visible and the Workbench failing to materialize.
The workaround is to disable the Workbench's use of Server Sent Events by adding file
/WEB-INF/classes/ErraiService.properties to the exploded WAR containing
the value errai.bus.enable_sse_support=false. Re-package the WAR and
re-deploy.
These steps help you get started with minimum of effort.
They should not be a substitute for reading the documentation in full.
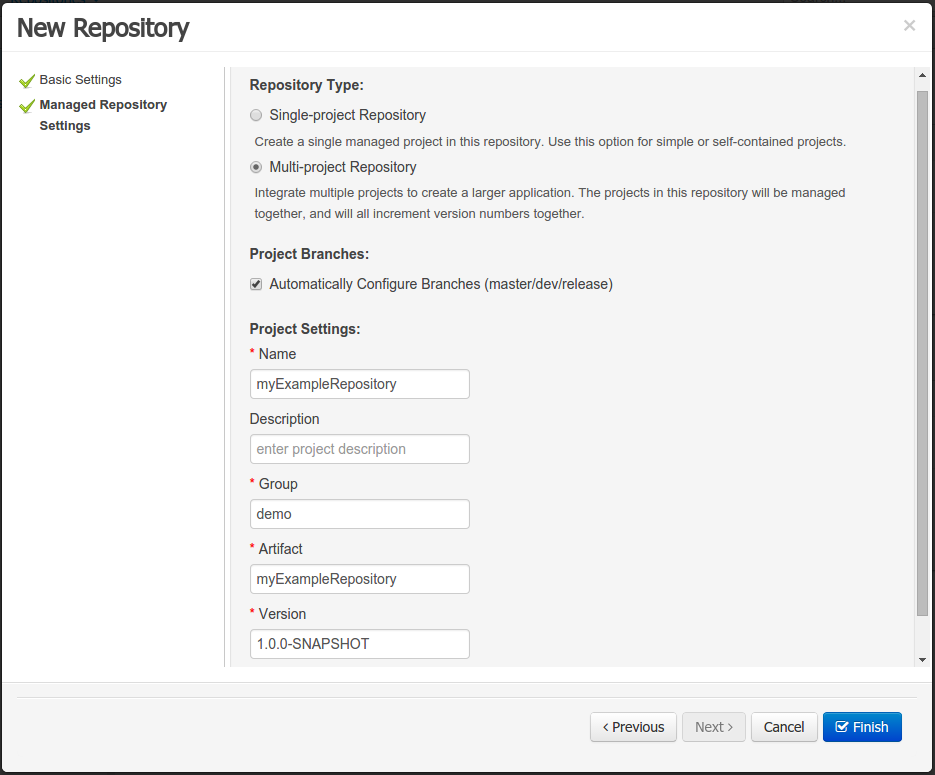
Create a new repository to hold your project by selecting the Administration Perspective.
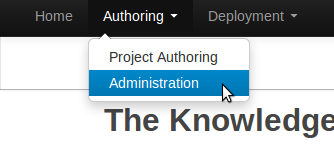
Select the "New repository" option from the menu.
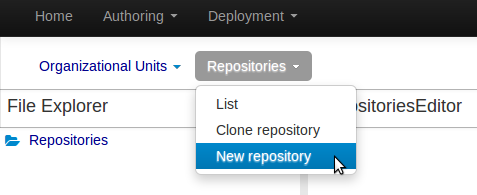
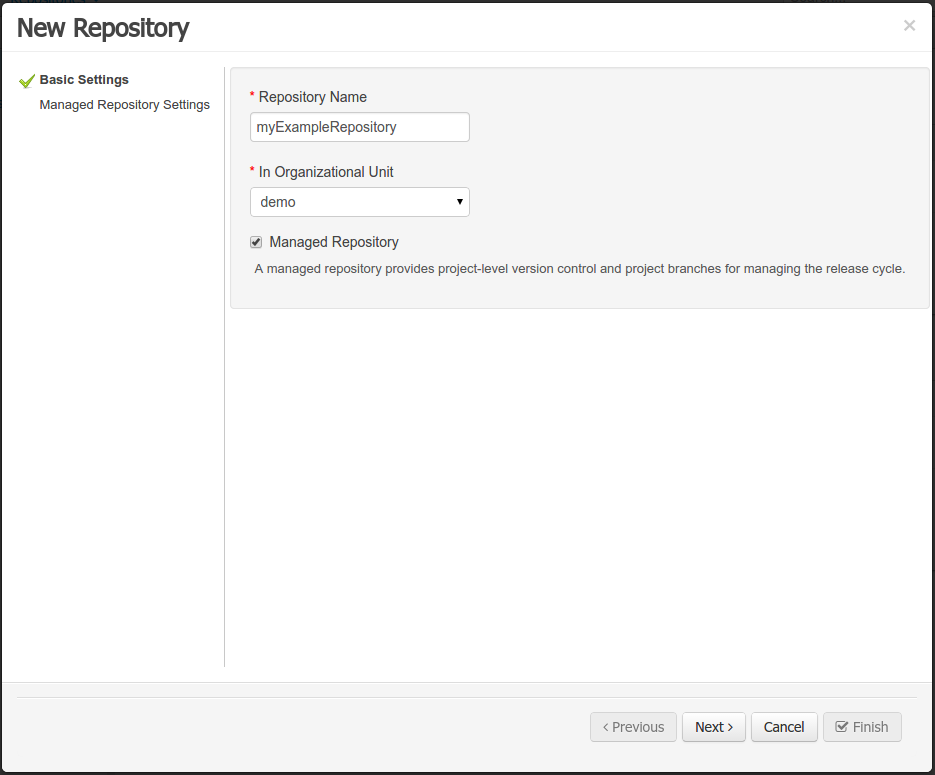
Enter the required information.
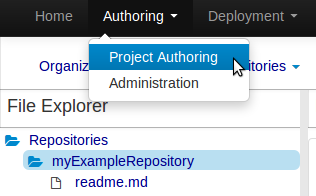
Select the Authoring Perspective to create a new project.
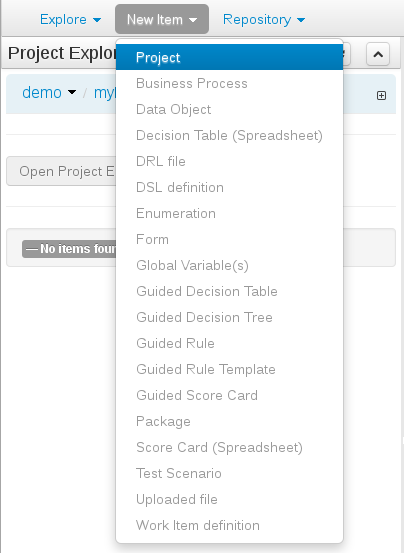
Select "Project" from the "New Item" menu.
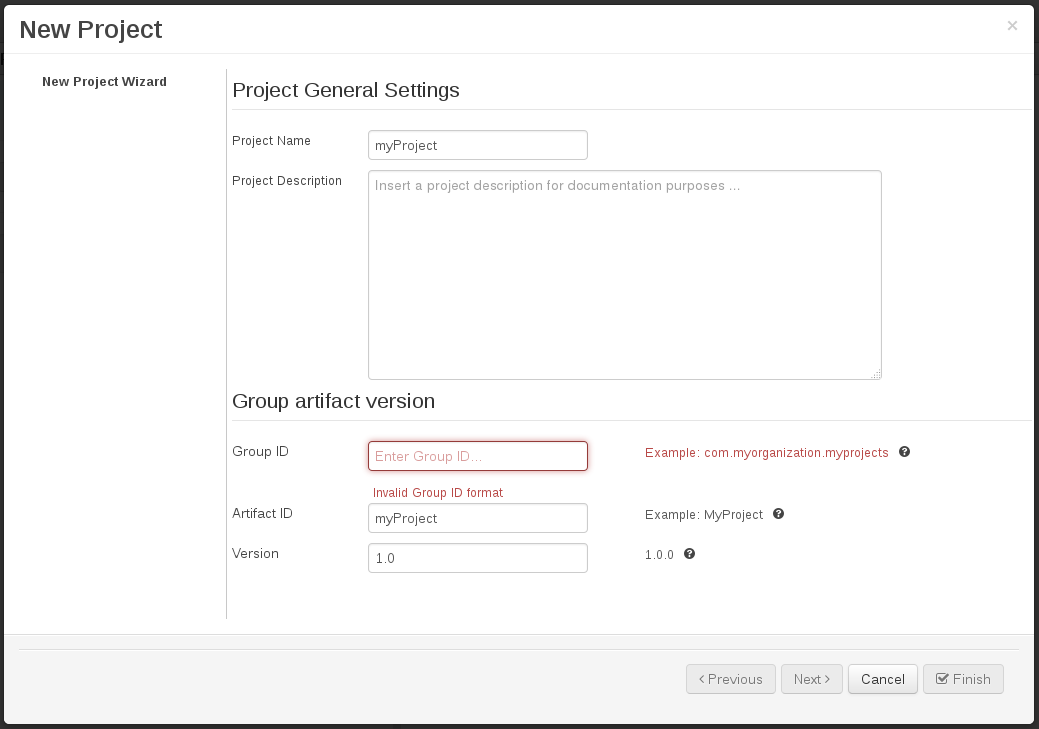
Enter a project name first.
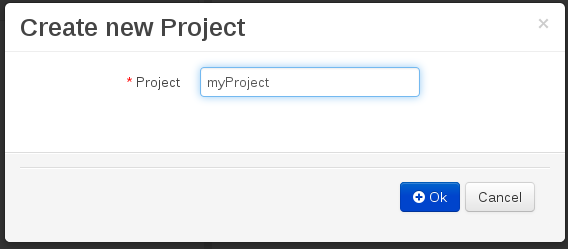
Enter the project details next.
Group ID follows Maven conventions.
Artifact ID is pre-populated from the project name.
Version is set as 1.0 by default.
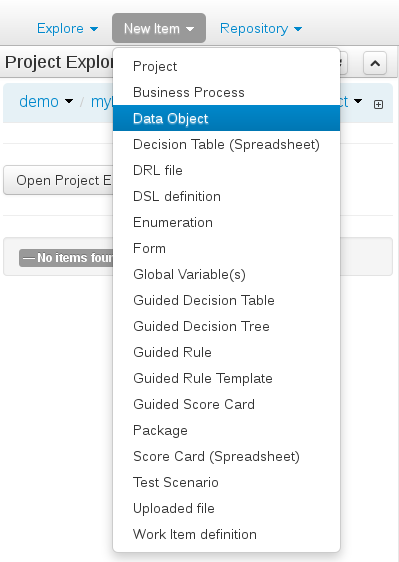
After a project has been created you need to define Types to be used by your rules.
Select "Data Object" from the "New Item" menu.
Note
You can also use types contained in existing JARs.
Please consult the full documentation for details.
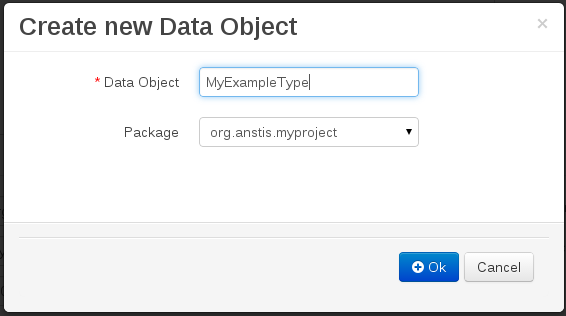
Set the name and select a package for the new type.
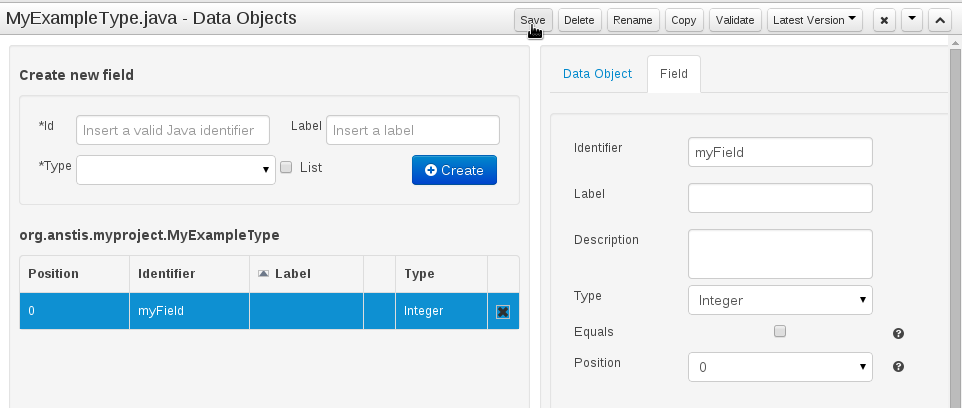
Set field name and type and click on "Create" to create a field for the type.
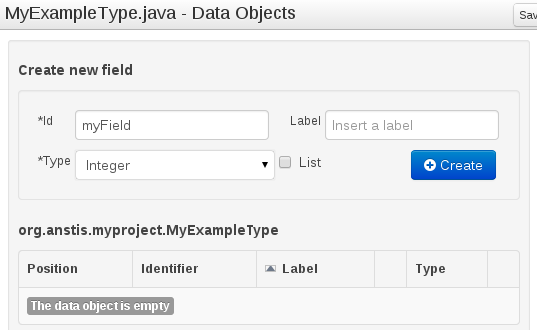
Click "Save" to update the model.
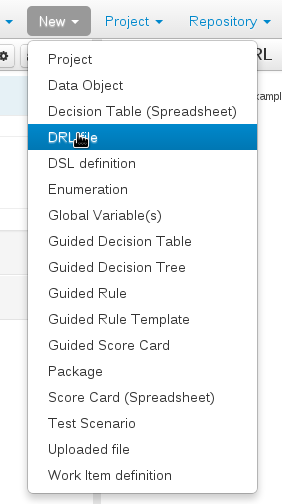
Select "DRL file" (for example) from the "New Item" menu.
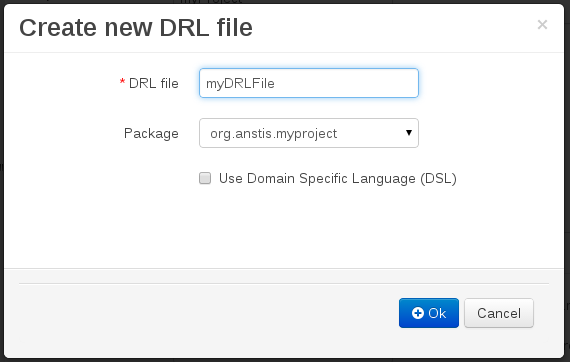
Enter a file name for the new rule.
Enter a definition for the rule.
The definition process differs from asset type to asset type.
The full documentation has details about the different editors.
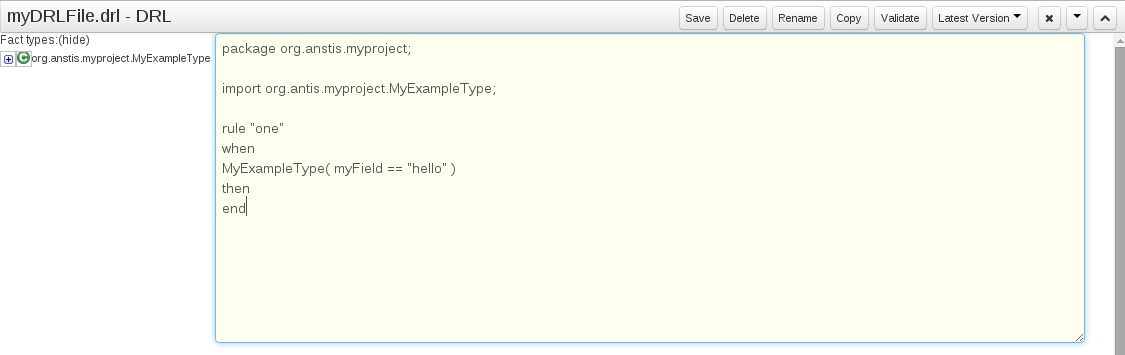
Once the rule has been defined it will need to be saved.

Once rules have been defined within a project; the project can be built and deployed to the Workbench's Maven Artifact Repository.
To build a project select the "Project Editor" from the "Project" menu.
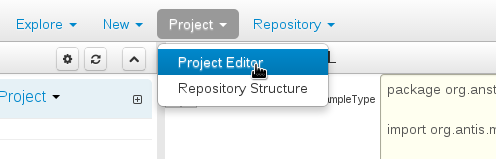
Click "Build and Deploy" to build the project and deploy it to the Workbench's Maven Artifact Repository.
When you select Build & Deploy the workbench will deploy to any repositories defined in the Dependency Management section of the pom in your workbench project. You can edit the pom.xml file associated with your workbench project under the Repository View of the project explorer. Details on dependency management in maven can be found here : http://maven.apache.org/guides/introduction/introduction-to-dependency-mechanism.html
If there are errors during the build process they will be reported in the "Problems Panel".

Now the project has been built and deployed; it can be referenced from your own projects as any other Maven Artifact.
The full documentation contains details about integrating projects with your own applications.
A workbench is structured with Organization Units, VFS repositories and projects:
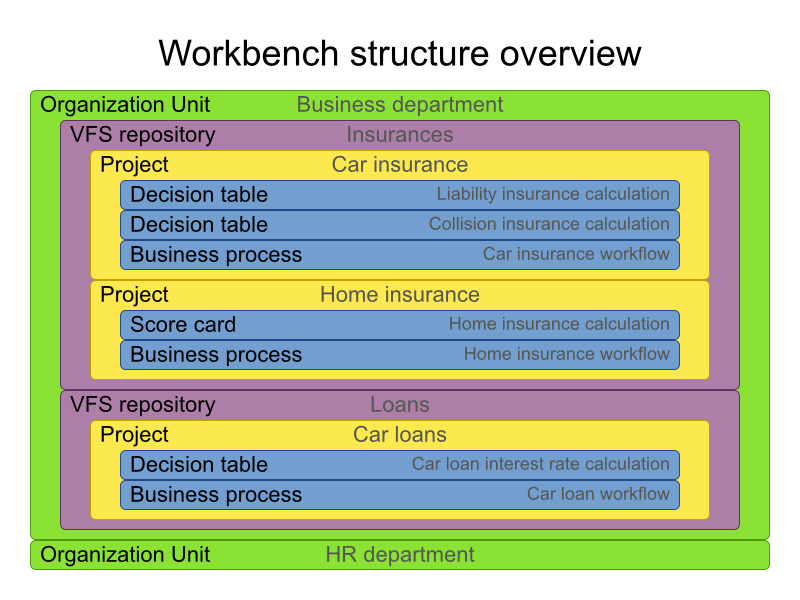
Organization units are useful to model departments and divisions.
An organization unit can hold multiple repositories.
Repositories are the place where assets are stored and each repository is organized by projects and belongs to a single organization unit.
Repositories are in fact a Virtual File System based storage, that by default uses GIT as backend. Such setup allows workbench to work with multiple backends and, in the same time, take full advantage of backend specifics features like in GIT case versioning, branching and even external access.

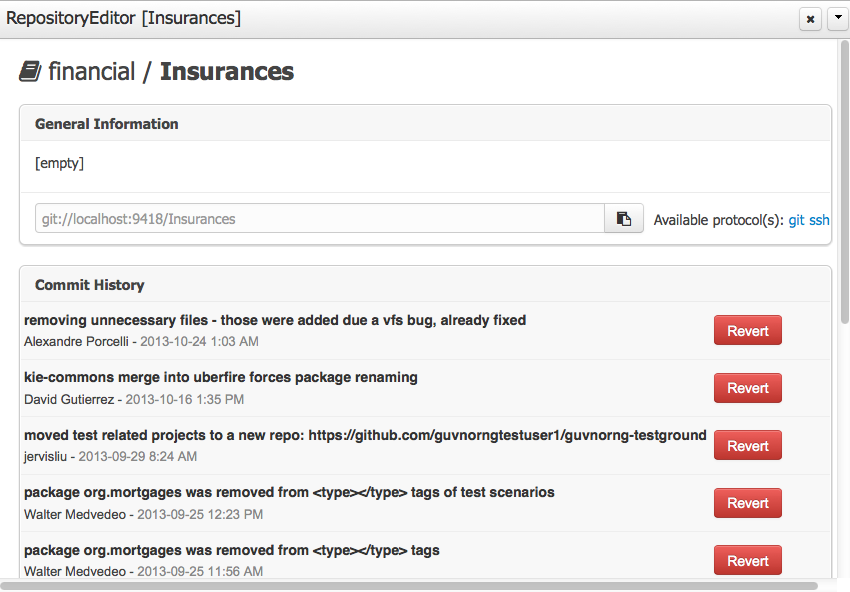
A new repository can be created from scratch or cloned from an existing repository.
One of the biggest advantages of using GIT as backend is the ability to clone a repository from external and use your preferred tools to edit and build your assets.
Warning
Never clone your repositories directly from .niogit directory. Use always the available protocol(s) displayed in repositories editor.
The workbench authenticates its users against the application server's authentication and authorization (JAAS).
On JBoss EAP and WildFly, add a user with the script $JBOSS_HOME/bin/add-user.sh (or
.bat):
$ ./add-user.sh
// Type: Application User
// Realm: empty (defaults to ApplicationRealm)
// Role: admin
There is no need to restart the application server.
The Workbench uses the following roles:
admin
analyst
developer
manager
user
Administrates the BPMS system.
Manages users
Manages VFS Repositories
Has full access to make any changes necessary
Developer can do almost everything admin can do, except clone repositories.
Manages rules, models, process flows, forms and dashboards
Manages the asset repository
Can create, build and deploy projects
Can use the JBDS connection to view processes
Analyst is a weaker version of developer and does not have access to the asset repository or the ability to deploy projects.
Daily user of the system to take actions on business tasks that are required for the processes to continue forward. Works primarily with the task lists.
Does process management
Handles tasks and dashboards
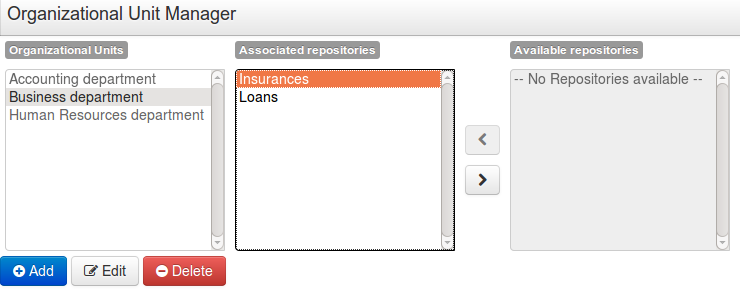
It is possible to restrict access to repositories using roles and organizational groups. To let an user access a repository.
The user either has to belong into a role that has access to the repository or to a role that belongs into an organizational group that has access to the repository. These restrictions can be managed with the command line config tool.
Provides capabilities to manage the system repository from command line. System repository contains the data about general workbench settings: how editors behave, organizational groups, security and other settings that are not editable by the user. System repository exists in the .niogit folder, next to all the repositories that have been created or cloned into the workbench.
Online (default and recommended) - Connects to the Git repository on startup, using Git server provided by the KIE Workbench. All changes are made locally and published to upstream when:
"push-changes" command is explicitly executed
"exit" is used to close the tool
Offline - Creates and manipulates system repository directly on the server (no discard option)
Table 18.1. Available Commands
| exit | Publishes local changes, cleans up temporary directories and quits the command line tool |
| discard | Discards local changes without publishing them, cleans up temporary directories and quits the command line tool |
| help | Prints a list of available commands |
| list-repo | List available repositories |
| list-org-units | List available organizational units |
| list-deployment | List available deployments |
| create-org-unit | Creates new organizational unit |
| remove-org-unit | Removes existing organizational unit |
| add-deployment | Adds new deployment unit |
| remove-deployment | Removes existing deployment |
| create-repo | Creates new git repository |
| remove-repo | Removes existing repository ( only from config ) |
| add-repo-org-unit | Adds repository to the organizational unit |
| remove-repo-org-unit | Removes repository from the organizational unit |
| add-role-repo | Adds role(s) to repository |
| remove-role-repo | Removes role(s) from repository |
| add-role-org-unit | Adds role(s) to organizational unit |
| remove-role-org-unit | Removes role(s) from organizational unit |
| add-role-project | Adds role(s) to project |
| remove-role-project | Removes role(s) from project |
| push-changes | Pushes changes to upstream repository (only in online mode) |
The tool can be found from kie-config-cli-${version}-dist.zip. Execute the kie-config-cli.sh script and by default it will start in online mode asking for a Git url to connect to ( the default value is ssh://localhost/system ). To connect to a remote server, replace the host and port with appropriate values, e.g. ssh://kie-wb-host/system.
./kie-config-cli.sh To operate in offline mode, append the offline parameter to the kie-config-cli.sh command. This will change the behaviour and ask for a folder where the .niogit (system repository) is. If .niogit does not yet exist, the folder value can be left empty and a brand new setup is created.
./kie-config-cli.sh offlineCreate a user with the role admin and log in with those credentials.
After successfully logging in, the account username is displayed at the top right. Click on it to review the roles of the current account.
After logging in, the home screen shows. The actual content of the home screen depends on the workbench variant (Drools, jBPM, ...).

The Workbench is comprised of different logical entities:
Part
A Part is a screen or editor with which the user can interact to perform operations.
Example Parts are "Project Explorer", "Project Editor", "Guided Rule Editor" etc. Parts can be repositioned.
Panel
A Panel is a container for one or more Parts.
Panels can be resized.
Perspective
A perspective is a logical grouping of related Panels and Parts.
The user can switch between perspectives by clicking on one of the top-level menu items; such as "Home", "Authoring", "Deploy" etc.
The Workbench consists of three main sections to begin; however its layout and content can be changed.
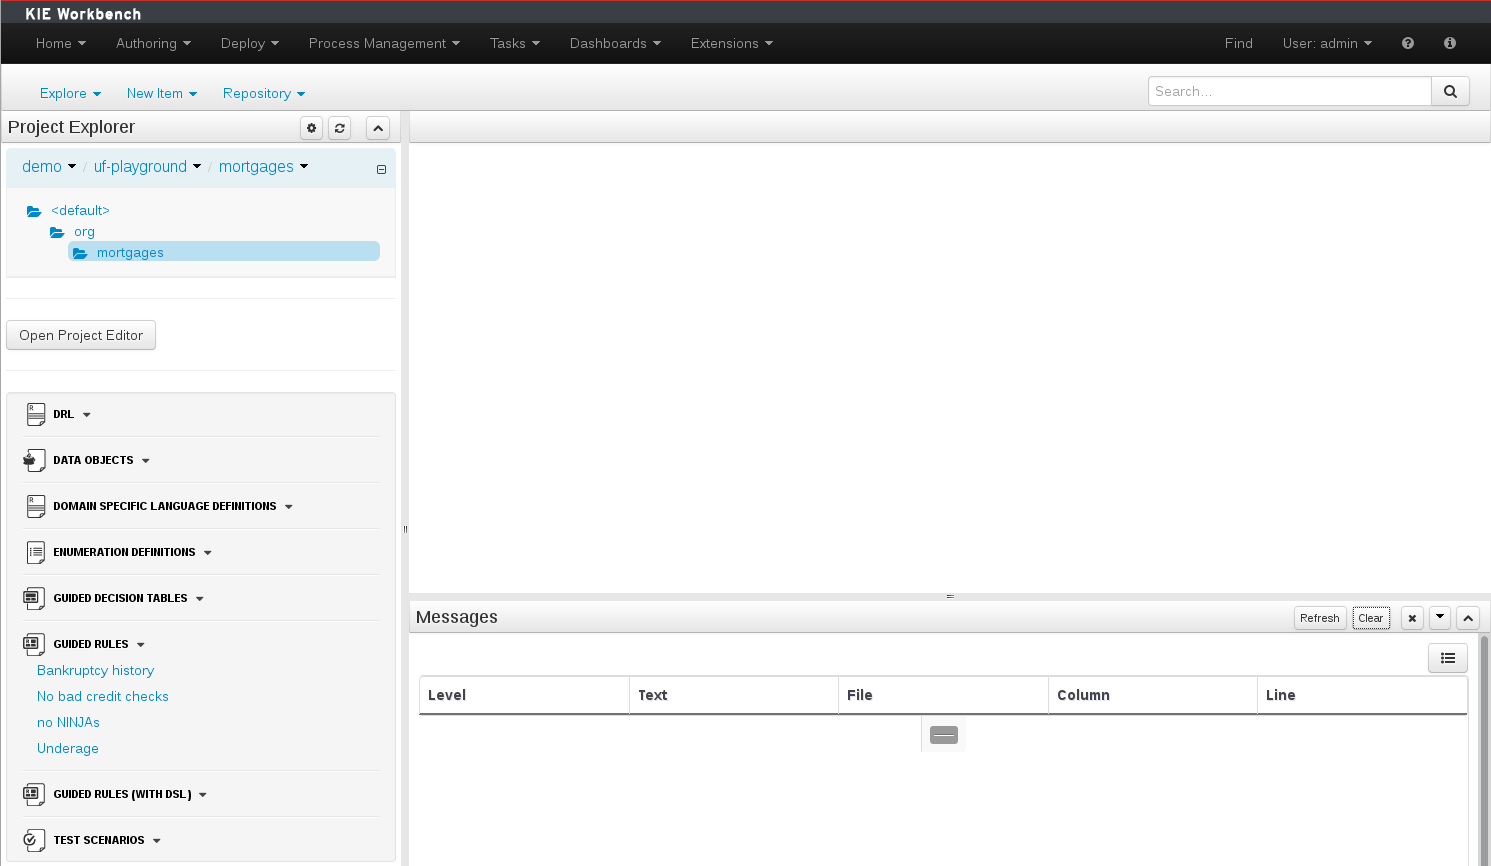
The initial Workbench shows the following components:-
Project Explorer
This provides the ability for the user to browse their configuration; of Organizational Units (in the above "example" is the Organizational Unit), Repositories (in the above "uf-playground" is the Repository) and Project (in the above "mortgages" is the Project).
Problems
This provides the user with real-time feedback about errors in the active Project.
Empty space
This empty space will contain an editor for assets selected from the Project Explorer.
Other screens will also occupy this space by default; such as the Project Editor.
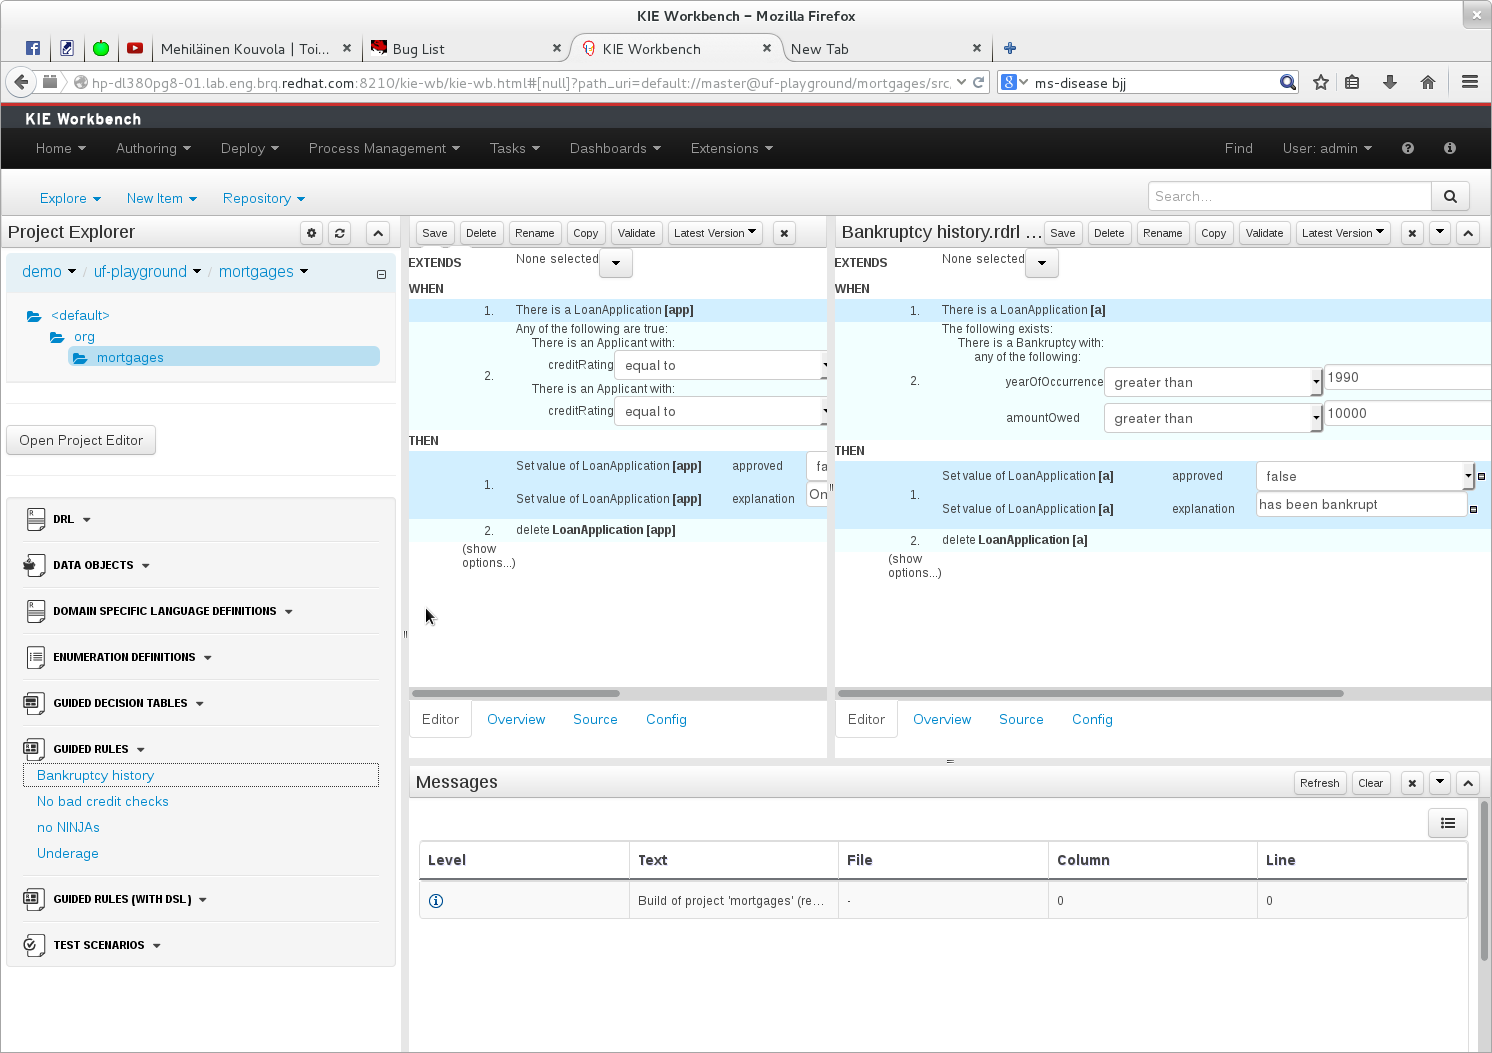
The default layout may not be suitable for a user. Panels can therefore be either resized or repositioned.
This, for example, could be useful when running tests; as the test defintion and rule can be repositioned side-by-side.
The following screenshot shows a Panel being resized.
Move the mouse pointer over the panel splitter (a grey horizontal or vertical line in between panels).
The cursor will changing indicating it is positioned correctly over the splitter. Press and hold the left mouse button and drag the splitter to the required position; then release the left mouse button.

The following screenshot shows a Panel being repositioned.
Move the mouse pointer over the Panel title ("Guided Editor [No bad credit checks]" in this example).
The cursor will change indicating it is positioned correctly over the Panel title. Press and hold the left mouse button. Drag the mouse to the required location. The target position is indicated with a pale blue rectangle. Different positions can be chosen by hovering the mouse pointer over the different blue arrows.

Projects often need external artifacts in their classpath in order to build, for example a domain model JARs. The artifact repository holds those artifacts.
The Artifact Repository is a full blown Maven repository. It follows the semantics of a Maven remote repository: all snapshots are timestamped. But it is often stored on the local hard drive.
By default the artifact repository is stored under $WORKING_DIRECTORY/repositories/kie, but
it can be overridden with the system property
-Dorg.guvnor.m2repo.dir. There is only 1 Maven repository per installation.
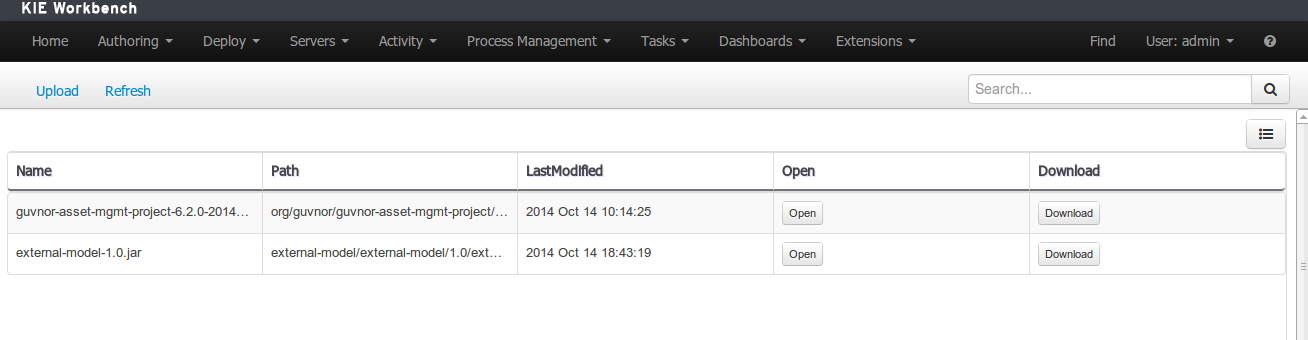
The Artifact Repository screen shows a list of the artifacts in the Maven repository:
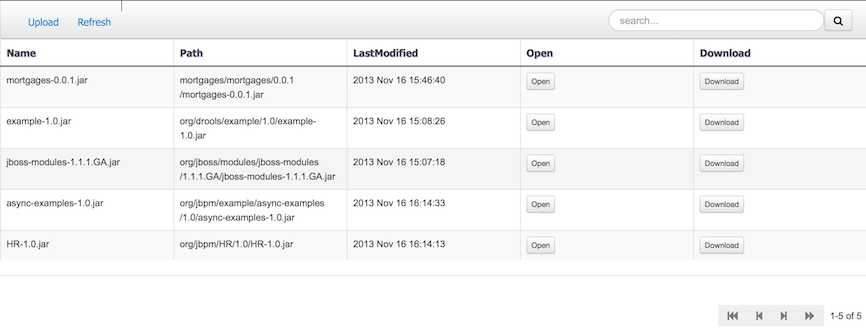
To add a new artifact to that Maven repository, either:
Use the upload button and select a JAR. If the JAR contains a POM file under
META-INF/maven(which every JAR build by Maven has), no further information is needed. Otherwise, a groupId, artifactId and version need be given too.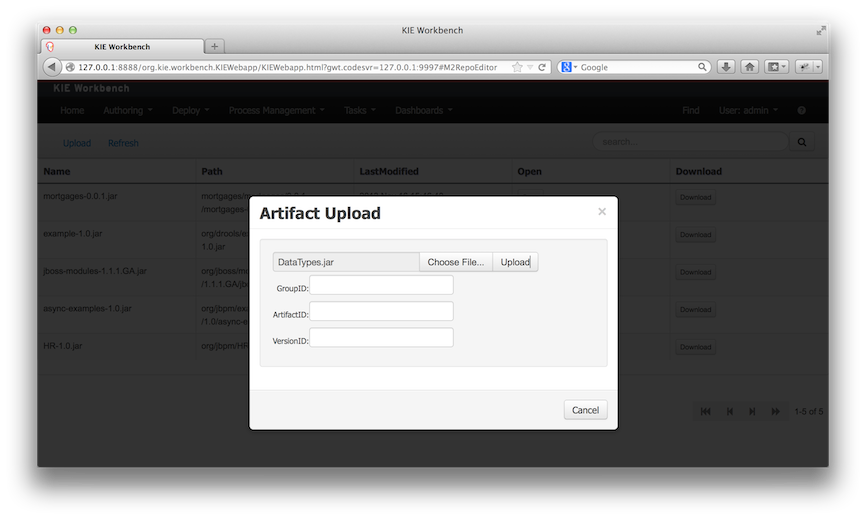
Using Maven,
mvn deployto that Maven repository. Refresh the list to make it show up.
Note
This remote Maven repository is relatively simple. It does not support proxying, mirroring, ... like Nexus or Archiva.
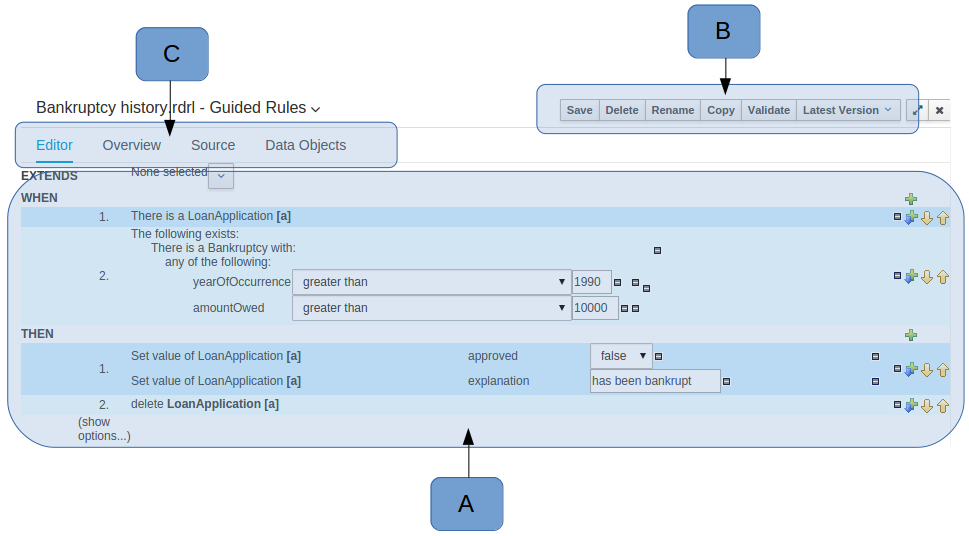
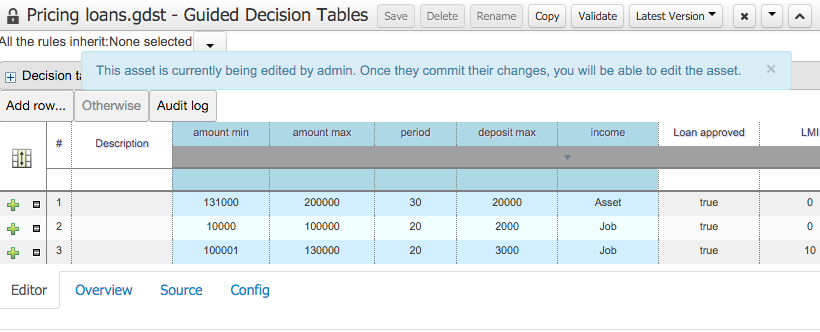
The Asset Editor is the principle component of the workbench User-Interface. It consists of two main views Editor and Overview.
The views
A : The editing area - exactly what form the editor takes depends on the Asset type. An asset can only be edited by one user at a time to avoid conflicts. When a user begins to edit an asset, a lock will automatically be acquired. This is indicated by a lock symbol appearing on the asset title bar as well as in the project explorer view (see Section 18.7.4, “Project Explorer” for details). If a user starts editing an already locked asset a pop-up notification will appear to inform the user that the asset can't currently be edited, as it is being worked on by another user. Changes will be prevented until the editing user saves or closes the asset, or logs out of the workbench. Session timeouts will also cause locks to be released. Every user further has the option to force a lock release, if required (see the Metadata section below).
B : This menu bar contains various actions for the Asset; such as Save, Rename, Copy etc. Note that saving, renaming and deleting are deactivated if the asset is locked by a different user.
C : Different views for asset content or asset information.
Editor shows the main editor for the asset
Overview contains the metadata and conversation views for this editor. Explained in more detail below.
Source shows the asset in plain DRL. Note: This tab is only visible if the asset content can be generated into DRL.
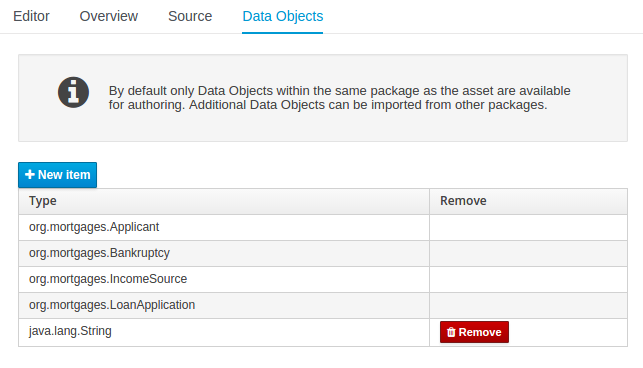
Data Objects contains the model available for authoring. By default only Data Objects that reside within the same package as the asset are available for authoring. Data Objects outside of this package can be imported to become available for authoring the asset.
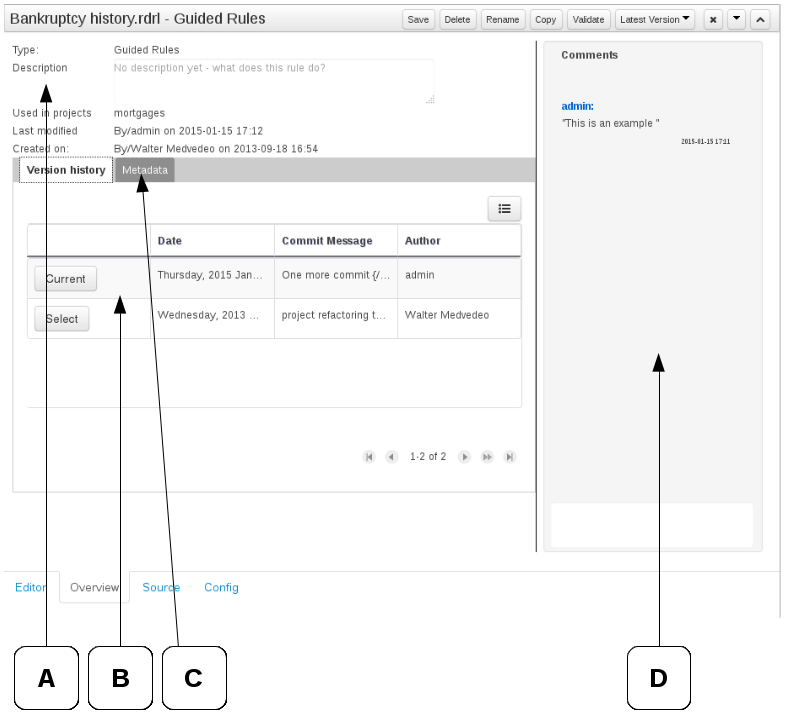
Overview
A : General information about the asset and the asset's description.
"Type:" The format name of the type of Asset.
"Description:" Description for the asset.
"Used in projects:" Names the projects where this rule is used.
"Last Modified:" Who made the last change and when.
"Created on:" Who created the asset and when.
B : Version history for the asset. Selecting a version loads the selected version into this editor.
C : Meta data (from the "Dublin Core" standard)
D : Comments regarding the development of the Asset can be recorded here.
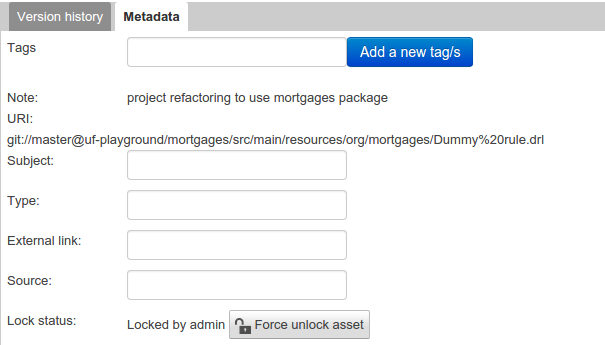
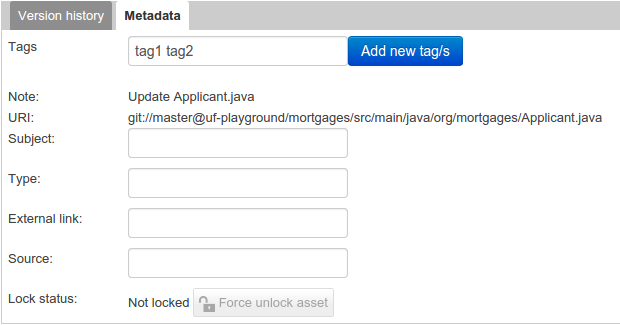
Metadata
A : Meta data:-
"Tags:" A tagging system for grouping the assets.
"Note:" A comment made when the Asset was last updated (i.e. why a change was made)
"URI:" URI to the asset inside the Git repository.
"Subject/Type/External link/Source" : Other miscellaneous meta data for the Asset.
"Lock status" : Shows the lock status of the asset and, if locked, allows to force unlocking the asset.
Locking
The Workbench supports pessimistic locking of assets. When one User starts editing an asset it is locked to change by other Users. The lock is held until a period of inactivity lapses, the Editor is closed or the application stopped and restarted. Locks can also be forcibly removed on the MetaData section of the Overview tab.
A "padlock" icon is shown in the Editor's title bar and beside the asset in the Project Explorer when an asset is locked.
Tags allow assets to be labelled with any number of tags that you define. These tags can be used to filter assets on the Project Explorer enabling "Tag filtering".
To create tags you simply have to write them on the Tags input and press the "Add new Tag/s" button. The Tag Editor allows creating tags one by one or writing more than one separated with a white space.
Once you created new Tags they will appear over the Editor allowing you to remove them by pressing on them if you want.

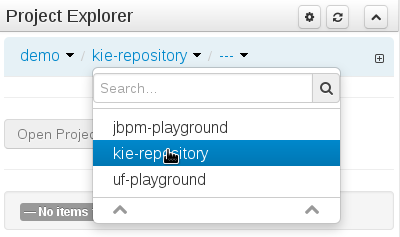
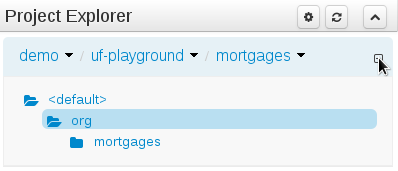
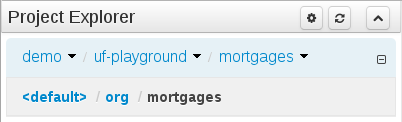
The Project Explorer provides the ability to browse different Organizational Units, Repositories, Projects and their files.
The initial view could be empty when first opened.
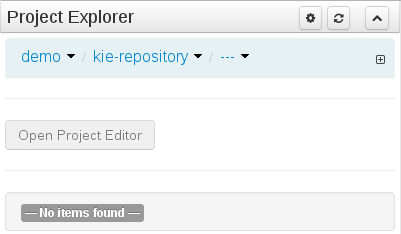
The user may have to select an Organizational Unit, Repository and Project from the drop-down boxes.
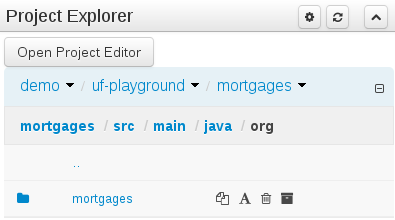
The default configuration hides Package details from view.
In order to reveal packages click on the icon as indicated in the following screen-shot.
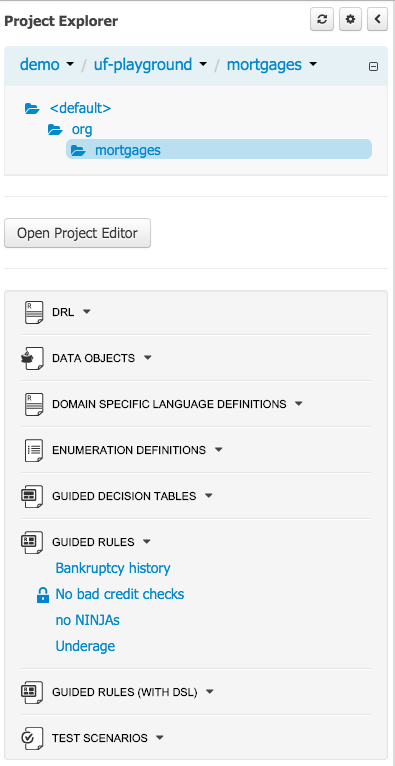
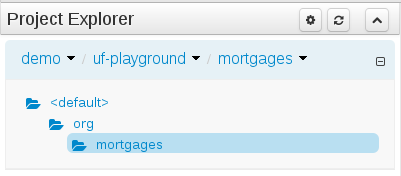
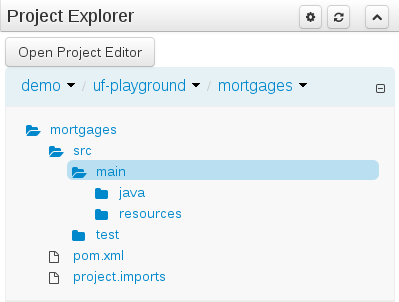
After a suitable combination of Organizational Unit, Repository, Project and Package have been selected the Project Explorer will show the contents. The exact combination of selections depends wholly on the structures defined within the Workbench installation and projects. Each section contains groups of related files. If a file is currently being edited by another user, a lock symbol will be displayed in front of the file name. The symbol is blue in case the lock is owned by the currently authenticated user, otherwise black. Moving the mouse pointer over the lock symbol will display a tooltip providing the name of the user who is currently editing the file (and therefore owning the lock). To learn more about locking see Section 18.7.2, “Asset Editor” for details.
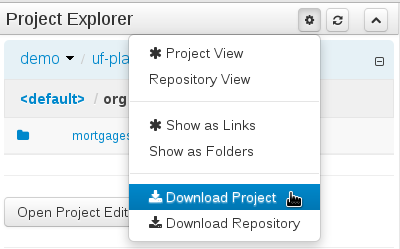
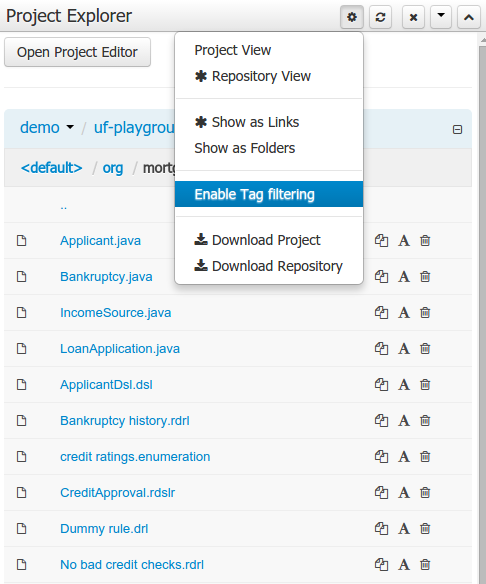
Project Explorer supports multiple views.
Project View
A simplified view of the underlying project structure. Certain system files are hidden from view.
Repository View
A complete view of the underlying project structure including all files; either user-defined or system generated.
Views can be selected by clicking on the icon within the Project Explorer, as shown below.
Both Project and Repository Views can be further refined by selecting either "Show as Folders" or "Show as Links".
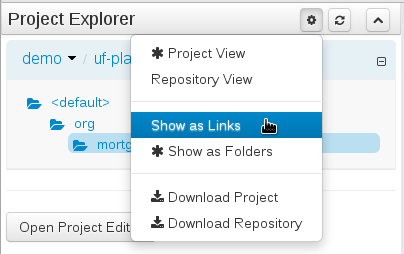
Download Project and Download Repository make it possible to download the project or repository as a zip file.
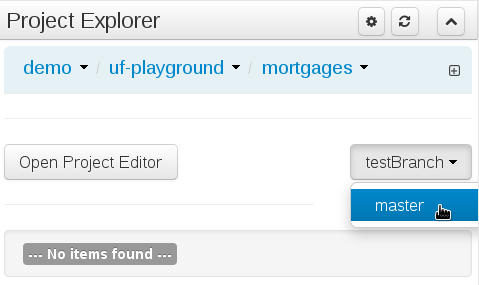
A branch selector will be visible if the repository has more than a single branch.
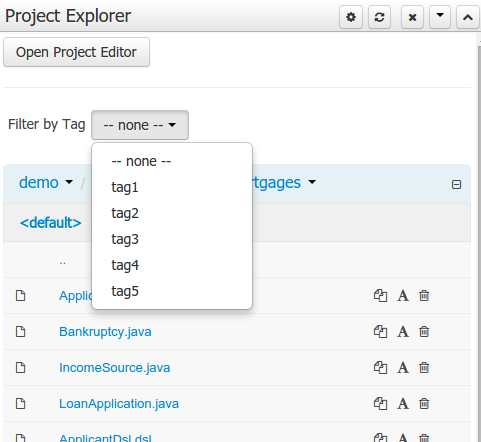
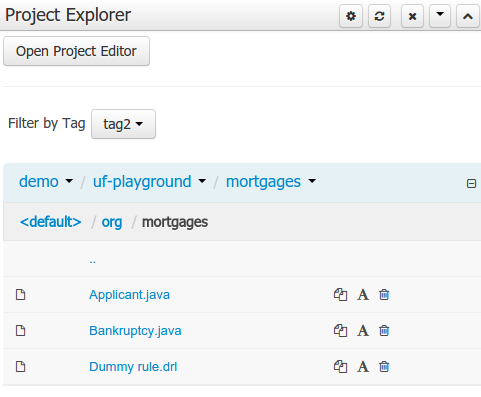
To make easy view the elements on packages that contain a lot of assets, is possible to enabling the Tag filter, which allows you to filter the assets by their tags.
To see how to add tags to an asset look at: Section 18.7.3, “Tags Editor”
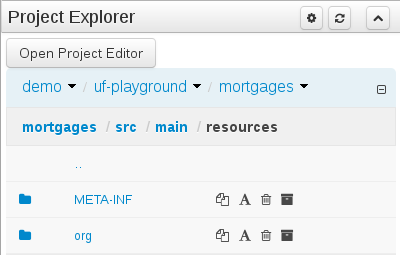
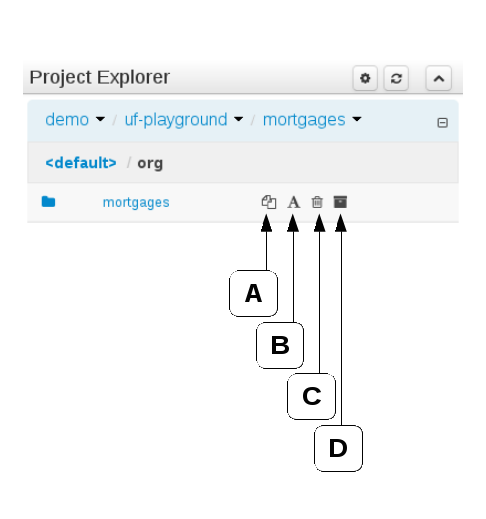
Copy, rename and delete actions are available on Links mode, for packages (in of Project View) and for files and directories as well (in Repository View). Download action is available for directories. Download downloads the selected directory as a zip file.
A : Copy
B : Rename
C : Delete
D : Download
Warning
Workbench roadmap includes a refactoring and an impact analyses tools, but currently doesn't have it. Until both tools are provided make sure that your changes (copy/rename/delete) on packages, files or directories don't have a major impact on your project.
In cases that your change had an unexpected impact, Workbench allows you to restore your repository using the Repository editor.
Important
Files locked by other users as well as directories that contain such files cannot be renamed or deleted until the corresponding locks are released. If that is the case the rename and delete symbols will be deactivated. To learn more about locking see Section 18.7.2, “Asset Editor” for details.

The Project Editor screen can be accessed from Project Explorer. Project Editor shows the settings for the currently active project.
Unlike most of the workbench editors, project editor edits more than one file. Showing everything that is needed for configuring the KIE project in one place.
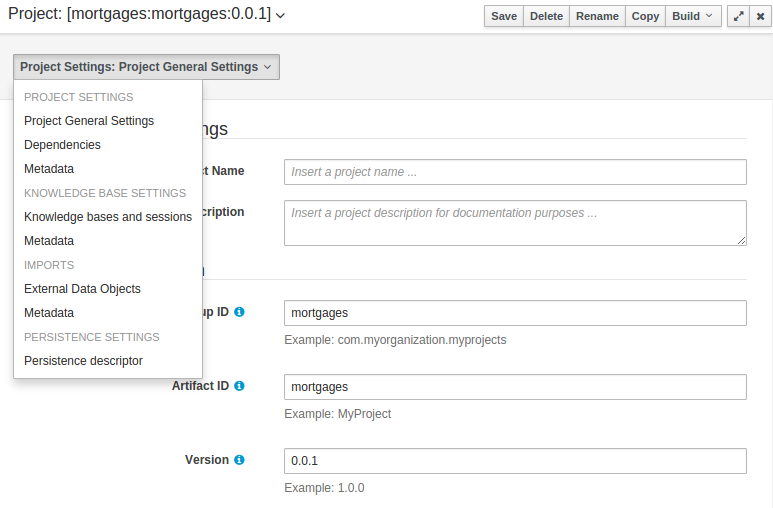
Build & Depoy builds the current project and deploys the KJAR into the workbench internal Maven repository.
Project Settings edits the pom.xml file used by Maven.
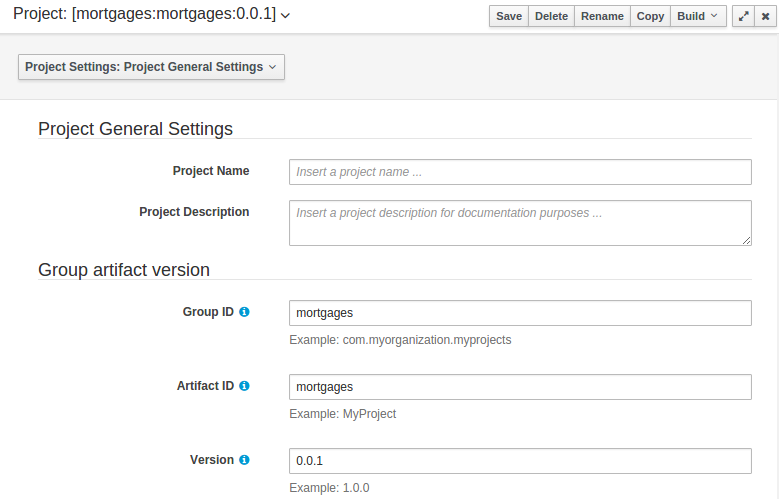
General settings provide tools for project name and GAV-data (Group, Artifact, Version). GAV values are used as identifiers to differentiate projects and versions of the same project.
The project may have any number of either internal or external dependencies. Dependency is a project that has been built and deployed to a Maven repository. Internal dependencies are projects built and deployed in the same workbench as the project. External dependencies are retrieved from repositories outside of the current workbench. Each dependency uses the GAV-values to specify the project name and version that is used by the project.
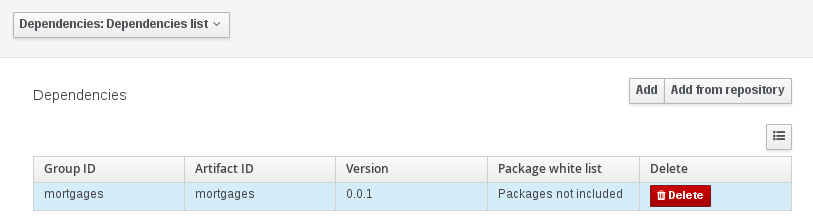
Classes and declared types in white listed packages show up as Data Objects that can be imported in assets. The full list is stored in package-name-white-list file that is stored in each project root.
Package white list has three modes:
All packages included: Every package defined in this jar is white listed.
Packages not included: None of the packages listed in this jar are white listed.
Some packages included: Only part of the packages in the jar are white listed.
Knowledge Base Settings edits the kmodule.xml file used by Drools.
Note
For more information about the Knowledge Base properties, check the Drools Expert documentation for kmodule.xml.
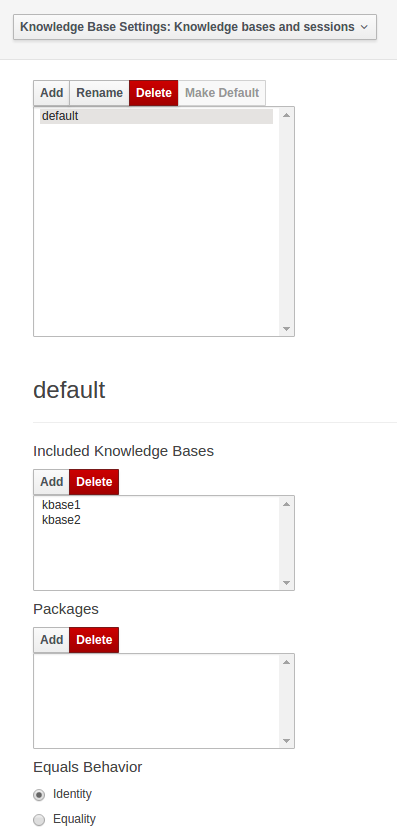
Knowledge bases and sessions lists the knowledge bases and the knowledge sessions specified for the project.
Lists all the knowledge bases by name. Only one knowledge base can be set as default.
Knowledge base can include other knowledge bases. The models, rules and any other content in the included knowledge base will be visible and usable by the currently selected knowledge base.
Rules and models are stored in packages. The packages property specifies what packages are included into this knowledge base.
Equals behavior is explained in the Drools Expert part of the documentation.
Event processing mode is explained in the Drools Fusion part of the documentation.
Settings edits the project.imports file used by the workbench editors.
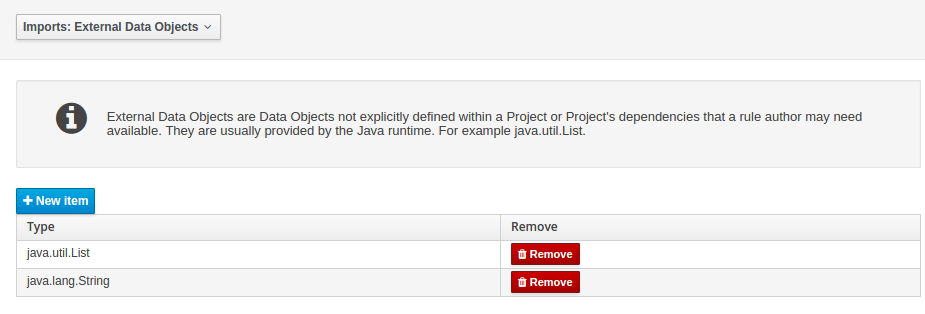
Data Objects provided by the Java Runtime environment may need to be registered to be available to rule authoring where such
Data Objects are not implicitly available as part of an existing Data Object defined within the Workbench or a Project dependency.
For example an Author may want to define a rule that checks for java.util.ArrayList in Working Memory. If a domain Data
Object has a field of type java.util.ArrayList there is no need create a registration.
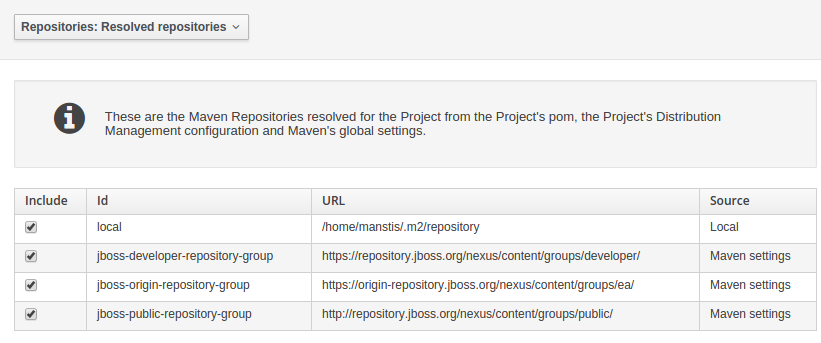
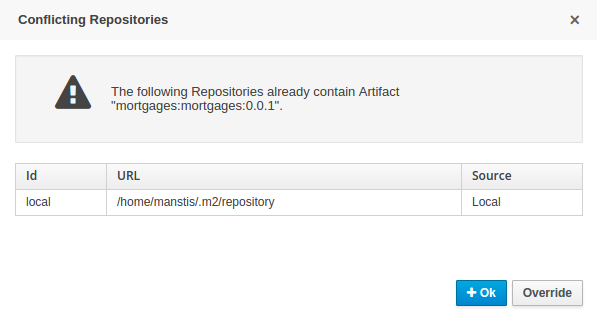
When performing any of the following operations a check is now made against all Maven Repositories, resolved for the Project,
for whether the Project's GroupId, ArtifactId and Version pre-exist. If a clash is found the operation is prevented; although this can be overridden by Users
with the admin role.
Note
The feature can be disabled by setting the System Property org.guvnor.project.gav.check.disabled to true.
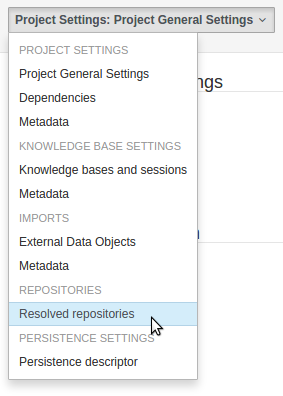
Resolved repositories are those discovered in:-
The Project's
POM<repositories>section (or any parentPOM).The Project's
POM<distributionManagement>section.Maven's global
settings.xmlconfiguration file.
Affected operations:-
Creation of new Managed Repositories.
Saving a Project defintion with the Project Editor.
Adding new Modules to a Managed Multi-Module Repository.
Saving the
pom.xmlfile.Build & installing a Project with the Project Editor.
Build & deploying a Project with the Project Editor.
Asset Management operations building, installing or deploying Projects.
RESToperations creating, installing or deploying Projects.
Users with the Admin role can override the list of Repositories checked using the "Repositories" settings in the Project Editor.
The Workbench provides a common and consistent service for users to understand whether files authored within the environment are valid.
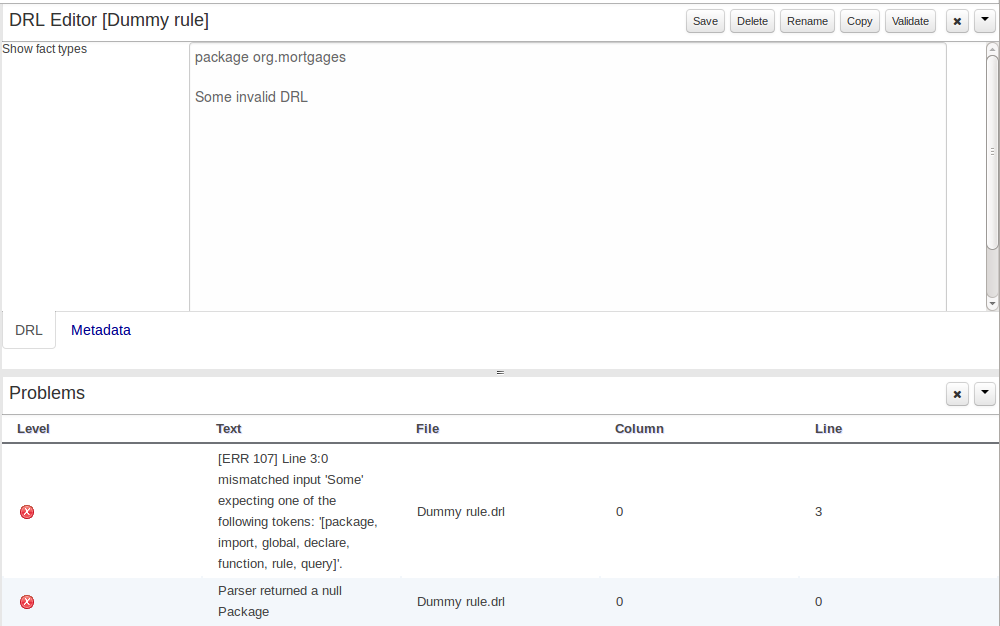
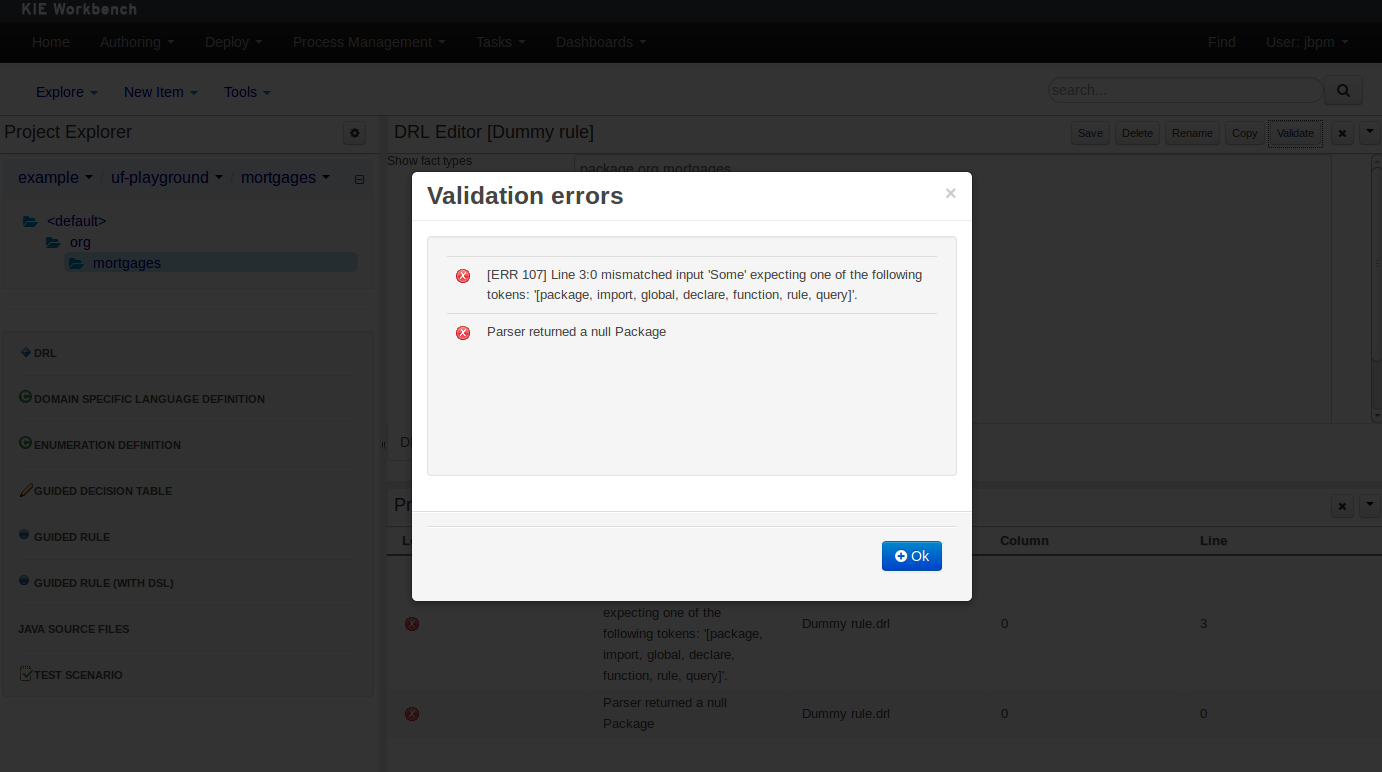
The Problems Panel shows real-time validation results of assets within a Project.
When a Project is selected from the Project Explorer the Problems Panel will refresh with validation results of the chosen Project.
When files are created, saved or deleted the Problems Panel content will update to show either new validation errors, or remove existing if a file was deleted.
Figure 18.54. The Problems Panel
Here an invalid DRL file has been created and saved.
The Problems Panel shows the validation errors.
By default, a data model is always constrained to the context of a project. For the purpose of this tutorial, we will assume that a correctly configured project already exists and the authoring perspective is open.
To start the creation of a data model inside a project, take the following steps:
From the home panel, select the authoring perspective and use the project explorer to browse to the given project.
Open the Data Modeller tool by clicking on a Data Object file, or using the "New Item -> Data Object" menu option.
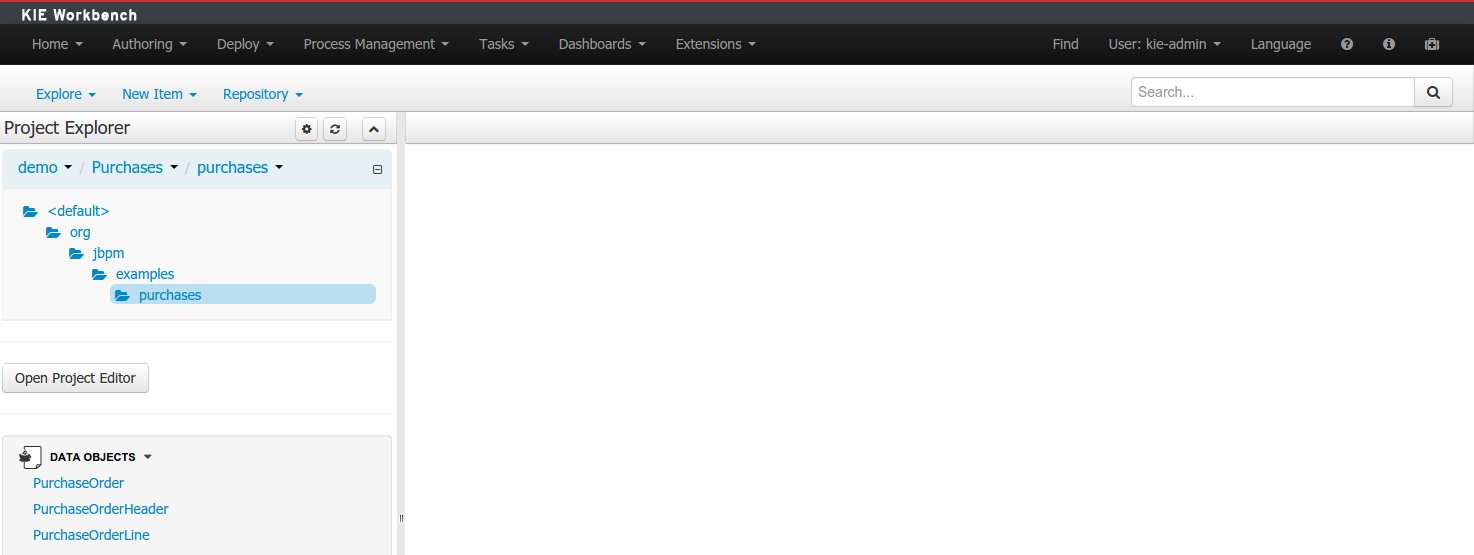
This will start up the Data Modeller tool, which has the following general aspect:
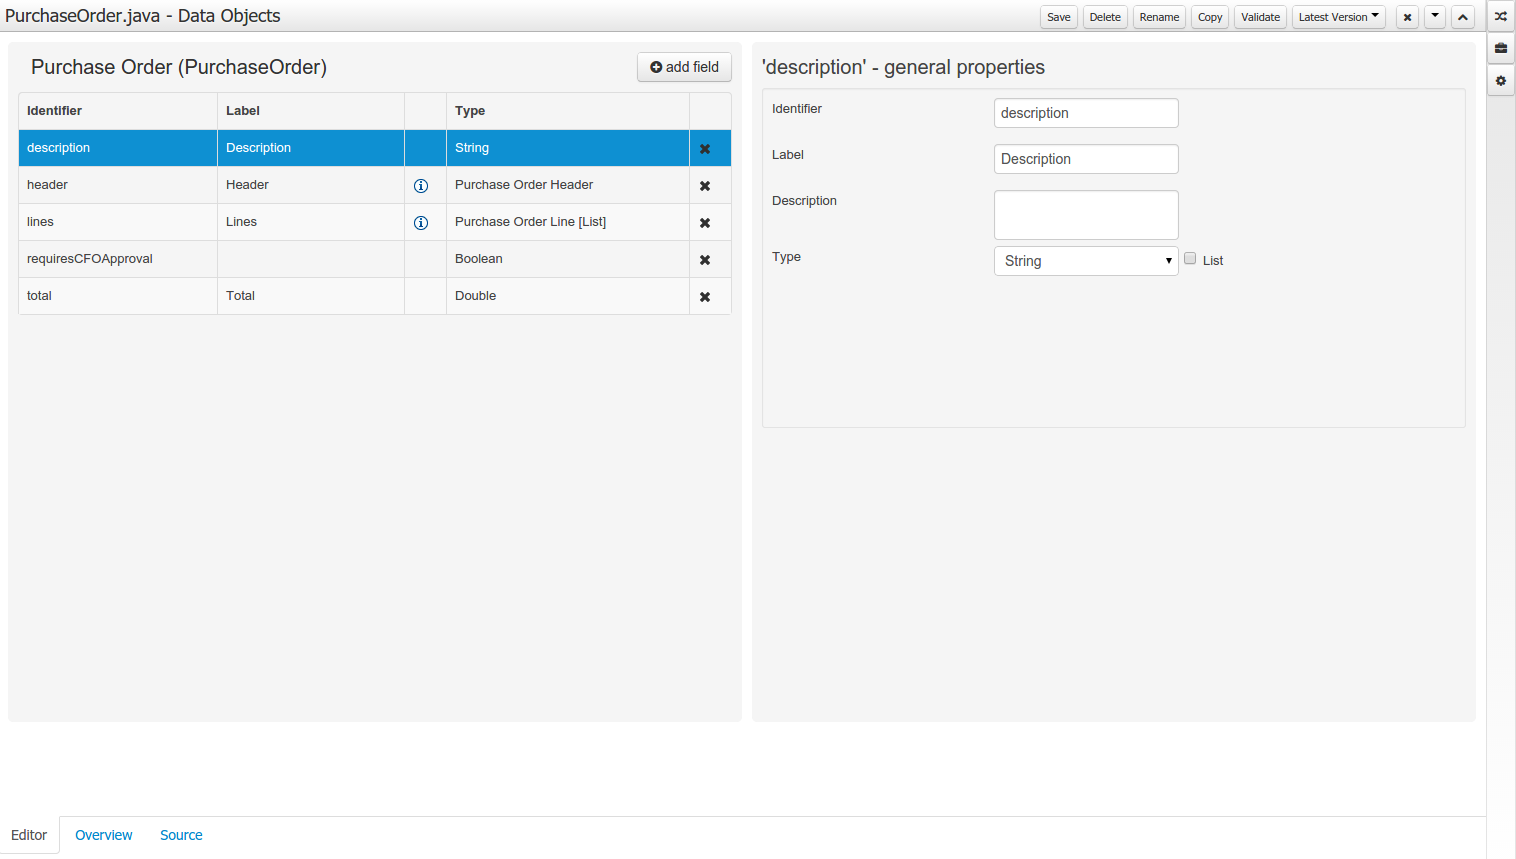
The "Editor" tab is divided into the following sections:
The new field section is dedicated to the creation of new fields, and is opened when the "add field" button is pressed.
The Data Object's "field browser" section displays a list with the data object fields.
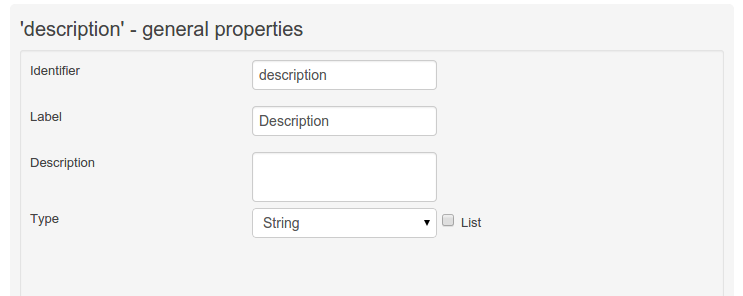
The "Data Object / Field general properties" section. This is the rightmost section of the Data Modeller editor and visualizes the "Data Object" or "Field" general properties, depending on user selection.
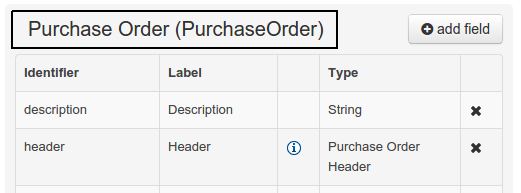
Data Object general properties can be selected by clicking on the Data Object Selector.
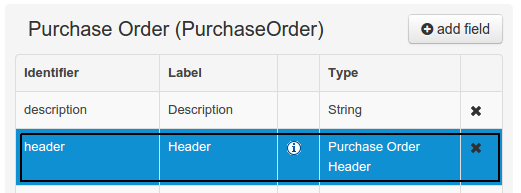
Field general properties can be selected by clicking on a field.
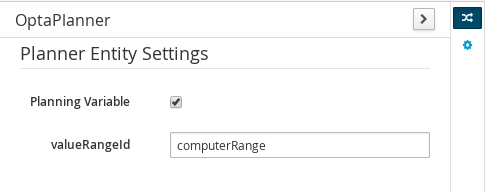
On workbench's right side a new "Tool Bar" is provided that enables the selection of different context sensitive tool windows that will let the user do domain specific configurations. Currently four tool windows are provided for the following domains "Drools & jBPM", "OptaPlanner", "Persistence" and "Advanced" configurations.
Note
To see and use the OptaPlanner tool window, the user needs to have the role
plannermgmt.


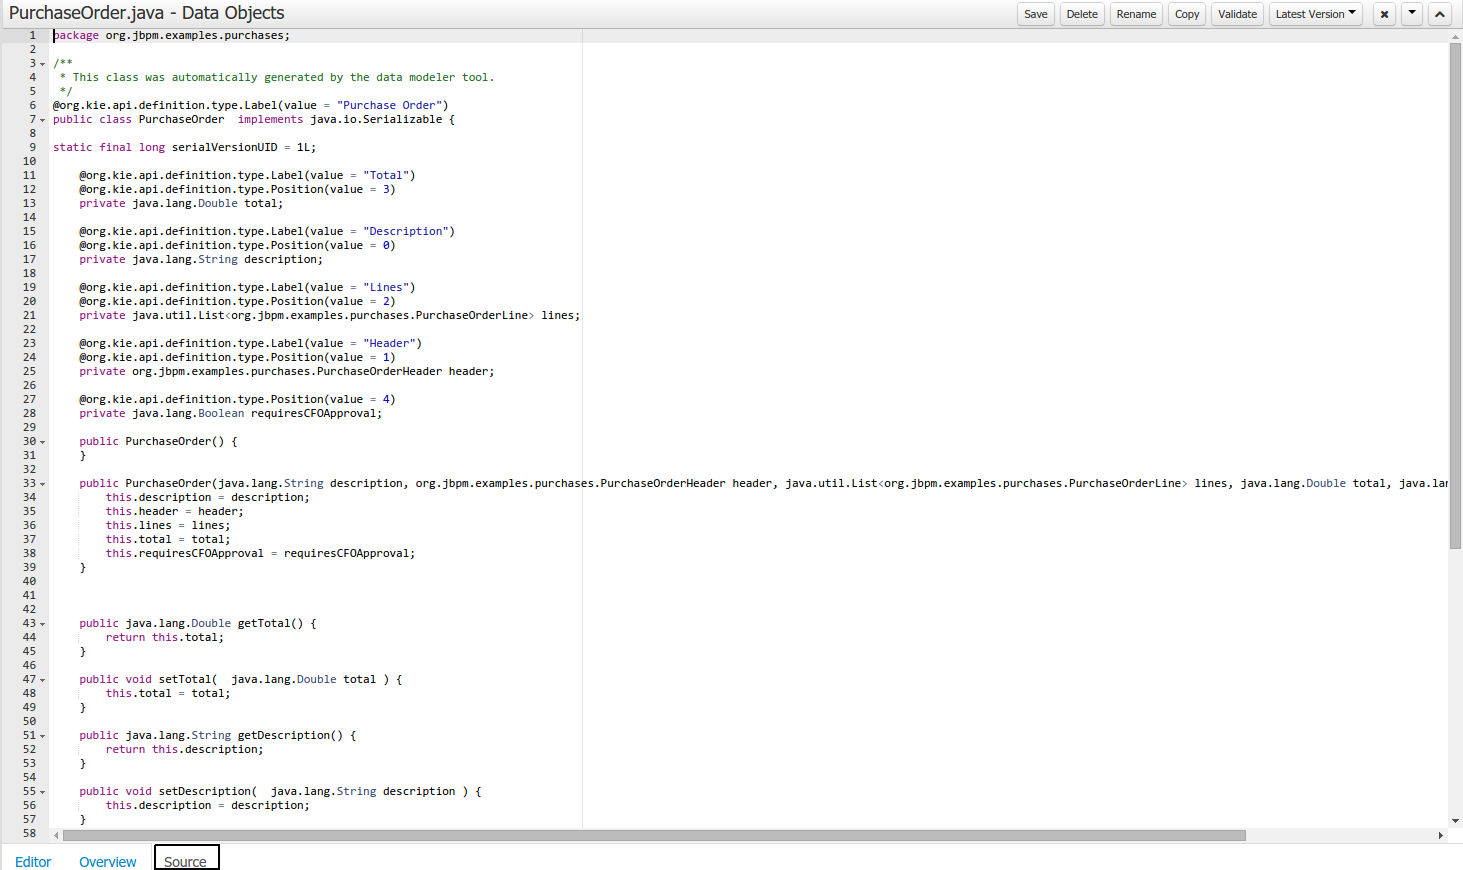
The "Source" tab shows an editor that allows the visualization and modification of the generated java code.
Round trip between the "Editor" and "Source" tabs is possible, and also source code preservation is provided. It means that no matter where the Java code was generated (e.g. Eclipse, Data modeller), the data modeller will only update the necessary code blocks to maintain the model updated.
The "Overview" tab shows the standard metadata and version information as the other workbench editors.
A data model consists of data objects which are a logical representation of some real-world data. Such data objects have a fixed set of modeller (or application-owned) properties, such as its internal identifier, a label, description, package etc. Besides those, a data object also has a variable set of user-defined fields, which are an abstraction of a real-world property of the type of data that this logical data object represents.
Creating a data object can be achieved using the workbench "New Item - Data Object" menu option.
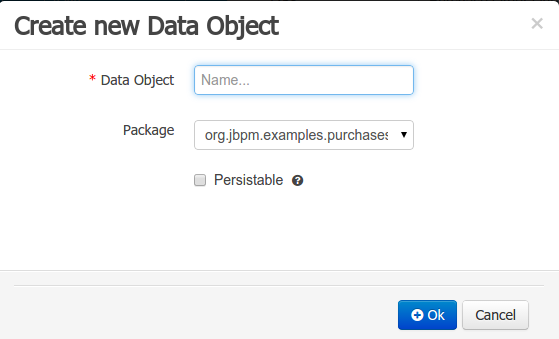
Both resource name and location are mandatory parameters. When the "Ok" button is pressed a new Java file will be created and a new editor instance will be opened for the file edition. The optional "Persistable" attribute will add by default configurations on the data object in order to make it a JPA entity. Use this option if your jBPM project needs to store data object's information in a data base.
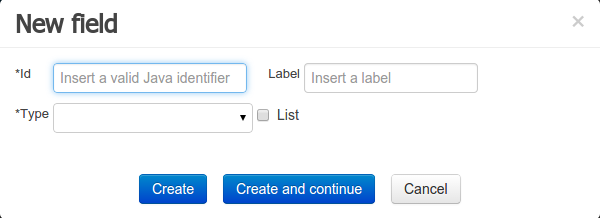
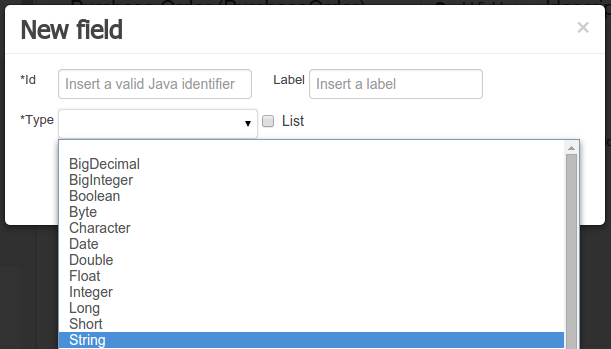
Once the data object has been created, it now has to be completed by adding user-defined properties to its definition. This can be achieved by pressing the "add field" button. The "New Field" dialog will be opened and the new field can be created by pressing the "Create" button. The "Create and continue" button will also add the new field to the Data Object, but won't close the dialog. In this way multiple fields can be created avoiding the popup opening multiple times. The following fields can (or must) be filled out:
The field's internal identifier (mandatory). The value of this field must be unique per data object, i.e. if the proposed identifier already exists within current data object, an error message will be displayed.
A label (optional): as with the data object definition, the user can define a user-friendly label for the data object field which is about to be created. This has no further implications on how fields from objects of this data object will be treated. If a label is defined, then this is how the field will be displayed throughout the data modeller tool.
A field type (mandatory): each data object field needs to be assigned with a type.
This type can be either of the following:
A 'primitive java object' type: these include most of the object equivalents of the standard Java primitive types, such as Boolean, Short, Float, etc, as well as String, Date, BigDecimal and BigInteger.
A 'data object' type: any user defined data object automatically becomes a candidate to be defined as a field type of another data object, thus enabling the creation of relationships between them. A data object field can be created either in 'single' or in 'multiple' form, the latter implying that the field will be defined as a collection of this type, which will be indicated by selecting "List" checkbox.
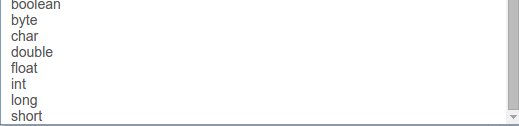
A 'primitive java' type: these include java primitive types byte, short, int, long, float, double, char and boolean.

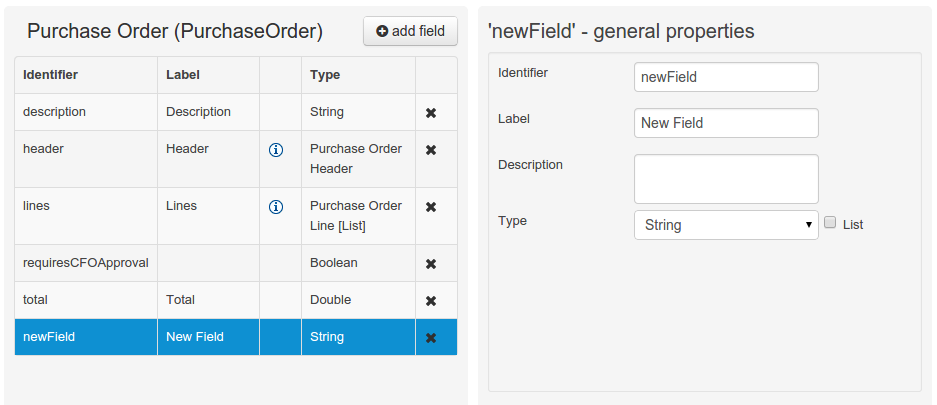
When finished introducing the initial information for a new field, clicking the 'Create' button will add the newly created field to the end of the data object's fields table below:
The new field will also automatically be selected in the data object's field list, and its properties will be shown in the Field general properties editor. Additionally the field properties will be loaded in the different tool windows, in this way the field will be ready for edition in whatever selected tool window.
At any time, any field (without restrictions) can be deleted from a data object definition by clicking on the corresponding 'x' icon in the data object's fields table.
As stated before, both Data Objects as well as Fields require some of their initial properties to be set upon creation. Additionally there are three domains of properties that can be configured for a given Data Object. A domain is basically a set of properties related to a given business area. Current available domains are, "Drools & jJBPM", "Persistence" and the "Advanced" domain. To work on a given domain the user should select the corresponding "Tool window" (see below) on the right side toolbar. Every tool window usually provides two editors, the "Data Object" level editor and the "Field" level editor, that will be shown depending on the last selected item, the Data Object or the Field.
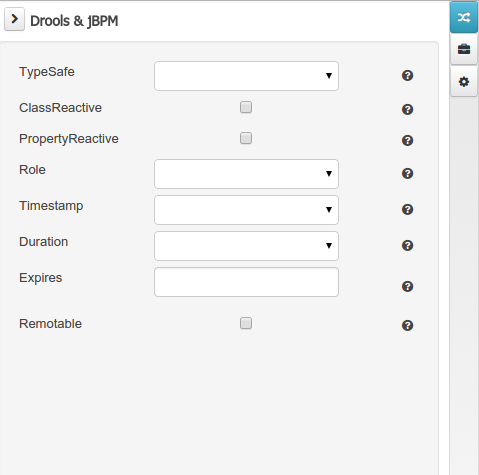
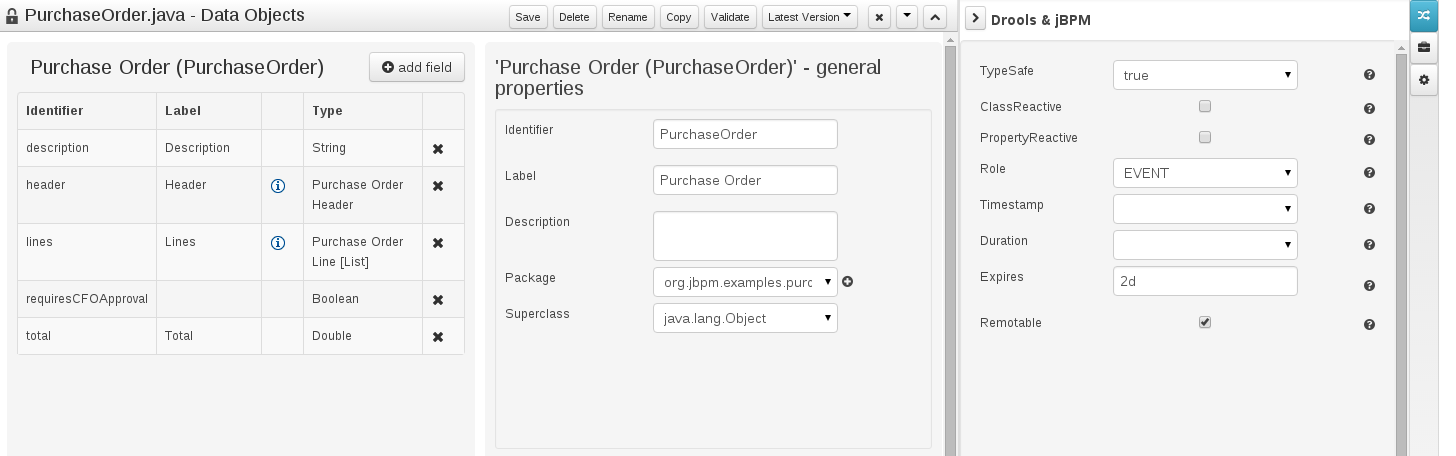
The Drools & jBPM domain editors manages the set of Data Object or Field properties related to drools applications.
The Drools & jBPM object editor manages the object level drools properties
TypeSafe: this property allows to enable/disable the type safe behaviour for current type. By default all type declarations are compiled with type safety enabled. (See Drools for more information on this matter).
ClassReactive: this property allows to mark this type to be treated as "Class Reactive" by the Drools engine. (See Drools for more information on this matter).
PropertyReactive: this property allows to mark this type to be treated as "Property Reactive" by the Drools engine. (See Drools for more information on this matter).
Role: this property allows to configure how the Drools engine should handle instances of this type: either as regular facts or as events. By default all types are handled as a regular fact, so for the time being the only value that can be set is "Event" to declare that this type should be handled as an event. (See Drools Fusion for more information on this matter).
Timestamp: this property allows to configure the "timestamp" for an event, by selecting one of his attributes. If set the engine will use the timestamp from the given attribute instead of reading it from the Session Clock. If not, the engine will automatically assign a timestamp to the event. (See Drools Fusion for more information on this matter).
Duration: this property allows to configure the "duration" for an event, by selecting one of his attributes. If set the engine will use the duration from the given attribute instead of using the default event duration = 0. (See Drools Fusion for more information on this matter).
Expires: this property allows to configure the "time offset" for an event expiration. If set, this value must be a temporal interval in the form: [#d][#h][#m][#s][#[ms]] Where [ ] means an optional parameter and # means a numeric value. e.g.: 1d2h, means one day and two hours. (See Drools Fusion for more information on this matter).
Remotable: If checked this property makes the Data Object available to be used with jBPM remote services as REST, JMS and WS. (See jBPM for more information on this matter).
The Drools & jBPM object editor manages the field level drools properties
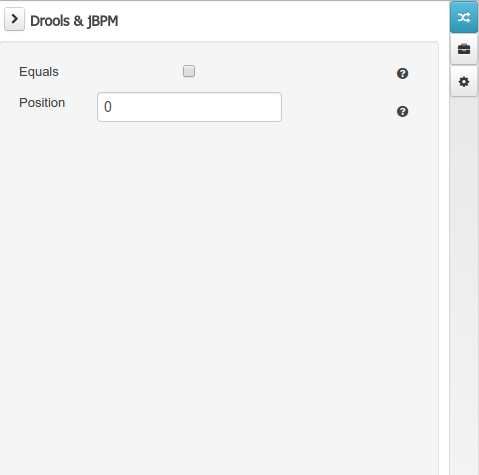
Equals: checking this property for a Data Object field implies that it will be taken into account, at the code generation level, for the creation of both the equals() and hashCode() methods in the generated Java class. We will explain this in more detail in the following section.
Position: this field requires a zero or positive integer. When set, this field will be interpreted by the Drools engine as a positional argument (see the section below and also the Drools documentation for more information on this subject).
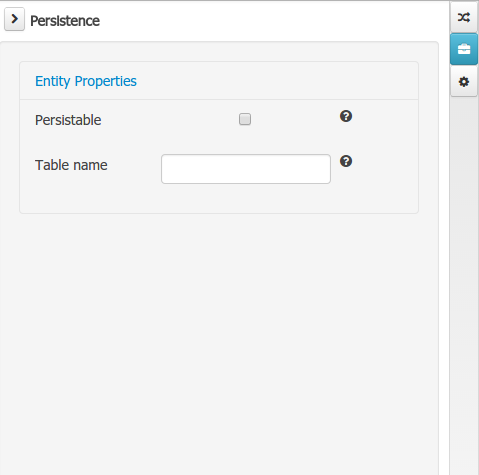
The Persistence domain editors manages the set of Data Object or Field properties related to persistence.
Persistence domain object editor manages the object level persistence properties
Persistable: this property allows to configure current Data Object as persistable.
Table name: this property allows to set a user defined database table name for current Data Object.
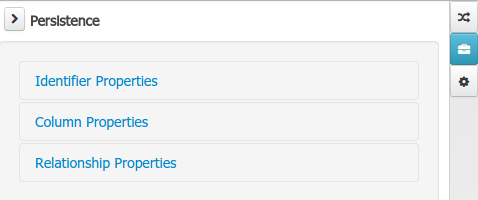
The persistence domain field editor manages the field level persistence properties and is divided in three sections.
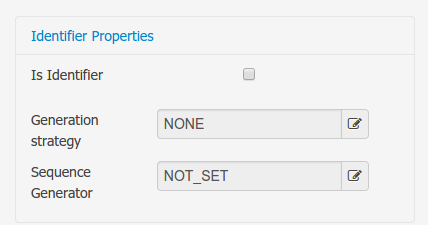
A persistable Data Object should have one and only one field defined as the Data Object identifier. The identifier is typically a unique number that distinguishes a given Data Object instance from all other instances of the same class.
Is Identifier: marks current field as the Data Object identifier. A persistable Data Object should have one and only one field marked as identifier, and it should be a base java type, like String, Integer, Long, etc. A field that references a Data Object, or is a multiple field can not be marked as identifier. And also composite identifiers are not supported in this version. When a persistable Data Object is created an identifier field is created by default with the properly initializations, it's strongly recommended to use this identifier.
Generation Strategy: the generation strategy establishes how the identifier values will be automatically generated when the Data Object instances are created and stored in a database. (e.g. by the forms associated to jBPM processes human tasks.) When the by default Identifier field is created, the generation strategy will be also automatically set and it's strongly recommended to use this configuration.
Sequence Generator: the generator represents the seed for the values that will be used by the Generation Strategy. When the by default Identifier field is created the Sequence Generator will be also automatically generated and properly configured to be used by the Generation Strategy.
The column properties section enables the customization of some properties of the database column that will store the field value.
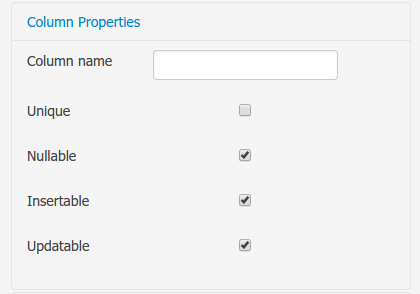
Column name: optional value that sets the database column name for the given field.
Unique: When checked the unique property establishes that current field value should be a unique key when stored in the database. (if not set the default value is false)
Nullable: When checked establishes that current field value can be null when stored in a database. (if not set the default value is true)
Insertable: When checked establishes that column will be included in SQL INSERT statements generated by the persistence provider. (if not set the default value is true)
Updatable: When checked establishes that the column will be included SQL UPDATE statements generated by the persistence provider. (if not set the default value is true)
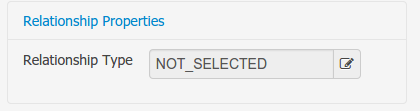
When the field's type is a Data Object type, or a list of a Data Object type a relationship type should be set in order to let the persistence provider to manage the relation. Fortunately this relation type is automatically set when such kind of fields are added to an already marked as persistable Data Object. The relationship type is set by the following popup.
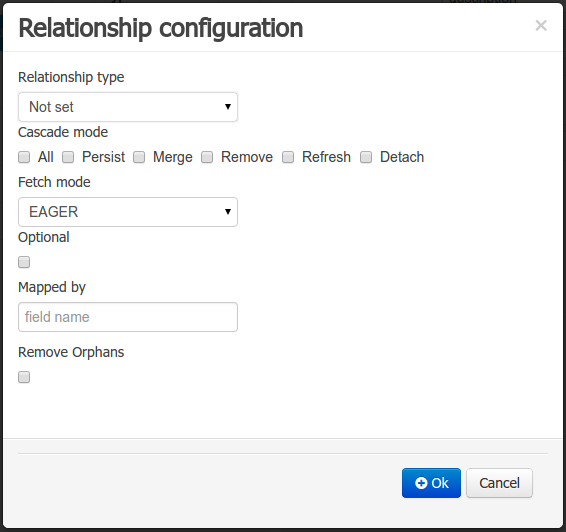
Relationship type: sets the type of relation from one of the following options:
One to one: typically used for 1:1 relations where "A is related to one instance of B", and B exists only when A exists. e.g. PurchaseOrder -> PurchaseOrderHeader (a PurchaseOrderHeader exists only if the PurchaseOrder exists)
One to many: typically used for 1:N relations where "A is related to N instances of B", and the related instances of B exists only when A exists. e.g. PurchaseOrder -> PurchaseOrderLine (a PurchaseOrderLine exists only if the PurchaseOrder exists)
Many to one: typically used for 1:1 relations where "A is related to one instance of B", and B can exist even without A. e.g. PurchaseOrder -> Client (a Client can exist in the database even without an associated PurchaseOrder)
Many to many: typically used for N:N relations where "A can be related to N instances of B, and B can be related to M instances of A at the same time", and both B an A instances can exits in the database independently of the related instances. e.g. Course -> Student. (Course can be related to N Students, and a given Student can attend to M courses)
When a field of type "Data Object" is added to a given persistable Data Object, the "Many to One" relationship type is generated by default.
And when a field of type "list of Data Object" is added to a given persistable Data Object , the "One to Many" relationship is generated by default.
Cascade mode: Defines the set of cascadable operations that are propagated to the associated entity. The value cascade=ALL is equivalent to cascade={PERSIST, MERGE, REMOVE, REFRESH}. e.g. when A -> B, and cascade "PERSIST or ALL" is set, if A is saved, then B will be also saved.
The by default cascade mode created by the data modeller is "ALL" and it's strongly recommended to use this mode when Data Objects are being used by jBPM processes and forms.
Fetch mode: Defines how related data will be fetched from database at reading time.
EAGER: related data will be read at the same time. e.g. If A -> B, when A is read from database B will be read at the same time.
LAZY: reading of related data will be delayed usually to the moment they are required. e.g. If PurchaseOrder -> PurchaseOrderLine the lines reading will be postponed until a method "getLines()" is invoked on a PurchaseOrder instance.
The default fetch mode created by the data modeller is "EAGER" and it's strongly recommended to use this mode when Data Objects are being used by jBPM processes and forms.
Optional: establishes if the right side member of a relationship can be null.
Mapped by: used for reverse relations.
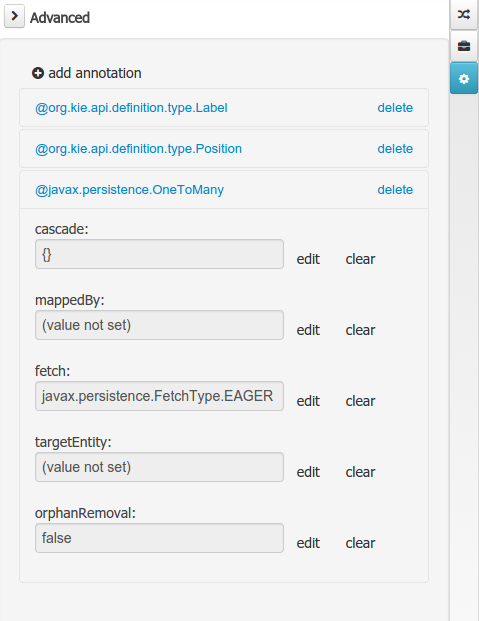
The advanced domain enables the configuration of whatever parameter set by the other domains as well as the adding of arbitrary parameters. As it will be shown in the code generation section every "Data Object / Field" parameter is represented by a java annotation. The advanced mode enables the configuration of this annotations.
The advanced domain editor has the same shape for both Data Object and Field.
The following operations are available
delete: enables the deletion of a given Data Object or Field annotation.
clear: clears a given annotation parameter value.
edit: enables the edition of a given annotation parameter value.
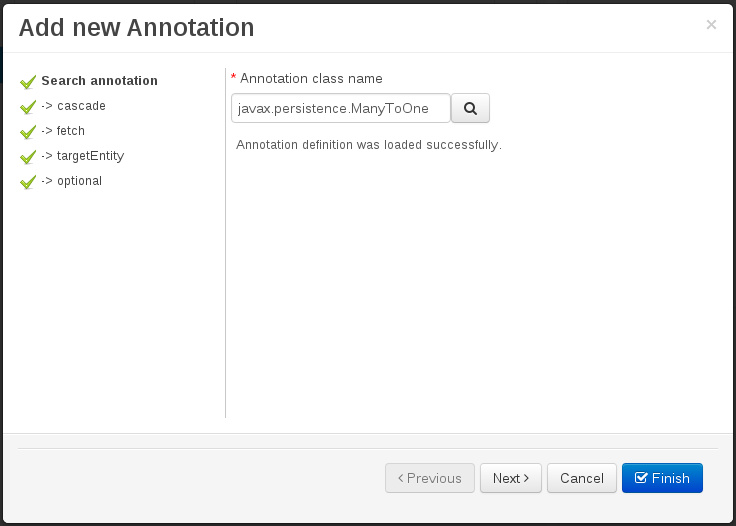
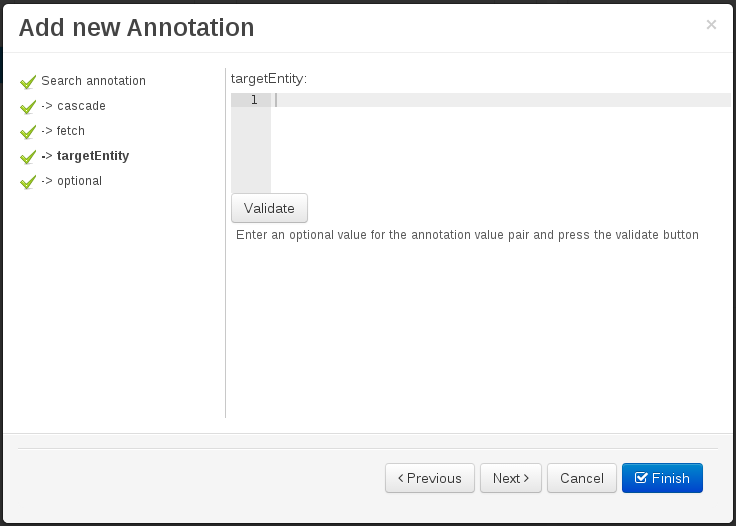
add annotation: The add annotation button will start a wizard that will let the addition of whatever java annotation available in the project dependencies.
Add annotation wizard step #1: the first step of the wizard requires the entering of a fully qualified class name of an annotation, and by pressing the "search" button the annotation definition will be loaded into the wizard. Additionally when the annotation definition is loaded, different wizard steps will be created in order to enable the completion of the different annotation parameters. Required parameters will be marked with "*".
Whenever it's possible the wizard will provide a suitable editor for the given parameters.
A generic parameter editor will be provided when it's not possible to calculate a customized editor
When all required parameters have been entered and validated, the finish button will be enabled and the wizard can be completed by adding the annotation to the given Data Object or Field.

The data model in itself is merely a visual tool that allows the user to define high-level data structures, for them to interact with the Drools Engine on the one hand, and the jBPM platform on the other. In order for this to become possible, these high-level visual structures have to be transformed into low-level artifacts that can effectively be consumed by these platforms. These artifacts are Java POJOs (Plain Old Java Objects), and they are generated every time the data model is saved, by pressing the "Save" button in the top Data Modeller Menu. Additionally when the user round trip between the "Editor" and "Source" tab, the code is auto generated to maintain the consistency with the Editor view and vice versa.

The resulting code is generated according to the following transformation rules:
The data object's identifier property will become the Java class's name. It therefore needs to be a valid Java identifier.
The data object's package property becomes the Java class's package declaration.
The data object's superclass property (if present) becomes the Java class's extension declaration.
The data object's label and description properties will translate into the Java annotations "@org.kie.api.definition.type.Label" and "@org.kie.api.definition.type.Description", respectively. These annotations are merely a way of preserving the associated information, and as yet are not processed any further.
The data object's role property (if present) will be translated into the "@org.kie.api.definition.type.Role" Java annotation, that IS interpreted by the application platform, in the sense that it marks this Java class as a Drools Event Fact-Type.
The data object's type safe property (if present) will be translated into the "@org.kie.api.definition.type.TypeSafe Java annotation. (see Drools)
The data object's class reactive property (if present) will be translated into the "@org.kie.api.definition.type.ClassReactive Java annotation. (see Drools)
The data object's property reactive property (if present) will be translated into the "@org.kie.api.definition.type.PropertyReactive Java annotation. (see Drools)
The data object's timestamp property (if present) will be translated into the "@org.kie.api.definition.type.Timestamp Java annotation. (see Drools)
The data object's duration property (if present) will be translated into the "@org.kie.api.definition.type.Duration Java annotation. (see Drools)
The data object's expires property (if present) will be translated into the "@org.kie.api.definition.type.Expires Java annotation. (see Drools)
The data object's remotable property (if present) will be translated into the "@org.kie.api.remote.Remotable Java annotation. (see jBPM)
A standard Java default (or no parameter) constructor is generated, as well as a full parameter constructor, i.e. a constructor that accepts as parameters a value for each of the data object's user-defined fields.
The data object's user-defined fields are translated into Java class fields, each one of them with its own getter and setter method, according to the following transformation rules:
The data object field's identifier will become the Java field identifier. It therefore needs to be a valid Java identifier.
The data object field's type is directly translated into the Java class's field type. In case the field was declared to be multiple (i.e. 'List'), then the generated field is of the "java.util.List" type.
The equals property: when it is set for a specific field, then this class property will be annotated with the "@org.kie.api.definition.type.Key" annotation, which is interpreted by the Drools Engine, and it will 'participate' in the generated equals() method, which overwrites the equals() method of the Object class. The latter implies that if the field is a 'primitive' type, the equals method will simply compare its value with the value of the corresponding field in another instance of the class. If the field is a sub-entity or a collection type, then the equals method will make a method-call to the equals method of the corresponding data object's Java class, or of the java.util.List standard Java class, respectively.
If the equals property is checked for ANY of the data object's user defined fields, then this also implies that in addition to the default generated constructors another constructor is generated, accepting as parameters all of the fields that were marked with Equals. Furthermore, generation of the equals() method also implies that also the Object class's hashCode() method is overwritten, in such a manner that it will call the hashCode() methods of the corresponding Java class types (be it 'primitive' or user-defined types) for all the fields that were marked with Equals in the Data Model.
The position property: this field property is automatically set for all user-defined fields, starting from 0, and incrementing by 1 for each subsequent new field. However the user can freely change the position among the fields. At code generation time this property is translated into the "@org.kie.api.definition.type.Position" annotation, which can be interpreted by the Drools Engine. Also, the established property order determines the order of the constructor parameters in the generated Java class.
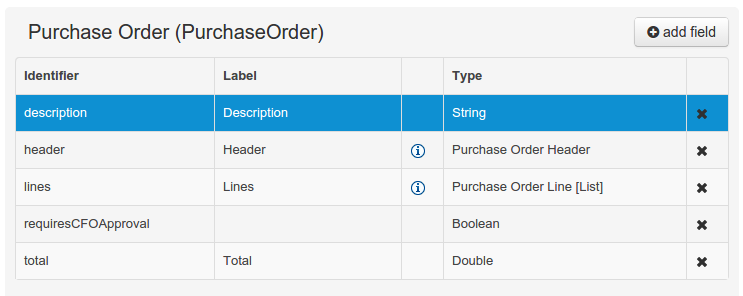
As an example, the generated Java class code for the Purchase Order data object, corresponding to its definition as shown in the following figure purchase_example.jpg is visualized in the figure at the bottom of this chapter. Note that the two of the data object's fields, namely 'header' and 'lines' were marked with Equals, and have been assigned with the positions 2 and 1, respectively).
    package org.jbpm.examples.purchases;

    /**
    * This class was automatically generated by the data modeler tool.
    */
    @org.kie.api.definition.type.Label("Purchase Order")
    @org.kie.api.definition.type.TypeSafe(true)
    @org.kie.api.definition.type.Role(org.kie.api.definition.type.Role.Type.EVENT)
    @org.kie.api.definition.type.Expires("2d")
    @org.kie.api.remote.Remotable
    public class PurchaseOrder implements java.io.Serializable
    {

    static final long serialVersionUID = 1L;

    @org.kie.api.definition.type.Label("Total")
    @org.kie.api.definition.type.Position(3)
    private java.lang.Double total;

    @org.kie.api.definition.type.Label("Description")
    @org.kie.api.definition.type.Position(0)
    private java.lang.String description;

    @org.kie.api.definition.type.Label("Lines")
    @org.kie.api.definition.type.Position(2)
    @org.kie.api.definition.type.Key
    private java.util.List<org.jbpm.examples.purchases.PurchaseOrderLine> lines;

    @org.kie.api.definition.type.Label("Header")
    @org.kie.api.definition.type.Position(1)
    @org.kie.api.definition.type.Key
    private org.jbpm.examples.purchases.PurchaseOrderHeader header;

    @org.kie.api.definition.type.Position(4)
    private java.lang.Boolean requiresCFOApproval;

    public PurchaseOrder()
    {
    }

    public java.lang.Double getTotal()
    {
    return this.total;
    }

    public void setTotal(java.lang.Double total)
    {
    this.total = total;
    }

    public java.lang.String getDescription()
    {
    return this.description;
    }

    public void setDescription(java.lang.String description)
    {
    this.description = description;
    }

    public java.util.List<org.jbpm.examples.purchases.PurchaseOrderLine> getLines()
    {
    return this.lines;
    }

    public void setLines(java.util.List<org.jbpm.examples.purchases.PurchaseOrderLine> lines)
    {
    this.lines = lines;
    }

    public org.jbpm.examples.purchases.PurchaseOrderHeader getHeader()
    {
    return this.header;
    }

    public void setHeader(org.jbpm.examples.purchases.PurchaseOrderHeader header)
    {
    this.header = header;
    }

    public java.lang.Boolean getRequiresCFOApproval()
    {
    return this.requiresCFOApproval;
    }

    public void setRequiresCFOApproval(java.lang.Boolean requiresCFOApproval)
    {
    this.requiresCFOApproval = requiresCFOApproval;
    }

    public PurchaseOrder(java.lang.Double total, java.lang.String description,
    java.util.List<org.jbpm.examples.purchases.PurchaseOrderLine> lines,
    org.jbpm.examples.purchases.PurchaseOrderHeader header,
    java.lang.Boolean requiresCFOApproval)
    {
    this.total = total;
    this.description = description;
    this.lines = lines;
    this.header = header;
    this.requiresCFOApproval = requiresCFOApproval;
    }

    public PurchaseOrder(java.lang.String description,
    org.jbpm.examples.purchases.PurchaseOrderHeader header,
    java.util.List<org.jbpm.examples.purchases.PurchaseOrderLine> lines,
    java.lang.Double total, java.lang.Boolean requiresCFOApproval)
    {
    this.description = description;
    this.header = header;
    this.lines = lines;
    this.total = total;
    this.requiresCFOApproval = requiresCFOApproval;
    }

    public PurchaseOrder(
    java.util.List<org.jbpm.examples.purchases.PurchaseOrderLine> lines,
    org.jbpm.examples.purchases.PurchaseOrderHeader header)
    {
    this.lines = lines;
    this.header = header;
    }

    @Override
    public boolean equals(Object o)
    {
    if (this == o)
    return true;
    if (o == null || getClass() != o.getClass())
    return false;
    org.jbpm.examples.purchases.PurchaseOrder that = (org.jbpm.examples.purchases.PurchaseOrder) o;
    if (lines != null ? !lines.equals(that.lines) : that.lines != null)
    return false;
    if (header != null ? !header.equals(that.header) : that.header != null)
    return false;
    return true;
    }

    @Override
    public int hashCode()
    {
    int result = 17;
    result = 31 * result + (lines != null ? lines.hashCode() : 0);
    result = 31 * result + (header != null ? header.hashCode() : 0);
    return result;
    }

    }
Using an external model means the ability to use a set for already defined POJOs in current project context. In order to make those POJOs available a dependency to the given JAR should be added. Once the dependency has been added the external POJOs can be referenced from current project data model.
There are two ways to add a dependency to an external JAR file:
Dependency to a JAR file already installed in current local M2 repository (typically associated the the user home).
Dependency to a JAR file installed in current KIE Workbench/Drools Workbench "Guvnor M2 repository". (internal to the application)
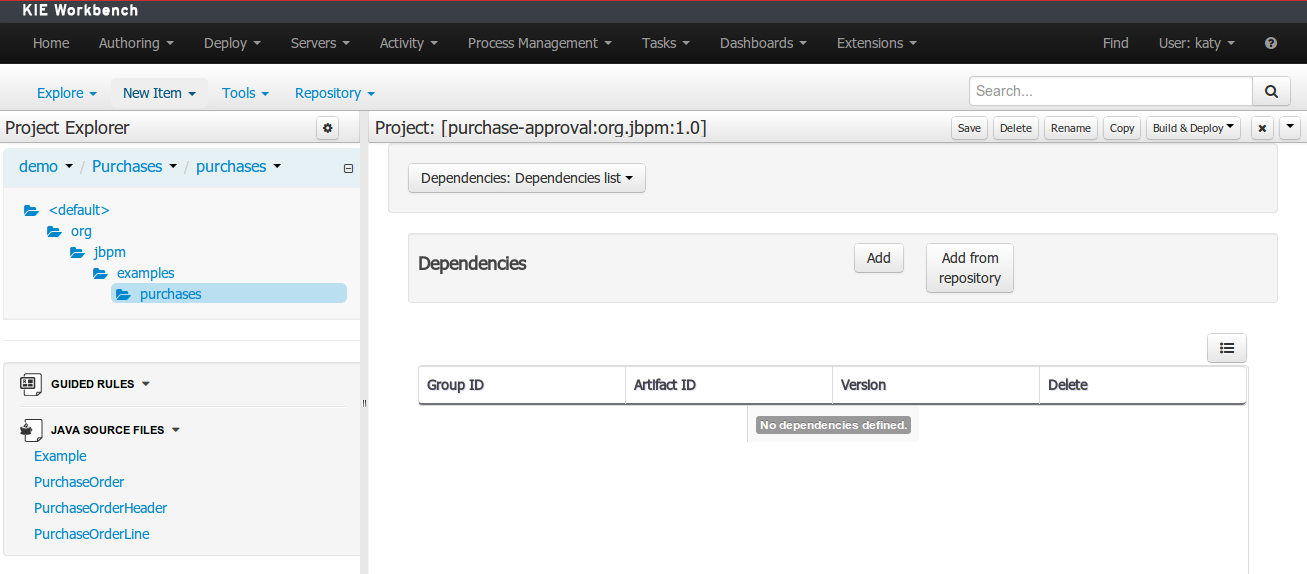
To add a dependency to a JAR file in local M2 repository follow these steps.
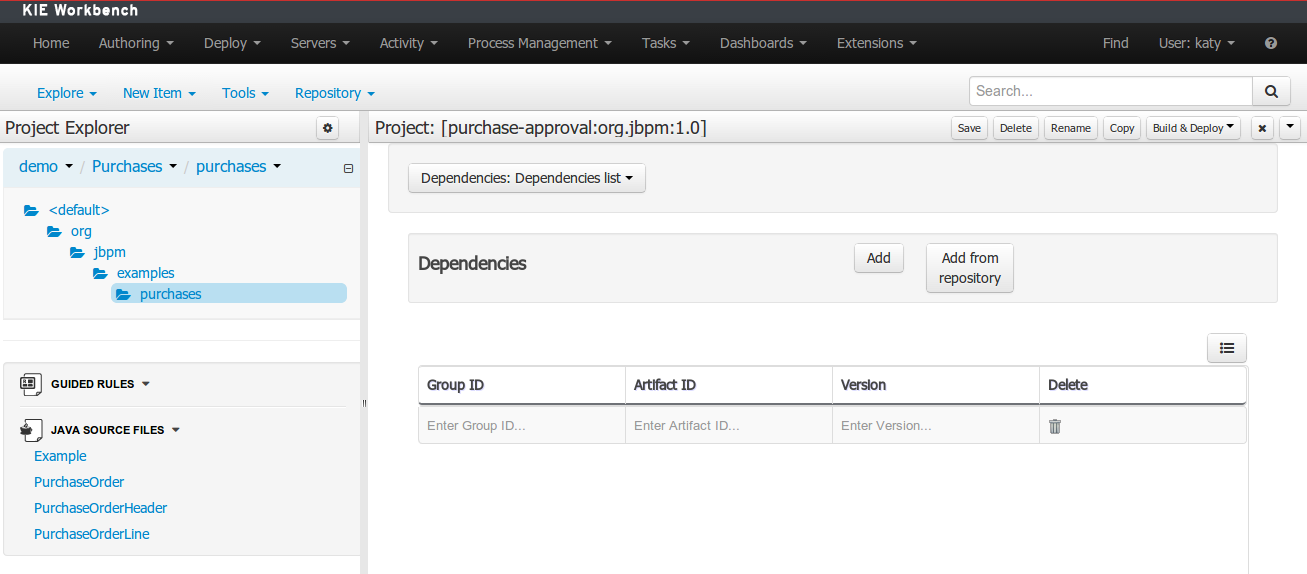
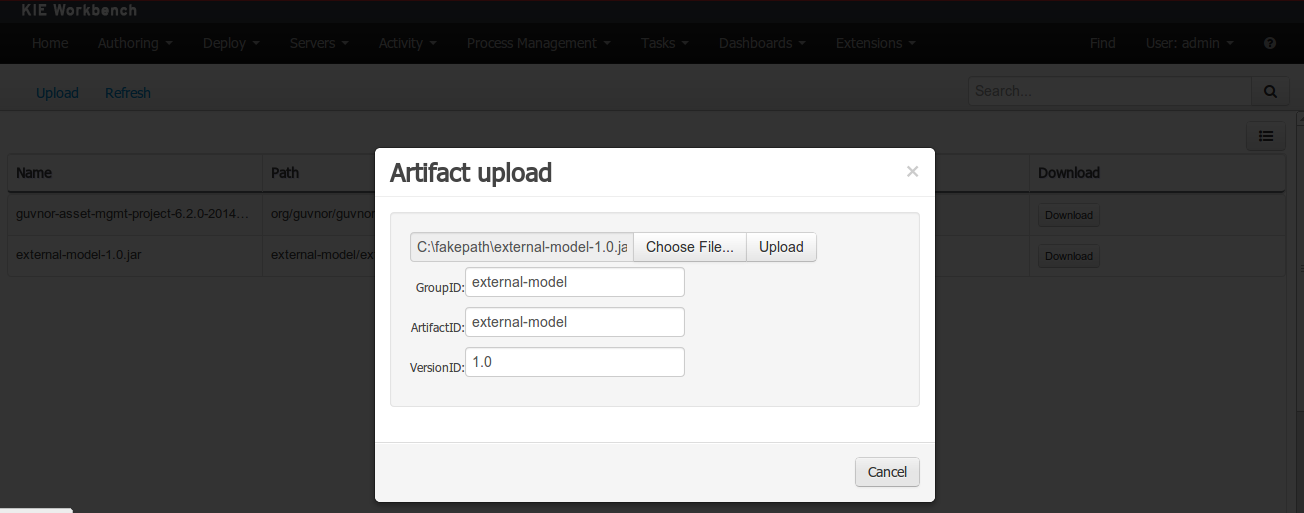
To add a dependency to a JAR file in current "Guvnor M2 repository" follow these steps.
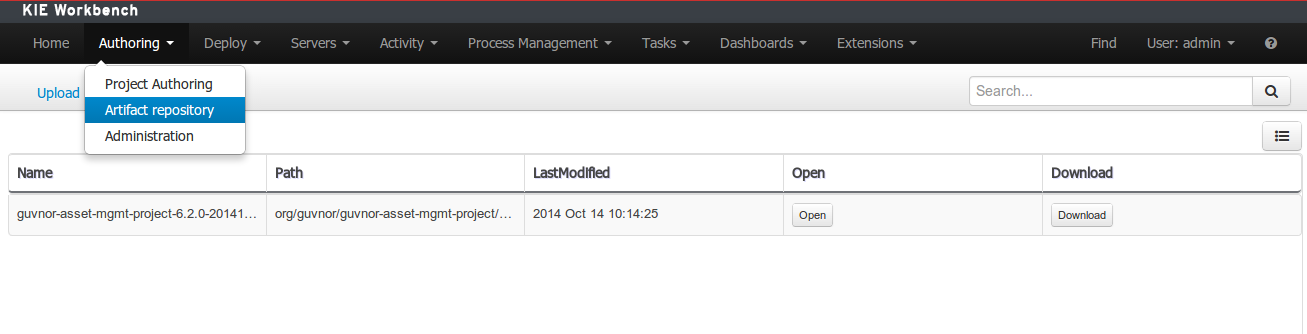
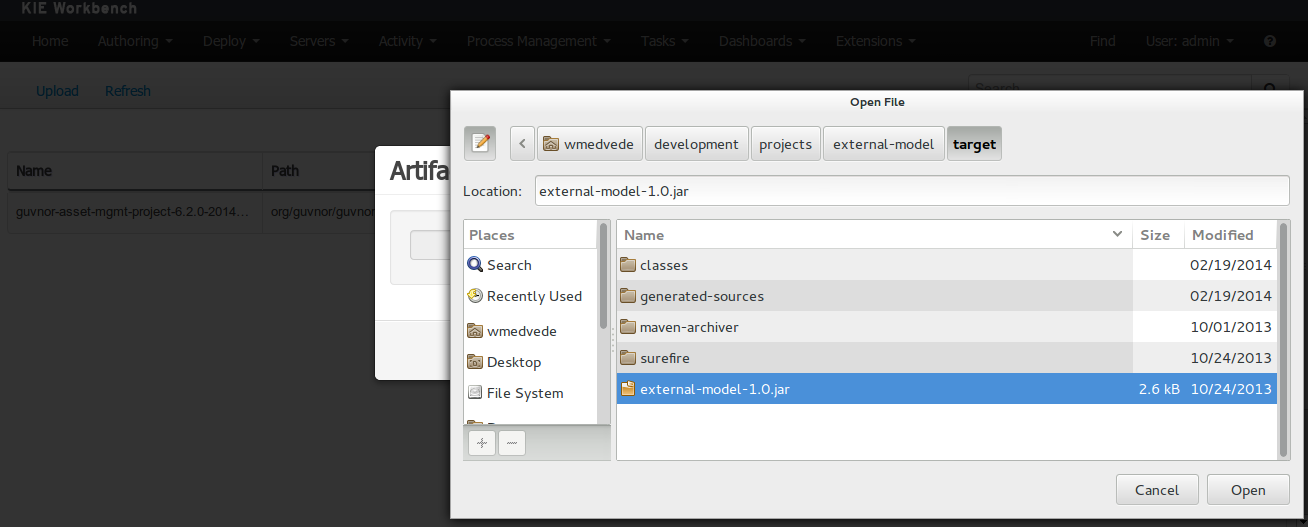
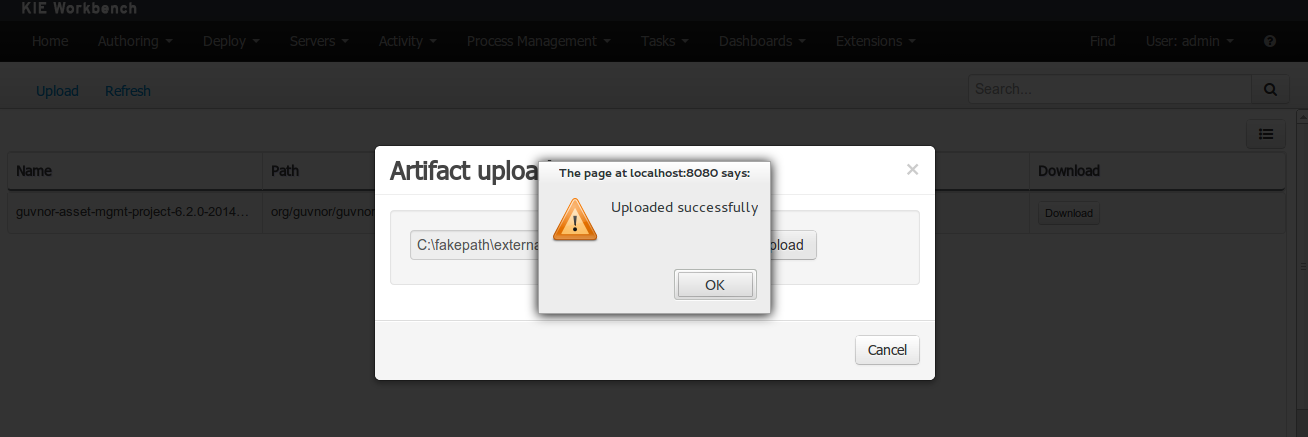
Once the file has been loaded it will be displayed in the repository files list.
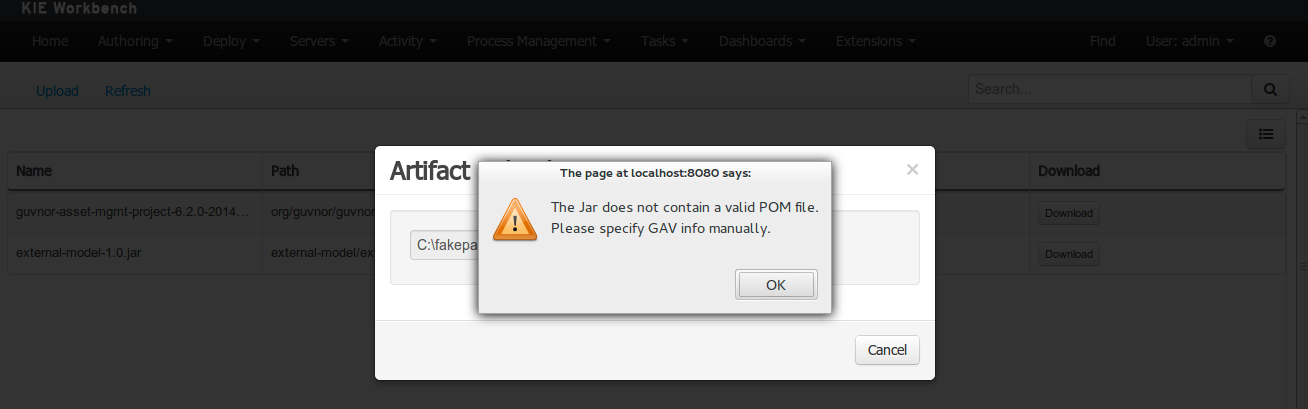
If the uploaded file is not a valid Maven JAR (don't have a pom.xml file) the system will prompt the user in order to provide a GAV for the file to be installed.
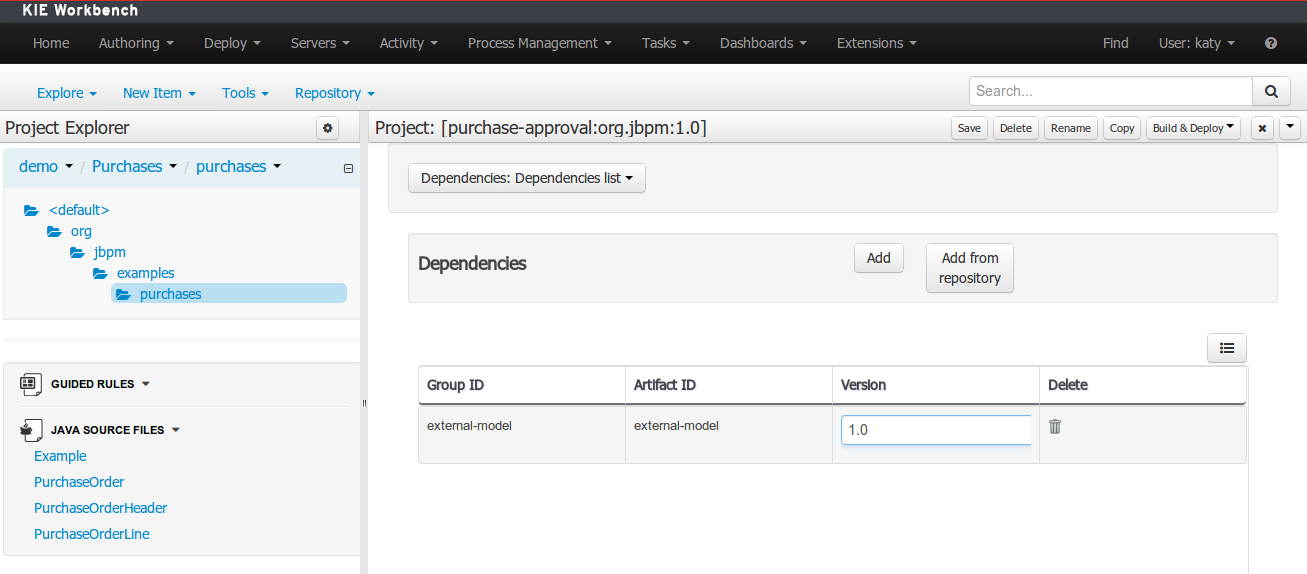
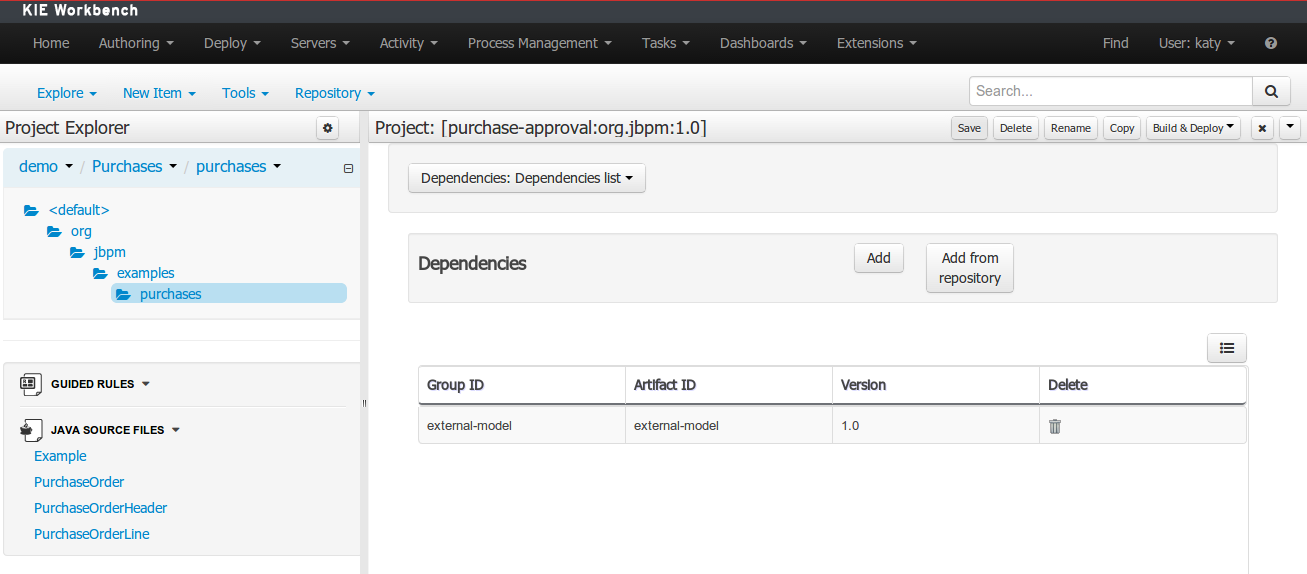
Open the project editor (see below) and click on the "Add from repository" button to open the JAR selector to see all the installed JAR files in current "Guvnor M2 repository". When the desired file is selected the project should be saved in order to make the new dependency available.

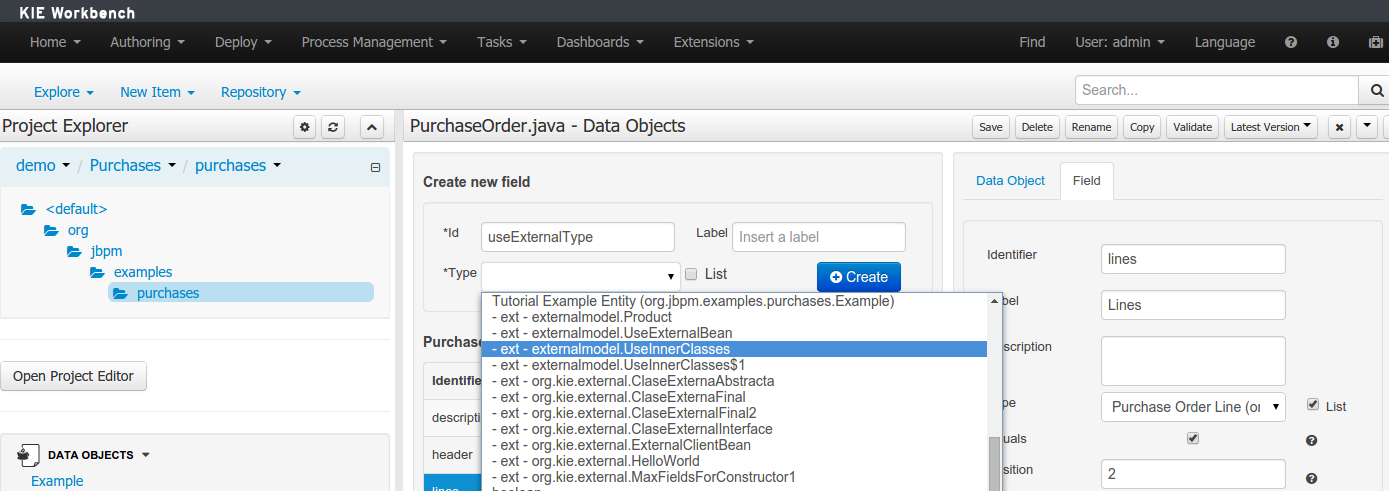
When a dependency to an external JAR has been set, the external POJOs can be used in the context of current project data model in the following ways:
External POJOs can be extended by current model data objects.
External POJOs can be used as field types for current model data objects.
The following screenshot shows how external objects are prefixed with the string " -ext- " in order to be quickly identified.
Current version implements roundtrip and code preservation between Data modeller and Java source code. No matter where the Java code was generated (e.g. Eclipse, Data modeller), the data modeller will only create/delete/update the necessary code elements to maintain the model updated, i.e, fields, getter/setters, constructors, equals method and hashCode method. Also whatever Type or Field annotation not managed by the Data Modeler will be preserved when the Java sources are updated by the Data modeller.
Aside from code preservation, like in the other workbench editors, concurrent modification scenarios are still possible. Common scenarios are when two different users are updating the model for the same project, e.g. using the data modeller or executing a 'git push command' that modifies project sources.
From an application context's perspective, we can basically identify two different main scenarios:
In this scenario the application user has basically just been navigating through the data model, without making any changes to it. Meanwhile, another user modifies the data model externally.
In this case, no immediate warning is issued to the application user. However, as soon as the user tries to make any kind of change, such as add or remove data objects or properties, or change any of the existing ones, the following pop-up will be shown:

The user can choose to either:
Re-open the data model, thus loading any external changes, and then perform the modification he was about to undertake, or
Ignore any external changes, and go ahead with the modification to the model. In this case, when trying to persist these changes, another pop-up warning will be shown:
The "Force Save" option will effectively overwrite any external changes, while "Re-open" will discard any local changes and reload the model.
Warning
"Force Save" overwrites any external changes!
The application user has made changes to the data model. Meanwhile, another user simultaneously modifies the data model from outside the application context.
In this alternative scenario, immediately after the external user commits his changes to the asset repository (or e.g. saves the model with the data modeller in a different session), a warning is issued to the application user:
As with the previous scenario, the user can choose to either:
Re-open the data model, thus losing any modifications that where made through the application, or
Ignore any external changes, and continue working on the model.
One of the following possibilities can now occur:
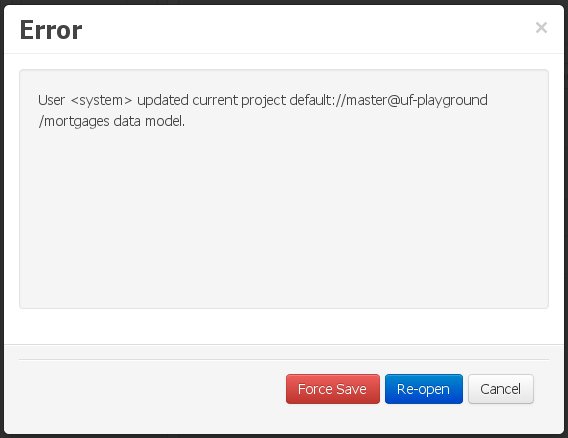
The user tries to persist the changes he made to the model by clicking the "Save" button in the data modeller top level menu. This leads to the following warning message:
The "Force Save" option will effectively overwrite any external changes, while "Re-open" will discard any local changes and reload the model.
A data set is basically a set of columns populated with some rows, a matrix of data composed of timestamps, texts and numbers. A data set can be stored in different systems: a database, an excel file, in memory or in a lot of other different systems. On the other hand, a data set definition tells the workbench modules how such data can be accessed, read and parsed.
Notice, it's very important to make crystal clear the difference between a data set and its definition since the workbench does not take care of storing any data, it just provides a standard way to define access to those data sets regardless where the data is stored.
Let's take for instance the data stored in a remote database. A valid data set could be, for example, an entire database table or the result of an SQL query. In both cases, the database will return a bunch of columns and rows. Now, imagine we want to get access to such data to feed some charts in a new workbench perspective. First thing is to create and register a data set definition in order to indicate the following:
where the data set is stored,
how can be accessed, read and parsed and
what columns contains and of which type.
This chapter introduces the available workbench tools for registering and handling data set definitions and how these definitions can be consumed in other workbench modules like, for instance, the Perspective Editor.
Note
For simplicity sake we will be using the term data set to refer to the actual data set definitions as Data set and Data set definition can be considered synonyms under the data set authoring context.
Everything related to the authoring of data sets can be found under the Data Set Authoring perspective which is accessible from the following top level menu entry: Extensions>Data Sets, as shown in the following screenshot.
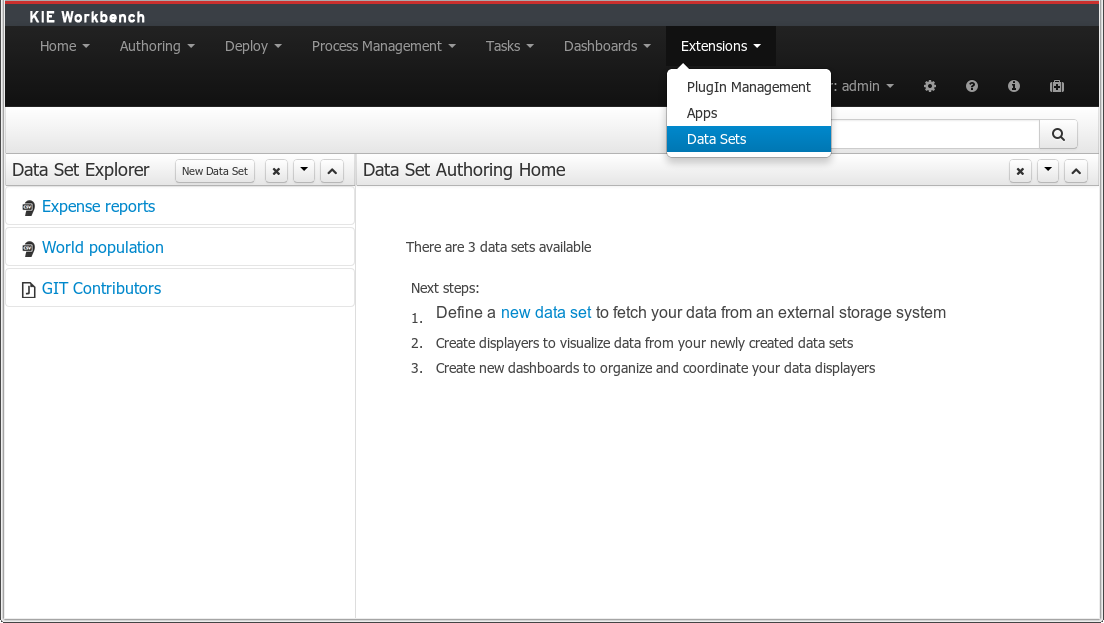
The center panel, shows a welcome screen, whilst the left panel contains the Data Set Explorer listing all the data sets available
Note
This perspective is only intended to Administrator users, since defining data sets can be considered a low level task.
The Data Set Explorer lists the data sets present in the system. Every time the user clicks on the data set it shows a brief summary alongside the following information:
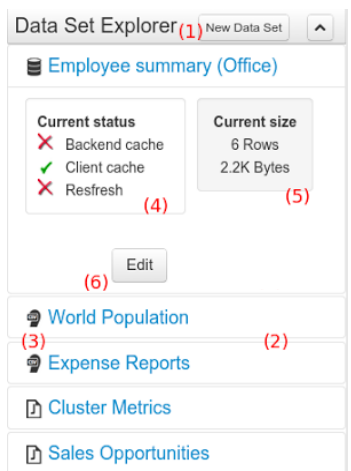
(1) A button for creating a new Data set
(2) The list of currently available Data sets
(3) An icon that represents the Data set's provider type (Bean, SQL, CSV, etc)
(4) Details of current cache and refresh policy status
(5) Details of current size on backend (unit as rows) and current size on client side (unit in bytes)
(6) The button for editing the Data set. Once clicked the Data set editor screen is opened on the center panel
The next sections explain how to create, edit and fine tune data set definitions.
Clicking on the New Data Set button opens a new screen from which the user is able to create a new data set definition in three steps:
Provider type selection
Specify the kind of the remote storage system (BEAN, SQL, CSV, ElasticSearch)
Provider configuration
Specify the attributes for being able to look up data from the remote system. The configuration varies depending on the data provider type selected.
Data set columns & filter
Live data preview, column types and initial filter configuration.
Allows the user's specify the type of data provider of the data set being created.
This screen lists all the current available data provider types and helper popovers with descriptions. Each data provider is represented with a descriptive image:
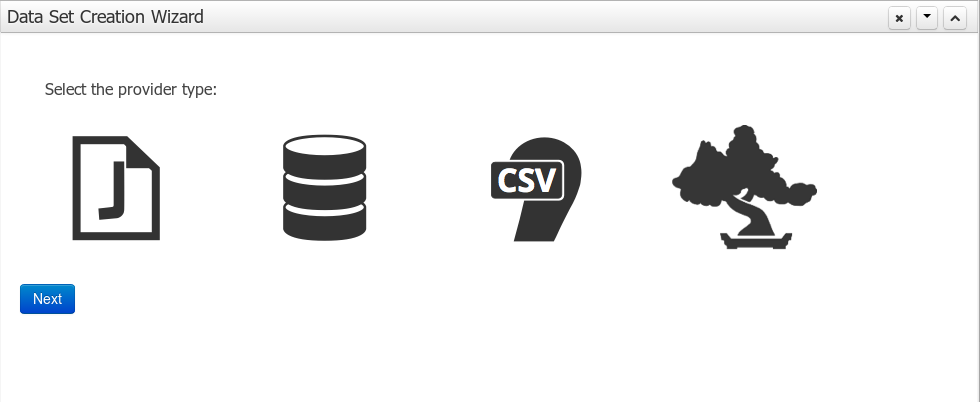
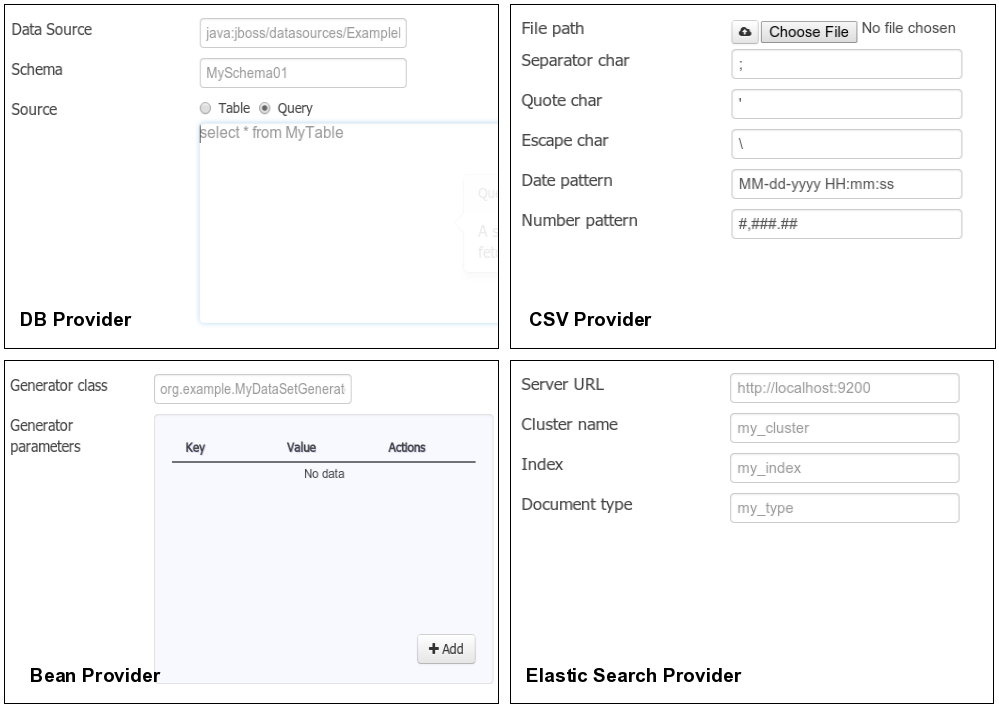
Four types are currently supported:
Bean (Java class) - To generate a data set directly from Java
SQL - For getting data from any ANSI-SQL compliant database
CSV - To upload the contents of a remote or local CSV file
Elastic Search - To query and get documents stored on Elastic Search nodes as data sets
Once a type is selected, click on Next button to continue with the next workflow step.
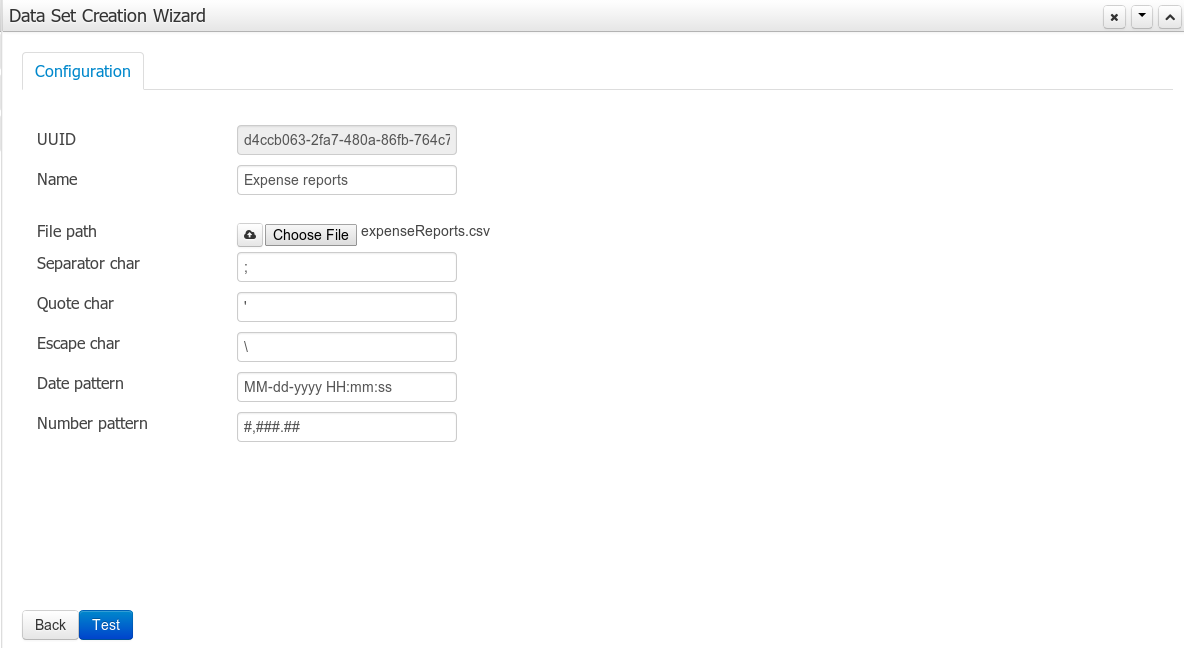
The provider type selected in the previous step will determine which configuration settings the system asks for.
Note
The UUID attribute is a read only field as it's generated by the system. It's only intended for usage in API calls or specific operations.
After clicking on the Test button (see previous step), the system executes a data set lookup test call in order to check if the remote system is up and the data is available. If everything goes ok the user will see the following screen:
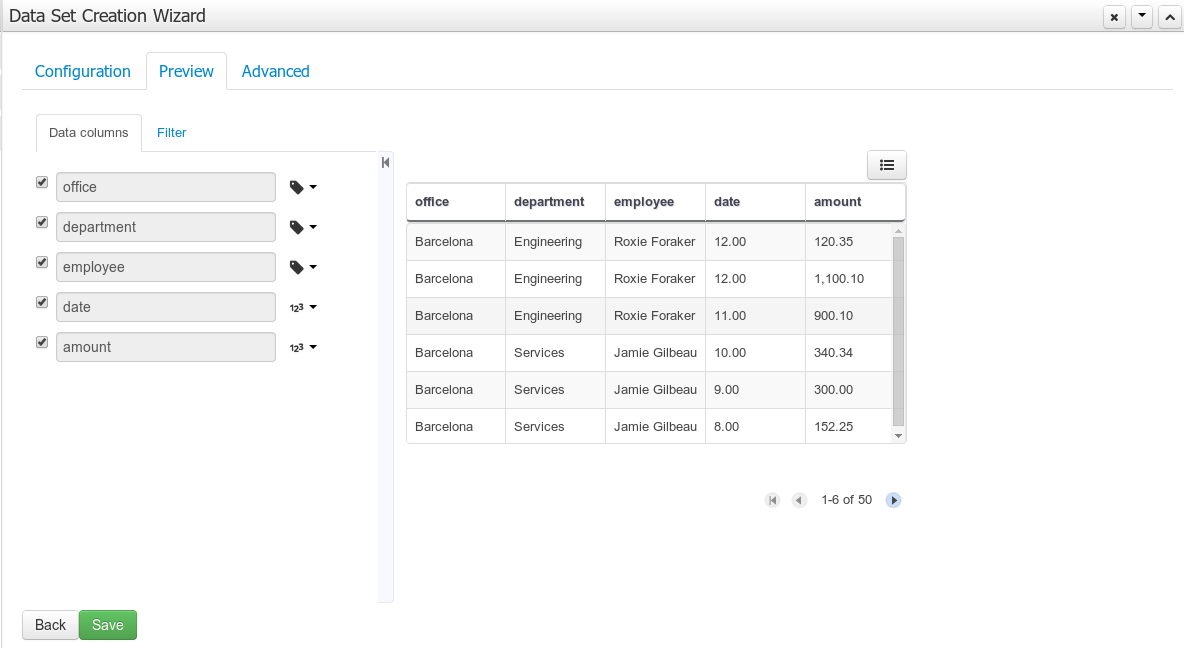
This screen shows a live data preview along with the columns the user wants to be part of the resulting data set. The user can also navigate through the data and apply some changes to the data set structure. Once finished, we can click on the Save button in order to register the new data set definition.
We can also change the configuration settings at any time just by going back to the configuration tab. We can repeat the Configuration>Test>Preview cycle as may times as needed until we consider it's ready to be saved.
Columns
In the Columns tab area the user can select what columns are part of the resulting data set definition.
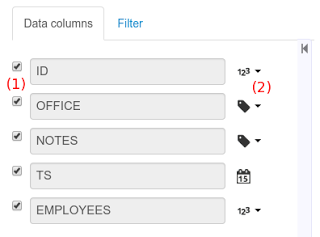
(1) To add or remove columns. Select only those columns you want to be part of the resulting data set
(2) Use the drop down image selector to change the column type
A data set may only contain columns of any of the following 4 types:
Label - For text values supporting group operations (similar to the SQL "group by" operator) which means you can perform data lookup calls and get one row per distinct value.
Text - For text values NOT supporting group operations. Typically for modeling large text columns such as abstracts, descriptions and the like.
Number - For numeric values. It does support aggregation functions on data lookup calls: sum, min, max, average, count, disctinct.
Date - For date or timestamp values. It does support time based group operations by different time intervals: minute, hour, day, month, year, ...
No matter which remote system you want to retrieve data from, the resulting data set will always return a set of columns of one of the four types above. There exists, by default, a mapping between the remote system column types and the data set types. The user is able to modify the type for some columns, depending on the data provider and the column type of the remote system. The system supports the following changes to column types:
Label <> Text - Useful when we want to enable/disable the categorization (grouping) for the target column. For instance, imagine a database table called "document" containing a large text column called "abstract". As we do not want the system to treat such column as a "label" we might change its column type to "text". Doing so, we are optimizing the way the system handles the data set and
Number <> Label - Useful when we want to treat numeric columns as labels. This can be used for instance to indicate that a given numeric column is not a numeric value that can be used in aggregation functions. Despite its values are stored as numbers we want to handle the column as a "label". One example of such columns are: an item's code, an appraisal id., ...
Note
BEAN data sets do not support changing column types as it's up to the developer to decide which are the concrete types for each column.
Filter
A data set definition may define a filter. The goal of the filter is to leave out rows the user does not consider necessary. The filter feature works on any data provider type and it lets the user to apply filter operations on any of the data set columns available.
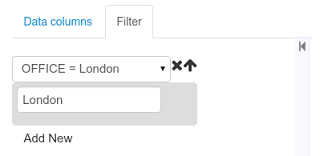
While adding or removing filter conditions and operations, the preview table on central area is updated with live data that reflects the current filter status.
There exists two strategies for filtering data sets and it's also important to note that choosing between the two have important implications. Imagine a dashboard with some charts feeding from a expense reports data set where such data set is built on top of an SQL table. Imagine also we only want to retrieve the expense reports from the "London" office. You may define a data set containing the filter "office=London" and then having several charts feeding from such data set. This is the recommended approach. Another option is to define a data set with no initial filter and then let the individual charts to specify their own filter. It's up to the user to decide on the best approach.
Depending on the case it might be better to define the filter at a data set level for reusing across other modules. The decision may also have impact on the performance since a filtered cached data set will have far better performance than a lot of individual non-cached data set lookup requests. (See the next section for more information about caching data sets).
Note
Notice, for SQL data sets, the user can use both the filter feature introduced or, alternatively, just add custom filter criteria to the SQL sentence. Although, the first approach is more appropriated for non technical users since they might not have the required SQL language skills.
To edit an existing data set definition go the data set explorer, expand the desired data set definition and click on the Edit button. This will cause a new editor panel to be opened and placed on the center of the screen, as shown in the next screenshot:
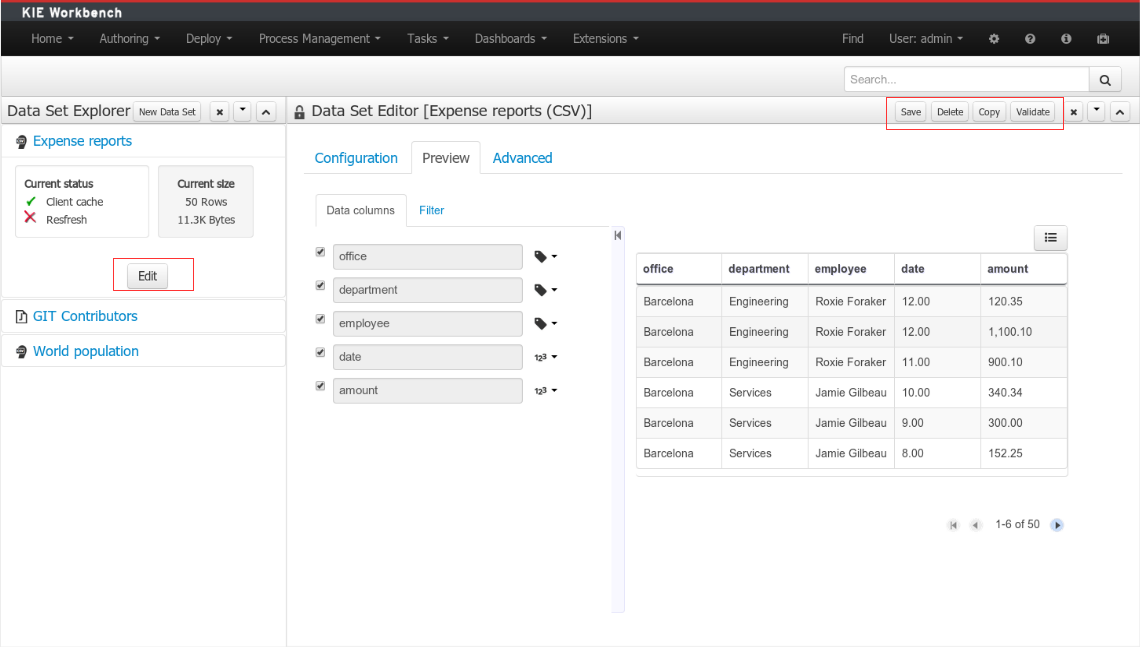
Every time we edit an item its editor is added to the center panel. We can navigate through the list of opened editors just by clicking on the down arrow icon placed at the editor's toolbar in the top right corner.

The editor provides all the features described in previous sections. We can change the configuration settings, test our data set definition and modify the resulting data set structure. Additionally, the editor provides some extra buttons in its toolbar:
Save - To validate the current changes and store the data set definition.
Delete - To remove permanently from storage the data set definition. Any client module referencing the data set may be affected.
Validate - To check that all the required parameters exist and are correct, as well as to validate the data set can be retrieved with no issues.
Copy - To create a brand new definition as a copy of the current one.
Note
Data set definitions are stored in the underlying GIT repository as JSON files. Any action performed is registered in the repository logs so it is possible to audit the change log later on.
In the Advanced settings tab area the user can specify caching and refresh settings. Those are very important for making the most of the system capabilities thus improving the performance and having better application responsive levels.
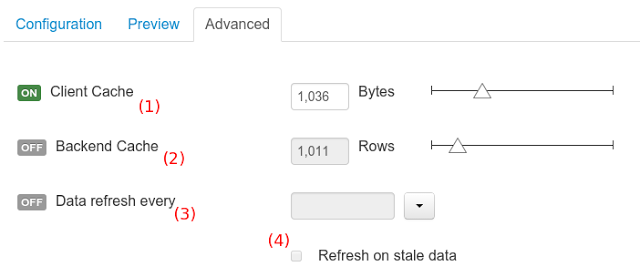
(1) To enable or disable the client cache and specify the maximum size (bytes).
(2) To enable or disable the backend cache and specify the maximum cache size (number of rows).
(3) To enable or disable automatic refresh for the Data set and the refresh period.
(4) To enable or disable the refresh on stale data setting.
Let's dig into more details about the meaning of these settings.
The system provides caching mechanisms out-of-the-box for holding data sets and performing data operations using in-memory strategies. The use of these features brings a lot of advantages, like reducing the network traffic, remote system payload, processing times etc. On the other hand, it's up to the user to fine tune properly the caching settings to avoid hitting performance issues.
Two cache levels are supported:
Client level
Backend level
The following diagram shows how caching is involved in any data set operation:

Any data look up call produces a resulting data set, so the use of the caching techniques determines where the data lookup calls are executed and where the resulting data set is located.
Client cache
If ON then the data set involved in a look up operation is pushed into the web browser so that all the components that feed from this data set do not need to perform any requests to the backend since data set operations are resolved at a client side:
The data set is stored in the web browser's memory
The client components feed from the data set stored in the browser
Data set operations (grouping, aggregations, filters and sort) are processed within the web browser, by means of a Javascript data set operation engine.
If you know beforehand that your data set will remain small, you can enable the client cache. It will reduce the number of backend requests, including the requests to the storage system. On the other hand, if you consider that your data set will be quite big, disable the client cache so as to not hitting with browser issues such as slow performance or intermittent hangs.
Backend cache
Its goal is to provide a caching mechanism for data sets on backend side.
This feature allows to reduce the number of requests to the remote storage system , by holding the data set in memory and performing group, filter and sort operations using the in-memory engine.
It's useful for data sets that do not change very often and their size can be considered acceptable to be held and processed in memory. It can be also helpful on low latency connectivity issues with the remote storage. On the other hand, if your data set is going to be updated frequently, it's better to disable the backend cache and perform the requests to the remote storage on each look up request, so the storage system is in charge of resolving the data set lookup request.
Note
BEAN and CSV data providers relies by default on the backend cache, as in both cases the data set must be always loaded into memory in order to resolve any data lookup operation using the in-memory engine. This is the reason why the backend settings are not visible in the Advanced settings tab.
The refresh feature allows for the invalidation of any cached data when certain conditions are meet.
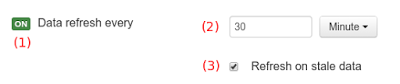
(1) To enable or disable the refresh feature.
(2) To specify the refresh interval.
(3) To enable or disable data set invalidation when the data is outdated.
The data set refresh policy is tightly related to data set caching, detailed in previous section. This invalidation mechanism determines the cache life-cycle.
Depending on the nature of the data there exist three main use cases:
Source data changes predictable - Imagine a database being updated every night. In that case, the suggested configuration is to use a "refresh interval = 1 day" and disable "refresh on stale data". That way, the system will always invalidate the cached data set every day. This is the right configuration when we know in advance that the data is going to change.
Source data changes unpredictable - On the other hand, if we do not know whether the database is updated every day, the suggested configuration is to use a "refresh interval = 1 day" and enable "refresh on stale data". If so the system, before invalidating any data, will check for modifications. On data modifications, the system will invalidate the current stale data set so that the cache is populated with fresh data on the next data set lookup call.
Real time scenarios - In real time scenarios caching makes no sense as data is going to be updated constantly. In this kind of scenarios the data sent to the client has to be constantly updated, so rather than enabling the refresh settings (remember this settings affect the caching, and caching is not enabled) it's up to the clients consuming the data set to decide when to refresh. When the client is a dashboard then it's just a matter of modifying the refresh settings in the Displayer Editor configuration screen and set a proper refresh period, "refresh interval = 1 second" for example.
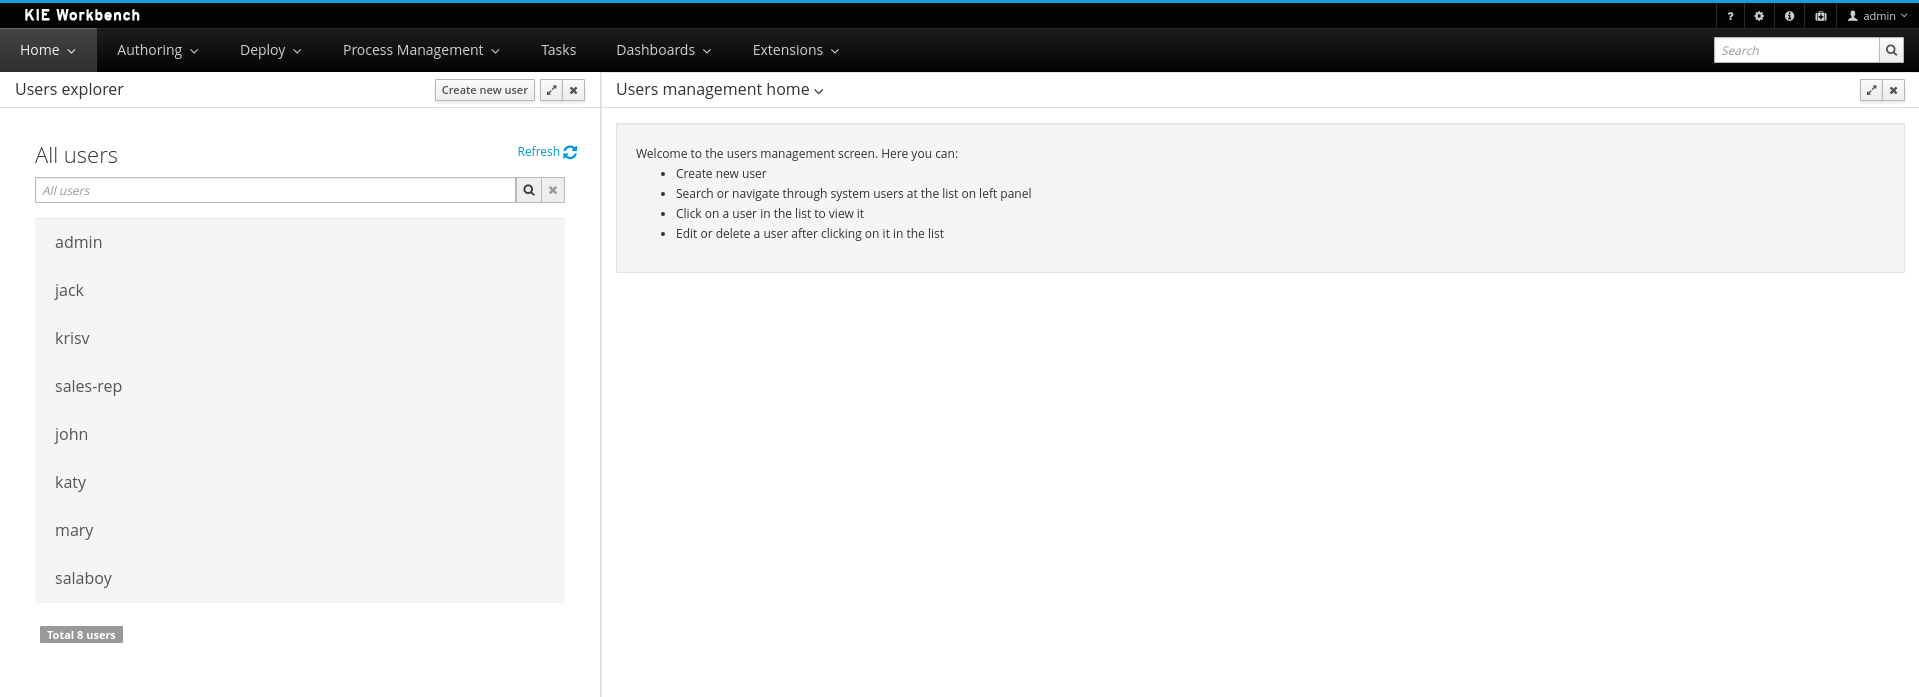
This section describes a feature that allows the administration of the application's users and groups using an intuitive and friendly user interface that comes integrated in both jBPM and Drools Workbenches.
Before the installation, setup and usage of this feature, this section talks about some previous concepts that need to be completely understood for the further usage:
Security management providers and capabilities
Installation and setup
Usage
A security environment is usually provided by the use of a realm. Realms are used to restrict the access for the different application's resources. So realms contains information about the users, groups, roles, permissions and and any other related information.
In most of the typical scenarios the application's security is delegated to the container's security mechanism, which consumes a given realm at same time. It's important to consider that there exist several realm implementations, for example Wildfly provides a realm based on the application-users.properties/application-roles.properties files, Tomcat provides a realm based on the tomcat-users.xml file, etc. So keep in mind that there is no single security realm to rely on, it can be different in each installation.
The jBPM and Drools workbenches are not an exception, they're build on top Uberfire framework (aka UF), which delegates the authorization and authentication to the underlying container's security environment as well, so the consumed realm is given by the concrete deployment configuration.
Due to the potential different security environments that have to be supported, the users and groups management provides a well defined management services API with some default built-in security management providers. A security management provider is the formal name given to a concrete user and group management service implementation for a given realm.
At this moment, by default there are two security management providers available:
Wildfly / EAP security management provider - For Wildfly or EAP realms based on properties files.
Tomcat security management provider - For Tomcat realms based on XML files.
If the built-in providers do not fit with the application's security realm, it is easy to build and register your own security management provider.
Each security realm can provide support different operations. For example consider the use of a Wildfly's realm based on properties files, The contents for the applications-users.properties is like:
admin=207b6e0cc556d7084b5e2db7d822555c
salaboy=d4af256e7007fea2e581d539e05edd1b
maciej=3c8609f5e0c908a8c361ca633ed23844
kris=0bfd0f47d4817f2557c91cbab38bb92d
katy=fd37b5d0b82ce027bfad677a54fbccee
john=afda4373c6021f3f5841cd6c0a027244
jack=984ba30e11dda7b9ed86ba7b73d01481
director=6b7f87a92b62bedd0a5a94c98bd83e21
user=c5568adea472163dfc00c19c6348a665
guest=b5d048a237bfd2874b6928e1f37ee15e
kiewb=78541b7b451d8012223f29ba5141bcc2
kieserver=16c6511893651c9b4b57e0c027a96075
Note that it's based on key-value pairs where the key is the username, and the value is the hashed value for the user's password. So a user is just defined by the key, by its username, it does not have a name nor address or any other meta information.
On the other hand, consider the use of a realm provided by a Keycloak server. The information for a user is composed by more user meta-data, such as surname, address, etc, as in the following image:
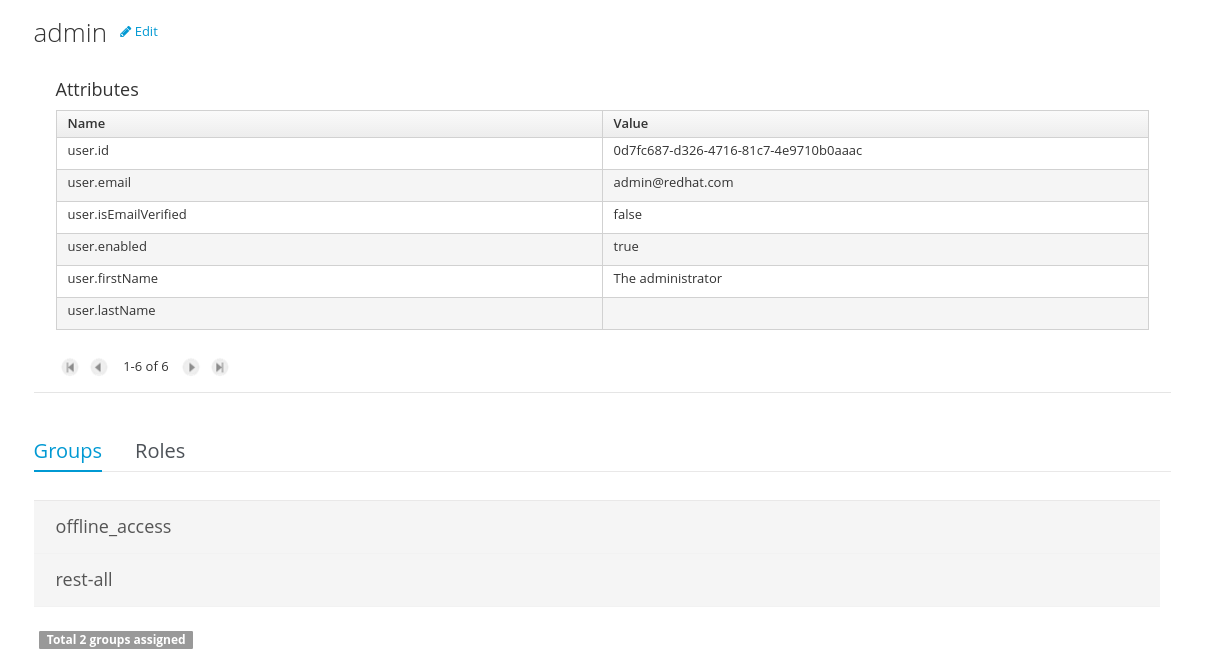
So the different services and client side components from the users and group management API are based on capabilities.Capabilities are used to expose or restrict the available functionality provided by the different services and client side components. Examples of capabilities are:
Create a user
Update a user
Delete a user
Update user's attributes
Create a group
Update a group
Assign groups to a user
Assign roles to a user
Each security management provider must specify a set of capabilities supported. From the previous examples you can note that the Wildfly security management provider does not support the capability for the management of the attributes for a user - the user is only composed by the user name. On the other hand the Keycloak provider does support this capability.
The different views and user interface components rely on the capabilities supported by each provider, so if a capability is not supported by the provider in use, the UI does not provide the views for the management of that capability. As an example, consider that a concrete provider does not support deleting users - the delete user button on the user interface will be not available.
Please take a look at the concrete service provider documentation to check all the supported capabilities for each one, the default ones can be found here.
Before considering the installation and setup steps please note the following Drools and jBPM distributions come with built-in, pre-installed security management providers by default:
Wildfly / EAP distribution - Both distributions use the Wildfly security management provider configured for the use of the default realm files application-users.properties and application-roles.properties
Tomcat distribution - It uses the Tomcat security management provider configured for the use of the default realm file tomcat-users.xml
Please read each provider's documentation in order to apply the concrete settings for the target deployment environment.
On the other hand, if using a custom security management provider or need to include it on an existing application, consider the following installation options:
Enable the security management feature on an existing WAR distribution
Setup and installation in an existing or new project
NOTE: If no security management provider is installed in the application, there will be no available user interface for managing the security realm. Once a security management provider is installed and setup, the user and group management user interfaces are automatically enabled and accessible from the main menu.
Given an existing WAR distribution of either Drools and jBPM workbenches, follow these steps in order to install and enable the user management feature:
Ensure the following libraries are present on WEB-INF/lib:
WEB-INF/lib/uberfire-security-management-api-6.4.0.Final..jar
WEB-INF/lib/uberfire-security-management-backend-6.4.0.Final..jar
Add the concrete library for the security management provider to use in WEB-INF/lib:
Eg: WEB-INF/lib/uberfire-security-management-wildfly-6.4.0.Final..jar
If the concrete provider you're using requires more libraries, add those as well. Please read each provider's documentation for more information
Replace the whole content for file WEB-INF/classes/security-management.properties, or if not present, create it. The settings present on this file depend on the concrete implementation you're using. Please read each provider's documentation for more information.
If you're deploying on Wildfly or EAP, please check if the WEB-INF/jboss-deployment-structure.xml requires any update. Please read each provider's documentation for more information.
If you're building an Uberfire based web application and you want to include the user and group management feature, please read this instructions.
The security management feature can be disabled, and thus no services or user interface will be available, by any of:
Uninstalling the security management provider from the application
When no concrete security management provider installed on the application, the user and group management feature will be disabled and no services or user interface will be presented to the user.
Removing or commenting the security management configuration file
Removing or commenting all the lines in the configuration file located at WEB-INF/classes/security-management.properties will disable the user and group management feature and no services or user interface will be presented to the user.
The user and group management feature is presented using two different perspectives that are available from the main Home menu (considering that the feature is enabled) as:
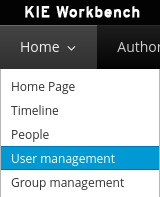
Read the following sections for using both user and group management perspectives.
The user management interface is available from the User management menu entry in the Home menu.
The interface is presented using two main panels: the users explorer on the west panel and the user editor on the center one:
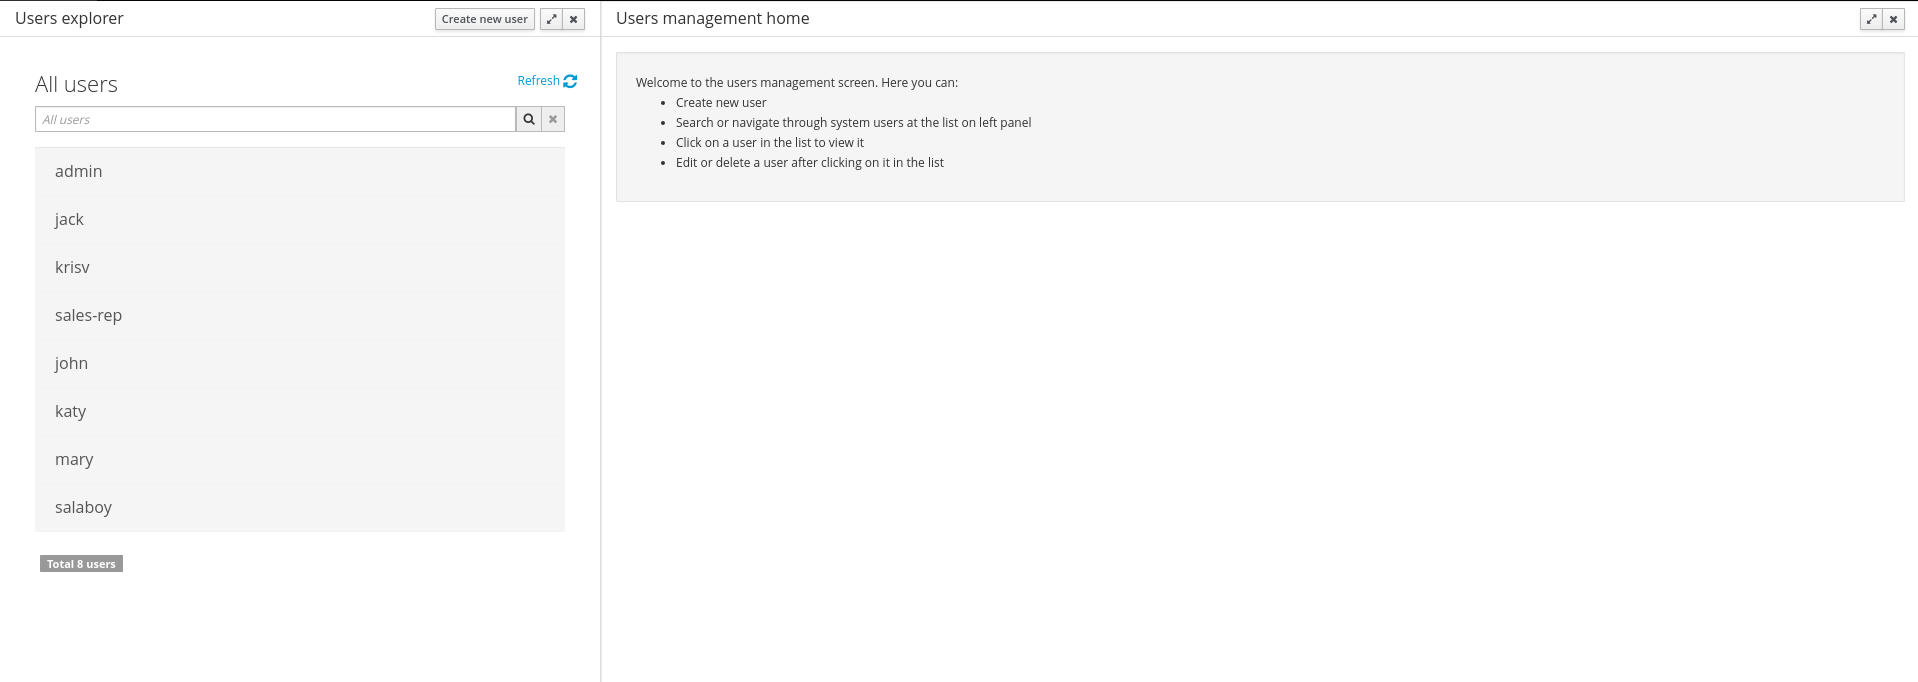
The users explorer, on west panel, lists by default all the users present on the application's security realm:
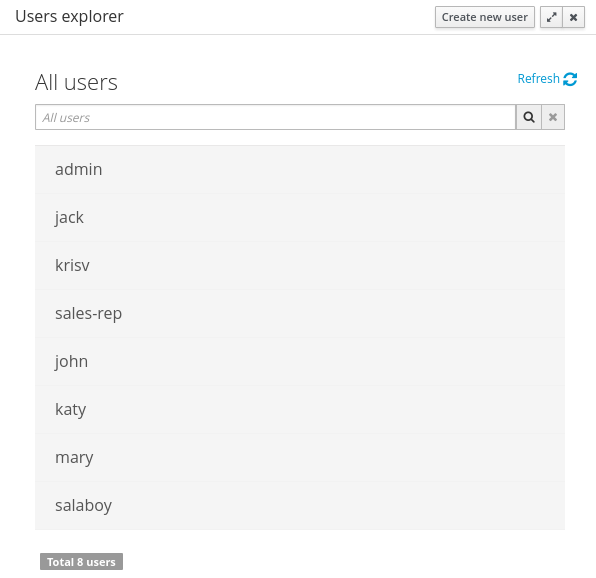
In addition to listing all users, the users explorer allows:
Searching for users
When specifying the search pattern in the search box the users list will be reduced and will display only the users that match the search pattern.
Search patterns depend on the concrete security management provider being used by the application's. Please read each provider's documentation for more information.
Creating new users
By clicking on the Create new user button, a new screen will be presented on the center panel to perform a new user creation.
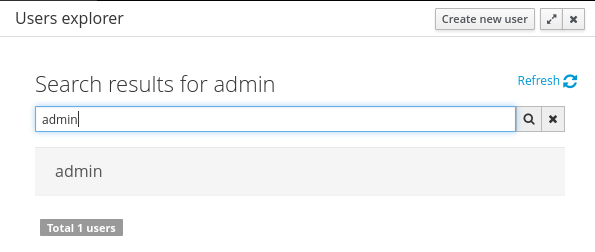

The user editor, on the center panel, is used to create, view, update or delete users. Once creating a new user o clicking an existing user on the users explorer, the user editor screen is opened.
To view an existing user, click on an existing user in the Users Explorer to open the User Editor screen. For example, viewing the admin user when using the Wildfly security management provider results in this screen:

Same admin user view operation but when using the Keycloak security management provider, instead of the Wildfly's one, results in this screen:
Note that the user editor, when using the Keycloak sec. management provider, includes the user attributes management section, but it's not present when using the Wildfly's one. So remember that the information and actions available on the user interface depends on each provider's capabilities (as explained in previous sections).
Viewing a user in the user editor provides the following information (if provider supports it):
The user name
The user's attributes
The assigned groups
The assigned roles
In order to update or delete an existing user, click on the Edit button present near to the username in the user editor screen:
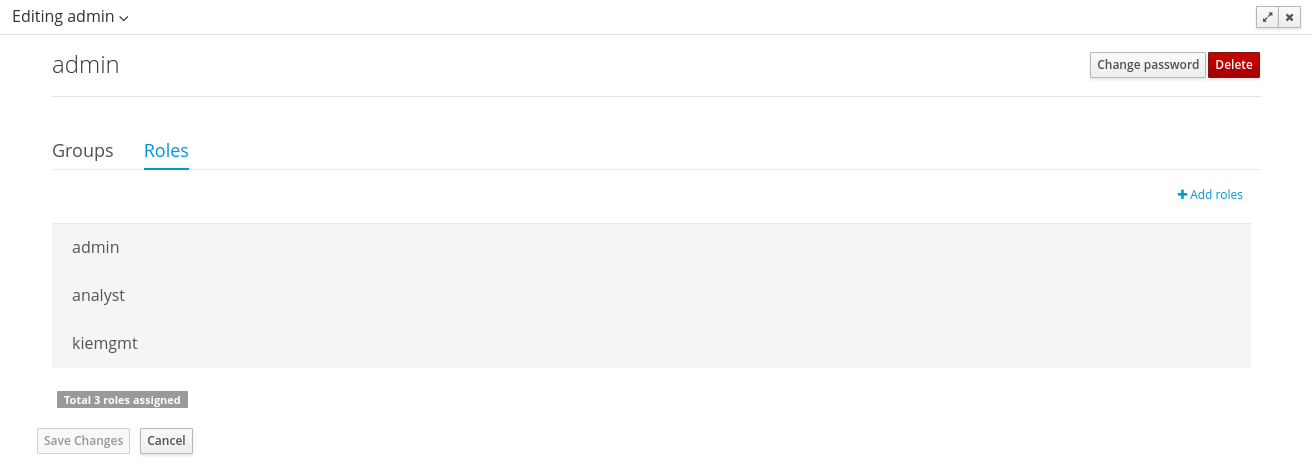
Once the user editor presented in edit mode, different operations can be done (if the security management provider in use supports it):
Update the user's attributes
A group selection popup is presented when clicking on Add to groups button:
This popup screen allows the user to search and select or deselect the groups assigned for the user currently being edited.
Update assigned groups
A group selection popup is presented when clicking on Add to groups button:
This popup screen allows the user to search and select or deselect the groups assigned for the user currently being edited.
Update assigned roles
A role selection popup is presented when clicking on Add to roles button:
This popup screen allows the user to search and select or deselect the roles assigned for the user currently being edited.
Change user's password
A change password popup screen is presented when clicking on the Change password button:
Delete user
The user currently being edited can be deleted from the realm by clicking on the Delete button.
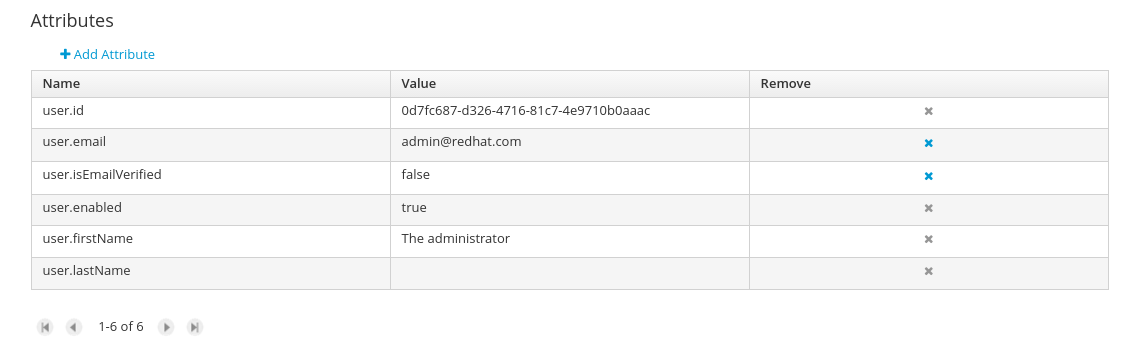
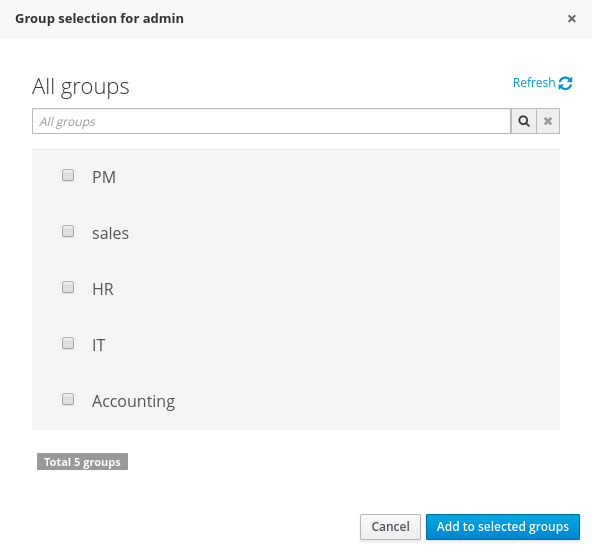
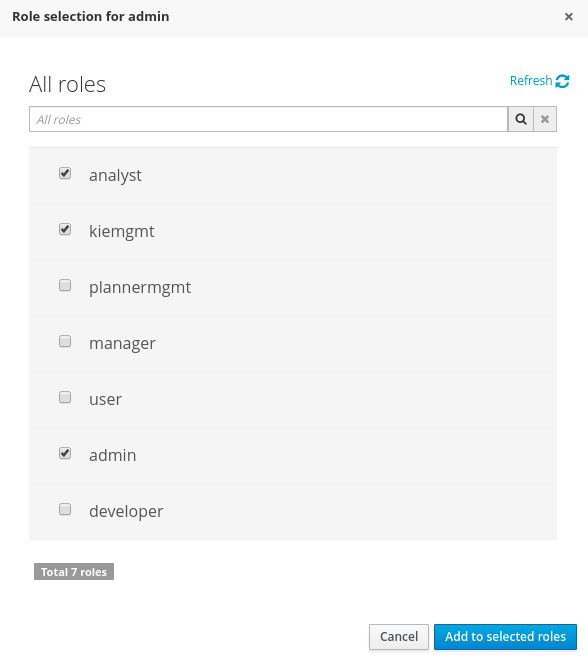
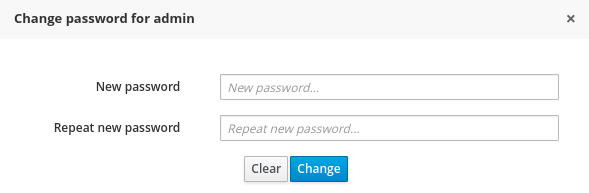
The group management interface is available from the Group management menu entry in the Home menu.
The interface is presented using two main panels: the groups explorer on the west panel and the group editor on the center one:
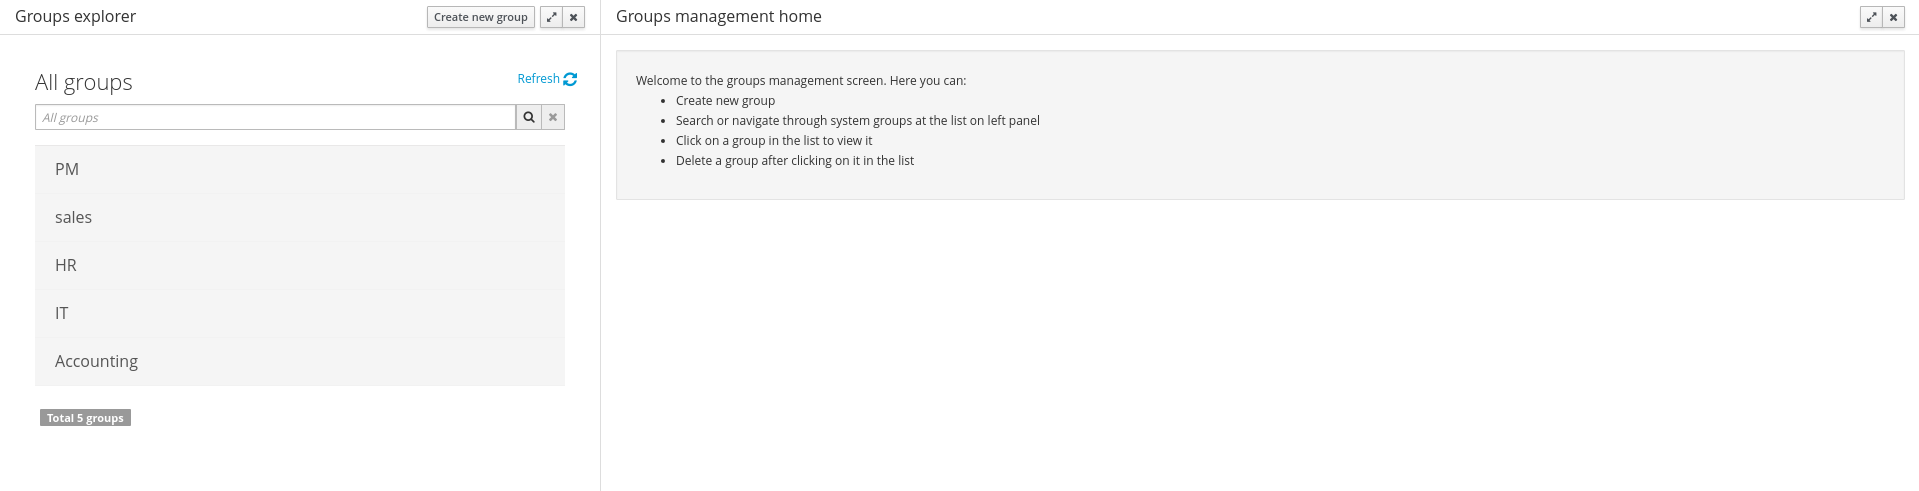
The groups explorer, on west panel, lists by default all the groups present on the application's security realm:
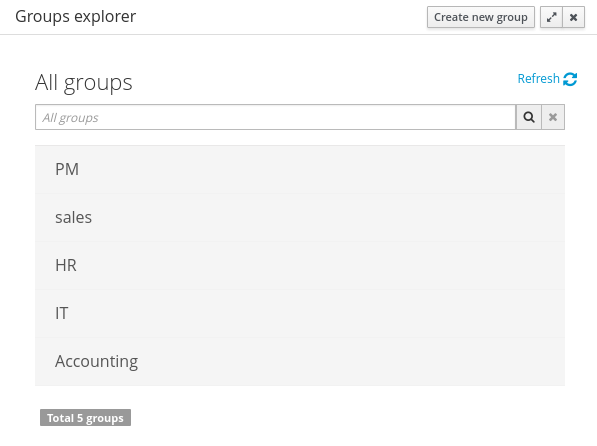
In addition to listing all groups, the groups explorer allows:
Searching for groups
When specifying the search pattern in the search box the users list will be reduced and will display only the users that match the search pattern.
Search patterns depend on the concrete security management provider being used by the application's. Please read each provider's documentation for more information.
Create new groups
By clicking on the Create new group button, a new screen will be presented on the center panel to perform a new group creation. Once the new group has been created, it allows to assign users to it:
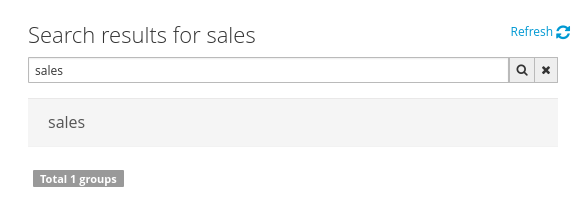
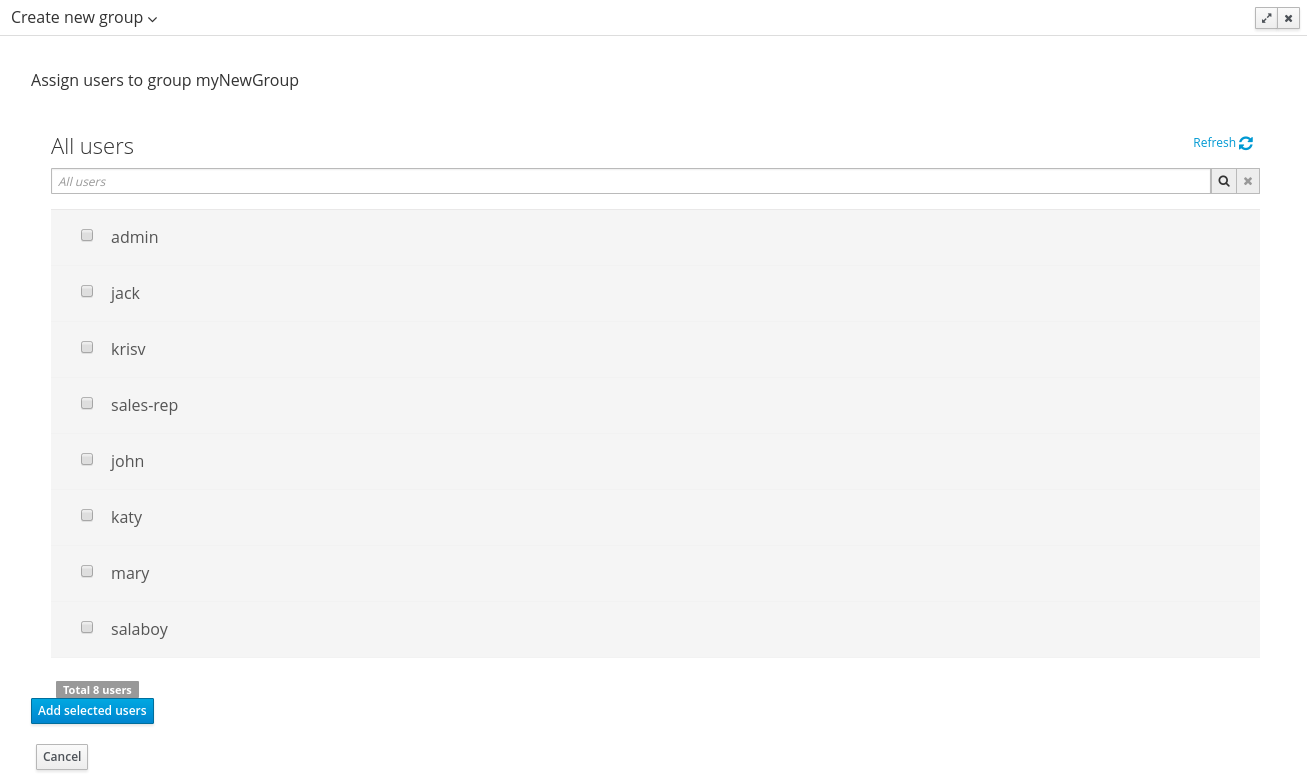
The group editor, on the center panel, is used to create, view or delete groups. Once creating a new group o clicking an existing group on the groups explorer, the group editor screen is opened.
To view an existing group, click on an existing user in the Groups Explorer to open the Group Editor screen. For example, viewing the sales group results in this screen:

To delete an existing group just click on the Delete button.
As we already know, Workbench provides a set of editors to author assets in different formats. According to asset’s format a specialized editor is used.
One additional feature provided by Workbench is the ability to embed it in your own (Web) Applications thru it's standalone mode. So, if you want to edit rules, processes, decision tables, etc... in your own applications without switch to Workbench, you can.
In order to embed Workbench in your application all you'll need is the Workbench application deployed and running in a web/application server and, from within your own web applications, an iframe with proper HTTP query parameters as described in the following table.
Table 18.2. HTTP query parameters for standalone mode
| Parameter Name | Explanation | Allow multiple values | Example |
|---|---|---|---|
| standalone | With just the presence of this parameter workbench will switch to standalone mode. | no | (none) |
| path | Path to the asset to be edited. Note that asset should already exists. | no | git://master@uf-playground/todo.md |
| perspective | Reference to an existing perspective name. | no | org.guvnor.m2repo.client.perspectives.GuvnorM2RepoPerspective |
| header | Defines the name of the header that should be displayed (useful for context menu headers). | yes | ComplementNavArea |
Note
Path and Perspective parameters are mutually exclusive, so can't be used together.
This section of the documentation describes the main features included that contribute to the Asset Management functionality provided in the KIE Workbench and KIE Drools Workbench. All the features described here are entirely optional, but the usage is recommended if you are planning to have multiple projects. All the Asset Management features try to impose good practices on the repository structure that will make the maintainace, versioning and distribution of the projects simple and based on standards. All the Asset Management features are implemented using jBPM Business Processes, which means that the logic can be reused for external applications as well as adapted for domain specific requirements when needed.
Note
You must set the "kiemgmt" role to your user to be able to use the Asset Management Features
Since the creation of the assets management features repositories can be classified into Managed or Unmanaged.
All new assets management features are available for this type of repositories. Additionally a managed repository can be "Single Project" or "Multi Project".
A "Single Project" managed repository will contain just one Project. And a "Multi Project" managed repository can contain multiple Projects. All of them related through the same parent, and they will share the same group and version information.
There are 4 main processes which represent the stages of the Asset Management feature: Configure Repository, Promote Changes, Build and Release.
The Configure Repository process is in charge of the post initialization of the repository. This process will be automatically triggered if the user selects to create a Managed Repository on the New repository wizzard. If they decide to use the governance feature the process will kick in and as soon as the repository is created. A new development and release branches will be created. Notice that the first time that this process is called, the master branch is picked and both branches (dev and release) will be based on it.
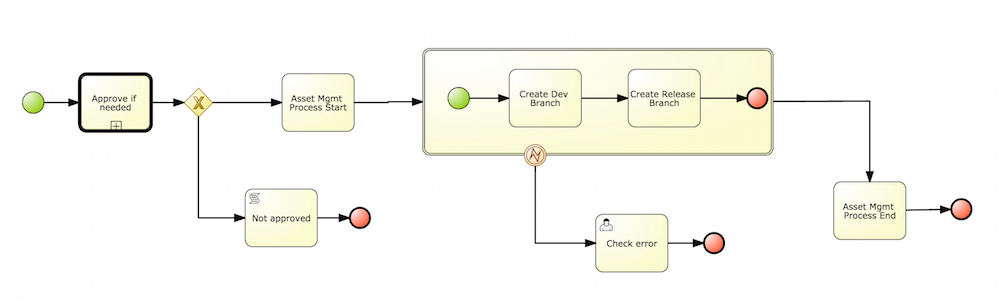
By default the asset management feature is not enabled so make sure to select Managed Repository on the New Repository Wizzard. When we work inside a managed repository, the development branch is selected for the users to work on. If multiple dev branches are created, the user will need to pick one.
When some work is done in the developments branch and the users reach a point where the changes needs to be tested before going into production, they will start a new Promote Changes process so a more technical user can decide and review what needs to be promoted. The users belonging to the "kiemgmt" group will see a new Task in their Group Task List which will contain all the files that had been changed. The user needs to select the assets that will be promoting via the UI. The underlying process will be cherry-picking the commits selected by the user to the release branch. The user can specify that a review is needed by a more technical user.
This process can be repeated multiple times if needed before creating the artifacts for the release.
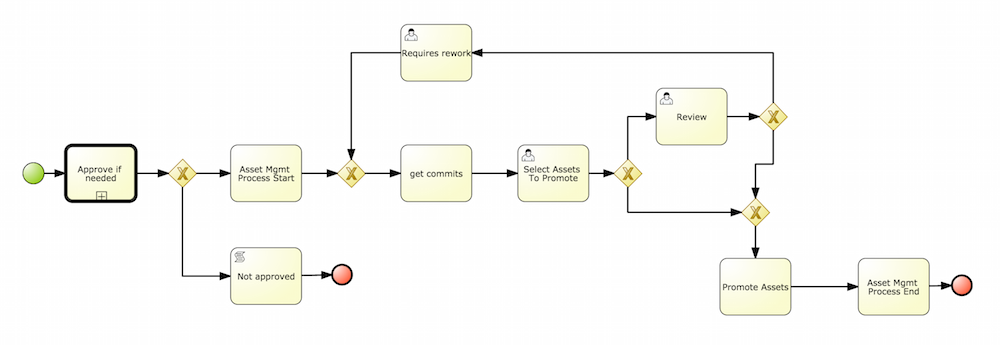
The Build process can be triggered to build our projects from different branches. This allows us to have a more flexible way to build and deploy our projects to different runtimes.
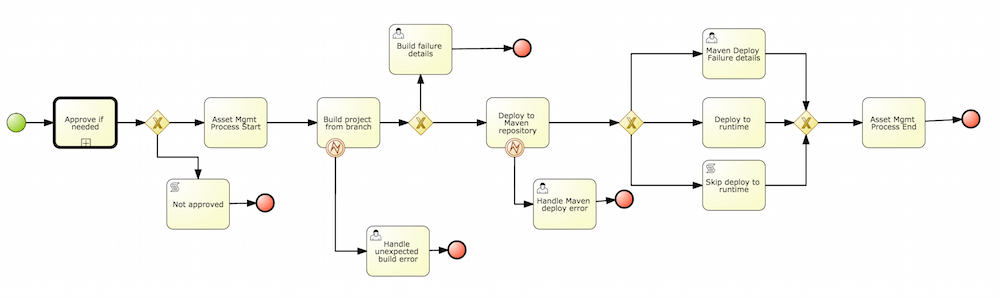
The release process is triggered at any time when the user decided that it is time to generate a release of the project that he/she is working on. This process will build the project (calling the Build Process) and it will update all the maven artifacts to the next version.
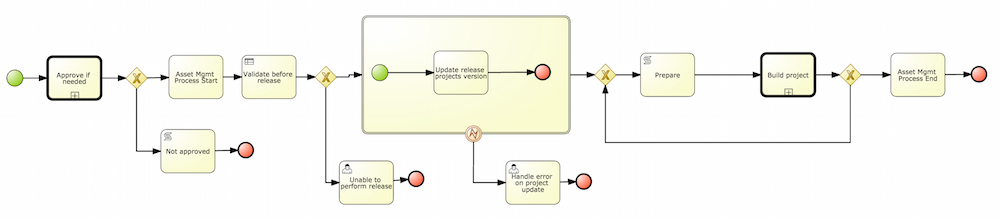
This section describes the common usage flow for the asset management features showing all the screens involved.
The first contact with the Asset Management features starts on the Repository creation.
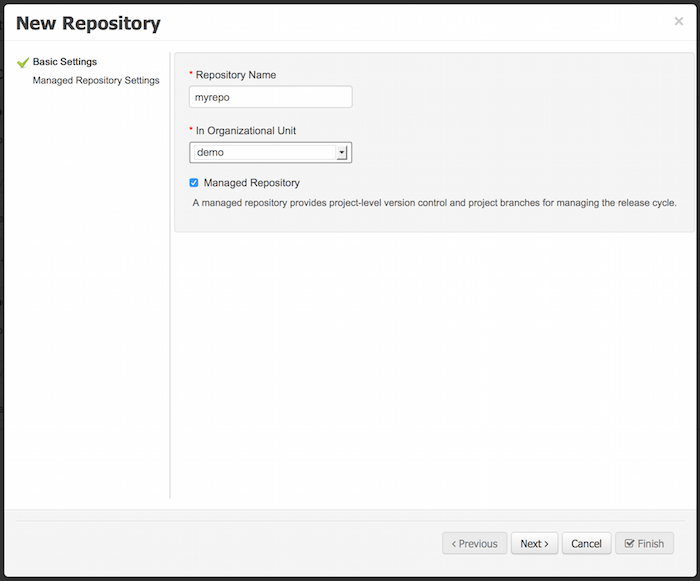
If the user chooses to create a Managed Respository a new page in the wizzard is enabled:
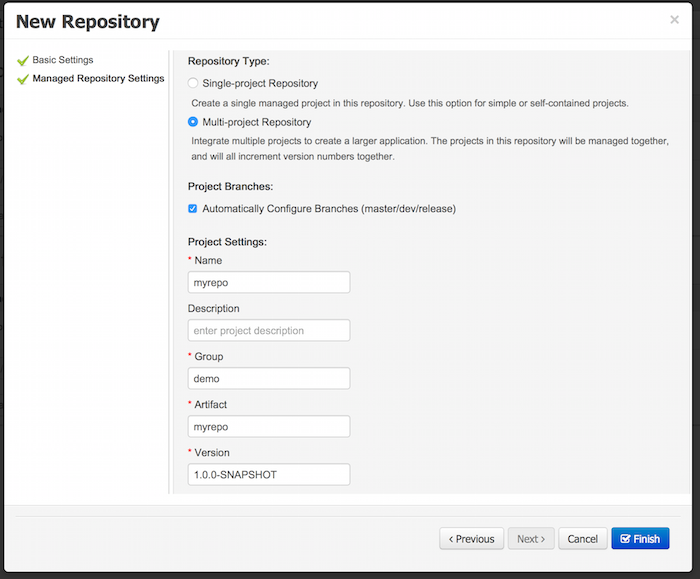
When a managed repository is created the assets management configuration process is automatically launched in order to create the repository branches, and the corresponding project structure is also created.
Once a repository has been created it can be managed through the Repository Structure Screen.
To open the Repository Structure Screen for a given repository open the Project Authoring Perspective, browse to the given repository and select the "Repository -> Repository Structure" menu option.
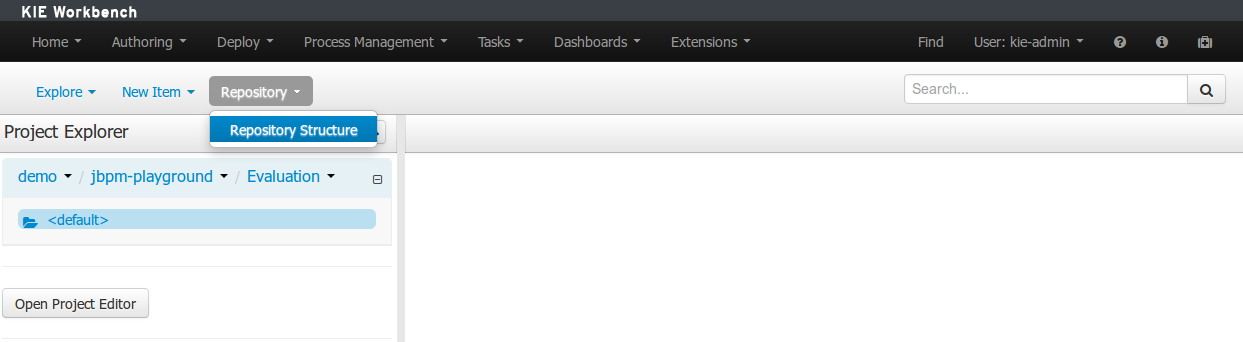
The following picture shows an example of a single project managed repository structure.
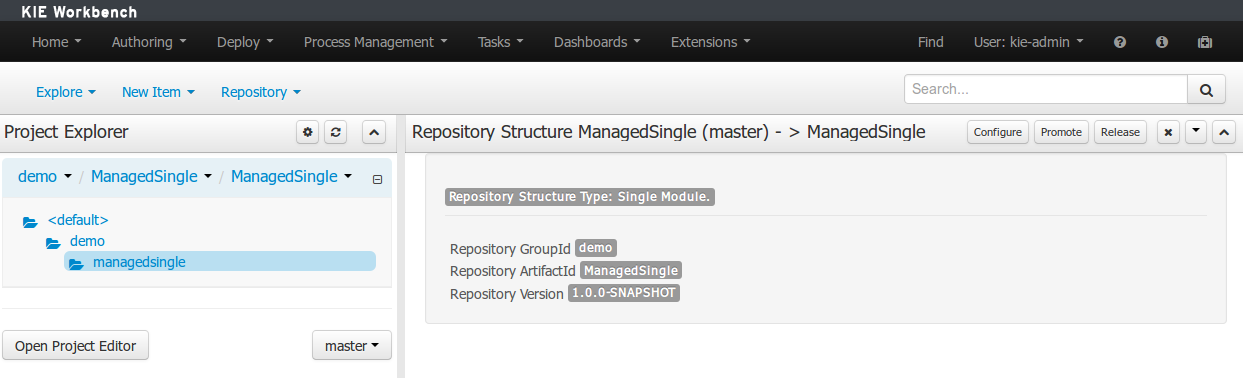
The following picture shows an example of a multi project managed repository structure.
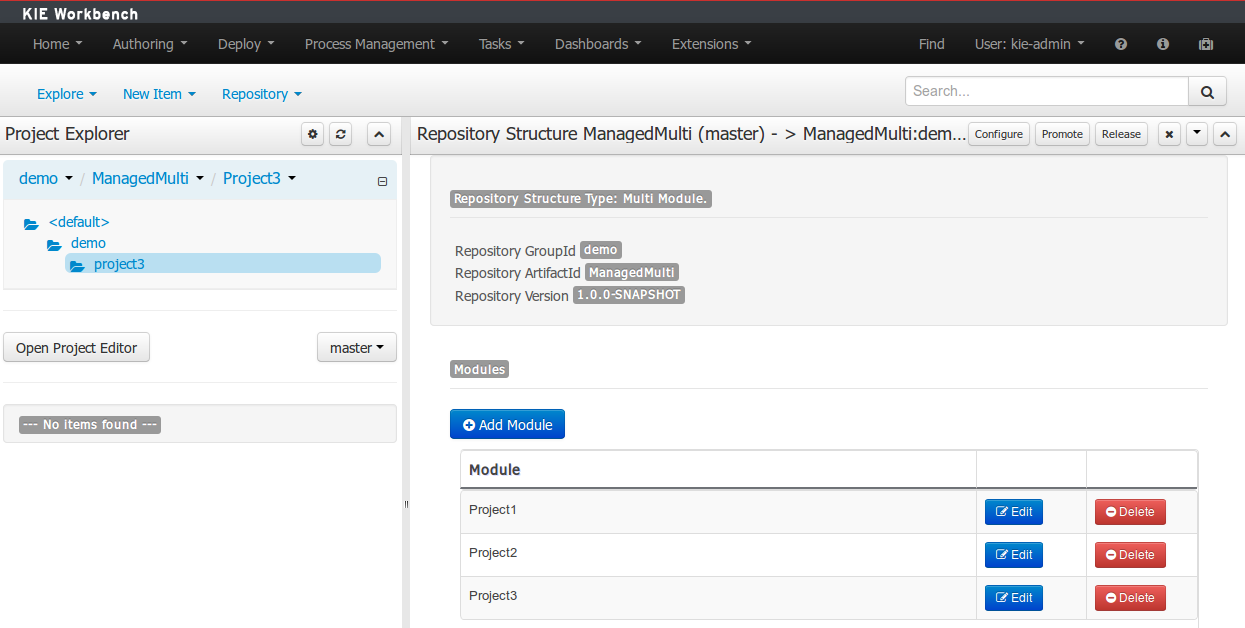
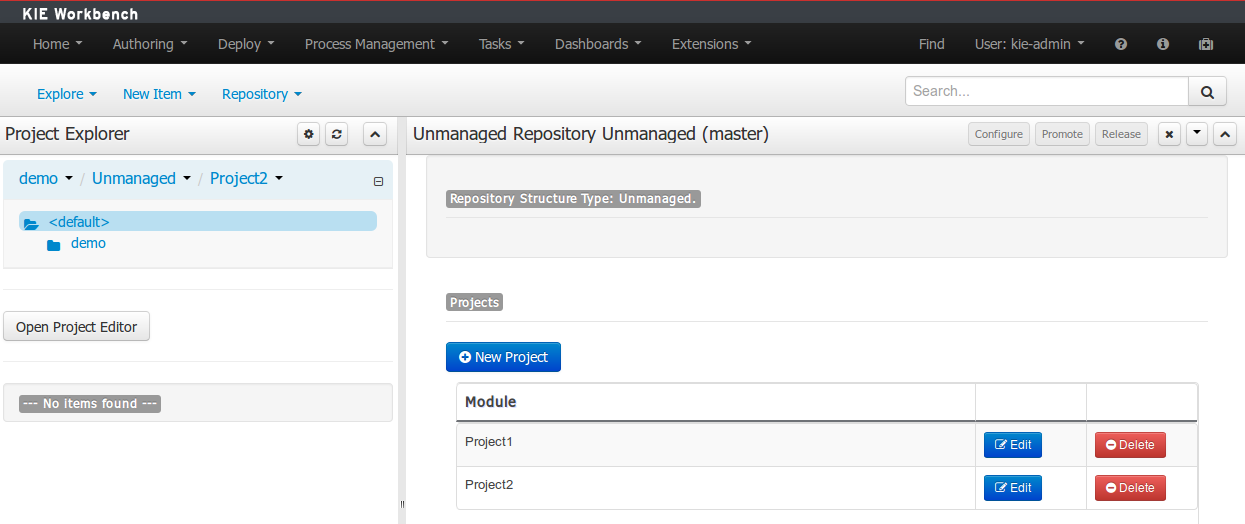
The following picture shows the screen areas related to managed repositories operations.
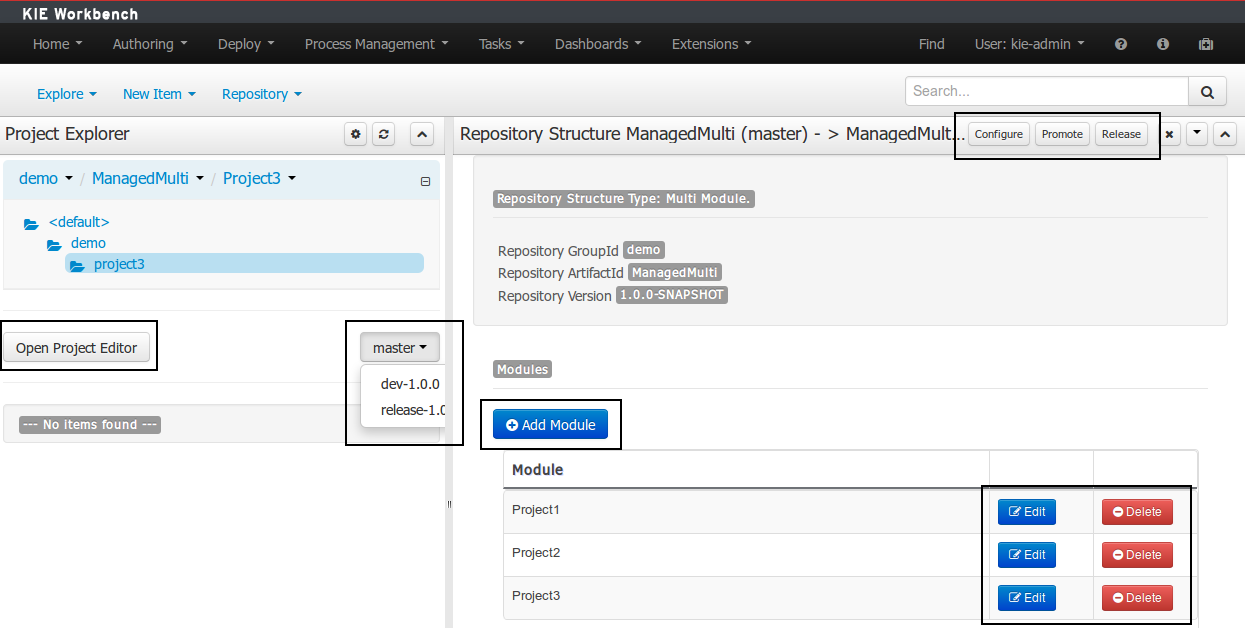
The branch selector lets to switch between the different branches created by the Configure Repository Process.
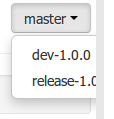
From the repository structure screen it's also possible to create, edit or delete projects from current repository.
The assets management processes can also be launched from the Project Structure Screen.

Filling the parameters bellow a new instance of the Configure Repository can be started. (see Configure Repository Process)
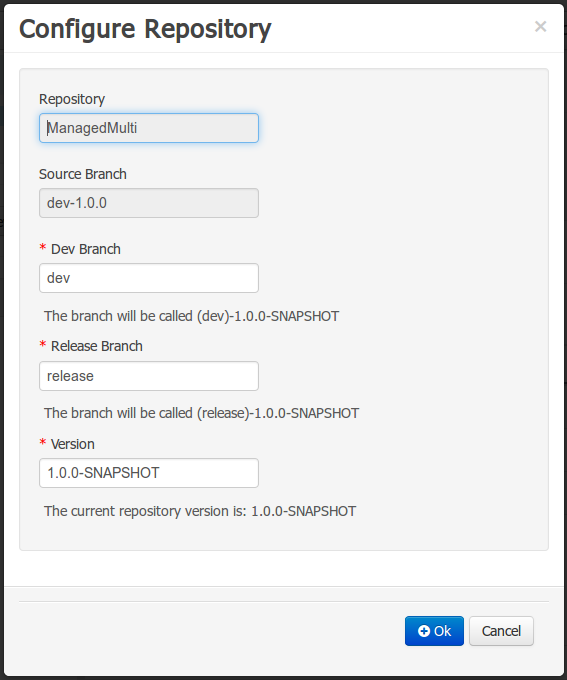
Filling the parameters bellow a new instance of the Promote Changes Process can be started. (see Promote Changes Process)
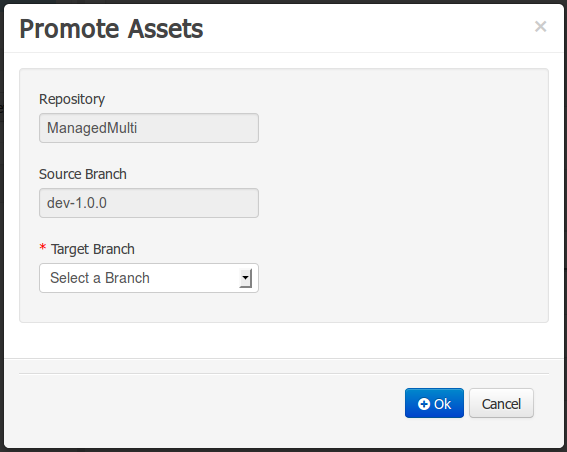
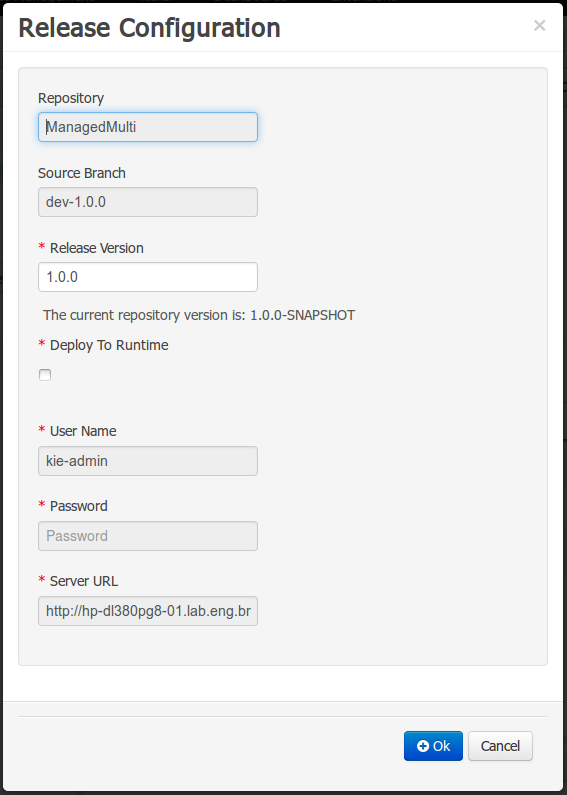
The Execution Server Management UI allows users create and modify Server Templates and Containers, it also allows users manage Remote Servers. This screen is available via Deploy -> Rule Deployments menu.
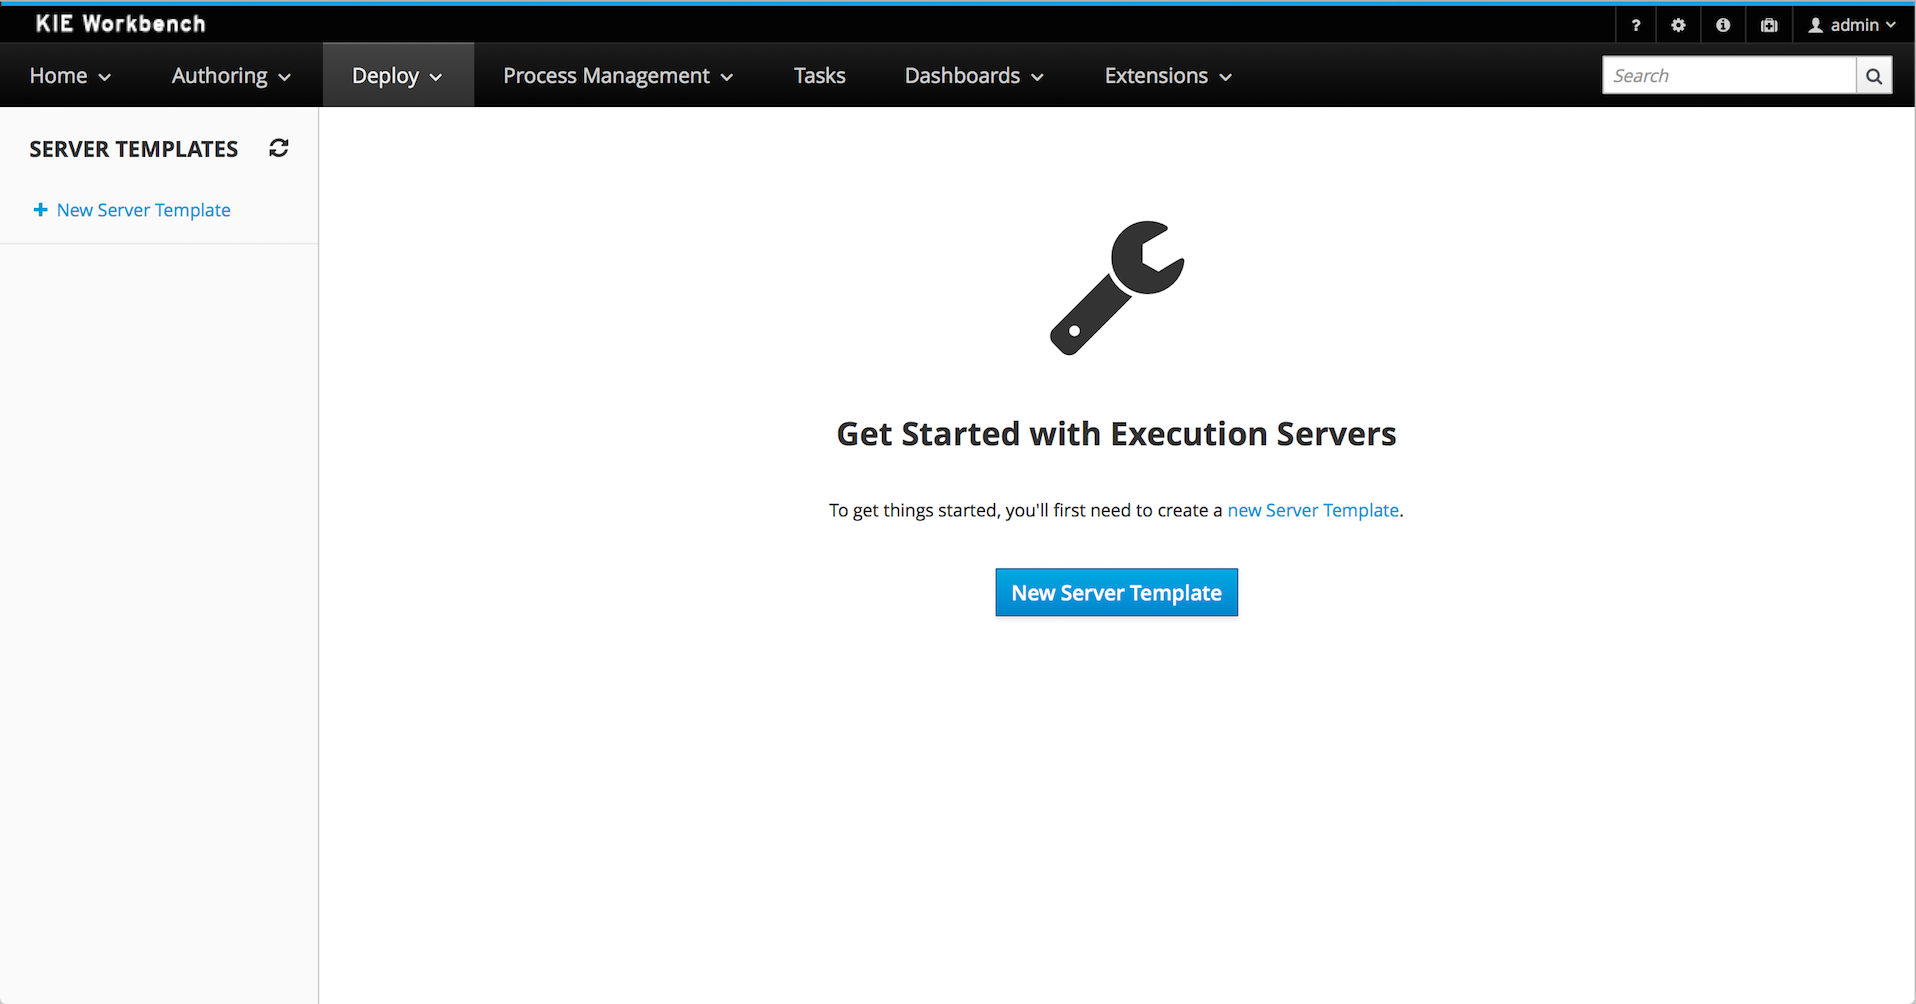
Note
The management UI is only available for KIE Managed Servers.
Server templates are used to define a common configuration that can be used for multiple servers, thus the name: Template.
Server Templates can be created directly from the management UI or it's automatically created when a server connects to controller and there isn't a template definition for that remote server. Server templates may have one or more capabilities, such capabilities can't be modified, if you need modify the capabilities you'll have to create a new template. Here is the list of current capabilities:
Rule (Drools)
Process (jBPM)
Planning (Optaplanner)
Note
For Planner capability it's mandatory to enable Rule's capability too.
In order to create a new Server Template you have to click at New Server Template button and follow the wizard. It's also possible to create a container during Wizard, but for now let's limit to just the template.
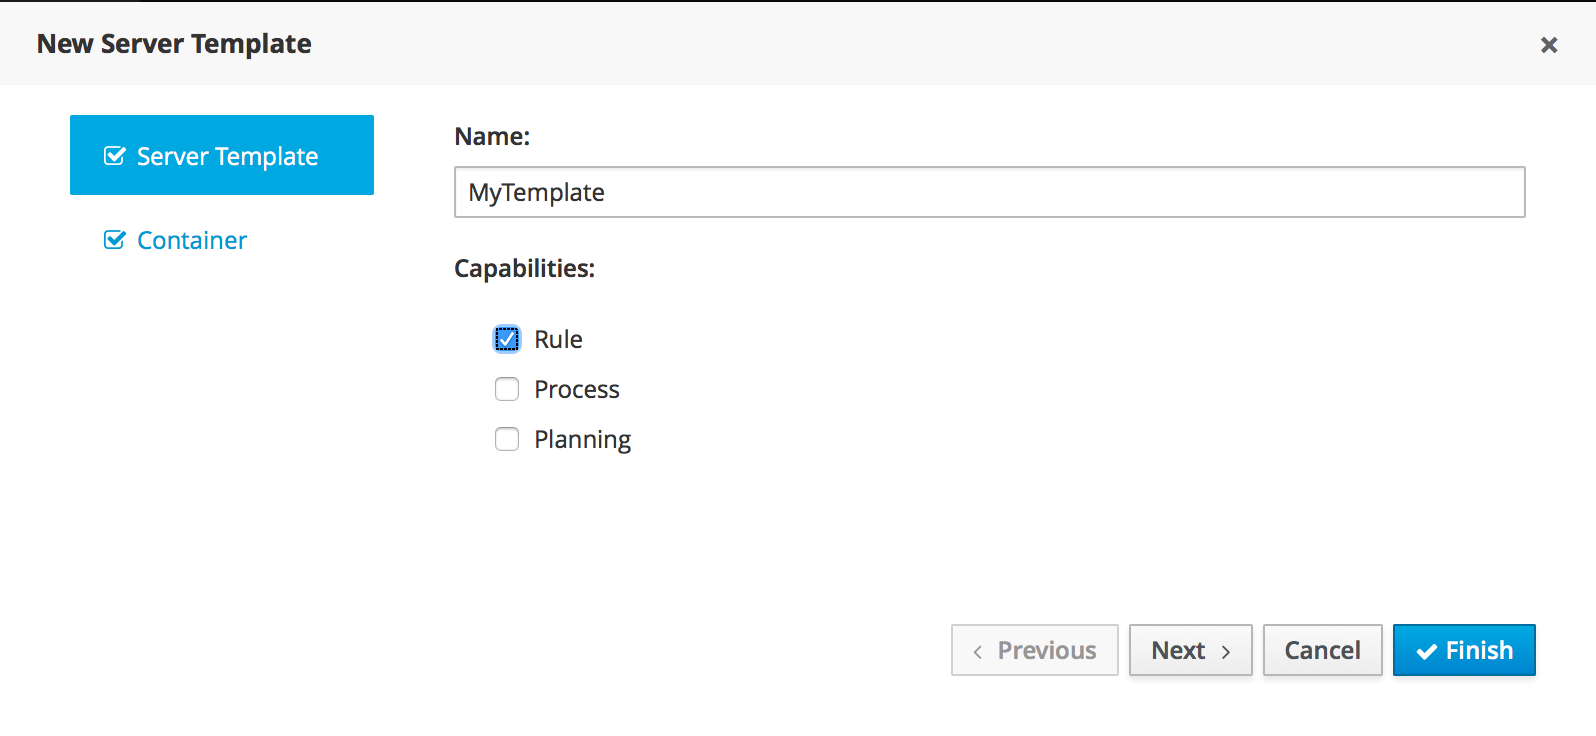
Once created you'll get the new Template listed on the left hand side, with the new Server Template highlighted. On the right hand side you get the 2nd level navigation that lists Containers and Remote Servers that are related to selected Server Template.
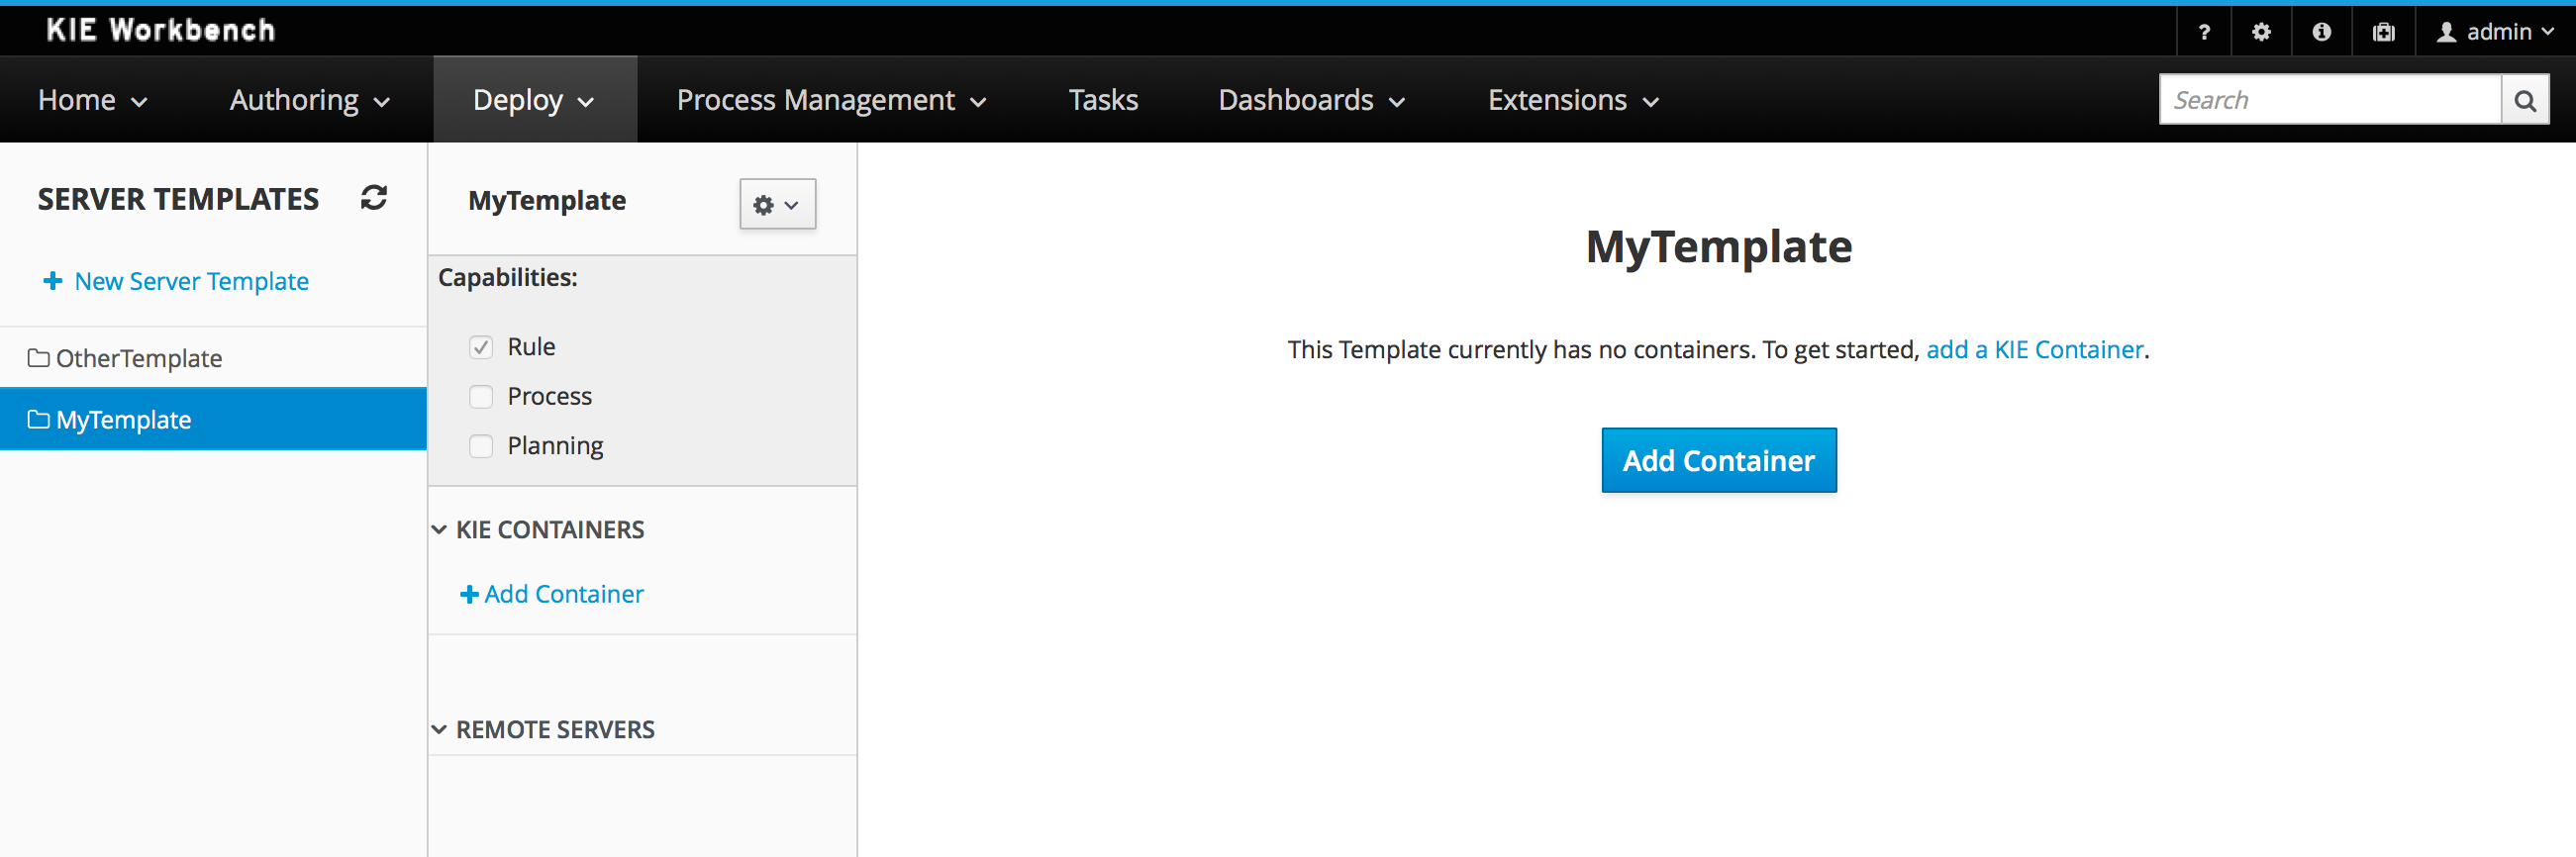
On top of the navigation is also possible to delete the current Server Template or create a copy of it.
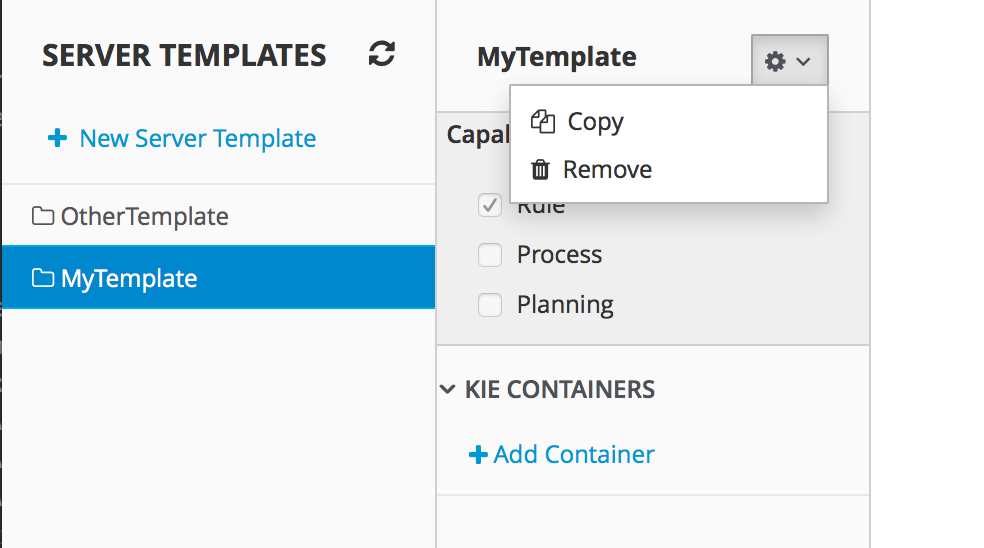
A Container is a KIE Container configuration of the Server Template. Click the Add Container button to create a new container for the current Server Template.
The search area can help users find an specific KJARs that they are looking for.
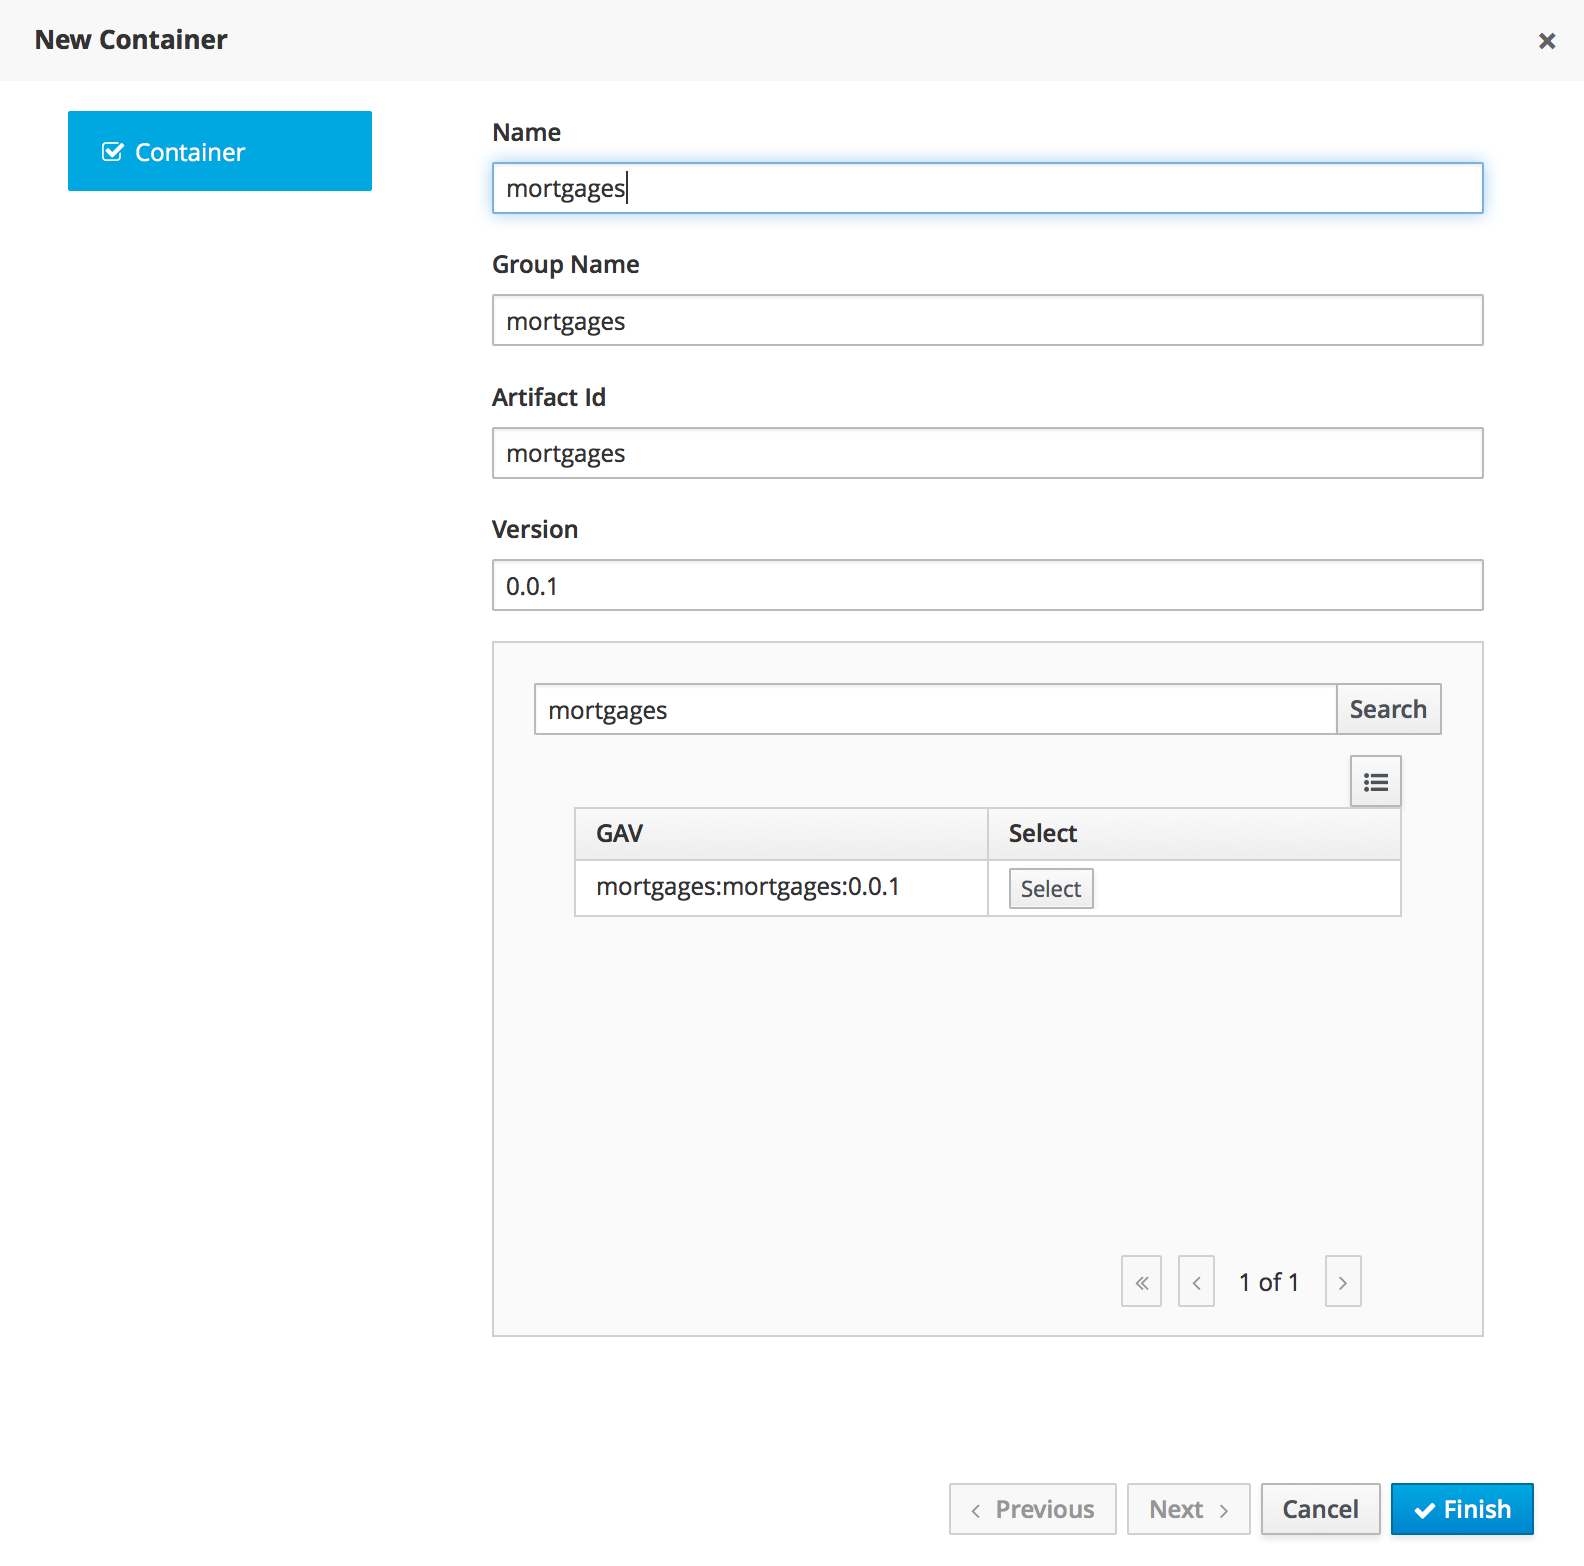
For Server Templates that have Process capabilities enabled, the Wizard has a 2nd optional step where users can configure some process related behaviors.
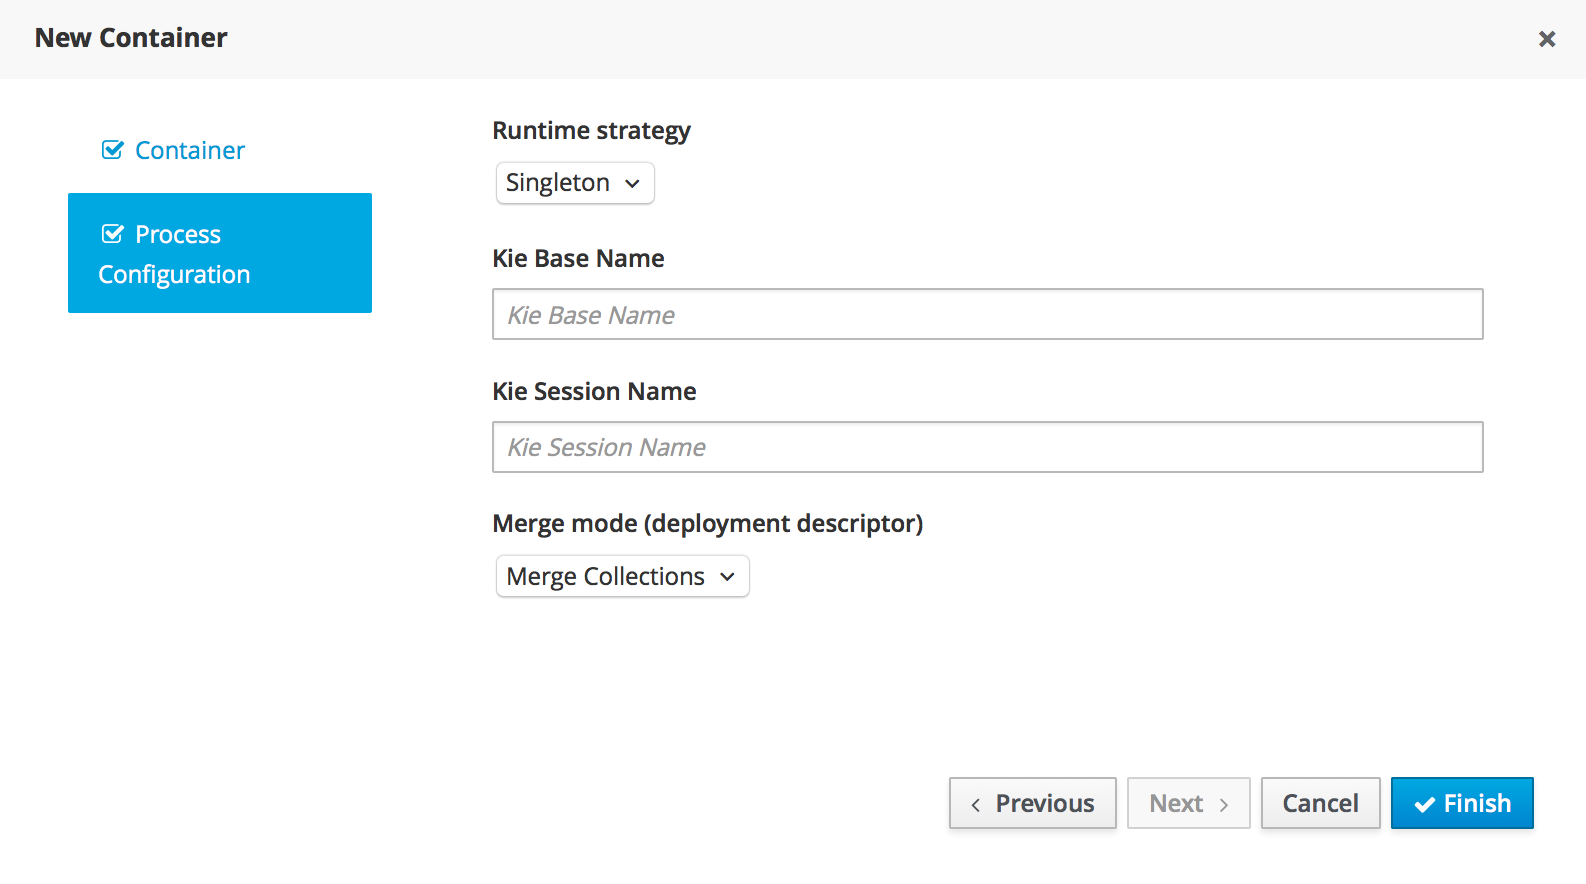
Once created the new Container will be displayed on the containers list just above the list of remote servers. Just after created a container is by default Stopped which is the only state that allows users to remove it.

A Container has the following tabs available for management and/or configuration:
Status
Version Configuration
Process Configuration
Status tab lists all the Remote Servers that are running the active Container. Each Remote Server is rendered as a Card, which displays to users status and endpoint.
Note
Only started Containers are deployed to remote servers.
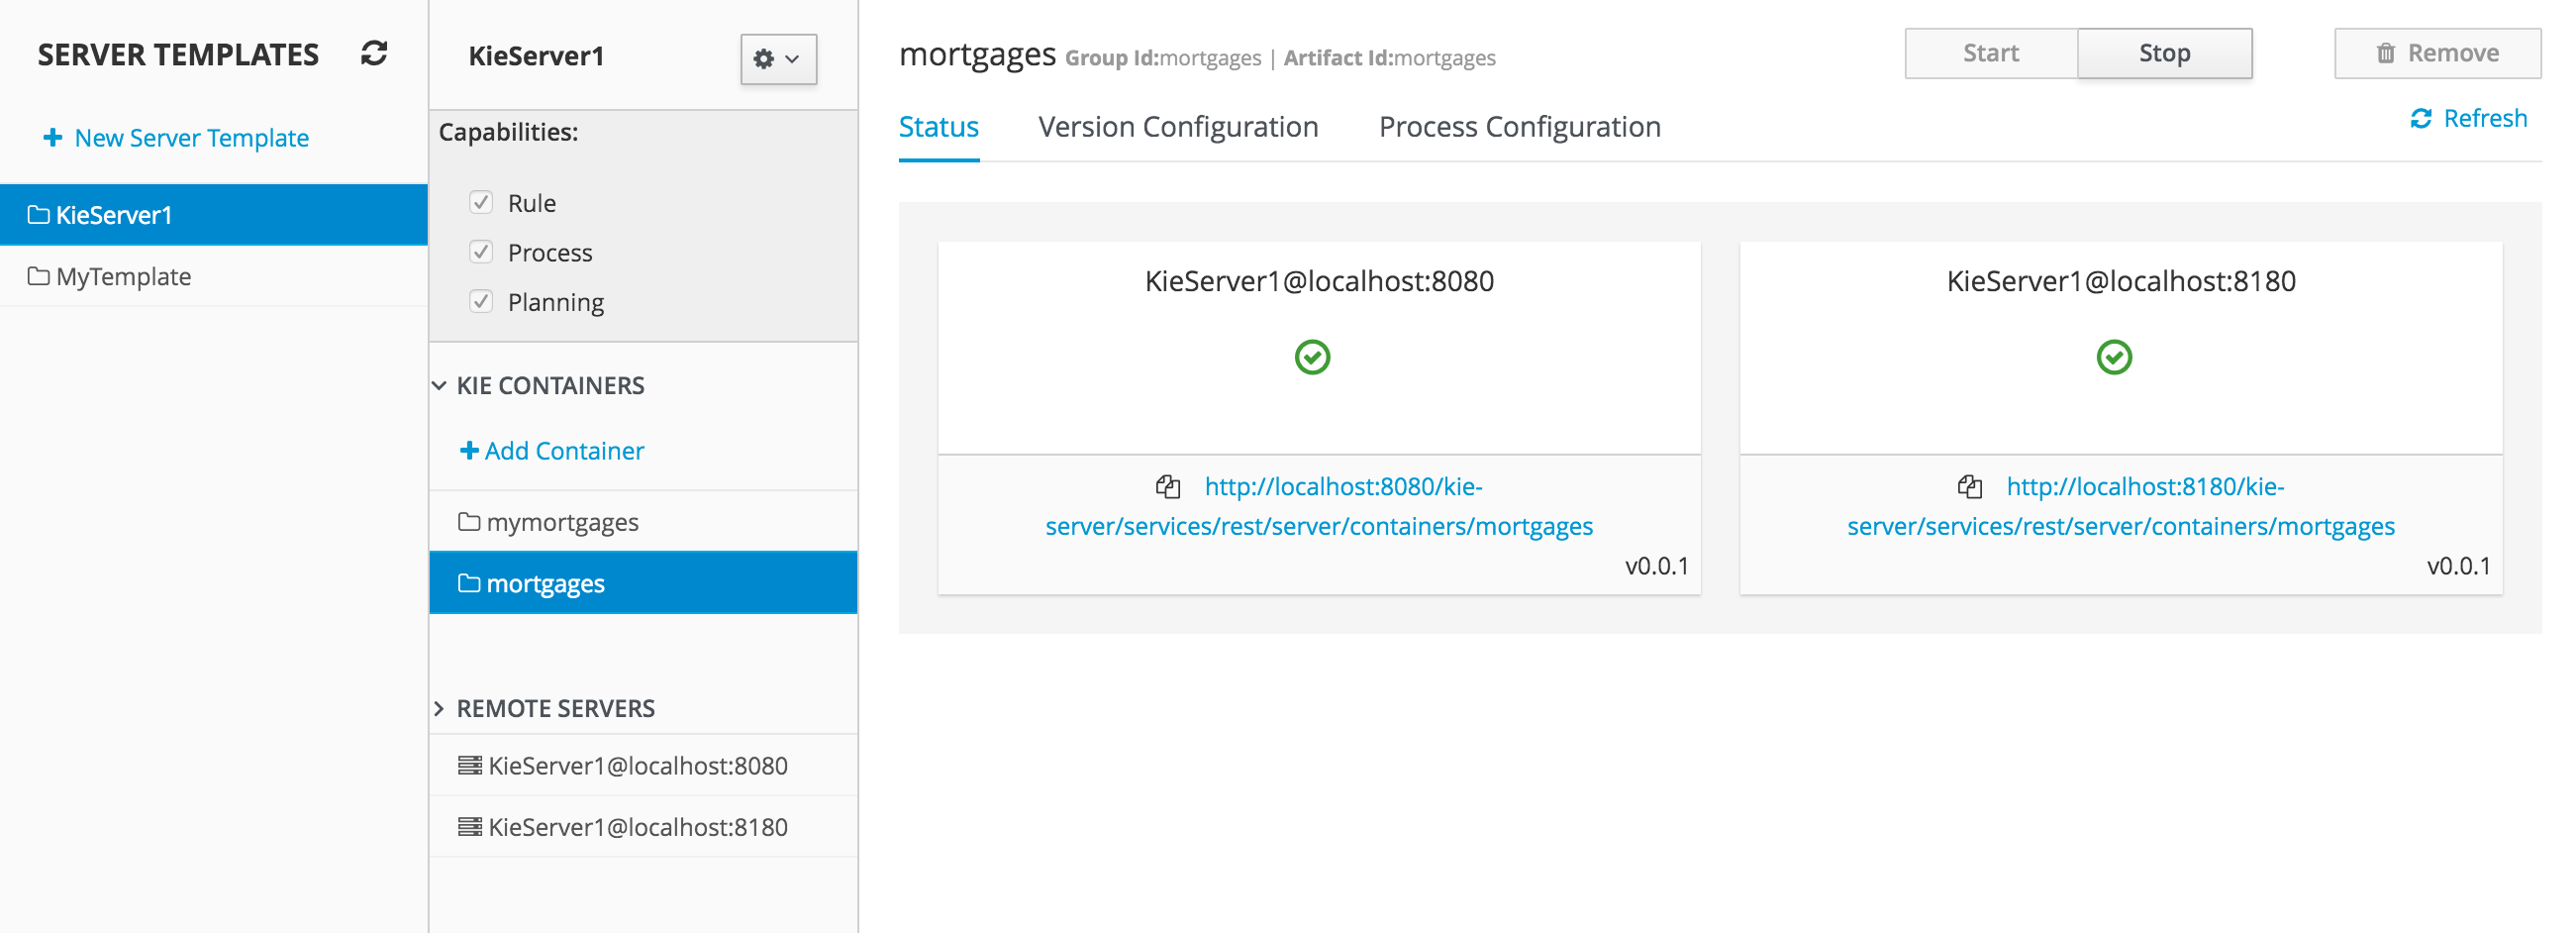
Version Configuration tab allow users change the current version of the Container. User's can upgrade manually to a specific version using the "Upgrade" button, or enable/disable the Scanner. It's also possible to execute a ScanNow operation, that will scan for new versions only once.
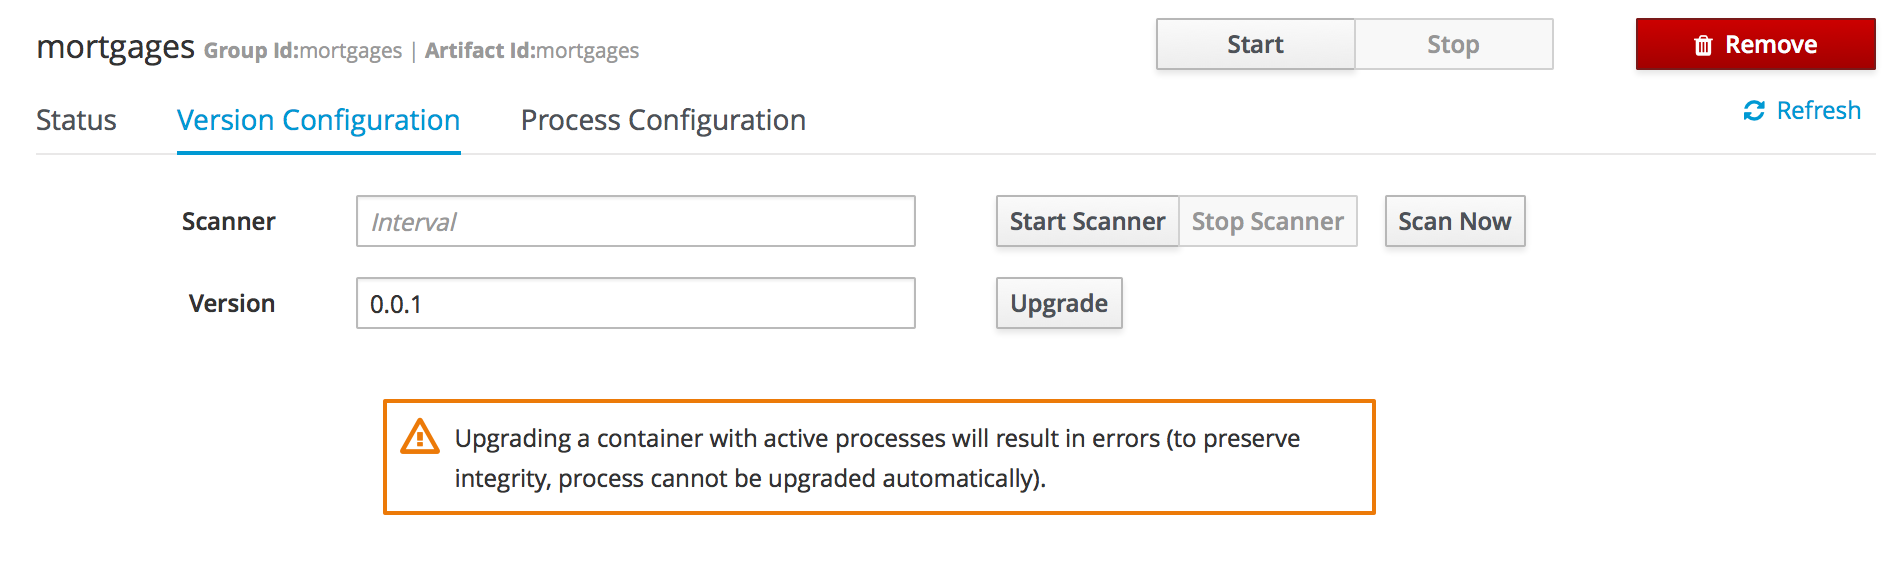
Process Configuration is the same form that is displayed during New Container Wizard for Template Servers that have Process Capability. If Template Server doesn't have such capability, the action buttons will be disabled.
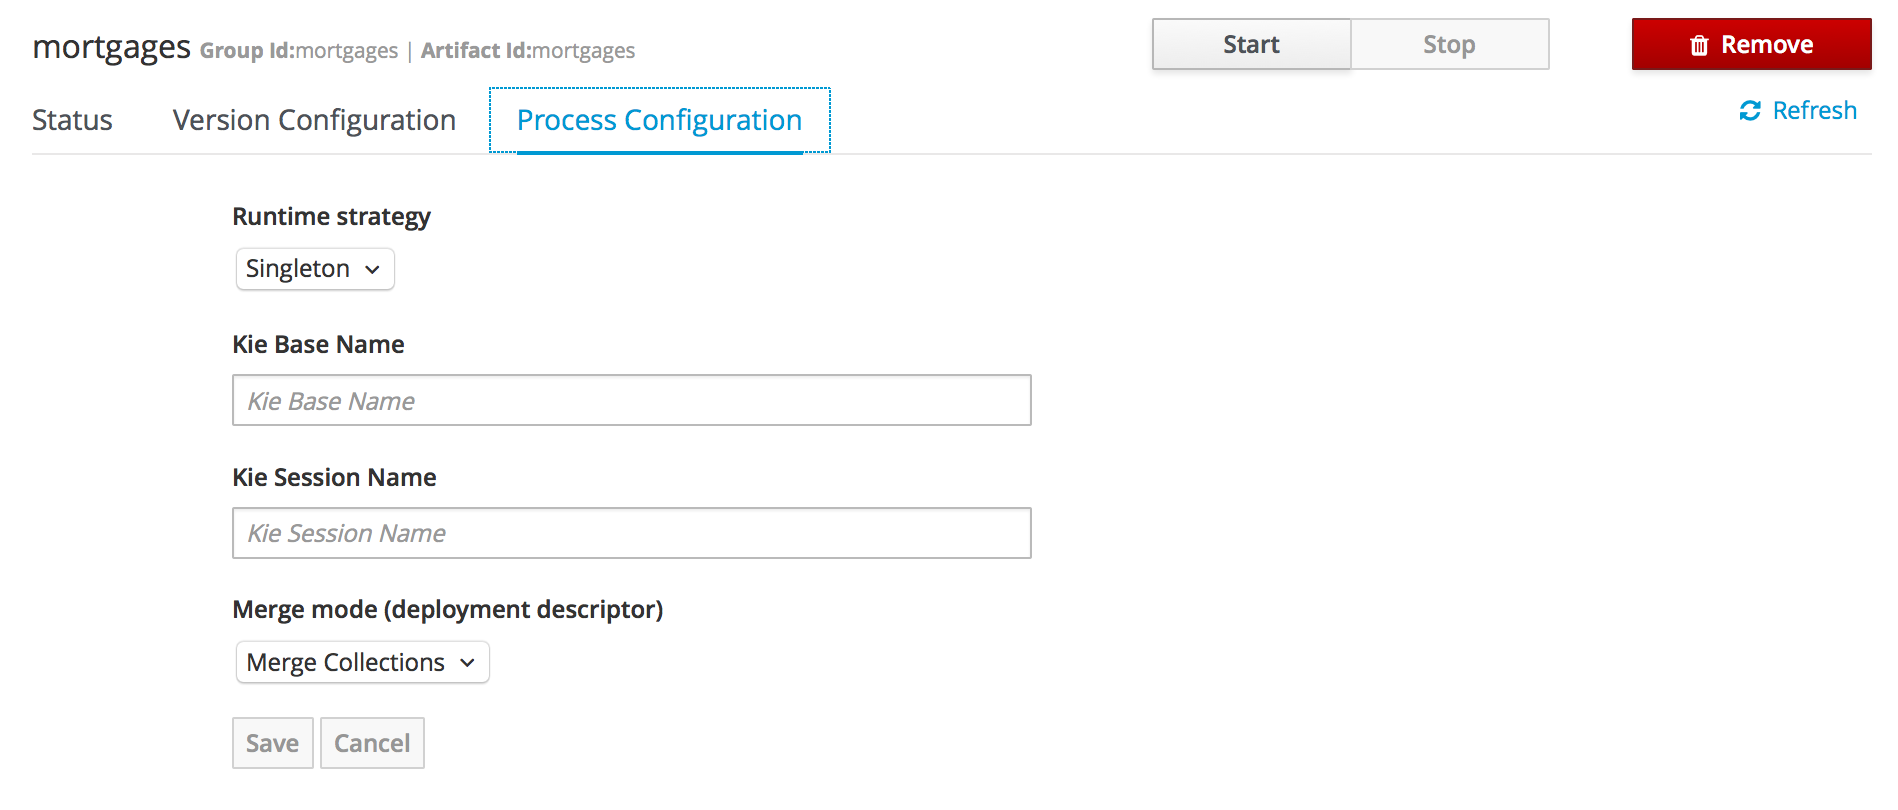
Remote Server is a Managed KIE Server instance running that has a controller configured.
Note
By default Workbench comes with a Controller embedded.
The list of Remote Servers are displayed just under the list of Containers. Once selected the screens reveals the Remote Server details and a list of cards, each card represents a running Container.